Checking your square’s squareness
For more information on the square, see our beginner site Common Woodworking.
Provided you have a perfectly square square, it’s a simple matter to check a square for square. Most people starting out may not have that luxury. So, you bought a tidy looking square from a carboot sale or flea market or you received one from granddad’s garage tools. How will you know if it’s got the dead square accuracy you must have for your work?
I want my squares dead square with no margin of inaccuracy so I strive for perfect methods to determine their accuracy so I can either correct the erring tool or get rid of it. The process is simple and quick, taking no more than a few minutes. To do this I need two flat boards about 9-10 wide. In this case I am using 12″ wide boards as my square is 12″. Pine is soft and easy and works best of all, but any wood will do.
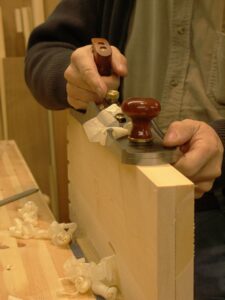
The reason for two boards is that one checks the other. Planing the two straight means that the two edges will meet perfectly with no gaps at an part. To do this, start planing in the usual manner from one end to the other, just to eliminate any disparity in levels. The move to a central point in the length of the boards and begin planing with short strokes working from the centre with longer and longer strokes until you get a continuous stroke from both edges.


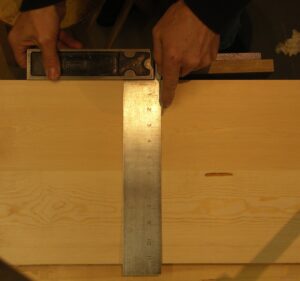
You must check both sides of the blade of the square by sliding the blade along to check the inside edge.
One part remains to be checked. The outer edge of the stock of the square. This is simply a measurement check to see if it’s dead parallel to the inner face. If it is it is also square to the blade.
Glad you liked it. They are important. The plane’s ones seem to have helped too. My goal is to try to help people think beyond the bench, the tool and the wood. To feel comfortable walking through the woods and smell the earth, feel the rain and the sun’s warmth. The fuller colour of working wood.
Mrnanowire,
I am the one who keeps changing the visual theme. Paul is probably as surprised by the constant changes as you are.
Thanks for the feedback.
Joseph Sellers
Very informative post. This has shed a lot of light on refurbishing my old square.
I’m still having trouble understanding why you need two boards
Because planing two boards at the same time and bringing the edges together will show and discrepancy as I is impossible to plane one edge round and the other hollow when done at the same time.
get necessity for 2 boards planed in tandem but missed the “rear in vise” vertical edge treatment, maybe in an earlier post? If those verticals were “out”, or tilted just a fraction rear to front in the vise as you were planing, seems they would be doubly so, forming, I guess, a “V” shape when the 2 boards were flipped on side, opposed and meeting tightly at their seam?
sorry for my confusion, verticals “out” a fraction ( any ever so slight “v” shape formed at the ends of the two planed and flipped boards meeting snugly ) would imply the square is not “dead square” ( 90 degrees precisely ) and I missed your post were you write “I have made it a policy never to admit a non-square square to ever remain in the shop so it’s now the square is tested for absolute truth.”
Understand your “test” and was thinking forward how to fix or adjust the square when I should have dug more deeply to discover your policy
Paul, I respectfully disagree; When a machinist wants to create a straight edge without using a factory straight edge, it takes three pieces of metal to achieve that result. The procedure is much like what you’ve described. The additional steps are to compare edge A with edge B, B with edge C. You keep checking and modifying to the point that any one of the edges matches the other two. This was how the first surface plate was made, how true squares were first made, etc. [I use a machinist’s square, inexpensive machinist’s square are almost certainly within the budget of most home woodworkers and home metalworkers.