Veritas Marking/mortise gauge review

It’s often hard to adopt a new tool, even well made ones, because they often don’t measure up to their ancient counterparts. This week we introduced new Veritas marking gauges into the new New Legacy, NY school and these are top notch marking tools and no mistake. One issue I always found consistent with new gauge users is pressing the spike of the conventional gauge into the wood and seeing the forced, impressed point follow the contour of the wood’s grain. Although that can be the same with the Veritas gauge, I found that students were readily able to use them and used them more lightly than the conventional gauges to their advantage.
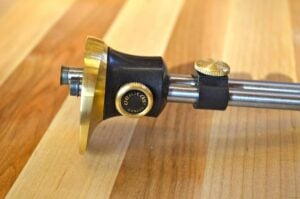
There are a couple of advantages to this gauge over the conventional pinpoint marking/mortise gauges that I liked. Firstly I liked the absolute precision of this tool as a layout tool. The highly engineered components are snugly fitted together, pristinely finished and I thought carry a more high-end quality in similar fashion that the old ebony and brass gauges might have done back in the 1800s but on a modern engineering level.
On a practical level, although it is described as a marking/mortise gauge, and that’s what we and others will use it for, the business end of the tool is a highly effective cutting edge and so technically it is more cutting or slitting gauge than a marking/mortise gauge. That said, even if the cutting edge dulls this tool would be excellent for scoring gauge lines even if it no longer cut and the actual lines on the wood would be fine and super thin; just what you want for most fine woodworking and furniture work anyway.
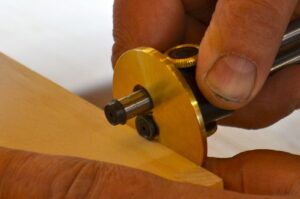
Although I have used this gauge for some time now, and like it very much as one of my daily-use tools, in the class this week the gauge proved highly successful with seventeen testers for a key task we have in the box project recessing the brass hinges. Whereas the advantage of two separate cutting discs for marking out mortises means you can and would run the lines separately, the cutting discs can be set for the two distances you need for hinge recessing; the thickness or depth of the hinge flap, and the width setting from the edge of the hinge flap to the knuckle. Once you have established and cut your knifewall either side of the length of the hinge, using the gauge cuts a pristine wall along length of the grain for depth and width of the flap. Forming this recesses ready for cutting out the waste in the conventional manner with the single pin method meant that you had to have two gauges plus, if you wanted a mortise layout capability you would really need three or reset the gauge and lose the setting for subsequent hinges if you had more gauges. Effectively, this gauge becomes highly economical when you see that you need only one gauge because it’s truly capable of multitasking. Instead of buying two or even three gauges, this gauge does it all. Also, don’t forget that this also translates into better economics with regard to storage space. The more angular gauges do take up substantially more room in the tool box.
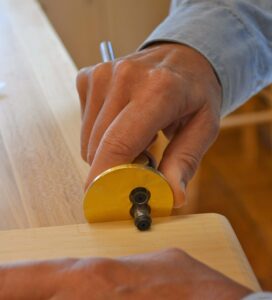
The thing I liked the most about the Veritas gauge and its hinge-recessing capability that sets it’s apart from conventional gauge (except for the slitting or cutting gauge) is its definitive thin cut. Prior to this gauge it was standard to use the conventional marking gauge lightly to delineate the cutline for subsequent cuts with the chisel. In soft woods-grained woods this lead fibre compression either side of the pointed edge that became wider the more the gauge was pressed or the wood itself yielded to the point. Herein lies the problem, especially with students new to woodworking, removing the waste wood took away half of the bruising but left half that showed as a slight gap between the edge of the hinge and the recess wall. Using the Veritas gauge gives the most perfectly crisp and clean cut lines along hinge recesses I have ever seen. Exactly what my students want.
Finally, though the circular cutters don’t actually rotate as such, the gauge itself can be rotated by a simple wrist/hand movement. If preferred, either one of the stems holding the cutter can be fully recessed into the brass stock, tucking it out of the way as needed, effectively exposing the whole 380-degree cutting edge for use.
I can think of many additional uses and adaptations for this gauge beyond recesses and mortise and tenon layout but even if I couldn’t, this gauge has proven a highly effective layout tool.
It’s easy to keep sharp, too. Just remove the cutter and hone the back flat on a fine stone or paper.
Wow, a 380 degree cutting edge! (Whatzat? – my circles only have 360.)
Whoops!
Just kidding around.
Paul,
When using the Veritas Double marker for mortises/tenons, is it best to cut both lines at the same time or use one cutter at a time?
Thanks
One at a time. This gauge type is difficult to use in some harder woods where the grain seems to trap the disc and prevent it or you from moving the disc along the surface of the wood. I find this especially so in woods like oak, elm, ash and others too. Their main advantage is the pristinely thin line they leave. The art is not pressing the disc too hard down into the wood as it is with regular gauges too. Running two at the same time makes things worse as you have twice the resistance. In softwoods like pine, spruce and some of the softer hardwoods it will work fine. I think that pinned gauges generally work better for general mortise and tenon layout lines as long as you are simply trailing the pins and not trying to score deep lines which is not what the intention should be at all.
first rate tool i would recommend it to anyone
I have both the double (featured in this article) and single marking gauges by Veritas, along with standard beech and rosewood pin mortice and single gauges. I use them all, usually setting up each for a different mark I need to make in the thing I’m making. The big plus for these cutting gauges is cross grain. They excel at that, whereas pin gauges can leave a woolly line, particularly in softer woods. Although the double Veritas gauge doesn’t have it, their single gauge has a micro adjuster which is great at fine tuning. One other thing to note, is that unless things have changed recently, the lock bar (see second picture above,) is an optional extra, so make sure you get it when you buy one of these.
I was delighted to find this review. I’ve had this tool in my wish list at Lee Valley for weeks now. This pushed me over the edge and I placed the order. Thanks.
I moved on some time ago from the LV dual-wheel marking gauge you reviewed above. I’ll share why: I found that the same type of marking gauge with a singe scoring wheel was easier to use and left a clearer line. I attribute this to two factors. The single wheel on my Tite-Mark gauge is centered in the face of the marking gauge while the LV dual marker require me to get a grip that allowed the majority of the gauge to contact the workpiece directly. Also I found that the facility to mark both faces of the mortise was diminished by the greater force required to mark both faces at once, resulting in faint lines. In short, the dual wheel gauge appeared to be poor compromise. The single wheel gauge I have also has a micro-adjuster barrel that can be used with one hand to dial in the exact dimension desired. It was the clear winner in my mind.
This tool was not designed to mark two cut lines at the same time.
Hi Ashley,
Yes, the lock bar is still optional, and my shop was out of stock, so I got the gauge without it.
I was fully intent on getting the clasp, however, i have found that if you grip the two marker-rods in in one hand, its relatively easy to still move them whilst retaining the dimensions exactly, and then tighten the screws with your other hand.
Obviously the clasp would be convenient, but seeing that I’m able to maintain crisp precision with this technique, i may actually opt not to get it any more.