Perfect Bench-build – Video Training to Build Your Own
NOTE:Just so you know, this is an older workbench series. Paul has a newer Workbench series. If you are interested in the updated version of Paul’s workbench please click the button down below. This page links to a cutting list, tools list, FAQS and much more.
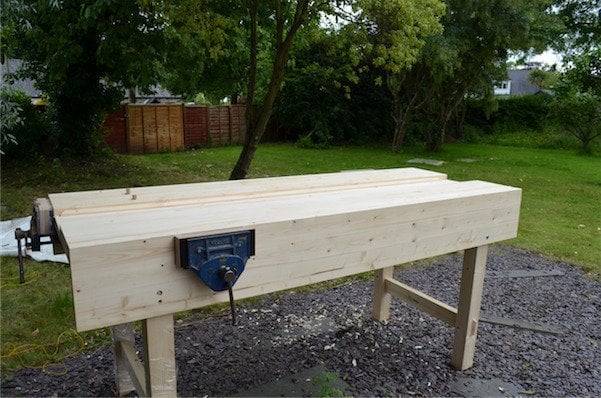
When we started this series I don’t think anyone realised it could possibly be so popular. It’s taken a lot to pull it all together but now I am so glad we chose to do what we did. The results are staggering in terms of how many people have watched the series, that’s great, but it’s the impact it had on changing people’s perspectives about benches, about hand tools, about craftsmanship, workmanship, work, woodworking and much more that has impressed me. You see what’s impressive is the fact that, well, its so ordinary. I mean the work is so woodworking and so uncomplicated. Not at all complicated or difficult and all the way through we never really stopped to think of the dangers because there really weren’t any. It’s not the first time I have made benches in my back garden (yard US) or in my living room, once in a den and another time in our kitchen. It’s been a part of my life and my children’s lives as they have grown into craftsmen. Joseph made and sold benches that some of you work at when you go out into your workshops some years ago. He also made beautiful marking knives and mallets. To me, this series has been very much a relational approach to woodworking and going of the stack of emails and such there are now a few hundred benches around the world made according to the video series here and all with good results.
You can watch this second to the last in the series here and see just how this bench-build works in shaping new-genre woodworkers around the world. It’s not fancy or difficult yet the results are that people now have working benches that really work well for the most demanding craftsmen and women.
The workbench series is amazing. I am very thankful for you sharing that with everyone. That’s how I built my first bench. It was the first mortise and tenons I ever made. It was a journey for me. One that was difficult yet rewarding. Thank you.
Hi paul
Thank you so much for sharing this build. I’ve followed it from the start and am just completing mine now. It came at the right time as I’ve recently started my own woodwork business and your advice about hand tools and there use is invaluable. As I come from a machine background, I started reading your blogs and watching your videos and masterclasses at first just for information, as although joinery is my trade, it’s more of a hobby too. After buying some hand tools on ebay, I now find myself reaching for my plough plane and hand router more than my electric router for dado,s, and have also discarded throw away saws for ebay purchased Henry disston and Spear and Jackson saw, which thanks to your help and guidance, I can now sharpen for a perfect cut. Also the use of planes and sharpening techniques as well as the knife wall has meant less sanding too!
It’s a shame that these tools and techniques weren’t taught when I was learning joinery, with the emphasis on power tools mostly, but I know now the direction I want to take, and although ill still use power tools, they are certainly not going to be my first point of call.
Sorry this has been a bit long, but just wanted to say thanks:)
P.s sorry if I’m jumping the gun, as I know there’s one final bench part to come, but do you bother with a finish on your bench, was thinking of an oil finish myself, but just wondered your thoughts
I like long and short emails. Thanks for taking the time to let me know what you are up to. These responses to our work really help us to know how people feel. Most people have been really positive and the occasional criticiser even helps occasionally.It is impractical to think that woodworking can go forward without machines, but there is a balance that we try to address to help people pick their way through the mire of misinformation caused by mass information from cyber space.
Most any oil finish will work. there is little difference between them. I would avoid too much build and shiny surfaces because things slip around. Two coats is usually enough and Danish oil is an appropriate finish for benches.
Keep on keepin on!
Best regards,
Paul
Paul,
I really enjoyed your videos on construction of a work bench.
Currently I am strapped for cash, is there a way to glue the pieces together with out purchased clamps you show in the videos?
Thanks
Bradley,
I also didn’t have quite enough clamps when I build my bench, here is what I did…
Buy a box of 2-3/4″ Duplex screws. They are usually used in the creation of concrete forms.
http://www.homedepot.com/p/RemoveRite-10-x-2-3-4-in-Hardened-Steel-Hex-Head-Duplex-Screws-1-lb-DS-203/204474937
As you laminate, drill clearance holes on one lamination and drive the screws into the adjacent one. Once the glue has dried, remove the screws and start again. Its a little slower, you can only add 2 lamination per glue up, but they are cheap.
Bradley-
A trick you can use if you have them and the boards are twist free, is stacking cinder blocks on them. You will need to brace them left to right but this seems to work welll
I’ve been watching video after video just trying to get my footing on this. I suppose I’m overthinking this tool issue. I’ve been combing through antique shops and flea markets and have found a brace, an egg beater drill, a double marking gauge, and a combo square. I even got talked into buying a corner chisel for $2.00 US! However, I’m stuck on the planes to buy. Cheap Stanleys are $20 US and Woodrivers are the price of weekly groceries! Online, I’ve found Stanley Bailey but get stuck at which ones to choose.
I think Paul has said you can do fine with a #4 and a #5. Is that what I should be looking for? Also, I need a good recommendation for a type of saw. Seems like I need two saws; one for joinery and one for rip/crosscut. Does that sound right.
Greetings!
Our Cub Scouts and Boy Scouts (ages 6 to 17) use an old, one story house with a basement for their meetings. It’s a great space… but it could some improvement for doing crafts and woodworking. For example, when using a saw to cut something clamped to a wobbly table is quite an effort. Most of the energy is wasted in table shaking back and forth, instead of cutting the wood. Therefore, I would like to build a workbench (with the help of the Boy Scouts) for use in the basement to help with crafts and woodworking projects. Here’s my question:
Is it better to build a lower workbench to accommodate the younger kids or build a normal workbench and provide some method to safely allow the younger ones to “belly up” to the bench?
I first I thought of trying to build it so the bench go up and down, but I think that would sacrifice too much stability or add too much to the cost. I am now leaning towards a step up platform, with rails around it to keep the kids from just walking away from the bench and falling down. It would be great if the platform could be stored under the bench.
Before I get started, I was hoping to see if anyone had any ideas or suggestions.
Thank you,
Jim Meyer
I have seen people make low benches for children and felt personally that, for the main part, and whereas it may seem cute, it was both impractical and something of a waste of time. Kids are every height you can imagine. my kids worked at my benches and were quite safe on podiums that jacked them up as they grew. All my benches have been at 38″ and I have either put blocks under the bench legs for the six footers or podiums under the kids legs for the shorter guys and changed them as they grew.
Sounds wise. Thank you.
Just as a note the the heights range from under four feet to 6’4″. And I knew most all of the Boy Scouts when they were making their first pinewood derby cars almost a decade ago.
The trouble with all of this hand tool wood working is that I get so into it that often times my coffee goes cold in my mug. Just kidding.
I have learned a ton of things from these videos and it makes me a better wood worker. I have made things all my life, but after retiring I started dabbling with fine woodworking. It is a fascinating journey for me. Since I have lots of time on my hands, I am seldom in a hurry to get a project done. For me, the thing that makes it is that I have learned to sharpen my plane irons, chisels and hand saws. Techniques I have picked up make the jobs easier and more precise. I never used a marking knife or a marking gauge before.
By the way, I started this journey a couple of years ago after watching one or your videos where you made a work bench out of 2 by 4s in the back yard. I made a similar one, but moved the tool tray to the back and made the bench of maple and added three drawers with purple heart fronts. It is the main thing I use in my shop.
Thank you very much for the lessons. This has become the main activity in my life.