Fine Woodworking – Debunking Myths and Mysteries on Cabinet Scrapers
For more information on the #80 Scraper, see our beginner site Common Woodworking.
Answering the needs in real woodworking realms
Onward then from myth-busting in our age of increasing mass-informed misinformation.
The multi-point questioning I presented here a few days ago about an article featured in Fine Woodworking July/August issue caused a bit of an unexpected spin and my hope was, is and always will be to counter any misinformation before it became another one of those internationally accepted facts that has no real basis but seemed a good idea-smart to us at the time. From time to time we all get something wrong and I am no different. When this happens it’s important to see its origin and ask where it came from. This kind of authority needs questioning in the sense of its authority. Here are some examples. On woodworking planes people now call the cap iron a chip breaker and this includes some very well informed guru’s in the field including some makers themselves. Here’s another; for at least three decades people resorted to a mass of information surrounding micro-bevel sharpening, thinking in the end that that was the only way to go when in fact it has many negative influences on the work not the least of which is that edge fracture happens more quickly and the type of bevel it creates is not really of very great value to us real woodworkers that work the tools and not machines. Showing the chisel chiselling the end of a piece of softwood has no real value except to show that immediately after it’s sharpening it is in fact sharp. That’s no different than the edge you get from free-handing a convex bevel, which is faster and more efficient. Another emerging reality follows exponents stating bench heights are determined from the crease in the front or back of the wrist. No one really heard of that as a guide before recent years and thousands of woodworkers following this advice now have back, neck and other physical problems. I just looked at yet another blog where the guys are below waste height planing and straining their backs to do it. More on this in a new and controversial release soon, but these kinds of things are worrying and they creep in inch by inch and yard by yard so I thought it best to counter what was said with fact so that people don’t believe that these scrapers cannot create pristine surfaces or that you need to sharpen your scraper a certain way or that you must hone bevels to 16,000 grit to get an edge that won’t produce a surface that doesn’t need correction with 240-grit sand paper. We’ll tackle them in the order I presented them so that we can see exactly what we need for sharpening and using bench cabinet scrapers.
Cabinet scraper- simple, effective and unequalled
Those of you who read my blog know that I read a recent Fine Woodworking article plainly stating that, “You Need a Cabinet Scraper”. It became one of those articles you first skim over and then you look back in surprise to see if what you read was really in print and that you weren’t mistaken in how you took it.
Q #1) The cabinet scraper is “the best tool for cleaning up tearout before final smoothing”
Answer:
This statement suggests that the next step is the card scraper and that you need sandpaper to improve the work of the cabinet scraper. This seems to have become something of a common thread of late. You should be able to get the same results with the cabinet scraper as you get with the so-called card scraper. Though you may not believe it and you may not know it, but sandpaper is always used by craftsmen to roughen the surface and not smooth it. We use more sandpaper today than ever before in the history of woodworking as a direct result of NOT having the skills to sharpen and use cabinet scrapers and planes, which is to remove flawed surfaces made by machines. Especially is this statement questionable if you hone and turn the edge after using 16,000 abrasion. Skilled hand tool craftsmen and women use sandpaper to give ‘tooth’ to an otherwise too smooth and finished surface resulting from planes and scrapers. Most often the surface is severely dulled and takes on a ‘flat’ look after sanding.
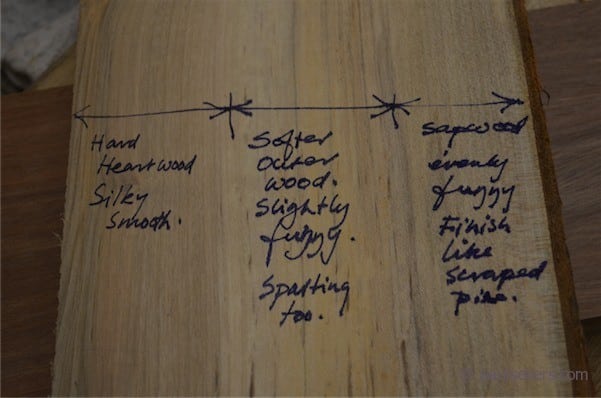
What this and most if not all other articles has failed to identify is that the wood type itself plays a major part in what kind of finish you can get with the cabinet scraper. The cabinet scraper relies on a firmness, density and closeness of grain structure for it to work properly. We’ll discuss this shortly, but soft woods cannot generally support the pressure of the type of cut you get from a turned cutting edge of the type used in cabinet and card scrapers.
Example of different grades of hardeness in one piece of wood
Solid hard, heartwood left, (superbly smooth and flawless). Softer, slightly spalted and degraded section (not quite so smooth but still smooth). Soft sapwood (fuzzy and in need of refinement).
Q #2) Using the (cabinet) scraper hardens the edge too much to allow you to re-turn the edge.
Answer:
I never heard of this before so I would be interested in some support that shows this as fact. Even so, this is not the reason that we generally cannot re-turn the edge on the cabinet scraper blade. The bona fide reason you cannot re-turn the edge is due to the developed angle following the 45-degree bevel. Trying to re-turn the edge causes it to fracture along the now turned bevel in the same way cowboy-cutting wire by bending it back and forth causes wire or nails to break. As I said previously, stating that the work of “using the scraper hardens the edge too much” doesn’t mean that what’s being said is true. The edge becomes naturally brittle from consolidation and burnishing as the cutting edge is being formed with the ticketer (UK) also known as a burnisher.
Important note:
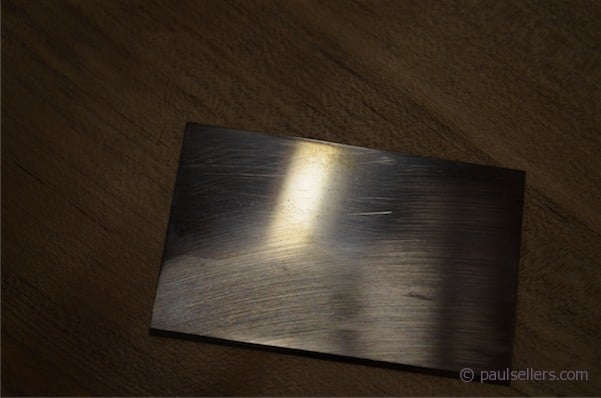
Also, the author doesn’t explains that polishing the larger flat face is a once in a lifetime procedure and that it is unnecessary to repeat this as part of the sharpening process in future sharpenings.
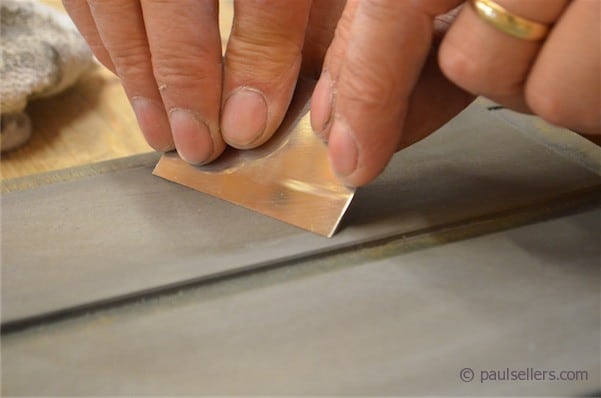
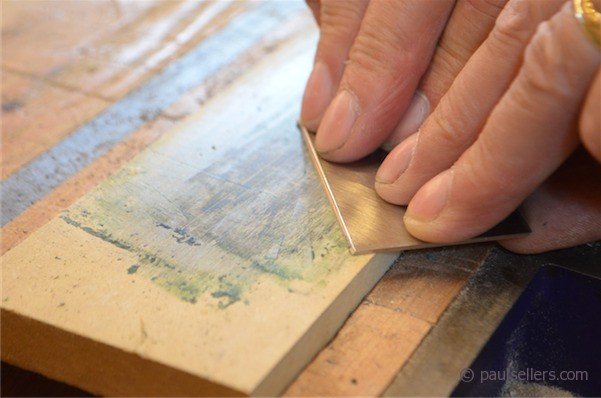
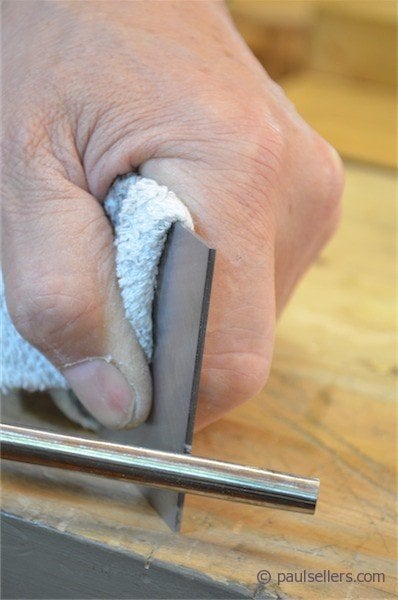
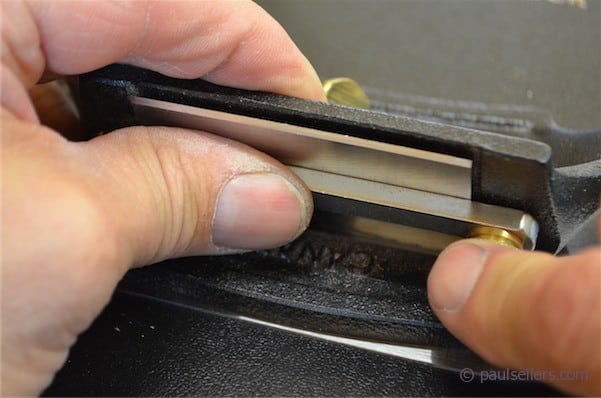
#3 The cabinet scraper blade will not fit into a honing guide because the blade is too big for the guide.
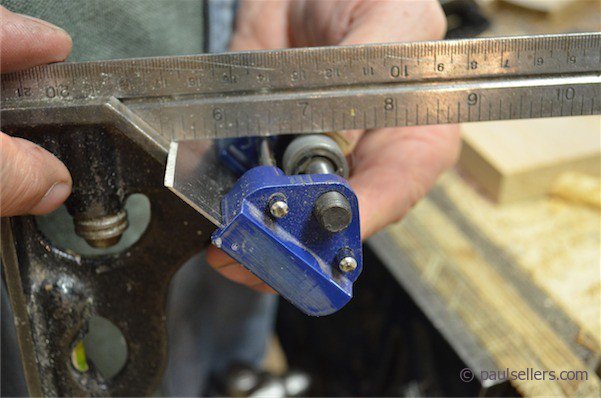
As can be seen here, almost all cabinet scraper blades fit perfectly into many if not all honing guides. There are some older ones that won’t, but generally they will.
Q #4) Unlike the more familiar card scraper, the cabinet scraper is not made to leave a finished surface.
Answer:
a) The card scraper and cabinet scraper are equally well-known by woodworkers worldwide. I don’t think I have ever met a woodworker that didn’t know both types.
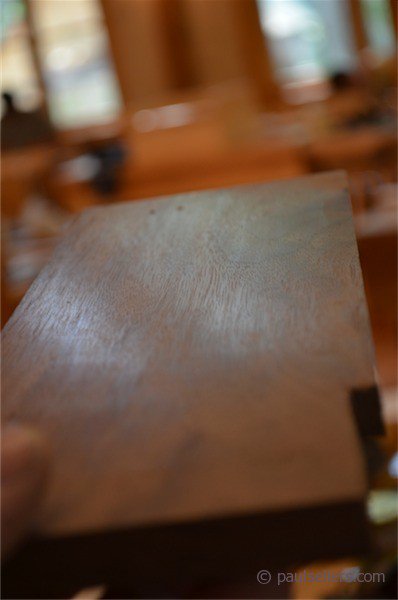

The two examples shown here are African mahogany and American walnut
Q #5) They are used to remove jointer and planer marks and tracks left by hand planes.
Answer:
Yes, we use scrapers of both types to do this and also to remove to the machine marks, skud marks and even the occasional chatter but not tracks left by hand planes really. Machines especially always leave the telltale marks of the rotary cut on the surface of woods worked by machines such as routers, planers, jointers and circular saws of every type. As a boy and throughout my life it has always been a fact that all surfaces must be planed and scraped before they leave the shop.
If planes leave tracks it’s a result of the tool’s cutting edge being misaligned and mis-set, which as I said previously is not the really the way of the artisan.
Q #6) It’s a bit of a quirky tool.
answer:
I have found the tool simple to understand and use and without fail seems always ready to work. Problems arise in two main areas; the cutting edge can be over-turned and under-turned so that it is not presented to the wood properly when installed in the body of the scraper.
Q #7) The blade looks like a card scraper.
Answer:
It in fact looks nothing like a card scraper, but more like a shortened, double-edged plane iron.
Q #8) That the card scraper can leave divots in the surface of the wood.
Answer:
No, this really doesn’t happen and it can be very difficult to do that. You would have to be using it pretty badly to do that. Perhaps dig a corner in or something like that.
Q #9) The author says he will show you how to take nice shavings.
Answer:
Perhaps I am being pedantic here, but shavings are secondary to planing or scraping wood smooth and have little to do with the work in hand. What people need to know is how to make a presentable surface that reflects competent handling of the tool and it’s that that the author says cannot be achieved with this tool.
Q #10) The author states honing through four stone grades 1,000, 5,000, 8,000, and to 16,000 is generally the necessary procedure to gain a highly polished edge.
Answer:
This could be very expensive and is not absolutely necessary for most scraper sharpening. Stones to around 1,000-1,200 should prove sufficient when followed by consolidation, polishing and burnishing. The consolidation step to the steel blade is something he has left out of the article and this is a critical procedure many writers now leave out of the sharpening strategy.
Important note:
You may not realise this, but you can sharpen scrapers to a very decent cutting edge straight from the file if you burnish the bevel edge sufficiently, almost if not to the same level as fine honing the bevel. Most of us do this for speed. it’s very effective and practical.
Q #11) Burnishing the bevel makes for a sharper edge.
Answer:
That’s true, the question for me is whether the four stones were indeed necessary beyond the initial polishing when also states that several strokes back and forth across the bevel flattens out scratches left from honing. 16,000 grit is a super high level to polish to.
Q #12) The author uses the point of his burnisher to retrieve what seems to be an intentionally overturned edge.
Answer:
It’s best to turn it rightly first off the bat, which is very simple to do. Burnishers are simple tools made from hardened steel. I find oval shaped ones give me variability for different types of scrapers.
Q #13) Set up for fluffy shavings.
Answer: Fluffy and nice shavings may be a byproduct of having a good cutting edge that cuts the surface dead smooth, which is what people are really looking for in their scrapers. Describing fluffy shavings is a bit like looking at the fluffy feathers after you just butchered the chicken for the oven.
Q #14) Put the blade into the scraper body from beneath, with the hook facing toward the depth adjustment thumbscrew.
This drawing shows the effective position of the blade housed the wrong way in the cabinet scraper
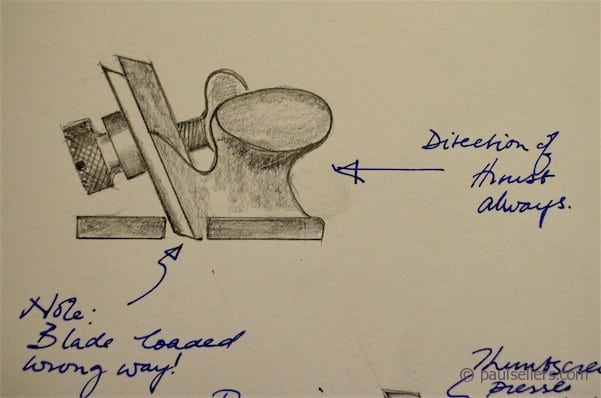
Answer:
You can put the blade through from the top or bottom, but you must simply take care not to damage the newly turned and formed edge through rough handling during installation. “with the hook facing toward the depth adjustment thumbscrew.”
I think this was just a major blunder here, but a genuine mistake. We all do it. This advice is wrong, so never do it. It’s utterly the wrong way around to put the blade back to front and backwards this way.There will be an ear-piercing scream…
The editors should indeed have caught this.
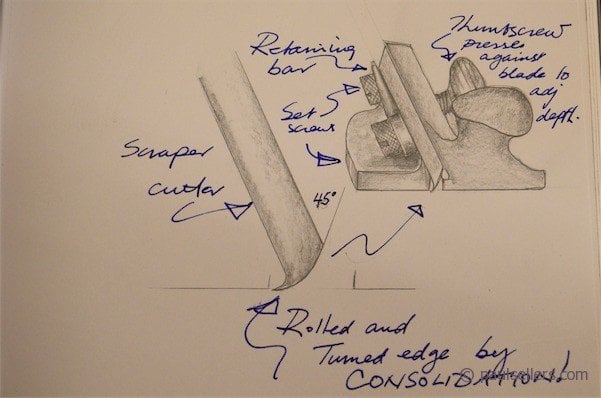
This drawing shows the blade installed correctly.
Q #15) With the scraper on your bench, press down on the blade so it’s bottoming out on the bench.
Answer:
Bench surfaces would need to be hard and dead flat; better a harder surface of well planed wood, plastic laminate, MDF or some other such surface because it must bel level and flat.
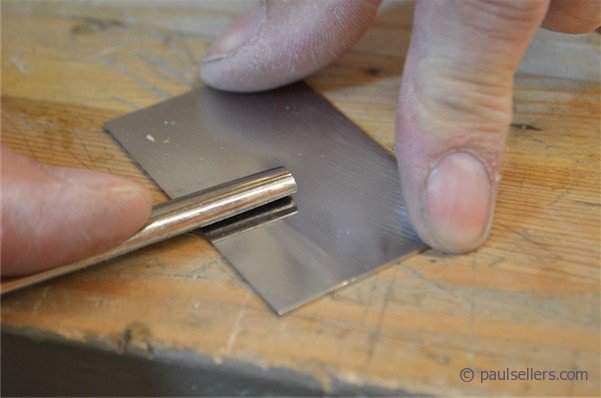
Q #16) You can buy a burnisher like this from (Philip C) Lowe for $65.
Answer:
$65 seems a lot to pay for a burnisher. Don’t feel that this is at all necessary to sharpen a scraper. There are ways to make burnishes from a 3/8″ steel rod and you can use such things as drill bits and the backs of gouges and screwdrivers. I hate to think that anyone would think that they must have an expensive tool just to get the edge on a scraper.
Q #17) The author reiterates, “The cabinet scraper isn’t meant to produce a finished surface and you’ll be smoothing afterward.”
Answer:
The cabinet scraper is indeed meant to create a finished surface and you can rely on it if you are armed with a few more truths about the tool, sharpness, using the tool,
and most of all the wood
Q #18 The writer describes the scraper as a plane.
Answer:
This could be another mistake, but the scraper is still called a scraper even though scraper is a great misleading misnomer too. It really isn’t a plane.
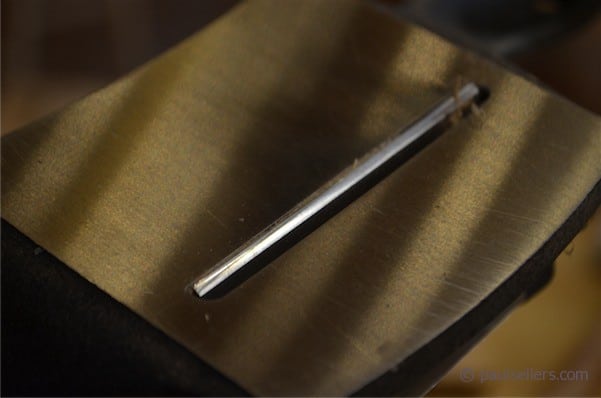
Steps to Sharpening the Cabinet Scraper
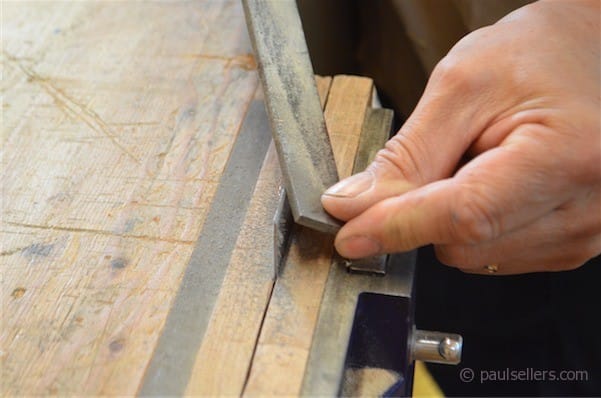
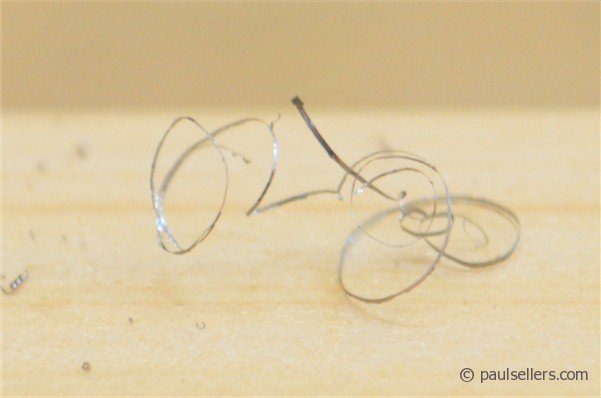
Draw filing removes long wire edges that coil like this
Refine the bevel edge on sharpening stones if you have them. Follow the angle you filed at as closely as possible. Going through various grits is quicker, but if you have only one, that will do too.
Pinch the retainer bar so that the blade is sandwiched evenly between the scraper body and the bar yet the blade is levelled at the bottom mouth of the scraper. Cinch up the screws evenly so no gaps are left to either side.
Turn the thumbscrew till it just touches the back of the blade and test on wood. Turn to adjust depth of cut.
I’ve had a #80 kicking around for years, an artifact of a foray into eBay that I never actually put to use. After reading your earlier article I put the blade in my Eclipse-style tool holder, shaped the bevel on a coarse and fine DMT stone and turned the edge with a couple of strokes on the back side and a couple on the bevel. I checked that I had a small, uniform hook and put it in the scraper (backwards the first time, opps!) and gave it a try.
Nice, fluffy shavings and a reasonably smooth surface on an American Cherry cutting board with breadboard ends as you show on your video series. I didn’t polish the bevel or the back, and I suspect that would help produce a better surface finish – the surface I was left with was flat and free of tear out, but not finish ready. I’ll do the additional steps to polish those surfaces and try it again.
Thanks for sharing good information!
I just posted an updated version on my blog that should help.
Hi Paul,
I got a Stanley 112 fifty years ago and have used it very rarely. Recently I started gluing scraps of pine framing together end to end after dressing a 2:1 scarfe joint. All good. The glue bead and and marks from nicks in the thicknesses blades come off a treat with the 112. I made a blade by electric arc hard facing the edge of a 3mm mild steel plate, grinding it flat in a surface grinder and sharpening in a Tormek. The edge sharpens easily and outlasts the Stanley blades edge 3:1 I am guessing. I don’t bother pushing up a burr. It cuts fine without it. Oh and it chattered but only when the adjusting knobs were loose.
I assume you already had all of this equipment; Arc hardening, Tormek grinder, surface grinder and 112 scraper plane too! It does seem rather a lot to get together and a lot of expense too for so simple a task, Miles. Also, couldn’t you just use a regular plane like the #4. That’s all I have ever done and it works perfectly well; and before anyone says anything about glue damaging the cutting iron, it doesn’t! If you are worried though just use a paint scraper instead.
I love this tool. I do have issues with chatter on very hard woods though. I even bought a thicker blade and don’t think I am overdoing the “hook” or extending the blade too far below the tool …??? Any advice? Also, thank you so much for educating us more to the environment of peaceful planing and scraping and away from the noise and filth of the obnoxious power sanding machines. Not to mention the enormous expense trying to get the dangerous dust out of the air. I know fine instrument makers who run to their belt sanders (or routers/jigs) to do almost every type of wood removal. Mainly because that’s all they have learned (mostly on their own). We lost the traditions and the teachers along the way so it is no wonder “experienced” wood workers are grappling with the basics of the basic hand tools. They are really just discovering them. You, on the other hand have many years of experience with these tools and methods and can see the mistakes immediately. Thanks again for such refreshing honesty and we learn best to use tools and techniques from those who know first hand what has come to be accepted over time. Perhaps we have been too quick to embrace the lasest flashy “improved” tool or technique at the expense of losing the tradition of the “tried and true”.
re: chatter in late model #80s — I have two #80s, one is a very nice Sweetheart vintage, the other I think was made the day Stanley announced they were firing everybody at the foundry. It is absolutely one of the worst castings I’ve ever seen. It took a bit of filing to smooth out the bed for the blade. Once I did that, it started to perform as it should. The blade just couldn’t seat properly and would chatter about.
A thicker blade may have also solved the issue but now it works with its original blade (as does the Sweetheart one). I haven’t seen the need to upgrade to new blades. Yet…
The #80 is good by most makers I think. I don’t care too much for the German made Kuntz models and neither do they. Much of what was once respected about European makers including England has gone down the tube of reverse progress.
Thanks for this informative post Paul.
I too have a #80 I have never put to work. I tried to sharpen a new blade on my Worksharp system but apparently the heat on the thinness of the blade caused it to warp.
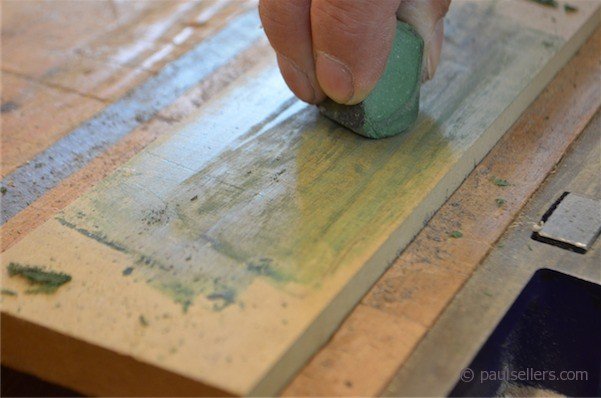
So the next one will be done by hand, but the part I do not yet understand is how to polish the back. Is that what you are doing with buffing compound on the mdf? It seems like that would take quite awhile to do, though I know (like on plane blades) that is only done once.
Actually, the back does not have to flattened as with a plane iron, just refined to remove coarse grind marks and then refined further to give a polished area behind the cutting edge. Very different than chisels and planes. should take no more than about ten minutes or so.
I have a worksharp system and think it is the best thing since sliced bread. I never had sharp planes or chisels until I got one, and now all my tools are sharp. I know that is going to cause me to go to hell for saying that, but it is true. I use the system to sharpen the blade of my old Stanley number 80. I grind it to 45 degrees using 80 grit, hit it with the 220 and then follow Mr. Sellers system for the rest. It works nearly every time. Once in a while I don’t get the burnishing just right and need to try again, but that doesn’t happen very often. I’m willing to bet Mr. Sellers didn’t have high number grit stones when he started, and I’m sure the old time real woodworkers didn’t. I think a lot of what you read about $300.00 planes and Scary Sharp sharpening systems is just hype, put out by people who are more interested it talking about wood working than they are in actually making something.
On #9 above, it is interesting that one of the points you made in the Baltimore show this past year was to “listen” as you plane. I must admit, that point along with learning to “feel” how the plane is working the wood are now more of a gauge for me. I used to look at the nice shavings and gauge that way. It seems the more I use the tools, it is the sound and feel that are my first clues – and especially feel when it comes to sharpness. That one point – about listening – has improved my approach as now more than just one sense is in play – i.e., seeing (nice shavings). I found the same is true with the #80 – feel…listen…see. If I would have followed strictly the advice others had given me previously, my sole focus would still be on the nice, fluffy shavings. And my experience would be lacking…thanks again for all your solid instructions.
Interesting to note, with respect to the insertion of the blade/hook direction blunder, the on-line edition of the article available as a PDF download has been corrected. The full magazine electronic edition has not been corrected. And obviously, they can’t recall all the print editions…
I think by now there is enough correct information for people to glean from. I’m sorry it happened but now we can all move on.
I just looked up the FWW article online. It appears as if they have repaired their gaff:
“Insert the blade into the scraper body from beneath, with the hook
facing toward the clamping bar.”
Great content, as usual.
I’ve converted all my sharpening processes to your cambered technique, which I love. I’m a little confused with this post though. When you hone the bevel, do you not sharpen it as you do with the chisels/plane irons? This is, do you specifically _not_ sharpen the scraper with a camber? And if that’s the case, why?
Thanks.
Aiming for a near 45-degrees is only the start point. the next aspect of the process is a sort of reverse of what I advocate for chisels and planes. On sharpening those, we start right at 30-degrees and allow the bevel to become oval in the sharpening process. In other words we hit the stones at 30-degrees right from the start. the heel of the bevel then follows and we spend more time on the heel than we do on the actual cutting edge. With scrapers we do end up with a camber on the cutting edge, but we start at 45-degrees and increase the angle to rollover the edge.. This results in a convex camber too, but now we are moving the steel to a highly refined cutting edge where the iron rod we use sharpens the iron. Hence the saying, “Iron sharpens iron.” This iron os of course steel and butchers of old brandished one knife against another to consolidate the steel edges and the bevels themselves into themselves. So too using the steel rods we called the “steel”.
Very accurate and informative. I especially like your common man, economical approach to woodworking and addressing the myths that get created for all manner of reasons. I have a #80 I use for “rough” work – cleaning glue lines, cleaning up a some what dirty surface (no tearout) to prep for planes and …….a Veritas scraper plane – called so because it has about a 10″ sole, but uses a scraper blade – wonderful, but not necessary, tool. The #80 will do wonderful finish work as well. Keep up the great work!
There is another way to get to get the 45° bevel on scraper. If it doesn’t fit your honing guide… Take 8″ long by 1 1/2 thick wood or 2×4 . run it through your table saw with blade tilted at 45°.. You got yourself a Jig for honing a bevel on scraper…set it down on large sheet glass ontop sand paper … place blade against your Jig hold the Jig stationary with one hand , and run the blade back and forth over sand paper… Works for me!
Just purchased a #80 and restoring it. I’m not clear on the consolidation. You mention to consolidate the back of the blade. From the picture, I’m not sure if that is the back of the bevel or the back of the blade on the opposite side of the bevel. From the pictures it appears that the side opposite the bevel is consolidated. I don’t understand how doing that makes the bevel edge better
Try to image the metal as soft putty and you are pressing the putty into itself. Steel can be readily pressed into itself but you can’t see it without the aid of magnification. I consolidate the non-bevel side. This enables the steel to hold the edge that is then formed by consolidating the bevel and then turning the edge.
Why is no one doing rounded corners of the cutting edge with a file for example?
Paul, I really enjoy your articles. I recently found a Stanley No81 at a yard sale, the sole is very worn down to the screws on one end. What would be the best wood to restore this to a user?
Paul I have seen you use flexible scrapers in a few videos, but I haven’t seen any for sale. Where would you suggest I pick some up?
Lee Valley Veritas sell a set
This discussion revived a very old Union cabinet scraper , once I got the 45 degree edge acing the right way! What was just a curiosity is now deadly at smoothing antique table tops faster than a messy electric sander and I can finish and polish them straight away.
Thank you
Hello Mister SELLERS,
Can I have a clarification on the consolidation process for the back of the blade, please?
You wrote: “Move it (the ticketer) back and forth across the cutting edge …”.
Based on your picture above, what does it really mean : horizontally, all along the cutting edge ( reciprocating left-right) or perpendicular to the cutting edge (reciprocating backwards) ?
Sorry, English isn’t my first language and I do not allways understand perfectly it, hence this demand for precision.
Thank you for all that you do to us drean (again) and all that you transmit to us of your fullness and your experience.
You made me want to take back all my hand tools for carpentry because, today, I’m sure to get it at last, thanks to all your cours, videos, blog, books and additional informations.
Hello, Mr. Sellers,
Are cabinet scrapers and card scrapers interchangeable? Do I need both or will one do the same job as the other?
Thank you very much for all you do for us. I nearly gave up on woodworking for all the confusion before I began learning from you.
All the best,
Jacky
Technically they are used interchangeably but they can also identify two different tools too. Plate steel scrapers are the simplest forms of the cabinet scraper and as with many things it was the the US woodworker that simplified things and gave us the term card scraper. Both terms identify the steel plate version but for simplicity, cabinet scraper is best applied to the two handled version known as the #80. Are you here in the UK woodworking?
Thank you for answering so quickly, Mr. Sellers.
In other words, if I have one, I don’t need the other? I own a steel scraper which I need to learn to burnish and use properly (no handles, just the steel “card”).
I am in Houston, Texas. After several false starts, I am beginning to get my bearings through your Masterclass videos and Artisan Course, and as my budget permits, I am gathering some of the tools I am missing. I am trying to avoid duplicates and keep it simple, but I would like to have what I need.
Again, my best,
Jacky
It is by far the best way to grow. I bought all my tools over three years as a poorly paid apprentice. A #4 plane cost me a week’s wage but I never felt sorry for myself parting with the money because the tools meant so much to me. Today people pay so much less than that via ebay and flea markets.
I appreciate your encouragement very much. Ten years ago I read chaotically and rushed buy what I thought were essentials after reading chaotically. Now I am acquiring basics on a tighter budget. Live and learn. Ebay and flea markets are friends indeed.
Thank you for the sanity!
My best,
Jacky
P.S. So if I have a plate steel scraper, can I do without a #80 style cabinet scraper?
Not long term, no. The edge on the 80 is stronger and more powerful and the sole makes it ideal for taking off high spots on a more regulated basis. The nice thing is that they are often sold as spokeshaves on ebay so look there first. Yesterday there were two that went much lower than normal, around £20, so more a spokeshave price.
Oh! I hadn’t thought to look under “spokeshave” on ebay. No wonder I wasn’t having much luck. Thank you again, Mr. Sellers, both for your patience and your generous advice.
My best, as always,
Jacky