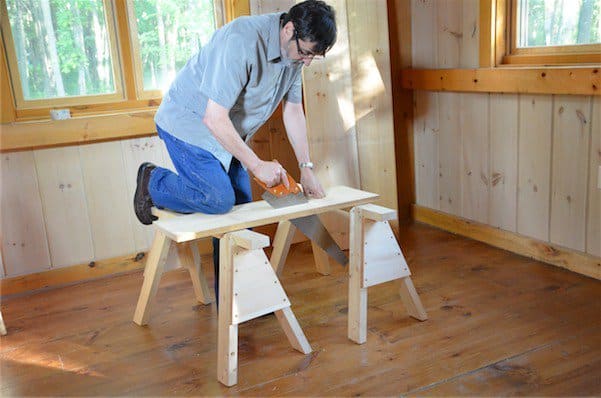
I suppose we take it for granted that plastic saw trestles now as saw horses are cheap enough to buy and replace so it’s not worth making them. In the USA you can buy two 2 x 4’s for about $6 and make a saw horse of substance that will last you all your working life whether you are a full time woodworker or part time hobbyist. Mostly used in pairs, that’s an inexpensive investment for a mobile and temporary work support.
Traditional saw horses like these were once commonplace but have disappeared from most joiner’s shops for different reasons. These work horses rely on four compound housing joints undergirded by direct bird’s-mouth seating atop the legs and two broad gussets that distribute stresses and arrest the possibility of leg-spread under weight. Here are my methods for making a pair I find suited in height, strength and weight. As I say, 2×4’s are good stock to build from. My sizes are finished out at 1 1/2” by 3 1/2” for the legs and 1 1/2” by 3 1/2” for the crossbeam. You can of course alter these sizes to almost any practical size you want and increase length and height by using longer pieces. You know your personal needs so build accordingly. 24” long legs will give a saw horse height of about 22 1/2”. I have made my saw horses 30” long. If I need something longer I simply add longer boards or 2×4’s on top and that works fine for most work.
Cutting list for two saw horses
8 @ 1 1/2” x 3 1/2” x 24”
2 @ 1 1/2” x 3 1/2” x 30”
4 @ 3/4” x 11 1/2” (long) x 11”
My first step was to plane the edges so that I had square-edged stock, which I like, looks best and gives square edges to mark recesses and shoulder lines from. I used a #4 Stanley smoothing plane for this and it takes only two minutes per edge. Not slow, not hard, not too much trouble. Result! Pristine handwork and clean, smooth wood alongside self satisfaction and fulfilling work.
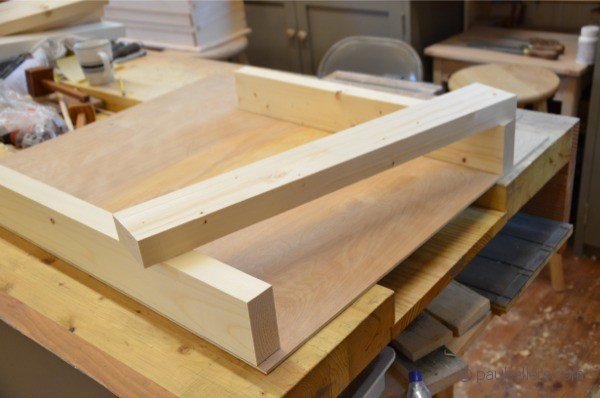
WIth the pieces cut and smooth the next thing I did was to lay a piece of plywood on the bench to lay out my pieces and establish the splayed angle for the first leg, which in turn gave me the angle to set my sliding bevel and so use it for all the other legs and shoulderlines.
Put the beam along the top edge of the plywood, flush along the edge and 1/2″ from the corner edge.
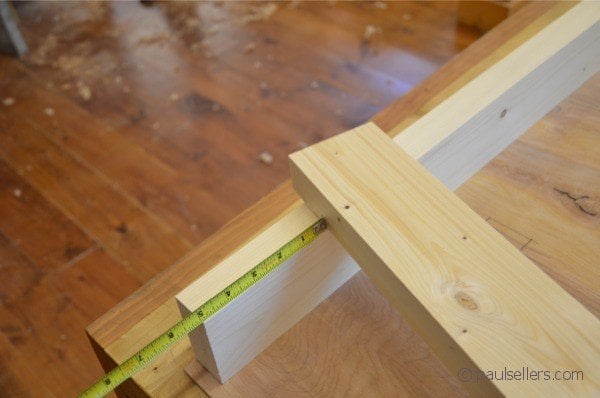
Measure 5″ from the end of the beam to establish the point at which the leg housing begins. Support the opposite end of the lag atop another leg so that the corner of the leg aligns with the edge of the plywood this time. The difference between the start of the top beam and the bottom leg means that the legs will splay beyond the extreme of the beam and reduce the risk of tipping.
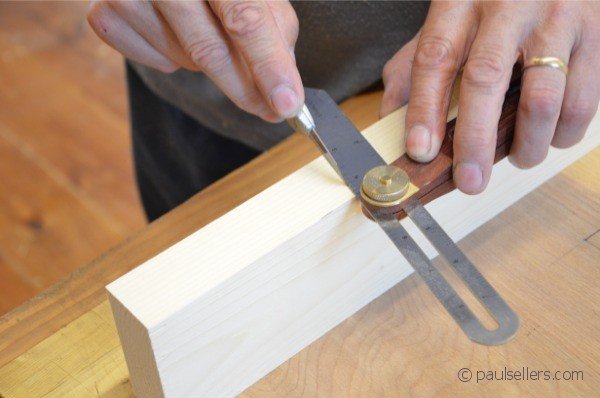
Establish the angle from the leg onto the sliding bevel as shown.
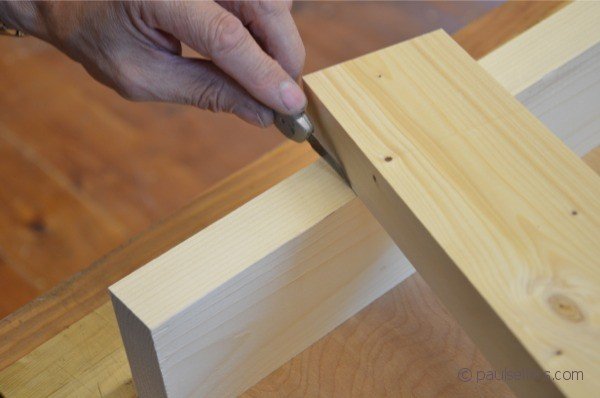
Now use the knife to establish the first crosscut knife wall. In this case I used the actual leg, but you could now use the sliding bevel too.
I used a knife against the sliding bevel to deepen the cut and make the the second knife wall to receive the full width of the leg so that the second knife wall distance was exact. This then enables me to run a gauge line to show the depth on the top and underside of the beam.
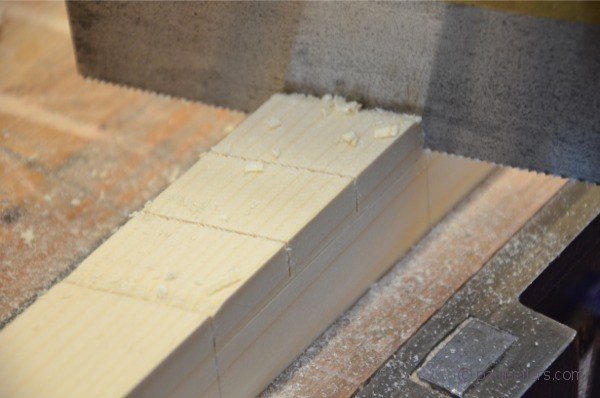
I square the lines onto the top and underside and then run the gauge lines for depth.
Saw down the knife lines on the waste side of the line using a tenon saw. I find it best to make two or three crosscuts in the recess area. This helps when chopping out the waste wood.
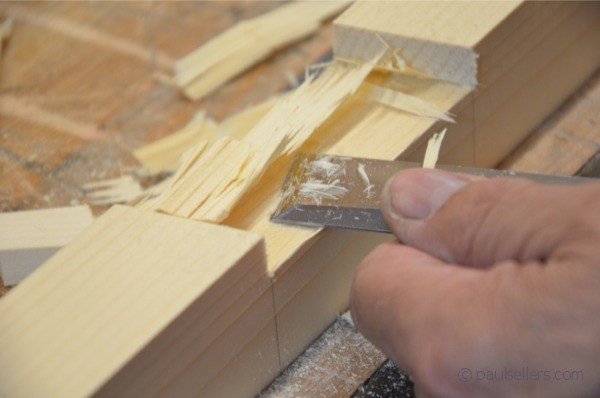
Chop out the waste and then pare the surface to level the final depth.
Repeat for the other three legs.
18 Comments
Once again, just in the nick of time. I tried plastic sawhorses about a year ago. They lasted 2 days before they started falling apart. My experience with the metal bracket “you supply the 2X4” stuff is they last very little time before they’re wobbly. Also if you use as much reclaimed 2X4 as I do the new brackets won’t fit the old 2X4s. So I’m looking at my needs and see that my current generation of sawhorses are either holding something up or just fell apart with nothing left over for me to use to build my work bench on.
And Paul starts his “how to build sawhorses” series.
No degrees but dead-on angles. Just posted the next stage for this. Hope you enjoy it.
These instructions are impossible to follow. For example following the text it’s impossible to work out what “the splayed angle for the first leg” actually is. Why is the piece placed 1/2″ from the end of the plywood? Are there other notes to go with this? This looks like a wonderful design to follow but there’s too much missing to be able to follow it.
Sorry if it seems confusing. It still makes sense to me.The angle isn’t necessary of you follow the distances from the end of the cross beam and use the square edge of the plywood as a reference. The 1/2″ in is to ensure that the beam is slightly within the parameters of the legs splay; so that it doesn’t tip.
I think I understand the instructions as written. Paul is moving on to more involved projects these days so perhaps some things won’t fully register without doing some of the other projects? That’s not to be disparaging, but just to say it can be hard to write every detail every time. I’ll bet, though, if you do what is written step by step it will make more sense. If you do what he says step by step, it is a recipe to _generate_ the angle that you need rather than calculating it.
Paul, I did have one question regarding, “I used a knife against the sliding bevel to deepen the cut and make the the second knife wall to receive the full width of the leg so that the second knife wall distance was exact.” It sounds like you knifed both lines at once by transferring the width of the leg from the leg itself. If we were cutting a housing dado, we’d have cut down the first wall before knifing the 2nd wall to make sure that we get a tight joint. Are you doing that here or it isn’t important because the leg will be screwed on?
Neither. Notice here that we are sawing down the knife walls. When we saw we do not compress the knife wall because we don’t mallet the chisel, which does compress andover knife wall. Sawing them leaves fibers within the two knife walls, which usually means that the joint will be tight.
I was actually thinking along the same lines. Not in following it; I follow it okay and I think the instructions are fine. Maybe if you stumbled on this before anything else you’d be a little confused, or something.
But I’m still not sure I have the skill to do the joints yet. You said “doing some of the other projects” first. Perhaps he was looking to build saw horses to build the workbench to “[do] some fo the other projects”. Or not. I’m in the same boat if so. I don’t have anything on which to build the bench just watching the first couple videos, so I ended up here, but these look a little more involved than I’m really ready for.
I may just need to buy some plastic ones at a big box store for the time being. Or perhaps just get a flat table to use to do the initial laminations.
This paradoxical cycle also comes to a head with buying suggested secondhand hand saws to start out. Which I think is great. But I’m not sure how I’m going to sharpen a saw if I need to before the workbench is done without a bench and vise. I’ll figure something out.
No more than 1/2″ is plenty. Simple really. There is no real maxim but it is very rarely necessary to house any housing deeper than 1/2″.
I’m looking forward to trying this out! Unfortunately it looks like there’s a WordPress plugin that’s gone wrong with the post, and none of the images are showing up. Is it just me or is this a problem for everyone?
There are a couple of older postings that never relinked after a problem and this is one of them.
Thanks very much!
Excellent posts, thank you for fixing the links to the images. I am about to build a pair of these so I have something to build your bench project upon.
Degrees? I don’t know what angles he’s using here, but in general sawhorses are built using 15 to 17 degree angles, sometimes as much as 20, but I’ve built them based on 15° and they came out fine (basically you cut everything at the same angle or at the inverse of it and it all fits together).
Thanks Paul. I have picked this as my first project as it is needed for my second project a work bench. Wish me luck cutting the angle while holding the material in my workmate.
What’s the depth on the gauge line set at, 3/8″?
I had the luxury to watch Paul’s video on how to build these sawhorses, which made things a bit more clear that reading the text. After watching the video I immediately went to my shop and built a pair for myself. Man, they are the best of the best sawhorses I have ever used. But then, that is what we have come to expect from Paul Sellers projects right.
Thank you. Again you are spot on with the need for a “DYIer” to make their own sawhorses. I took your advice and made three stout sawhorses out of treated exterior lumber, that way I can leave them outside and not sacrafice the scarce room in my garage/workshop.
Kind regards, Al
Really enjoying this build thanks, using the design to make a roman style workbench. find the video very easy to understand and I am learning loads from this project thanks
Comments are closed.
Privacy Notice
You must enter certain information to submit the form on this page. We take the handling of personal information seriously and appreciate your trust in us. Our Privacy Policy sets out important information about us and how we use and protect your personal data and it also explains your legal rights in respect of it. Please click here to read it before you provide any information on this form.


Once again, just in the nick of time. I tried plastic sawhorses about a year ago. They lasted 2 days before they started falling apart. My experience with the metal bracket “you supply the 2X4” stuff is they last very little time before they’re wobbly. Also if you use as much reclaimed 2X4 as I do the new brackets won’t fit the old 2X4s. So I’m looking at my needs and see that my current generation of sawhorses are either holding something up or just fell apart with nothing left over for me to use to build my work bench on.
And Paul starts his “how to build sawhorses” series.
No degrees but dead-on angles. Just posted the next stage for this. Hope you enjoy it.
These instructions are impossible to follow. For example following the text it’s impossible to work out what “the splayed angle for the first leg” actually is. Why is the piece placed 1/2″ from the end of the plywood? Are there other notes to go with this? This looks like a wonderful design to follow but there’s too much missing to be able to follow it.
Sorry if it seems confusing. It still makes sense to me.The angle isn’t necessary of you follow the distances from the end of the cross beam and use the square edge of the plywood as a reference. The 1/2″ in is to ensure that the beam is slightly within the parameters of the legs splay; so that it doesn’t tip.
I think I understand the instructions as written. Paul is moving on to more involved projects these days so perhaps some things won’t fully register without doing some of the other projects? That’s not to be disparaging, but just to say it can be hard to write every detail every time. I’ll bet, though, if you do what is written step by step it will make more sense. If you do what he says step by step, it is a recipe to _generate_ the angle that you need rather than calculating it.
Paul, I did have one question regarding, “I used a knife against the sliding bevel to deepen the cut and make the the second knife wall to receive the full width of the leg so that the second knife wall distance was exact.” It sounds like you knifed both lines at once by transferring the width of the leg from the leg itself. If we were cutting a housing dado, we’d have cut down the first wall before knifing the 2nd wall to make sure that we get a tight joint. Are you doing that here or it isn’t important because the leg will be screwed on?
Neither. Notice here that we are sawing down the knife walls. When we saw we do not compress the knife wall because we don’t mallet the chisel, which does compress andover knife wall. Sawing them leaves fibers within the two knife walls, which usually means that the joint will be tight.
I was actually thinking along the same lines. Not in following it; I follow it okay and I think the instructions are fine. Maybe if you stumbled on this before anything else you’d be a little confused, or something.
But I’m still not sure I have the skill to do the joints yet. You said “doing some of the other projects” first. Perhaps he was looking to build saw horses to build the workbench to “[do] some fo the other projects”. Or not. I’m in the same boat if so. I don’t have anything on which to build the bench just watching the first couple videos, so I ended up here, but these look a little more involved than I’m really ready for.
I may just need to buy some plastic ones at a big box store for the time being. Or perhaps just get a flat table to use to do the initial laminations.
This paradoxical cycle also comes to a head with buying suggested secondhand hand saws to start out. Which I think is great. But I’m not sure how I’m going to sharpen a saw if I need to before the workbench is done without a bench and vise. I’ll figure something out.
No more than 1/2″ is plenty. Simple really. There is no real maxim but it is very rarely necessary to house any housing deeper than 1/2″.
I’m looking forward to trying this out! Unfortunately it looks like there’s a WordPress plugin that’s gone wrong with the post, and none of the images are showing up. Is it just me or is this a problem for everyone?
There are a couple of older postings that never relinked after a problem and this is one of them.
Thanks very much!
Excellent posts, thank you for fixing the links to the images. I am about to build a pair of these so I have something to build your bench project upon.
Degrees? I don’t know what angles he’s using here, but in general sawhorses are built using 15 to 17 degree angles, sometimes as much as 20, but I’ve built them based on 15° and they came out fine (basically you cut everything at the same angle or at the inverse of it and it all fits together).
Thanks Paul. I have picked this as my first project as it is needed for my second project a work bench. Wish me luck cutting the angle while holding the material in my workmate.
What’s the depth on the gauge line set at, 3/8″?
I had the luxury to watch Paul’s video on how to build these sawhorses, which made things a bit more clear that reading the text. After watching the video I immediately went to my shop and built a pair for myself. Man, they are the best of the best sawhorses I have ever used. But then, that is what we have come to expect from Paul Sellers projects right.
Thank you. Again you are spot on with the need for a “DYIer” to make their own sawhorses. I took your advice and made three stout sawhorses out of treated exterior lumber, that way I can leave them outside and not sacrafice the scarce room in my garage/workshop.
Kind regards, Al
Really enjoying this build thanks, using the design to make a roman style workbench. find the video very easy to understand and I am learning loads from this project thanks