Building Bookshelves on woodworkingmasterclasses.com
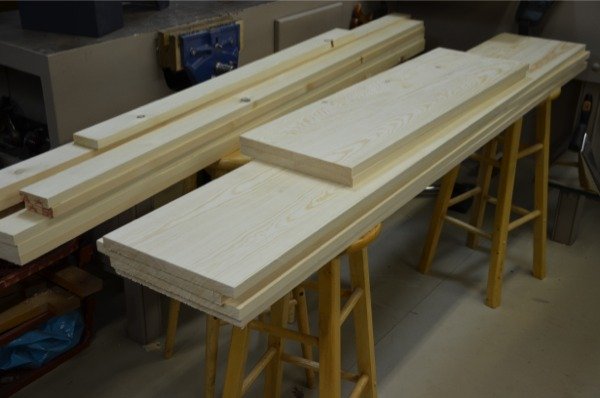
For those of you following our courses on woodworkringmasterclasses.com we are about to start releasing the weekly broadcast on Building Bookshelves. I have added several features for developing skills and techniques. Whereas we could just use thicker stock, and indeed of you wish to do so you can change the dimensions to suit your desires, I have chosen my wood so that you can walk into any supplier and pretty much buy it off the shelf. When I refer to sizes such as 1 x 12 or 1 x 3, these sizes will be nominal and unless you have machining capability, you will need to adjust the sizes accordingly. In the UK, 1″ stock is nominally sizes at 21mm which is 13/16″. This is close to but not exactly what you get in the US. This is not too helpful internationally. In the US, for instance, 2″ stock is nominally downsized after machining to 1 1/2″ or 38mm. 1″ stock will be around 18mm. But the idea is to help the majority wherever they are in the world who have no ability to alter the thickness of wider boards. It is impractical to plane down a 1″ board 12″ wide for so large a project using hand planes. B&Q may not be the best place to get started with wood but it may be all that you have access to. Hime Depot likewise although they do have decent premium boards to select from. To get you a head start on materials the cutting list is given below.
Materials
Part # Qty Description Size
1 2 Side pieces 21mm x 280mm x 1831mm
2 4 Shelf 21mm x 280mm x 882mm
3 1 Top 21mm x 255mm x 978mm
4 1 Top arch 21mm x 70mm x 882mm
5 1 Bottom arch 21mm x 70mm x 940mm
6 1 Kick board 21mm x 70mm x 882mm
7 2. Divider. 21mm x 200mm x 392mm
Back face frame
8 2 Stile 28mm x 70mm x 1820mm
9 5 Cross rail 28mm x 70mm x 864mm
10 1 Top rail 28mm x 70mm x 998mm
11 13 T&G panel (optional) 7.5mm x 70mm 22m lin (metres)*
*Panel material
You may want to buy pre made T&G boarding rather than making your own. If you want to make your own you will need enough material to cover an area of 1.85 sq meters 0r 18 sq ft
For my panelling I will be using 12mm (1/2″) stock with a 3/16″ T&G. That means that the actual coverage is the width of the board less the width of the tongue 7mm (5/16″). If you follow this paneling for this project you will need:
22 linear metres or 73 linear feet of 12mm x 62mm T&G.
The tools you will need are:
Combination square
Chisel set
Chisel hammer or mallet
Combination gauge
Knife
Hand router (you can use a poor man’s router)
Tape measure
Tenon saw
Tongue and Groove planes or Plough plane or Rabbet plane (to be discussed)
The joints we are making are:
Through housing dado
Stopped housing dado
Mortise and tenon joint (through)
Mortise and tenon joint (stopped)
Mortise and tenon joint (stub)
Mortise and tenon joint (haunched)
Techniques and methods
We will be discussing face frames for added lateral stability to case goods using mortise and tenon frame construction.
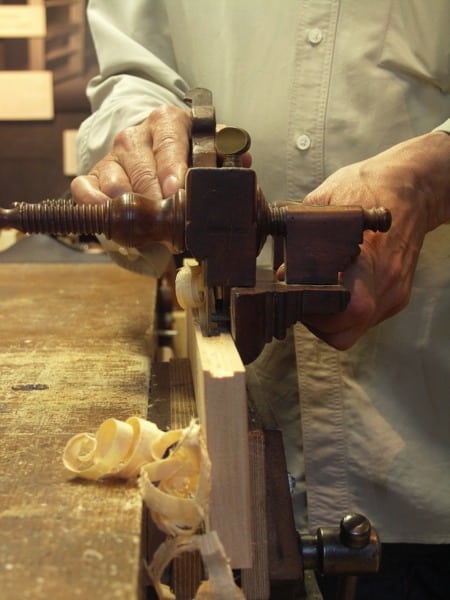
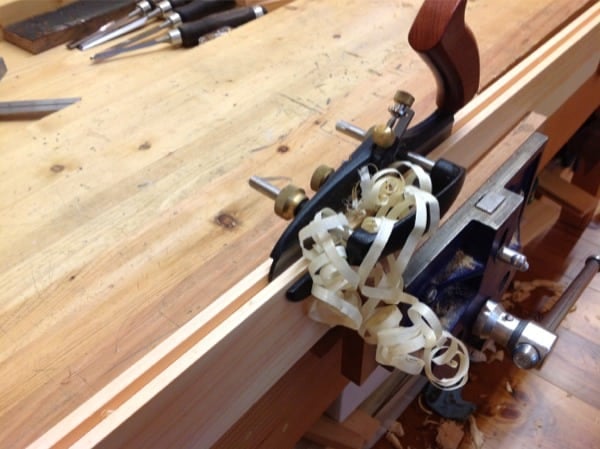
Panelling using hand-made lapped and/or tongue and groove panelling and the bead- and vee-jointed features commonly used on this type of panelling. Don’t worry, you will not need the screw stemmed Marples plough plane, we will be using another type as well as showing you how this one works too!
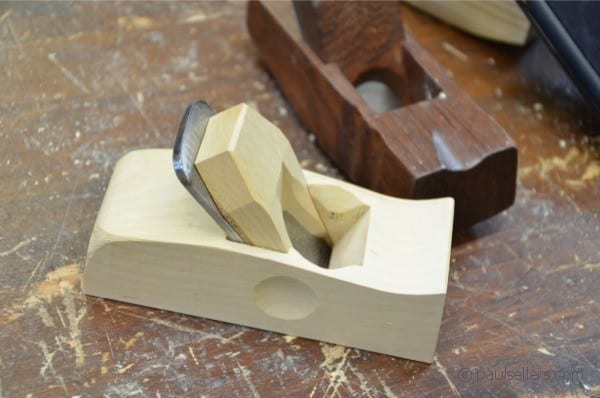
We have added a coved mould to crown the top of the bookshelf unit that could be made from an existing moulding plane, but I will be using the methods shown in the plane making videos just featured on woodworkingmasterclasses to get the exact shape we want and we show you how to install stops that will guarantee accurate cove shaping.
this will be a very useful series as this house can resemble a library at times , i do like a project that can be made to suit the space its going to be used in .
Hi Paul,
Out of curiosity, how would you go about hand planning a side panel that large? Is it the same techniques you covered in your stock perpetration videos?
Cheers
Justin
We will be showing that as a separate video soon.
Thanks Paul,I can’t wait. As John mentioned below, I just finished up the tool tote and will start on the wall clock or bookshelf next. Thank you a for created Master Classes.
Really looking forward to this series!!
Lots to learn here!
I’ve done most of the techniques covered here by muddling through on my own, but in self-teaching I sometimes find it hard to find information on why things are done the way they are. It’s one reason why the masterclasses are so good for me.
Looking forward to hearing your teachings, and I’m very excited to get started!
I just completed a tool tote project (sort of), in that series, you stated that it is simpler project to prepare ourselves for a bookshelf. On to the next level.
Well done John. I hope that you were satisfied with your success and that you enjoy your next project, which could be the wall clock or the bookcase.
this will be exciting,my wife was only asking last night ” when is paul going to make something useful for the house” she wasn’t please with a bar stool and a plane in the last two projects .we are avid readers and have books all over the house. i suppose 18mm in thickness will be ok but the widest i can find i think is 9″ (230mm) i am wondering do you need to laminate for extra width .really looking forward to this
Paul I am really looking forward to this series as I am in dire need of a couple Book Cases for myself as well as for my Grandchildren’s, ( they currently have the Ikea specials which I detest ). I have started the tool tote with my Grandson but had to put it on the back burner temporarily as he has other commitments. I did want to start and finish this without him. I have a Stanley #45 with a 5/16″ blade and a Wooden plow plane by Auburn tools with a 1/4″ blade which i need to learn how to use.
I have enjoyed all your projects to date and looking forward to 2014.
Steve
I meant to say I “did not” want to start and finish the tote without him. My brain works faster than my fingers at times LOL.
Steve
I can appreciate catering to the lowest common denominator, but please do keep in mind that some of the members (for sure one – me) probably will want to use finer woods and finer tools.
Besides the great learning experience available from Master Classes, I also seek to be inspired to achieve great outcomes. The use of sub-par materials (pine from the home center) or badly warped plywood, is often not very inspiring.
This is meant as constructive feedback – I continue to be a paid member, so I obviously find value here. But I’m always hopeful for more. Thanks.
I believe that the quality of a project is in the way that it is made. Not the type of wood or the tools used to make it. The skills that can be learned through these projects can be applied to a far greater range of woods, tools and styles than can easily be imagined.
your response is so true Joseph .Paul continually repeats “its not what you make its the way that you make it ” another point is that woodworking master classes from the beginning has kept us novices in mind those of us on a tight budget but just wanted to get started in woodworking and i am grateful for that . if Paul started of with high end tools and exotic wood i believe a lot of followers would feel less than adequate to proceed. and besides if one reads pauls posts on “buying good tools cheap ” you well on your way . thanks David
I have to respectfully disagree with the first half of your comment.
The type of wood used (unless painted) in large part determines the quality of a project. A mahogany bookcase, employing straight grained wood for the faceframes is going to be superior to a knotty pine case built with disregard to the grain.
People (myself included) seem to progress from using cheaper woods to finer woods, and eventually (hopefully) spend time and money acquiring quality woods and selecting the sections with grain that’s appropriate for the component.
Paul often seems to be use whatever wood is available to himself when building these projects. I’m sure that wasn’t the case with the White House furniture.
Now granted, what we make is not destined for such preeminent locations, but I still like to be inspired by seeing work that I might not be able to accomplish, or can only accomplish with great effort and skill.
I don’t read woodworking magazines to see average work. I want to see what’s possible and how I need to push myself to achieve higher levels of skill. Wood use and selection is important in reaching those higher levels.
Just one mans opinion.
The learning experience is largely in the techniques, methodology, and approach to the project. Sure different woods respond and perform differently, but the teaching comes from developing skills.
You will have the added benefit of ending up with a project that is both beautiful in appearance and technique.
Don’t let yourself get bogged down and held back from technicalities. Your argument makes me think that you will get some people complaining because they don’t like oak (whereas some love oak) and that it should have been constructed I rosewood. It is all a matter of degrees, what’s locally available, affordable, and best suited to learn a new technique and expand your woodworking skills.
All the best.
Marty, what’s stopping you using some other species? You could even jazz up the look with a simple bead or even add glass doors for that fine looking finish.
Personally, I’m quite pleased to see a project demonstrated using an economically viable and readily available wood. I think budget and availability are behind Paul’s decision to do so.
We’re not constrained by the choice of wood used in the videos – the gallery and forums have examples of, for example, clocks in oak, or toolchests in pine.
Similarly with tools – it’s the result that matters, not the tool.
I think when we get started with this, no one will be disappointed at all. I feel excited about it and have had a good day working on the final details.
very true I have used wood from old pallets and shipping crates to build some of the projects.It did entail a bit more work to prepare the wood before I could start the build. But it was so worth it in the end simply because of the experience I received from working the wood.
That’s certainly the way I see it Joseph. I made my first clock out of ‘Whitewood’ from Wickes but my second one out of Oak. Both are beautiful to me. I also used regular B&Q pine to build my tote but I got hold of an Ebony pen blank and used that to make the two pins for the handle. Once a project is finished I tend to add more drawings to my journal of things I could do different next time or as variations and I’m starting to mix and match methods from different projects. I don’t think I could do that if I were not building a skill set. As I see it, that’s what WMC is all about; learning and building skills that are slowly vanishing.
Joseph, I am really glad to see that attitude. I love pine and it works as well for me as any other wood. My house is 80% pine paneling and I have made many projects for my house with pine. As long as it is dry, pine is my favorite…
Unfortunately for me where I live, I do not have access to “premium” wood and Home Depot is the only game near where I live. I come to like pine because of Paul’s projects and also being retired I can not afford some of the more expensive woods.
I believe the intent here is the process on making / building book shelves. I am also a little confused on better tools, I love my vintage tools.
Please don’t take my comments the wrong way I am not trying to start an argument here and if I offended anyone please accept my apologizes.
steve
Why cutting lists back to front? LxWxT is what I was taught. I think I know the answer.
I suppose it a bit like 1st and 3rd angle drawing projections
Preferential habit?
I am in agreement with Joseph and Paul. It’s not the wood or the tools, it’s how you make it. The tool chest and coffee table video’s used mahogany and oak. They should be enough to show anyone the different issues and behaviors encountered when using different species. Watch those if you want to make the bookcase using oak or mahogany. The planing and scraping issues will be the same. Paul is a great teacher.
Thank You Frank I could not agree more. I used to live to make saw dust. Now I live to make shavings. Now I can listen to music while I work and I don’t have to flush out my sinuses before I go to bed. I am so great full I found Paul and his course.
This is so true and is the main reason I am choosing to use Hand Tools more so than the corded cousins. For me it is so relaxing and is basically a therapy for me, and like others have mentioned Paul is a great teacher.
Steve
I am looking forward to the start of the series. I’m still playing catch up on projects but I’ll be watching the videos as soon as they are availible. Maybe I’ll get to build them before to long. 🙂
Just to encourage everyone. We are providing lot of different projects designed for growth, but we try to make sure you know that you don’t have to complete all of them now. You can go back to them at any time.
Will the mesurements be converted to Imperial? If not, do you know where good metric rules can be obtained in the USA, what brands to look for?
It still amazes me that you can buy imperial only tape measures in the USA. I think the UK may be the only European country that has both on one tape. I am most likely wrong. Perhaps Eire too? Yes we will do the conversion for this series too.
Metric only and Metric/Imperial tapes are certainly available in the USA, but all the construction lumber and hardware is sold with Imperial measurements. So all the tape measures in the big box stores are Imperial only.
That’s probably not going to change as long as you can by “2×4’s” in the lumber section of your store.
Will you be doing the measurement conversion soon? I sometimes forget to put my dual measurement tape measure in the truck. The conversion I did has some really “strange” measurements.
This is going to be a great project!
Forgive me all but I have read this thread twice now and I don’t understand the discussion at all. Its your clock, table, box, or stool make it out of whatever wood you want or have. I don’t recall Paul ever saying that a cutting, sizing, scraping, or measuring techniqe only works with pine.
The same applies to measurements. Its mine- how tall do I want it, and how wide do I want it? Most of the great monuments of the world were created without a tape measure. The boss got a stick and said ” ok everybody this is ONE” Then geometry told them how to find half and a quarter and so on…
I know everyone has a different goal but I didn’t join Masterclasses to copy Pauls plans I joined to learn Pauls techniques. I can get a book of plans anywhere. Hope I didn’t offend anyone but thats my take on the matter.
For the next project I think I will try sweet gum with hornbeam inlays and use cubits as the base measurement, Egyptian cubits not common cubits of course!
Hi Paul,
what do you think about dado planes?
Are they less accurate rater than making an housing dado by chisel? It seems to me like the difference between cutting dovetails by chisel and with a copiyng saw.
Just curious to know what do you think about.
Hope that we can see your new elm workbench soon.
Thanks very much.
They can be set up to produce perfect dadoes. When buying look for ones that are not too worn and unused old ones are good ones to start with too. Most dado planes have a skewed iron for one thing. That means they pare-cut with the long point of the iron engaging crossgrain work by lifting the corner point and then following through with the remaining edge of the cutting iron. The other feature is the depth of cut which can be adjusted with the turn of a thumbscrew or, if older, the tap of a wedge. They are a joy to use as long as they have good side cutters that sever to crossgrain fibres ahead of the cutting iron. I own several sized ones and they are super fast.