For more information on sharpening stones, see our beginner site Common Woodworking.
I’m still surprised to see how little it takes to keep things sharp and uncomplicated. I have always fought against complication in everything I write about and work on and work with. One thing is very very clear to me. Sharpening has been made complicated all the more by a mass of choices. The issue is what to buy more than how to sharpen.
Even when I was but fifteen, sharpening for the very first times the saw and plane, a few chisels and a spokeshave, I could see the simplicity of creating a sharp edge to a piece of steel. It was a simple Norton India combination stone back then that developed a convexed bevel on all of the edges. I took the edges and stropped them on my then soft hands as the men did and they laughed and joked as the blades slapped my palm one after the other.
My planes and chisels were sharp enough for working hardwoods and softwoods equally well. People mock me from time to time because I work pine and compare hardness to some of the hardwoods. I find that funny really, that people think softwoods to be soft when many aspects of the softwood are indeed harder than hardwoods like mahogany or sapele, oak, walnut, cherry and others. You see for the main part they discount the knots that are not just hard but intensely brittle.
My learning then was that knots in wood remained, were not cut around, discarded for better but fully used. Even from the stones I used and the stropping on my hand, the knots and wood came smooth and level from this simplicity. Since then I’ve moved to new levels, but looking here I see that despite many intrusions, experiments and rabbit trails, my sharpening remains the simplest thing. Once a year I might, just might, use a mechanical grinder on a single blade. Sometimes a chisel corner might break or hidden screw catch an edge to damage my plane. Some such thing to leave a deep chip. Then I might grind it out, but not always.
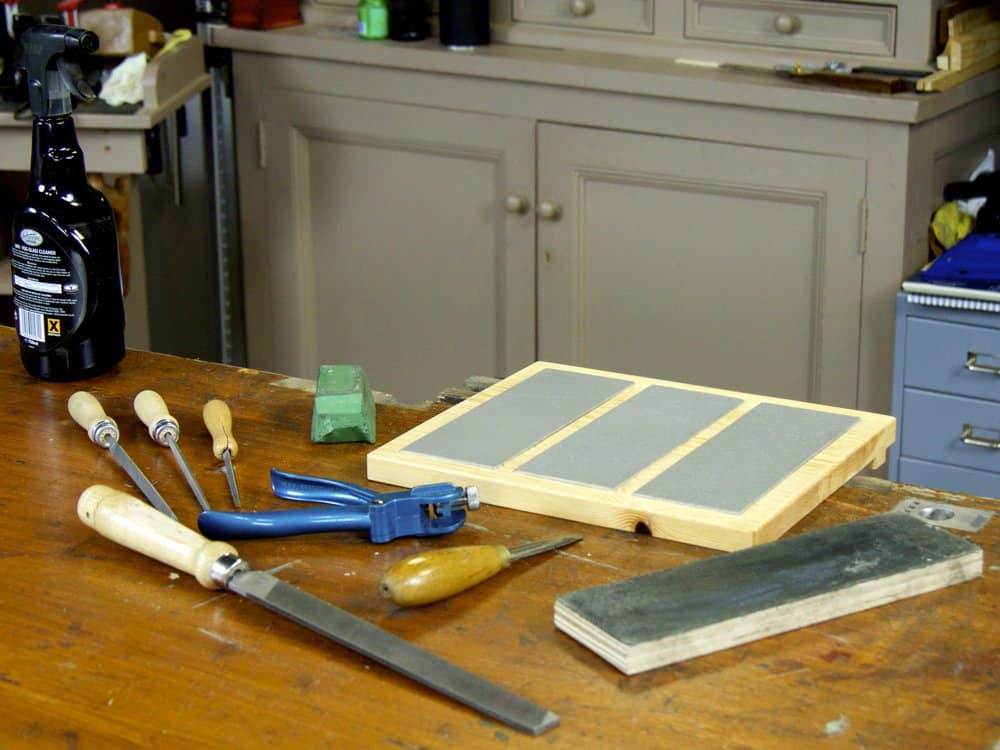
Here in is the simple thing I’ve retained throughout my working life as a crafting artisan selling nothing more for the main part than the things I made. What you see in the picture at top is what I use to sharpen all of my tools. Nothing more, nothing less. These tools, abrasive plates abrasive compound and files give me pristine, surgically sharp edges as fast or faster than any method I ever saw. It takes me about a minute per chisel, two for a plane iron and the same for a spokeshave. With the saw files I sharpen any saw in under four minutes and the flat file? That’s for my scrapers, axes, froes and some other edge tools.
Oh, the saw files do my auger bits too. Forgot that.
35 Comments
Evening Paul,
I’m beginning to get quite comfortable with sharpening my chisels and planes, and pushing a freshly sharpened plane feels like floating through air compared to what it was a few minutes before.
I’m still struggling with saws though. I just sharpened up two saws I’d bought at a car boot, and set them, but the result was so disappointing that I went back to the old hard point I’d bought before I became inspired by your work. Even though this isn’t as it was it still cut better than the freshly sharpened saws.
Could it be the saws are rubbish or that the file is, or that I’m not filing the teeth straight?
Is there a way of telling the quality of the steel in the saw? They look decent enough, and after a good rub down with some sand paper look quite nice. I can see the teeth gleaming after a few good rubs with the file.
send me a pic of a few teeth sideways and from an oblique angle and I can probably help. Close and as sharp as you can get them.
I read your blog every morning before work. This kind of stuff makes me smile, seeing that you take the time to help people just for the sake of helping people. You truly have inspired me.
nice post .i became totally overwhelmed with amount of sharpening jargon the jigs, reels and dancing people go to to bring both sides of a chisel or plane iron to a point amazes me .i got sucked into it for a time but seemed to be spending more time ,thought,and money on sharpening than actually working wood .thanks to your method of diamonds and stropping i can now freehand with excellent results .it took time practice and a lot of patients but well worth the effort. i only recently filled off the teeth of a car boot sale tenon saw and recut a 14ppi thanks to your excellent video and simple methods. p.s waiting for the crosscut video.many thanks and kind regards
Have been following your advice on sharpening for a while now, has really worked well for me. Have you ever noticed that some plane irons and chisels just wont get as sharp as others? I have an old #5 iron that will not get quite the edge my other planes will. Time for a new iron?
I haven’t, sorry.
What are those sharpening abrasives in your photo at the top of the page? Stones set into the bench hook or glass panes with abrasive films? I can’t tell from the photo. Thanks for your videos. I enjoy them.
No, never film on glass, just EZE-Lap diamond plates let in to the wood for holding.
Paul’s simple approach to sharpening opened the door for me to really start working with wood. You have got to start with sharp tools and this makes it “dead simple”.
Paul’s attittude to sharpening certainly made a difference for me, especially his information about just how long a sharp edge actually lasts, that the sharpest edge still fractures and dulls really quickly and the need to “sharpen up” even during a job!
Hi Paul,
Do you sharpen your turning chissels the same way as your bench chissels?
Thx.
Bert
No, they are usually made from high speed steel and need too much grinding for hand work because turning tools are thicker than ever in the western turning culture. Parting tools and skews work fine on diamond plates but the bowl and spindle gouges are now much thicker than the old and thinner carbon steel ones. Much of this revolves around the machine turnery rather than say the treadle, which was slower and had almost no heat build up as with today’s lathes. Much of the lathe work today is actually more wasted energy than in the past because most of it goes unused and at much higher speeds. If you can’t turn bowls large and small with todays equipment then you can’t turn. It’s almost impossible not to get good results with todays equipment.
Thanks Paul for your prompt reply.
Yesterday I purchased a small lathe for 35€ with 8 HSS chissels who need some TLC.
I was thinking about using my diamond plates but I’ll use a grinder now.
Does it mean that stropping turning chissels is not necessary?
I’ll probably only use it for small shop appliances such as drawer pulls and chissel hefts. I got inspired by your turning video on youtube.
Many thanks for all you do
Bert
Hi Paul,
I have an oil stone that I was given by my Dad. It’s probably the one he showed me how to sharpen chisels on when I was a wee-un. It’s a long time since he showed me, but with practice the skill is coming back. He only ever used a single stone as far as I know, and stropped it on his hand like you describe. I’d be interested in working out what grit it is though, just to compare, but there are no marking at all. Is there a way I can work it out?
Also, that flat file, could you tell us the serial number if if it’s a Bahco? I got one the other week by mail order but it has the diamond pattern, not the single cut you recommend in other posts.
Thanks
Nevy, from what I understand, oil stones are somewhat different in that they do not have different grits. They cut differently depending on how densely the crystals are packed in the stone. The more dense, the finer the cut and the higher the grit equivalent. The more “loosely” packed crystals have a more aggressive cut, but the size of the crystal is pretty much the same. If you search for “Arkansas oil stones” on the internet you should find a few of the manufacturers who are still in Arkansas and they have more information on grading the stones and other things about natural oil stones.
Thanks Bogden. I’ll have a bit of a hunt.
The thing i would need to know is whether the stone is indeed cutting the steel first. Often old stones are glazed over because the pores are surface clogged and then polished out by more of a burnishing than actually cutting the steel.
If however it is cutting the steel and there are no scratches in the steel that are visible it may well be you own a nice a fine stone, perhaps comparable to 2,000-3,000 grit, something like a hard Arkansas.
I am working on a blog on files and filing so just finishing up tests to publish.
Thanks Paul. I’m pretty sure it is cutting. I can get a sharp edge to the chisels and the block plane I’ve tried so far.
You are right, Paul, but I think the issue is complicated not just by the need of the marketing industry to sell an ever increasing volume of gadgets, but by the mystique created by the “gurus”, who are, after all, primarily writers, to keep stringing along their stable of groupies.
Hello Paul,
thanks for this post. As I started working wood it was your advice I followed to sharpen my tools. And I’m still doing so.
It is easy to learn and easy to use in the every day shop life.
And after a while of practising sharpening that way I’m glad how my edges come out.
By the way – sharp enough for the ER. But this is another story 😉
I have to admit that the whole issue of sharpening used to make my head spin, all the different guides, stones and paraphernalia available and with all the conflicting advice on micro-bevels and back bevels and techniques from all directions.
After seeing Paul’s videos on preparing chisels and sharpening hand planes it all started to make sense. Simple techniques, and clear advice is all that is required and Paul supplies that every time. It seems to me that people become obsessed with insignificant details on subjects like sharpening, fueled mostly by advertisers and manufacturers, when all it needs is someone like Paul with, solid, real world experience to cut through all that and get to whats really important. Now I have sharp tools that give me good results and most of the sharpening gear I purchased over the years now gathers dust at the bottom of a draw. Sharpening mostly takes a matter of seconds and I have more time to spend actually using the tools.
Thanks Paul for all the good advice.
Paul, you have said that your diamond stones do eventually wear and that you have buy a new coarse stone. At what point do you do this and what do you do with the other stones? Do they just ‘move along’ and what do you do then with the super fine stone? Just throw it away, or something else. I ask because I am finding that although I get a good edge, I am spending longer and longer on the coarse stone to get a burr and want to know when it should be replaced.
I have found the best preservation of stones is to use 120-grit abrasive paper on a roll. The thicker stiff type used for sanders and sold in builders yards. I use this for restoration of bevels and especially when they are way off too steep. Remember we have a hundred chisels used by students and even so we rarely ever use a mechanical grinder for this. This abrasive paper gets them back to shape fast. I simply unroll a stretch and restore the bevel. Then I go through my normal three-plate sequence. I do pass along my plates and upgrade them to finer positions in the cycle and end up giving the then super, super fine stone to someone else for polishing out. So far I have never been able to wear through the EZE-Lap plates to the steel plate, that’s how good they’ve been. I went through to the plate in only a few hours with those diamond pattern surfaces sold by Trend though.
Paul,
I have found if it is difficult to source jewelers rouge or compound for a strop locally that automobile polishing compound also works.
I ran some Marple/Blue handled chisels through wet sandpaper from 220 to 2000 and then stropped with using Meguiars clearcoat safe polishing compound and was stunned at how sharp the blades were. I have been sharpening knives (pocket, kitchen, hunting knives) my whole life and these cheap chisels were the sharpest blade I have ever touched after following your advice.
Thanks for all you sage and sound advice.
Any car polish works well. Sometimes just a bot messier, especially if you use a polishing mop on a buffing machine.
Just wanted to make a comment about sharpening in general. I’m new to woodworking and I’m currently working on dovetail boxes. I have yet to saw and chop gap-free corners in all four corners of the boxes I’ve made. The closest I came was three gap-free corners for 1 box. Sometimes I get frustrated and start to question whether or not woodworking is for me. When this happens I sharpen the saw, chisel, and hand plane I’m using. Of course, the wood instantly becomes smoother to work. My boxes may still have gaps (usually smaller) but the process becomes more fun. So, I guess I’m trying to say that if things aren’t going well for me with a project I’m working on, I know that I can always sharpen and have a better woodworking experience. I’ve learned everything about sharpening from Paul’s sharpening videos. Thanks Paul.
Thanks Anthony, Soon sharpening will become so second nature to your endeavour it will be just like writing your name or saying it. You’ll know exactly the point to sharpen up and you can then tackle the other issues but more than that you will be floating through the work because the process is so beautiful.
I noted the frame that you have your diamond sharpening stones mounted in. Could you please say something about how it was constructed and what keeps the stones in place? I apologize as I know you have done so in a video, but I can’t seem to find it.
Dwight, if ever you need something like this just go to the search box on my blog. That’s all I do nowadays. Put sharpening plates or sharpening stones in and up the info pops. Here is one link but there are others.
I wet my plates with a bit of WD40. This stays wet for a long time, does not clog matters up and can be removed easily with a bit of turpentine.
I started out with that too, but then I found the can over-sprayed onto my work, bench and other things, transferred through my hands to the wood and then cost 5 times the auto glass cleaner that seemed to work better and didn’t smell of WD40 all the time.
In my view the difference is that with WD40 only wetting is necessary, where with a water based product, a surplus is necessary for it evaporates faster.
Oil does not make things rust and WD 40 is not blue.
Paul, I wanted to thank you for your advice on sharpening. I just have a two-sided water stone and made a strop myself. After following your advice on YouTube I managed to sharpen my new chisels to a degree I did not think was possible (for a beginner like me). But what truly amazed me is that I was able to pass the “paper-test” and let my chisel cut through paper like warm butter!
I may be too optimistic but after that experience I also wanted to sharpen my plane iron free-hand since I don’t own a honing guide. Do I need to be more careful with this compared to the chisels? I would assume it is less forgiving since it is made to work with the other components of the hand plane.
There is little difference between the plane irons and the chisels. Hopefully you have seen the vids we made to help with this, but just as you dod with the chisels, go for it. And thanks for the encouraging words too. Always appreciated.
I bought an M390 steel alloy knife. I sharpened it on the diamond DMT stones through the various grits. I keep getting a burr to one side of the knife edge or the other. The steel is so hard and tough, the burr is hard to remove by stropping. That’s a good problem to have, right? It means the edge will last longer once I deburr it?
Comments are closed.
Privacy Notice
You must enter certain information to submit the form on this page. We take the handling of personal information seriously and appreciate your trust in us. Our Privacy Policy sets out important information about us and how we use and protect your personal data and it also explains your legal rights in respect of it. Please click here to read it before you provide any information on this form.
Evening Paul,
I’m beginning to get quite comfortable with sharpening my chisels and planes, and pushing a freshly sharpened plane feels like floating through air compared to what it was a few minutes before.
I’m still struggling with saws though. I just sharpened up two saws I’d bought at a car boot, and set them, but the result was so disappointing that I went back to the old hard point I’d bought before I became inspired by your work. Even though this isn’t as it was it still cut better than the freshly sharpened saws.
Could it be the saws are rubbish or that the file is, or that I’m not filing the teeth straight?
Is there a way of telling the quality of the steel in the saw? They look decent enough, and after a good rub down with some sand paper look quite nice. I can see the teeth gleaming after a few good rubs with the file.
send me a pic of a few teeth sideways and from an oblique angle and I can probably help. Close and as sharp as you can get them.
I read your blog every morning before work. This kind of stuff makes me smile, seeing that you take the time to help people just for the sake of helping people. You truly have inspired me.
nice post .i became totally overwhelmed with amount of sharpening jargon the jigs, reels and dancing people go to to bring both sides of a chisel or plane iron to a point amazes me .i got sucked into it for a time but seemed to be spending more time ,thought,and money on sharpening than actually working wood .thanks to your method of diamonds and stropping i can now freehand with excellent results .it took time practice and a lot of patients but well worth the effort. i only recently filled off the teeth of a car boot sale tenon saw and recut a 14ppi thanks to your excellent video and simple methods. p.s waiting for the crosscut video.many thanks and kind regards
Have been following your advice on sharpening for a while now, has really worked well for me. Have you ever noticed that some plane irons and chisels just wont get as sharp as others? I have an old #5 iron that will not get quite the edge my other planes will. Time for a new iron?
I haven’t, sorry.
What are those sharpening abrasives in your photo at the top of the page? Stones set into the bench hook or glass panes with abrasive films? I can’t tell from the photo. Thanks for your videos. I enjoy them.
No, never film on glass, just EZE-Lap diamond plates let in to the wood for holding.
Paul’s simple approach to sharpening opened the door for me to really start working with wood. You have got to start with sharp tools and this makes it “dead simple”.
Paul’s attittude to sharpening certainly made a difference for me, especially his information about just how long a sharp edge actually lasts, that the sharpest edge still fractures and dulls really quickly and the need to “sharpen up” even during a job!
Hi Paul,
Do you sharpen your turning chissels the same way as your bench chissels?
Thx.
Bert
No, they are usually made from high speed steel and need too much grinding for hand work because turning tools are thicker than ever in the western turning culture. Parting tools and skews work fine on diamond plates but the bowl and spindle gouges are now much thicker than the old and thinner carbon steel ones. Much of this revolves around the machine turnery rather than say the treadle, which was slower and had almost no heat build up as with today’s lathes. Much of the lathe work today is actually more wasted energy than in the past because most of it goes unused and at much higher speeds. If you can’t turn bowls large and small with todays equipment then you can’t turn. It’s almost impossible not to get good results with todays equipment.
Thanks Paul for your prompt reply.
Yesterday I purchased a small lathe for 35€ with 8 HSS chissels who need some TLC.
I was thinking about using my diamond plates but I’ll use a grinder now.
Does it mean that stropping turning chissels is not necessary?
I’ll probably only use it for small shop appliances such as drawer pulls and chissel hefts. I got inspired by your turning video on youtube.
Many thanks for all you do
Bert
Hi Paul,
I have an oil stone that I was given by my Dad. It’s probably the one he showed me how to sharpen chisels on when I was a wee-un. It’s a long time since he showed me, but with practice the skill is coming back. He only ever used a single stone as far as I know, and stropped it on his hand like you describe. I’d be interested in working out what grit it is though, just to compare, but there are no marking at all. Is there a way I can work it out?
Also, that flat file, could you tell us the serial number if if it’s a Bahco? I got one the other week by mail order but it has the diamond pattern, not the single cut you recommend in other posts.
Thanks
Nevy, from what I understand, oil stones are somewhat different in that they do not have different grits. They cut differently depending on how densely the crystals are packed in the stone. The more dense, the finer the cut and the higher the grit equivalent. The more “loosely” packed crystals have a more aggressive cut, but the size of the crystal is pretty much the same. If you search for “Arkansas oil stones” on the internet you should find a few of the manufacturers who are still in Arkansas and they have more information on grading the stones and other things about natural oil stones.
Thanks Bogden. I’ll have a bit of a hunt.
The thing i would need to know is whether the stone is indeed cutting the steel first. Often old stones are glazed over because the pores are surface clogged and then polished out by more of a burnishing than actually cutting the steel.
If however it is cutting the steel and there are no scratches in the steel that are visible it may well be you own a nice a fine stone, perhaps comparable to 2,000-3,000 grit, something like a hard Arkansas.
I am working on a blog on files and filing so just finishing up tests to publish.
Thanks Paul. I’m pretty sure it is cutting. I can get a sharp edge to the chisels and the block plane I’ve tried so far.
You are right, Paul, but I think the issue is complicated not just by the need of the marketing industry to sell an ever increasing volume of gadgets, but by the mystique created by the “gurus”, who are, after all, primarily writers, to keep stringing along their stable of groupies.
Hello Paul,
thanks for this post. As I started working wood it was your advice I followed to sharpen my tools. And I’m still doing so.
It is easy to learn and easy to use in the every day shop life.
And after a while of practising sharpening that way I’m glad how my edges come out.
By the way – sharp enough for the ER. But this is another story 😉
I have to admit that the whole issue of sharpening used to make my head spin, all the different guides, stones and paraphernalia available and with all the conflicting advice on micro-bevels and back bevels and techniques from all directions.
After seeing Paul’s videos on preparing chisels and sharpening hand planes it all started to make sense. Simple techniques, and clear advice is all that is required and Paul supplies that every time. It seems to me that people become obsessed with insignificant details on subjects like sharpening, fueled mostly by advertisers and manufacturers, when all it needs is someone like Paul with, solid, real world experience to cut through all that and get to whats really important. Now I have sharp tools that give me good results and most of the sharpening gear I purchased over the years now gathers dust at the bottom of a draw. Sharpening mostly takes a matter of seconds and I have more time to spend actually using the tools.
Thanks Paul for all the good advice.
Paul, you have said that your diamond stones do eventually wear and that you have buy a new coarse stone. At what point do you do this and what do you do with the other stones? Do they just ‘move along’ and what do you do then with the super fine stone? Just throw it away, or something else. I ask because I am finding that although I get a good edge, I am spending longer and longer on the coarse stone to get a burr and want to know when it should be replaced.
I have found the best preservation of stones is to use 120-grit abrasive paper on a roll. The thicker stiff type used for sanders and sold in builders yards. I use this for restoration of bevels and especially when they are way off too steep. Remember we have a hundred chisels used by students and even so we rarely ever use a mechanical grinder for this. This abrasive paper gets them back to shape fast. I simply unroll a stretch and restore the bevel. Then I go through my normal three-plate sequence. I do pass along my plates and upgrade them to finer positions in the cycle and end up giving the then super, super fine stone to someone else for polishing out. So far I have never been able to wear through the EZE-Lap plates to the steel plate, that’s how good they’ve been. I went through to the plate in only a few hours with those diamond pattern surfaces sold by Trend though.
Paul,
I have found if it is difficult to source jewelers rouge or compound for a strop locally that automobile polishing compound also works.
I ran some Marple/Blue handled chisels through wet sandpaper from 220 to 2000 and then stropped with using Meguiars clearcoat safe polishing compound and was stunned at how sharp the blades were. I have been sharpening knives (pocket, kitchen, hunting knives) my whole life and these cheap chisels were the sharpest blade I have ever touched after following your advice.
Thanks for all you sage and sound advice.
Any car polish works well. Sometimes just a bot messier, especially if you use a polishing mop on a buffing machine.
Just wanted to make a comment about sharpening in general. I’m new to woodworking and I’m currently working on dovetail boxes. I have yet to saw and chop gap-free corners in all four corners of the boxes I’ve made. The closest I came was three gap-free corners for 1 box. Sometimes I get frustrated and start to question whether or not woodworking is for me. When this happens I sharpen the saw, chisel, and hand plane I’m using. Of course, the wood instantly becomes smoother to work. My boxes may still have gaps (usually smaller) but the process becomes more fun. So, I guess I’m trying to say that if things aren’t going well for me with a project I’m working on, I know that I can always sharpen and have a better woodworking experience. I’ve learned everything about sharpening from Paul’s sharpening videos. Thanks Paul.
Thanks Anthony, Soon sharpening will become so second nature to your endeavour it will be just like writing your name or saying it. You’ll know exactly the point to sharpen up and you can then tackle the other issues but more than that you will be floating through the work because the process is so beautiful.
I noted the frame that you have your diamond sharpening stones mounted in. Could you please say something about how it was constructed and what keeps the stones in place? I apologize as I know you have done so in a video, but I can’t seem to find it.
Dwight, if ever you need something like this just go to the search box on my blog. That’s all I do nowadays. Put sharpening plates or sharpening stones in and up the info pops. Here is one link but there are others.
I wet my plates with a bit of WD40. This stays wet for a long time, does not clog matters up and can be removed easily with a bit of turpentine.
I started out with that too, but then I found the can over-sprayed onto my work, bench and other things, transferred through my hands to the wood and then cost 5 times the auto glass cleaner that seemed to work better and didn’t smell of WD40 all the time.
Please edit as you deem fit.
All arguments well taken, but…
I think you are a bit harsh on WD40.
http://s812.photobucket.com/user/NAPA121/media/WD40.jpg.html
In my view the difference is that with WD40 only wetting is necessary, where with a water based product, a surplus is necessary for it evaporates faster.
Oil does not make things rust and WD 40 is not blue.
Paul, I wanted to thank you for your advice on sharpening. I just have a two-sided water stone and made a strop myself. After following your advice on YouTube I managed to sharpen my new chisels to a degree I did not think was possible (for a beginner like me). But what truly amazed me is that I was able to pass the “paper-test” and let my chisel cut through paper like warm butter!
I may be too optimistic but after that experience I also wanted to sharpen my plane iron free-hand since I don’t own a honing guide. Do I need to be more careful with this compared to the chisels? I would assume it is less forgiving since it is made to work with the other components of the hand plane.
There is little difference between the plane irons and the chisels. Hopefully you have seen the vids we made to help with this, but just as you dod with the chisels, go for it. And thanks for the encouraging words too. Always appreciated.
I bought an M390 steel alloy knife. I sharpened it on the diamond DMT stones through the various grits. I keep getting a burr to one side of the knife edge or the other. The steel is so hard and tough, the burr is hard to remove by stropping. That’s a good problem to have, right? It means the edge will last longer once I deburr it?