Setting your plane after sharpening
For more information on planes, see our beginner site Common Woodworking.
Question:
Paul –
I really dread having to remove the irons from my hand planes for sharpening as I have so much trouble getting them back in so that they make consistent shaving both in thickness and width (i.e. square). So far it takes me at least 30 minutes (sometimes longer) testing on a scrap of wood them measuring the thickness and looking at the cut across the width.
I have looked at your blog entries and did not find one that answered that question (at least by the titles). So do you have a blog that addresses that? If not can you tell me how to accomplish re-setting the iron for consistent cuts without taking forever (I know there has to be a way or no one would mess with hand planes).
Regards,
Terry
Answer:
In times past tool makers sent planes out just barely assembled and wrapped in wax paper in a box, unsharpened but ground and quite badly finished too. Both Stanley, Record and others lowered the bar to whatever they could get away with, which is as low as it gets. Post-war engineering in tool producing entities came to an all time low certainly UK makers Record and Stanley UK left the door wide open because of their lethargy and diminished standards. New planemakers saw the flawed standards and entered the market with a well set and sharpened plane straight out of the box that, unless the postal service were really in a bad mood, could be applied to the wood and give the pristine shaving people were looking for. Whereas setting the standard was important, it served mostly to prove that the plane was in good working condition when it arrived, but reality hits of course when it needs sharpening. All that really happened was learning to sharpen and reinstall the plane iron and set it well was postponed for a few days. So what is it that’s so intimidating?
First of all, new or old, planes shouldn’t really be feared and the best way to counter any fear is a determination to fully understand what is intimidating you.
I can assume from your letter that you have mastered sharpening and that the plane is fettled for flatness and so on, so it is purely a loading and setting issue and I realise that this is indeed a miserable thing when you try hard and have no one to show you. Let me run through what I do in the day to day of life when I have just sharpened my plane iron and I am ready for reassembly:
1) I make sure that I hone my cutting iron as near to square as possible.
2) I make sure that the bevel of the cutting edge is never more than 30-degrees and certainly not less than 30 at the tip because the latter here makes the edge weaker.
3) I make sure all the moving parts are periodically oiled with 3-in-One or similar light machine oil. Oil ensures easier movement and serves also as a dampener.
4) I make sure the face of the frog is periodically surface-smeared with same. This eases the swivel action when the blade edge is aligned via the lateral adjustment lever.
5) I make sure that the frog aligns level with the fore-edge of the rear aspect of the sole. This is a good position for general work which is almost all work.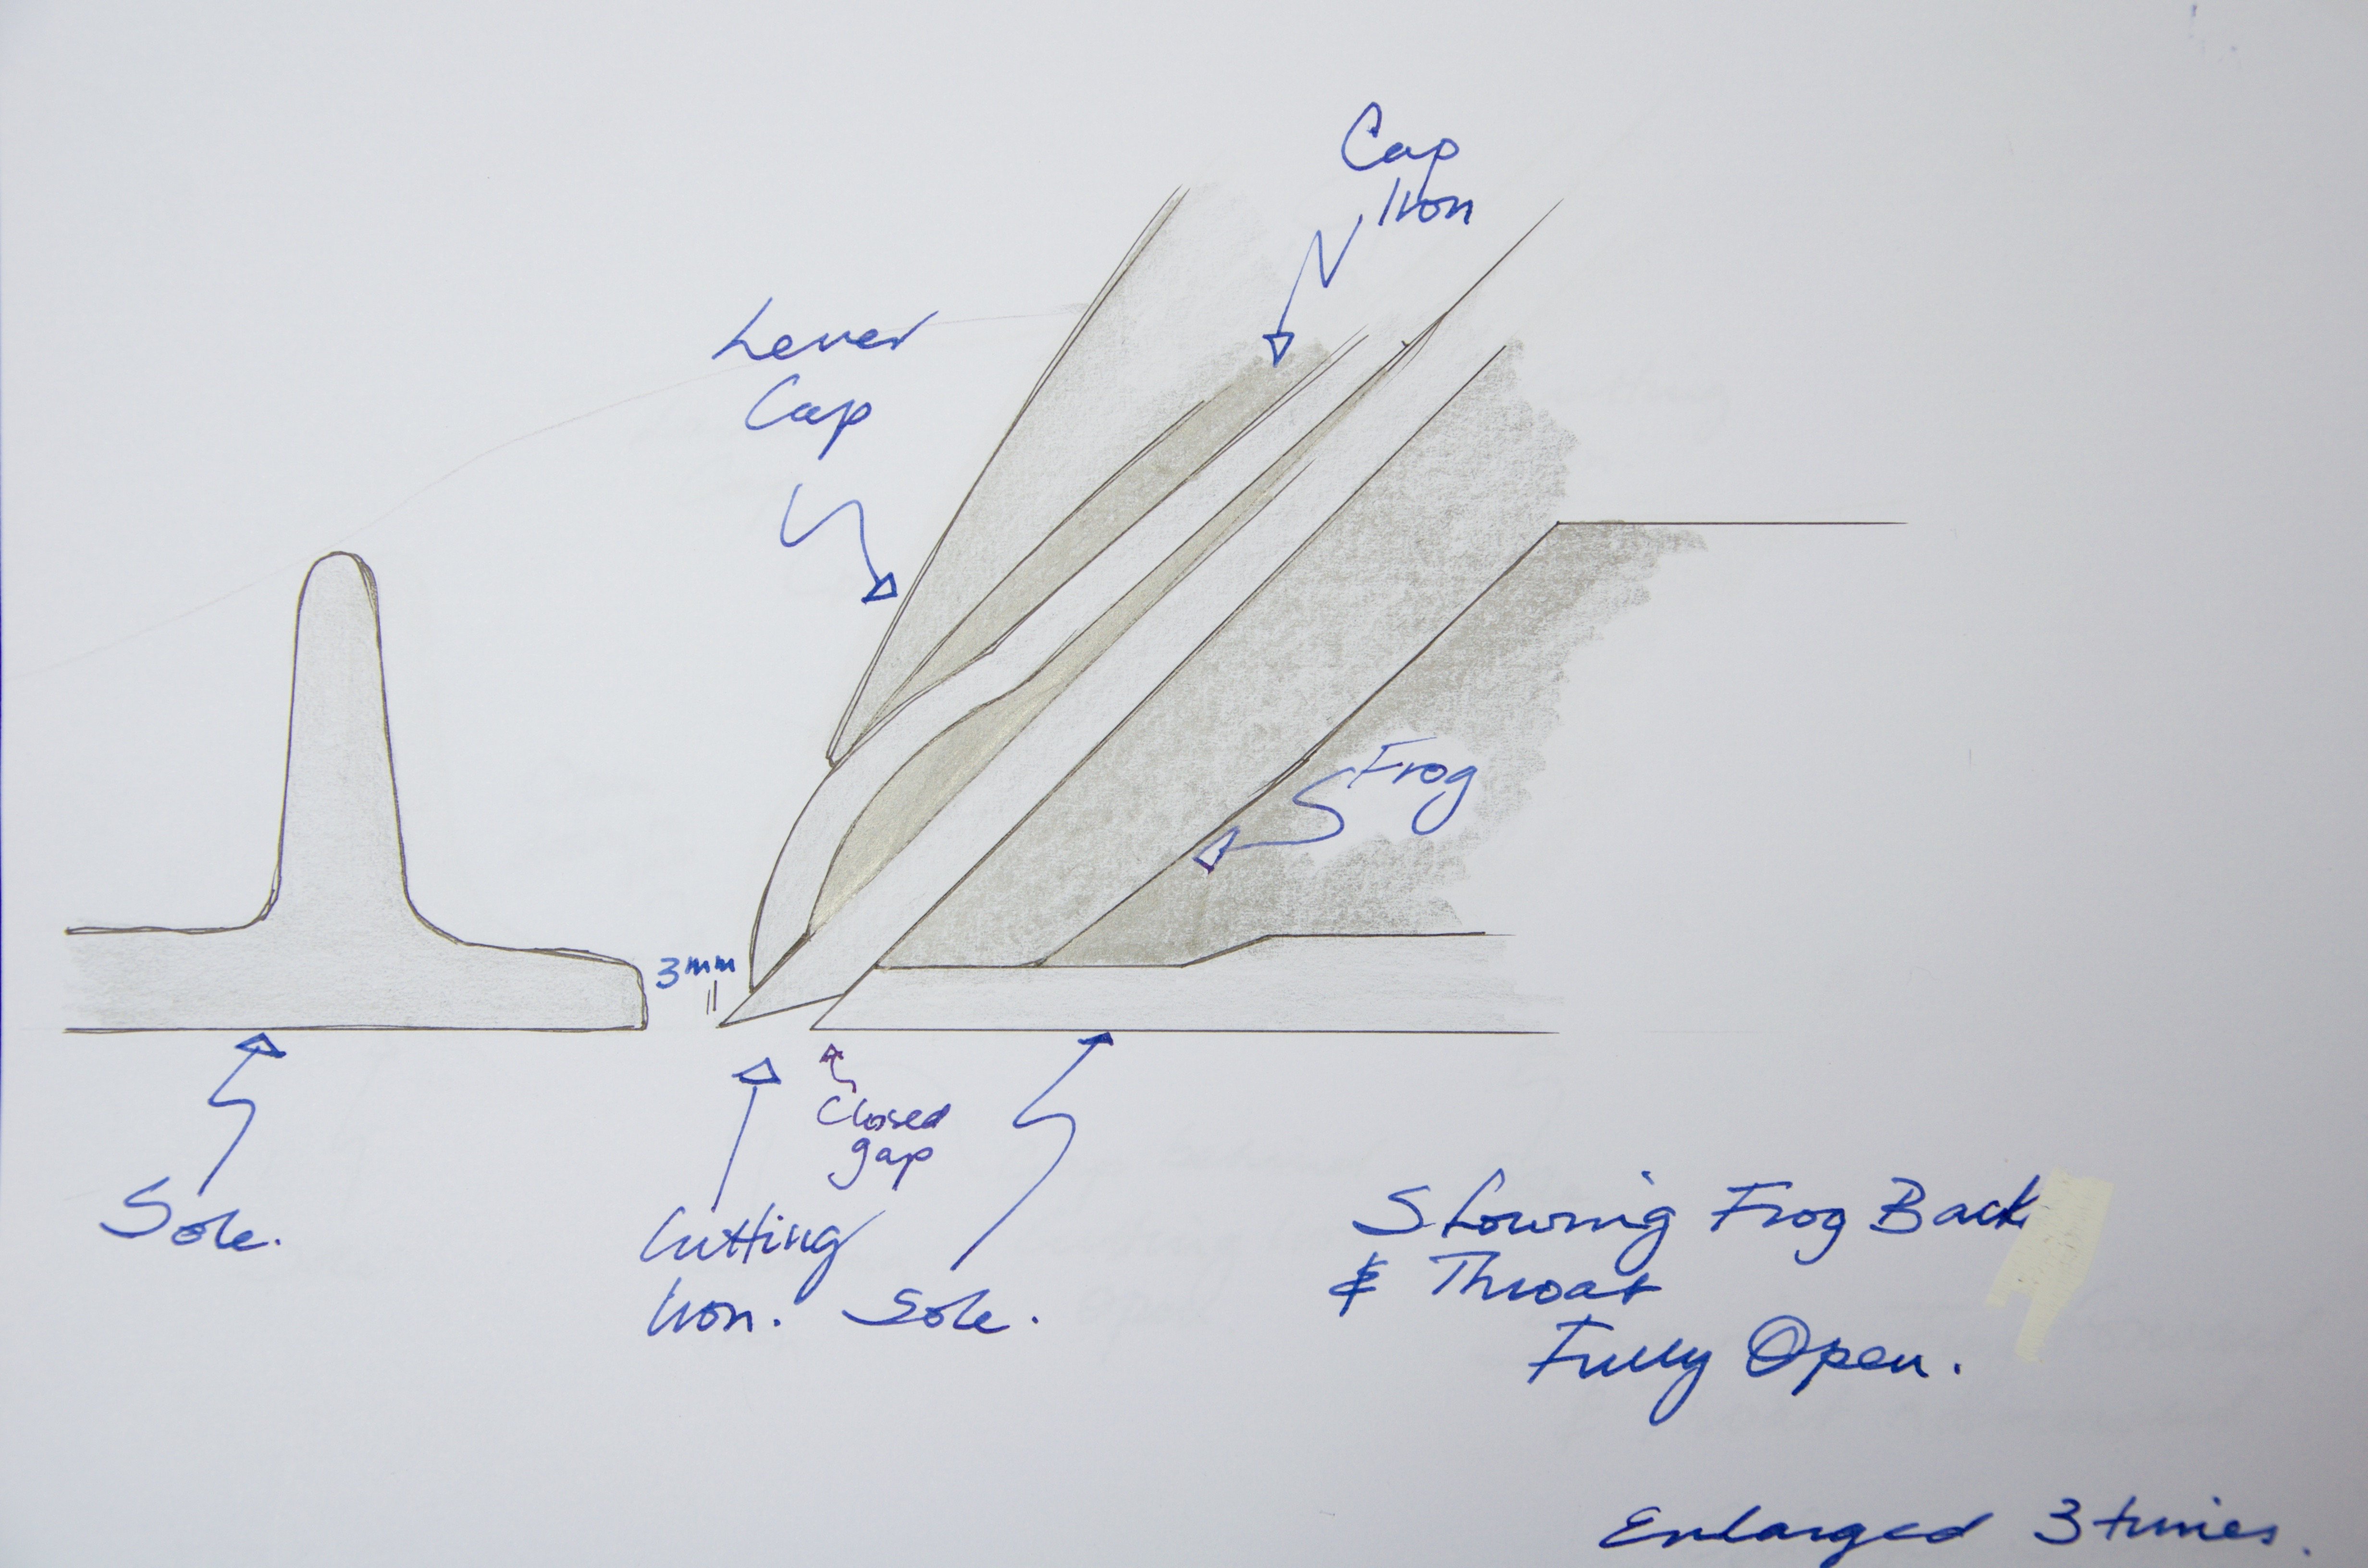
6) I make sure that the cap iron (chip breaker USA) is set about 2mm from the cutting edge. Some say set finer but I have never felt or seen any advantage to this.
7) I cinch the setscrew and lock the cap iron and the cutting iron together. Make sure there is no slippage as the screw tightens the two.
8) Drop the cutting iron assembly onto the frog and move laterally so that it seats onto the rectangular end of the yoke of the depth adjuster and also they lateral adjuster sets in between the long slot in the plane iron.
9) Install the lever cap.
10) Pull the lever from its open position toward lockdown but don’t lockdown. Feel for the pressure. There should be some pressure but not a two handed fist grip to get it down. It should be a fairly solid thumb pressure. More makes it too tight and immoveable and less makes it move around.
11) Back the iron into the plane using the adjustment wheel and winding anticlockwise. Using your finger tips (carefully), feel for the cutting edge very lightly to see if, one, you can feel it, two, how much. If you can’t feel it, that’s fine. If you can, feel for how evenly set it feels. 
12) Place the plane on the edge of a 1/2” piece of straight-grained pine with no wild grain or knots and held tightly in the vise. Push the plane forward moving from one side to the other to see if any shaving comes up. There should be none. If there is, tweak the lateral adjuster toward the side where a shaving came up. This should even out the alignment of the plane iron cutting edge parallel to the sole, but will not set the depth of cut as we want it yet. It’s purely a step towards that at this stage.
13) With no shaving emitted, turn the depth adjuster 1/2 a turn, no more, clockwise and try again moving the plane from side to side each time. Keep turning 1/2 a turn until you see a shaving somewhere in the throat. Once a shaving appears you can start micro-adjusting from here on.
14) When the first hint of a shaving appears, turn the adjuster 1/4 of a turn, take another shaving from the same side and then move the plane from that side of the wood to the other with each stroke to see where the shavings come up from.
15) If one side only, move the lateral adjustment lever towards that side where the shaving is, but only a small amount. Sometimes this small amount is only a millimetre and sometimes its. several millimetres. This swivels the cutting iron assembly on its pivot point and aligns the cutting edge to the sole.
16) Advance the depth of cut by only 1/4 turns until a shaving appears on both sides of the plane throat. Adjust, take a pass and then repeat until the shaving comes.Quarter turns will rarely be too deep on normal work. One eighth turn for finer work.
17) Once you have a shaving both sides, look at the shavings to see how closely even they seem to one another to you. Now take a shaving on one side and then the other and, and this is very important, ‘listen’ for the thickness. That may be the first time you’ve ever heard someone say, “ listen to the thickness”, but I hope every time you set your plane in future you will here me saying, “listen for the thickness.” Listening tells you most accurately how thick the shavings are, and successive strokes between the two sides of the iron will tell you within one thousandth and less how close you are to thickness evenness. It’s as accurate as using a vernier, so forget measuring thicknesses.
18) You must tweak the lateral adjuster to perfect the thickness. Once set, the depth of cut will be maintained and it’s purely a question of now setting to the depth you want.
Reading through this post takes longer than the actual process of doing it. From start to finish, and I just added this to the post following the timing of it, it took me 38 seconds.
Measure the shaving? “measuring the thickness” – with what , and why? I’ve never measured a shaving in my life! Sure, I’ve admired shavings, sometimes, and cursed them on occasion. Only a day ago, I brought one to my wife to show off – an old wooden jointer plane I’d fettled started giving yard and a half shavings off a board I was “unwinding”.
Sorry, I should not be so hard on Terry. There is so MUCH dis-information on the internet about what planes should do etc.. What they should do is to flatten, smooth or reduce the size of wood, and you adjust them to do that, and that only. Measure the wood left behind, to see if the plane is getting the result you are seeking.
Paul, you have the patience of a saint. And thanks for the complete and thorough description. The only thing omitted is that sometimes, just sometimes, you need to take shavings that are thicker one side than the other, in order to correct the slope on the wood you are planing.
Hi Momist
I think I’m correct in saying that Paul doesn’t use adjustment of the lateral adjuster to correct, for example, the ‘square’ of an edge to a face. He simple applies more pressure to the side of the edge needing most wood removing.
John
That’s almost right, but what I do is actually move my plane all the way over to the side needing more off so my plane overhangs that side, take two shavings and then move back to centre for a final stroke. Works every time.
Ah you see it’s little nuggets of information like that that make this blog so awesome!
I didn’t understand why at first, but I think it just clicked that this is like how winding sticks exaggerate the twist in a board, the further edge of the iron is more out of square than close to center. Is that correct?
Almost. If the iron is dead square, you move the body of the plane to line up with the “low” side. As the iron of a bench plane doesn’t reach all the way to the side of the plane body, no shaving will be taken along the low side, so only the high side is being planed / lowered. If you have a slightly cambered iron, set to take its thickest shaving in the centre, you are simply centreing the plane body and the deepest part of the cut where you need to remove the most material. In either case the sole of the plane is supported across the full width of the edge being worked.
i had this problem at the beginning. because i was determined to sharpen freehand on diamonds i eventually realized that the technique i was applying i was gradually sharpening my iron out of square it was minimal at first but gradually increased which in turn gave me great difficulty setting my iron correctly nearly having to maximize the lateral adjuster to get an even thickness .i might add here that its also important to have an accurate square to check same iron. i tweaked my technique a little and still sharpen freehand but now and again i will use a honing guide to maintain square
Good advise and so would I too. Absolutely nothing wrong with that.
“Listen to the thickness”? In all the times I watched Paul sharpen and set up a plane, and that would me MANY times, I’ve never heard this before. I can distinguish planing against the grain, but that’s sound and feel. See, these little tricks of a master show up slowly over time, but only if you’re paying attention. I’ll be trying that out, you bet. Also, Davidos is right about keeping the iron square.
It is very useful to have a blow-by-blow account of something many (most?) of us take for granted – in this case replacing and setting the newly-sharpened plane blade. It is a good check that we are not missing something of value. In my case, though I have never had a problem with this technique, I must admit that it never occurred to me to lightly-oil the surface of the frog, the lateral adjuster and the depth wheel. I’ll watch out for that in future!
I agree with momist, re Paul Sellers’ patience. It must have taken quite a while to write all that out, so, thanks for taking the trouble amidst everything else you do to help the rest of us.
There is only one detail which I (and no doubt many others) might add, to help Terry: Having replaced the blade in the plane, waggled it (or the lateral adjuster) side-to-side to make sure it is settled, and snapped on the lever cap, I then turn the plane upside-down, holding it upright, with its heel resting on the bench, in the case of a long plane, and the the knob in my left hand, so that I can sight down the sole. You will then see the edge of the blade projecting past the sole. (If you can’t, turn the depth adjusting wheel until you can, but in almost every case, the blade will be well out.) I use a white bench cloth, which happens to make this easier. You could always put a sheet of paper under the plane, if that helps. Use the lateral adjuster to level up the edge of the blade with the sole, then use the depth wheel to retract the blade. As it disappears, you should see an effect like the sun setting in the ocean. (Unless your blade is perfectly straight, it will most likely be a little convex – as it should be.) As the ‘sun’ sets, use the lateral adjuster to make sure that it sets in the centre of the sole. This process takes seconds. Writing it out takes far longer.
Then you are in a good position to go on to the super-fine adjustments described in Paul Sellers’ post.
‘Listening for the thickness’ – that’s another new one on me. Thanks for the tip!
Paul, your blogs are always a source of pleasure and not just information, thank you. But, forgive me, as a boy at a grammar school in the early 50s (yes, in those enlightened days it wasn’t just dead languages we were taught!) our woodwork master, a winner, if I’m right, of the 1932 Coop cabinet maker’s prize, always made us ‘sight’ our planes (metal or wood) along the sole towards a light source, with the plane held upside down. We learned that this method could accurately show the trueness of a set blade as well as its cutting depth and it certainly avoids cut fingers testing the blade! Is that way just different or is it really inferior to using fingers?
I sight too, but the reality is that the fingertips can tell a difference in surface level of two thousandths of an inch. I haven’t cut myself in all my 50 years that way and I am surgically sharp. I suppose I could emphasise ‘carefully’ a little more. Thanks for your account and concerns though. I would that we could go back to those days. A man in one of my classes brought in an oak desk he had made in high school with all manner of joints made throughout. Bring back real woodworking in schools and then again what would we do about the sharp chisel in hand these days???
Thank you Paul for taking the time necessary to write all of this down for me. I will definitely give all your steps a try, and with these and practice it should become easier.
I really love using hand planes as it is much quieter and a better way to get just the right fit.
Thank you for all the great help, amnd inspiration you give us all.
I just timed it at the bench and it took me 38 seconds start to finish, so you are on your way.
Paul that is a great write up. I almost follow that exact path. The one thing that I have found to be very important is to listen. I use all of my senses when using tools to the point that I rarely have any noise distractions in my shop. The feeling, the look and the sound of a hand tool at work is an indicator of something being amiss. I don’t know how many times it has saved me from tear out or punching thru the bottom of a mortise with a chisel or other things. This goes for power tools also.
Jim
One thing I noticed in steps 8-10 in Paul’s videos is that he sits the plane on the bench and then tilts the front up. This gives a view down the throat from above-rear making it easy to see that the cutting iron assembly and lever cap are in the centre.
About ‘listening’ – one of the benefits of having your own workshop is the peace & quiet. When I worked in commercial workshops the radio was ALWAYS on, blasting out somebody else’s taste in music and the banal, childish witterings of the DJs
Two ideas to consider:
1. Before reassembling the cap iron and iron, give both surfaces of each a wipe across your oil rag / tomato can. It takes but a second, and if the plane ends up sitting it helps prevent rust.
2. When inserting the blade, lift the heel relative to the toe enough that the blade slides downhill to the throat. It is tempting to drop the heel so that you can see better, but the result can be having the blade slide back out. This happened to me once, leading to a badly cut palm when the blade fell out and bounced off the bench. This may be more of an issue with wooden planes, but I do it for metal planes too. If you _do_ drop the blade, step out of the way, let it fall, stay clear.
Terry- I don’t think it was a silly question in the least. You’re just being attentive and sorting out what relates to what as you learn. It will get faster. If “measuring the thickness” is meant literally, i.e., with a caliper, I’d stop doing that at this point.
“If you _do_ drop the blade, step out of the way, let it fall, stay clear.”
This is good advice for any sharp tool – plane blade, chisel, gouge, whatever. If it starts going, I put my hands up and step back. Better to have to regrind a busted edge than get stitches.
Thanks for sharing. These are good tips to to keep handy in the workshop. I don’t plane very often so it’s nice to have a refresher handy.
Just found your blog Paul and it is a treasure trove of good useful information. Thanks for the tips on sharpening plane blades, it helps my immediate need but now that I found your blog and YouTube Channel, I will definetly come back here for more projects and tips!
ED, I UNDERSTAND OIL RAG, BUT TOMATO CAN?? WHAT IS THAT (BESIDES FOR COOKING)?
You roll up the rag and cram it into the tomato can (or similar) with the rag’s ‘end-grain’ (!) uppermost. The can holds the oily rag so that it is convenient to pick up and rub over the surface of the plane. The small tomato can (or similar) is just a convenient holder for the rag.
Yeah works great. I use the cap off a spray can. Less chance of metal to metal contact and I keep it face down on an up turned jar lid to prevent dust build up and I believe it helps keep the oil on the surface of the rag rather than letting gravity help it seep deeper into the tin/cap. The tomato tin trick is one of the best tips I’ve learned from Paul.
How do I get my plane all the way inside the plane base? I have the frog all the back and still when I back the plane iron back it is still protruding about an 1/8″.
You have something wrong because when the cap iron is set 1-2mm from the cutting edge, loading it would make it impossible to protrude 1/8″. Is it possible you have the blade the wrong way around?
I bought a crappola Sylver…. #4 plane.
I have had to grind 2 mm off the cap iron to correct this.
Otherwise, fettling the plane as you recommend, makes it work.
It is a pity all those Sylver… tools needs extra engineering. Don’t buy them.
Sylvain
I didn’t find this info elsewhere, so please forgive me if I’m duplicating efforts.
I found a Craftsman smoothing plane (originally purchased 1956!) at a flea market recently and worked on sharpening it today. I think I have the blade essentially square, but the cap iron is not. Will it be a big deal to have it offset to square it to the blade where the two meet? I noticed this decreased the size of the opening for the lateral adjuster by 2-3 mm.
No, but you can also file it square if you like. Either file the sides square to the leading edge or the leading edge to the sides. Depends on which you think is out. You could start with a centreline down the length of the cap iron and then work 90-degrees from that or just square the cap iron leading edge to one of the sides. Either way will work but if it was made out of square you could correct it using the centreline as your reference line.