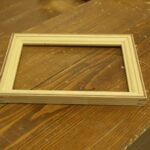
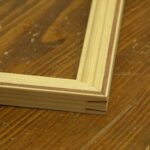
Following up from the video film on the strength of these mitres. These are the steps I took to make this picture-frame moulded and inlaid stock and the frame itself. It’s dead straight forward using a pair of wooden T&G planes, a moulding plane, a tenon saw and a plane. You can make a simple shooting board with stop screwed to a board at 45-degrees or a proper one with removable stops. I took about 45 minutes to make it.
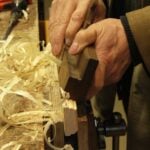
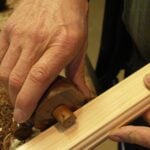
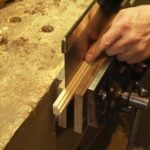
Mould the stock with the moulding plane. I am using to edges of a shorter piece but you could use a single edge if need be. I am using a 3/8” ovolo profile here; it’s simple and quick to work on the stock. Always start at the nose and work backwards along the stock. I am using 7/8” thick pine, but many other woods will work as well such as walnut, mahogany or cherry.
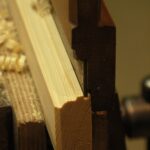
Now run the groove with the grooving plane aspect of the matched pair of T&G planes. Again we always start at the beginning end and work backwards along the stock with each subsequent swipe of the plane. This helps set the plane and the wall of the cut helps keep the plane in line and parallel to the edge of the wood.
Use a contrasting wood such as walnut or mahogany to run the tongue on.
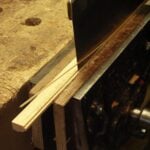
Cut along the corner of the tongue to remove the tongue wit a tenon saw, which becomes the inlay.
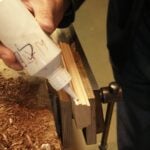
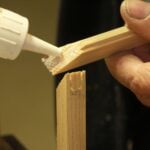
Glue the inlay into the groove by running a bead of glue along each wall of the groove.
Insert the inlay and press firmly to the bottom. Set aside to dry.
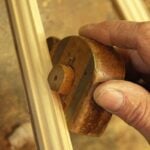
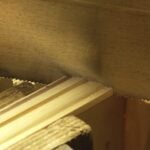
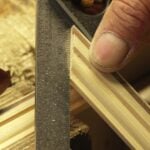
Plane the inlay down to the level of the main wood.
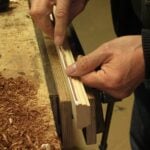
Use a marking gauge set to 5/8” and run a guideline alongthe edge of the stock.
Rip down the stock and surface plane smooth.
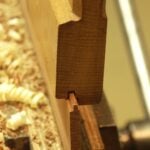
Use a marking gauge set to 1/8” and run a guideline along the inside edges of the stock.
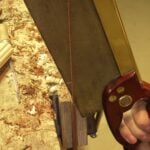
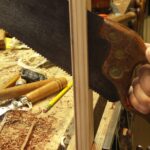
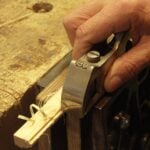
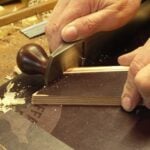
Secure in the vise and run the tenon saw along the gauge lines starting at the nose and working backwards with each deepening cut to remove the corner.
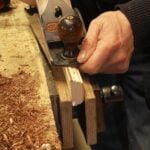
Use a bullnose plane to clean up the saw cuts if you have one.
Making the mitres
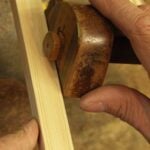
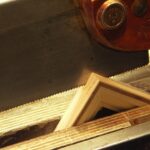
Cut 45-degree mitres BY EYE. You will get to a point where you can cut within 1 degree every time.
Use a shooting board, trim the saw cut smooth and pair each opposite for exact length.
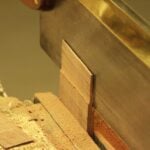
Secure each matched pair in the vise as shown, mark them as pairs for later ID, and cut the corresponding angled cuts down into both mitred pieces to a depth of about ½” from the corner. It’s important to mark them accordingly as I said, so that when you put them together the joints match the same saw cuts.
With all of the dovetailed saw kerfs completed, cut some spline material.
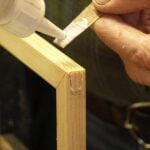
Place the first mitred pair into the vise and glued up.
Glue a section of spline and insert into the kerfs, tap down with a small hammer if needed.
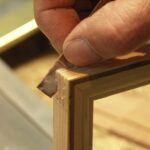
Trim with the tenon saw and plane flush.
Repeat to each corner. The last two can be the hardest depending on your vise type.
10 Comments
Thank you for the very straight-forward method of cutting a splined mitre joint. It certainly is stronger than it appears.
I must confess that I don’t make small picture frames, but I do occasionally make larger mirror frames and the like where I use a mitred mortise & tenon.
I noticed that you apply glue to the short grain on the face of the cut mitres; can you tell me please what glue you use? Is it effective on short grain or do you rely on the side grain contact of the spline and the host material?
All best wishes
Howard In Ceredigion.
I use this spine method for larger frames too, including mirror frames. They hold well and will hold about fifty pounds in actual weight without breaking.
I used a glue you can buy in the UK from Screwfix called No Nonsense PVA. About £6 per gallon. Dries to clear or pearlish finish.
Hi Paul,
You’ve mentioned tongue and groove planes in several discussions can you advise on particular examples to look for?
I see the Stanley # 48 & #49 on ebay quite often, here in the states. Will thes work as well as the matched pair wood body planes?
Once again, thank you for all the knowledge that you are passing on to the rest of us.
John aka pinkie
P.S. I picked up the Stanly 10-949 to use as a marking knife and it works very well. Also I’m awaiting a Disston # 4 for dovetail use.
Both of these planes work well if you can’t find matched pairs of T&G planes. I have used them but never owned one. Perhaps one day. The 48 and 49 give the same end result but don;t feel as good in use as the wooden counterparts. I believe the best thing for any of us is to know what we are looking for, wait for the right product or the right price and buy as we can afford.
Thanks Paul.
I’ll keep watching the listings to see if a matched pair becomes available.
As an aside, I meeant a Stanley 10-049… my proofreading leaves much to be desired.
Take care!
You can also buy matched pairs from specialist dealers. They may cost £30-40 pair but even that’s worth it of you get a good pair and of course you use them.
Using a matched pair won’t be an issue… now that I’ve seen just how versatile these can be.
Your use of the T&G strips for inlay has my imagination going in new directions, boxes, furniture, and picture frames… too much fun.
Paul- Not sure where to post/ask this: How do you do crown molding by hand? I need to apply some to the top of a pantry, but crown is also needed in some furniture and case work, no? For simple 45 degree miters and bevels, you’ve shown shooting boards and donkey ears, but crown molding is both mitered and beveled (and not at a simple 45) so neither seems to apply. I can’t imagine being dead on or smooth enough right from the saw so it seems a plane is needed. My best guess is to put the crown “upside down backwards” at it’s correct spring angle in a miter box to cut it and then somehow do something similar to hold it for planing.
Resting the mould in the mitre box works fine when you have two flats to the mould that guide you and of course you can put a 45-degree fillet in the mitre box to guarantee non slippage mid cut, but that’s not usually necessary. A sharp plane makes all the difference to crown moulds and, yes, you should be able to get the mitre straight from the mitre box if you make your own mitre box and that should mean the saw cut is good enough to put the two parts of the mitre together without having to plane it. That said, there is no reason not to lay the mitred piece in the vise with low pressure or on the bench top and whisk of a couple of shavings with a shallow plane setting.
Internal intersecting is always coped of course, and this too comes straight off the saw cut too..
Wow and double wow Paul. I ask myself how on earth did I miss this one.
You using wooden moulding planes….dead chuffed to find this repeated post
After all the times I have asked you to show wooden moulders.
This post will be saved and looked at bit later
Big thank you John 2v
Comments are closed.
Privacy Notice
You must enter certain information to submit the form on this page. We take the handling of personal information seriously and appreciate your trust in us. Our Privacy Policy sets out important information about us and how we use and protect your personal data and it also explains your legal rights in respect of it. Please click here to read it before you provide any information on this form.
Thank you for the very straight-forward method of cutting a splined mitre joint. It certainly is stronger than it appears.
I must confess that I don’t make small picture frames, but I do occasionally make larger mirror frames and the like where I use a mitred mortise & tenon.
I noticed that you apply glue to the short grain on the face of the cut mitres; can you tell me please what glue you use? Is it effective on short grain or do you rely on the side grain contact of the spline and the host material?
All best wishes
Howard In Ceredigion.
I use this spine method for larger frames too, including mirror frames. They hold well and will hold about fifty pounds in actual weight without breaking.
I used a glue you can buy in the UK from Screwfix called No Nonsense PVA. About £6 per gallon. Dries to clear or pearlish finish.
Hi Paul,
You’ve mentioned tongue and groove planes in several discussions can you advise on particular examples to look for?
I see the Stanley # 48 & #49 on ebay quite often, here in the states. Will thes work as well as the matched pair wood body planes?
Once again, thank you for all the knowledge that you are passing on to the rest of us.
John aka pinkie
P.S. I picked up the Stanly 10-949 to use as a marking knife and it works very well. Also I’m awaiting a Disston # 4 for dovetail use.
Both of these planes work well if you can’t find matched pairs of T&G planes. I have used them but never owned one. Perhaps one day. The 48 and 49 give the same end result but don;t feel as good in use as the wooden counterparts. I believe the best thing for any of us is to know what we are looking for, wait for the right product or the right price and buy as we can afford.
Thanks Paul.
I’ll keep watching the listings to see if a matched pair becomes available.
As an aside, I meeant a Stanley 10-049… my proofreading leaves much to be desired.
Take care!
You can also buy matched pairs from specialist dealers. They may cost £30-40 pair but even that’s worth it of you get a good pair and of course you use them.
Using a matched pair won’t be an issue… now that I’ve seen just how versatile these can be.
Your use of the T&G strips for inlay has my imagination going in new directions, boxes, furniture, and picture frames… too much fun.
Paul- Not sure where to post/ask this: How do you do crown molding by hand? I need to apply some to the top of a pantry, but crown is also needed in some furniture and case work, no? For simple 45 degree miters and bevels, you’ve shown shooting boards and donkey ears, but crown molding is both mitered and beveled (and not at a simple 45) so neither seems to apply. I can’t imagine being dead on or smooth enough right from the saw so it seems a plane is needed. My best guess is to put the crown “upside down backwards” at it’s correct spring angle in a miter box to cut it and then somehow do something similar to hold it for planing.
Resting the mould in the mitre box works fine when you have two flats to the mould that guide you and of course you can put a 45-degree fillet in the mitre box to guarantee non slippage mid cut, but that’s not usually necessary. A sharp plane makes all the difference to crown moulds and, yes, you should be able to get the mitre straight from the mitre box if you make your own mitre box and that should mean the saw cut is good enough to put the two parts of the mitre together without having to plane it. That said, there is no reason not to lay the mitred piece in the vise with low pressure or on the bench top and whisk of a couple of shavings with a shallow plane setting.
Internal intersecting is always coped of course, and this too comes straight off the saw cut too..
Wow and double wow Paul. I ask myself how on earth did I miss this one.
You using wooden moulding planes….dead chuffed to find this repeated post
After all the times I have asked you to show wooden moulders.
This post will be saved and looked at bit later
Big thank you John 2v