Plane soles should be mostly flat
Here is a post I did recently and now want to show you how to do it through a short video. This is not the same plane shown below but it is all the same procedure I use for smoothing planes:
Something I have wanted to post on for a while. Next week I will be using a Stanley #4 at the Springfield New Jersey Show and the Fredericksburg Virginia Show Masterclasses I will be teaching for The Woodworking Shows show. It’s an eBay find for £8 – $12. This plane is and always was an amazing tool in and of itself with no retrofits of metal components at all.
Prepping your plane
Here is my technique for prepping a number four and other Bailey-pattern planes you may own. I hope that this knocks your socks off. No body’s done it before so watch carefully.
First off, how many of you know that you can easily bend most metal-cast planes by merely flexing the handles? This then changes the shape of the sole and many craftsmen I grew up with did this all the time when they were jointing the edges of boards. None of the planes were straight just as many new models made with heavy castings may not remain flat even though factory tested before being shipped. Truth is steel changes according to exchanges of heat and exposure to extreme temperatures is when the greatest change takes shape. Pun intended.
What we aim for is a general goal of flatness and then we work with our planes at a personal and relational level. That’s why it is a rare occurrence to pick up someone else’s plane and feel comfortable with it straight off. Now all of that should help you understand your own plane and the need to develop a thorough and insightful relationship directly through working it.
Following are the steps guaranteed to flatten the sole based on the fact that soles flex with even hand pressure. That is why, when Clifton flattens the soles of their planes they never apply more than 12 pounds of pressure to any part of the plane.
Flattening the sole needs to be done from time to time because they wear in different parts of the sole depending on use and user. This must be
Testing your plane for flex
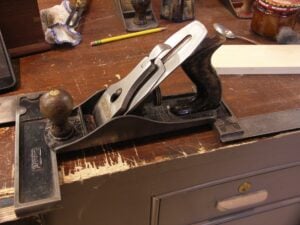
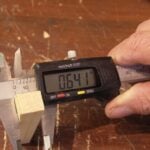
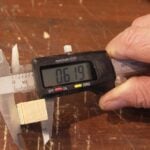
If you want to test your planes flex, here is simple enough test I put together simply to show that they do. Suspend the extreme ends of the plane on two hard, non-compressing surfaces. Here, I am using two steel-stocked squares.
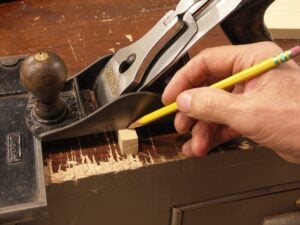
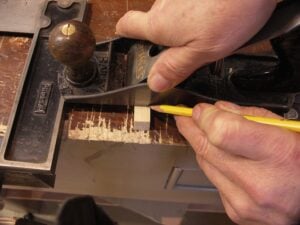
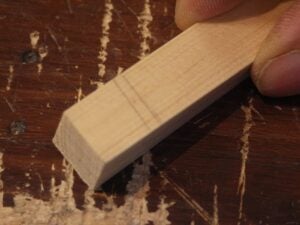
Cut a wedge that tapers shallowly and is wide enough to engage the under edge of the plane as shown. With no pressure, slide the wedge under the plane until you feel engagement and with a sharp pencil make a mark.
Actual flattening or lapping
The plane must be fully loaded with the cutting iron assembly and under the same general pressure you use in daily use. This varies from craftsman to craftsman so there is no torque-wrench test to govern you.
If necessary, clean off the surface of the sole using abrasive paper on a flat plate of thick, float glass or a dead flat tile. Here, I am using 120-grit paper, which is enough for flattening. I also use my diamond plates for this and they work well too as long as they are truly flat.
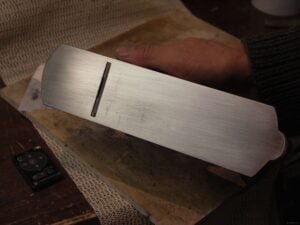
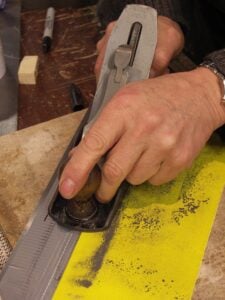
Mark the sole across its width and intermittently along the length with a sharpie and return to the abrasive.
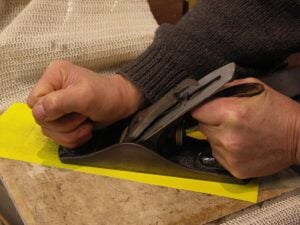
Instead of gripping the fore-knob and the rear tote in a bulldog grip like this…
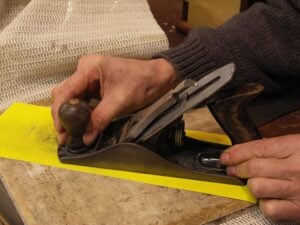
…hold it firmly at the fore part and rear of the sole. You can use the handles, but this must be done sensitively as the extra leverage from the extended handles will readily flex the sole. I learned this years ago when after flattening soles they all somehow seemed to be slightly hollow after checking with a straightedge.
Continue until the lines become so feint you can scarcely see them over the whole width.
Feathering the sole edges
Now if you read my earlier post you will know that older planes and new planes work best if the perimeter edge is well worn so that it feathers in to the flat face of the sole. This allows smooth transition over the surfaces of boards being trued and also where two or more adjacent surfaces intersect. The rim of a box or a framed door are good examples.
Here is the new step that gives the Paul Sellers’ ‘glide-slide’ you want in a plane sole.
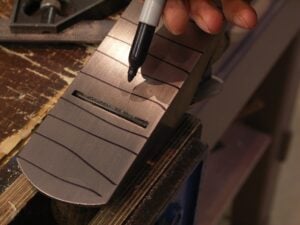
Having flattened the sole as directed, tape a steel rule to the surface of the plate so that the plane’s sole glides on the duck tape and the plane sole is slightly angled into the abrasive paper. Keep the sole corner parallel to the ruler and simply move back and forth about twenty or so times. It’s also handy to remark the sole with the sharpie just to make certain you are working evenly.
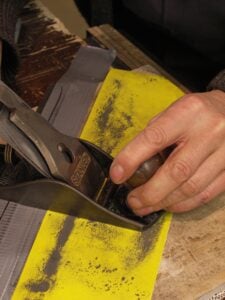
Do the same to the fore end of the sole; Following the arc.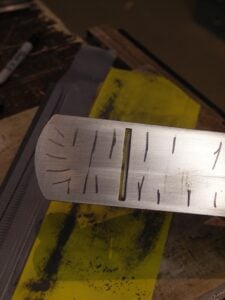
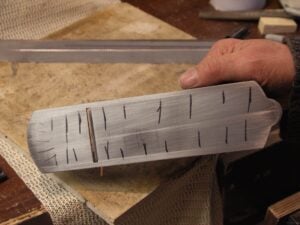
See now how the edges are gently chamfered uniformly.
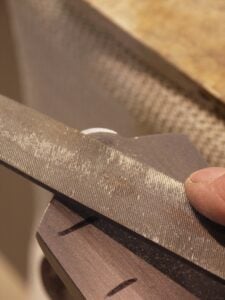
File off the heel of the plane if this has not been done previously. This heel is notorious for damaging the corner edges of work on the reverse stroke of the plane in use. Sand off any unevenness from the file.
If you want to you can use finer grit of #240 to give an overall smoother finish, but this doesn’t add anything to the sole’s flatness.
I use furniture wax after abrading. When the surface is newly opened by abrasion it is highly prone to rusting.
hello Paul
Enjoyed your video on plane sole flattening I never thought of chamfering the edges makes sense to me I recently contacted a man on youtube called woodsman that was flattening a plane sole that did not install the blade and lever cap so I emailed him to try and give him some friendly advice and told him that he should keep the blade cap iron and lever cap in the plane to allow for stress in the plane as you have also mentioned but he won’t have it and in another video installing a blade he calls a lever cap the frog but that might just be a slip of the tong I also told him it’s a good idea to turn the plane round front to back every 20 or 30 strokes as one arm tends to put more pressure on one end than the other in the end I gave up trying to get through to him.Anyway it’s nice to see there are people like yourself who know what they are talking about. Very Good Tony.
What people don’t like is when I say that that’s what should be done to new, high-end planes like Clifton, Veritas and Lie Nielsen planes. In my experiments I did this to their planes too and it totally transforms and improves every one of them to perform much better.
Sorry, but i’m totally new to furniture woodworking, as i’ve only done constuction type work – like building my own house.
I often hear the term “use a dead flat surface”, but what does “dead flat” mean? Is it within 1/100 of a mm? What are the tolerances here?
I don’t own a engineers straight edge, and the ones i have seen are only accurate to within 5/100 of a mm over the length. 5/100 is a big enough gap that daylight is visible under it. But should that even be necessary?
I love your “real woodworking” idea, and down to earth philosophy, which gives me hope and releaves stress, since i can’t afford to buy £1000 tools, but still want to produce things i can be proud of, and pass on to people who will appreciate them for years.
In a blog post, you mention using a granit tile from a home center. If i put that on a wooden surface, by bressing in the middle of that tile i can deflect it by 5/100 of a mm quite easely. So i found some 30 and 40 mm granit kitchen counter top off cuts. But when these get longer than 60 cm’s, they deflect as well when downward pressure is applied. Glass is even worse.
And how would I even check them for straightness without a precision straight edge?
When using 120 grit paper to lap the sole, the first sign of scratches in the black marker, would mean your within 5/100 mm (i’ve checked that with feeler gauges). Not when the marks are uniformally faint. When all the marks are uniformally faint it means that you have succesfully made the sole conform to the surface you lapped it on and with exactly the pressure you used. But is that necessarily flat?
I’m not correcting you here. But i live in “the sticks”, and have no one to show me the skills, and i can’t attend your classes, since i live i Sweden, so i’m asking, because i need the advise – not to be a “smart ass”.
I wan’t to tune my tools, so i know that the mistakes i make are due to lack of practise – not because my tools are poorly set up. (I had that before with a table saw, with significant run out on the arbor for instance).
Sorry for my english skills – it is not my first language.
Best wishes
Peter
Hello Peter,
I think that we do take dead flat to enth degree. What matters is that it as near as you can get it to the fraction of the millimetre that’s as small as you can get it. When the tile is supported on a wooden surface that is flat you will not have a problem. Dead flat is flatter than hollow and round. there is no definitve dead flat as far as we are concerned so go to as near as you can by taking astraightedge to the plate you are going to use and take that as near enough. I have a proven granite block I bought for about $40. It’s ideal, but for a new person spending more than they can afford, a tile or piece of plate glass will work.
Thanks Paul.
What an incredibly helpfull person you are. You are an inspiration.
The only Granite lapping stone i have seen, was on axminster.co.uk, and it was £110, and weighed 80 kg. So even if i wanted it, the shipping would be around £200 :).
I will give my 40mm thick granite kitchen counter cut off a go.
I don’t have a truly flat surface to work on, since my skills with the no. 4 aren’t up to it yet, so my first order of the day is to get my newly purchased record no. 7 up and running.
It may be slower and more work, but i my mind, a longer plane sole eliminates some of the requirements for “feel” and intuition, of which i have next to none so far :).
Once again thanks – i’m a great fan of yours.
Here is one from Tilgear for £39. Well worth the investment.
http://www.tilgear.info/diatec/dia0912gp–diatec-granite-surface-plate-dimensions-9in-x-12in-x-2in-
Looks great. But I live in Sweden, and the site states: “We ship overseas to educational establishments (such as schools and colleges), but not private addresses.”… I am just a private person, with a private adress :)…
Thank you for the tip anyway – could have been cool!
Try a monumental stone mason. They often have broken slabs of granite to give away. These are the guys that make grave stones.
Can you please tell me if you find that size of surface plate large enough for flattening the soles of longer planes? By the way, I have only just discovered the wealth of information you are providing to everyone and I don’t mind admitting I am looking at my machinery and power tools with a little less interest. I have just followed your advice on a couple of Stanley No. 4 planes and although I lack a granite plate, I have managed to utterly transform what were rough tools into things that I now love to use, so thank you!
Regards,
Michael
You could use a larger flat surface, the bed of a jointer would be good, or maybe a table saw.
Thanks Kris but unfortunately none of my machine surfaces would be particularly flat; certainly not enough to work the sole of a plane. I was just wondering if the granite plate Paul uses at 12″x9″ would be too small to flatten anything larger than a No. 4 plane.
You can do 5s and 5 1/2s well on this size too, Michael.
Thank you very much for that Paul. I have a mid 50s Record No. 5 that I have been trying to flatten using a Veritas glass plate but have been rather disappointed at my lack of success. The plate is relatively thin such that I imagine it can flex somewhat. None of my planes have come off it sufficiently flat so I used the blade from my Starrett square to check. Unfortunately it is rocking here and there so I am going to leave well enough alone until I get a granite plate.
As a very recent newcomer to your world of woodworking videos, methods etc I want to say that I have genuinely learned a lot. It is important that the old ways are not lost and for my own part, there is simply something deeper that results from working wood the way it has been done for centuries. A sharp chisel and plane make comforting, satisfying sounds that no machine will ever replicate.
Best regards,
Michael
I just bought an old Bailey plane off Ebay and this is very helpful.
How do you hold the sandpaper down to the granite tile?
Thanks
The best way is spray mount adhesive. Just a light misting does it.
Hey Paul!
Do you think the thickness of the sole of the rear push
Tote impacts the performance of the plane’s sole once you feather
it? Ie. Could it adversely affect wanting to round and follow the ch-
fered sole or rock?
Hello Paul,
I bought a no. 4 plane on eBay that had sat in its box–unused for decades. I have worked on it for days and it is now nearly flat. I think this is a right of passage moment. It bears to repeat what you’ve been saying, that sticking to a proper method will inevitably result in a flat surface. All this work has made me feel ownership of this tool. I’ll take care of it and will dedicate myself to the mastery of it. I don’t think that if I had gone to buy a fancy high-end plane that I would feel the commitment I now have. A few days ago I wasn’t sure I would ever tackle my no. 5 and no. 7 planes. It’s just a matter of time.
I already had a granite surface plate and some mylar sheet material. I bought some silicon carbide powder from a supplier who sells to telescope makers who grind their own mirrors.
I bought 4 oz. of 120 grit for less than $2.00. A tiny bit applied to the mylar (which is held on to the granite surface with spray adhesive) works very well. Use honing oil.
Thank you for your encouragement.
Yours,
Richard Groomer
Seattle
Hello Mr. Sellers,
Appreciate if you can share any tips on flattening a convex sole? I have a bellied #5 stanley.
I have tried to flatten it when i got it but it seemed like it was an impossible to get the high spots removed and the sole was never really flat. I have tried all the advise I can find over the internet, except for scraping and machining.
The areas just before the mouth, behind the mouth up to approximately just before the tote is quite flat though and I have been using it for rough works and it works fine.
But of course every little now and then i look and the sole and wonder how to get it right.
Thanks/Luke
I use 120-grit abrasive paper from a long roll and in most cases three feet of it will flatten any plane sole to acceptable levels. I use a certified granite surface but any flat surface of wood, MDF, glass, concrete, steel will work as long as the surface doesn’t flex. Granites best but not convenient for most. OK. Are you gripping the plane hard with clenched fists by the handles? The wrong answer will be yes and that’s what most people will answer. I say wrong because most people are gripping the plane and bulldogging the sole down on the surface of the abrasive and this flexes the sole that can be hollow or bellied depending on which way you apply the pressures on the handles. Just apply the pressures at the fore and aft end of the plane, keep it steady and rub forwards and backwards with even pressure. Use no water, just change the paper as often as the grit seems to be unproductive. Without water you can apply markers and see where the marker wears off. Remember that production plane makers, Clifton of Sheffield, known to make some of the finest planes in the world of that type, never apply more than 10lbs pressure on any point on the sole during final abrading of soles. That’s not much.
Got it. Feather touch then. I might have bulldogged the handles and i think it might be wise to revisit my surface again.
Thanks.
Hi Paul:
First, thanks much for your instructions, I am a beginner woodworker and really enjoy. I just started restoring my dad’s old plane (Stanley #4) that I didn’t even know he had. Alot of surface rust, and some pitting on the iron. Regarding flattening the sole, I see that you recommend flattening with the frog and iron installed. Does this really affect the main casting? It seems that it would be easier to apply downward pressure without the frog assembly and the handles attached. I am trying to understand how tightening down 2 small screws (on the frog) can affect a heavy casting. Also, not having the tote and handle installed would prevent me from applying lateral pressure, which as you note can distort the sole.
Thanks for any insight into this, and thanks again for all of the great info.
Paul M
It’s the lever cam on the lever cap that changes the shape of the plane body and thereby the sole.
Mr Sellers:
Thanks for the quick response, I would have suspected the lever cap even less. The iron assembly has to be loose enough to slide, yet it applies enough force to warp the casting? The engineer in me will probably try to test this.
By the way, I had watched your video on the large workbench build, and though I don’t yet have the skills (or space) for such a bench, I picked up alot of simple tips and tricks that I can use right away. Fascinating video.
Thanks again for your response.
Paul M
Hi Paul
I have a stanley #5 that is not flat on the last 1-2in of the heel, it is off by less than 1/32, what I would like to know is it possible to flatten this much off with 120 grit paper? How long do you think it would take me? If flatting is possible and I would take off 1/32 of steel would this affect the overall performance of the plane? would it stay flat during operation?
Hopefully you can help
Thank you
I wouldn’t do it if the rest of the sole is flat. I’d just use it as is because ot will not make any difference to the planes functionality.
Really? even though I will be using this no. 5 to square and flatten boards?
Paul another question In your opinion do I need a no. 6 fore plane or will the 5 do the trick?
thanks
No, not really, a 5 will do it. If I were going for an additional plane after a #5 I would go for the #5 1/2. I think that a 6 is nice to have though.
Hi Paul,
I just received a new Lie Nielsen 5 1/2 jack plane. When I unboxed it, I tested the sole with a straight edge and was surprised to see light along most of the lenght of the straight edge. I attempted to slip a .004 feeler gauge under the straight edge, but it didn’t quiet make it. The high spots are at either end, so lapping it should be easy. I’m reluctant to do this with such a fine plane however. I have had very good results with several Stanley’s I’ve flattened, but I assume the Stanley’s are made of softer steel.
Would you recommend sending it back for this small of a defect. I would add, I like to use my jack as an edge jointer for boards under 20-24inches.
Thank you, your videos have helped an inspired very much.
Ben
This question has already been answered, see comment from February 6th, 2013.
What boggles my mind is how quick people are to dismiss experienced master craftsman. Its just plain disrespectful in my opinion. Your work obviously speaks for itself.
Hello, Mr Sellers. Is there any difference when preparing a box plane? Thanks Ian
Thanks Paul this is most helpful. I tried flattening a 4.1/2 with some 10mm glass and then learnt to my time costs the difference between float and toughened glass. The toughened glass I have is bowed from the manufacturing process, no real harm done, it’s taken the worst out so now off to pick up some granite. I’ve left the frog in but have not yet left the irons and cap on because of honing the iron first, but I can get round that by putting an older iron on. Had no idea that cast could flex like other steels, even after all these years I still have thing to learn.
Paul,
A huge thanks to you for all of your shared wisdom. It is hard to say how many years you have saved me in getting up to speed with hand tools. It is a truly knowledgeable person that is able to explain things and have them understood in the way you do.
On your advice I got a Stanley #4 plane form a reputable local tool dealer. Today I started working on restoring it. I flattened the sole on the glass top of the Lee Valley Stone Pond with loose grit and a PSA backed sheet. Everything came out great except the first 1/4 inch or so of the heel and toe of the plane. They are about a 1/32nd or so tapered off. I know you recommend doing this in some part to the plane as part of getting it into working order but is this too much? Should I dedicate another few hours to working the entire bottom down to them? I struggled with the PSA sheet wearing through on the plate glass. Would I be better off with the granite block from Lee Valley (we have one where I live in Halifax, Nova Scotia)?
Hi,
I’ve got the flat granite tile from Woodcraft, I have various grits of sandpaper 120 down to 1000-3000 I think it is. I have deep scratches in the sole of my new plane that are very hard to get out. The more i try, the more I add deep and shallow scratches onto my sole. What am I doing wrong? Am I putting too much pressure so the big pieces of aluminum or silicon carbide are eating into the sole? What is the proper amount of pressure? My diamond stones left big gouges due to swarf I think.
Any help would be great.
Jeff D>