Recutting saw teeth – An at-the-bench-method that works
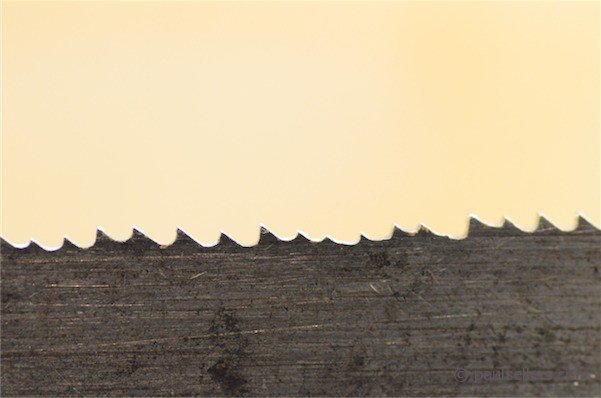
People don’t always realize that it can often be easier to file off all of the teeth and recut than to try a reshape to each of the teeth. Here is a method that works well for me and you may want to try if you have a saw that has highly irregular teeth. An eBay Disston came to me with a real orthodontic problem. Crowded teeth every other three or four teeth, some, many, missing. Uneven tooth height along the whole length caused the saw to trip and jerk into the cut with every forward thrust and accuracy went out the window altogether. The teeth in this condition would be almost impossible to straighten by eye and by hand except by the most skilful saw doctor and here is where in normal circumstances we would send the saw for recutting the teeth. Yes, there is a Foley Belsaw saw tooth recutter that mechanically recuts the teeth before sharpening. The recutter stamps out the teeth into the saw plate very quickly but of course we don’t have a recutter!!! It takes about an hour to file off all of the saw teeth and refile new ones using this method and the results are surprisingly accurate. Here is what I do and it works:
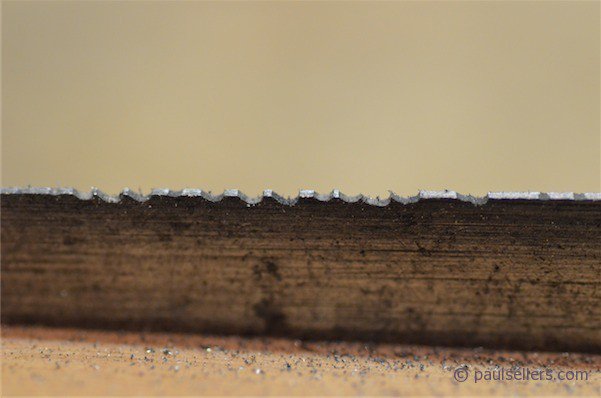
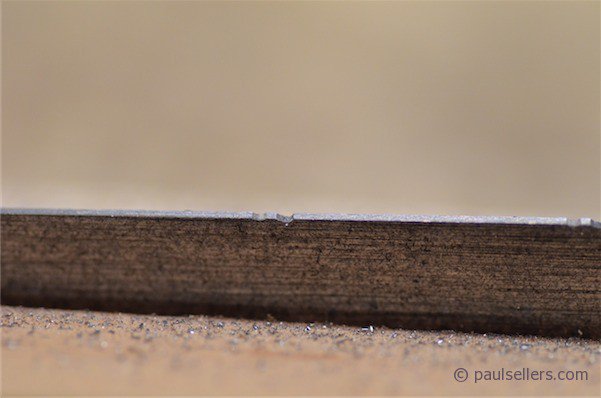
Don’t leave any spots unfiled
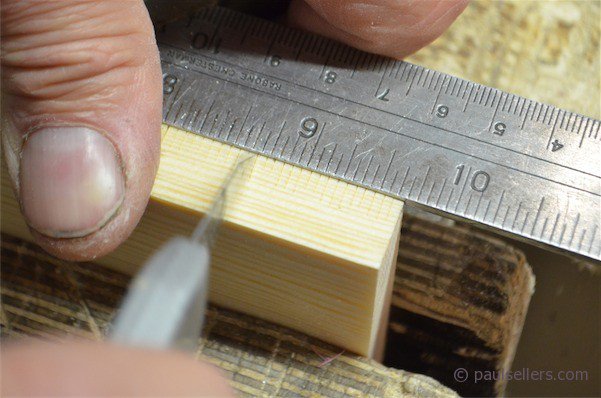
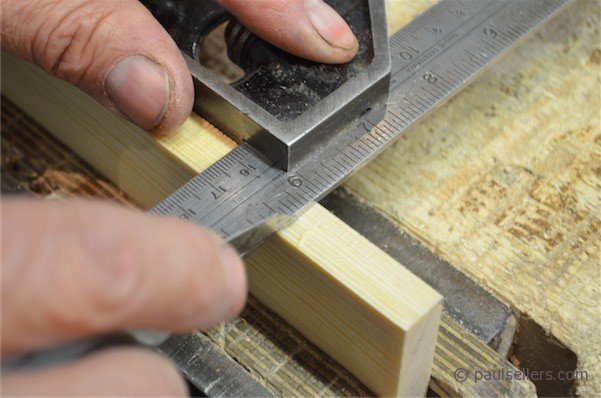
Before cutting, I align the guide with the start of the saw and fractionally below the saws edge, perhaps 1mm or 1/32”, and then, with a second wooden stiffener at the front of the saw, clamp the whole assembly into the vise. It’s important to note here that the guide is purely to set exact distance between teeth and not an actual depth controller, which unnecessary. The first pass with the saw file simply places the front of each tooth on the steel saw plate. Subsequent file strokes deepen the cut and it’s the number of passes combined with sighting the narrowing light on the saw edge that determines the depth and size of the teeth. This is not hit and miss effort, but truly accurate, provided care is taken not to go too deep with the final file cut. Traveling from toe to heel, left to right when the handle is on your right as you file, simply align the file with the squared line and the saw file locked in your hand at an angle where the top of the file is tilted slightly downwards toward the toe of the saw as shown in the drawing. This gives a rake to the fore part of the saw tooth. 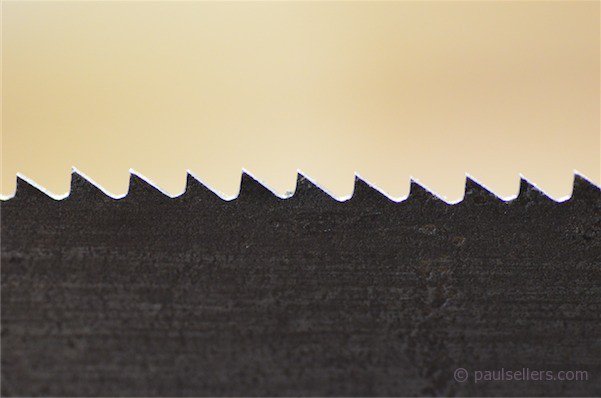
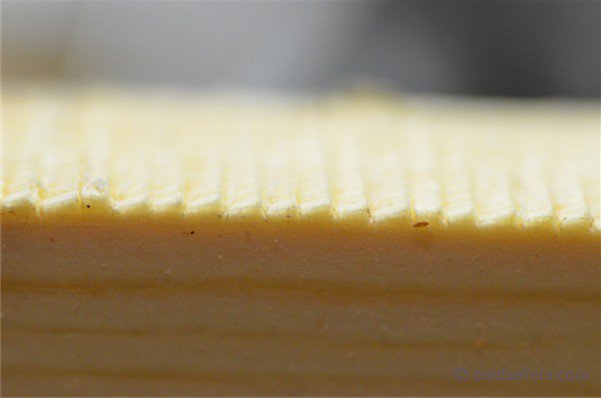
This is how the teeth will look after recutting using my method.
cut to the cutting face of the saw tooth and it’s this that makes the saw more aggressive for faster, deeper cuts. Take care to cut to the exact line and press harder in one direction, left or right, to align the file to the knife line. Once you have say 1” of alignment cuts that position the teeth, go back and file the teeth to depth. Work methodically from left to right. Go down to depth. This is gauged by filing until the light on the top of the adjacent tooth to your left becomes super thin. The final, partial stroke removes the light and the cutting edge of the newly cut tooth is level with the edge of the saw. When the saw teeth are cut to the extreme of your guide, move the saw guide along and align the cuts in the wooden guide with the last tooth you just final cut and start the next section. The whole process of recutting the actual teeth should taken no more than 20 minutes. This system also works well for simply changing tooth size.
All that remains is setting the teeth. Worth noting that in thin wood or soft woods, you may choose not to set. I keep a saw with no set for super-fine dovetails in thin stock.
If you are new to saw sharpening, go along to The Home Depot (US) or B&Q (UK) and buy a piece of sheet steel plate or floating and taping trowel. The first time I tried this was about 8 or 9 years ago on such a trowel. It actually made a working saw.
Great tutorial and video, would,the same method work for a 4-6 tip saw ?
I haven’t had the opportunity to work on large teeth but I would have thought perhaps easier except for having to remove more steel. I have done 8 PPI with no issues at all except the file is about done in by the time you are done.
I created a 4.5 tpi rip saw using this method, be warned it means lots of filing, but is well worth it, as the finished rip saw is amazing. It rips 1″ and 2″ pine very easily
Paul Grannon,
I have a 28″ Disston D8 at 4.5 tpi rip configuration. The saw and teeth are straight. Not at all a basket case, I think a careful sharpening will do. If two or three teeth have to be adjusted, it won’t take much time.
Do I set the teeth? After sharpening for a rip cut, should the teeth be flat or have a bit of set applied (and if so, how much)?
There is a pair of 12″ backsaws handed down from my grandfather (steel backs). Bothe made from those famous brothers, “Warranted Superior”. The one saw with the Keystone medallion is 15 tpi crosscut and the teeth are nicely formed. The other (Eagle medallion) had the weirdest tooth configuration I’ve ever seen. I didn’t want to replicate them, so I filed the plate flat and figure to cut a rip pattern. Not the most delicate and thin steel I’ve ever seen, the plates are nevertheless tapered and I’m wondering what tpi would help make a matching set for these two backsaws.
I saw Paul Sellers cut teeth in one saw video to 12 tpi, using the metric ruler scale (24mm/inch; 2 mm per tooth yields 12 tpi). In this blog he suggested the Imperial inch ruler, using the 16th of an inch marks to yield 16 TPI. Bearing in mind that these will be meat and potato saws, 12 or 16? Your thoughts.
The other Paul (Sellers) would be more than welcome to chime in, but this is not a world shattering decision.
In addition to your superb skills as as a woodworker and tutor, your craftsmanship in English grammar and usage is an equal joy to behold. I had a teacher in my old grammar school who was similarly proficient. Thank you for making it a pleasure to listen and learn.
When re-cutting teeth for a crosscut saw, at what stage in the process would you form fleam on the teeth?