One thing that I have noticed through the years is that America is a dog-loving nation, more so than even Britain and most European countries. Walk into an American workshop where woodworking takes place and you will see dogs on the bench top and in the sides and ends of benchtops. It’s truly cultural. One article on a new bench dog and you have yet another series of holes in the bench. A comment I made saying I didn’t generally use bench dogs raised questions of why and how? In all of my training as an apprentice and for a decade after that I never saw a furniture maker use a bench dogging system of any kind. So that begged the question. Were those men missing something or did a more modern world invent something that answered the lack? It’s a fact that there has not been a new woodworking hand tool that wasn’t around in some form 300 years ago.
Since we launched the planing stock from rough sawn boards to finished boards on our online broadcast these past couple of weeks and since I mentioned that I generally do not use or advocate bench dog systems using holes I have had questions asking me why and what I do. I thought that in addition to watching the woodworkingmasterclass videos, it would help if I showed and explained more about my methods here.
At the Woodworking Shows shows many of you have watched with intrigue how I hold large boards and small boards for planing and scraping as well as simply holding something as large as a tool box whilst setting the hinges or fitting the lid or door. In all of my years working wood I have never found a better holding system. It ticks all of my Three-E criteria for me – Economical, Efficient, and Effective. It’s also fast and most likely free in that you most likely already have them in your shop right now. If you don’t, you can buy a clamp like the one I am using for about $10.
Versatile adjustability in just seconds
You can find an article on retrofitting the clamps I find myself using the most by going to a previous blog I wrote some time back on improving clamp quality. There’s also another previous blog similar to but not quite the same as this here. I think this is important enough to reiterate and expand it because it equips you. You can also use a pipe clamp to the same end. Adding a second clamp across the bench top and removing the shoe from the clamp in the vise means you are limited in length only by the length of your bench.
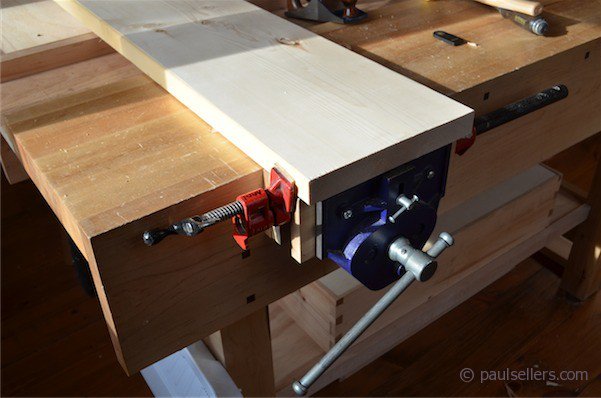
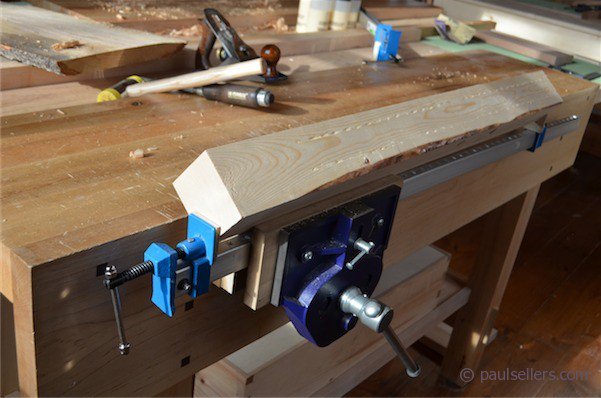
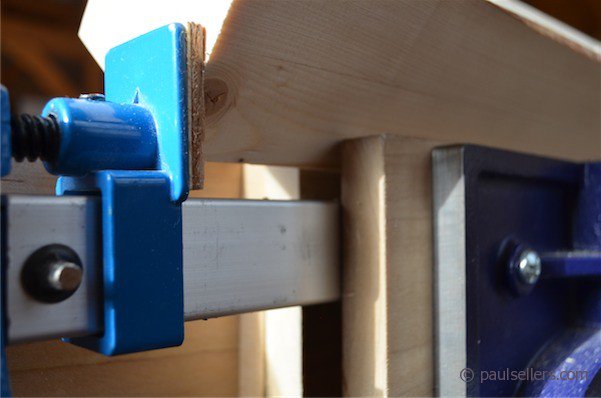
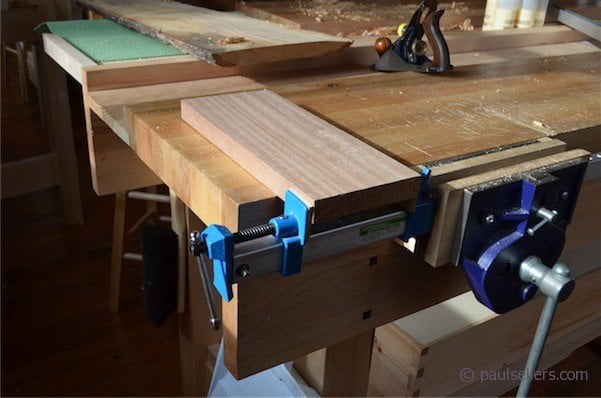
Here I have clamped a rough-sawn waney-edged board of oak along its length. Notice how it rests on the benchtop and is fully supported on that side of the clamp. I think you’ll like that. I put the clamp in the vise jaws and keep it loose enough to adjust it to the thickness of the board less 1/4” or so so that nothing hinders my planing. Once I have the clamp height set in the vise I cinch the clamp tight and then adjust my board, firstly for settling it on the benchtop until it feels solid all along the inner length so that even twisted boards don’t move under downward pressure from planing and scraping, and then, secondly, for orienting the grain for best direction, even angling it in the clamp. I suppose this might be the most common application for this method.
Unlimited by sizes large or small
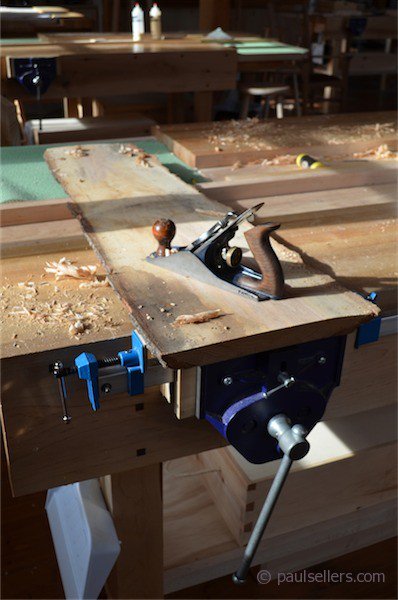
Remember that using this clamp-in-the-vise system means you can put a wide tabletop right across the bench and it will cantilever a 6’ and longer top across the bench for not only planing and scraping, but belt sanding too if that’s your persuasion.
Working across the bench means that you can you have very solid anchorage at the start of planing and on into full-length plane outreach if needed. To get to the other end, plane from the opposite side of the bench toward the clamp-vise aspect. Notice that the clamp will grip wane just as well as square-edged stock, so you can plane a flat surface and then pop a chalk line for your first straight edge cut whether by hand or using a handsaw.
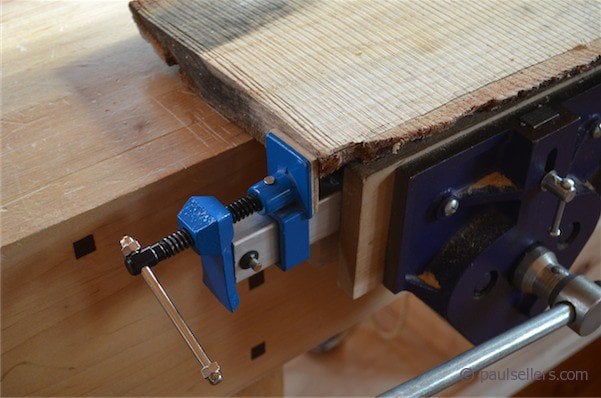
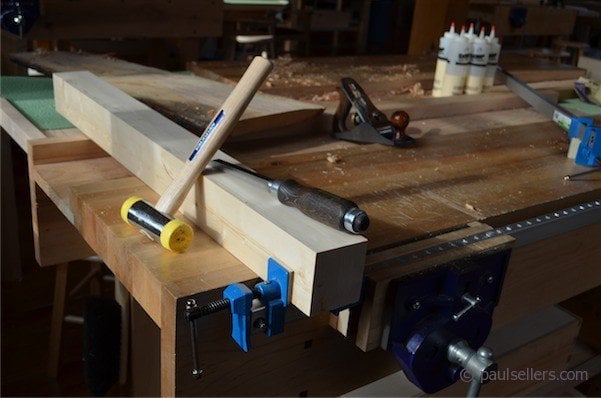
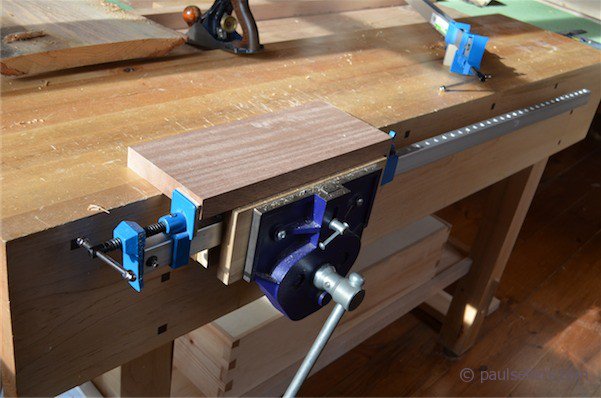
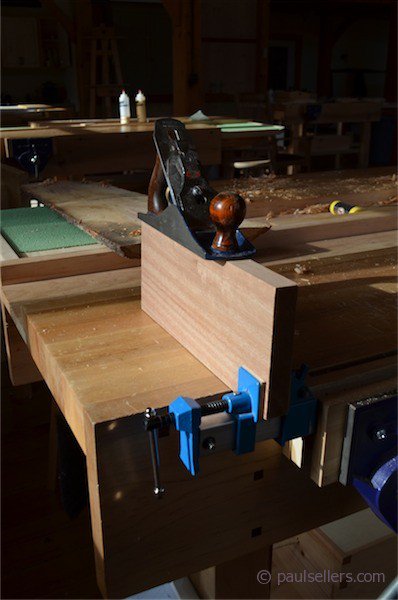
For short stock and even very small stock, the Paul Sellers’ vise-clamp system is unlimited. Generally the most solid clamping is when the stock being held is somewhere in between the clamp shoes on either side of the vise jaws. With short stock that’s not possible. Whilst I am here, it is best to mention that the stock will be held the most solidly when one of the shoes is right by the vise jaws. When holding short stock. Go on one side of the vise only as shown. This is very solid indeed. If stock is too small to go onto the bench top at all, put a packer of wider stock under the workpiece and on top of the bar of the clamp. That will undergird the stock and reduce the risk of slippage. In most cases this is not necessary because small stock can usually go into the vise itself.
Angled presentation of billets
Here is another application for the vise-clamp system. To make square stock round or to chamfer your chair leg or table leg, place the clamp in the vise and drop the square edge into the clamp so that the two adjacent faces rest on the jaws of the vise. This is really solid and better than using the vise as it clamps along the axis and not the fragile corners of the workpiece. I like this method for making things like stopped chamfers and such. See how it nestles cradle-fashion nicely in the vise jaws.
For bench top holding the vise-clamp system is ideal too. Though I do chop most of my mortises in the vise, I also chop on the bench top and this really works well as you can see. The work is held firm and doesn’t slip, which can be the case with holdfasts sometimes.
Unseen advantages
I think that one advantage that’s not readily apparent is that you can orient the board along or across the bench, which you can rarely do with the vise alone and that’s the main advantage with bench-top dogging. I have not found a situation in any of my work where my vise-clamp system has not worked and worked quickly and more simply than almost any other system. It so improves your third-hand holding in that it truly compliments the vise and expands the scope to extend the vise beyond its limit as a side, tail or front vise to utilize the benchtop.
Benchtop ploughing and rabbeting
There may be times when wood on edge may not work in the vise, but you can lodge it in the clamp and across the bench; rabbeting and ploughing for instance, where the plane fence snags on the vise jaw on narrower stock, say of door stiles, for instance.
Holding frames for surface planing joint areas
Door frames and in fact any frame can be rested on the bench top and at the same time securely held in place for surface planing intersecting points which is common with framed doors where stile and rail come together. You can either hold the door stile or rail or indeed clamp the full width of the door from stile to stile. This also helps if you are belt sanding and scraping, installing panels of glass or wood, beading or whatever. (I will add a picture of this tomorrow).
Clamping with and across the grain gives advantages for panel raising with bench planes.
Life is full of revelation and some times the simplest solutions are the hardest ones to find. Using this vise clamp may even eliminate installing a tail vise. The only reason I have a tail vise and and bench dogs is because people have been told they are essential and therefor want them on their benches. I suggest that before you start boring holes and letting your bench top go to the dogs, try this for one month.You may find that like me you don’t need them.
My conclusion is this. I will shortly provide information on tests I have done another dogging system that works well. One thing I will say is that most dogging systems I know of use the vise itself for the dogging system pressure point. This works, but I find the lateral pressure I get from the clamp-in-the-vise system gives more advanced pressure with less localised pressure damage. The other issue? Dogs are nice in the shop. I like the way they hang around.
16 Comments
Fantastic post Paul! Your straight forward approach to woodworking has opened the door for me to actually work wood. Your methods are always practical and effective. Thank you so much for all of your efforts!
So simple, so obvious… once you’ve been shown! I was going to say that finding this site has been like a revelation but it’s more like a whole series of revelations one after the other.
Thanks
Paul, yesterday i saw you using in your masterclass video planing a twisted board! Younare using – how to say – a small piece, which is put in the middle frame of your bench to hold the board on one side and in the vise on the other side. I never asked me, why are there no bench dogs, so i know now why! Even more and more, when i look the difference between your benchh style and the other benches ( the ones with dogs and two vises…), your simple ( sorry) workbench style is trough and trough the only needed style. Its simple, it works. For me! And for less money! Thanks for this post, i really appreciditate. Greetings from Vienna
Alexandrr
Thank you Alexander. I did not think that this post was of as much interest as it should be when I posted a few months ago, but at the Woodworking Shows people are fascinated by the fact that I generally don’t use dogs so I thought it was time t do a more in-depth one because it’s important for people to know that for little money you can have a good system. Thank you for taking the time to reply, Alexander.
Best regards,
Paul
This is immensely helpful and the timing couldn’t be more perfect as I am putting my bench together this weekend!
Paul, I am solidly in the camp of the dog. I started working wood without bench dogs using clamps and all sort of contrived clamping methods. It wasn’t until I made a proper bench and started using bench dogs and holdfasts that I was able to do more work more quickly and to a higher degree of quality. Using dogs keeps the work 100% supported by the bench, nothing hanging over the edge or being supported by supplementary stands. The cost of a wooden bench dog is nil, it is there in the cut-off bin waiting to be shaped into the likeness of a dog.
Bench dogs work best for me since my bench has to be against a wall, and long pieces must be worked along the bench rather than across. I would think that having to walk around the bench to plane a long board would be rather inconvenient.
That being said I believe that we tend to stay with methods we were trained in that work best in our individual situations. In my case I am self taught and had to experiment for many years before deciding on my present (and hopefully my last) setup.
Thanks for writing a great blog and sharing, I do enjoy reading it.
The clamp still works best and I have been in both camps and tested the best of the best. I have used dogs in the bench build i did on YouTube, but that was to cater to the US dog lovers.
I never clamp to the apron, that I can recall anyway. Any decent vise will readily hold a two foot wide board or panel of oak. If it were four foot long, that might present an issue and in theat case I simply cut a stick of 2″ stock and stick it under the extended edge. It’s quick and simple. There is a lot of effort going into complicating simple issues and this is one of them. Bench dogs are the other.
A nice compendium of clamping! I used this method on my benches at the New England Home Show, showing people the way you showed me at the Springfield show. It took them a few minutes to get used to it, but worked well.
I particularly like the use for raising the back edge of a panel. I’ve found that to be an awkward spot to get to, and this makes it easy.
Paul,
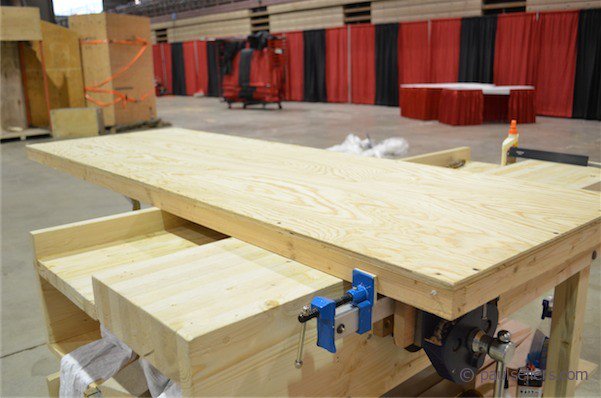
I noticed in the 6th picture that the bench has only one top and the well. In the build a bench series the well sits between two tops. Wondering when it is acceptable to have just one top and the well. With the back apron providing a stop for the well. This size bench is appealing to me because of limited space.
Yes, it’s the same pattern bench but 12″ pr so narrower, standing at about two feet overall width from front to back. Just a question of shortening the the four rails to whatever suits your situation and making one laminated top instead of two. All else remains the same.
I like the name: Paul Seller’s Dog-Gone Vice-Clamp system. 🙂
It’s 15 months since the last activity here but I try my question. Like others, I am going to give this a go. I am an amateur guitar builder (made about 15) but have relied on drum sanders for thicknessing tops etc to date. I have started trying to do more of the job with hand planes. The dog culture you refer to was unfamiliar to me and I figured it was something I was going to have to embrace. So I am grateful to have stumbled across your system. Most guitar components are pretty short so I can see it working well for many jobs. One aspect however I am uncertain about is how to hold tops, backs and sides when you are getting down to thicknesses like 2 to 2.5mm. For example, I imagine I would hold a back lengthwise in the clamp and, being right handed, would planethe right side. But when I turn it around, I will run into tearout problems because I can’t access it from the opposite direction. Does that make sense? Regards. Frank.
I wish I would have read this post a few months ago. I made a few face frames for raised panels and had a difficult time securing the stiles to my end-vice-less bench to chop the mortises. I will use these clamp in vice ideas on my next project! Thank you
Hi Paul, I see some old english workbenches like yours that had a vise and no dogs’ holes or tail vise: where the stocks hed for planing with a method ike yours or simply they planed free against a stop?
Dear Mr Sellers, as usual thanks for another great, sensible and “non elitist” trick. I’ve been using this system since a few month, working on live edge pieces for a sculpture, and having a small dog-less bench, this saved me lots of problems. Thanks again
Comments are closed.
Privacy Notice
You must enter certain information to submit the form on this page. We take the handling of personal information seriously and appreciate your trust in us. Our Privacy Policy sets out important information about us and how we use and protect your personal data and it also explains your legal rights in respect of it. Please click here to read it before you provide any information on this form.


Fantastic post Paul! Your straight forward approach to woodworking has opened the door for me to actually work wood. Your methods are always practical and effective. Thank you so much for all of your efforts!
So simple, so obvious… once you’ve been shown! I was going to say that finding this site has been like a revelation but it’s more like a whole series of revelations one after the other.
Thanks
Paul, yesterday i saw you using in your masterclass video planing a twisted board! Younare using – how to say – a small piece, which is put in the middle frame of your bench to hold the board on one side and in the vise on the other side. I never asked me, why are there no bench dogs, so i know now why! Even more and more, when i look the difference between your benchh style and the other benches ( the ones with dogs and two vises…), your simple ( sorry) workbench style is trough and trough the only needed style. Its simple, it works. For me! And for less money! Thanks for this post, i really appreciditate. Greetings from Vienna
Alexandrr
Thank you Alexander. I did not think that this post was of as much interest as it should be when I posted a few months ago, but at the Woodworking Shows people are fascinated by the fact that I generally don’t use dogs so I thought it was time t do a more in-depth one because it’s important for people to know that for little money you can have a good system. Thank you for taking the time to reply, Alexander.
Best regards,
Paul
This is immensely helpful and the timing couldn’t be more perfect as I am putting my bench together this weekend!
Paul, I am solidly in the camp of the dog. I started working wood without bench dogs using clamps and all sort of contrived clamping methods. It wasn’t until I made a proper bench and started using bench dogs and holdfasts that I was able to do more work more quickly and to a higher degree of quality. Using dogs keeps the work 100% supported by the bench, nothing hanging over the edge or being supported by supplementary stands. The cost of a wooden bench dog is nil, it is there in the cut-off bin waiting to be shaped into the likeness of a dog.
Bench dogs work best for me since my bench has to be against a wall, and long pieces must be worked along the bench rather than across. I would think that having to walk around the bench to plane a long board would be rather inconvenient.
That being said I believe that we tend to stay with methods we were trained in that work best in our individual situations. In my case I am self taught and had to experiment for many years before deciding on my present (and hopefully my last) setup.
Thanks for writing a great blog and sharing, I do enjoy reading it.
The clamp still works best and I have been in both camps and tested the best of the best. I have used dogs in the bench build i did on YouTube, but that was to cater to the US dog lovers.
I never clamp to the apron, that I can recall anyway. Any decent vise will readily hold a two foot wide board or panel of oak. If it were four foot long, that might present an issue and in theat case I simply cut a stick of 2″ stock and stick it under the extended edge. It’s quick and simple. There is a lot of effort going into complicating simple issues and this is one of them. Bench dogs are the other.
A nice compendium of clamping! I used this method on my benches at the New England Home Show, showing people the way you showed me at the Springfield show. It took them a few minutes to get used to it, but worked well.
I particularly like the use for raising the back edge of a panel. I’ve found that to be an awkward spot to get to, and this makes it easy.
Paul,
I noticed in the 6th picture that the bench has only one top and the well. In the build a bench series the well sits between two tops. Wondering when it is acceptable to have just one top and the well. With the back apron providing a stop for the well. This size bench is appealing to me because of limited space.
Yes, it’s the same pattern bench but 12″ pr so narrower, standing at about two feet overall width from front to back. Just a question of shortening the the four rails to whatever suits your situation and making one laminated top instead of two. All else remains the same.
I like the name: Paul Seller’s Dog-Gone Vice-Clamp system. 🙂
It’s 15 months since the last activity here but I try my question. Like others, I am going to give this a go. I am an amateur guitar builder (made about 15) but have relied on drum sanders for thicknessing tops etc to date. I have started trying to do more of the job with hand planes. The dog culture you refer to was unfamiliar to me and I figured it was something I was going to have to embrace. So I am grateful to have stumbled across your system. Most guitar components are pretty short so I can see it working well for many jobs. One aspect however I am uncertain about is how to hold tops, backs and sides when you are getting down to thicknesses like 2 to 2.5mm. For example, I imagine I would hold a back lengthwise in the clamp and, being right handed, would planethe right side. But when I turn it around, I will run into tearout problems because I can’t access it from the opposite direction. Does that make sense? Regards. Frank.
I wish I would have read this post a few months ago. I made a few face frames for raised panels and had a difficult time securing the stiles to my end-vice-less bench to chop the mortises. I will use these clamp in vice ideas on my next project! Thank you
Hi Paul, I see some old english workbenches like yours that had a vise and no dogs’ holes or tail vise: where the stocks hed for planing with a method ike yours or simply they planed free against a stop?
Dear Mr Sellers, as usual thanks for another great, sensible and “non elitist” trick. I’ve been using this system since a few month, working on live edge pieces for a sculpture, and having a small dog-less bench, this saved me lots of problems. Thanks again