Many of you have said that you struggle to design pieces and asked me to talk you through the design process. That can be easier with some pieces than others, but there are stages that should be worked through to get you to a finished working model or indeed the finished piece working as a completed furniture piece.
First of all a prototype extends the mental concept from a mere thing mentally envisaged into its spacial occupation whether it’s made from plastic milk bottles and cardboard or foam core and wood, steel or folded paper. In most cases its about physically seeing what we perceived possible only by or in the mind. Building up a prototype piece by piece gives us a more nuts-and-bolts product sized and shaped and temporarily occupying physical space. From this we can make adjustments, refine and define shape, test for sizing and look for anything that might detract from bringing closure to the overall design. Prototypes help us to prove the theory, prepare for pre-production, cost out production costs, prepare cutting lists and present something of substance to others for their consideration and/or input.
A few weeks ago I was working with Phil who had a commission to build a two-sided sign for the Bluesky Cafe we all know and love. He and I talked through the initial concept for building the project, discussing the inner workings of joints, sign material, overall size and so on. Once we had a drawing down we felt that this didn’t convey enough for Chrissy, owner of Bluesky, to really see what she would be getting and so I suggested Phil make a scaled down mock up to better inform the client. This would only take an hour or so as all the parts for prototypes are nailed and/or superglued together. From that mock-up, Phil received the commission and built the sign superstructure. He’s waiting on the sign writer now and soon he will deliver the signage for Bangor High Street where the sign will stand.
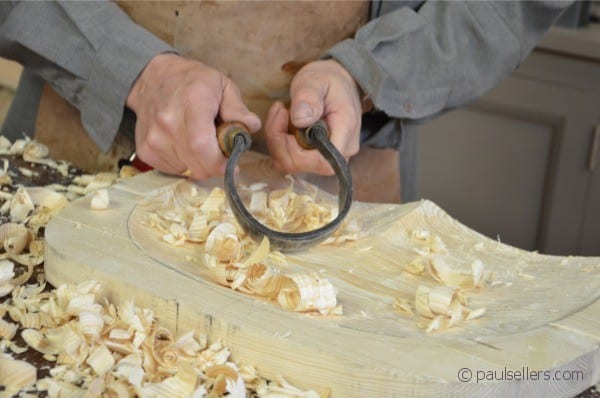
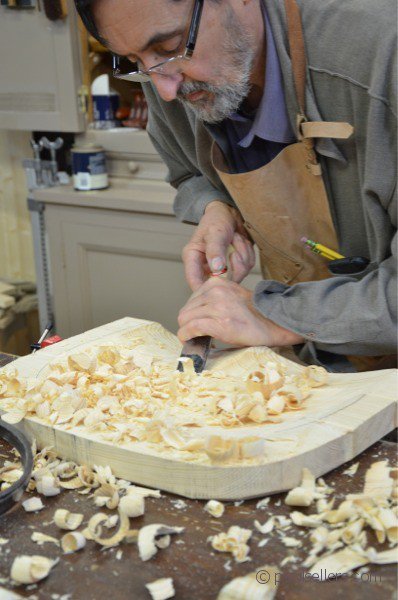
Several weeks ago, or even months ago now, I started to notice that in the class demonstrations and lectures some people seemed to prefer to stand. No matter how much I encouraged them to sit they seemed uneasy to sit. It hit me that the bar stools are standard, round-seated, tall stools. Very standard stools. It also struck me that people often scooted their bar stools nearer to the bench or pushed them back to a bench and in both cases this was so they could lean forward or back. Bar stools are not meant as free-standing seats as is a chair but to work with a bar to be used at bar height. They are quite silly things really but they are meant to combine seating with the working height of a standing person working the opposite side of a bar or countertop. They are designed to replace what might otherwise be the impractical use of normal tables. What we need then was a customised bench stool for our students to sit comfortably for periods of half an hour. The design brief was on the table, I drew my information from several different stools and then set about making one that I considered more practical and comfortable. One thing I learned from my inquiry was that bar stools vary in many ways not the least of which is height. Was that because no one size fits all or was it down to each manufacturer cutting the materials to cost effective production? Well, probably all of the above. The standard height for a bar combines the two heights of working and dining into one compromised height. Whether it’s in a kitchen or a commercial pub , the recognised height for a bar is 42″; that’s 6″ higher than the physical working height of the working bar or countertop height the person standing and working at on the other side has.
Join me as we discuss more aspects of designing from concept to conclusion.
4 Comments
The seat you are making looks lovely. I do wonder how you sharpen odd shaped blades like the scorp you’re using or the knives u use to carve spoons. I use your method to sharpen my chisels and plane blades but I struggle with anything odd shaped.
Looks like we should do a video on this!
Yes please!
Another great Blog Paul and one I totally agree with. Nothing like a prototype to work with to get a general idea on what the product may end up looking like. I do make drawings ( “Hand drawings” ) on my projects not as thorough as yours but will try on my next project. I did finish your bench this week end except for a couple things I may want to add like dog holes etc. and did make notes in my book ( your book ) that I changed sizes etc. By the way I love the 39 1/4″ height mine ended up being and adding shelf liner to the face of my Record vice.
Any way’s that chair seat you are working on looks similar to Sam Maloof’s and what a comfortable seat design that is. Highland Woodworking in Atlanta has a couple of Sam’s chairs on the 2nd floor area where the books are and what a pleasure to sit in.
Also I would love to see a video on sharping scorps, gouges etc.
Steve
Comments are closed.
Privacy Notice
You must enter certain information to submit the form on this page. We take the handling of personal information seriously and appreciate your trust in us. Our Privacy Policy sets out important information about us and how we use and protect your personal data and it also explains your legal rights in respect of it. Please click here to read it before you provide any information on this form.

The seat you are making looks lovely. I do wonder how you sharpen odd shaped blades like the scorp you’re using or the knives u use to carve spoons. I use your method to sharpen my chisels and plane blades but I struggle with anything odd shaped.
Looks like we should do a video on this!
Yes please!
Another great Blog Paul and one I totally agree with. Nothing like a prototype to work with to get a general idea on what the product may end up looking like. I do make drawings ( “Hand drawings” ) on my projects not as thorough as yours but will try on my next project. I did finish your bench this week end except for a couple things I may want to add like dog holes etc. and did make notes in my book ( your book ) that I changed sizes etc. By the way I love the 39 1/4″ height mine ended up being and adding shelf liner to the face of my Record vice.
Any way’s that chair seat you are working on looks similar to Sam Maloof’s and what a comfortable seat design that is. Highland Woodworking in Atlanta has a couple of Sam’s chairs on the 2nd floor area where the books are and what a pleasure to sit in.
Also I would love to see a video on sharping scorps, gouges etc.
Steve