Questions Answered – Flush-to-Face or Protruding Vises
Question:
Hello, Mr. Sellers,
Thanks for all you do. I’ve been following your videos on YT, and they are a breath of fresh air, especially for a beginner like me.
I have two questions about the workbench you built in the videos. First, do you find there is much difference between attaching the front vice flush with the apron (in effect making the apron the rear jaw of the vice) and attaching it such that the whole thing protrudes beyond the bench’s skirt? The only thing I can think of is that making the vice flush with the apron would allow one to clamp a board lengthwise against the apron (with something to hold the other end of the board) in order to joint its edges.
Second, do you use dog-holes on your benches? Do you think they are necessary?
Thank you again for your generosity.
J G
Answer:
This is a good question and I am asked it regularly enough to think it of interest to others too. I thought it might help others by answering on my blog, I think hand tool enthusiasts could look at the reasoning behind what has helped me over the decades.
I didn’t invent this. This was how joiners and furniture makers installed their vises and as far as I can see this has been the way everywhere I looked. When I went to the US I saw people doing it the way you describe and tried it for myself. Within two hours I changed back to the traditional way I knew and the main reason was that I could better install my workpiece in the vise without trapping my hand or installing with my hand on the front. My first experience with vise use and installation began 50 years ago in my native England. Since then, because one of my sons had a business building workbenches, I have installed more vises than I care to remember.
Situating the vise face flush to a continuous apron seems to make sense and in fact most everyone these days does it. Usually they do it because they never tried leaving the vise forward by about 1 1/2″ including the wooden drawer liner and then use the vise for about a month or so to get used to it. If they did, i doubt that they would go back to a flush vice. perhaps they would.
For the few times that I might consider the face-flush vise installation to be an advantage in clamping the other end to the bench, I would feel it definitely not worth it for me and my work. Placing boards of anything less than say 6′ works fine by centring the piece over the jaw and simply planing from that position. Most quick-release vises grip like a bulldog and will not turn loose of properly torqued. When boards are indeed long, there may well be a need to support one end as you say. Especially is this the case with narrower stock such as 1 x 3. If it is the case that one end needs supporting for some reason, I offer to options as alternatives. You can simply place a 1 1/2″ spacer between the apron and the workpiece and clamp away happily to end of the apron on the bottom side of the board. The other way is if you have an end vise. This is another great method I like for most types long board supporting. I have never seen anyone else use it but it is very quick and effective and the material feels rock solid. I have stacked some images to see it work for different situations and material aspects.
Were I too adopt the flush method, I would lose what I consider to be a positive and simple advantage over flush-facing. With the space offered by protruding back jaws, I can use both an overhand and underhand grip yet still have the same holding ability flush-face jaws have with my hand facing into the face of the jaw too. This is very convenient in the day to day of my work.
I can’t hold my wood with a very comfortable and strong overhand grip and cinch the vise shut without gripping my hand between the wood and the apron or bench top. In reality, the half dozen times I have wood long enough to warrant clamping to the bench top is of such little significance compared to the hundred and more twists and turns of dozens of smaller pieces (up to 4′) I do throughout each day. This gives me such freedom in my work. It’s fast, efficient and highly effective. I think many people use face flush vises because of the type of vise they install. Many front vises have no second back jaw and rely on the bench top or the apron as the second jaw. If they did want a second, protruding jaw, they could add a 1 1/2″ piece of wood and try it by double taping one to the bench front. If they like it they can make it permanent and lose nothing if the like their flush face.
This is my best shot at convincing people to at least try it. I find flush faces very, very awkward when I am forced to work on them. If I use a bench when I am away from home I simply double-tape an extra jaw.
Here is the underhand hold that allows for finger clearance when holding a board during installation along the bottom edge.
Oh, I also I like to hang my saws close to hand. This is very convenient to pick up the saws by the handle, and a safe place for stowing the saws. The 1 1/2″ gap allows for the saw handles when i am clamping longer pieces in the vise.
With regards to dog holes.
I think that they can be handy to have. I just don’t like them too much. I use a clamp in the vise and can handle almost everything.
I have several benches in my workshop and I do have a dogging system on one of them, but again, I so rarely use them I wonder why I have them. I think it was peer pressure that made me do it. Every one I met had dogs and couldn’t seem to live without them. I don’t know if you have seen my clamp in the vise method but it works for everything I can do with dogs and then much more. When I passed 60 a few years ago I learned one thing, it is a true saying that “you can’t teach an old dog new tricks.”
As you can see, clamps in vises work very well for most work and in fact will do much more than dogs. Here, a long clamp in the vise rigidly holds the board while it rests well supported on the bench.
For a good hold on stock that needs shaping, the clamp-in-the-vise works effectively and allows stock rotation as needed. I use this for shaping with planes, rasps, spokeshaves and scrapers. We use this method all the time at the school and have found no equal in many cases.
Here are some more images to show the optional ways the method can be adapted to.

If you are near North Wales you can stop in and try the school benches.
As you can see in the very top image, the vise is holding a massive overhanging weight of around 200-lbs not accounting for leverage with no additional apron clamping.


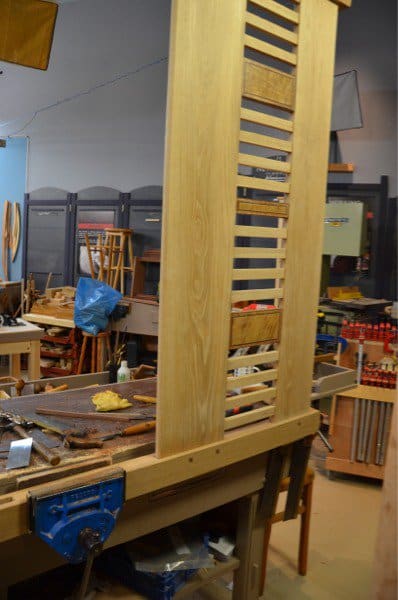
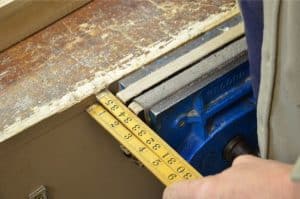


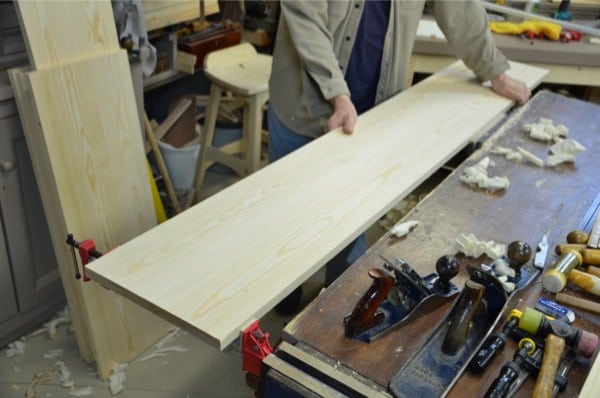

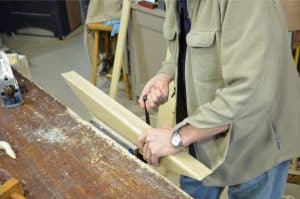
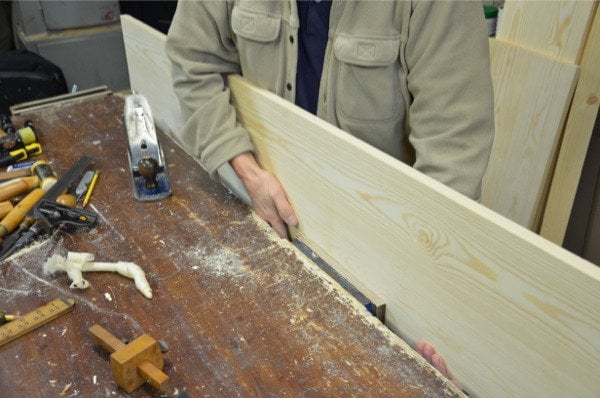
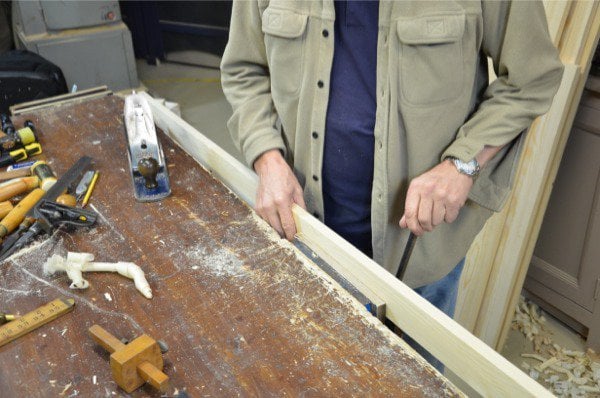
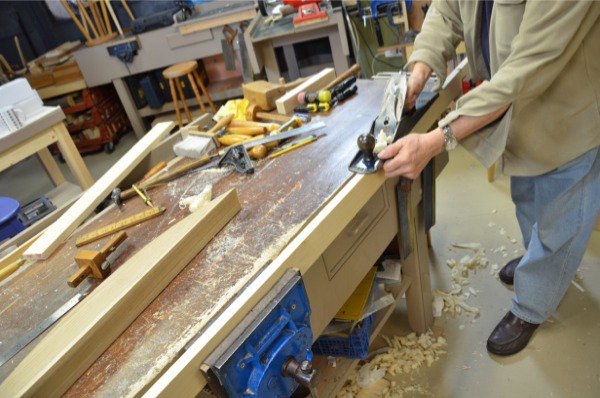
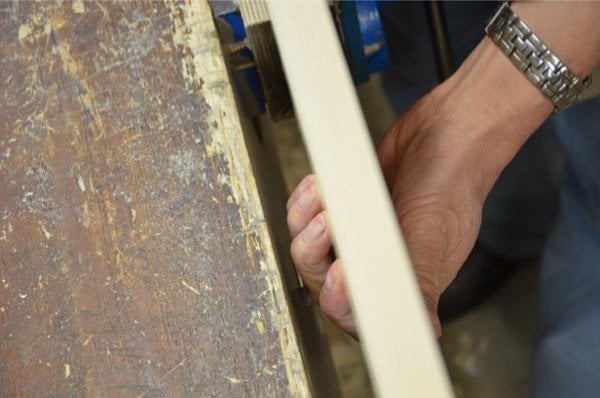


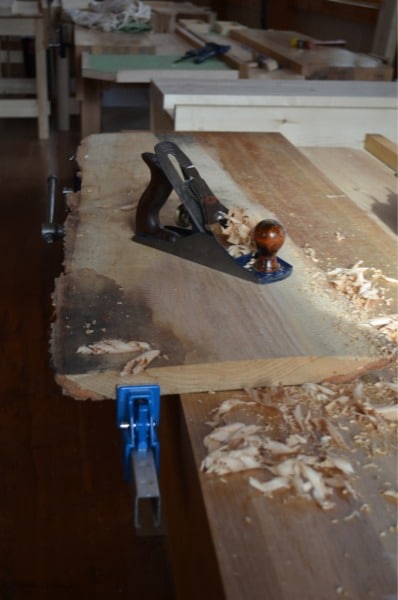


It is possible to have the benefits of both types of vises. My front vise on my Paul Sellers style work bench is set flush with the apron. That is the front of the back of the vise is flush with the apron. Should I want to clamp a board across the front of the bench with a space between the apron and the board, I would simply place a spacer at the back of the vise first.
I use a one jaw vise on my bench. When I built my bench (Paul’s YouTube bench build), I used home center 2×4 studs for the aprons. Over time, the apron warped a bit making it so I can never get my vise to close flush against the apron, a real problem when working with small pieces. I attribute the warping to the unstable wood used and strong humidity changes over time in my shops. I know I can re-plane the aprons flat again, but had I bought a 2 jaw steel vise as pictured above, I wouldn’t have to worry about the jaws going out of alignment. Hindsight is 20-20. 🙂
I think topics like this really come down to what are you used to. Obviously you have been working with the gap for years and have found it useful, and found ways of working around using dogs in the bench.
I work with both flush vise at home on my French style bench, and with a gap on my quick release vise at work. Though at work I am doing more general carpenter work and don’t need anything more than that. I started with a vise with a gap and moved to the flush vise because I found it worked better for me. With longer boards I don’t have to use an overhand gripe to put them in place, I simply rest the piece on a holdfast when placing the piece in the vise. but, that is what I have become accustom to.
I think either way there are pluses and minuses, or really, different workarounds that you have to come up with from time to time.
I love my holdfasts. I have used them for 15 years or so. I also use dogs. It is abundantly clear that Paul’s method works wonderfully. There are different methods to take the hair from a feline. The question is do you have a convenient reliable way to hold the work for what you need to do to it?
Mr. Sellers,
Thank you very much for the detailed and very helpful response! I’m slowly working on building my bench, and your help is invaluable.
I also have a feeling that I’ll be asking you more questions, and I hope it won’t become a pain in the neck.
Again, you are very generous, and I’m grateful.
Jacky
Hello, I’m debating whether to buy a brace and bit and I was wondering is it worth it, are they needed
You will not regret it. Essential? Probably not, so long as you have access to electricity.
would you say i stick to using a cordless drill for drilling?
There are advantages to both brace and bit and the cordless drill. Total self-sustainability on the one hand and single-handed use on the other frees one hand to hold wood or screw. Totally your energy one way, yours, and the possibility of over-torque the other. You will likely end up with both. Were I to choose I would go for the cordless first followed by a good set of bits and a brace.
Paul,
You missed the main reason for your type of vise install. Simply show a picture of you rip sawing a board held in the vise by one edge. Can’t be done in a flush vise! I’ve seen you do it in your vise. Yes, you do have to squat, but it is easily doable. The concept of a flush front to a bench is a fallacy.
Great and creative use of bar clamps in place of dogs. Thanks for sharing these great ways of working and thinking. Wish I had seen this before I drilled the 20 dog holes in my new bench last week!
We show a lot of practical applications on this in an upcoming video associated with building the bookcase in our next series on woodworkingmasterclasses.com .
Paul, i like the clamp in the vise idea. i was considering putting dogs in my work bench until I used your method in the wall clock series. So you really are teaching some old dogs new tricks! 🙂
This was a great post Paul. The pictures are perfect for convincing your audience.
I’m convinced that besides your #4, your bench vice is your favorite tool in the shop.
I am about to get a vise and was wondering why you don’t install it so that the left side of the vise (or the wooden jaw) is flush with the left side of the bench. This way you could saw “past” the bench without bending down to tilt the saw.
Is there any reason why you mount your vise about a foot from the left side? Would you recommend against mounting it flush to the left bench side?
Mostly its so that the vise is next to a leg, for solidity, but between legs rather than overhanging on an overhang because then ot would bounce. I have never or rarely ever seen the vise flushed up as you suggest and so I assume past craftsmen did it for the same reason too. It makes a huge difference when mortising mostly but in many other tasks too.
I see, that makes sense. Thank you
I am having a real issue mounting a 9″ Veritas Quick Release vise to the bench I made following Paul’s design. I cut a hole in the apron, as required, and mounted a packing board to the underside of the bench top so as to position the top of the jaws 1/2″ or so below the top of the bench. No problem so far.
With the bench on its side, I have access to put lag screws in two of the 4 mounting holes (those on the distal end of the horizontal aspect of the bracket) into the bottom of the bench top. And, of course, I can put 1/4″ lag screws horizontally through the inner face and into the edge of the bench top.
However, there are two more mounting holes into which I really want (need) to put some large lag screws. These are in the proximal part of the horizontal bracket (near the vertical face). However, these are exactly in line with the apron. That is, there is no way to get a drill in there UNLESS I were to remove (cut away) ALL of the apron under the vise (as opposed to just that part of the apron that needs to be removed to fit the assembly through). And doing this would diminish the bench’s stability,
Indeed, due to the weight of the vise, my initial mounting attempt failed: the face of the jaws were not perpendicular to the top of the bench. The whole thing sagged away from 90 degrees. I can loosen the lag screws on the distal end of the bracket and place a wedge in there to bring the face back to square with the bench top, but what is REALLY necessary is to get lag screws into the proximal end of the bracket. This would both bring it back to square and add much need stability. Without those lag screws, I am depending almost entirely on the two 1/4″ lag screws that go through the face into the edge of the bench top for vertical stability of the vise. I would hesitate to do much pounding on it.
I was thinking that perhaps I can fashion a wedge to go between the bottom of the vise assembly and the bottom of the apron hole, which would transfer vertical energy from the vise into the apron. But I am hoping someone has a better solution. If nothing else, maybe this note will warn others about the difficulty they may encounter when trying to mount this vise to this bench.
Hello Joel, I gave up trying this years ago. I locate the back two lag screws replete with washers and rest the lugs on this and get them semi tight first. I locate a clamp and pull the vise tight up to the forepart of the bench and enlarge the holes to 3/8″. I make certain that the vise jaw is fully seated and with no gaps anywhere along the back of the rear vise jaw. I pre-drill a whole through the holes and toward the top edge of the hole so that when the lag bolt is tighten it ensures closure to the top of the vise jaw against the bench top/apron. I have never had a problem with vises coming loose using this method. i then cinch up the rear lag bolts. I drill holes in the rear of the wood vise lining to to receive the head of the lag screw. Another method I have used successfully is to inverse the vise onto the top of the apron/bench top and mark the hole centres for all four hole positions and then drill a 1″ dia hole to receive a coach bolt head so that it will be recessed into the bench top. I then drill a 1/2″ hole that allows enough wiggle room for the bolt. passing the vise into the vise hole and using nuts to hold up the rear end with washers and clamps to hold the front end of the vise, I sight through the hole to see how close the front holes are to the lug holes on the vise. If they are off little I then pass the drill into the hole and aim the bit toward the centre of the lug. this will correct misalignment. I then use a socket wrench on the recess hole and a nut on the other end.
Paul,
Thanks for your comments! If you gave up trying this years ago, I’ll take that as a suggestion that I give up on it now :o). I reckon my next purchase will be a 3/8″ bit for boring metal (my dad used to take an old worn out bit and break it near the tip to get something suitable for use on metal. Well, almost suitable).
As I understand the second method you describe, the lag bolts are mounted vertically through the bench top, recessed, of course, so the bolt heads are beneath the surface. Still, having that metal near the working surface scares me. I’ll try your first method, enlarging the 1/4″ holes in the face by 50% and using 3/8″ lag screws.
Thanks again for passing along your experience. I trust this discussion will be helpful to others.
Has anyone tried the Veritas Twin Screw Vise? There is a bicycle chain connecting the two vises, and supposedly you only need to use one handle to turn both screws looser or tighter. I installed one on the end of my bench so that I could work on dovetails between the two screws. However, I’ve had a lot of difficulty getting the vise(s) to work smoothly. Once tightened up, it does do a beautiful job of holding a wider piece to work on dovetails, especially if you are comfortable working from a seated position (since I have bone cancer, I have had to learn to work sitting down). However, it seems to me more of a pain than a help most of the time. Two handles are in my way and I am always hitting them walking past. I built this over 15 years ago.I probably would not choose it again. If I were doing it today I’d be intrigued with the Bench crafted wheels to accomplish the same thing. However, if you have any comments about the Veritas Twin Screw vise, I’d be interested in hearing them.
Can’t really comment. Only time I used one was at a woodworking show one time. I use Woden and Record vises for 50 years, old original Records, not the new ones, and had never any need to change because they works so well.
I came here to ask this question but it’s great that Andrej already asked it.
For some reason I had got into my head that the vice must be flushed up to the left so that I could clear the bench when sawing but I wasn’t able to mount it there due to the design of my bench.
What do people do when sawing, it’s not crucial to be able to clear the bench like this? Do people in the know like yourself use sawhorses or bench hook most of the time
Paul,
I wanted to say thank you for this. The simplicity and genius of your methods never cease to amaze me, especially when we have so many reinventing the wheel with their “ingenuity”. I wish I would have seen this article months ago! I am about to finish my bench and install a vise, this would have saved a lot of headaches in trying to decide between all the options.
Building a small workbench and this was most helpful. I don’t see any need to set my vice flush.
I bought a York HVK 516 quick release vise from Lee Valley and just finished installing it on my work bench. The quick release requires you to rotate the spindle 2 times which is easy enough the problem I am having is that although it will back up (loosen) it won’t tighten. I read your blog about York but this is brand new so it can’t have worn. It is as though the nut doesn’t swing for enough to engage the screw when tightening. It was such a beast to install I hate to uninstall unless it is necessary. BTW I really enjoy your Youtube Channel.
Actually, the 20 York vises we installed worked fine for the few hours they were used but then they went wrong. Not one but many. Certainly the parts were offered to fix them but that’s not the point.
Thank you Paul I probably put this question in the wrong thread.