Questions Answered – When is Sharpening Enough or too Much
For more information on sharpening stones, see our beginner site Common Woodworking.
Paul,
I am watching your hand plane videos and as you are planing the end grain you make the comment “make sure your plane is sharp”… “don’t neglect the sharpening of your plane”.
You are not the first teacher I have heard say this and I think every woodworker understands that we need sharp tools but my confusion is with how often do you sharpen your tools?
When building the coffee table I sharpened my chisels 3 or 4 times chopping mortises. Is that too much or too little?
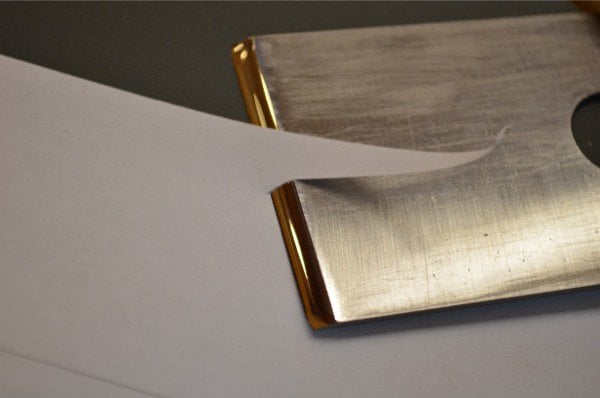
When Making my dovetail boxes I started with a sharp plane and did not re-sharpen through the whole project. I realize there are many variables in ‘when you should sharpen’; wood type, sharpness to begin with, end grain work vs long grain, etc. I guess I just would be curious to know at what point during a project you stop and sharpen. I realize for the sake of time you need to edit that stuff out of the videos, but I would be very interested to know how you incorporate that into your working.
Thanks and I love everything that You, Joseph, Phil and the others do.
DR
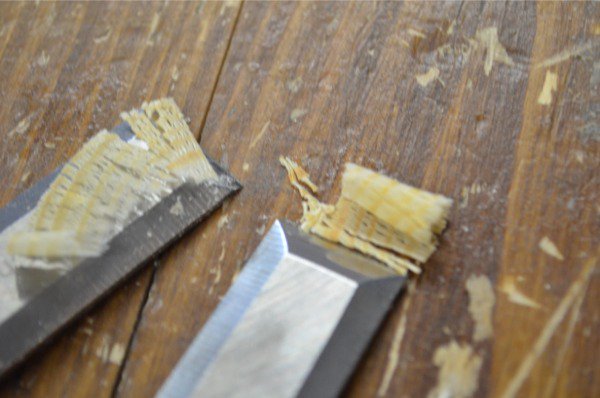
Answer: The edge above took under one minute to develop using only freehand methods
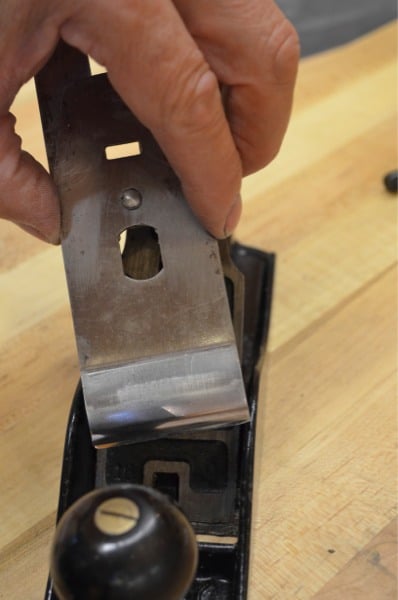
In my lifetime I’ve seen people go to the stones, sharpen a tool edge and get on with the work in a couple of minutes. No big deal. This might happen several times a day, depending on the work. That’s changed and now, instead of going to the stones and sharpening a tool edge quickly and intuitively, woodworkers set up guides and gauges, measure the accuracy of angles throughout the process and labour for up to an hour to sharpen and set up a plane. The whole process of sharpening a plane surgically sharp should take about 3-4 minutes including resetting. I see all too often that people don’t believe they can achieve independent freehand sharpening that’s highly effective and efficient. They think that it takes years instead of a few minutes a day for a week or so. The fact is that this culture in woodworking has indeed changed our perceptions. Today, many people like to do just that, which is fine. On the other hand though, some people just want to get on with their woodworking and I wouldn’t want anyone relatively new to woodworking or searching for hand tool methods to think the type of sharpening I am referring to is a normal standard procedure. It’s not. Many modern-day procedures have complicated the processes of sharpening and serve more to distance woodworkers from a simple sharpening process done throughout the day.
When to Sharpen
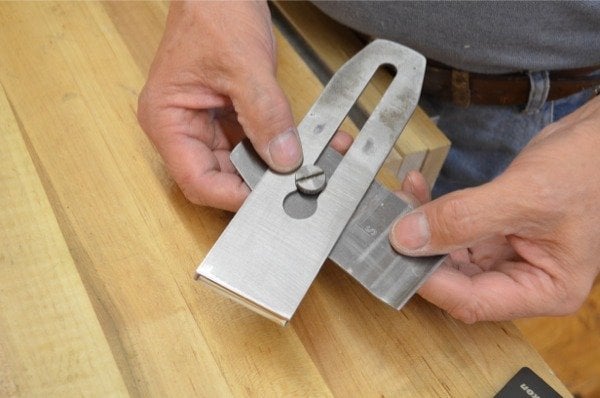
I think that it is important not to challenge natural emergent development in any area of becoming a skilled worker with substitutes for too long. The bevel side of the chisel or plane is the smaller of the two facets and so it makes sense that we grind the bevel until we reach past the fractured area along the edge. I have several reasons for promoting the flexibility in sharpening I enjoy from freehand sharpening.You see, what’s happening at the cutting edge is usually a fracturing (sometimes buckling) along the thin edge that’s so minute it can barely be seen by eye. We tend to see the edge more as wearing away as water rounds over rocks in a river or a hand smooths a well-used surface through years of use. That is not necessarily the case with edges to edge tools. Most cutting edges are fracturing, so on the larger flat face a sort of a bevel begins to occur through this edge fracture and light is reflected along this edge. We then lift up the chisel to redirect a blunter edge to the work to compensate for the fractured edge and so it’s this that should tell us that the chisel is duller than is acceptable. The fractured edge must be removed. It’s quick to do provided you don’t have to set up a guide or check the bevel angle and you are willing to develop a built-in ability by rote practice.
Sharpening to Different Levels
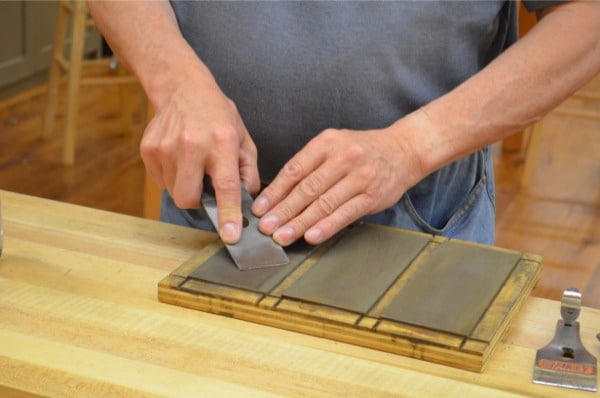
Because I have so many planes and other edge tools, I might have three planes sharpened up at the same time. One plane I will keep for only fine work and another for less fine work and so on. That way I can sharpen to task depending on the work I have planned. I usually have one plane sharpened only to 250, which is most acceptable for lots of types of work. I have another plane sharpened to 15,000 and rarely would I ever go beyond this because as soon as the wood takes two or three shavings it is already reduced to 15,000 anyway.
In some spheres I see that the process of sharpening has become more an extended process. For some woodworkers and especially those new to the craft there exists a search to escape confusion. The process should be as simple as it is so that we go to sharpening so automatically it seems no more effort to us than an extra couple of strokes with the plane.
Let me leave you with this question. If the chisel at left was sharpened to 250-grit, and it was, and it slices nicely across end grain pine like this, is that sharp enough?


I’m extremely new to woodworking, and don’t have much of a tool budget. After watching Paul prep and sharpen some inexpensive chisels, I ordered a cheap set from HF. With a plate of glass, some adhesive spray, 500 & 1200 grit paper, and a day of practice, I have got a set of decently sharp chisels. If someone as inexperienced as me can hand-sharpen edge tools, I have no doubt that anyone can… no need to buy all those fancy guide gadgets ;).
Freehand sharpening is for sure what everyone would like to (and should) learn; but a guide can be useful when you are learning (in order to see and then to “visualize” the angle) or when you have to restore the right angle for a bevel. I mean, a guide is not always a fault… 🙂 The main difference between the two methods – I think – is that freehand sharpening is faster and doesn’t break the continuity of your work. Usually I don’t feel “unable”, if I use a guide… 🙂
I haven’t had much luck with freehand or honing guide sharpening. I’ve free handed a chisel to passable, but I cannot get a plane iron very sharp. I have yet to truly get a burr on the back edge. Don’t know if it’s too much or too little pressure. I use a 1000 and 8000 glass stones.
maybe using abrasive paper is easier for achieving a nice burr because you can only apply pressure on the pull stroke, but the push stroke uses no pressure and is more for keeping the steel registered to the surface… just a thought I had. maybe someone with more experience can chime-in here.
I suggest these are too fine for what you need to reestablish your worn bevel. You need a coarser stone to get the rough off first. This will get you back to a cutting edge faster and more effectively. Try to set the iron at a guessed 30-degree angle right at the start, at the near end of the stone, and start to push forward from that point with each stroke and allow the hands to drop naturally as you extend the arms along the strokes. This then creates a camber on the iron’s bevel starting at around 30-degrees and then dropping to create a type of quarter of an ellipse shape to the bevel. It works. Then go to a finer stone. I suggest 600-800. After that your 1000 stone kicks in and you can end polishing anywhere you like after that.
Mr. Sellers, I’m hearing you want chisels and plane irons just as flat as you can make then without curvature of any kind, but i’m also hearing to put a small curvature in the bevel to extend the life of the edge. I’ve been going with the deadly flat school with no issues that i know of,but there is a high chance this is amateur naivite, lol.
Thank you kindly,
Mark
I don’t have much of a problem with sharpening plane irons, my trouble comes when it is time to put it back together and get the blade adjusted.
It takes me quite a while, and at times I am hesitant to take it apart and sharpen at all because of how long that takes (though I know it is necessary).
OK. This I understand. Practise will get you where you need to be here. Of you have got sharpening to where you have a decent cutting edge, then start practicing loading the iron on its own; without sharpening. In other words don’t sharpen, just disassemble and reload the assembly and set the plane in quick succession. Try to feel after things like am I jamming on the lateral adjustment lever before I cinch down the lever cam on the lever cap. Once have adjusted the set screw that holds the whole assembly to the frog, you should have no need to adjust that again except very occasionally because you bumped it or something.
So, release and remove the lever cap, remove the cutting iron assembly and use the lever cap as a screwdriver to loosen the set screw in the cutting iron assembly, separate the two parts. Now bring them back together and set the cutting iron to the cap iron (the chip breaker that’s incorrectly called a chip breaker). About 1/32″ from the cutting edge. Carefully drop into the throat and waggle from side to side with the least dominant hand until it clicks to the bed of the frog. Move the lateral adjustment iron three or four times left and right and then drop in the lever cap and,before you cinch down the lever, straddle the assembly to hold the plane down to the bench amd pull the cutting iron assembly upwards slightly so that the blade is locked in an upward position before you cinch the cam.this means that the small rectangular hole in the cap iron is fully registered against the adjuster we call the yoke. So now, when you come to turn the wheel adjuster, the yoke is fully engaged straight way. And your main turn will most often be clockwise to push the blade down into the throat right from the start. In other words you are not starting out with too much iron set but usually none. A good place to start every time. Turn the wheel only one revolution and try on a narrow edge of a board and never on a full width. Look into the throat to see which side of the iron is cutting first. Most often it’s one side only. Move the lever toward the shaving side until the shaving starts to emerge from nearer to the centre. Keep checking until the shavings from both sides are equal.
Chris-I don’t think your first stone is coarse enough. 1000 grit water stones are more of a honing stone.
Paul-What does sharpening to 250 “look like”? Do you grind the bezel on 250 then use the strop on the back?
I don’t strop on compound when I sharpen to 250 I just strop on a plain strop that has no charge with compound at all. This is to remove the burr only. I actually strop on my hand which I have done since I was 15 and this removes the burr immediately. I just don’t usually show this on camera because someone out there will start stripping with a blade sharpened to 25,000 and we don’t hand strop,with an iron that sharp,although I knew some that did.
I have to confess. I had a lot of trouble chopping the mortices for the workbench and it just ocurred to me that I never once stopped to sharpen the chisels I was using. I was too focused on the method of walking the chisel downhill on the bevel to notice that the chisel was dull. I must have watched the video of chopping a mortice behind glass half a dozen times trying to figure out why I was having so much trouble.
I know this is going against every thing this site stands for, but I have never been able to sharpen tools to an edge that satisfied me. I finally gave up and bought a Worksharp sharpening system. It was a little expensive, but it is a wonderful little machine. It is very easy to use, it only takes a few minutes to set up, and best of all it ACTUALLY WORKS. I now have sharp planes. My planes were not in very good condition so it took a little longer the first time, but now that is over I can sharpen them in just a few minutes. If you are able to sharpen free hand, that is better, and good for you, but for a klutz like me, I recommend the machine. If you live near a WoodCraft store ask to see one demonstrated. They will probably be glad to do so.
I don’t mind mentioning the alternatives at all, but I would also like to think that you and others would pursue developing the skill parallel to the machine and then eventually rely more on the intuitive skills you have developed. It is so fast and efficient when you do that.
I think the difference is whether you want to learn woodworking, or if you need to knock something out NOW. I’ve been both people. The need for quick results led me to machines I could rely on to give me right angles, straight lines, and sharp edges. But I felt like I’d never really learned woodworking. To me knowing woodworking would mean that I could do something with fewer tools and fewer machines doing the work for me because I understood the process and technique. For that, however, I needed the luxury of feeling I had the time, and that I COULD do it. Once I had that feeling, I found every task that seemed to take forever rarely took more than 20 minutes. With hand sharpening, once I decided to trust myself with it, it’s now just a few minutes. I would guess that over time the machines actually take longer and are more expensive. But for someone who needs a sharp edge NOW, they do give great results very quickly.
Great post, I think every one starting out has a problem sharpening. I now use Sigma Power Stones I bought from Japan, I have a 120 grit, 200 ( i think this was given to me ) 1000, 6000, and finally end at 8000. I also have a strop loaded with the green crayon and I bought several years ago at a Wood Working Show in Atlanta a Tormek which I use to establish a bevel or take out a knick only.
I also have the LV MarkII honing guide and a eclipse guide but I freehand 95% of the time. It took some practice but I like to freehand like Paul does. I don’t have Ez – Lap Diamond plates yet but is something I am really considering because of less mess and will be handy to take along when I travel.
Steve
I have a Tormek machine and have used it for years, mainly for my turning tools, it is an excellent machine. I also have 4 DMT diamond plates and a Norton 4000/8000 combo stone. I do use a very inexpensive sharpening guide most times when working on the plates and stone.
I will say Paul has been an inspiration to me for the past year or so and have thrown myself into doing things in the traditional way. Using my 100 + year old Stanley planes is been a wonderful experience and even better since I have learned better and better technique and knowledge. I have even started to sharpen without the guide when I am in the middle of working on a project. much faster turn around time.
Thanks for this, John. I love hearing of people’s progress.
To follow up on what John C. said. I have only known about this site for a very short time. I saw Mr. Sellers at a Wood Show several years, and was amazed at what he could do with a few simple hand tools. This is a wonderful site. I have already picked up a number of tips. Since I now have sharp planes, I’m like a kid with a new bicycle. Every time I go into my shop I have to make a few shavings just to hear the plane cut the wood. I have a few molding Planes that I am trying to learn to use. I don’t have a clue, but I will probably figure it out.
Hi Paul,
I’m currently building the workbench via the video series you published on youtube. First of all, thank you very much for your work and advice for us novice woodworkers…
I currently have a 1000/6000 Japanese waterstone. It is too narrow to sharpen my #4 stanley plane iron on so I sharpen on an angle. it is also slow work as this is a 1000 grit stone. I see you often use 250 grit diamond stones.
What 250 grit diamond stones (or finer) would you recommend?
There is nothing wrong with sharpening at an angle. I have done that all my life no matter how wide the stone. It’s a question of body comfort not square-to-the-stone presentation. Much more practical at the angle. I use EZE-Lap diamond plates.
I am starting out in my woodworking pursuits but budget is not a huge concern…that being said, which grits should I get? I see the 3 you use in your youtube guide; would you recommend the same 3 or could I get away with just 2 of these?
Two works fine. You will need to lighten up on your close-out strokes on the course 250 plate to reduce the striations in the surface and spend a little more time on the finer 1200 grit. The mid-grit plate just helps transition that’s all.
As I read this blog post and the ensuing discussion two quotes come to mind, both from great men, which seem applicable here. The first speaks to how much effort we should be putting into sharpening keeping in mind that the act of sharpening is not the goal itself, but rather a means to an end. The goal is to produce good work which requires sharp tools. The quote is from Albert Einstein who said, “a thing should be built as simple as possible and no simpler”. The applicable lesson to sharpening is simply that it should be only as difficult as required to produce sharp tools. To my mind, freehand sharpening the way Paul teaches it produces not only the best edges, but does so in the least amount of time. The second quote relates to how sharp must a tool be which reminds me of a quote by Abraham Lincoln. When asked how long a man’s legs should be Abraham Lincoln once replied, “I suppose they should be long enough to reach from his waist all the way to the ground.” His point is it really doesn’t matter how long a man’s legs are as long as they get the job done. I think this applies directly to the question of “when should I resharpen?” I answer this question by saying, “whenever you notice the edge starting to dull and the tool not cutting as cleanly as your work requires, it’s time to sharpen up.” As someone who prefers to work wood to sharpen, I would emphatically stated that freehand sharpening is the way to go. I was able to master Paul’s methods of free and sharpening in just a few days of practice so now it literally takes me about 45 seconds to sharpen a chisel which means that I can sharpen a half a dozen times in an hour if I need to. This means that I am far more productive during that time. Because sharpening takes me almost no time to accomplish, I find that I am much more likely to sharpen more often. I sharpen up as soon as I notice the edge starting to dull, so I don’t push my tools past the point when they need touching up. Since extremely sharp tools produce better work, I find frequent sharpening which leads to finer tolerances in my woodworking. I would encourage my fellow woodworkers to take the time to develop the muscle memory to learn freehand sharpening. It can be frustrating at first, but once you have a breakthrough and have cracked the code on how it’s done, you will have a very fundamental technique mastered for the rest of your life. The time savings that this will produce in the coming years is extremely significant as compared to setting up sharpening jigs. I will leave you with one final thought. That is, I found three things significantly improve the quality of my work: 1) high quality tools 2) getting my edges extremely sharp 3) practice. In my experience without any one of these three things I couldn’t produce find work.
I initially had success with my first try at freehand sharpening, with stropping, as you Paul have demonstrated. But it was limited success. At times I was close to what you would call merely “carpenter sharp”… not really something to shave with or cut paper.
But, I gave myself a prop. Not a bevel gauge of the kind that you attach the blade to, but a simple wedge of wood, cut on a 30-degree angle. It’s about 4″ long, and perhaps 1 1/8” wide, so that the bevel runs down one of the long edges.
I simply place the wedge down on the stone, holding it with one hand, and use it as a reference point to start the freehand stroke. It prevents me from inadvertently varying the starting angle each time from, say 28 degrees to 32 degrees to 29 degrees, etc.— whatever I’ve been doing.
For me it’s working like a charm, and it causes no delay whatsoever. I can also alter the other angle of presentation of the edge to the stroke, skewing the iron to the right, or just running it straight. In that way I can inspect the scratch pattern as I go through the grit sizes as I skew to the right on one grit size and then go straight on the next and repeat (helpful for me… you obviously don’t need that).
Hello friend …. I’m from here in Venezuela jose I have seen their videos on youtube … I learned a lot from his old school technique …. freehand sharpening is much better and faster sharpen the plane .. greeting and thanks ..a friend …. congratulations
I’m new to working with tools as I have been taught to use machines for working wood in the past. But I would compare sharpening a chisel to that of a kitchen knife, as I’m an avid cook. When I start to feel resistance, such as in slicing a tomatoe when there is more resistance from the skin than usual, then it’s time to sharpen. It may be a couple of days or a couple of weeks since I last sharpened my knife. I’m now noticing the same concept with working wood.
Just yesterday as I was creating a knife wall in some red oak, I had to push a little bit harder than usual, but not so much I needed a mallet. I took a few minutes to sharpen it using the vastly easier and superior Paul Seller’s method, and the the wood was less resistant to the chisel. I’m realizing that all I need is “time in the saddle” as some of us in the US would say. Or for others, experience. After a few months of not turning on my machines, I’m becoming more aware, more sensitive to my surroundings. I can actually feel the difference between maple, oak, and hickory. Couldn’t really do this with a screaming router. I haven’t had this much fun working wood than I have now.
I bought a used Stanley Number 5 with a kidney shaped hole in the blade holder My ? is can a blade be sharpened so many times the blade is short for the plane
Tom
Yes. When the blade gets too short you will lose enough adjustment on the depth wheel and a new blade will be needed. I imagine this would take a significant amount of time to wear so much though!
Paul, your answer reminds me of Abraham Lincoln’s answer when asked how long should a man’s legs be? He supposedly replied, “I suppose they should be long enough to reach from his waist all the way down to the ground.” If I understand your comments, sharpening is very similar in that an edge should be sharp enough to accomplish the task. Well said and well done. As someone who was fascinated with sharpening when I first started Woodworking, I can understand why some spend countless minutes or hours experimenting to find that “perfect edge”. However, now that I’ve long since adopted your methods and become proficient at sharpening, I don’t find the desire to spend much time sharpening. My sharpening routine now is merely a means to an end. using your technique it now takes me about 45 seconds to finely hone a dulled edge. Nowadays I am much more interested and resharpening as quickly as I can in order to get back to work. After all, working wood is the point and what I really enjoy
Your comment about what should be a relatively simple and routine task becoming a quest for scientific perfection confirms my suspicion about a lot of woodworkers on youtube and the web. The individuals I find most compelling for my woodworking education don’t overcomplicate what should be in the grasp of most normal people. I believe that sharpening an edged tool, be it a plane, a knife, or a chisel, isn’t rocket science. There is of course a right way to do it, using the right tools, but you can’t get bogged down in trying to achieve technical perfection or you will never get to work. I really enjoy your presentation and demonstration style. It is entertaining, clear, and helpful to rank amateurs like me.
Good Day Paul. Need a few advice from you actually if it is alright. I am just starting in the field of woodworking and were fortunate to acquire a Woden No.4 and a Woden No. 4 1/2. Now being cash strapped I have no other means to sharpen the plane blade but a small piece of a flat thick glass from a scrapped glass door, a few 180, 250, 400, an a 1000 grit emery paper. I have started with the no.4 blade and its not getting anywhere sharp (just getting shiny) even after applying the various ways i have seen in the internet on how to sharpen freestyle (or maybe i need to start with a honing guide?)
Thanks and all the best from the Philippines.