Hidden Shelf Supports – Simple, Strong, Effective
I am trying to pull together the stats from different countries around the world that follow the blog, to try to give you some idea of how many possible like-minded people there are in your region of the world. Perhaps there is something to all of this and perhaps there is some way we can link everyone of like interest to be in touch to help or encourage one another. For instance in Pakistan there are 13 people who read the blog and in Poland there are 513. In Saudi Arabia there are 13 and in Germany 2,487. Belgium has an amazing 1,060 and right next door in the Netherlands there are 1,346. Britain is the largest following per capita at 12,837 and the USA 46,261. The list is very incomplete, but in some smaller countries there are three and four people interested in what we do and I can see you guys sharing your interest if indeed you wanted to. These numbers go up everyday and have done since I started the blog. Ill let you know how this all goes and if it is of any interest please let me know.
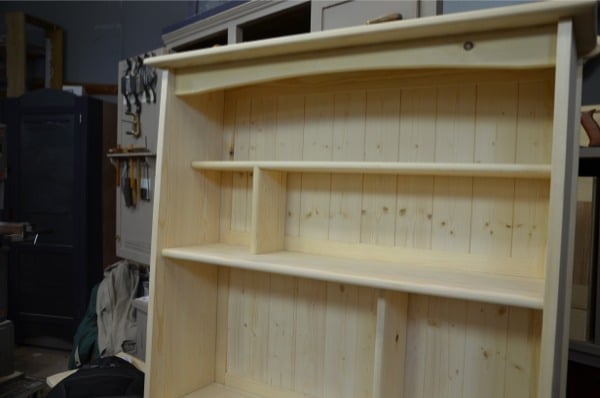
Yesterday I worked on new aspects of work to prepare for a blog; primarily because of the book case I have been building. I like the idea of adding smaller shelves between the big, main, fixed shelves that could be adjustable vertically and with vertical spacers or dividers that could be adjustable too. I do not like little plastic pins and pegs in holes particularly and so I used something I have used for decades now made from a bent rod or even a wire coat hanger.
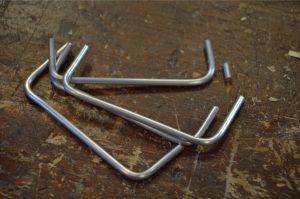
As I said, I have made my brackets from coat hangers, but over the years these have gotten thinner and thinner, so you might want to consider something a little thicker. the alluminium rod is I think ideal, inexpensive, easy to work and more than strong enough for any weight you want to put on them.
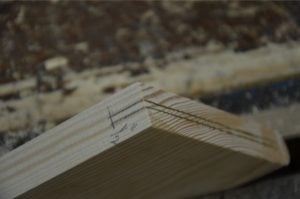
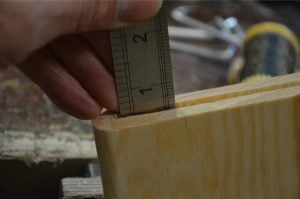
To begin with we need to make a couple of simple jigs. Obviously the shelves you make or need maybe different to mine so I suggest the following formula. Allow 35mm (1 3/8”) for the first bend and then add the width of the shelf less 38mm (1 1/2”). This 38mm (1 1/2”) allows for two bends one to each side of the shelf 5/8” in from the front and the back edges of the shelf plus two thickness of the rod of 1/8”. Then add 1”. So, as an example, my shelf is 126mm (5”) wide. I start with the 1 3/8” distance and add the shelf width of 126mm (5”) less 38mm (1 1/2”) so my distance is now at (124mm) 4 7/8”. I now add 1” form my last bend, so the overall length of my rod is 5 7/8”.
None of this is too critical. I am trying to void waste, but you can bend to any distance and cut the rod to length after the bends are made. the next steps are the most important for accurate brackets that interchange to fit the holes exactly.
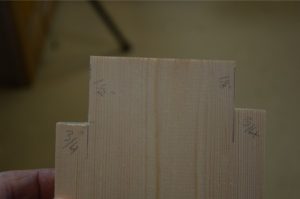
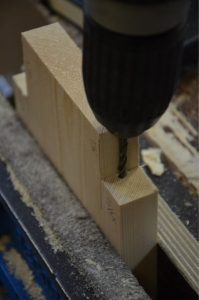
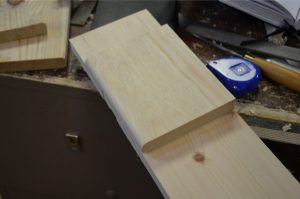
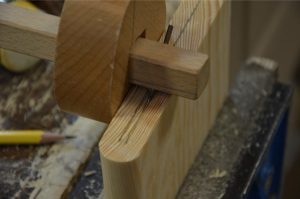
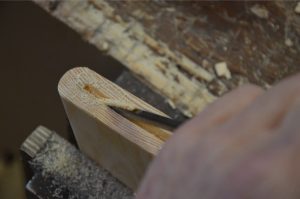
I lay out and the remove the corners to the sizes as shown.In the one corner I drill a 3mm (1/8”) hole centred in the corner from front to back (not critical) and up against the vertical wall. I cut my rods to length.

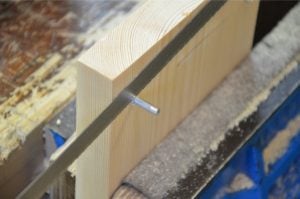
In this case 152mm (5 7/8”).I insert the end of the rod in the hole and make my first bend as tightly as I can and then hammer the corner to conform it as closely as I can to the corner using a soft faced hammer. It does not have to be a perfect 90-degrees at this point, tweaking can come shortly.
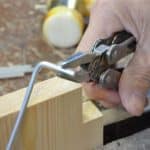
Now I make the second bend at the opposite end and use the hammer to square things up.

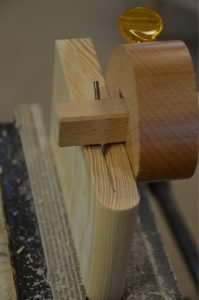
Now I make my second jig-guide.Using the existing jig and a second shelf off-cut, I square a line about 1” across and from the end of the piece of wood. I align my jig with the second jig piece front and back, clamp the two in the vise and drill to either side of the recesses I cut to the bending corners, making certain to leave no gap between the walls as I drill.
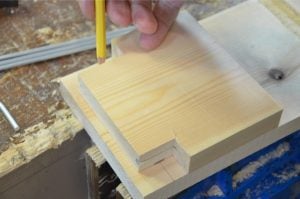
I want these two holes to align with the first jig walls as these governed the bends in the rod I used for the brackets.Making sure that the holes are centred on the square line, drill through the second piece of wood with the same 3mm (1/8”) drill bit. 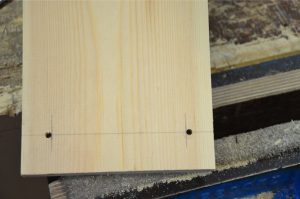

This jig serves two purposes. One, it holds the brackets to cut them to exact length at each end of the brackets and, two, it also aligns the holes within the book shelf allowing me to drill the holes exactly into the case sides. I set my drill bit to the thickness of my jig plus 12mm (1/2”) for depth into the case sides. This governs the distance from the bracket to the bookshelf sides, which is about 10mm (3/8”).
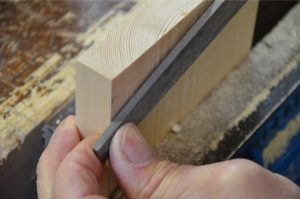
By passing the newly shaped brackets through the holes in the second jig and pressing them firmly into the holes, you can cut the brackets stems to equal length using a hacksaw.Press a second time, just a little harder, and you can file the ends support fully and safely in the jig.Remove the brackets and file or sand the corners of the stems.
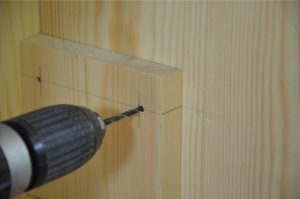
To drill holes in the cabinet mark the centre line of the bookshelf on the cabinet side and align the centre mark you aligned the holes with on this line.If you are worried about marking a finished cabinet with finish on and completed. Use masking tape on the cabinet to write on. With the jig aligned, drill through the holes to the depth you set. before doing this it is best to place the jig and the bit in to full depth along the front edge to check the depth before drilling. do the same to the opposite end and you are ready to install the brackets.
Preparing the shelf
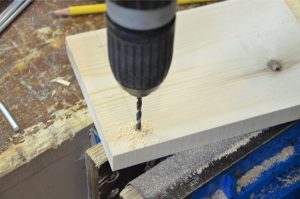
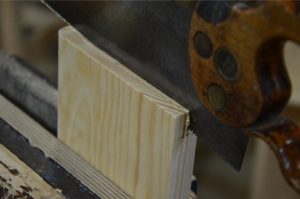
The shelf should first fit within the walls of the bookshelf with about 1mm less than the shelf opening. This allows a .5mm gap to each end of the shelf when fitted.Set a gauge to 1/16 wider than the thickness of the shelf and gauge a line along the end of the shelf starting 1/2” from the front edge of the shelf. Turn the shelf over and do the same from the opposite side. This will leave 1/8” gap between the lines that we must now remove to a depth of 1/2” using a tenons saw and 1/8” chisel.
These are available ready made in many sizes from Lee Valley. I used them on my tool cabinet and they worked well.
Yes, they are not new, but making your own is satisfying and it takes just a few minutes to make a dozen. And it is much cheaper too.
Pau, I appreciate that you are even thinking of a woodworking community in each of our own backyards. Thank you for any help you can provide in this area. I also want to thank you for sharing so much of your experience. You make the complex simple and give me the confidence that I to can do this work.
Any idea when your new book will be out?
Not sure yet. Still working on it
If you only need shorter lengths of Ali rod you can just buy a packet or two of knitting needles. You can get these really cheap and the surface is nicely pre finished. Obviously make sure you’re buying Ali needles rather than plastic ones. They come in a wide variety of thicknesses and even the 2 or 3 mm ones are really strong.
That’s a good idea. I am sure they will be as inexpensive everywhere too.
Hi Paul,
When you say x number of people read your blog, do you mean x number visiting your site/blog on a daily basis, monthly, since you started blogging, as from Jan. 1, 2014, or on what basis? I am sure you have a lot of followers, but the numbers you quoted do not give us a good picture of what is happening. Could you clarify the numbers for us.
Second question: What are the numbers like for Australia, Canada, and Japan please?
Simon
A lot of Belgian(Flemish) and Dutch readers already meet at http://www.woodworking.nl , the mutual language helps of course.
As a matter of fact two of the members are organizing a workshop/ Q&A concerning hand tools and furniture making. The first member is a furniture maker/tool maker/teacher, the other one started out his own amateur focused specialty wood store.
Apart from the workshop/Q&A it will be nice to see each other and have a proper chat about wood. The only downside is of course the distance, it’s a three hour drive.
I will be taking some pictures to give you an impression, I think it’s gonna bee lovely.
Thanks Renoud,I would love to see how things develop.
It would indeed be interesting to see how many people are following your blog. Do you have any figures for India, which is where I am from?
Paul enjoyed this Blog very much and am glad to see such a following, I know I mention you when ever I have an opportunity on other forums etc.
Also the wire shelf hangers, great idea I don’t like those plastic adjustable pins either.
Steve
Thanks for your support, Steve. We are gaining a lot of ground and hope to make people more and more aware of DIY in real terms of craftsmanship.
Hi Paul, I too would like to thank you for your most informative U-Tube video’s and your Blog. I am a Sparkie who did woodworking and metalwork at school plus my Dad was also keen on woodworking. I am now retired and since finding you on U-Tube have been fascinated by your skills as a cabinet maker and all the simple hints and shortcuts that make a difference to amateurs like me. I watched you make a workbench in your backyard and was very impressed, this will be my first project so i have something to work on. Thanks a million and cheers from Australia.
Rex Jackson
As usual, just one more example of why Paul Sellers has more common sense than most of the average bears walking down the street! The jig is fantastic, I doubt I could have come up with that one on my own, even if given 40 years to ponder the problem and the solution?! Thank you.