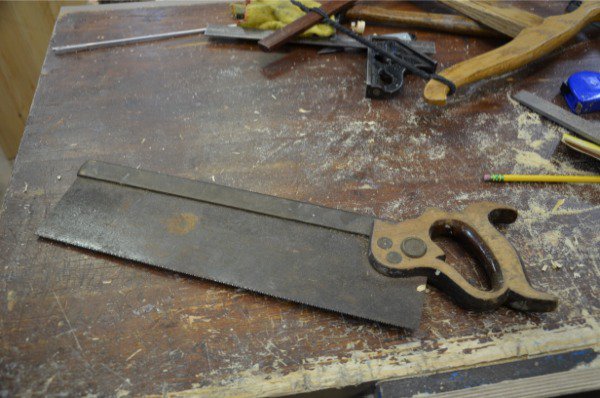
I found a tenon saw two weeks ago and picked it out of the basket of junk smothering it. It seemed sad, uncared for and out of place. I did have some sympathy for it and as I traced my fingers along the dulled teeth I considered putting it back down. I do that a lot. In my eyes it was worth a pound or so and I asked the lady, “How much?” She surprised me when she said, “Four pounds?” I surprised myself when I said, “OK.” My eyes traced a bead along the teeth like I might sight down my old Smith and Wesson 38 in my former life. She was surprised when I pulled the four coins from my pocket and placed them in the palm of her hand. “Why did I pay so much?” I asked myself as I tucked the saw under my arm and walked away. It looks like a junker and you have a hundred tenon saws. Something told me there was a bit more depth to this saw and it is harder to find 14”, 16-tpi tenon saws secondhand these days. But I think it was more the lady selling the saw that I felt respect for that affected me. Yes the saw was a much neglected specimen. It was unkempt but my inmost considerations proved right. The saw had belonged to her late husband. She knew he bought it with good intent, valued its worth, bought the best he could afford and used it as much as he could before it went dull. The asking price became fair to both of us and for me, I wanted to refine my find to better condition than when it was new back in 1945. I wanted the saw to work like it never had and I wanted it in the hands of woodworkers not the landfill.
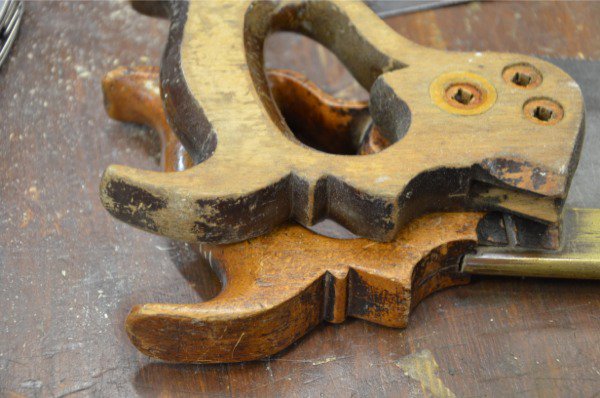
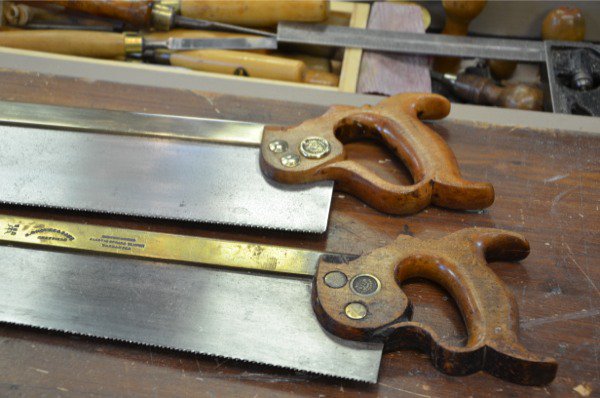
I left the saw alone by my bench for two weeks and picked it up from time to time. The restoration appeal grew each day, but patience and a heavy workload said wait. I sensed something hidden beneath grime, oxidation and crumbling varnish wanted out. Some modern saws leave me feeling that way too. Yesterday I lifted the saw to my eye once more to remind me of the needs. No kinks, thankfully, but what lay beneath the grunge on the plate? Before deciding anything, I place my Groves on top of the unknown, no maker’s marks anywhere, and see that parts parallel the flow in the newer handle, yet aspects seem stunted by a phase in modernity. I see that the similar parallels connect through a span of near 200 years. Imagine that preservation anchored in a design. Why did we stop. Utilitarianism resulting from two World wars was over. My Groves 14” matched several details of the new find. The angle of presentation of the handle to the line of the saw identical. Both handles were beech, of course, but my Groves felt like an old glove-fit as yet unmatched by any modern maker but close to in one or two.
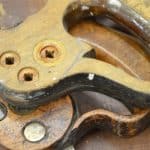
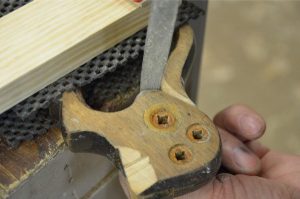
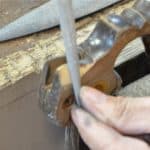
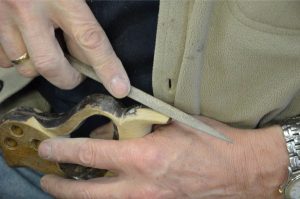
The handle came loose easily and the brass screws parted from their dimpled recesses beautifully. Reshaping came quickly with the smaller Auriou rasp. I think they should sell the rasp as a saw handle rasp. It’s the most perfect rasp I have ever used for this purpose.
I am sure there are other makers too. But this one gets you there fast, really fast. Sanding is minimized and your soon done with shaping. In an hour my saw felt no different than my Groves. That’s a good starting point and I have shortened perfecting by two decades. The plate surfaced quickly and without any pitting. I was glad, but pitting is only aesthetic and such physical defects make no difference to functionality. The brass started shining but the original was not smoothed like old saws were. I took it up several notches with abrasive to 2400 and then buffed with buffing compound and cotton mop. So too the heads of the bolts both sides. The domes glistened in the sunlight. Two primers of shellac thinned to sanding level and with a little colour mix I dyed the handle close to where I liked it. All that’s left for tomorrow is wax.
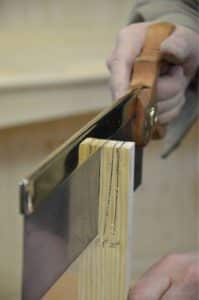
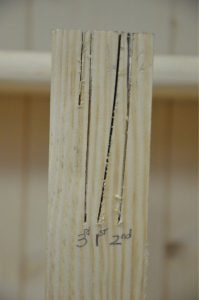
Before sharpening the saw curved in the cut, which took 50 strokes to bottom out. After sharpening the curve was less and the number of strokes was 18. After I knocked of most of the set the saw cut to line and took 14 strokes.
38 Comments
i have two really old saws and im stuck with what to do with them..they need sharpening and are slightly bent. Should i send them off to get resarpened or should i try myself?
Bends almost always bend back out when you counter the bend the opposite way. Some bend easy and others hard. You are the only one to decide. If the teeth are shaped well then go ahead and file them yourself. If they are irregular, teeth missing and so on, send them off for recut and/or sharpening. Unless of course you have experience. You may as well get started some time?
one mans trash is another artisans treasure
Thanks Paul,
I was curious, if the saw did have a kink or bend in the blade, would this have caused you to leave it in the basket as ‘beyond help’?
I’m asking because I have a 26″ Disston panel saw that has a kink in the saw body and I was trying to work out how to straighten it without damaging it any further.
Bends come out but kinks are more stress-related and have to be planished out with a hammer and anvil. If you have nothing to lose you can try as the saw is useless with a kink in it.
Iam a carpenter of 40 years and i can appreciate the nostalgia of our trade.money has taken over our industry .production is number 1. because of this .one concept comes into play.If you do not use you lose it. hand tools versus power tools .production takes the lead. the skills of hand tools drops over time.
I’ll give you 10 pounds for it
Hey Paul! You’ve done some great videos on fettling planes, would you consider perhaps doing a video or two on saving old saws? It’d be a great help to me in particular, and probably others too.
After I had finished this one I thought it would have been an ideal one to film.
So I can take that as a yes then? 😛
Only I have a couple of saws sitting around with nice sharp teeth, and wobbly blades I don’t know how to fix.
If they are back saws, level the back with the bench top and bring it down in a good whack. This shocks the blade back into the spline and usually straightens any bent saw.You want the whole of the saw back to hit the bench in one go.
Ok, I will give that a go. I have a few old handsaws with curved blades, which I think is from the way they were stored when I found them. They tend to jam in the cut and sound like a wobble board when you pull them. I haven’t got a good one of those yet so I’m really keen to fix them.
Could be a lack of or too much set on the teeth too.
It’s amazing how you find these good saws. I’ve been searching for a good saw for more than a year now on flea-markets. I couldn’t find a single one. Only plastic handles and hardened teeth. It feels like all the saws from the past vanished. And on the rare occasions you find one online they are either expensive or to far from home to collect, most of the time both.
I know the feeling. You can find them on ebay, but most of the time the people selling them don’t know what they’re looking for, so the actual quality and condition can be a roll of the dice. It’d be nice if you could atleast get a decent starting point from a big box store, with decent steel and a wooden handle.
When you do eventually find them though, they cost almost nothing, so the real cost is just the time to find a good one.
Home depot in us has $10 buck saw that isn’t too bad if you refile the rake.
I have a Stanley back saw from with a plastic handle that I think came with one of those cheap plastic miter boxes at Home Depot. But I’ve sharpened it up and it works like a pro. I recently got a Veritas dovetail saw on Paul’s recommendation. That’s great for detailed work like dovetails, but the cheap Stanley continues to be my go to saw for everything else. Every time I use it I’m surprised at how perfectly it performs.
It makes me sick to see some of the fine old saws and other hand tools I’ve seen hanging on the walls of Cracker Barrel restaurants across the country. I too, cannot seem to find any in flea markets, antique stores or yard sales.
I think there were masses of saw makers in the UK from the 1700s until the 1960s. America ran with the power tools’ world way ahead of the UK and abandoned hand work many decades before and for many seemingly viable reasons. The Norm camp followed their guru and seem to me to have abandoned more traditional ways for a few decades. Britain was more reserved for several cultural differences, reluctant to changes really, and so hand tools were made over a much longer period. Norm offered entertainer diversion more than someone to be emulated I think. Woodworking wasn’t so much a mass-making alternative people were seeking. Men were still using hand tools in their woodworking, even those making their living from carpentry and joinery. Change was slower and so tools survived a little longer. On any given day there are saws available from many quarters here in the UK. I just purchased a 14″ brass-backed I Sorby tenon saw £15 as a Buy it Now. I think this is some of the difference between the US and the UK.
I need to do this
still dot have a decent tennon saw
surprising to me now, but i miss the ones we had at college
It’s heartwarming to see old tools be brought back to life. I hate to ask questions since you get so many, so if anyone has seen the answers in previous blogs I’ve missed, feel free to fill me in. I was wondering which Auriou rasp that is. They have a number of cabinetmakers and modelers rasps in different grains (coarseness). I’m guessing maybe one of the modeler’s rasps? Also what dye did you use to get the handle looking so nice? Last, after cleaning did you uncover any identifying marks to tell who made it?
A #10-grain modeller’s rasp from highlandwoodworking.com if I remember rightly. I use a mixed colour of dark oak and brown oak. Rustins is the maker here in the UK. Dyes don’t eave pigment to muddy the surface. I have finished the handle off today with a coloured wax most of which buffs off and leaves a pleasing finish and now the handle feels exactly like my Groves now. So much so, when I close my eyes I can’t tell one from the other.
That’s fantastic thank you. I’ll look for something equivalent to the Rustins on our side of the pond. Their website doesn’t say any specifics on the kind of dye it is, but I’m sure I’ll be able to find something reasonably close. I’ve got some saws that need some repair to the horns so I’m hoping some careful dying will help match the repairs. I also want to try the chisel method of carving the handles you’ve covered in older blog posts too.
Personally, I don’t bother with the colour. As I see it, it’s another chapter in the life history of the saw. I have very big shovels attached to my wrists and have never found a comfortable tote on any saw. Because of this I look for saws with damaged horns, cheaper too. Then add a repair piece and shape the whole tote to my hand. I then just oil the whole thing.
Collectors will have a fit at this. It is unlikely, however, that a collector would be interested in the examples I buy. So just go ahead, clean and fettle your saw, make it fit you and work for you. Love using it and remember, you are writing another chapter in it’s history. In years to come, hopefully, some one will find your old saw, look at the by then slight difference in colour, and know someone loved it enough to go to the trouble of making a repair. In doing so, appreciate it as you have.
Just my 2d worth.
Mark
Found two Stanley rip saws at a thrift store for $2.00 each. A bit rusty and missing one screw on one and two screws on the other. Anyone know where I can find replacement screws?
There are a few places around that used to sell them, Wenzloff & Sons being one, but they seem to be out of stock for the moment. There are also plenty of guides on how to make them on the internet too. You just need to google “Brass Split Nut”, and you will get a tonne of results.
I love seeing old tool’s resurrected, most of my tool’s ( 98% ) are vintage, plane’s, chisel’s, and saw’s. I am just getting into rehabing saw’s, need to get a few more spare files and I am good to go.
Paul if you ever find time I would love to see a video on saw sharpening from you as well. Keep up the good work.
Steve
Paul has already done a video on saw sharpening. Check out his YouTube channel.
Mark
Your new saw resembles the Roberts and Lee saws I purchased about 20 years ago. Mine indicates they were a London company.
I learned a technique from a Japanese saw maker that if the spine of the saw is straight, you can remove the curves in a spined saw. Hold the saw with the teeth pointing up. Tap on the spine from the heel to the toe end with a mallet or hammer. The action sort of chases the curves off the end of the saw.
That’s the way it’s been done as long as I can remember and the old joiners taught me to do it that way. I still find the whack on the spline works best if the plate is not dished. Sometimes a saw has been trodden on and that’s when tapping the spine in different parts works best. Tapping along the whole length of the spine works on some saws, but not all saws. This tapping is more usually points at or between the toe and the heel, depending on where the damage in the plate is.
Great blog post and great discussion. That old saw had a lot of character gate Paul got done with it. I just loved the patina on the brass spine. I too would like a video about rehabilitating and old flea market find or boot sale treasure.
hello paul, i have made a marking gauge and i was wondering what would you suggest for the pin?
Piano wire from most model shops works well. They use it for different reasons in model plane making as in flying planes!
Hi Paul. Recently bought two vintage saws on Ebay and after following your video on saw sharpening, work great. But seeing this post, I think there is a detail that escaped me. The cut of one of the saws is curved as I saw in one of your photos. Can you explain me how to solve this problem?
1000 Thank you.
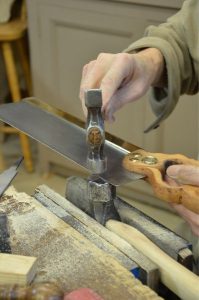
The most common causes for this is either one side of the teeth caught something like a nail or screw, the vise or some other hard surface, and dulled the teeth to that side so much that that one side of the saw no longer cuts efficiently when the other does. Children often catch the vise, damage the teeth and keep on cutting. Another issue causing this curve in the cut is that the saw teeth are unequally set. This means that the set is unequal so the efficient and inefficient sides create an unequal cutting strategy and curves the cut. In the first case the teeth must be refiled until equal. In the second case you must remove the set using one hammer in the vise as an anvil and a second hammer to carefully tap the teeth between the two hammerheads. I recommend that you do both sides of the teeth quite gently and try the saw. Sometimes this still leaves enough set in the teeth for the saw to be used. Often this will take care of the inequality. If not, reset the teeth using a sawset.
wow! Paul, thank you.
I think maybe my sharpening was not quite perpendicular to the saw blade. In this case should sharpen it again more carefully.
1000 Thanks
Great post…I collect all types of old tools buying them mainly at antique fairs or boot sales.
It is a bit of an obsession but I never really find the time to restore them. Your work on the tenon saw has inspired me to get sharpening and polishing and to preserve these tools for future generations. Thankyou
SO, after restoring the old saw that was the shopkeeper’s long gone husband ‘s- did you ever take it back to her so she could see the loving care you put back into the saw so she could be proud of her husband’s choice of saw?
I really like your blog posts and the replies/answers.
Comments are closed.
Privacy Notice
You must enter certain information to submit the form on this page. We take the handling of personal information seriously and appreciate your trust in us. Our Privacy Policy sets out important information about us and how we use and protect your personal data and it also explains your legal rights in respect of it. Please click here to read it before you provide any information on this form.

i have two really old saws and im stuck with what to do with them..they need sharpening and are slightly bent. Should i send them off to get resarpened or should i try myself?
Bends almost always bend back out when you counter the bend the opposite way. Some bend easy and others hard. You are the only one to decide. If the teeth are shaped well then go ahead and file them yourself. If they are irregular, teeth missing and so on, send them off for recut and/or sharpening. Unless of course you have experience. You may as well get started some time?
one mans trash is another artisans treasure
Thanks Paul,
I was curious, if the saw did have a kink or bend in the blade, would this have caused you to leave it in the basket as ‘beyond help’?
I’m asking because I have a 26″ Disston panel saw that has a kink in the saw body and I was trying to work out how to straighten it without damaging it any further.
Bends come out but kinks are more stress-related and have to be planished out with a hammer and anvil. If you have nothing to lose you can try as the saw is useless with a kink in it.
Iam a carpenter of 40 years and i can appreciate the nostalgia of our trade.money has taken over our industry .production is number 1. because of this .one concept comes into play.If you do not use you lose it. hand tools versus power tools .production takes the lead. the skills of hand tools drops over time.
I’ll give you 10 pounds for it
Hey Paul! You’ve done some great videos on fettling planes, would you consider perhaps doing a video or two on saving old saws? It’d be a great help to me in particular, and probably others too.
After I had finished this one I thought it would have been an ideal one to film.
So I can take that as a yes then? 😛
Only I have a couple of saws sitting around with nice sharp teeth, and wobbly blades I don’t know how to fix.
If they are back saws, level the back with the bench top and bring it down in a good whack. This shocks the blade back into the spline and usually straightens any bent saw.You want the whole of the saw back to hit the bench in one go.
Ok, I will give that a go. I have a few old handsaws with curved blades, which I think is from the way they were stored when I found them. They tend to jam in the cut and sound like a wobble board when you pull them. I haven’t got a good one of those yet so I’m really keen to fix them.
Could be a lack of or too much set on the teeth too.
It’s amazing how you find these good saws. I’ve been searching for a good saw for more than a year now on flea-markets. I couldn’t find a single one. Only plastic handles and hardened teeth. It feels like all the saws from the past vanished. And on the rare occasions you find one online they are either expensive or to far from home to collect, most of the time both.
I know the feeling. You can find them on ebay, but most of the time the people selling them don’t know what they’re looking for, so the actual quality and condition can be a roll of the dice. It’d be nice if you could atleast get a decent starting point from a big box store, with decent steel and a wooden handle.
When you do eventually find them though, they cost almost nothing, so the real cost is just the time to find a good one.
Home depot in us has $10 buck saw that isn’t too bad if you refile the rake.
I have a Stanley back saw from with a plastic handle that I think came with one of those cheap plastic miter boxes at Home Depot. But I’ve sharpened it up and it works like a pro. I recently got a Veritas dovetail saw on Paul’s recommendation. That’s great for detailed work like dovetails, but the cheap Stanley continues to be my go to saw for everything else. Every time I use it I’m surprised at how perfectly it performs.
It makes me sick to see some of the fine old saws and other hand tools I’ve seen hanging on the walls of Cracker Barrel restaurants across the country. I too, cannot seem to find any in flea markets, antique stores or yard sales.
I think there were masses of saw makers in the UK from the 1700s until the 1960s. America ran with the power tools’ world way ahead of the UK and abandoned hand work many decades before and for many seemingly viable reasons. The Norm camp followed their guru and seem to me to have abandoned more traditional ways for a few decades. Britain was more reserved for several cultural differences, reluctant to changes really, and so hand tools were made over a much longer period. Norm offered entertainer diversion more than someone to be emulated I think. Woodworking wasn’t so much a mass-making alternative people were seeking. Men were still using hand tools in their woodworking, even those making their living from carpentry and joinery. Change was slower and so tools survived a little longer. On any given day there are saws available from many quarters here in the UK. I just purchased a 14″ brass-backed I Sorby tenon saw £15 as a Buy it Now. I think this is some of the difference between the US and the UK.
I need to do this
still dot have a decent tennon saw
surprising to me now, but i miss the ones we had at college
It’s heartwarming to see old tools be brought back to life. I hate to ask questions since you get so many, so if anyone has seen the answers in previous blogs I’ve missed, feel free to fill me in. I was wondering which Auriou rasp that is. They have a number of cabinetmakers and modelers rasps in different grains (coarseness). I’m guessing maybe one of the modeler’s rasps? Also what dye did you use to get the handle looking so nice? Last, after cleaning did you uncover any identifying marks to tell who made it?
A #10-grain modeller’s rasp from highlandwoodworking.com if I remember rightly. I use a mixed colour of dark oak and brown oak. Rustins is the maker here in the UK. Dyes don’t eave pigment to muddy the surface. I have finished the handle off today with a coloured wax most of which buffs off and leaves a pleasing finish and now the handle feels exactly like my Groves now. So much so, when I close my eyes I can’t tell one from the other.
That’s fantastic thank you. I’ll look for something equivalent to the Rustins on our side of the pond. Their website doesn’t say any specifics on the kind of dye it is, but I’m sure I’ll be able to find something reasonably close. I’ve got some saws that need some repair to the horns so I’m hoping some careful dying will help match the repairs. I also want to try the chisel method of carving the handles you’ve covered in older blog posts too.
Personally, I don’t bother with the colour. As I see it, it’s another chapter in the life history of the saw. I have very big shovels attached to my wrists and have never found a comfortable tote on any saw. Because of this I look for saws with damaged horns, cheaper too. Then add a repair piece and shape the whole tote to my hand. I then just oil the whole thing.
Collectors will have a fit at this. It is unlikely, however, that a collector would be interested in the examples I buy. So just go ahead, clean and fettle your saw, make it fit you and work for you. Love using it and remember, you are writing another chapter in it’s history. In years to come, hopefully, some one will find your old saw, look at the by then slight difference in colour, and know someone loved it enough to go to the trouble of making a repair. In doing so, appreciate it as you have.
Just my 2d worth.
Mark
Found two Stanley rip saws at a thrift store for $2.00 each. A bit rusty and missing one screw on one and two screws on the other. Anyone know where I can find replacement screws?
There are a few places around that used to sell them, Wenzloff & Sons being one, but they seem to be out of stock for the moment. There are also plenty of guides on how to make them on the internet too. You just need to google “Brass Split Nut”, and you will get a tonne of results.
I love seeing old tool’s resurrected, most of my tool’s ( 98% ) are vintage, plane’s, chisel’s, and saw’s. I am just getting into rehabing saw’s, need to get a few more spare files and I am good to go.
Paul if you ever find time I would love to see a video on saw sharpening from you as well. Keep up the good work.
Steve
Paul has already done a video on saw sharpening. Check out his YouTube channel.
Mark
Your new saw resembles the Roberts and Lee saws I purchased about 20 years ago. Mine indicates they were a London company.
I learned a technique from a Japanese saw maker that if the spine of the saw is straight, you can remove the curves in a spined saw. Hold the saw with the teeth pointing up. Tap on the spine from the heel to the toe end with a mallet or hammer. The action sort of chases the curves off the end of the saw.
That’s the way it’s been done as long as I can remember and the old joiners taught me to do it that way. I still find the whack on the spline works best if the plate is not dished. Sometimes a saw has been trodden on and that’s when tapping the spine in different parts works best. Tapping along the whole length of the spine works on some saws, but not all saws. This tapping is more usually points at or between the toe and the heel, depending on where the damage in the plate is.
Great blog post and great discussion. That old saw had a lot of character gate Paul got done with it. I just loved the patina on the brass spine. I too would like a video about rehabilitating and old flea market find or boot sale treasure.
hello paul, i have made a marking gauge and i was wondering what would you suggest for the pin?
Piano wire from most model shops works well. They use it for different reasons in model plane making as in flying planes!
Hi Paul. Recently bought two vintage saws on Ebay and after following your video on saw sharpening, work great. But seeing this post, I think there is a detail that escaped me. The cut of one of the saws is curved as I saw in one of your photos. Can you explain me how to solve this problem?
1000 Thank you.
The most common causes for this is either one side of the teeth caught something like a nail or screw, the vise or some other hard surface, and dulled the teeth to that side so much that that one side of the saw no longer cuts efficiently when the other does. Children often catch the vise, damage the teeth and keep on cutting. Another issue causing this curve in the cut is that the saw teeth are unequally set. This means that the set is unequal so the efficient and inefficient sides create an unequal cutting strategy and curves the cut. In the first case the teeth must be refiled until equal. In the second case you must remove the set using one hammer in the vise as an anvil and a second hammer to carefully tap the teeth between the two hammerheads. I recommend that you do both sides of the teeth quite gently and try the saw. Sometimes this still leaves enough set in the teeth for the saw to be used. Often this will take care of the inequality. If not, reset the teeth using a sawset.
wow! Paul, thank you.
I think maybe my sharpening was not quite perpendicular to the saw blade. In this case should sharpen it again more carefully.
1000 Thanks
Great post…I collect all types of old tools buying them mainly at antique fairs or boot sales.
It is a bit of an obsession but I never really find the time to restore them. Your work on the tenon saw has inspired me to get sharpening and polishing and to preserve these tools for future generations. Thankyou
SO, after restoring the old saw that was the shopkeeper’s long gone husband ‘s- did you ever take it back to her so she could see the loving care you put back into the saw so she could be proud of her husband’s choice of saw?
I really like your blog posts and the replies/answers.