Questions Answered – Why Bevel-up, Bevel-down, Low-angle, High-angled Planes are Equal to Task
Question:
Paul,
I know you have mentioned that jointer planes aren’t needed much anymore due to milling being done by machines, however I have read some blogs where you mentioned how you like your Veritas low-angle jointer plane. Can you explain what you like about it vs a standard bevel-down no 7 Stanley?
Answer:
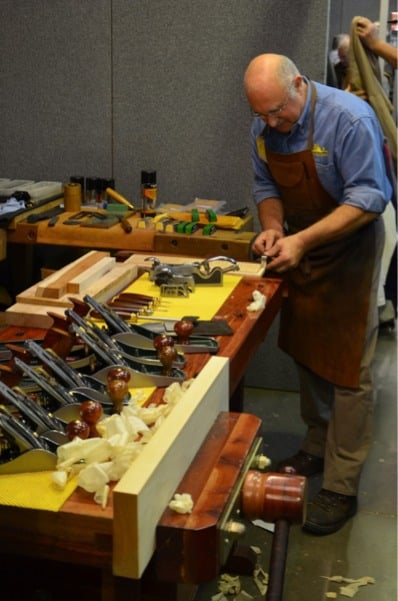
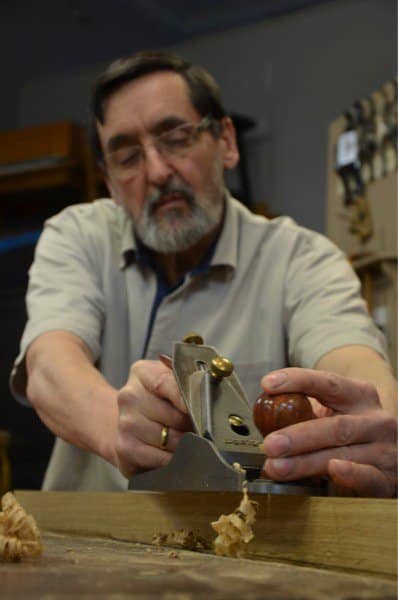
To prepare for this answer we worked with several bench planes including a wooden jack and several metal jacks by various makers. The effort was well worth it and some might be surprised by the results, which were very telling indeed. I enjoyed the challenge of working with different planes and working with the film crew to produce a half hour video showing the results of working the different planes in 1 1/4″ wide white oak.
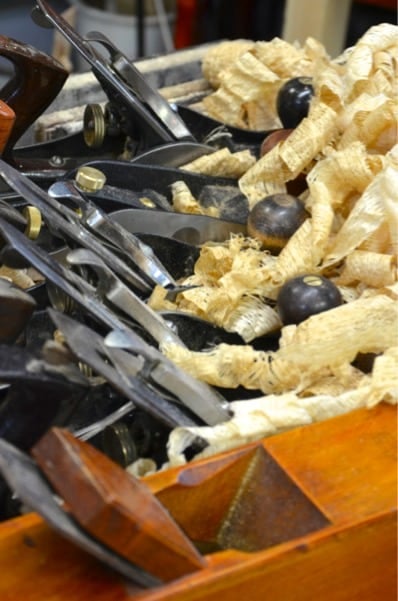
Below you see a wooden jack, a Veritas bevel-up low-angle jack and several Bailey-pattern jacks by different makers; planes we used throughout our filming session and experimental research
My background for working hand planes on wood.
There are not many joiners and furniture makers left that come from a background of using hand planes and hand tools as part of their daily work. I mean those who walk to their workbenches, around them and work at them for 8 or more hours a day 6 days a week and start their daily work by picking up a plane or a chisel and start making something with these tools. That’s how my work always starts and it finishes by putting them down after 8-9 hours using them, even now after 50 years. I mill my wood once, maybe twice a week using machines for no more than an hour tops, if that. The rest, all joinery, shaping wood, surface planing, trimming and fitting of parts, is hand work. In most cases woodworkers like carpenters, joiners and furniture makers since the 1960s shifted from different types of hand work to reliance on mechanised production using machines of some type to a greater or lesser degree. Today these methods are generally known as power tool methods meaning they use large and small-scale machines of one type or another. Generally, what they make is machined components that they then fit and assemble and sand with any one of many different sander types ranging from drum, stroke or strafing sanders to detail and random orbit sanders and of course the ubiquitous belt sander in all its many diverse forms. The men I trained under as an apprentice never used machine sanders on their individual work but used standard smoothing planes made by different makers and #78 and #20 rebate planes to clean off the machine marks left by the planing machines and spindle moulders. Rarely did they ever use anything longer than a #4 1/2 and #4 smoother because all stock was roughed out of 3-4″ thick beams 8-12″ wide and 12′ long taken from stacks of a hundred there in the lean-to buildings outside the workshop. Subsequently we then dimensioned and shaped the parts on different machines. All of our work was always in house. Hand work seemed to me to diminish in most workshops over the ensuing years and so after my journeyman years I decided to stay more with hand work and not pursue the machine-only set up. I still have no regrets in choosing that route.
Machines have gained ground through the decades, primarily because of the ease they bring to woodworking in dimensioning and machining stock, but also because they require minimal skill. The result since the 60′s of course is that we have seen the demise of tool making companies like Record and Stanley and several others who were once known for the production of all types of planes. To replace them we have seen new companies emerge and develop their own ideas. Companies like Lie Nielsen in the USA, Quang Sheng in China and Clifton from England all of whom now present their repro models of the old Bed Rock versions of the Stanley Bed Rock and then we have the Canadian Veritas on the other hand who came up with its own innovative alternatives to challenge the status quo. The interest and subsequent resurgent interest in hand tools caused many to reconsider using planes originally conceptualised in the 1700s that were gradually abandoned through the 1800s and left us void until just two decades ago. Heavy-bodied, low-angle planes used mostly by British cabinet makers of that period were preferred as mitre planes for perfecting mitres and cross grain cuts anywhere between 90-degrees and shallow slopes. These planes were mostly short-soled planes the length of a smoother but sometimes a little longer; most often in the form of shorter planes referred to as block planes. The common maker of the USA was of course Stanley Rule and Level who aggressively defended its turf by buying up as many oppositional plane making companies as possible. Stanley was also based here in the UK’s Sheffield factory, with only a short distance between itself and the Record factories. The older long established and highly respected companies manufacturing different plane types ranging from moulding planes to wooden ploughs and low angle planes then known as chariot planes and mitre planes also lived in what was recognised as the steel and tool making capital of Britain.

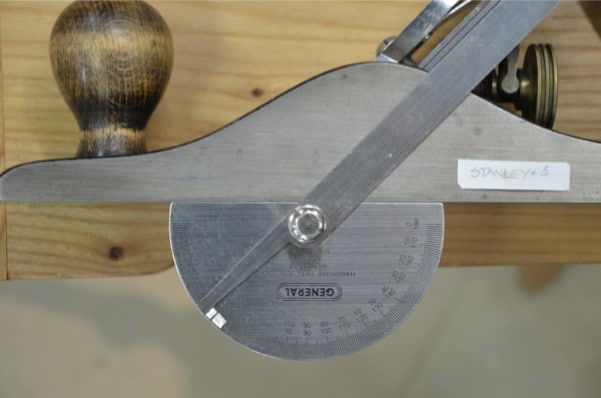
In the last two decades we have seen the bevel-up planes repopularised with added developments and finer adjustment mechanisms that many have come to admire. The fact that they are well engineered however doesn’t always mean that they tackle the grain we work any better or any differently than the planes of old or indeed that they are much if any better at planing wood than bevel down planes, even with thin irons. And here in lies my answer to the question. Bevel-up, long or short planes have a place of limitation in the arsenal of planes. For bevel-up planes to work as shown by tool sellers at shows they must be pristinely sharp. That’s a must and it’s not hard to achieve and maintain at a show. It’s the same at the workbench for real woodworkers too. In my view the type of edge sharpness I need at the bench for a bevel-up bench plane to work effectively AND efficiently is the same for a bevel-down plane, but if a bevel-up plane is going to go wrong in the grain it often goes very wrong big time. More so than the bevel-down planes for reasons of physics. When a bevel-up plane begins to tear out the grain it can and indeed does rip the grain out at the very root mercilessly and not rarely but commonly. Unfortunately, at shows, where salesmen sell planes, they never show this plane reality even though this is the reality of why bevel-up planes differ from bevel-downs and why they never replaced the bevel-down planes through the centuries or came anywhere close to them. Now then, that said and out of the way, the reason I do like them some of the time is for the relatively restricted practice of low-angle work, edge-grain work and jointing boards for lamination. I find that it is practical to keep these planes available and sharp and dedicated to end and edge-grain work. I have found the Veritas bevel-up range of planes from the tiny apron planes and block planes to the long jacks and jointers unparalleled if so dedicated. When I am jointing edges for tabletops, I work between bevel-ups and bevel-downs equally. I admit to the purest of joys of using a new and pristinely sharpened bevel-up Veritas jack plane across the end of any hardwood you might care to name. But I reserve the same for my I Sorby 5 1/2 and my Scottish Panel plane too. A fine and marginal difference does exist when using a low-angle bevel-up plane because of the inline point of thrust that centralises the pressure on the cutting edge of the blade. This then serves to more equalise the pressure above and below underside and top of the bevel with a mass of steel behind the very edge. In bench tests this week we tested out the two plane types of standard bevel up and bevel-down planes in the 5 and 5 1/2 jack sizes. Whereas the physics of a low angle presentation with a thick iron in a straight-soled heavy plane might be deemed to make a large difference in finding the sweet spot of planing end grain and such, we found that if there is a difference we couldn’t discern sufficient significant difference. In our testing we found the bevel-down plane actually felt lighter in the cut on or along the grain and could discern no difference in quality of cut or shaving. We sharpened both plane types to equal standards and set both planes to remove the same thickness of shaving; generally one thousandth of an inch. We have found the bevel-up planes work well on cross-grain cutting but again not substantially different than the bevel-down plane and certainly we have not found planing along the grain produces any improved difference at all but that bevel-up planes seem often highly problematic in general and especially wherever we encounter reverse direction in the grain that rips when the angle of the blade presentation on the low bedded angle is commensurate to the angle of the grain undulating and rising periodically to match that of the bed of the plane.
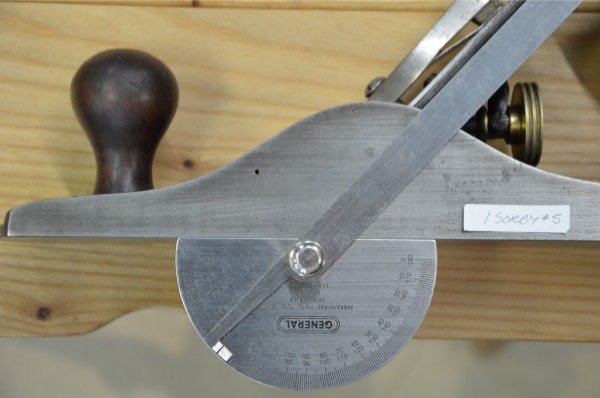
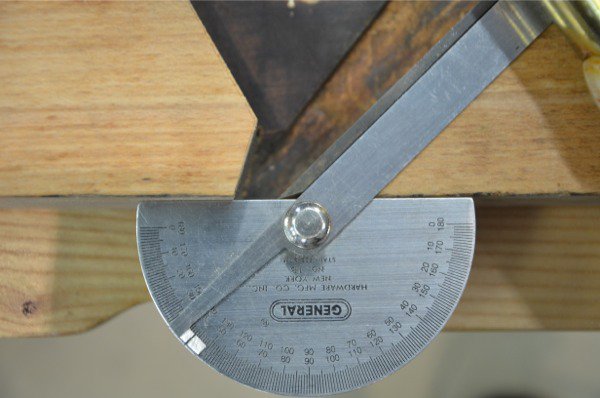
We also checked the angle of presentation of the cutting iron the wood in different plane types and makers and found them to be within 2-degrees of consistency somewhere around 45-degrees.

I think my comments in my videos are the result of picking up a well maintained and extremely sharp plane to tackle what is traditionally a difficult task when edge joining or end planing grain. My workhorse planes are bevel-down planes that may or may not have been sharpened at the point of my changing one plane for another. Had I sharpened my regular bench plane and picked it up afresh from sharpening and used it after a used bevel-up plane I would most likely have felt the same thing, which is what we felt in our experiments in this video.
I switched out a thicker Veritas iron for a thin Record iron and found it performed equally well in their standard bevel-down pane.
I feel we were trying to test out the planes non scientifically but honestly and the results were very real. It wasn’t only my opinion either. Both Phil and John felt the same as I did when they took the two plane types and put them to the test. We used three #5s, a Stanley, an I Sorby and a Woden and two #5 1/2s, a Record and a Stanley. They all performed equally well. I felt my I Sorby planes both performed best, but only marginally better than the Stanley #5, which matched the Veritas Jack in performance.
Tomorrow we will be showing the video of our findings for you to watch.
Did I miss your answer to the question of why you like the #7 bevel up jointer plane?
Thanks,
Andy
I have appreciated your classes tremendously. Your methods of accurate work have elevated my hand tool skills, and your sharpening techniques have been liberating. I share your sense of appreciation for the craftsmen of the past who depended on these tools for their livelihood and produced amazing works with them. I was pleased to see that you mentioned a wooden bodied jack as one of the planes you evaluated, but did not find discussion of how it did. Those of us who use these vintage wood bodied planes find that same “purest of joys” with them. Also, you mention respecting the wisdom of tradition, that tools and practices which have endured for centuries did so for a reason. I understand that to a certain extent you are trying to help us do excellent work with a minimal or “starter” set of tools, but would like to hear more as we advance about the longstanding traditions of using different planes for different work, such as the benefits of a try plane in smoothing a panel or the pleasure and unmatched precision of a jointer plane for shooting an edge. Thank you so much for your instruction.
Kerry
I will be adjusting the blog post further today as we post the video work and you will be able to see all the plane’s performances in their own right; all being well and the creeks don’t rise, that is.
Paul:
Why did they make bevel up versus bevel down? What is the essential difference in performance they are trying to achieve? Is it that with the bevel is up the angle to the grain is greater and therefore better for cross-grain cutting? I use primarily Stanley/Record bench planes but I have a Veritas low angle that I just got but haven’t use much. I have a No. 40 scrub plane that is bevel down.
In my purview at the bench, when I stand and stare at the plane, look inside its internal gubbins, something tells me this low-angle plane is better equipped to the task and challenge because of its low angle, thickness of iron, weight-in-the-throat, inline support of mechanical adjuster mechanism, mass of steel because of low-angle presentation and so on. In other words I want to believe that by its very appearance it will be vastly superior in performance. In reality however, at the bench, there is barely (if any at all) any difference between a low-angle bevel-up and a high-angle bevel-down, whether wood or metal, new or old, straight from the box or from eBay once you sharpen and fettle the planes. So my wanting to believe in it’s better presentation angle makes no difference except for me to put more effort into the ‘one-I-want-to-beleive-in’ plane, which I avoided for the sake of the tests we did. Remember it wasn’t just me that tried the planes but two other craftsmen too. So my loving the bevel-up Veritas makes little difference. I can’t alter the fact that a 30-degree bevel on a 12-degree bed incline plane is only 2-degrees difference between and 44-degree bevel on a bog-standard Stanley or Record plane. In the stroke the Low-angle, bevel-up felt more solid whereas there was something a little absorbing in the low-cost alternatives, but I did definitely get equal results from the cheaper planes.
Thank you for your objective and unbiased opinion on the subject Paul. It sheds the light of reality on a subject that has become murky by advertising.
Can you also speak to the characteristics/effectiveness of so called high angle (55-56 degree) bevel down smoothers? Thanks.
Cheers
It’s much cheaper to have a second iron, just an ordinary non-thick one from any plane, and put a 5-degree micro-back bevel on the flat face, 1mm is more than enough, and that gives exactly the same effect without retrofitting another frog. This was known as the poor-man’s york pitch.
Thank you for doing this – I am looking forward to watching the videos. I am in the process of trying to get a base set of good long term planes, and was thinking it is going to take me a long time to acquire the kinds I see my friends have gotten (Veritas low angle, bevel up, etc). It just costs too much at $200 to $300 a pop, plus about as much for the replacement blades to experiment as to buy one of the old Stanley on eBay outright.
I have been using a very inexpensive Kobalt from Lowes that I spent a lot of time studying your videos to sharpen the blade and get the sole right. Now, one workbench and a number of practice dove tail boxes later, I have to say that plane actually works ok. I hope after I go buy the old antiques or whatever I end up with they are considerably better though. Not because of the cost as much as the work and anticipation I am expecting. I was wondering if you will be comparing / have compared the WoodRiver planes?
I agree with Mr Sellers completely.
However in the US, we have the greedy monster “MARKETING”! To convince us we need the latest new car, TV, tools, etc.
I think that greedy monster lives throughout every nook and cranny of the whole world unfortunately.
I have to say though that is one of the primary reasons I like to follow this blog and the videos. Paul demos those fancy tools, but also shows the “poor man’s” version, often that can give excellent results (i.e. the poor man’s router). An excellent case in point is in this video it is clear the old, pre 1970 Stanley seems to be a good first choice that will last long term.
I think I am more confused than ever on youtube I commented according to others the sole needs to be flat in order to produce a flat board but you disagreed yet in one of your videos on tuning a hand plane you took the time to flatten the sole. In other videos you see them flattening the frog, filing the mouth, flattening the edge of the chip breaker for better and full contact on the blade. All these things are done to hand me down planes, eBay bought antique planes and so forth. According to today’s hysteria on yesteryear planes if these tune ups are not done these planes will not perform. I would like to know did craftsmen back then tune up their planes prior to use. Did Stanley, record and others knowingly produce inferior products or did we create this hysteria in order to justify the ridiculous price that is being asked for a premium hand plane. A jointer hand plane costs well over $500 and a 6″ machine jointer costs the same, do you see where I’m going with this. This is a machine a bulky machine with many components and a large iron surface yet a premium hand plane costs as much. I’ve always been a loyal fan of lie nielson but after watching you video and reading this blog I feel that I have been suckered into spending more than I had too.
Most handtools when they are bought new it is understood they need some tuneup or “fettling”-this has always been the case. The vintage Stanley planes when they were new and first purchased the craftsman anticipated doing a bit of sole flattening, making sure the chipbreaker made good contact, flattening the back of the iron and honing the iron. The sole does need to be flat enough, but that definition varies- a jack plane for rough thicknessing and stock removal doesn’t need the same degree of flatness as a smoothing plane for final finishing, and even the smoother just needs to be flat in the central portion in front of and behind the mouth, not dead flat from edge to edge. Vintage planes often need to renew this bit of a tuneup. The difference is that most new cheap hand planes are so poorly made that even with a tuneup they can’t function properly-“tool shaped objects” as Chris Schwarz says. On the other end are the modern premium planes which are very well made but also part of their premium price is that you are paying someone else to do the tuneup-your Lie-Nielsen plane will arrive sharp with a flat sole, lapped iron, and properly fit chipbreaker. So, we can buy vintage planes and do the tuneup, or buy new premium planes ready out of the box-both will work equally well. And these vintage planes are so readily available that unless you buy a badly abused plane, the fettling is not a major operation. A difference between buying a $600 Lie-Nielsen plane and a $600 power jointer is that with the Lie-Nielsen you are getting a top of the line precision tool, and the $600 jointer is the bottom of the line. With power tools precision and accuracy depend almost entirely on the quality of the machine-with hand tools precision and accuracy are almost completely up to us as craftsmen.
I think that the appeal of buying a plane ready to go is purely a temporary fix. It’s the same with saws, spokeshaves and many of the edge tools people need to work wood. Stanley utility knives eliminated the need for sharpening blades by bringing into being the disposable knife blade. The knife itself was almost at cost. The blades on the other hand, whereas not cheap, were very convenient. Within a decade people forgot that they once sharpened their own blades and saw buying them as essential as buying food. It’s about the same psyche as buying computer printers that cost $40 and the ink price needs a remortgage to pay for it.
When you bought a plane prior to the modern makers like Lie Nielsen, Clifton, Woodriver and others, you had to make the plane ready. You would absolutely not be able to set the plane alone and make a shaving with it. I can recall men standing at the bench with me at 15 years old for about half an hour and taking me through the steps. We did not flatten the sole, but it did flatten as I used it over the years for some reason. I am still using that #4. So fettling at new was a bit like a chick being born. Helping it out of the shell usually means the chick dies because the essentiality of the chick breaking its way out of the shell with its temporary egg tooth is what enables it to enter and survive in the new world outside the former shell. Dismantling a plane that NEEDS fettling means you must immediately think through the process of the plane. Doing it once equips you for life. It may seem like the makers seem to be helping with a kindness by offering a ready-to-go tool but there is method in this. The kindness kills what it takes to establish the skill from the get-go. Anyway, why put off what you can do today instead of tomorrow. Go on, jump in, get your feet wet. The plane’s going to work in an hour or two.
Kerry old boy very well explained so my next question will be what are your thoughts on the wood river planes, Rob Cosman claims they are a premium plane and half the price of their competitors.
What you have just written makes more sense to me and a realisation of what a true master is all about. Thank you Paul for opening my eyes, my journey has just begun.
Ditto the question about WoodRiver planes. I am heading down to Woodcraft tomorrow and have been eying their planes. That seems the only brand they sell. $145 for the #4 and $170 for the #5 here in the US.
Comparing to LN they are cheap but if your going to get a 5 go the next size up to a 5 1/2
In response to your question about the Woodriver planes from Woodcraft, I would echo what Paul Sellers just said. Last night I spent an hour with a Stanley #4 I bought for $25 at a flea market. I didn’t flatten the sole, just disassembled the plane, cleaned it up, lapped and sharpened the iron using Paul’s techniques, and honed the edge of the chip breaker to make sure it made good contact. After reassembling and adjusting it, I used it to take coarse then wispy oak shavings from my project. It works now every bit as well as the Lie Nielsen #4 on my shelf, but it’s lighter and nimbler. This evening when I reach for a #4 it will be the Stanley. To use woodworking tools we have to learn to sharpen and adjust them. Every woodworking magazine will have an article about how to tune your bandsaw…tablesaw…jointer…etc. Our learning curve learning how to fettle a handplane is small compared to this. If you buy the Wood River, Lie-Nielsen, or any plane, it will eventually need to be sharpened and tuned up, as Paul says, and we might as well learn to do it up front. This easily mastered skill will let you obtain and enjoy these vintage tools for much less money, and they are much lighter in the hand and nimbler. Try it!
The difference is as you pointed out earlier premium planes only need honing you will not have to tune up the plane ever regardless of how many years have past. This is not including wooden planes but I agree hand me downs and flea market buys are cheaper. I’ve never owned an antique plane so I’ve never tuned one up
Now they claim that the A2 stays sharper longer after 25mins of use I need to sharpen and this is something I do several times a day I did have some stanley chisels prior to buying a set of LN ones and the stanley went blunt after a few chops while my LN ones stayed sharp for much, much longer.
As for smoothers I prefer the bevel up veritas over the LN #4 to me it leaves a glassier surface and I’m able to cover more surface due to it’s wider sole. All I need now is a 5 1/2 for many of my projects my #7 is over kill.
There is so much to learn in this wonderful craft I love going to work everyday it doesn’t always pay the bills that’s why I have a second job but it sure does bring alot of satisfaction, peace and tranquility to my life. In my shop behind my bench is what makes me happy.
Thank you Kerry, I will. I think after reading through these posts, I figured out what is wrong with my Kobalt from Lowes. It simply needs to be sharpened more often. I really like how well it works for about 10 minutes after I sharpen it. I have been trying to bid on good Stanley no 4 on eBay, but keep getting outbid at the last few seconds. It seems like the going rate is about $35 to $40 plus shipping. Some of them look like a lot of rust on the nuts and bolts so I usually pass on trying for those.
I’m not a fan of Kobalt, they’re poorly made and I’m not surprised you have to resharpen after 10 mins of use.
Shipping prices are an issue and not just with eBay, unfortunately many are abusing this by over charging. It is hard to find someone who will actually charge true shipping rates, I got charged $56 for a set of plans I know you think I’m crazy for paying it but it was too good to pass it on, yes it hurts when they openly rip you off like that.
Yep. Still, a far sight better than $200 or $300 for one new, good quality plane. I just bought an old Stanley for $14, but the shipping was $15. It looks pretty beat up but I am hoping it can be brought back to life.
I was always taught never to buy low quality tools no matter how cheap they are, Paul plane is a great example of a quality tool which he bought when he was an apprentice. I bet your bottom dollar even back then on apprentice wage that would of set him back quite a bit. Buy the tools you need and never be stingy on the dollar. If you can’t afford it now then save up for it, that tool is your bread and butter even if your a hobbyist you don’t want to be frustrated with poor performance.
I think you’ll be amazed at what a little elbow grease will give you with the old Stanley, compared to the Kobalt. Good luck, let us know how it’s working.
Just got back from hand tool special interest group with our local woodworker’s guild. Topic today was handling difficult grain- quilted wood, changing grain directions, etc. This reaffirmed what Paul Sellers was saying: an old Stanley, well-sharpened with a close set cap iron works as well as low angle Lie-Nielsen planes.
I think he also mentioned about creating a 5° back bevel on the back of the blade will also give you a low cutting angle if I’m not mistaken.
Paul;
I have purchased two old Stanley #4’s and have gone through the cleaning and restoration process. However, after sharpening the plane iron and lapping the base to a pristine shine, I am still unable to accomplish two objectives.
1. planning gossamer maple shavings. I use maple because I have come into a supply of maple flooring left over from a recent re & re.
2. Planning a square edge along a length of 3/4″ / 19mm wood. I always end up with a slight to noticeable bevel along one edge or the other.
Any suggestions?
I just went through this Bob on a blog a few days ago. Look there first. Not sure why you want gossamer shavings. They don’t really have much to do with real woodworking but sales of planes by salesmen who spend an hour honing and polishing their wares in an endeavour to impress people to buy their expensive planes. That’s not real woodworking really. Follow the blog and some of the comments there. I think that that will really help you. If still struggling then get back to me and I will try further.
Paul;
My apologies. I had read the article a few moments after I posted my request for info.
As far as the gossamer shavings item is concerned, I made the assumption that in order to produce thin shavings, you required a sharp blade and the right setting.
I also have an issue with the concept of the plane doing the grunt work and not the planer-man.
Planning with the grain on maple, I find the plane difficult to move unless I apply some elbow grease. Not that I am adverse to such work conditions, it is that I would like to know how to do all things.
If I set the blade to a fine cut, it whispers over the surface, without much of a result. The adjuster is rather finicky, ~ five turns ahead before to blade will cut and then it is right into the wood. There is quite a bit of lash.
How to tell a good frog from another?
At this point I should explain how I have the frog set. The forward edge is right in line with the blade opening. The blade lays right across the frog and the edge of the opening. The pressure plate has no resting spot other than the rounded top of the chip breaker.
Please reference a recent blog were you have broken down the alignment of all adjustable components.
Great. Here we go. Most often the issue comes in one or both of a couple of areas. The bevel becomes the critical contact with the surface and whereas people can put a lot of effort into sharpening and stropping but negate the intent by overdoing things unwittingly. Edge fracture along the cutting edge readily occurs but steeper bevels on bevel down planes don’t alter the front bevel so you can sharpen up to 35 degree without altering the fore edge of the bevel. The best bevel at the actual cutting edge is therefor between 30-35 as a good strong edge for BD plane. Now my blades have a camber on the bevel and this is I feel the best bevel for freehand sharpening and perfectly natural. So with the bevel angle established I have found that the main issue comes when stropping. People strop on the leather strop wrongly usually. Instead of a straight pull from left to right without altering the bevel from say 25-30 degrees there is a tendency to exaggerate following the bevel and lift up on the end of each stroke rather than keeping the bevel angled the same as the ground angle. This then rounds the cutting edge and even marginal difference means that the cutting edge is actually above the surface of the wood even though the plane will still cut the slight round causes the plane to ride the wide rather than actually give a cleanly engaged cut. The next real problem is stropping at the correct angle and then dropping off the strop at the end of each stroke thinking that this somehow culminates the strokes in a better way. This too undoubtedly rounds and dulls the key edge and spoils the work we are trying to achieve. Just about every student I have seen starts to develop this bad habit without thinking.
It sounds as though you have the frog set fine for 99.9% of work. Only rarely is it necessary to alter the frog.
Remember that the harder the plane is pressed down the greater the friction. People have been led to believe that the plane should be forced this way which is utterly erroneous. If the plane doesn’t grab straight off and pull itself to task then the bevel on the cutting edge is rounded and rides the would without cutting.
There is a problem there with the adjuster. I wonder how much pressure you are applying to the lever cap. Try different settings. Setting should be minimal but enough to prevent the cutting iron assembly from being moved by hand. I think that most planes have an exchange between forward and reverse thrust on adjusters and I don’t mind five turns as it takes split seconds to do. Make sure it is oiled and not under undue pressure from the lever cap.
The hump on the cap iron (You say chip breaker) is exactly where the leading edge of the lever cap should be.
I know that this is old posting, but Thank You Paul.
Your simple and elequent explanation helped solve a problem that I’d had for months. I was being deliberate and precise while setting the bevel, then sharpening and then honing. However, I was behaving like a sex-starved bonabo or chimpanzee when it came to stropping on my leather-clad little block of wood and was subsequently creating a micro-bevel allowing a bulge to form BELOW the cutting edge of my plane blade, which allowed said blade to easily and simply ride up over the surface of everything I was trying to work on. Now, obviously, a little more pressure and “elbow grease” would get me there, although the end result was far from perfect and needed quite a bit of effort with a course sanding block.
Thank you for making me think!