Part Two of Forensic Researching in Wood

It is common practice to use twin tenons at around 6” in width. So when you approach that width you begin thinking of what use a piece will be used for and also what stresses will be placed on the piece too. In this case the drop leaf flaps are to create a larger table for sitting at and yet the table cannot be used that way when the flaps are down. This then suggests that the flaps are usually down to create more space around the table when not in dining use but perhaps still useful for preparing for other aspects of family life or to fill an otherwise empty space.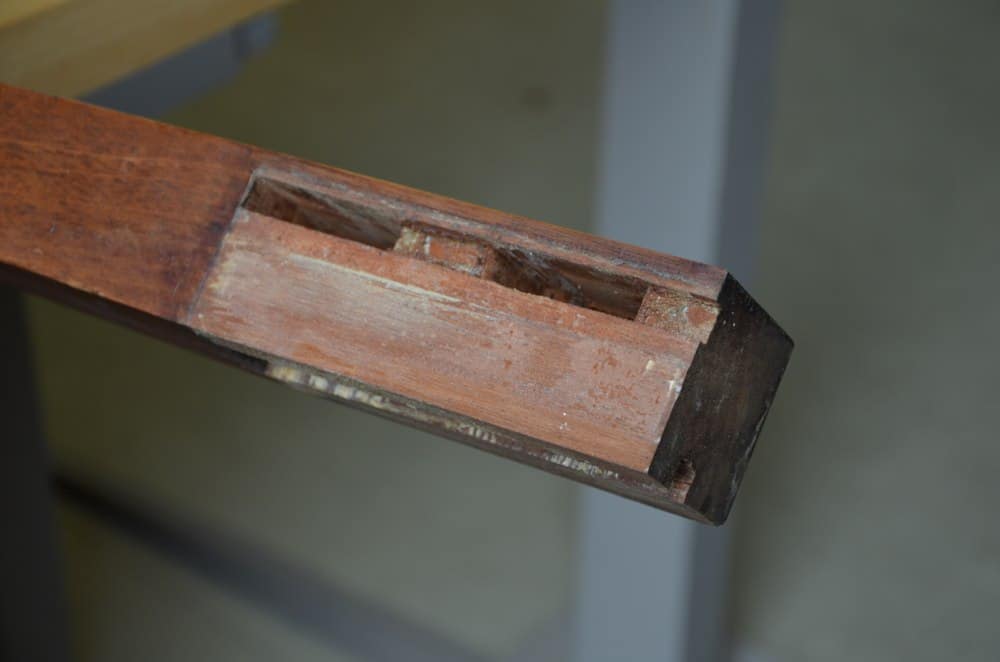
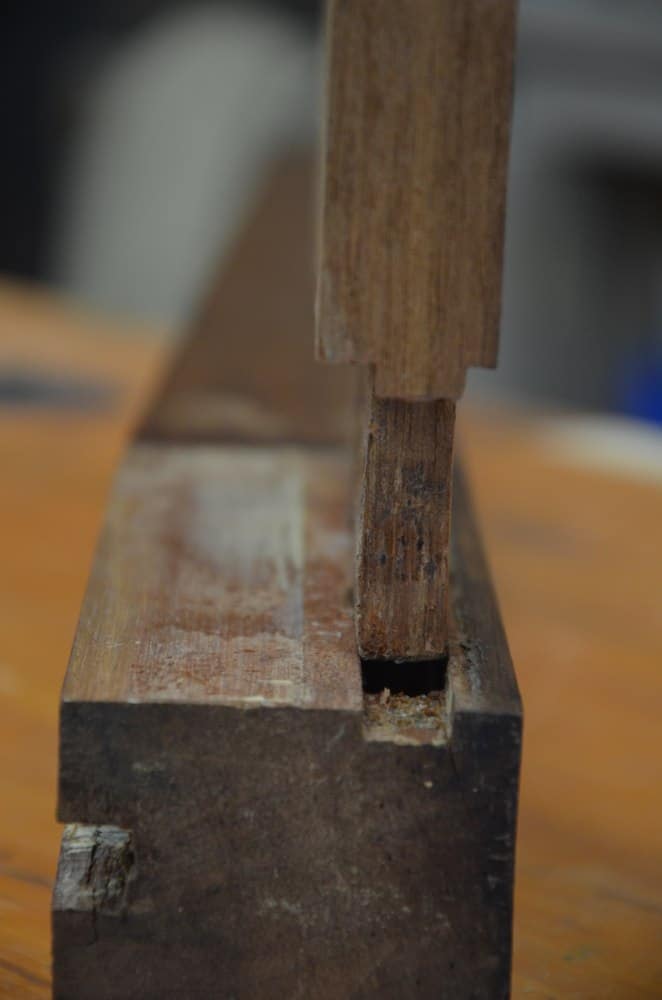
The table itself when the flaps are down is relatively narrow at just two feet over all. With a leg between the knees the table seats six or eight if some are children. Tables get pull and pushed into place quite frequently to create work areas, passages and flow for other needs. Pulling tables on carpets is hard on the joints. Lots of leverage and only a small jointed area to resist stress. These are often the breaking points with the tenons holding but the outer wall of the mortise giving way and resulting in a split. Especially is this so if no glue is used but only a draw-bore peg. This was well known on tables and not a problem on doors. Draw bore was not used on this table and so suggests the use of clamping and this then helps in the dating too. Although it was common enough to devise wedged clamping systems requiring only boards and wedges, long screw-threaded clamps were relatively unknown prior to the late 1800s. That doesn’t mean they weren’t invented at all, it meant that the accuracy in machining to cut threads was still in the developmental stages both in the US and the UK. My namesake, an inventor mechanic named William Sellers, worked diligently towards dissecting non-standardised threading and sizing of the age to produce a standard by which threading would be reliable and so to the British engineer Joseph Whitworth of Whitworth-thread fame who also endeavoured to establish a standard for measuring and creating threads.
The Mortises
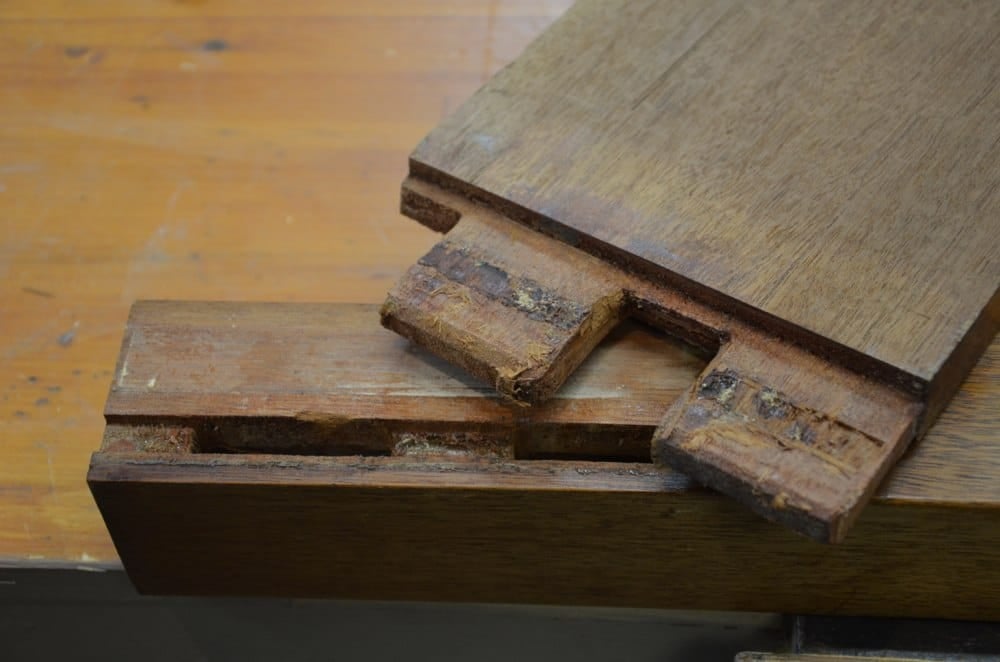
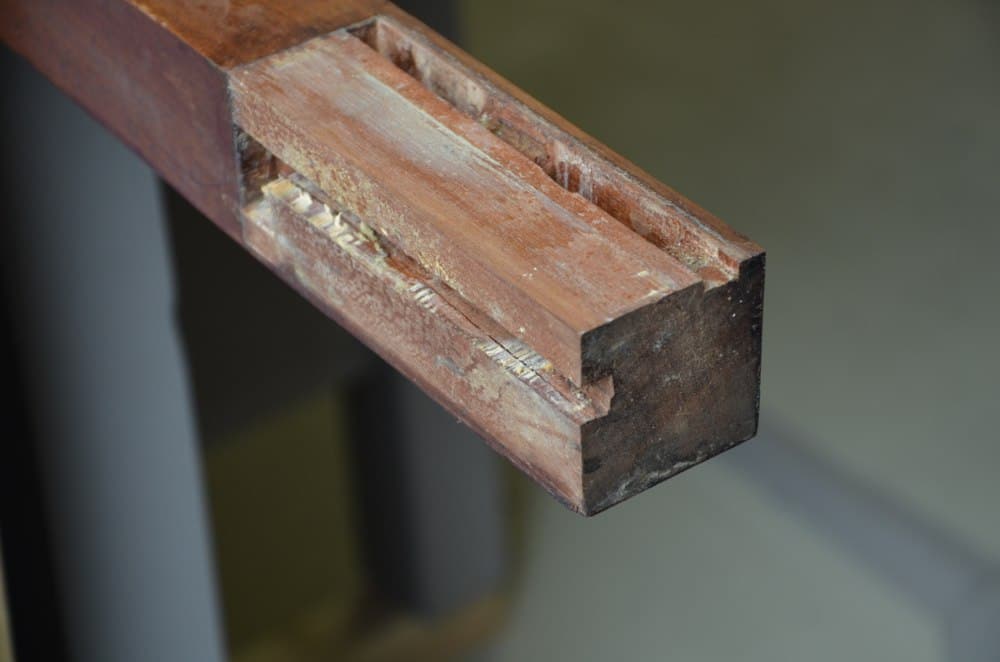
In all cases of sound M&T joinery the mortise hole surrounds the tenon on four sides. When the tenon is used in the middle of a stile or leg there may be two, three or four sides of the tenon sporting shoulders. When one or more shoulder is missing the tenon is usually referred to as a barefaced tenon and in this case the longer pine aprons have a shoulder missing on the large face of the twin tenons. This is relatively unusual on tables as tables are commonly apt to accomodate both front and back shoulders as in the short aprons. It’s not uncommon to have shoulders of different depth however. That way you can push the limits in favour of stronger joinery, which only the craftsman can determine according to his discernment.
Factors surrounding this joinery revolved around the swing-out arms that support the flaps. These are indeed wide flaps at a foot wide. Quite heavy really. The need for them to be recessed away from the front edge pushed the mortise hole back toward the rear inside corner of the leg. It was a careful consideration and well though through in terms of sizing and distance and so on. This is true of apron sizing too. The width of the leaves meant unhindered seating arrangement at least along the flap edges. More problematic in the short apron space, but no problem for children with a leg either side of the leg or indeed a child sat in the middle and older siblings near the corners. All thoughts really.
By now you will see the critical thinking every craftsman had in developing a piece. it is most likely that this piece was more functional than decorative in that there are no decorative features to the table at al except for inside tapers to the legs. Even this was most likely a functional consideration. Thicker around the joint areas and thinner to the foot for access, sweeping and cleaning and of course swinging legs in and out of spaces to sit at a chair. In those earlier days of design the craftsman was constantly engaged in decisions minute by minute when he designed his work. The decisions were at the bench and in the home or workplace, office and so on. The design, this particular design, was most likely not a one off but a pattern developed through many years. That’s also true of todays developers in designing their pieces. Artisans place their work considerations at the forefront in establishing the form they will build to. Function is of course paramount unless you cross over into realms of art. In this case the art was designing a functional piece.
The bottom of the mortise holes, or inside the enclosure, were trapped two pine shavings. Not significant at all but interesting in some cases. In times past I have found shavings between the cap iron and the cutting iron that told me the last work of the man and the plane. In my mind these are a type of time capsule.
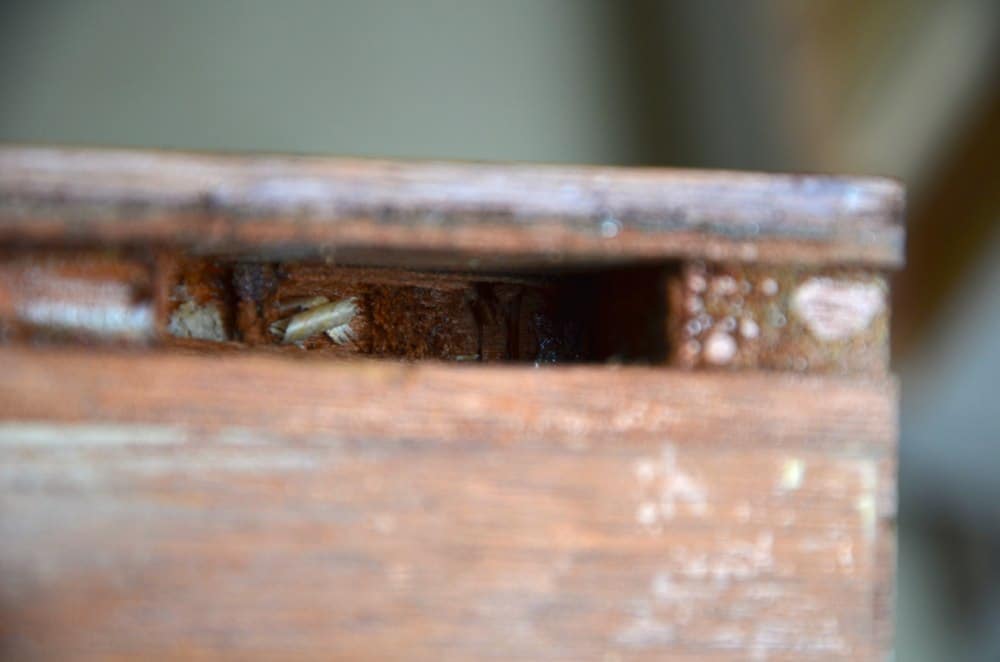
In the bottom of the mortises the chopping is indeed choppy and not smoothly executed. In fact they come surprisingly close to the outside faces and in one case on 1/16” remained between the bottom and the outside face; a near flaw. I noticed that the inside walls were very smoothly cut and suspect that they were cuts with mortising chisels of one type or another and not firmer chisels. The sizing was 13/32” and corresponded to to the tenons. that may sound obvious but it’s not always the case as in some cases craftsmen did undersize tenon thickness for speed and relied on either a draw bore pin or tenon width to be tight. This sped up the process for those under pressure from their masters. The width the tenons are set to show no underside shoulder and this is common with pieces where the shoulder is unseen. It’s quicker and easier and any shrinkage that might show as a gap is of no consequence because you would need to be bent over on your knees to connect to this. Sometimes, however, I do use shoulders here because it’s good exercise for my students in establishing skilful shoulder cutting.
My next part in this will be examining the making and using of the knuckle joints. Hand cut and no machines. Fascinatingly accurate and effective underpinning!
Paul.
A few weeks ago I mentioned my apprenticeship in Macclesfield starting in 1960.
Long before that I was helping out in a Cabinet Makers shop, father and two sons the old boy was 73 and still doing a very full day.
They were superb craftsmen.
They made a range of furniture but specialised in bow fronted and serpentine chest of drawers a lot of which was exported to America and some were sold in Prestbury and Alderley Edge..
The only machine in the workshop was a Lathe, and they never used new timber apart from veneer.
Back then “brown” furniture had gone out of fashion, and could be bought at the saleroom for next to nothing.
One of the sons would go and buy all the best pieces for the timber.
After school I would go with him with a handcart (several trips to collect the purchases.
My job was to dismantle the furniture with the minimum of waste,and thus I had a great insight as to how things were made.
One joint took me by surprise, a slot screwed butt joint I only found out about it after I had sawn thro a screw.
When I started work this experience put me ahead of my peer group
.
Regards
Fred Sutton.
Paul,
Any chance we might see you demo the processes used for this joinery?
Hello Paul,
thanks for your time to write all those valuable information.
I hope to see (read) more in your future book;
your Masterclasses make it possible to make differend kind of joints,
but which joint to choose on a certain project?
very interesting!
Erland
It’s simpler if you break it down this way. There are almost 3,500 woodworking joints recorded somewhere in the world of woodworking but we actually use mainly three. There are two or three variations on these three but the principles for making them use the same skills and techniques as in the first three. The three most commonly used joints are the mortise and tenon joint, the housing or dado joint and the dovetail joint. The M&T joint is always some kind of frame joint and is indeed used to make frames for doors and windows, chairs, tables and so on. The dovetail joint is always used for boxes such as drawers and jewellery boxes, ordinary boxes such as tool boxes and son and the housing or housing dado joint as I prefer to call it is famed for book cases and shelving units. The other 3490 plus are not often used.
Paul the spilt you mention in the text, the same as can be seen in pic 5 of the six, with the tenon hovering above mortise hole? What could have been done differently if anything construction wise?
Paul
A very interesting series of posts and comments. It would help me a lot if you could take a pic of the piece you are discussing to complement the detailed joints. Thanks. Jonathan
Paul your comment about wood shavings left in old planes intrigued me. I have refurbished several Stanley metal body planes and cleaned out the old shavings myself. I wish I would have paid more attention and not treated it as just a means to an end. Next plane I will pay closer attention. Thanks again
John Crosby
Hi Paul,
should bare faced tenon be used for aprons instead of classic two-shoulder tenon? In the 17h century furnitures, that had drawbored tenons, the inside shoulder were undercut and didn’t touch the correspondant style’s face, and the joints holded for century, and there weren’t problems of out-of-alignment due to the presence of only one shoulder thouching the style.
I’m always glad to know the opinion of a big master like you.