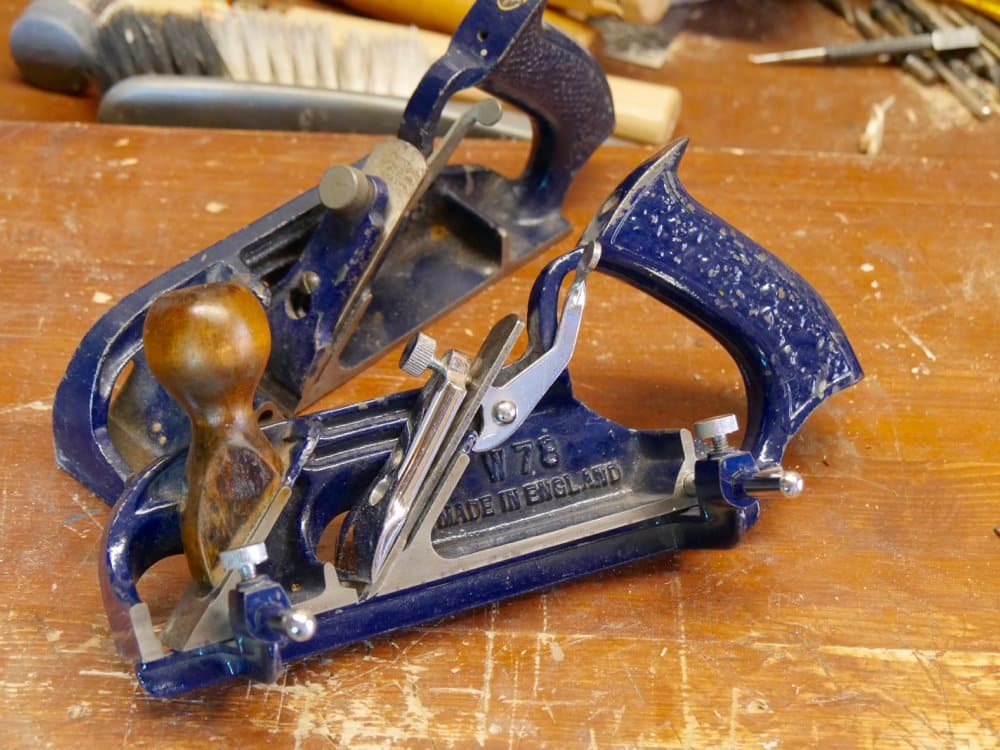
Rebate Plane No1—The #78 Filletster Plane
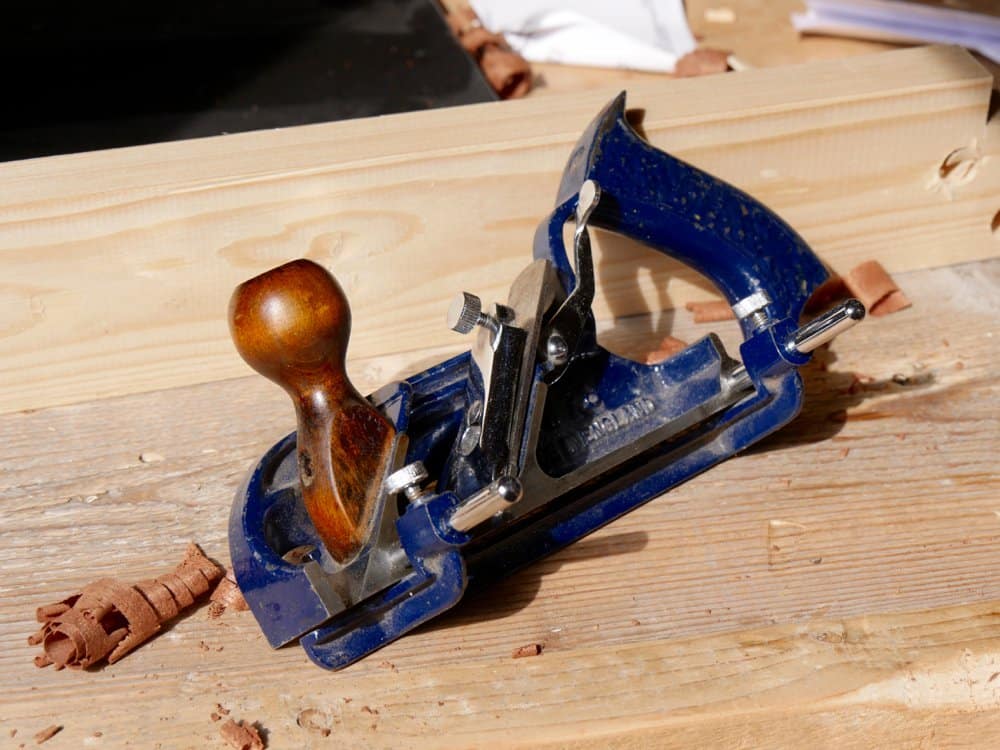
The Stanley #78 is a plane I have kept turning to for 50 years because of its versatility, compactness and reliable neatness. As with all planes it has unique nuances everyone should learn of but let’s discuss the plane in general first. The filletster plane is simply a rebate or rabbet plane and can be called such in the day to day of benchwork. The Stanley 78 pattern we are discussing has been made by many different makers over the years and all of them are just abut identical.As a bevel-down plane pattern type it is generally used by joiners and furniture makers for forming the occasional rebate and especially for cleaning up machine marks from spindle moulders before finish is applied. As a boy every rebate was cleaned up using one kind of rebate plane or another and this was the one I bought and used. It is not common practice to clean up machine work today. Looking at most surfaces in houses, even on architraves and skirting boards, I see the monotonous ripple left from machines as the light catches the high points exaggerating the rotary cuts. But rebate planes make short shrift of this task and more than that the task of sanding too. Once planed, a rebate can be sanded with 240-grit paper and a block in two strokes and you don’t need to wear a dust mask all day either as the dust falls to the benchtop and is not swirling for an hour in the atmosphere.
The Stanley 78 was one of Stanley’s most popular carpentry tools for those hanging and fitting doors and also for refitting sticking doors too. Stanley US and UK supplied almost every workman between 1900 and the mid 1960s with one of these core planes. Of course most woodworkers today see them as planes used to form rebates only and not for the tasks I have just described. I don’t know if this plane will ever be as popular as it once was because most people will form rebates using routers, spindle moulders (shapers US), tablesaws and jointers. In my view it is a highly functional plane that can often be bought secondhand for not too much and as you come across one you should consider buying one. Rebating a section of wood 12″ long with a 1/2″ x 3/4″ rebate is literally 2 noiseless minutes work for me.
Which one to buy
Well, there is not too much difference between makers. Once you know the plane and are used to its set up it is indeed a low risk even belts-and-braces plane. Two makers I know have made this plane with only one difference and that is adding an extra bar to make twin bar rigidity to the fence. In actuality this makes little or no difference to functionality unless you are prone to overly bulldogging the plane to the wood and break the fence itself. This doesn’t happen if you are careful or if you own the twin bar Record or Woden models. Beyond that they are basically the same unless you buy a really early model without the adjustment feature of those made after the mid 1920s.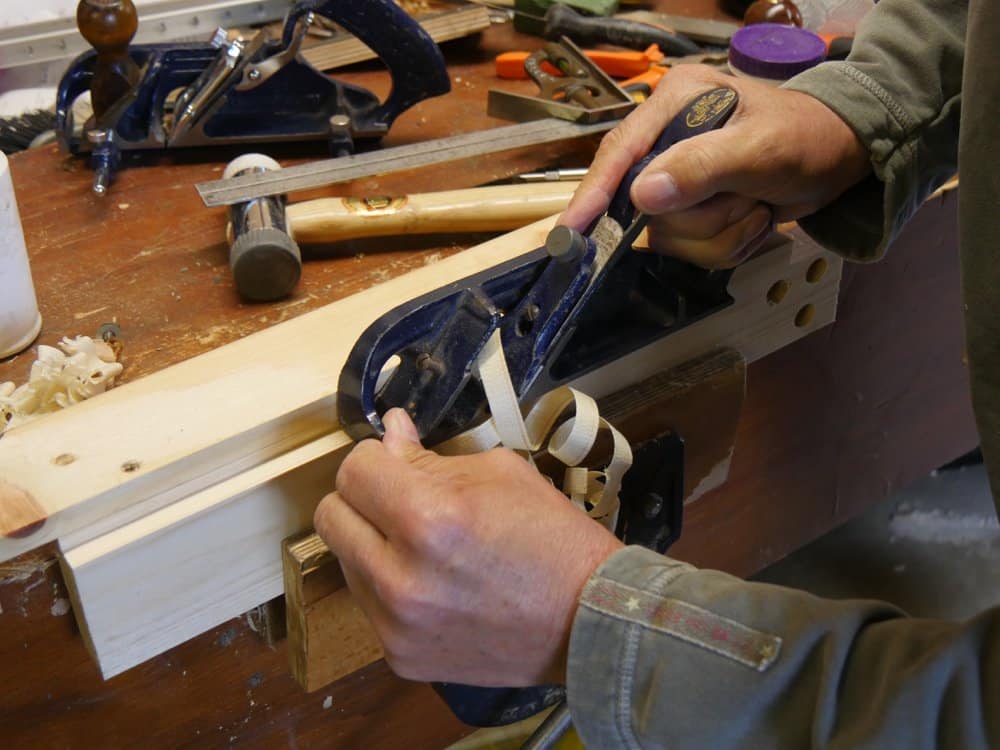
Fence guide
As with wooden planes, the #78 is kept parallel to the corner of the wood being rebated by a fence beneath the plane. A partially threaded rod we call the arm (some planes by the British makers Record and Woden have two parallel rods. 
If the fence is missing from the plane you can clamp a fence to the stock and use that to guide the plane. 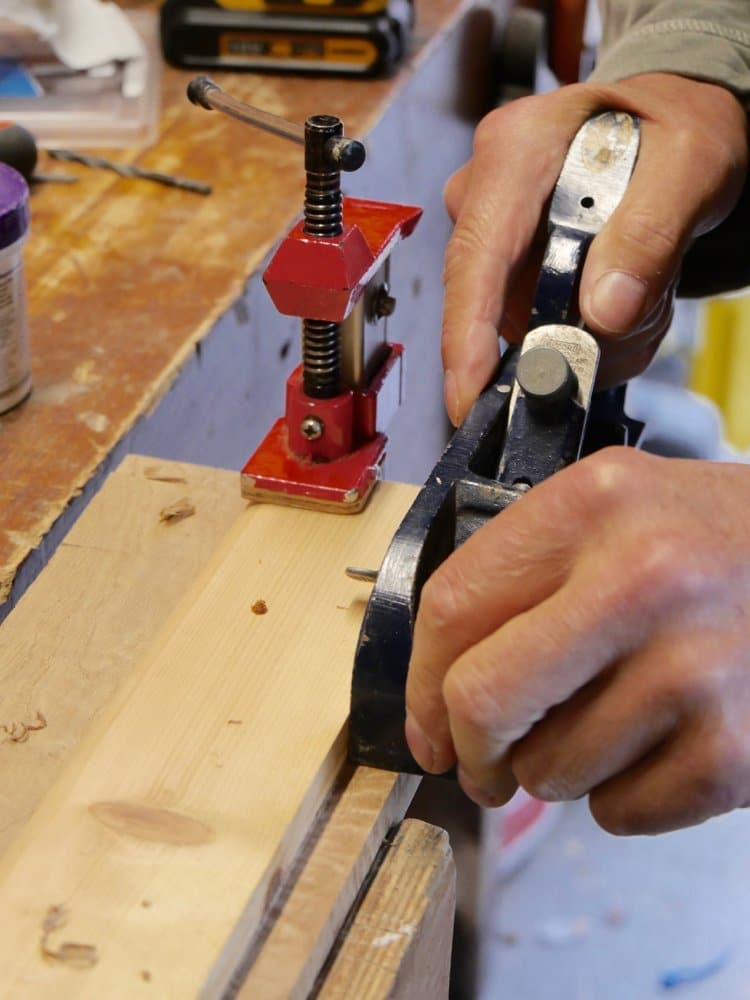
Simple enough and very clean. You can also use screws for securing the fence if you cut the stock you need a little longer so you can cut out the marred wood..
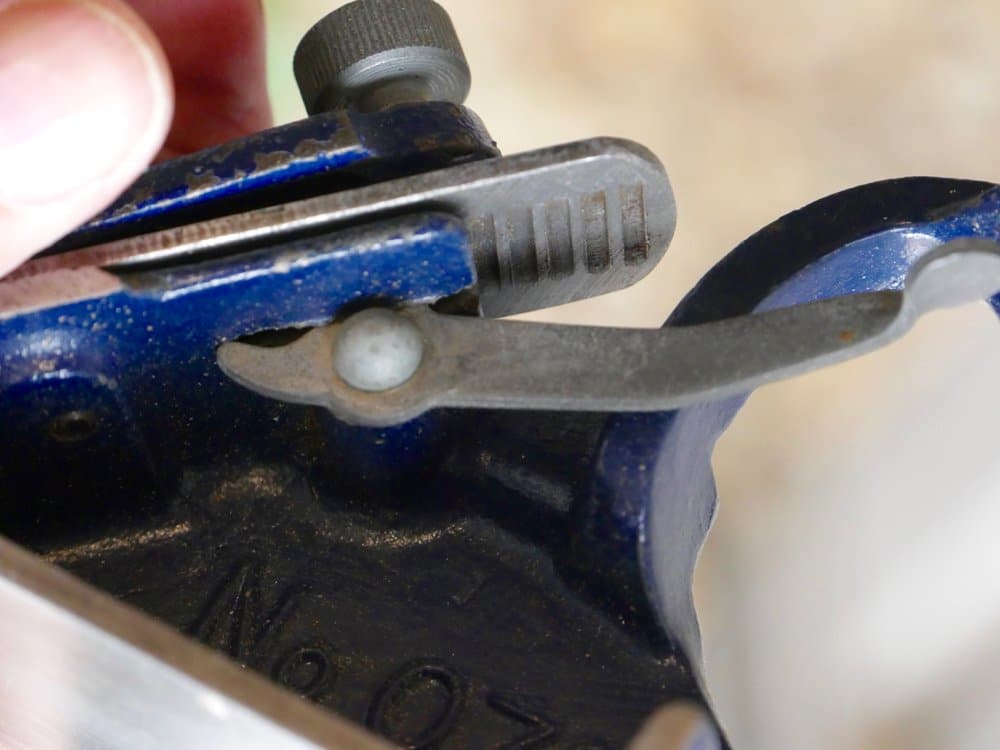
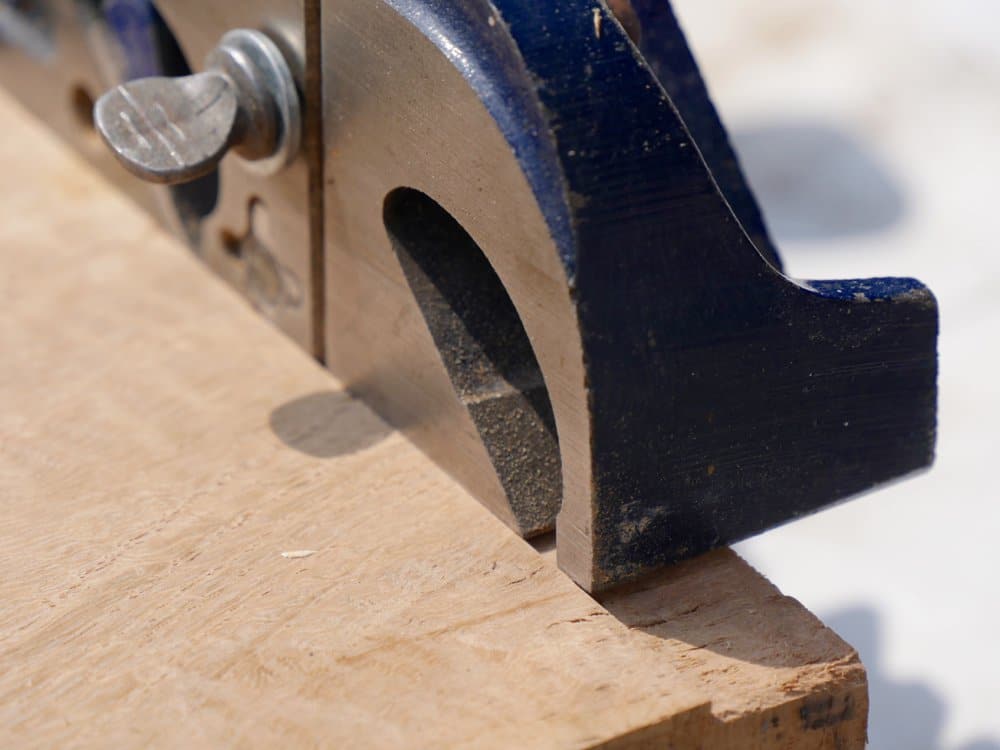
Depth stop
We control the final depth of the rebate by way of an adjustable depth stop on the outside of the plane. This stop is secured by a simple thumb screw generally but some planes use a slotted head and this gives extra leverage for good securement. To keep the depth shoe in vertical alignment and then again parallel to the longitudinal line of the wood being rebated, a groove in the side face of the plane on the right side where the depth stop is located receives a protruding upstand on the inside vertical aspect of the depth shoe. 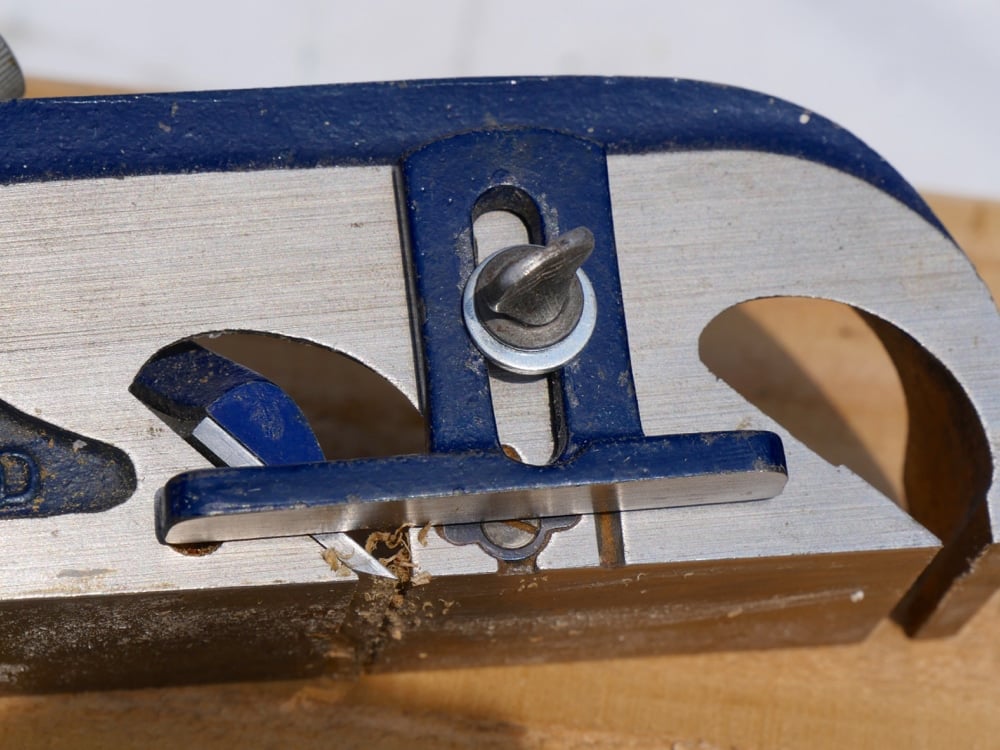
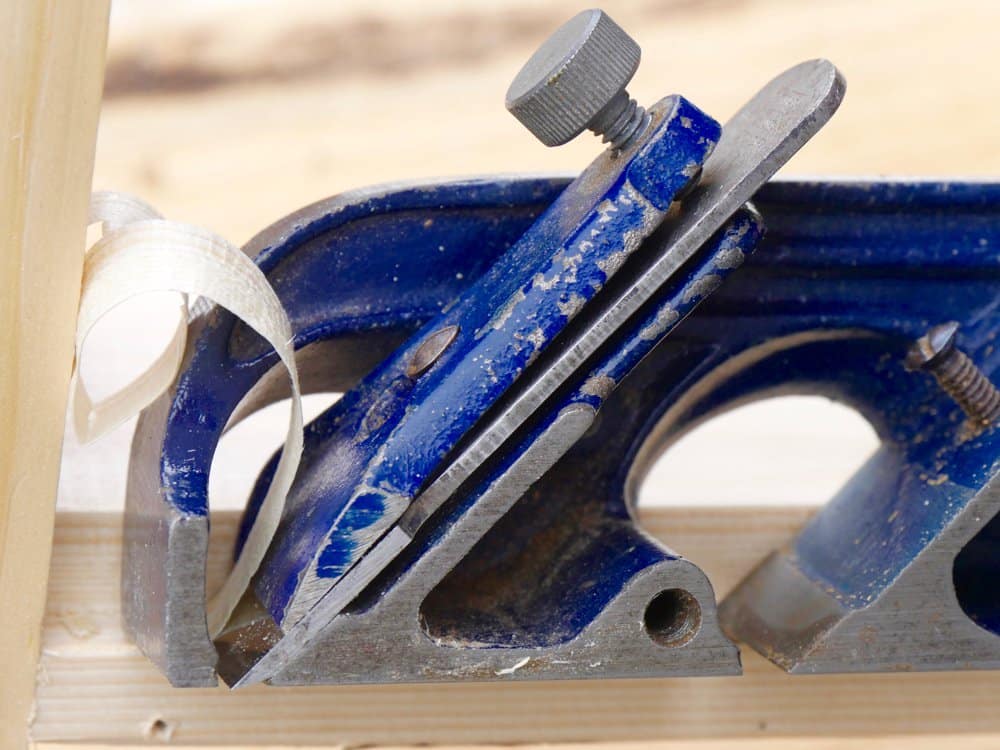
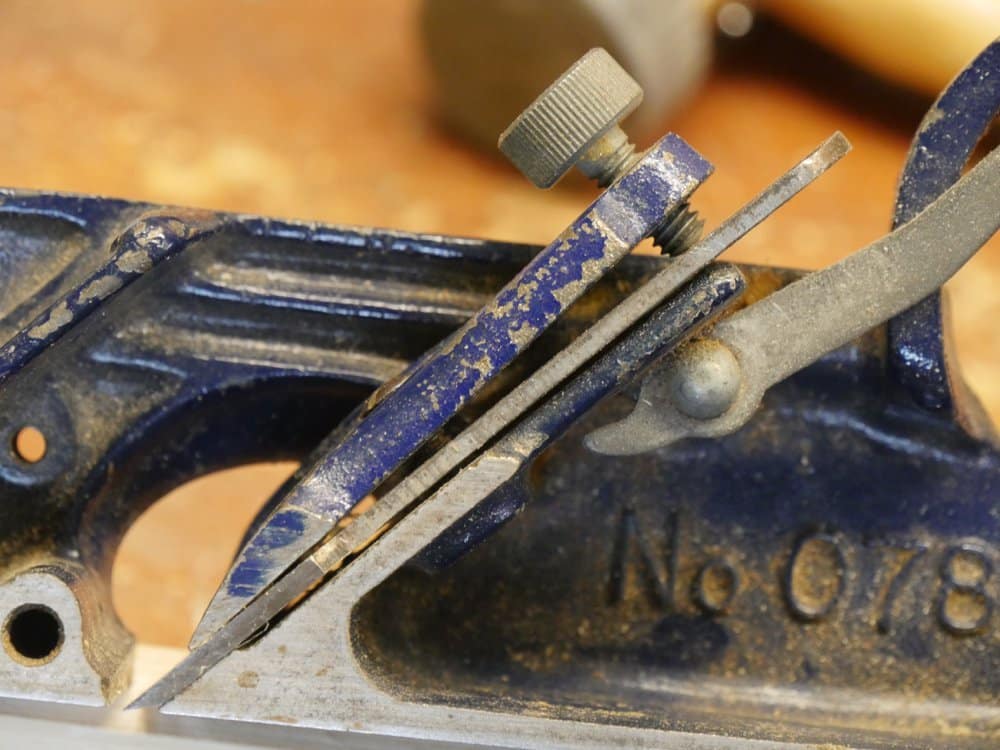
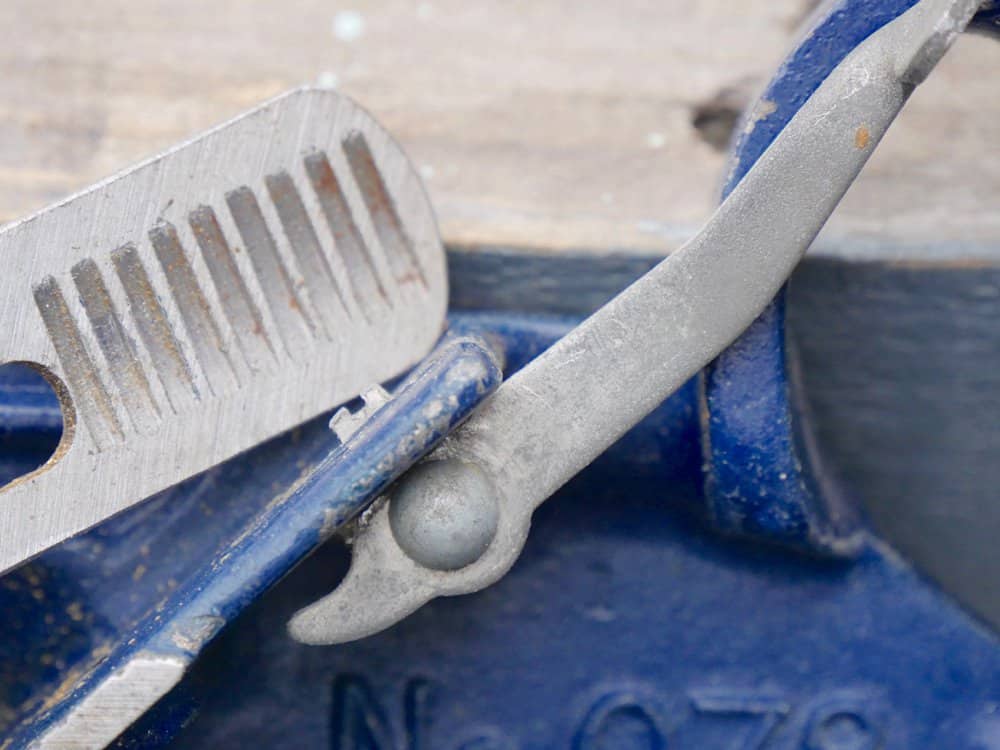
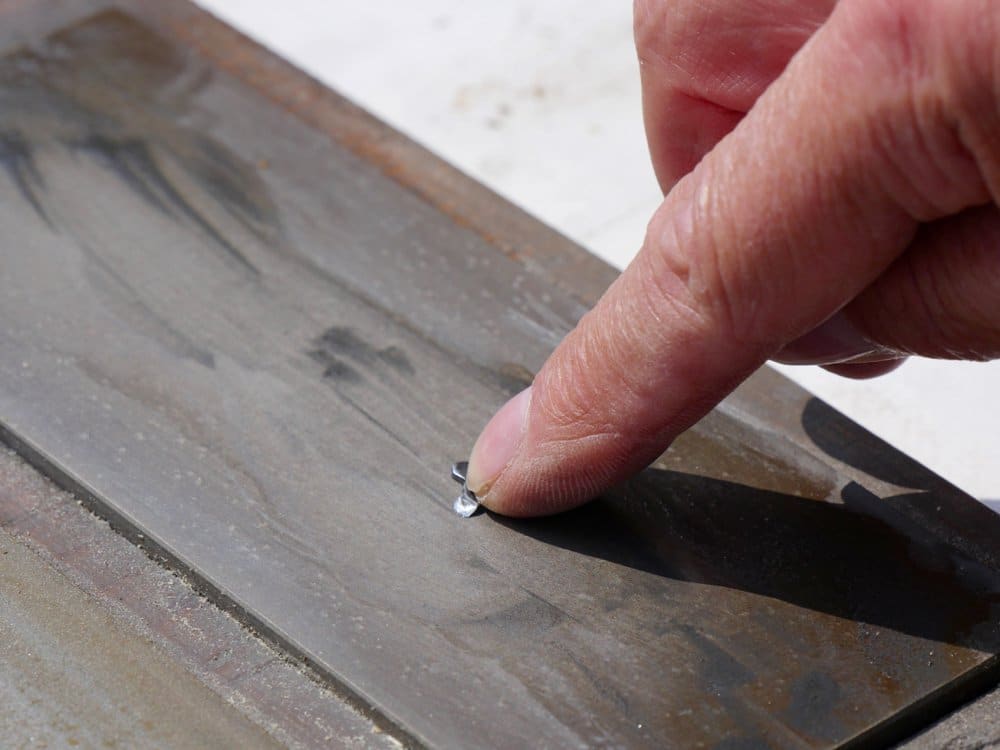
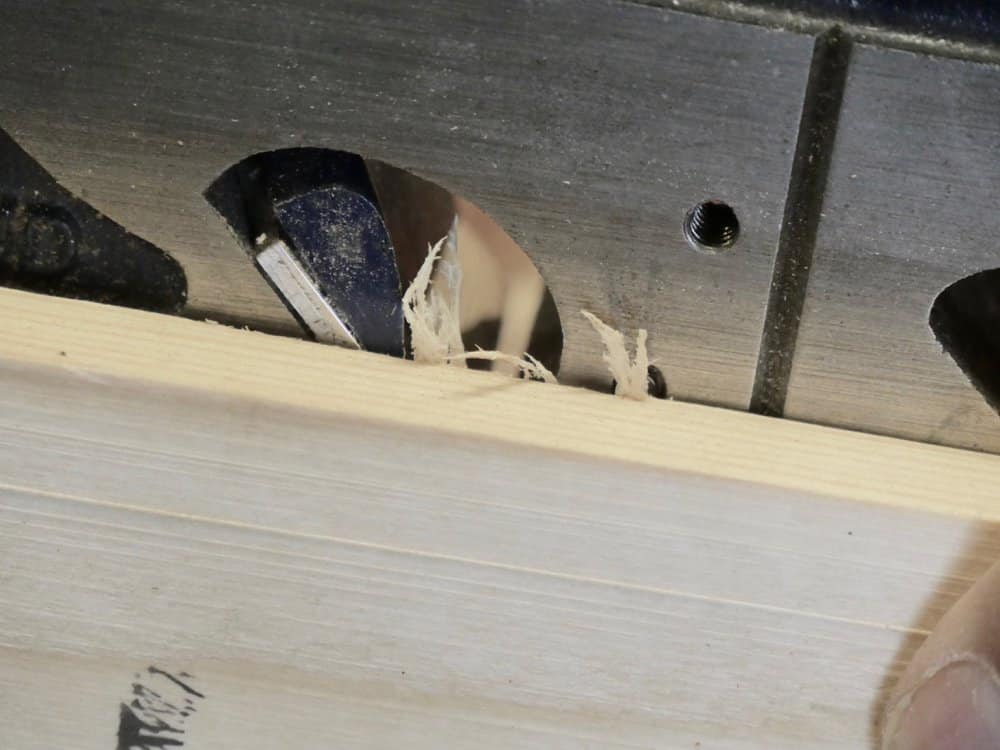
Snicker or spurred cutters
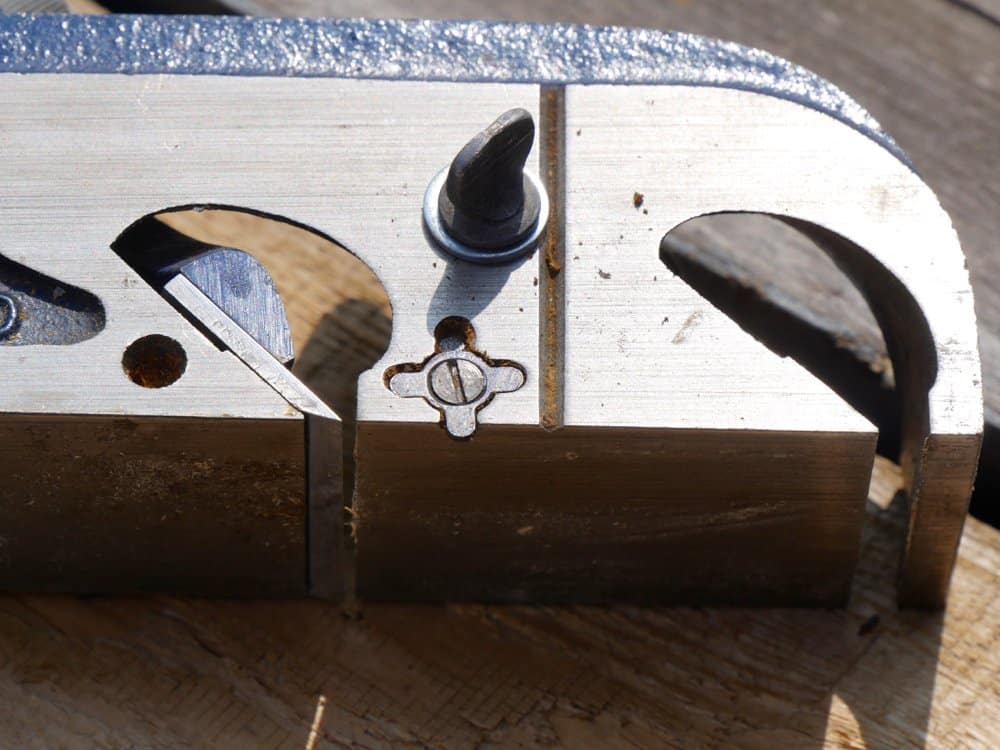
Directly beside or below the depth stop (seen above) you will find a cutting spur that on old wooden planes was called a snicker. 
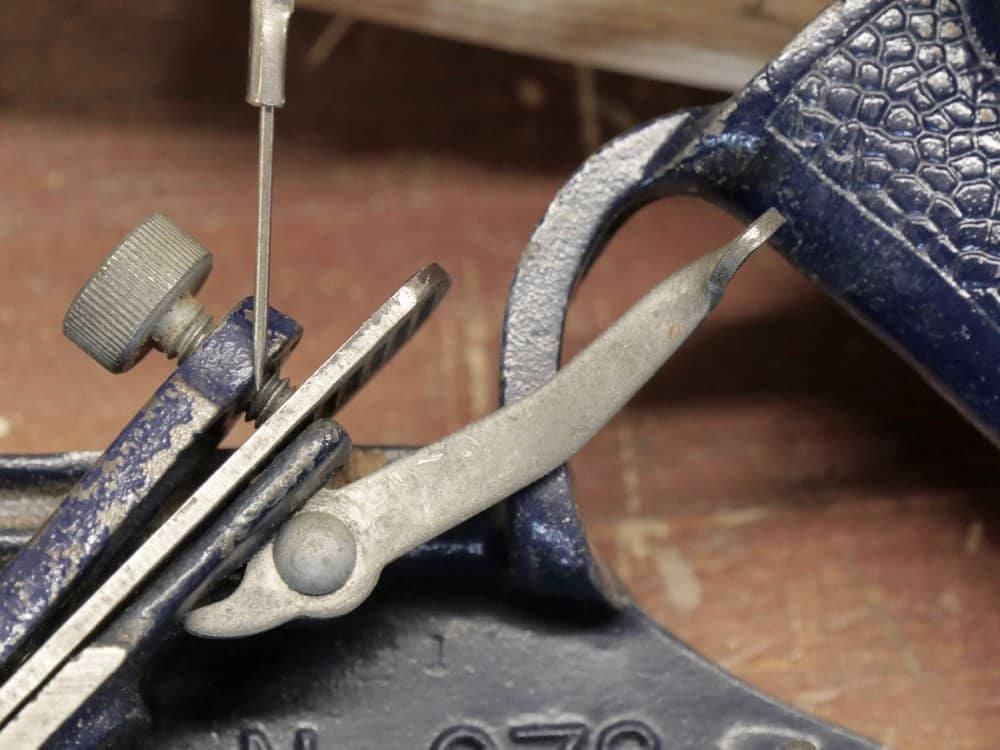
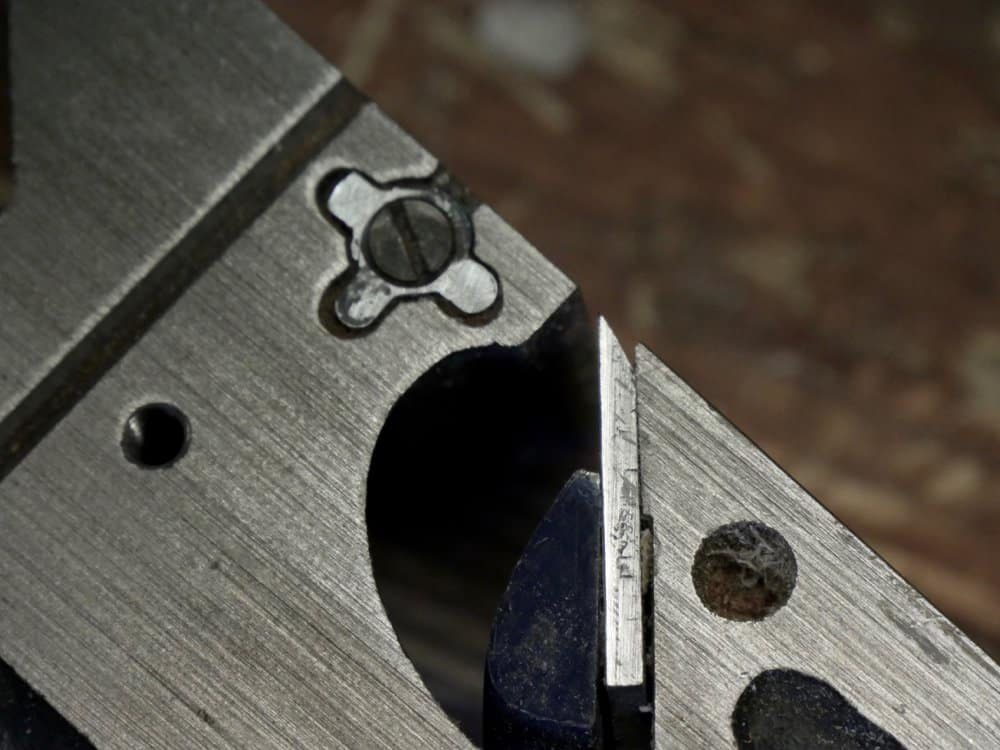
Blade width
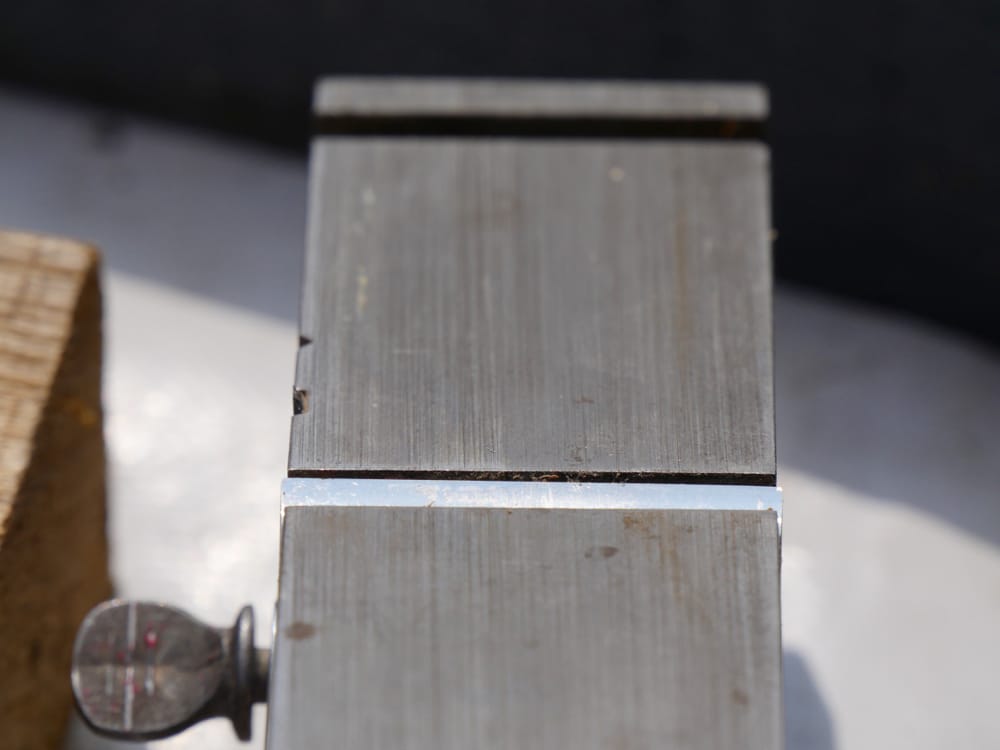
It’s not uncommon for people to feel the overly wide blade width to almost all planes made for rebating was down to shoddy workmanship when that is not the case at all. The 2mm of extra width beyond the width of the plane itself creates a relief between the side edge of the cutting iron and the plane body without which the plane stair-steps away from the intended cut line with each and every subsequent cut or stroke of the plane. The weakest points on any cutting iron cutting edge are the outer corners. These corner often break right from the start but are usually too small to see with the naked eye. Combining this corner fracture with the fact that the sides of the iron itself have no cutting edge and you begin to understand that there must be relief that allows the cutter to cut. So when we set up the plane for cutting we allow a millimetre of cutting iron to overhang the side of the plane forming the inside corner of the rebate. As I said, without this micro adjustment the rebate becomes stepped even by very small amounts and the side of the rebate becomes apparently sloped from the original cut line. By the time the rebate reaches a depth of say 10mm, and depending on the depth of cut, the slope can be as much as 4mm or so. Now this is the same for all rebate planes regardless of their names. So, don’t do as others have done and start grinding the iron narrower to match the width of the plane’s sole. It’s not necessary even though you can still move the iron to outside the width of the plane’s side.
Fettling the cutting iron
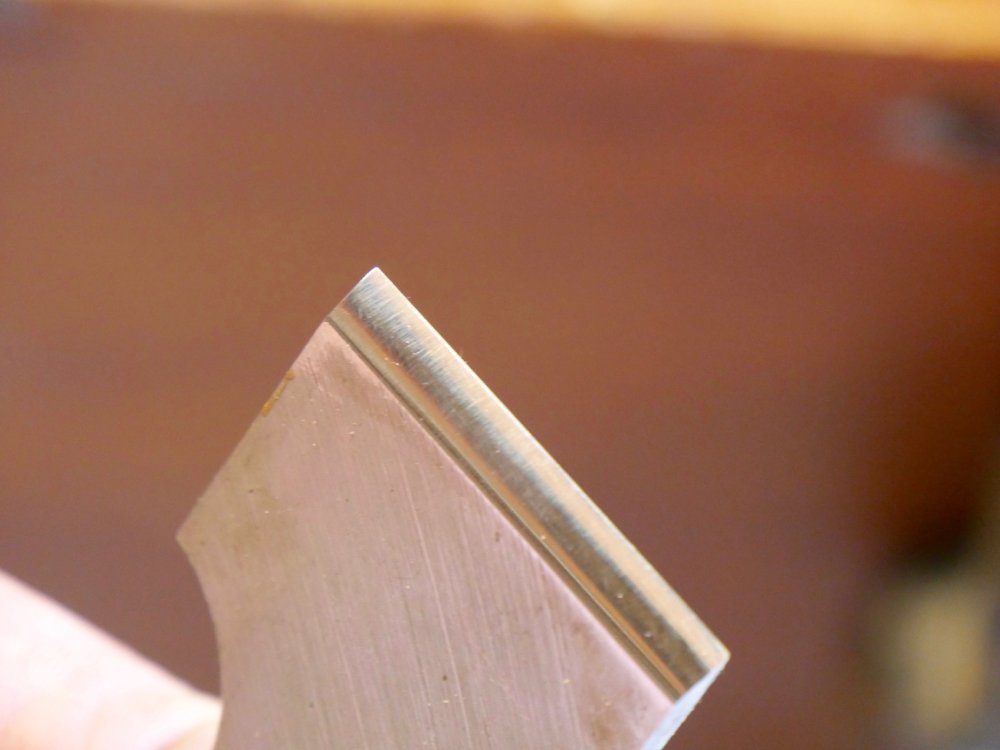
I find it a good practise to put a 2-3 degree bevel on the sides of the cutting iron using a flat file this give the right relief to the sides of the iron and gives a good clean edge to the rebate. If the iron is to hard to file use a diamond file.
Fettling the spur cutter
The spur cutters need sharpening. There are three cutters on them mostly but then there are round cutters on some too.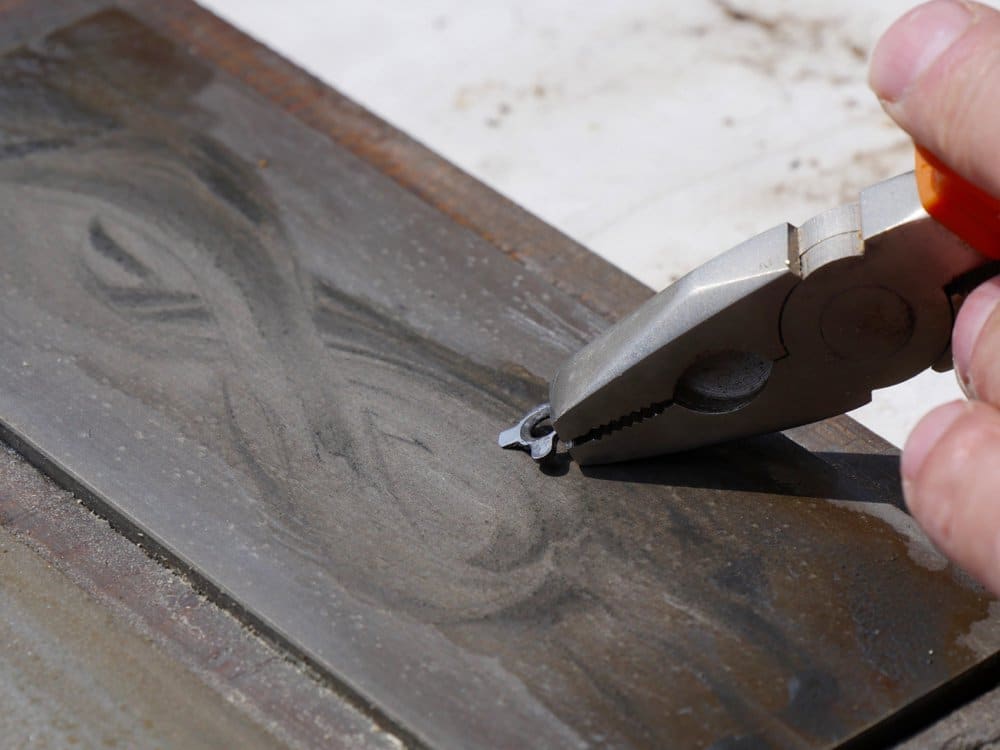
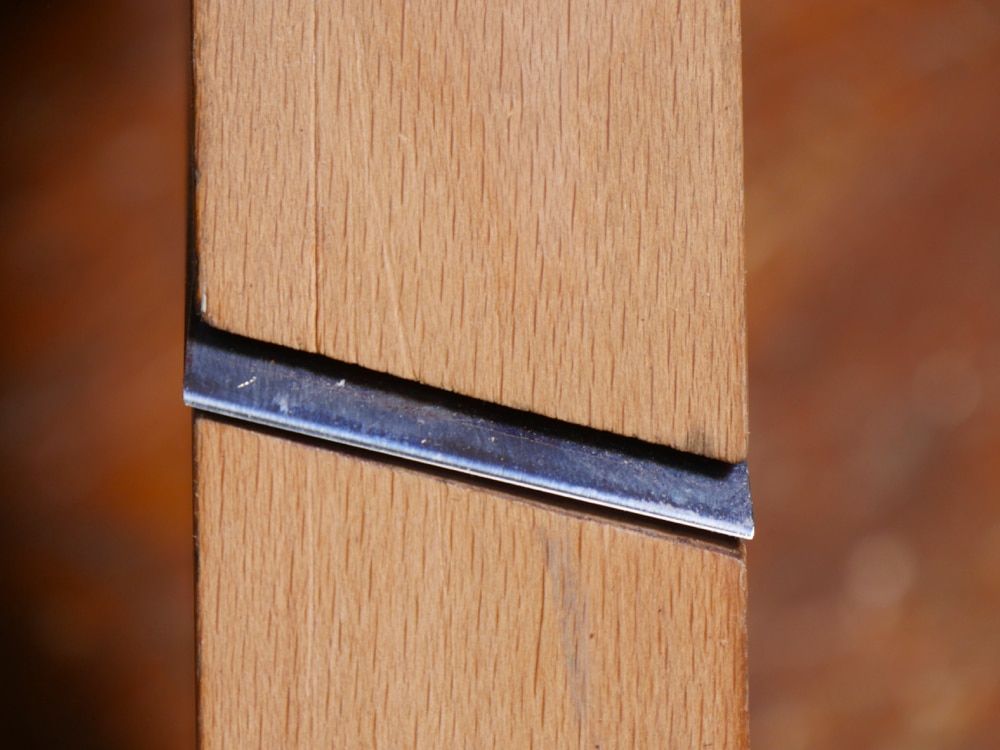
The plane in use
The first passes with the rebate plane should always start at the beginning of the wood and worked backwards. This standard practice leads to indistinguishable levelling and the cleanest edges possible to the side of the rebate. Start with shallow cuts and then deepen the cutting depth once you have descended 3-4mm. You can take quite heavy cuts with the #78 but still be considerate that the heavier the cut passes the more likely you are to tear the grain fibres, which is never the way of the craftsman.
Cutting square
There is a tendency to unwittingly tilt the plane to the side and so create a bevelled or tilted angle to the rebate being formed. After two or three strokes check yourself by sighting at the start and end of the workpiece or checking with the square and make corrective strokes as you progress. This is the way we develop skill leading to good muscle memory and not bad muscle memory and and habits. Eventually you will create rebates perfectly with only minor need for self checking and correction.
Watch for fence and depth shoe movement as you work. Sometimes these can shift without noticing and it’s always sickening to discover this too late.
Setting the plane for crossgrain rebating
Here’s a funny thing and it’s never been written so listen closely. Setting the iron for rebating is different when aligning the blade to the plane side. Remember earlier where I said that the spur aligns to the edge corner or outer face of the plane? If you were to align the bevel outboard to the side of the pane so that it protrudes as for long grain cutting by the 1-2mm it would not align with the cut made by the spur and so the face edge corner of the blade will undercut and the edge of the cut would indeed be very ragged. This makes the setting need slightly different. When we use the plane for crosscutting and so too the spur, we can set the blade either dead on to the corner or indeed slightly in from the corner. This is to do with the grain more than the plane. When crosscutting, the grain splits the remaining distance into the corner so, even if you set the blade as much as 4 mil in from the corner, the plane will still cut the rebate quite neatly. I suggest the iron be set 1-2mm in from the corner edge of the plane this time. That should work well for you.
Warning!
Sometimes we forget the lever cap securing the cutting iron and it protrudes past the side of the plane. As the rebate deepens the front bottom corner of the lever cap starts to intrude into the corner of the rebate and damages the corner. Make sure that the lever cap is not in a position to cause such damage.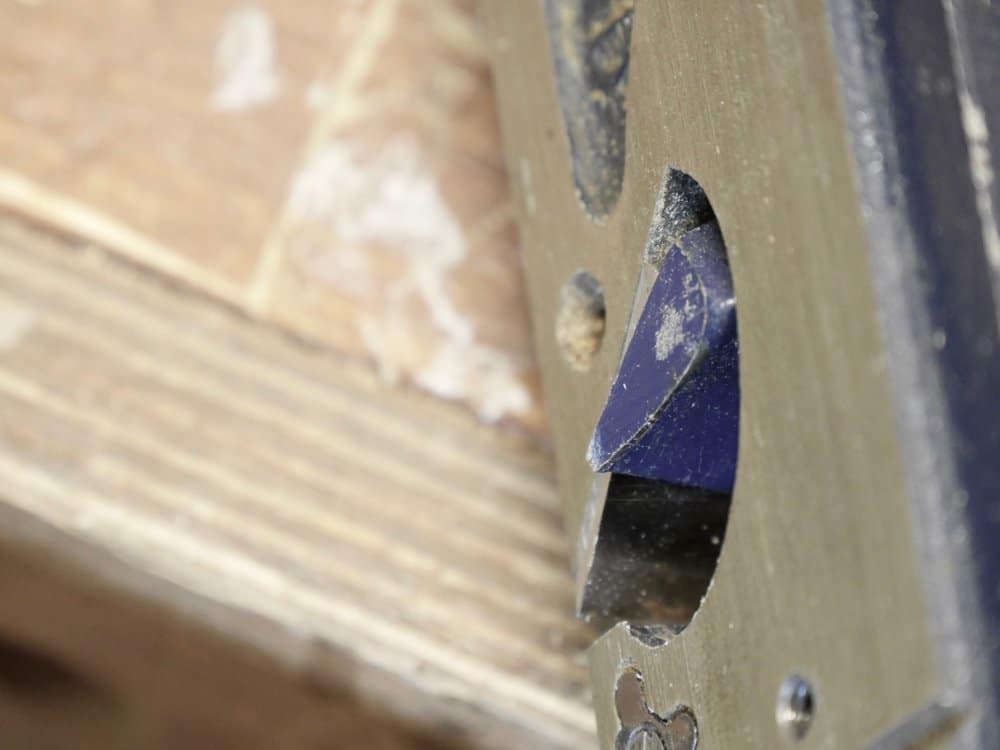
Additional tidbits
The plane is simple enough to adjust. Sometimes though it will reset itself if the cap securing the iron to the bed is not tightened down enough or you hit some really wiry grain. If you see the grain before you plane you can reduce the set for a couple of strokes and this helps to redirect rising grain and reverse it just enough to reset and continue planing even against the grain.
Cold weather
Of course we all like wooden handles over plastic and then especially over metal ones. The #78s are all made as a single piece casting—handle and all. In cold weather, where the tools are left in subzero temperatures at different times, the cast metal can be very uncomfortable until warmed up. Sometimes the handle can indeed freeze to your hand if your hands are slightly damp or sweaty and you are not careful. This once happened to me in Salt Lake city in January. Anyway, an old man I worked under as a boy wrapped his handle very neatly and tightly with cotton twine (thin) and then coated the finished wrap with three coats of shellac. It increased the diameter of the handle a little but it still felt well sized and it did make the plane very comfortable in the freezing winter months.
Many thanks for this – not that long ago I was lucky enough to find a nearly complete Woden version, which cleaned up to a pretty nice example. I have however experienced the stepping problem – presumably because I’d incorrectly aligned the blade bevel flush with the side of the plane body; I’ll get that right next time.
Unfortunately most of these that I find are missing the fence and depth stop.
It’s easy enough to clamp a fence to the wood though. That works as well if not better sometimes. I bought two almost new ones yesterday, both complete. They cost £30 each but today they will sell higher for some reason!
That would work for my vintage wooden rebate plane too 🙂 Mine is very simple: it has no fence or snicker spur or depth gauge. It has Bristol markings (tool seller?), a flat base and a simple straight iron about an inch wide and set at a skew. I bought it for £5 I think, hardly used from a local charity shop sometime ago, not knowing exactly what it was at the time but fearing that it might end up in the local dump otherwise (I need not have feared, I have since discovered I am not their only tool buyer) and I figured I could find a use for it. I honed it and tried it out (works very nicely as a plane) but I haven’t yet used it for rebates, but I hope to very soon now 🙂
You solved the fence problem (I think I saw you do this in a video too). You described ways to work around the lack of a snicker spur (the spur sounds like a desirable feature). To make up for the lack of depth gauge, I suppose we just plane to a marked/cut line?
i’m building a pattern to cast the depth stop and next will be the fence i need one for my 78 and i know many others will also id love to save as many good users as i can . hope its not a problem but ill leave my email address if any one wants one
[email protected]
Thanks Paul,
This was the first vintage plane I bought after my course with you last summer. It works brilliantly.
Best wishes
Rob
Now I understand why the thing steps away all the time!
Awesome. I am glad you are addressing some of these old specialty planes, as I have picked up a bunch. Nice to know your thoughts on them. Cheers!
I bow to your knowledge and experience in using these planes but I think the name is spelled “fillister”, not “filletster”. The Oxford dictionary suggests a fillister was originally the term for a rebate for holding a sash window. See http://www.oxforddictionaries.com/definition/english/fillister
Sorry Steve, Bit sad when the Oxford dictionary gets it wrong by being incomplete. Both spellings are fully correct and the Stanley plane has been sold as a filletster for over 100 years (with my spelling on the box label) to date as have rebate planes made in wood with the name in the UK of Filletster too. You could at one time trust the Oxford but not since the digital age. Many such spellings are now omitted and especially with regards to craftwork names such as this. In some ways it is the same with the USA too. A rebate is what you get back from the government and rabbet is more the accepted word whereas here we have always used the term rebate.
Ah I see. Sadly I have only the online dictionaries to refer to. I’ve never seen one of these planes. Do Stanley still make them or must one keep an eye out for old ones? Here in South Africa we seem to have far less choice in products than in Europe or North America. I’ve been after one of your favourite Stanley layout knives for a while but never seen them in shops even though Stanley’s local site lists them. Finally found one on the web site of a local electronic part supplier of all places, and ordered one, only to find it was fulfilled from their UK branch. Perhaps Stanley doesn’t bring that particular product into this country.
“Filletster” is actually a better name because the plane can cut fillets. Makes you believe it was a filletster first and a fillister later.
And all these names coming probably from the french!
I still have my #78 that was included in my apprentice tool kit and was regularly use in those days to tidy up machine marks and misalignments left from the spindle moulder. As the years progressed this finishing became less common, except for very bad marks or repairs to a door or window rebate. In recent years mainly building kitchen units and the like, this plane has become virtually redundant (like me unfortunately). I’ll have to re-introduce myself to the #78 once again. Many thanks Paul for this article and the tips & tweaks for it’s use, some of which I have either forgotten, or never really understood in the first place.
When becoming familiar with my Ebay Stanley No. 78 I noticed that while the flat right-hand side is of course very perpendicular to the sole, the left-hand side is not.
That is, there are structural cross pieces that end with edges on the left-hand side, and these are beveled in from the vertical toward the body of the plane— easily measured or even eyeballed.
What is the purpose? One idea that I had was that it would simply provide clearance when operating left-handed, as the edges of the structural members, which are not sharp but which are nonetheless edges, might otherwise mar the wood.
But then I wondered if perhaps the idea was that if you wanted to clean up the shoulder of the rebate— this would be the along-the-grain type of rebate — that you might also want to undercut the edge, to bevel the shoulder of the rebate slightly way from vertical so the the very top edge would be the only part that would make contact with the joined piece of wood.
That might also make for quick remediation of the problem of chips or fibers in the corner of the rebate (or on the edge of the joined piece) potentially preventing perfect mating of the two pieces.
If I’m not being perfectly clear, after cutting an along-the-grain rebate right-handedly you would keep the right-handed grip and just flip the plane on it’s left side, resting the left side on the bottom of the rebate, to clean up the vertical shoulder of the rebate.
But then again, i thought that perhaps there would be a problem with the left corner of the plane iron not being able to make it into the corner of the rebate— especially since I can detect no taper to the width of the plane iron corresponding to the lack of perpendicularity of the left-hand side to the sole. However, in spite of that, there seems to be no problem with making the left edge of the plane iron lay exactly along the left edge of the iron bed (which is not exactly perpendicular to the sole) whilst the right edge overhangs the right-hand side just as Paul here recommends for such along-the-grain rebates.
And thanks once again Paul Sellers, as I had no real understanding of how to position the blade (but mine, I can assure you, sports a gleaming Paul Sellers camber).
I’m not sure if you may read too much into the possibilities. Whereas you can use the plane left handedly in the opposite direction, you lose the depth stop but can still use the fence. The fins that taper are tapered to remove the mother pattern from sand cast mould inside the flask so technically it has to be tapered so that it can be removed and made ready for the actual casting process. I often use the plane as a left hander for convenience to work problem grain or because situations dictate. I also lay the plane to correct the other wall as you say.It perfects the wall.
Fascinating and helpful, as always. You suggest a 2-3 degree relief to the side of the blade, but I didn’t find it clear which way the relief works – on the top side or the underside of the blade?
The bevel side.
Not sure I’ve got this right Paul. I think you mean from the front face of the blade to the seat face ?
Howdy Paul,
Maybe sometime you could write a paragraph or two about how you would go about making a replacement spur. I would much appreciate it. I don’t have a 78, but have a couple of other planes that are missing the spur.
I’m no Paul Sellers for sure, but if it were me, my first try would be to make one out of an appropriately sized steel washer of the proper inside and outside diameters, filing out the waste at the ordinal directions, as it were, and then flattening & refining the cutting edges on stone or diamond plate.
If you were game for it, no reason one couldn’t buy a bit of O1 or W1 tool steel bar stock of the right thickness and then drill, shape, refine and harden it for real, but I reckon a nicker doesn’t probably need to be super high grade steel at R60 to do a decent job.
The greater problem may be find the size, pitch and thread count for the set screw, Eric. Making one is simple enough and thickest of the Veritas card scraper has proven to be the same depth as the spur recess if you are looking for steel. Cut the 1/2″ strip off the end of the scraper and you have enough for 4 replacements. Drill the hole sized to the setscrew and countersink it. File out two corners leaving the width of the spur width and then cut the two opposite spur widths and remove the new spur from the corner. File the new spurs to a radius, bevel and hone.
Hope the family is well, Eric. One day we will meet again I hope.
I have the Sargent #79 version of this. The Sargent lacks a depth adjuster, which doesn’t seem like a big deal, but the plane handle makes it hard to use a hammer to tap-adjust the blade for a deeper cut. Is there a trick that I don’t know about?
The only thing I like about my #79 adjuster-less version is that a friend machined a replacement for the missing fence arm. He’s not a woodworker, but recognized the need for a hole for a “tommy bar.” Having drilled the hole, he decided to convert some small square stock into a tommy bar by turning down the end. Having done that, he decided to inlay a couple of little magnets so the tommy bar would stick on the plane body and not be lost. He handed the lot over to me and apolgised for not figuring out how to add magnets to the fence bar. So, I hate my adjusterless version, but it has so much of Alex’s work in it that I enjoy using it even if it is a pain to set the iron.
A very good article and a very useful plane, however I often have trouble with the waste ribbon folding accordion style between the plane arm, chip breaker and depth stop. Any suggestions would be appreciated.
There is an answer. Sometimes I come across an individual plane where the blunt end of the lever cap applying pressure to the blade in the mouth causes the concertina effect to the shaving. In the latest blog post on bullnose planes here I discuss some of this. You can reshape the edge of the top curve to the cap iron by filing and also check the underside leading edge there too to make sure there is no gap that takes the leading edge of the shaving as this will almost inevitably cause clogging or better still jamming. If there is a gap just rub the underside of the cap iron on the sharpening stone until flat and this should take care of the issue.
Thanks for those suggestions, I will try this straight away!
Excellent to see this series of articles on rabbet and fillister planes. I have a Record 778 plane and it has quite a wide mouth. Is this intentional and if so, what is the reason for it?
By the Record 778 I assume you mean Record’s version that has the screw thread adjuster for setting depth rather than the 078 relying on the lever mechanism as in the Stanley original. The open throat is indeed intentional as this reduces the risk of clogging when removing heavy shavings, which was always common practice amongst craftsmen. It is nothing to remove a millimetre of stock per stroke to expedite the rough depth and then reset with a finer setting. The open throat or mouth opening works fine for rebating generally and I can see how it would be nice to close up the distance for a finer control to govern the lifting of the shaving too far ahead of the cutter but I haven’t really found this to be too much of a problem generally.
Just a quick thanks, Paul. I happened to acquire a Record 778 this week, and low and behold your email blog arrived.
Made setting up and working with this plane a pleasure from the start.
Couldn’t believe the perfect timing!
I love my 78 Stanley. It is an early one with no lever for setting the depth of the iron but it functions well without it. It takes a bit longer to set up but Paul is right …. it can take a large shaving. Then a 90 to clean up. Very rewarding working with just handtools. I can go to the shed at 2am if I want and not disturb anyone.
Any hints or suggestions as to how to make a wooden tote for the Stanley #78 similar to the Woden?
To give you some good advice here I wouldn’t suggest that you do it. It is quite useless. I think this mostly because the thumb of the non-dom hand pressed down into the fore part of the casting seems to work many times better. I never use it at all. It’s the right hand that gives perfect vertical alignment ability and so the fore hand is more just to apply the downward pressure really. If you did want to they are simple enough to turn on the lathe if you have one or you could shape your own with a spokeshave or use a rasp and scraper to shape one. The hole is already tapped in the casting and the screw could be bought.
Hi Paul,
Have you seen and/or tested the Axminster 078 Rebate Plane? I just noticed they have one for under 100 GBP. Do I understand that you recommend the 078 rebate plane before a shoulder plane?
Many Thanks and a Merry Christmas!
steve
Thank you so much for your indept review on this plane. I have Learned so much from you Paul. Thank you so much
Hi Paul, I just bought a Woden 78 in absolutely mint condition. However, it has one flaw: the depth stop seems to be out of parallel with the sole, and not even a little bit (around 1.5 mill). On further inspection, the groove that accepts the stop isn’t square to the sole. The way I see it, there are 2 options to fix this: 1) file the groove square (and therefore lose the registration) or 2) file the depth stop so it becomes parallel again. Which of those 2 would you prefer?
I find it best to be slight higher front and back so both leading and returning edges have a lead into the surface instead of a hard bang on the closing strokes that finalise the depth. So it is not necessary to be dead parallel as such, just have the mid section be the final registration point.
Great advice, as always! This saves me a lot of time as opposed to flattening the entire shoe. My instinct told me to consult you first before doing any remedial work, and I was right to do so. Many thanks!
Hi,
i find it difficult to set the blade parallele to the sole of the plane.
I just recently acquired a no78, and you must not have posted about them in a while, because the price was quite reasonable, especially given the condition. I notice the fence has a small hole in the casting, in the webbing where the fence itself meets the arm. What on earth is this for? It’s very clearly a standard feature, and yet I can find reference to it nowhere.
It’s to attach a wooden fence which means wood on wood and no metal tracing on the wood. It also give you the ability to elongate the fence by adding the wood for better longitudinal alignment.
I have one of these #78’s sitting here on my desk as I type this.
I’m just starting out as a beginner wood worker and had only a few modest tools of dubious quality. For the past couple of months I’ve been eyeing vintage hand tools on display at a nearby antiques store, and watching your videos. I recently announced my intention to build my first work bench with hand tools (following your instruction series), and within days a friend showed up at my house with boxes of tools wrapped in dusty old newspapers: six hand planes, an egg beater drill, a big heavy breast drill, spoke shave, a brace with a dozen or so auger bits, five Disston hand saws, and even two saw tooth set tools.
All the tools were well used, but also fairly well taken care of by their original owner until about the mid-1970’s. Since then they have all sat unused in a barn or garage. All require some work to get them back in order.
He said, “No idea what these are worth or if they’re any good– take what you want and pay what you think is fair”. I’ve already cleaned, polished, flattened, and honed the #4 plane (again thanks to Mr. Sellers’ tutelage) and a little #220 block plane cleaned up nicely too.
A #7 jointer plane needs a fair bit more work cleaning and de-rusting and has some pitting on the bottom near the heel. There is another #7 with a corrugated sole that is perhaps too rusted and pitted to bother with. And there is yet another corrugated #7 that has very little rust, but I’m not sure I care for the corrugated soles so much.
I was not even sure what the #78 was called before I read your post on the subject. The fence and depth gauge are present and there is very little rust on this one, but about 50% of the japanning is long gone.
I’ve spent the last few days researching and trying to date the tools and to come up with some sort of fair payment for the lot. I’m quite aware of how lucky it is to have all these tools from a single owner all fall into my lap like this.
I’m pleased to report that fixing up the #4 was one of the most satisfying things I have done in years. If you had told me just a few months ago that I would soon be grinning with delight at the thrill of reattaching the lightly refinished rosewood knob and tote to a Stanley type 15 #4 plane, not only would I have thought you were out of your mind, but I would have had no idea what any of that even meant! Now I can’t wait to start cleaning up the others! Thank you so much for all the information and inspiration. So begins a new chapter.
What a nice thing to have happen. A fair price? Now there’s a question. Consider looking at the eBay prices and then consider which ones you really need and then the luxury items you might ‘want’. I think eBay prices are fair but not sure if `i would want to pay the price without his input. Put eBay prices to him and let him decide based on how little work he has had to do to sell them without packing, shipping, cleaning costs I suggest.
I’ve been looking at eBay and only recently discovered the feature that lets you filter results by the actual sold price. It seems most of tools for sale on eBay are at least cleaner and prettier than this collection. But who knew fixing them up would be so enjoyable?
Hello Paul,
Not sure I understand the 2/3 degree relief – I think you mean from the front of the blade to the seat face on the side abutting the work. Thanks.
Paul,
as usual I always learn from your blog and videos. I bought a craftsman rebate plane used and am in the process of learning to use it. After I get the sole flat I will concentrate on usage. My plane has no depth adjustment so I am using a small brass hammer to adjust the blade. My spur is quite different from the stanley but it does cut a very good line. The blade was flat but the bevel needs work but should be ready tomorrow. I did give it a test run but there is definitely a learning curve.
I want to thank you though because you really opened my eyes to woodworking. I am 72 years old and have almost every power tool you can imagine but have really started to get into hand tools because of you, There is just something more satisfying when working by hand. Although I am only using my hand tools as the finishing touch I have started to build the bench you have on video.
Once again thank you very much for your time and effort in helping us learn this rewarding craft.
thanks Paul once again for clear concise explanation. I had a perfect 78, and drooped it breaking the handle. A very nice person on a wood forum sent me a new to me one and I promise to use it more. When I use a router on European Beech it tears very bad, but with the 78 even a little dull cuts mush better!
Thank you for your wonderful teaching. I am enjoying the learning.
I have a concern about the cut that the snicker leaves below the bottom of the dado. Is is practical to stop and turn it out of the way before you reach the bottom of the dado.
I tend to use a knife every three or so passes and not use the snicker.
Thank you, Paul. I will try that on my latest project.
I have just acquired a Woden W78. Everything’s OK apart from a small part of the depth stop missing – no biggie.
I also noticed that the casting of the seat for the blade isn’t great – it pushes the cutting iron to one side, making it very hard to keep the blade parallel to the sole and flush to the side of the cut.
The previous owner had dealt with this by tightening the cap iron. That over tightening has lead to minor bending in the cap iron, a slight distortion around the seating for the screw on the cap iron and wearing of the corner of the cutting iron at the top.
I am going to file down the body slightly to improve the seating of the cutting iron.
Jack