Choosing, Setting up and Using a Bandsaw
Choosing your bandsaw
In times past, a decade or two before I apprenticed in the 1960s, the only bandsaws really available in the UK at any rate were those developed for industry. In some countries bandsaws are still the rarity and scarcity, not the norm at all. We shouldn’t assume that all peoples have access to them. I’m fortunate, they have always been there, so it has been more a matter of which one to choose. And with several to choose from through the ensuing decades, the problem was which one to buy.
In some ways even that problem has lessened since the turn of the millennia. On the domestic front, bandsaw machines seem no longer to be made in Britain, the USA and now perhaps more surprisingly, Europe with its multinational community of 28 uniquely different countries and no common language except the euro; it’s interesting to see how domestic countries now import their bandsaw machines. I think Italy may possibly make bandsaws but often manufacturers in the EU suggest a domestic product using their history of manufacture banner when in fact they import or assemble imported parts and they mostly give the impression of being domestic products, which may not be the reality. Most bandsaws today are now made to high standards in Taiwan. There is no true British manufacturer of bandsaws left as far as I know. Together with east European and USA makers, they now have their machines made in Asia, usually China or Taiwan, and ship from their to their largest outlet the USA. You will find past makers now importing their machines and or component parts as sub assemblies and fully assembled with their own brand names emblazoned proudly. Take a look at a Rikon fence alone, a machine made for the US market, it is identical to a Record Power version or a US Laguna. Reality hits. Most bandsaw machines made today are imports from one source and most manufacturers and dealers are highly disingenuous in what they present. One company will put ‘patent pending’ on a feature and then you might find the same said on another importer as if it is indeed their patent they are applying for.
They are all mostly the same

The good thing is that, large or small, most bandsaws comprise the same basic features evolved during the late 1800s and early 1900s. With regards to wheels, bearings, tensioners, and general adjustment mechanisms, amazingly I think, nothing has really changed much since the 1960s. Perhaps the methods of bandsaw manufacture stand out the most to me. Today, manufacturers rely heavily on CNC production methods which have led to consistently high levels in the manufacture of repeatable replication of components. The greatest switch of all came when manufacturers changed from very heavy and strong cast iron body frames to folded box sections seam-welded. This alone enhanced manufacturing speeds, lowered manufacturing and material costs, reduced shipping weights and distribution costs etc. The outcome is indeed a reality. A machine costing a few hundred pounds/dollars/euros will last for decades of use. Amortising that over say as little as 10 years (when it could be 20-30) results in relative costs, perhaps as little as 20-50 pence a week. I bought one secondhand bandsaw in an estate sale that was then 60 year old for $25—a Delta with a solid cast iron body—I repainted it battleship grey as per Delta’s livery but never actually used it because of travel and repatriation. Another I bought for £60 here in the and used it over a number of years before passing it on but still it was worth the same price I bought it for. It was not particularly well made or even as popular as the US Delta model, in fact it was probably the cheapest on the UK market at the time, but I tweaked it, fine tuned the parts, and for my basic needs it served me perfectly well.

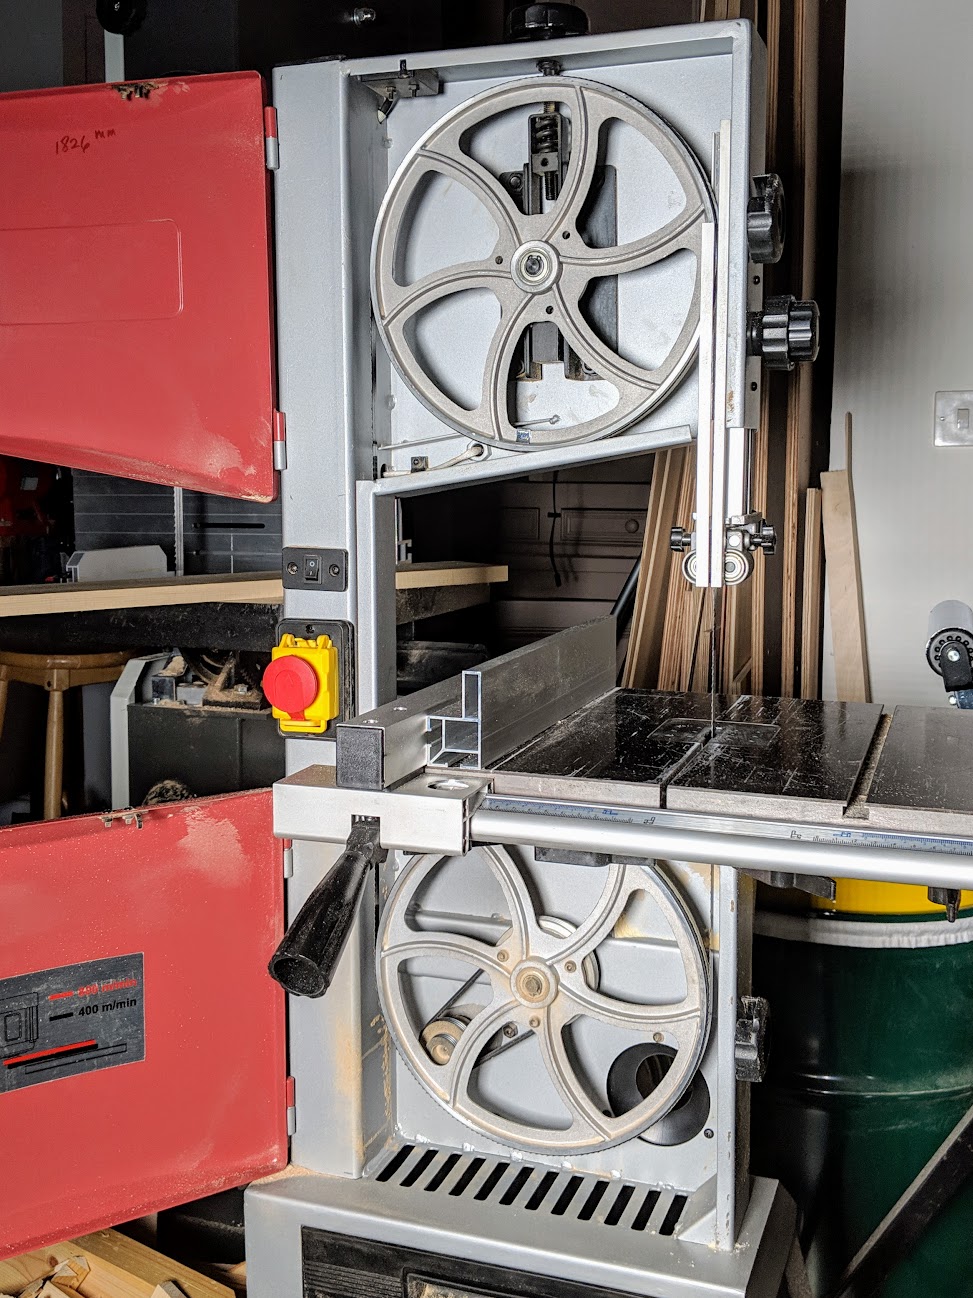
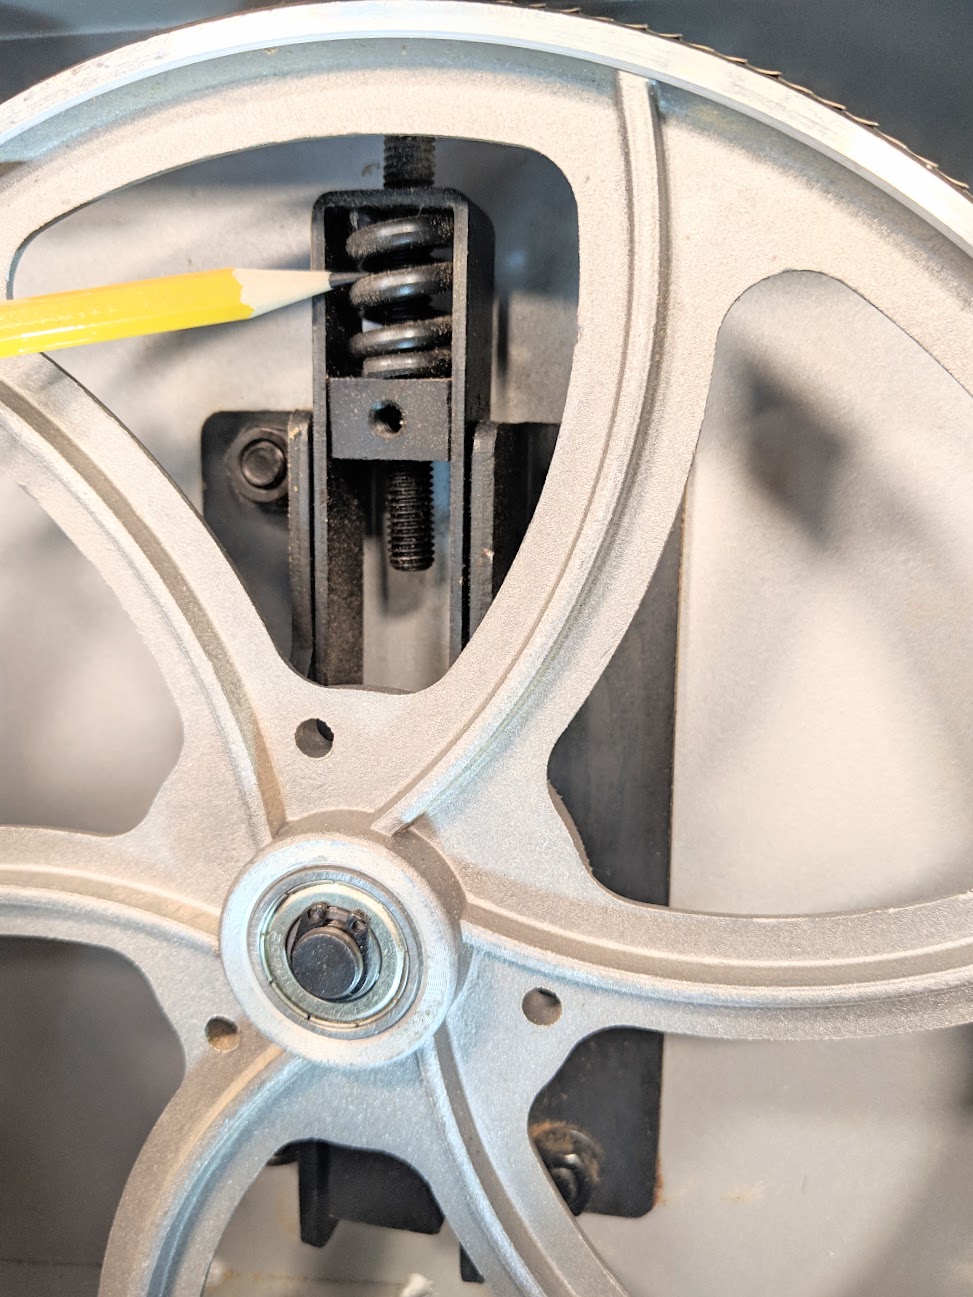
Currently I still own one of the early model box section Startrite 532 bandsaw models used by professionals and also school woodworking workshops. I bought for £400 nine years ago and it works flawlessly. I personally think it beats many modern machines with its simple fence, well thought through inside alignment adjustment for the top wheel and more. I know that some will dislike this but the guide blacks are simply solid steel blocks that slip nicely against the sides of the blade as was the case at one time in all bandsaws. You will be surprised that these blocks, still the originals from 40 years, show no sign of wear. You simply nudge them against the side of the blade when tensioned, lock them in place via hex-head bolts and that is it for just about ever. And there is no rear thrust bearing either, just a stem of round stock, hardened on the end and adjusted to the back of the blade as shown in the silhouette pic below.
Buying new is a good move
Secondhand is not everyone’s choice and nor is fixing one up without the practical experience of understanding bandsaws and indeed machines. But, like #4 hand plane, it can be a good way to get to know the parts early on. It does stand to reason that buying new is a good way forward. It will most likely come without needs, some modest setting up on your part, and within an hour you will indeed be cutting wood. The unfortunate part with secondhand is the evidence of abuse may not show at first. I think generally you can tell if a machine has been abused or damaged. Remember too that any machine has a sale price whether it is new or secondhand so you can sell on straightaway or down the road for an upgrade and without much loss at all usually. It’s inconvenient to sell on large and heavy machines but that’s OK.
It’s your choice
Only you can choose the bandsaw you want or need because you will assess what you need according to your considerations. If you know nothing about bandsaws and have never used one it can be difficult to know exactly what to look for or how and what to choose. Of all the woodworking machines the bandsaw is indeed the most different. When all the other machines have fixed blades and cutters rotating from a centre-point rotary shaft or spindle on a rigid and fixed axis; that’s circular saws (tablesawsUSA) chop saws, surface planers (jointers USA) and thicknessing planers, spindle moulders (shapers USA), the bandsaw is uniquely different. Whereas the direct drive may work in similar fashion to these other machines, it’s the twin wheels that are the game changer. These two wheels must in some way be balanced and aligned in unison via the very same stretched band of steel that has the thousand and more cutting teeth aligned in a single row to cut through wood. The tensioning and the flexing this brings within the whole frame of the machine, together with the dynamic momentum not dissimilar to the twin wheels aligned like a bicycle, give you a straight cut. It’s this that ultimately separates the bandsaw from any and all other machine types. As with many things in life, it is not usually predictability that adds unique dynamism to our endeavour but more the unpredictability of heightened risk. The bandsaw was and still is the most remarkable of inventions. Its strengths come to us with a sort of rigid flex via the thinnest of thin blades and from its cutting teeth we create as many diverse shapes as we can imagine. Often it is not the flexibility of shaping that causes the greatest problem, more the inline straight cuts that sometimes result in a minor or major meandering when the straightness is the more important track. Minimise this tendency, knowing how to, and you find the independence of a single machine that equips your hand tool woodworking in the most complementary way.
It’s an unfortunate thing
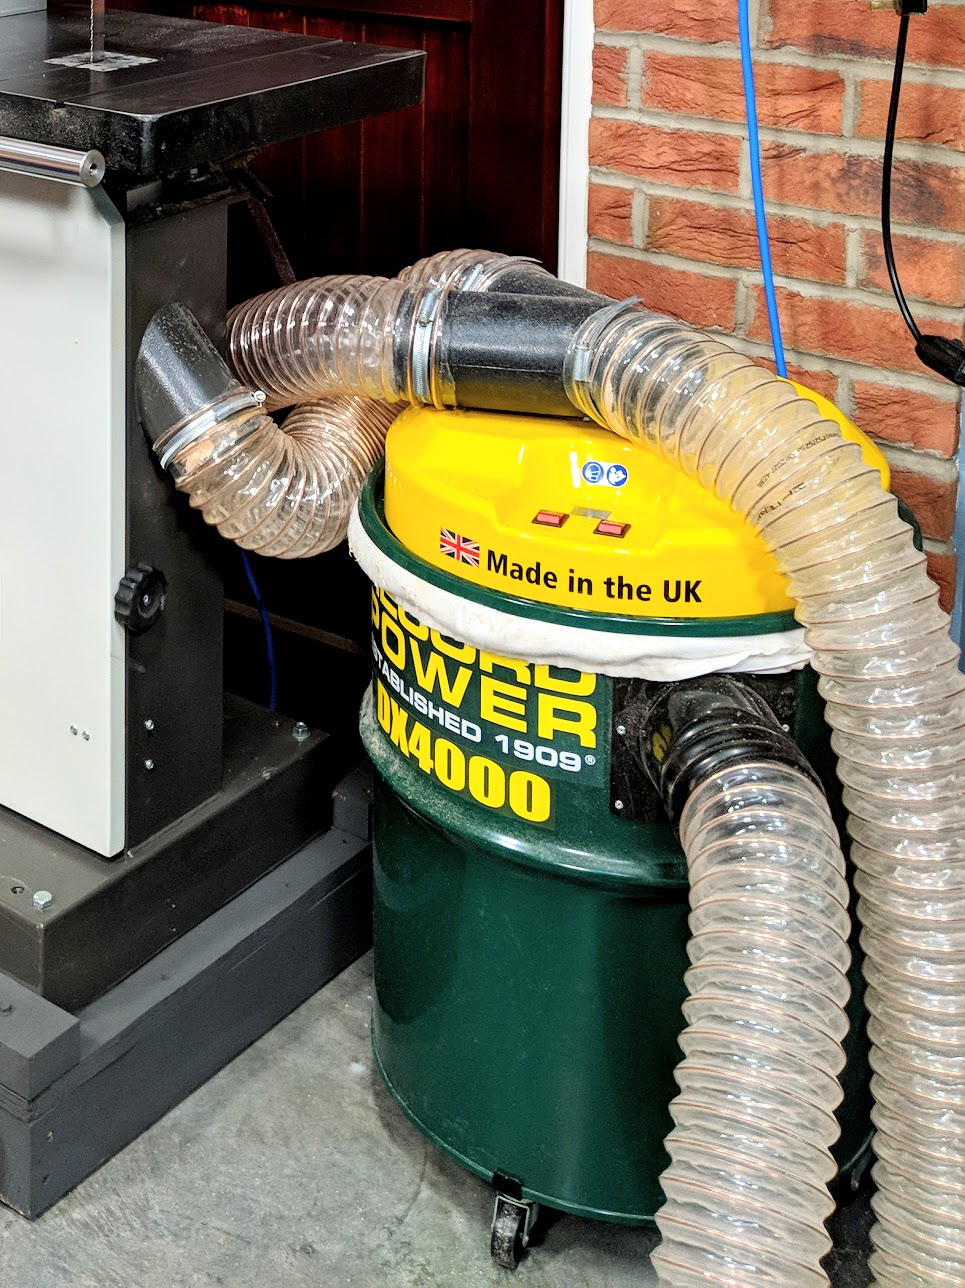
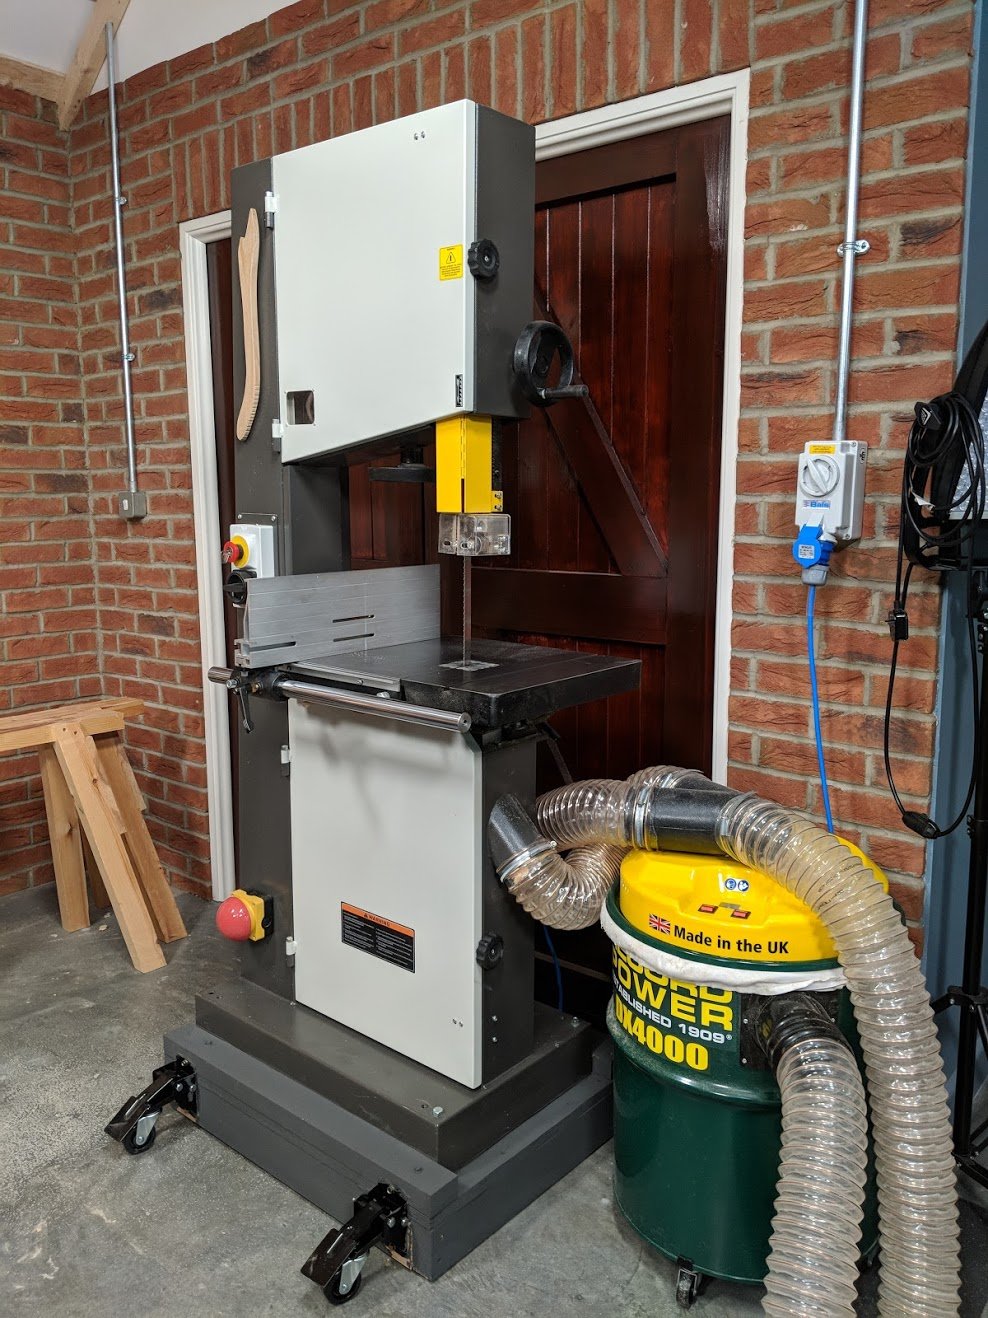
The bandsaw in and of itself is indeed one of the quietest of machines. Switch it on, let it gather its full momentum and with fine tuning it will indeed spin quietly on the lines of a spinning top. The two main wheels back up the motor with the fly-press fling of a flywheel and the machine should run quite quietly all day, raising its voice only when the actual wood engages with the teeth. The unfortunate element in all machines in a small domestic workshop is usually the vacuum system used to extract the dust as near to source as possible. I use a twin motored version that is very efficient in terms of extraction and one that is also compact in size. It’s noisy, but it works too well not to have it.
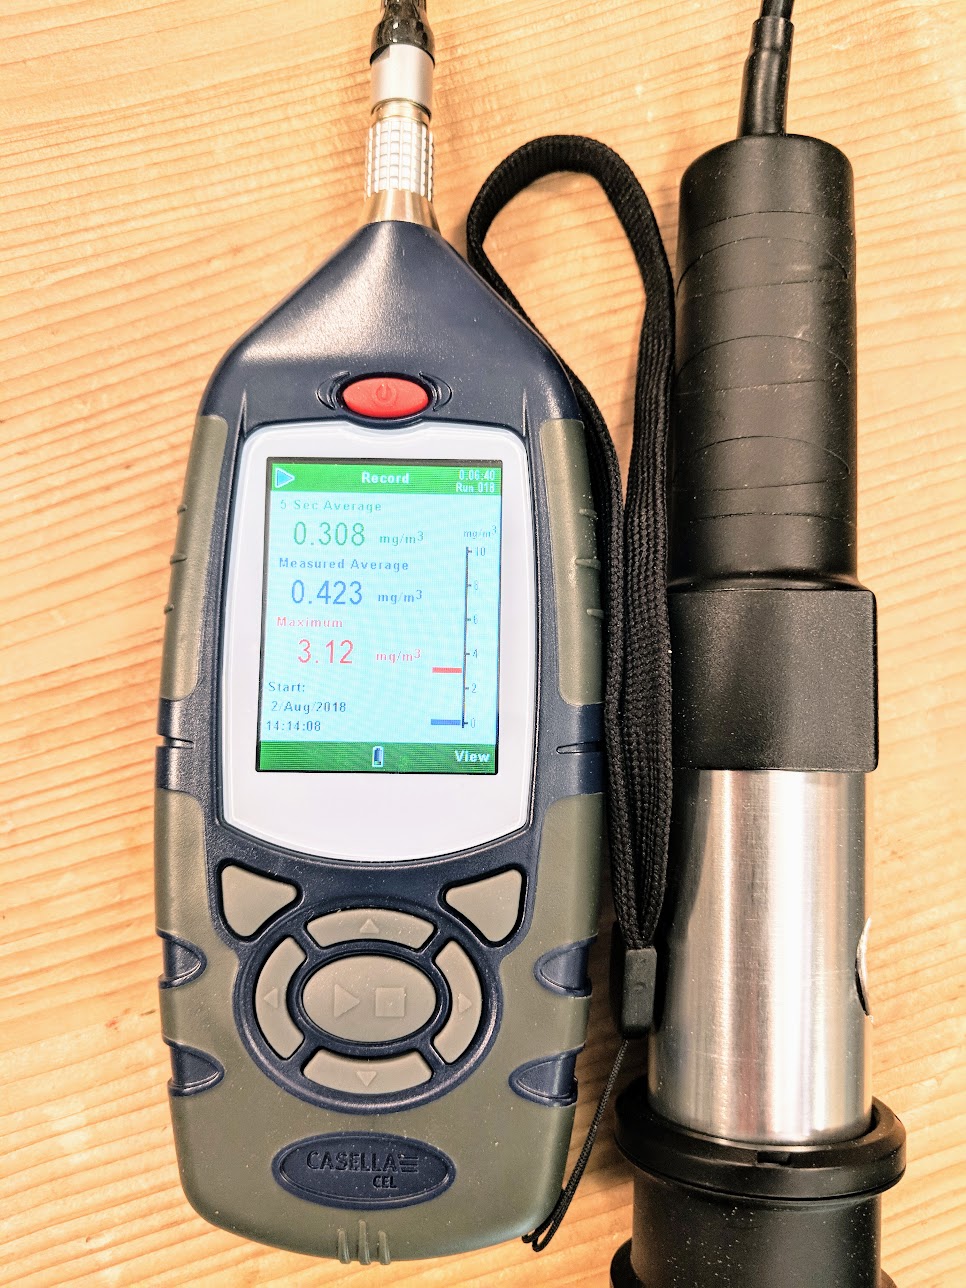
Using this quadruples the noise factor. Without it I would be in danger of filling the atmosphere with the harmful dust you cannot see with the naked eye. That’s why I have it. This clouding of issues is unacceptable so the dust extractor is a must. With it, my dust levels max out way, way below anywhere near levels that are harmful to anyone. Even when running all day, which `i never do, the levels per m³ are near to normal. That said, anyone with particular allergies must take any precautions deemed necessary to them so you may need to do more research.-
The flywheel effect
Though much less so on lightweight wheels of smaller bandsaws, the heavy cast wheels of larger bandsaws work to provide a flywheel effect. The flywheel works mechanically to efficiently transfer rotational energy in the flinging action of the rotation. By their nature, working as flywheels, bandsaw wheels resist changes to the rotational speed by energy stored in the wheels. This moment of inertia evens out any resistance in progressing the cut, this gives us smoothness as a continuum from the the drive of the motor. Whereas this is a good reason to buy a heavier machine, smaller machines using smaller blades require much less energy and so should not be dismissed as an option if indeed our only option is a smaller and less expensive machine with a smaller footprint to fit our workspace. I would much rather have a small and compact bandsaw for a tighter space than none at all. Even a small bandsaw with a 1/3HP motor will cut through 6″ of solid oak if the machine is set up properly and the blade is sharp with the appropriate sized teeth. That being fact, most band-sawing work for most woodworkers will be under the 3″ mark and on down. It’s not the big and deep cuts that are common to us but the small and narrow cuts continuously made throughout the day. Whereas larger machines have larger motors, they are often subject to much greater pressures and the combination of motor power and flywheel work in union to resist the higher pressures. Smaller bandsaws rely on more fine tuning. Both can work well for us.
Advise is sometimes good and sometimes awkward
Ask advice from others you know who have experience if you have never owned or used a bandsaw, but keep an open mind on options and tell them that you are just looking so that you can make a more educated decision. There is a tendency for people to suggest you buy what they have or the biggest and best known version. Also, ask any 10 woodworkers which bandsaw to buy and you’ll get 10 different answers. Ask 10 woodworkers what size to buy and you’ll get 10 more, so on it goes. You see outlay cost, placement, footprint consumption, manoeuvrability and so on all figure into the equation. Of course it’s probably good advice when people tell others to buy the best they can afford. On the other hand I have been advised by self-professed ‘experts in the know‘ to “ditch those Aldi chisels and buy the better UK brand” or then again the US or Canadian brands. Well, I already own most all of those and more, used them, tested them and found them lacking by some measure one way or another. Actually, I found some to be somewhat pretentious. Some even snapped, ferrules fell off, edges kept dulling, fracturing. So the things wrong with them were things I couldn’t altogether accept. At 10-15 times the price of the Aldi’s I own I could accept them even less. My Aldi chisels on the other hand were, are, unpretentious. They have worked flawlessly well for me for about ten years to date. The others either snapped, bent or cut my fingers and hands because of poor ‘design features’. My Aldis on the other hand are now well proven to have excellent steel, edge retention and have proved wholly acceptable in design features and qualities. I’m enjoying them yet! It’s an unfortunate step that they may have dropped them for the UK market to replace them with carpenter type chisels they only think we need.
What about a small and compact bandsaw?
I would have no problem living with a compact and inexpensive bandsaw, even one underpowered. A bandsaw like this will not work in a commercial setting, where several users work on it throughout the day, but in a small home setting it will work well for most tasks provided you always use a sharp blade, one that’s the right size, the right thickness and you remain always conscious that you alone provide and control the feed rate. It’s important to note here that feed rate is also reliant on gullet expulsion and that different woods affect the cut. Hardwoods such as oak and ash are quite easy on bandsaw blades whereas more resinous and soft-grained woods tend to leave wood in the gullet to become compressed in the curve of the gullet just behind the cutting edge. Tooth geometry gives us options. This must all be considered when using different wood species and choosing which blade best suits the work and wood type.
So, bandsaws!
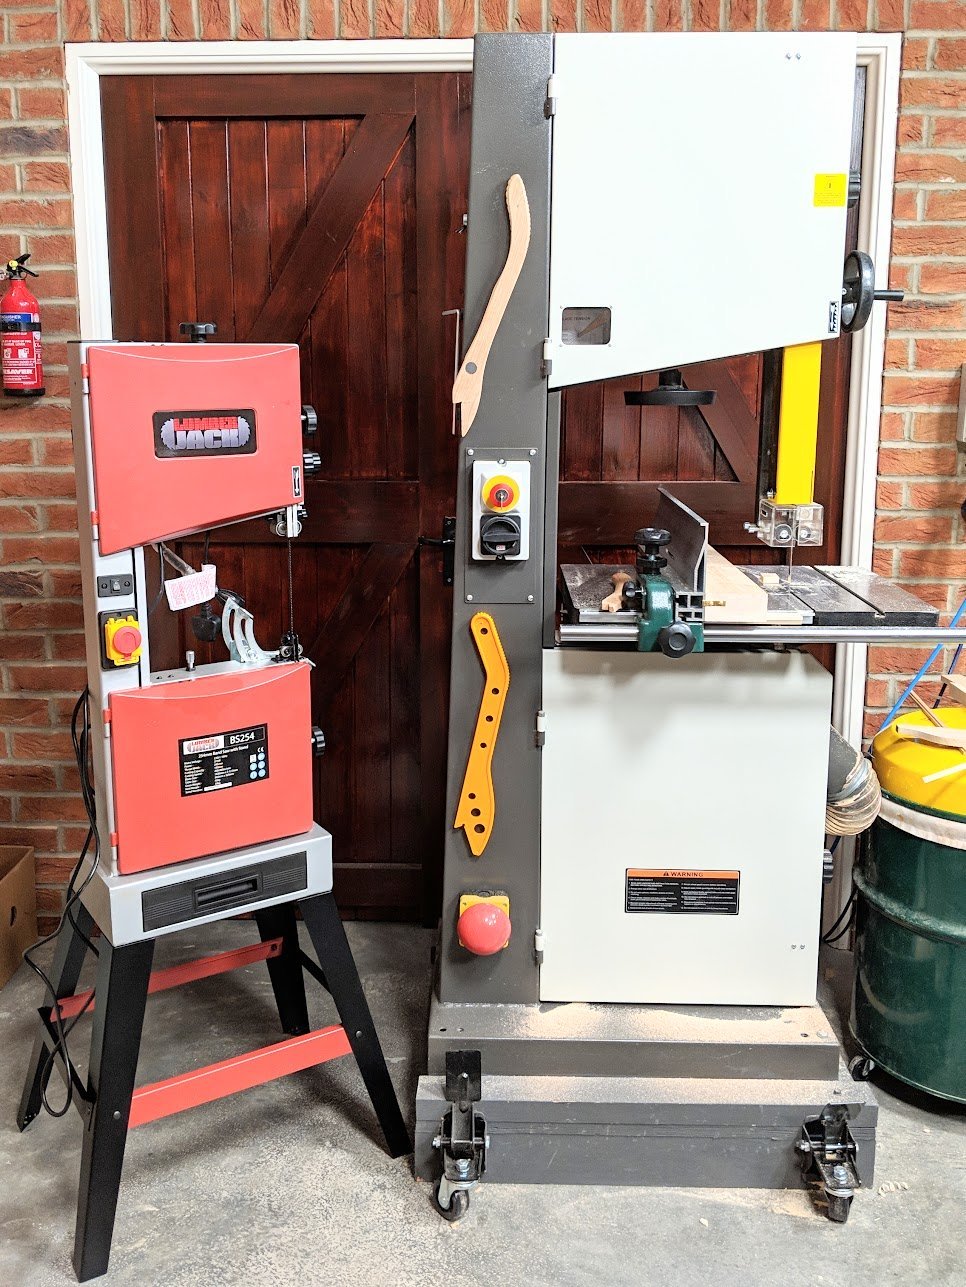
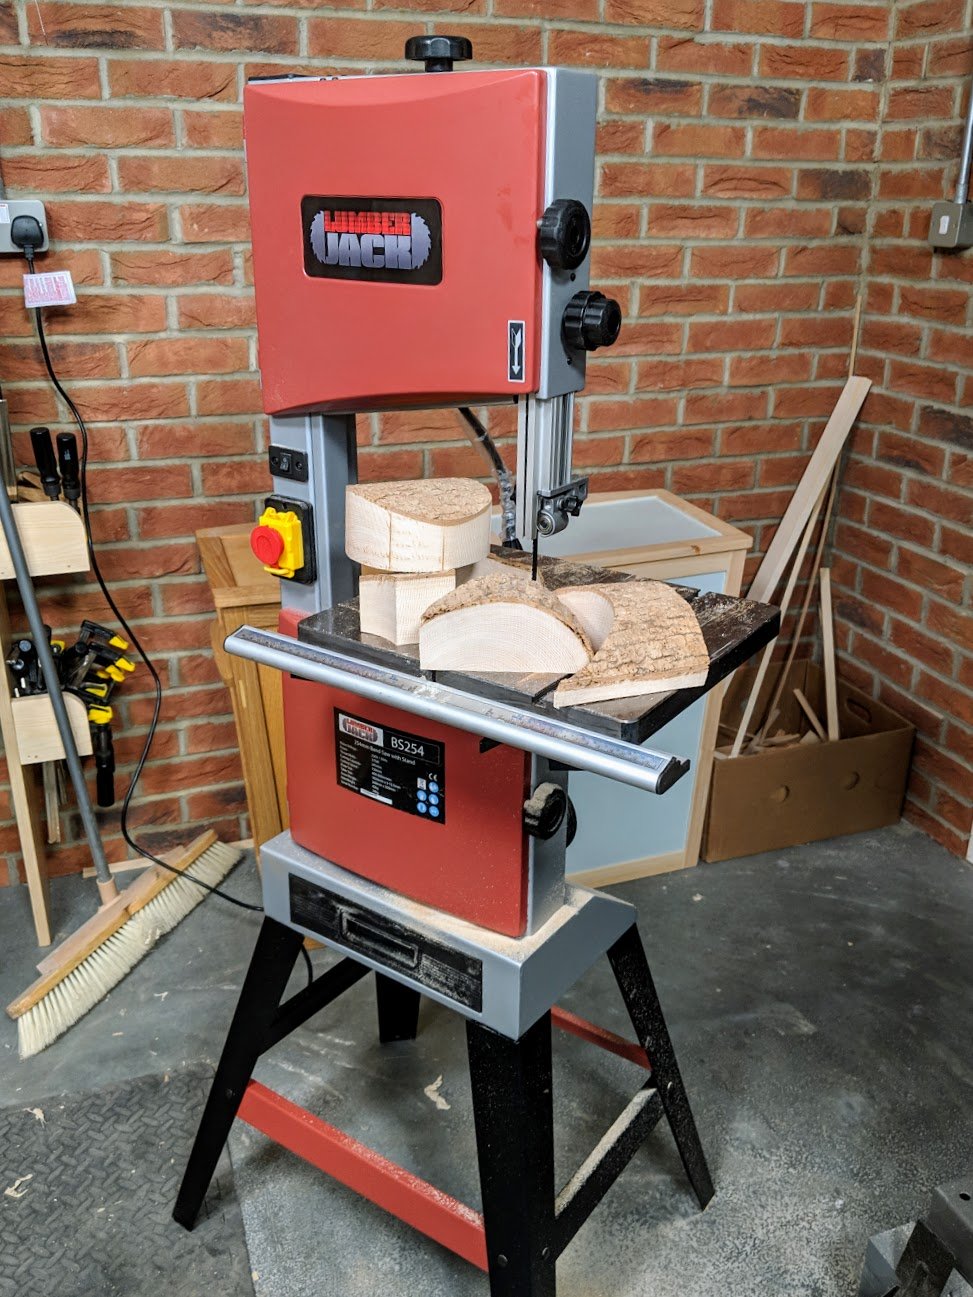
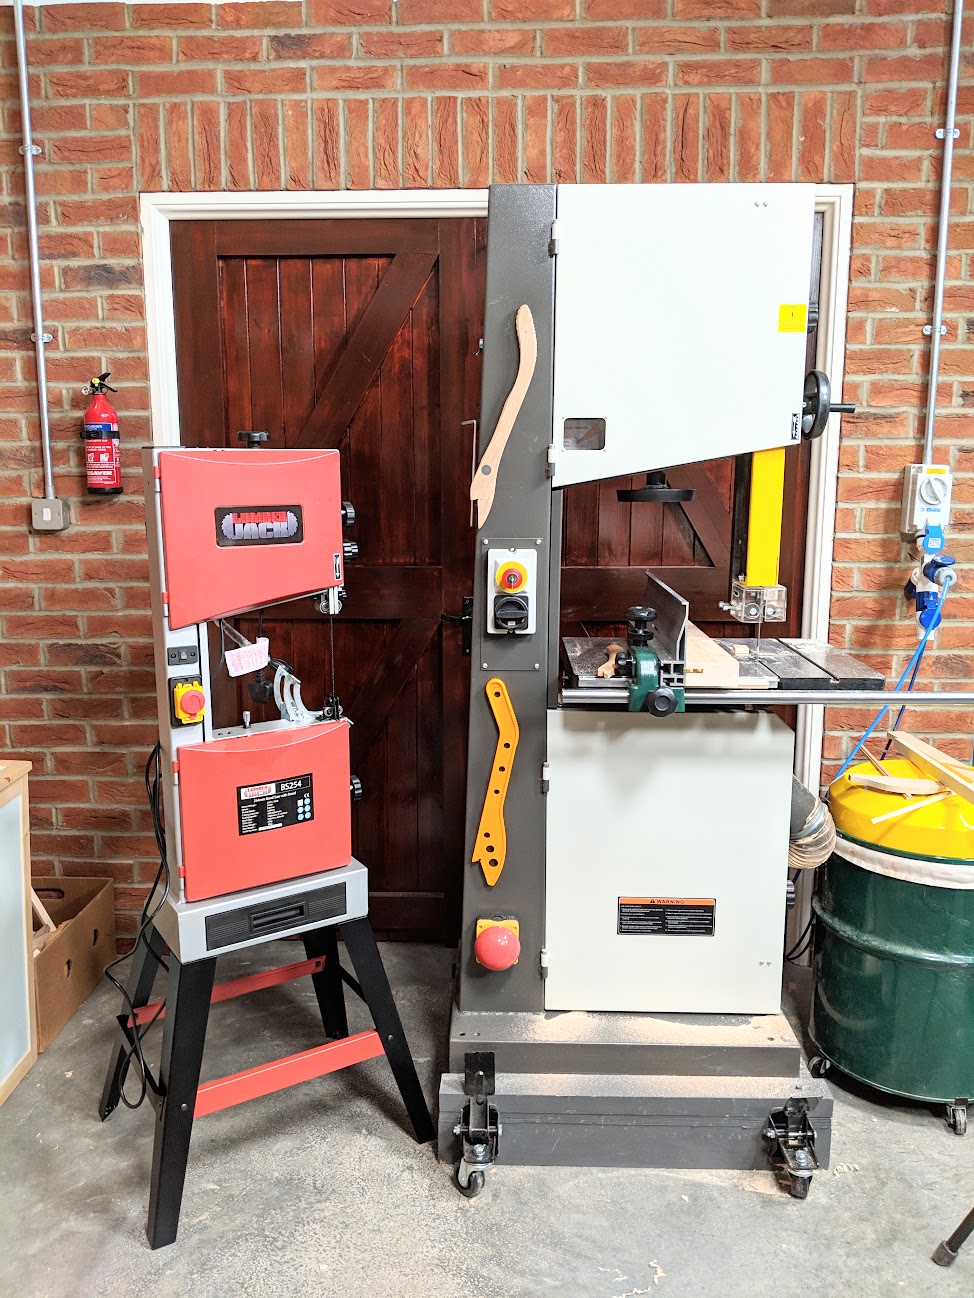
Bandsaws do seem somewhat different than chisels of course. Bandsaws do tend to be priced according to size. The wheels tend to govern this size. A 10″ bandsaw will have wheels slightly bigger than that in diameter. To get near to the 10″ width of cut, often a half inch or so less, 9 1/2″, the wheels would be somewhere around 11″. It’s surprising how much bigger the overall machine will be when you shoot for the 14″ or 16″ versions. The picture below shows a 10″ and 16″ bandsaw for size comparison, The one looks minuscule in every way.
In my view the bandsaw is of course not really a tool but definitively a machine. I’m outnumbered a thousand to one with that view but that doesn’t make the majority right. Just that they accept being raised to think a tool is what gets the job done. I don’t even try to get them to think about it a little. Programming leaves no margin for an alternative possibility. I was raised to question authority. This is not rebellious. That wasn’t what it meant. It meant to find out what the authoritative statements were based on.
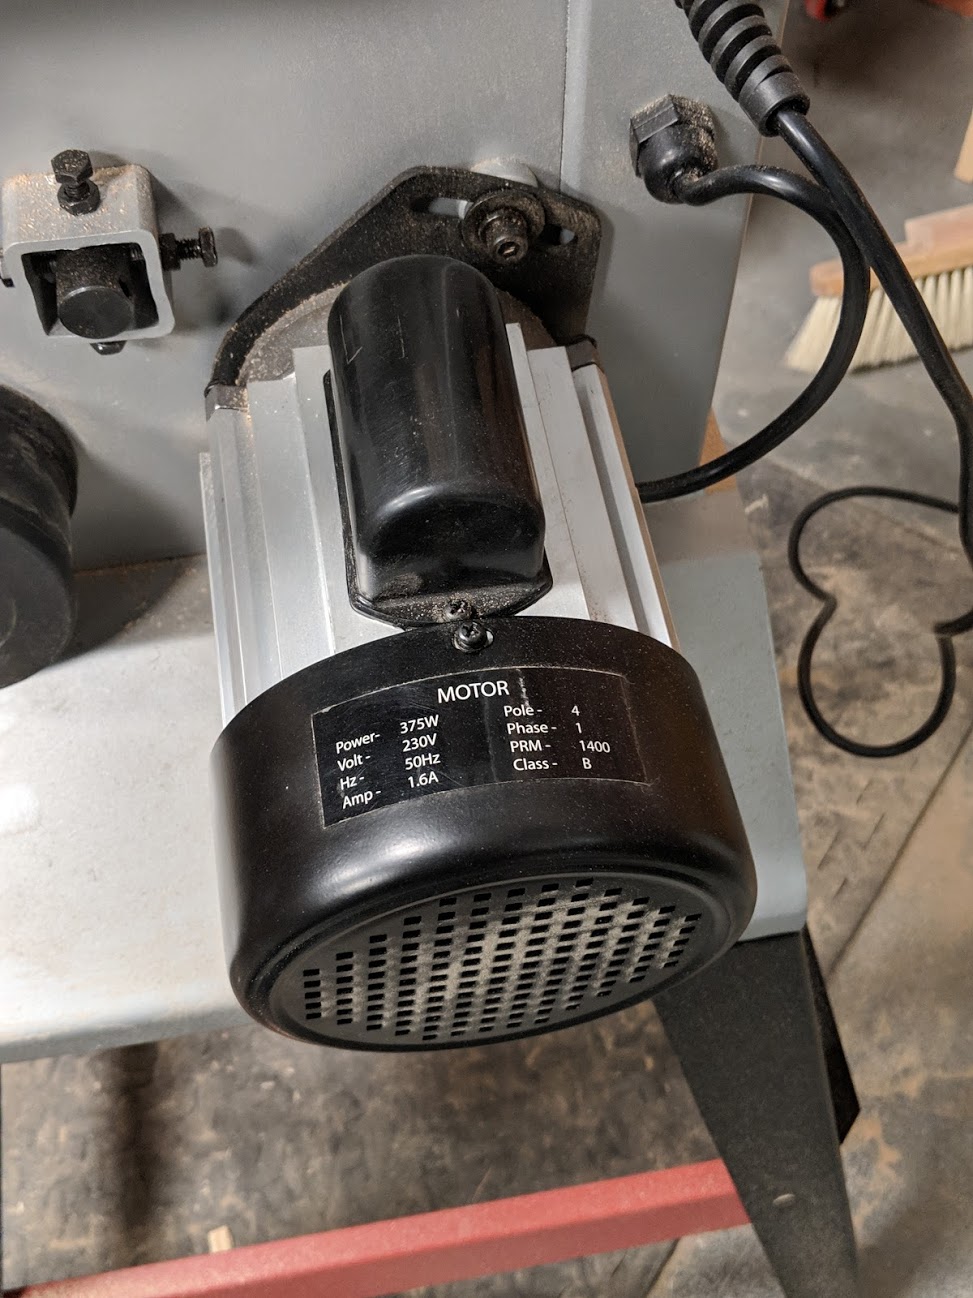
What’s nice about bandsaws is, large or small, domestic or industrial types, they all follow some very basic principles. Most bandsaws comprise the main frame that supports the motor for uniting drive power to two rotating wheels that carry, drive and tension the bandsaw’s cutting blade on an inline path. The motor needs no reference as it engages the machine to action with the push of an on/off switch.
The two wheels are both in line, one above the other, the bottom one immovably fixed to the main body of the machine, the top with built-in adjustability. The top one relies on its being adjusted to align readily, whereas the bottom one needs more mechanical tools and it’s the rare that we ever need to alter its alignment rather than the norm. Usually a worn bearing or housing necessitates a change out but we are talking after years of service working. So it’s the top wheel that needs more flexibility and all of our adjustments come through micro- and macro-adjust the top wheel alone. Two primary fields enable us to optimise our bandsaw’s performance, tension and alignment. It is here that we use these two areas of adjustability to produce a good cutting strategy. Tension and alignment are inextricably linked to one another and both are exerted via the steel band we call the bandsaw bade.
Tensioning the blade
Tension is simple enough to understand. By raising the top wheel we effectively stretch the blade between the fixed lower wheel and then the moveable top wheel that ultimately becomes fixed when the tension is right. Unfortunately the alignment of the blade in relation to both wheels is usually a fine balance and it takes a little time gain confidence making adjustments.
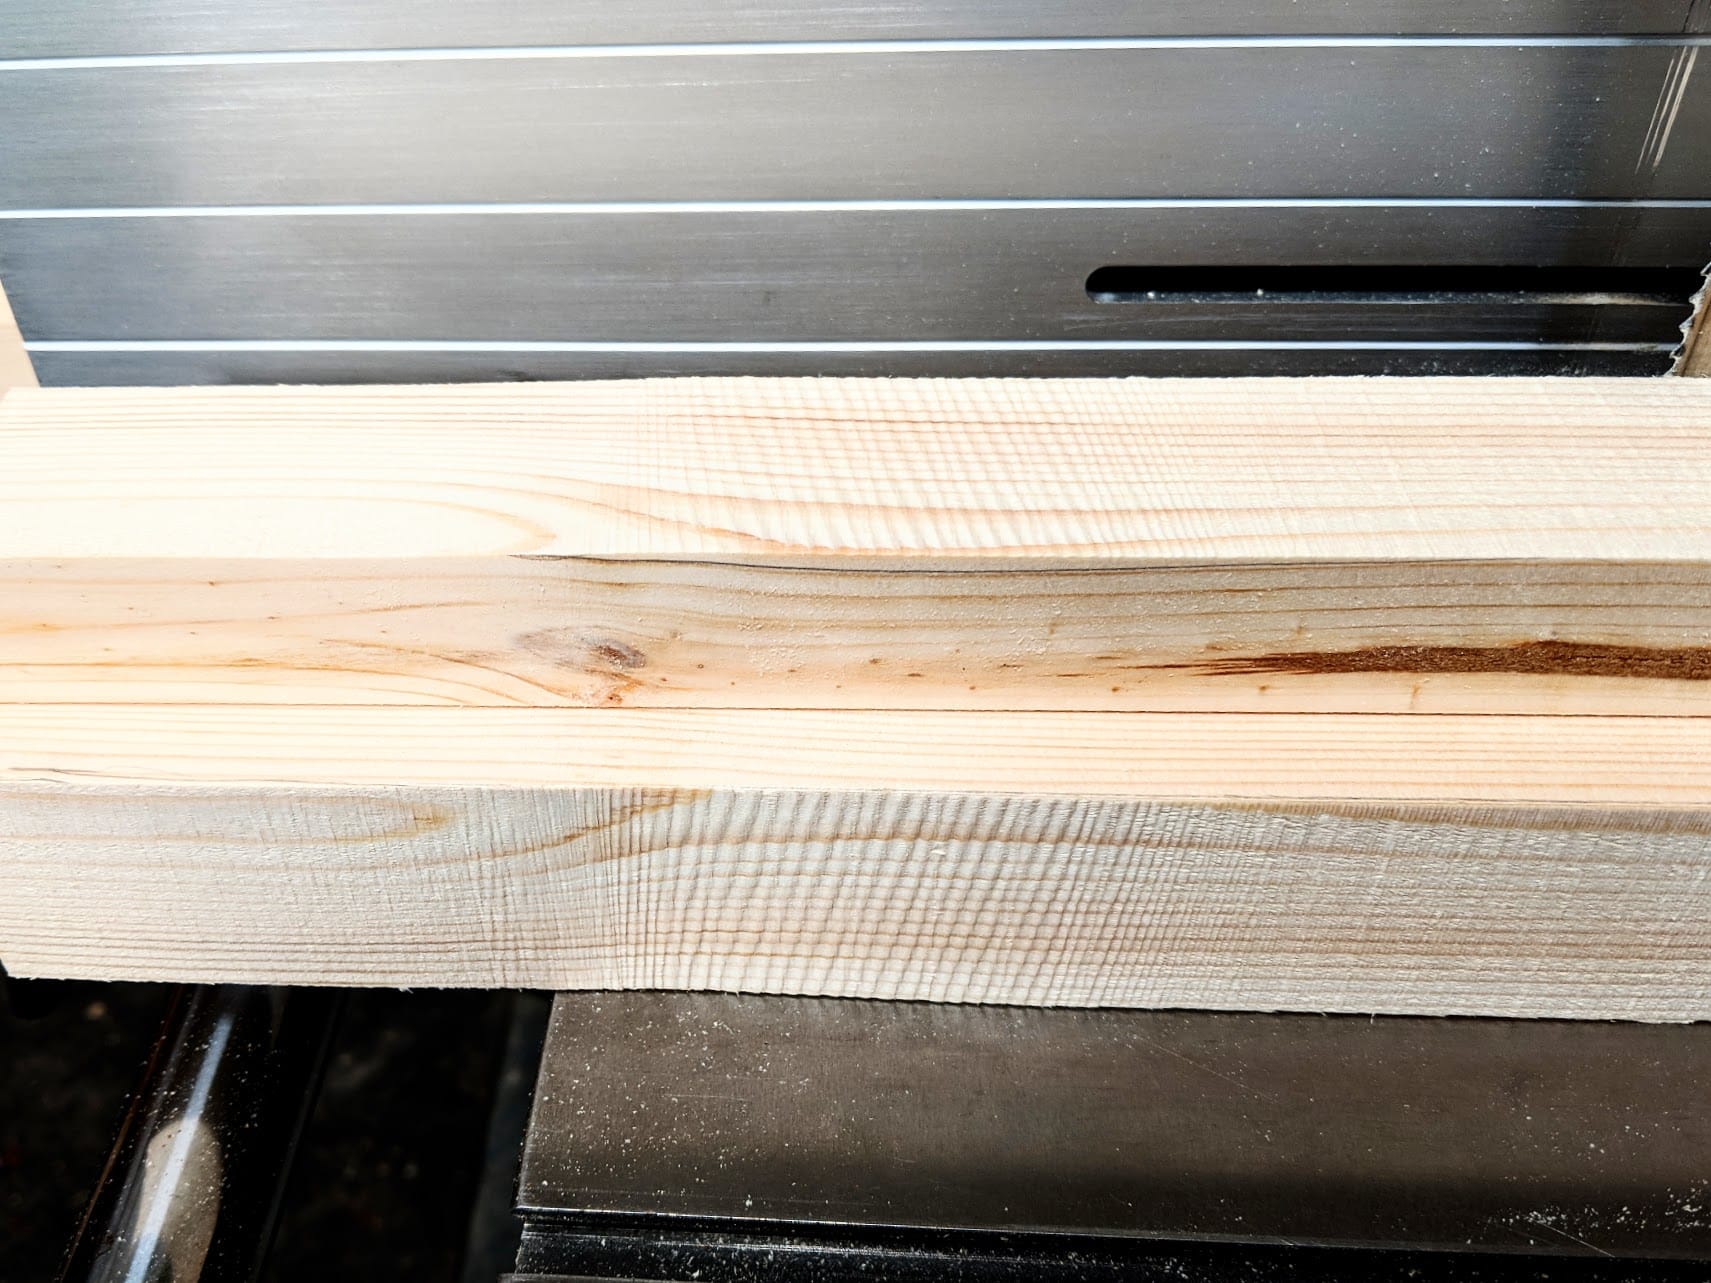
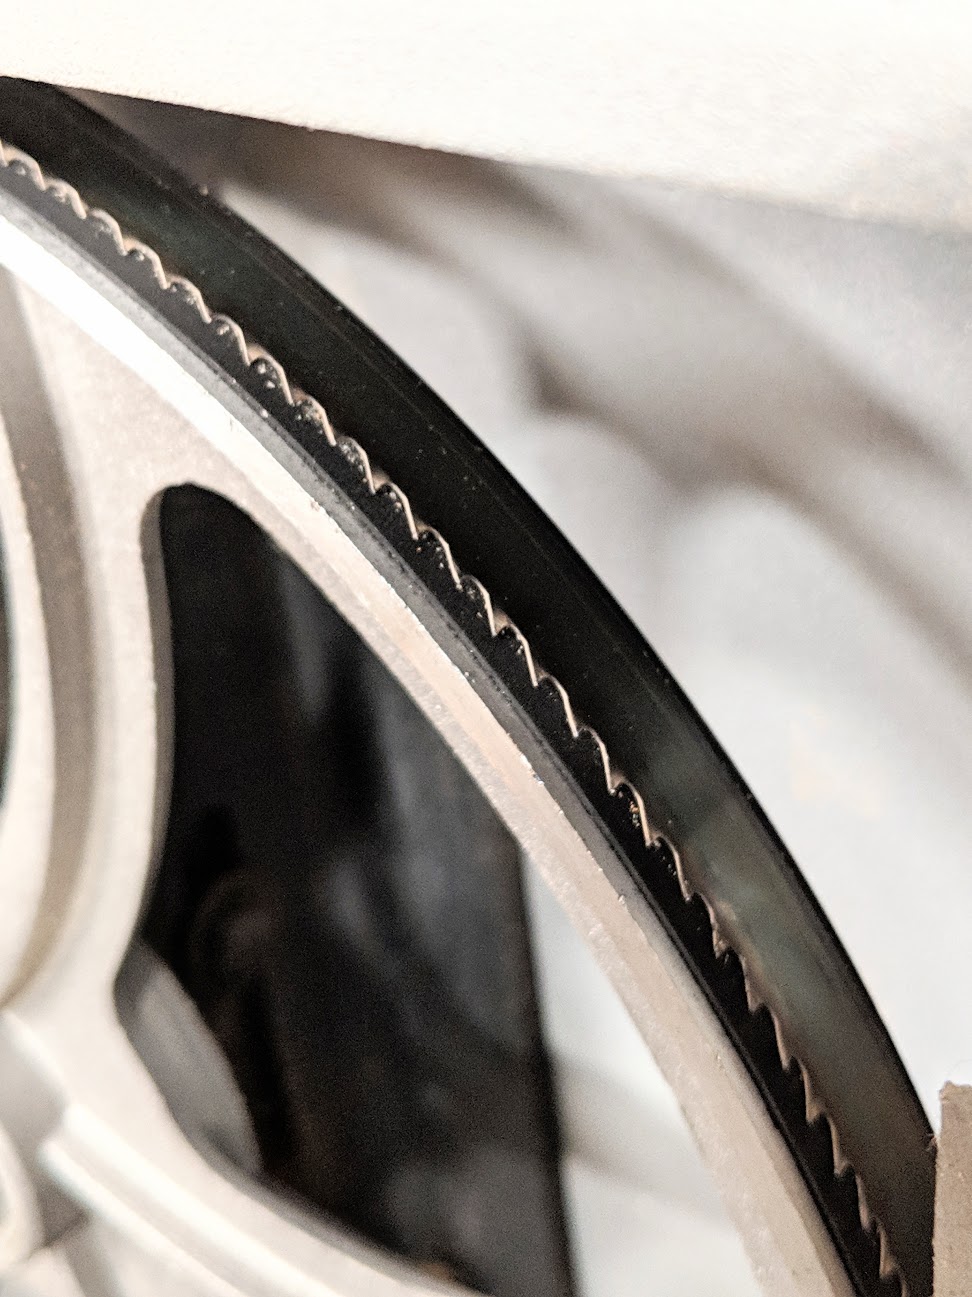
In narrower material (above), say 2″ or so, this flexing can actually develop wave-like undulations in the walls either side of the kerf cut because the blade is going from left to right intermittently. When the kerf is revealed by being opened up it has diagonal undulations running close together and parallel to one another. The pictures show these types of undulations as a rhythmic phenomenon that shows the development and its recession. Tension, pressure and feed rate produce the altering rhythm reflected in the textures developed. Increasing tension stretches the blade between wheels which generally reduces and prevents diversion and undulation.

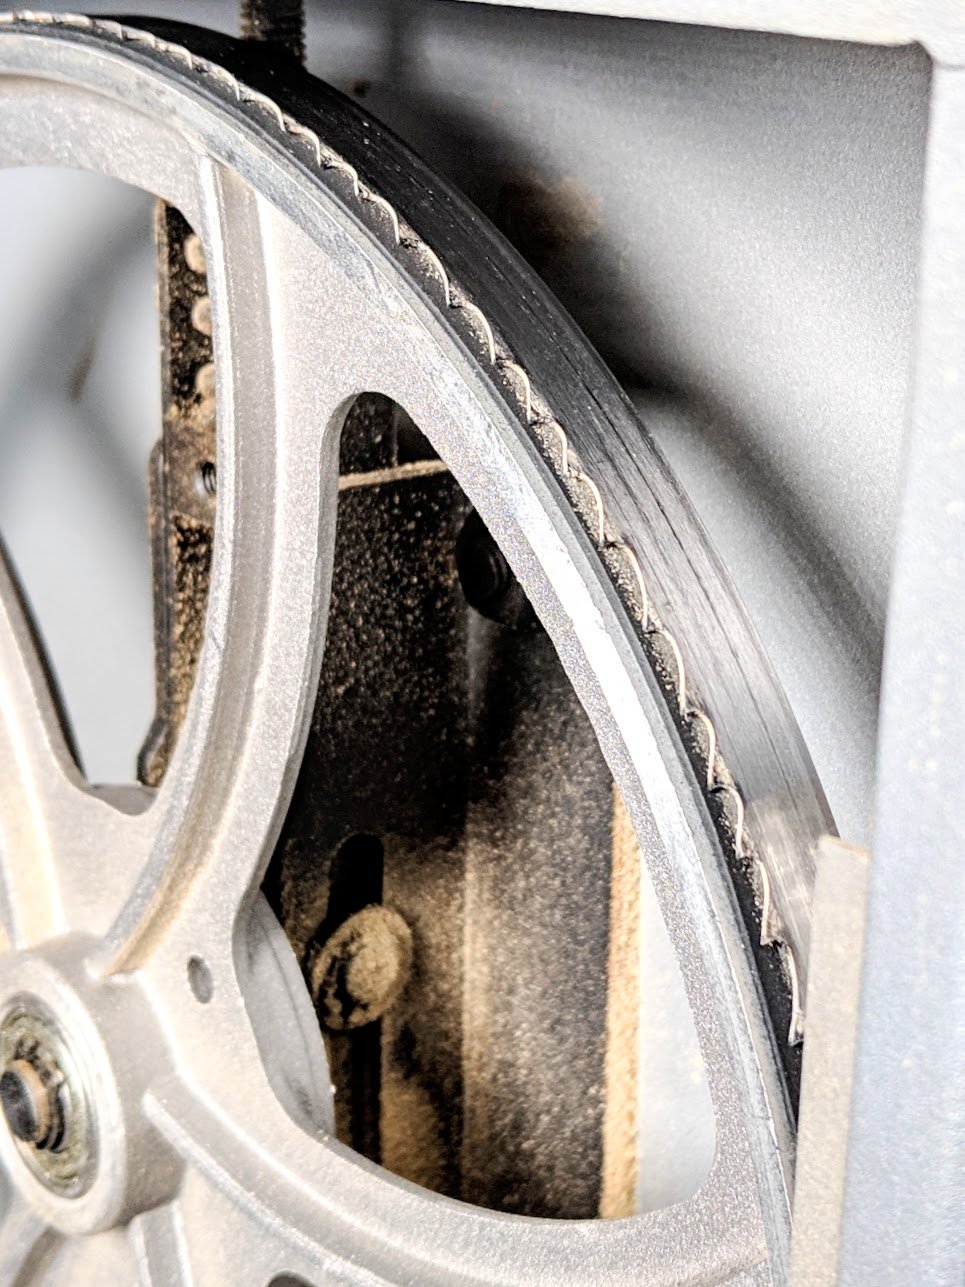
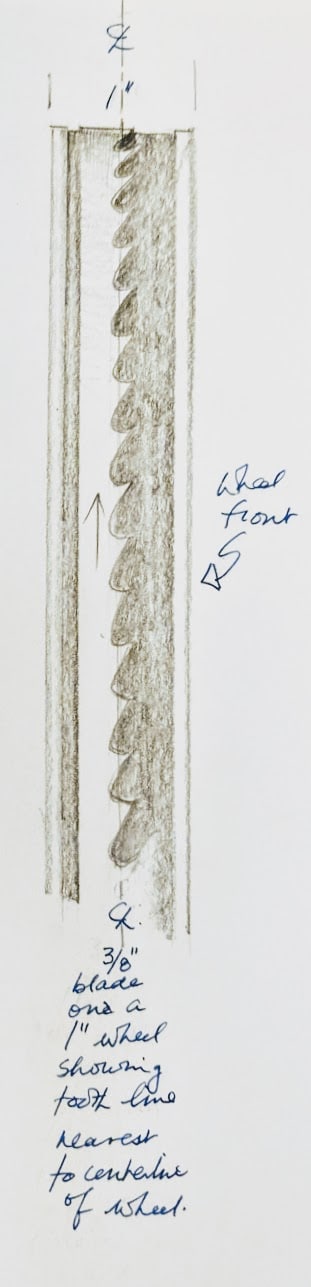
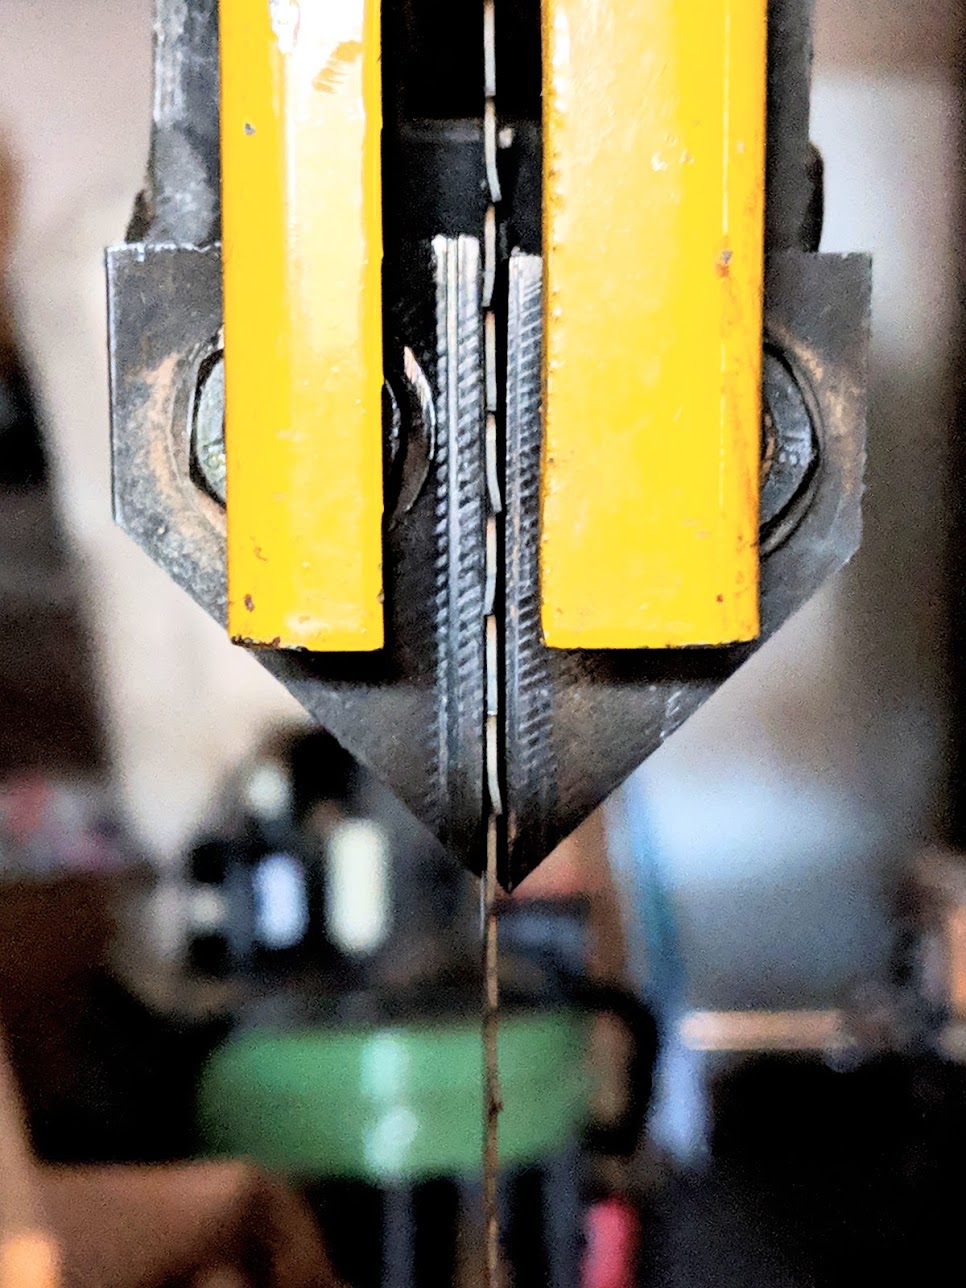
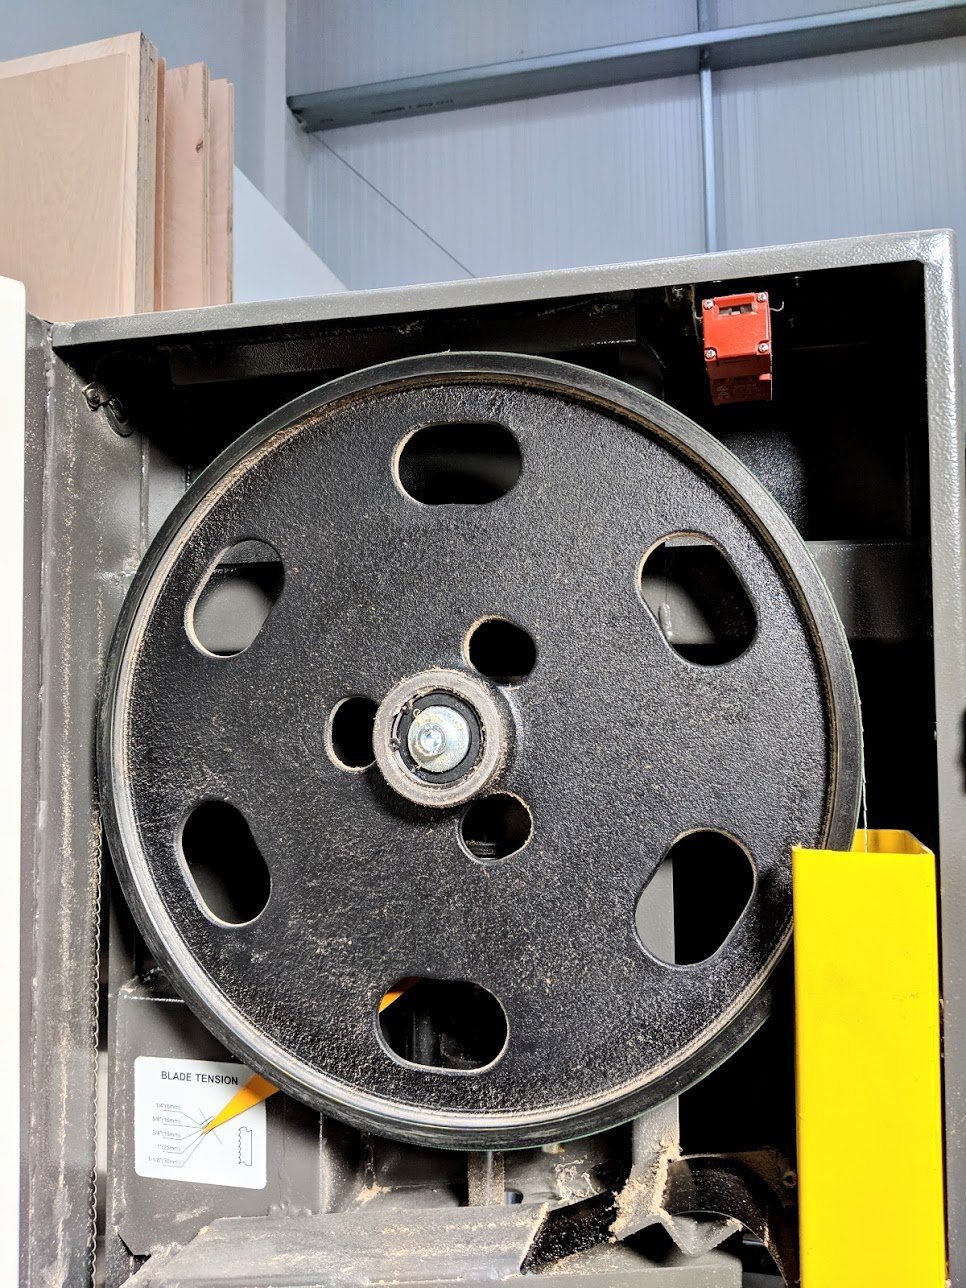
Looking inside the hinged covers of the top and bottom sections exposes the bandsaw frame and the wheel support, adjustment mechanisms and the access for blade changing, bearing adjustment and so on. It’s here that we look to centralise the blade to the wheels as closely as possible. It’s also at this point where you must make a decision. The debate surrounds the word centralise. The goal in some users view is to get the teeth as near to the centre of the wheels as possible. Sometimes, often, where wider blades are preferred, this then becomes quite impractical for a couple of reasons not the least of which is the majority of the blade is moved so far back the edge of the blade actually overhangs the back of the wheels. This can mean metal on metal as bandsaw wheels have an upstand to the front and back edges of the wheel that form lips. This also results in too much pressure on the rear half of the wheel which on the smaller, lightweight bandsaws can cause torque you don’t want because this results in early wear leading to malfunction in the wheels and bearings. In cases like this, trying to keep the blade on a consistently even path then necessitates an undue amount of tilt to the top wheel and often a reliance on the rear thrust bearings above and below the table. The alternative, and one I generally prefer, is to align the fore edge of blade, the toothed side or edge, just forward of centre. This is by no means rigid and with some bandsaw wheels it will be impossible because the wheel may only be a small fraction wider than the blade itself. The idea is to minimise unnecessary pressures and wear to all the component parts which includes the wheels themselves, the bearings in the wheels, the guide and thrust bearings, rubber wheel bands, the main bandsaw frame, tension mechanisms and so on (Don’t be put off. This is not as complicated as writing it down here makes it sound). The blade width, that’s the measurement from the front cutting edge of the teeth to straight back edge, not the thickness, means that locating the fore edge of the blade is/can/will be affected by where the teeth are in relation to the centreline of the wheel. It’s the blade itself that most directly affects delivery of balance between the two wheels as alignment and the applied tension through the tensioning mechanism—the blade size, blade type, blade thickness and so on each have influence here.
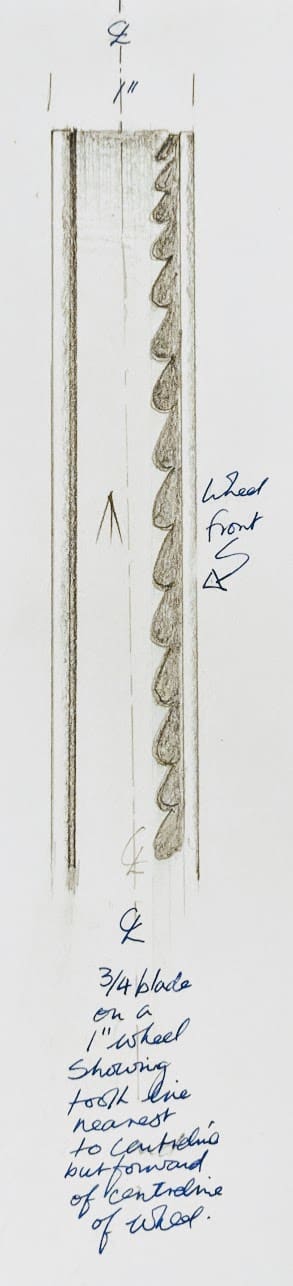

The smaller the machine the less bandsaw blade width you can install. Small bandsaws such as the 10″ shown above and below means that the maximum size of blade will be around 1/2″ but no more. It’s more practical then to use narrow bandsaw blades for narrower wheeled bandsaws. A 1/4″ blade is a good size for small bandsaws. Unfortunately, narrower blades run the higher the risk of snapping, usually around the weld area, and when you least expect it too. It almost always make you jump. There is also the reality that narrow blades, say 1/8″ to 1/4″, are harder to track on the wheels and then keep tracked, so they may well need micro-adjusting to keep them in line. Certainly this will likely be more than with the wider blades but don’t be put off using them. They are a different experience than wide blades and give extremely tight turning circles. Just work down from the 3/4″ down to 1/2″ and through to 3/8″. That way you can increase your comfort levels as you develop the ever important sensitivity and familiarity you need for your machine.
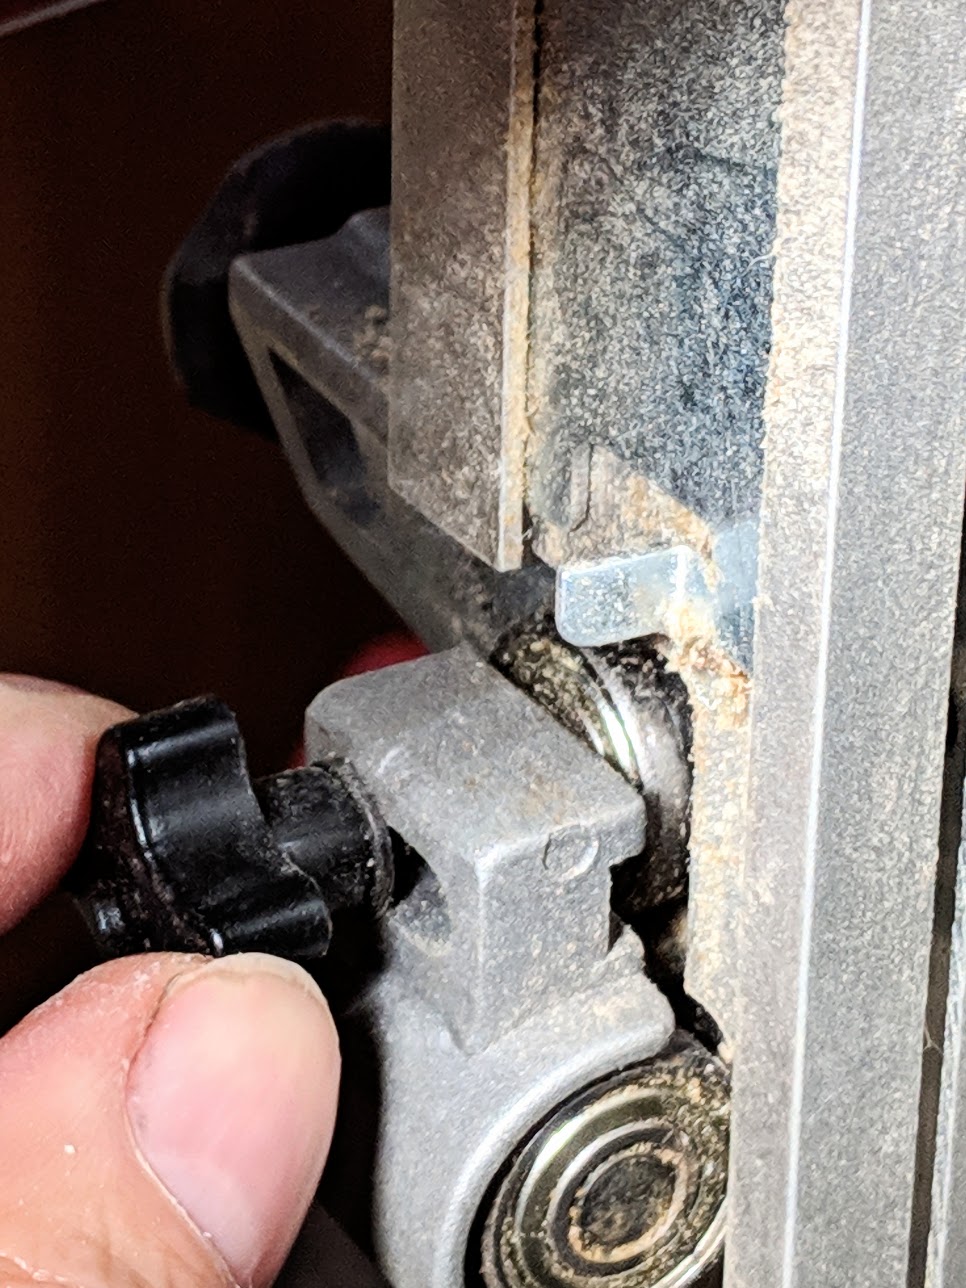
On this bandsaw above the wheels are only 5/8″(16mm) wide so to position a 1/2″ blade with the teeth near to centrality means that the back of the blade would need to overhang the back by far too much. It also means the pressure applied is on the rear half of the wheel and on the fore-edge of the blade. Because steel stretches and the rubberised wheel bands supporting and cushioning the blade becomes compressed, this creates a constant tendency to thrust the bandsaw blade towards the rear of the wheel which then must be countered by balancing the wheel via the alignment knob at the rear of the top wheel. In my view, based on my experience, it will be better to move the blade tracking slightly forward and quite off centre as shown in the drawing below. In my case here the 1/2″ blade on the 5/8″ wheel has been working just fine with the same blade being used now for about 3 weeks of occasional use but many times a day.
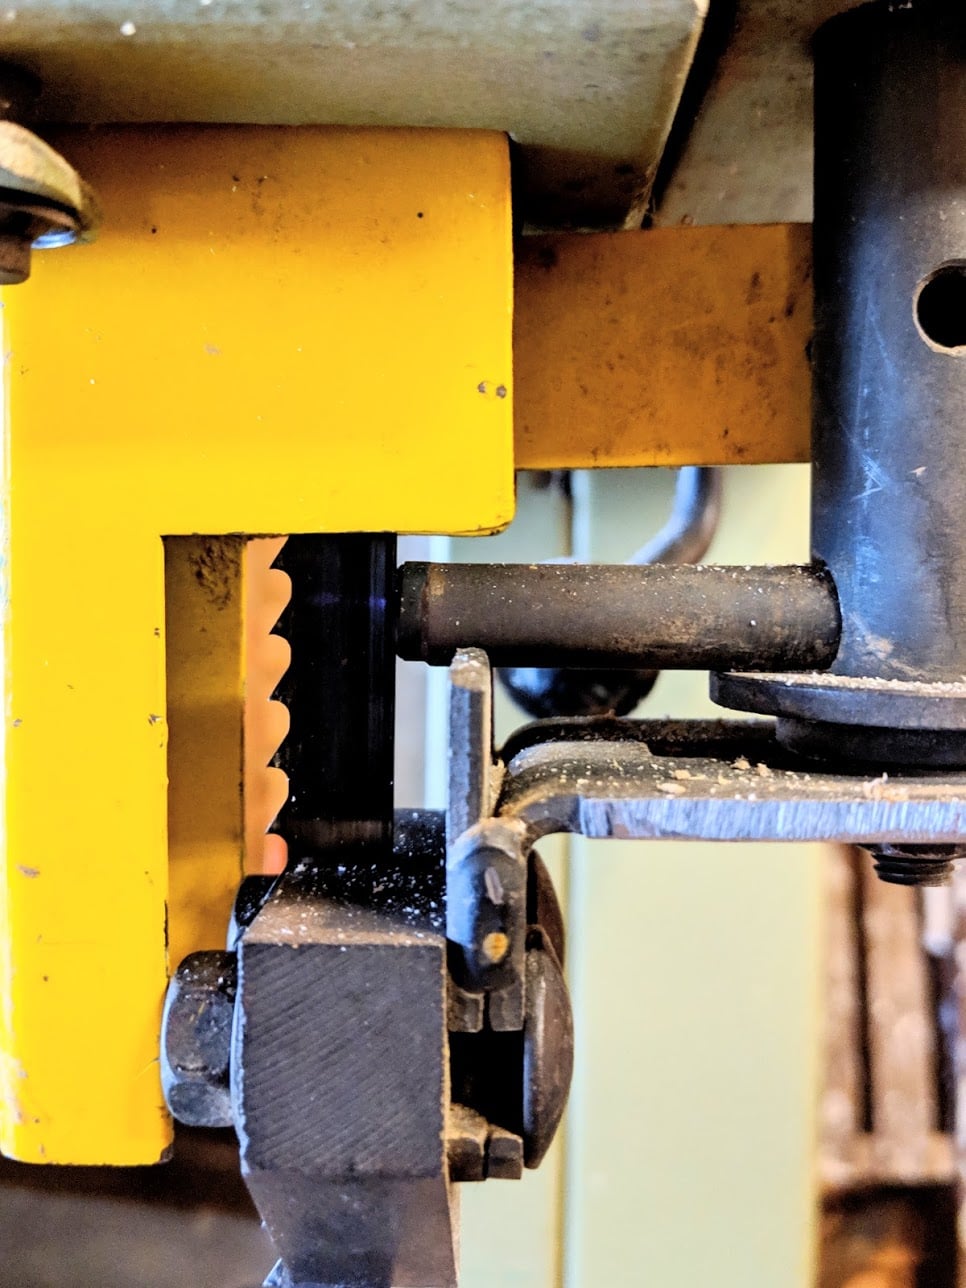
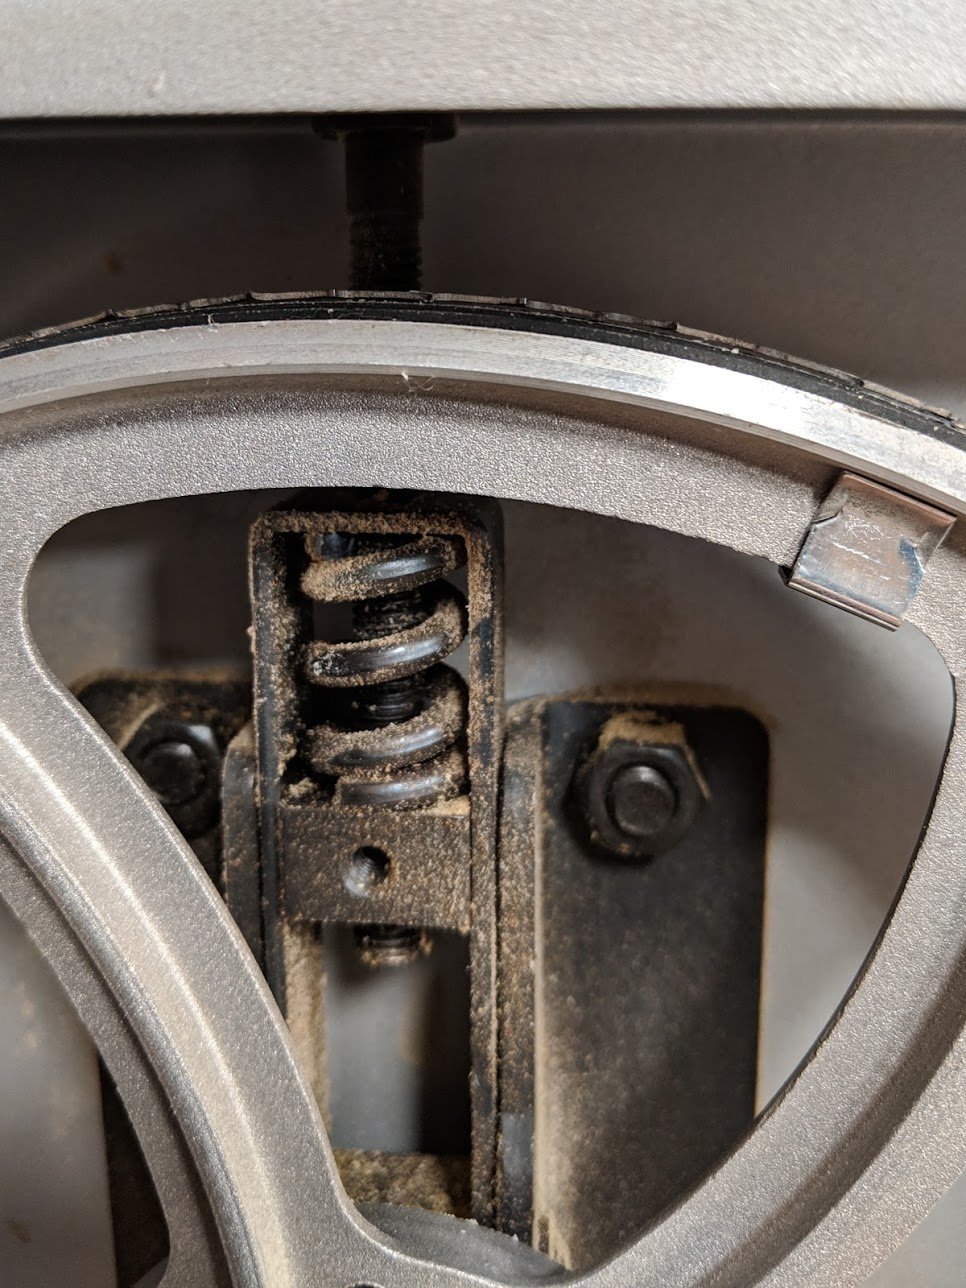
Remember, in changing blades and adjusting alignment, tensions etc, it is best to release the rear upper and lower thrust bearings to allow them to ‘float‘ until tensioning and alignment are complete. Once tension and alignment are set you can adjust the thrust bearing accordingly. Thrust bearings act as a back up to prevent the blade from being pushed too far towards the back of the wheels which would then result in pushing the blade out of alignment front to back or even off one or both wheels altogether. It also results in a cut that is unpredictably out of square which on straightforward thrust cuts may not matter but on shoulder cuts as in tenon shoulders would be unacceptable.
Special blades for small machines are available as a general rule by suppliers. They offer these small blades in thinner blade stock to reduce the amount of tension pressure necessary to adequately tension the blade. These blades are again made from high carbon steel with hardened teeth, usually .014” , around .33mm in thickness. Standard blades are about twice this thickness depending on the blade type, steel type etc.
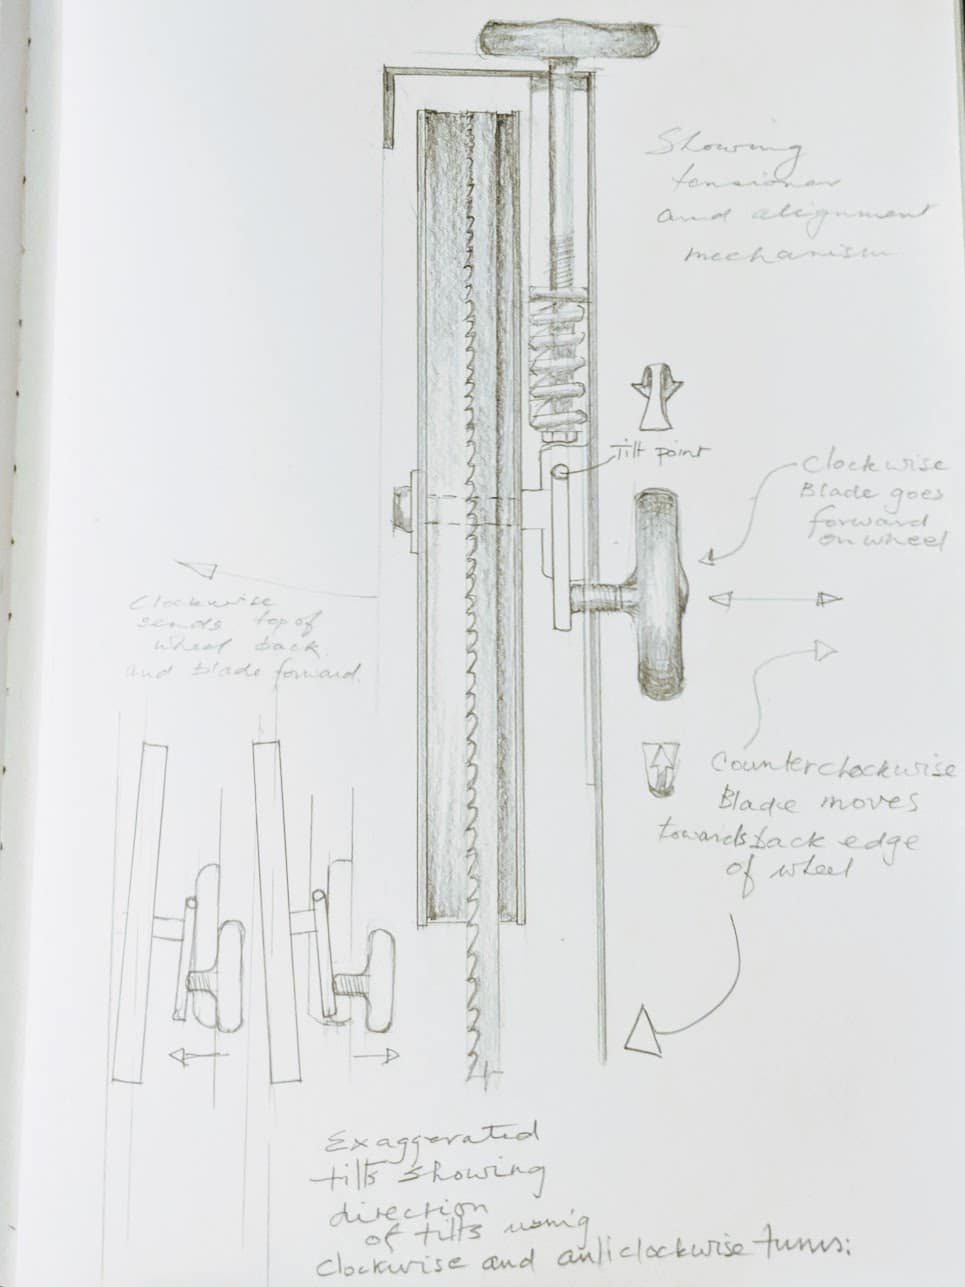
Some times the blade will be centred on the bottom wheel and less centred on the top or indeed set further forward on the bottom wheel facilitating better centring margins to the top wheel. We aim to reduce this margin of centrality as much as possible but slightly forwards or backwards is usually inconsequential. The adjustment knob just below centre of the top wheel (shown previous picture) at the rear of the machine enables us to tilt the top wheel on its axis by large and small amounts. Though the bottom wheel has no adjustability, being fixed, altering the angle of the top wheel via the rear adjuster moves the blade backwards and forwards depending on which ay you turn the knob. Turning adjuster clockwise when facing the back of the bandsaw will bring the top of the top bandsaw wheel towards you. On rotation of the bandsaw wheels, this then serves to move the bandsaw blade towards the front of the top wheel and also, to a lesser degree, forward on the bottom wheel. A counterclockwise turn will bring the bandsaw blade towards you, towards the back of the bandsaw wheel. Again, this will move the blade back on the bottom wheel also but usually by a lesser amount.
Once you have a blade aligned, subsequent blade changes usually fall closely to this alignment and only micro adjustments are usually necessary. What can also make a difference is any variation in blade length. Though you should expect manufacturers to make blades to the correct measurement, that sometimes varies. An extra 1/4″ makes a huge difference and even a much smaller miscut length means a shift will need making. Try to guard against creating a ‘yoyo effect’ by excessively turning the adjustment knob one way or the other and creating a quick move. Turning even a small amount will make the blade move forwards or backwards. If this happens then the blade will ultimately pop off and will keep popping off until you narrow the excessive discrepancy. If the blade keeps popping off the front of the top wheel then turn the adjuster counterclockwise. This will send the top of the wheel forward and the blade, when rotated, will move towards the back with each rotation. If it pops off the back of the top wheel, turn the adjustment knob clockwise to tilt the top of the top wheel backwards. These actions will work the blade in alignment on both top and bottom wheels. Also, a good place to start aligning the blade to its centralised positioning is with less blade tension. Once you feel it is to a point of centrality you can add more pressure by adding tension and rotating the top wheel as you do.
Blade tensioning extra
Blade tensioning is something we often misunderstand and that is because the methods of measuring the tensions are more complex on the one hand and dirt simple enough on the other. Mostly we none of us have the more sophisticated equipment necessary to measure with exactness how much tension there is when we stretch the blade between the top and bottom wheels of a bandsaw. In the day to day of life we actually don’t need such exactitude but it would be somewhat nice if we could indeed dial in a tension and get a digital readout as with say a digital vernier or such.

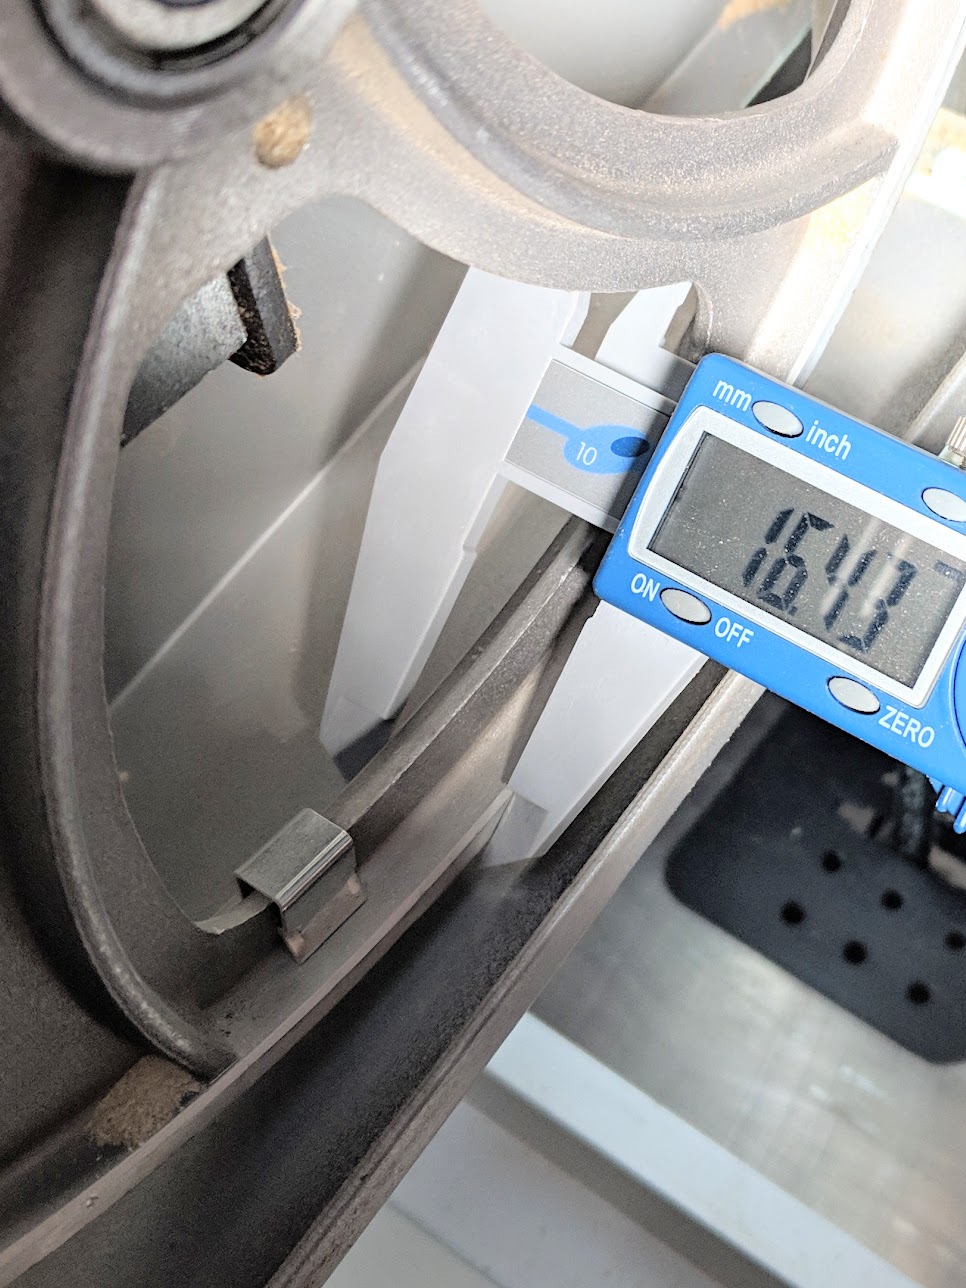
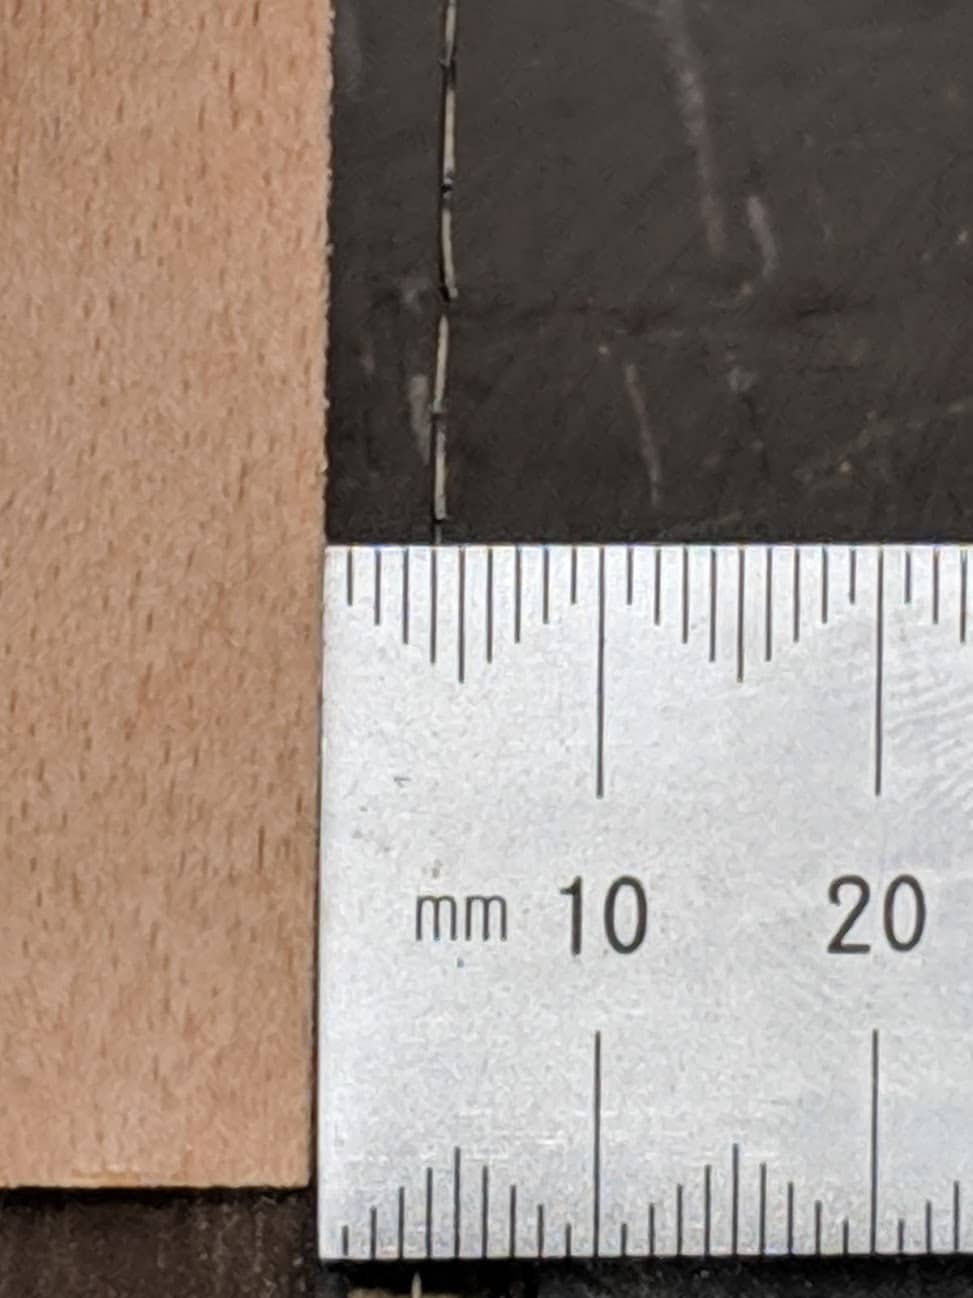
Asking how much tension is needed or has been applied is like asking how long is a piece of string? True and accurate testing only occurs when we have the right equipment for testing. Bandsaws being the only machine where we actually tension the cutting edge or edges makes them unique. Often nowadays they do come with a gauge built into the machine that registers the tension applied. Supposedly, watching the pointer on the gauge enables you to set the blade according to the width of the blade with the widest blades requiring the highest levels of tension. Taking two points in the given length of a blade and seeing how much difference there is helps you set the tension. That is not what we actually do because we don’t have the device to do this and neither do we want to or need to. In reality these gauges are merely a rough guide, a very rough guide. On one of my bandsaws I installed a half inch blade but to get anywhere near an appropriate tension I had to register for a blade correlating on the gauge to one of 1 1/8″ in width. The simpler test is to tension the blade using the adjuster and listen for the change in pitch as you ping the blade whilst applying tension. Some might suggest an E-flat corresponding to a guitar note. Not being any kind of musician this is unhelpful and therefore doesn’t work for almost all of us. The other test, after the ping test, is the distance measurement we use to press the blade from its central taut position. Raise up the top bearing guide column to expose a maximum mount of blade between the top bearings and the table ofd the bandsaw. Press on a central point in the blade laterally to see how far the blade pushes off its stretched taut centrality. Move of about 4-5mm on the lower side has generally been my aim and has proven reliable for me.
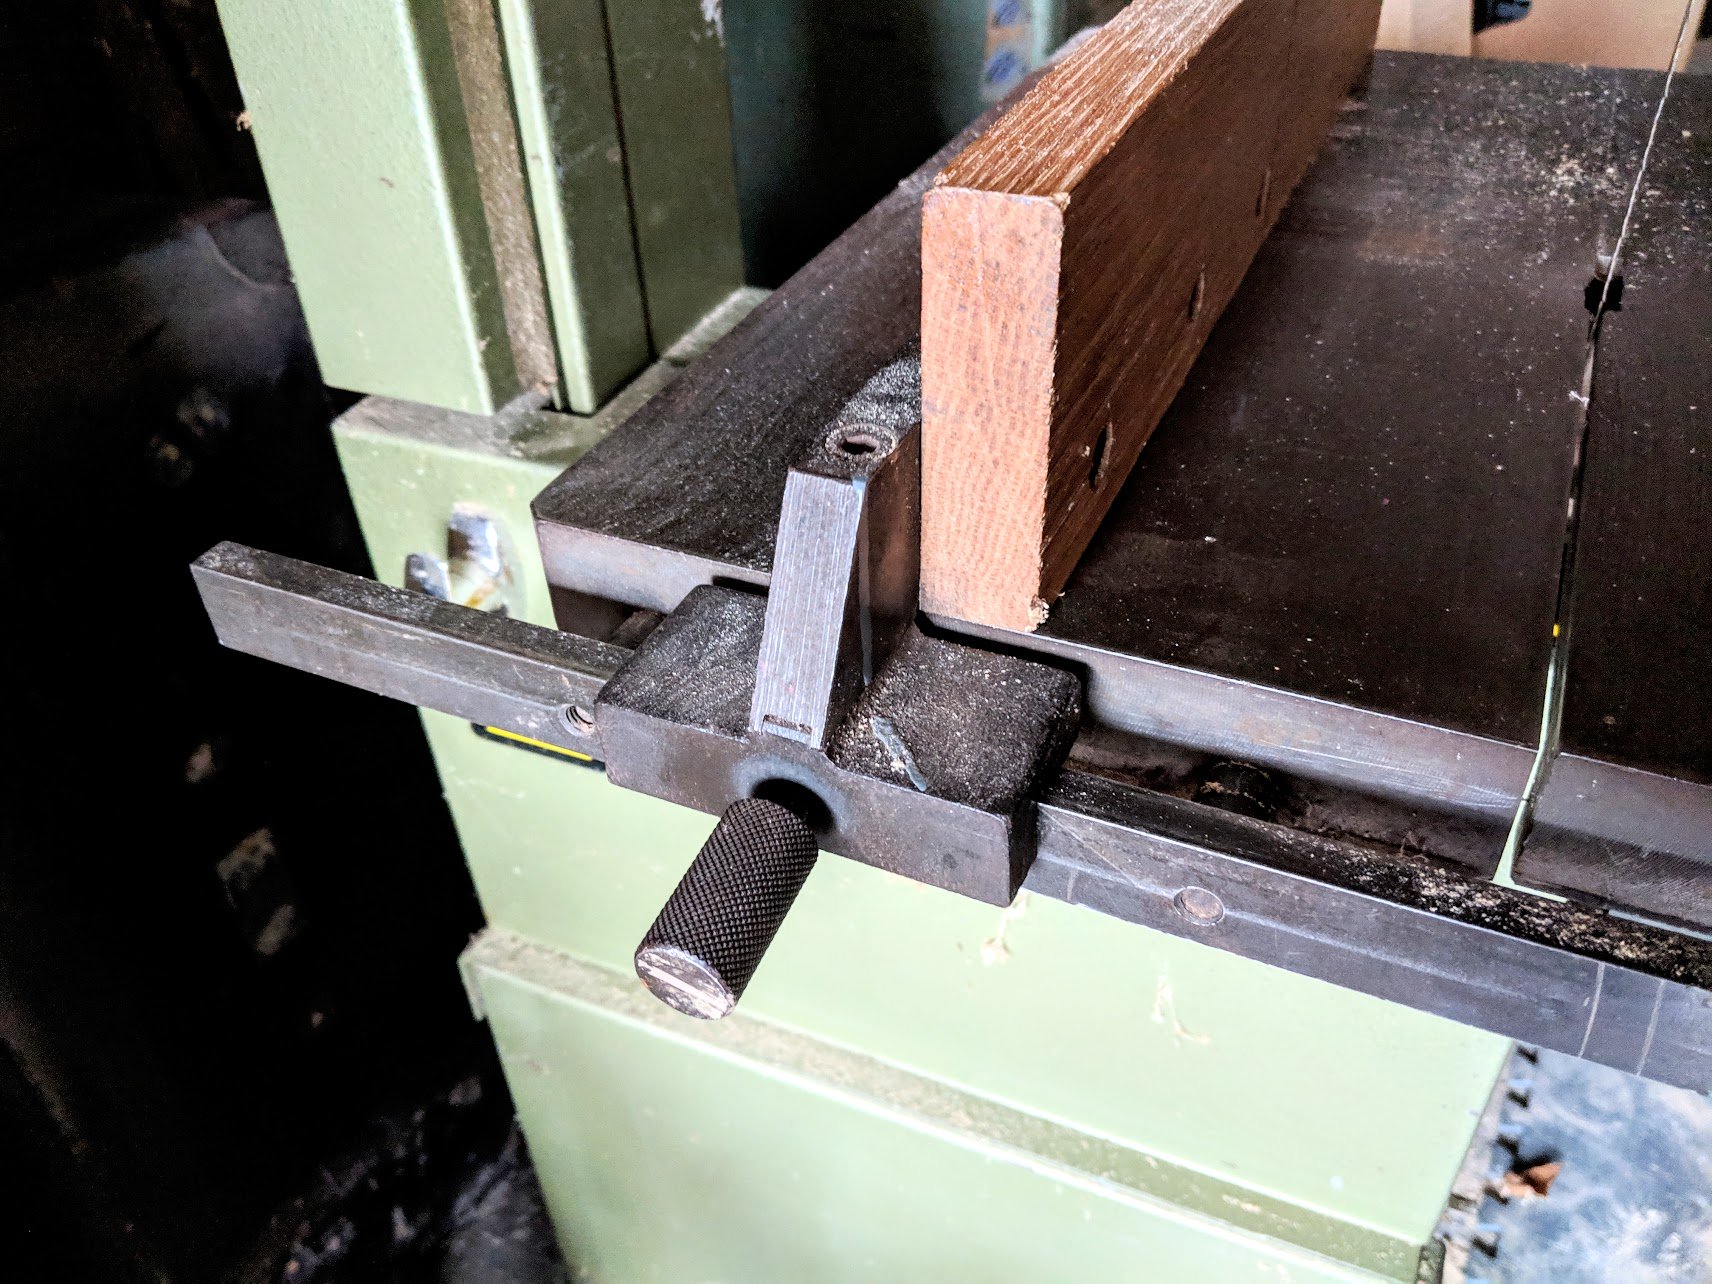
Tip for guidance
To help guide my tensioning I set a square ended offcut of wood against the side of the blade as shown.
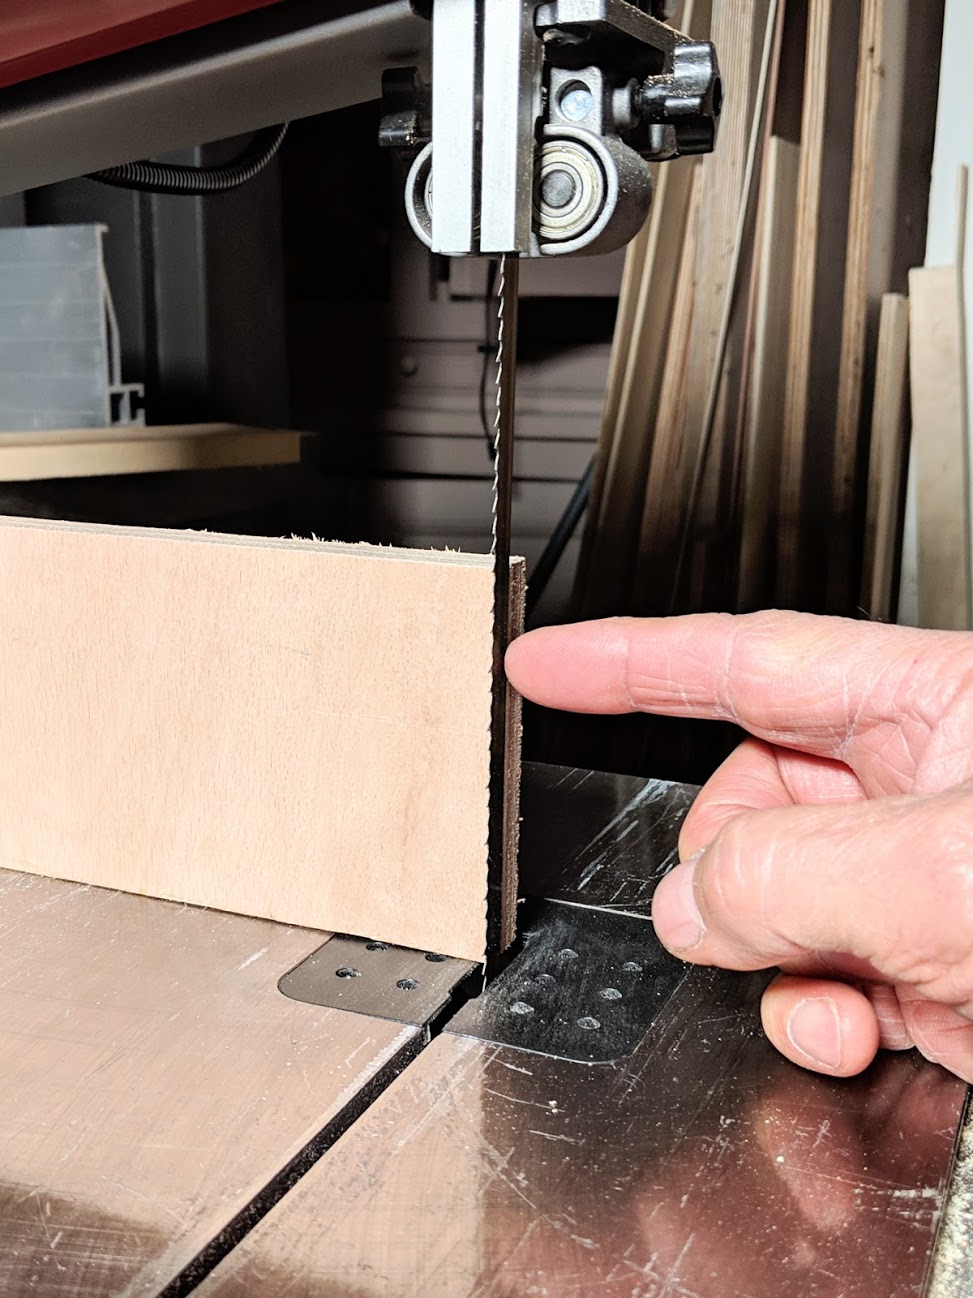
I press/prod the blade with the end of my forefinger towards the wood and then release the blade to spring back in line. Usually it is enough to gauge this release distance by eye but equally so you can measure the exact distance to see what you have.

Now I am not saying it’s scientific because you and I will have different press registers. We know that. I press hard, liker a good poke in the ribs, but watch you don’t slip. bandsaw blades, even when they are not running, can certainly bite back.
Bandsaws
If I were a wealthy man of unlimited means I probably would still not spend too much money on a bandsaw if I was doing as I have always done and that is making a piece and selling a piece for my living. I don’t need premium anythings, I just need equipment and tools that work well. I buy according to my needs and not for status or to project an image. Taking no sponsorship from hand tool suppliers nor machines means I am unencumbered, free to speak the truth in what I find.
Of course we want a bandsaw powerful enough not to baulk mid cut or have insufficient adjustment capabilities such as tensioning and alignment. Small machines are not meant for heavyweight cuts nor the loading of logs onto the table. In my lifetime, days of near being broke and such, I have had to compromise. I usually felt reluctant to buy a small machine secondhand yet looking back the two or three £100 bargains did in fact turn out to be bargains that suited my needs and my pocket. A little tweak here and there and I was soon in action. The important part never to neglect is mostly the blade itself. Blades get dull and we are often reluctant to change them out so we use them for too long to maximise our false economy concepts. Dulled out blades prey on our wellbeing, and our economic use of our time, but beyond that they put strain on everything surrounding ourselves and our machine. Small bandsaws have shorter bandsaw blades and the fewer teeth per blade means that short blades will wear much more quickly. Be prepared to change them out much sooner than the larger versions—perhaps even twice as often! Another aspect to consider with small-scale bandsaws is the width of blade. Most small bandsaws disallow anything wider than 1/2″. That said, my preferred blade width is around 1/2″ to 5/8″. These ‘stretch‘ well and have enough weld to withhold the tensioning needed for straight cutting without flexing away from the thrust in the cut.
Any bandsaw can be set up to give decent cuts. The issue ultimately comes down to how will the low priced ones hold up long term and whether I need an expensive make for the type of work I do. For around £1,250 I can buy a decent bandsaw designed to last around 50 years. Such a machine can be readily repaired by myself using standard replaceable bearings. Bearings do ultimately develop wear and will need replacing. How soon this happens depends of course on the amount of use, the type of use, the user and the quality of the machine and the parts. Expect to get 10 years use from your bandsaw bearings no matter the make. They are simple enough to replaces generally. The bearing details are etched into the side of the existing bearings and are standard bearings you can buy from any bearing supplier. Generally, on bandsaws and indeed most machines, it’s the bearings that go out first over any other part followed then by drive belts on pulleys.
I generally would advise anyone to buy a bandsaw large enough and with enough capacity to cut a variety materials—everything from veneers, sheet goods, plastics, solid woods of both hard and soft types; everything from logs and spoon blanks to turning blanks for bowls. This is my criteria. Capacity is the key word in choosing your machine. Capacity does not necessarily mean buy the biggest. Not at all. Capacity should reflect certain features surrounding robustness, motor power and solid stability in use. In addition adjustability should be as simple and quick as possible without too many wrenches of different sizes to keep track of. I am afraid many of the old bandsaws were better in this regard. Seems like each new generation loses track of simplicity sometimes.
To advise anyone on which bandsaw to buy is almost an impossible task simply because when you ask six different woodworkers which bandsaw to buy they will each give a different answer. Personally I have lived successfully with every size from 14″ US Deltas of vintage years to 30″ behemoths on massive castings ten men could not lift. These two extremes are pretty much gone these days. As I have said, most modern-day machines are indeed made in Asia, China and Taiwan. mostly Today they make excellent machines.

Bandsaws now come with outriggers lined with sliding tables and rollers. Mostly they will take up a lot more room than the basic bandsaw itself. We could just assume that you want to spend somewhere between £1,000 and £1,500. That way you will end up with a decent machine like mine that will cut everything you will ever need in furniture making, lathe turning and general woodworking. In my experience a 14″ to 16″ bandsaw is usually large enough for all of my work. Big bandsaws take big space. At what point you make the shift to larger I don’t really know. Mostly the advantage of larger machines is the depth of cut between the blade and the upright section of the frame to the left of the blade. If you are like me, most woodworkers don’t have that space to give up to a dedicated large machine. A 16″ bandsaw will everything I need except cut a width wider than 16″. But a 16″ machine cuts everything I need to make just about any kind of furniture and I can use it for cutting turning blanks larger than any lathe I have ever owned. I can set it up for log ripping up to around 12″. and combine this capacity with strategic log splitting and I have all I ever really need.
Now then, whereas benchtop and lightweight bandsaws will cut wood as a light capacity machine, we usually consider that a machine must have enough strength combined with weight to take the kind of pressure needed to get the tension between upper and lower wheels. This makes sense. The lightweights can be used for more lightweight cuts say up to 6″ thick. If you are resawing materials from larger sections to downsize materials they will indeed do quite a lot of the work. The one featured here is one I have been using to try it out for a few weeks and it works fine, especially for thinner materials up to 2″ thick, but I have sliced through 7″ oak just fine and without any waver. I just needed to give the saw time to cut. One such machine I owned as a secondhand import worked for me for years. Capacity was an issue but when I worked within its limits I was generally always happy. I suppose `i am saying don’t dismiss smaller and more lightweight machines. They will resize small sections of wood and they will cut veneer stock too. Try to buy a machine that stays put when push comes to shove though. You certainly do not want to be chasing it around the shop.
Motor size and blade sharpness
My 16″ bandsaws have 2HP motors, a good size that suits my needs for just about any depth of cut in any materials I might need really. Remember that you can have the most powerful motor but then all other features have to line up too. Blade tensioning, blade sharpness and so on. The most neglected element in bandsaw work is the sharpness of the blades. The sharper the blade the less the strain and effort on everything including you. I cannot emphasise enough the sharpness of the blade. I have been in more workshops than I care to remember where the owners were using blades way past their use by date simply because they never realised that blades are a consumable item.
Fantastic guide! Thank you! Bookmarking this for future reference. I think in my work, I would most likely use the bandsaw for resawing. (though I may be missing other valuable functions since I’ve never owned one before) What do you think is the minimum hight resaw capacity that would make sense for standard furniture making? Also, I see on youtube bandsaw crosscut sleds and zero clearance inserts and other jigs. I’m assuming you don’t really use things like this? Looking forward to how you use this in your workflow.
Wow, that was some posting Paul. Thank you! Just what I was looking for. It’s confirmed some (indeed most) of my setup on my bandsaw and also given me food for thought on a few aspects of setting up that I may have got wrong.
I have been looking to purchase an extractor (preferably second hand) similar to the type you use but the 2nd hand market here in Ireland isn’t bearing much fruit. I will have to buy brand new I’m thinking. Not looking forward to the extra noise but I can confirm that the amount of sawdust the machine produces and that finds its way into all sorts of internal places (including my lungs!) really has to be dealt with effectively. The hidden air-bourne dust is certainly a worry. Thank you again for a very comprehensive run-down.
One of the best articles I’ve read. Thank you! Will you be writing about drift at some point?
One comment about blade centering: My wheels are crowned, that is, the surface is not flat, but has a gentle camber from front to back making a peak in the middle. I place my blades similar to the way you showed, but I’d comment that, no matter what, I make sure the tips of the teeth are “in the air.” In other words, I don’t want to move the blade so far back that the back of the blade is on the low part of the crown and the tips of the teeth are biting into the tire at the top of the crown. This is only something to watch for on narrower blades.
You drawings in this article could have come right out of Aldren Watson’s book!
Thank You Mr. Sellers, excellent article.
Your advise and observation is spot on ,I think. The one item that I have recently found that is a benefit to all master or student is from the Stockroom Supply in Canada. They make a product called the little ripper for band saws. check it out I think you will see the benefit for yourself.
His YouTube demo https://youtu.be/4k-r5utmU2Q
Possible new book coming from Paul Sellers on bandsaws……
I already have a couple books on bandsaws (written mostly for the US market). Paul’s latest single instructional posting basically condenses both those books into one article! Use Paul’s last post and perhaps view a couple YouTube videos and you will be well set up!
I bought a small Britsh made bandsaw from a well known manufacturer about 40 years ago. Had a pressed steel table which was never flat. Arrived with the tension knob broken and then found the fence out of allignment due to sloppy welding, plus it was simply underpowered. Not surprised bandsaws are no longer made here. Recently bought a larger one very similar to yours Paul. Good machine, but arrived in inadequate cardboard packaging with top door caved in, replaced.
When you ask 10 woodworkers a question I get 13-14 answers. Boat builders 17-19. A bandsaw might be in the near future, but which one? I’ll go ask the usual visitors on the WoodenBoat Forum and report back 🙂
Now a ship saw, THAT is what I must really need!
Cheers
Clark
That is an excellent article which covers a huge amount of information. During a furniture making course I attended about 18 months ago I was advised that if you buy one machine for your workshop it should be a bandsaw. I therefore recently purchased my first band saw after spending nearly a year researching the different makes, sizes, methods of setting up, uses, types and sizes of blades required for different roles and one that would suit my requirements. If only this article had been available it would have saved me many hours of reading and searching the internet. Virtually all the points I used to select my final saw are mentioned here. Understanding tilt of the top wheel and positioning of the blade would have come much easier to me if I had seen those drawings before. The only addition I would make would be some mention of the requirements for sawing logs.
Hi Mike
Could you tell me what type of bandsaw you went for in the end and if you are happy with the results
Regards, Rob
“Europe with its multinational community of 28 uniquely different countries and no common language except the euro”
But in Europe they still make nice machinery including excellent bandsaws eg: http://www.klaeger.com
Not at all. These machines you send the link to are massive industrial grade machines and not for our audience in any way. Please read the blog properly. Show me a bandsaw made in France, Germany, Belgium, Luxembourg, Netherlands, Czech republic, England, wales, Scotland, Ireland etc and all of the rest that makes a machine suited to the small garage or shed workshop.
Be reading this again a few times. Lots of information. Thank You sincerely.