Making A Door
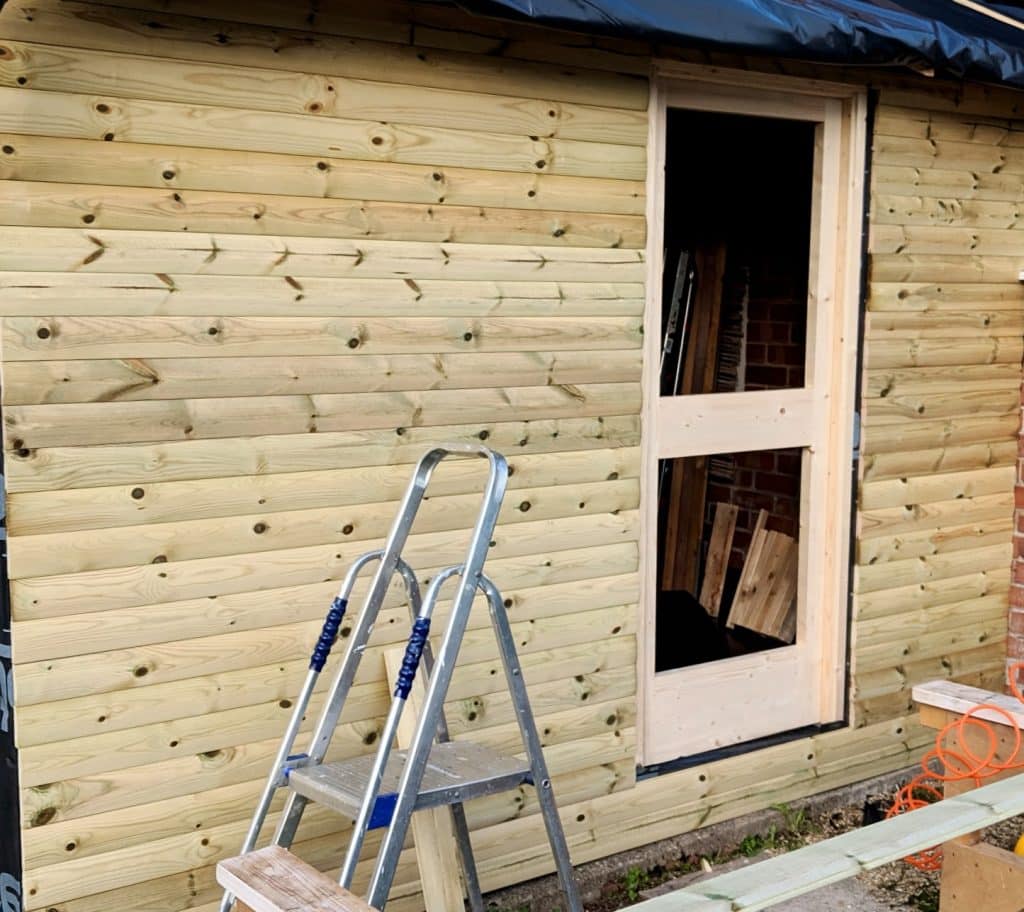
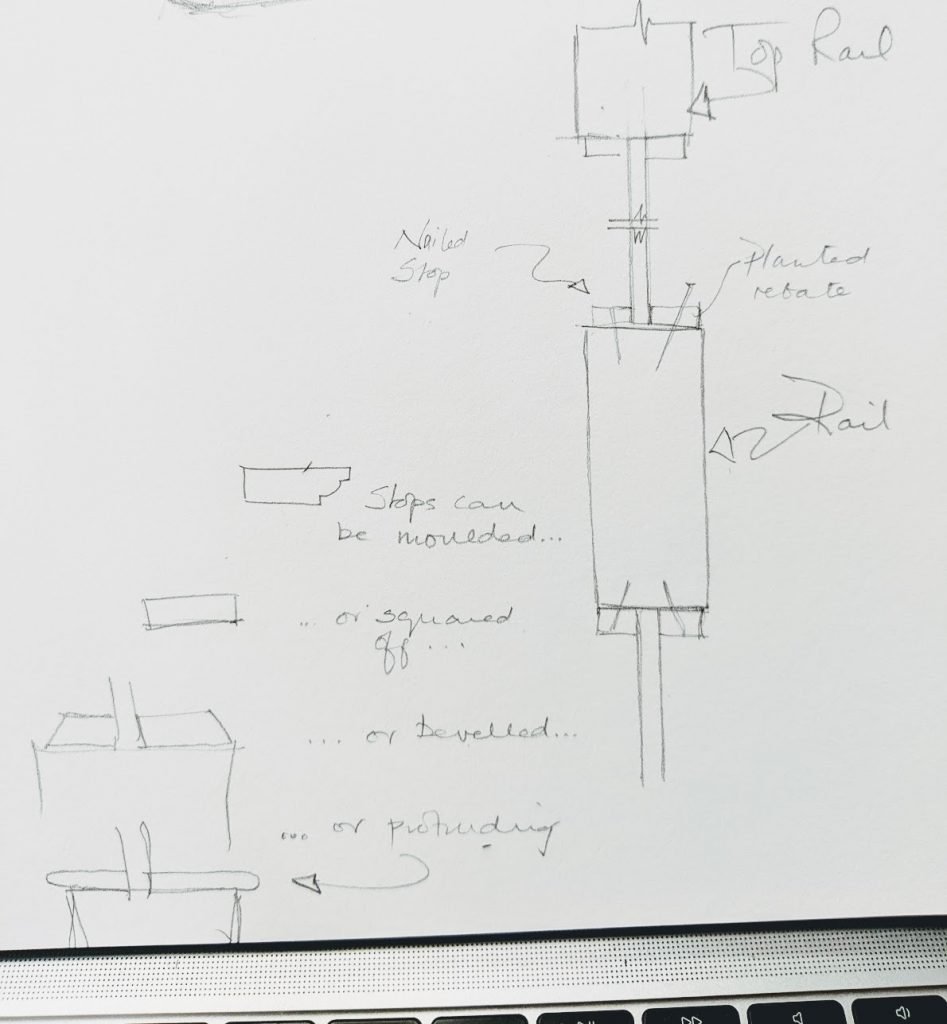
I should explain about my cheap door a little more, perhaps. Some of you picked up on the lack of grooves or rebates (rabbets), perhaps wondering why they were missing or suggesting that the simplified version is lacking in some way. Eliminating the built-in moulds and rebates is ideal for a quick door-making project and though this is a shed door, it is still a good method for any door. You should remember that with industrial production came the ability to set up huge tenoners with the capacity to create matching copes that replicated the mouldings. One pass through into the tenoner meant staggered shoulderlines and reverse moulds that matched the stiles in a single pass. With some tenoners you can pass many rails through at one pass. Not so easy with hand tools. The square edges to rails and stiles makes it so simple. If you want moulded rebates then you can simply add what we call planted stops. This simply means that they are nailed on or nailed and glued on. They perform exactly the same as the single piece moulded stock to retain panels of glass, plywood or other panelling types.
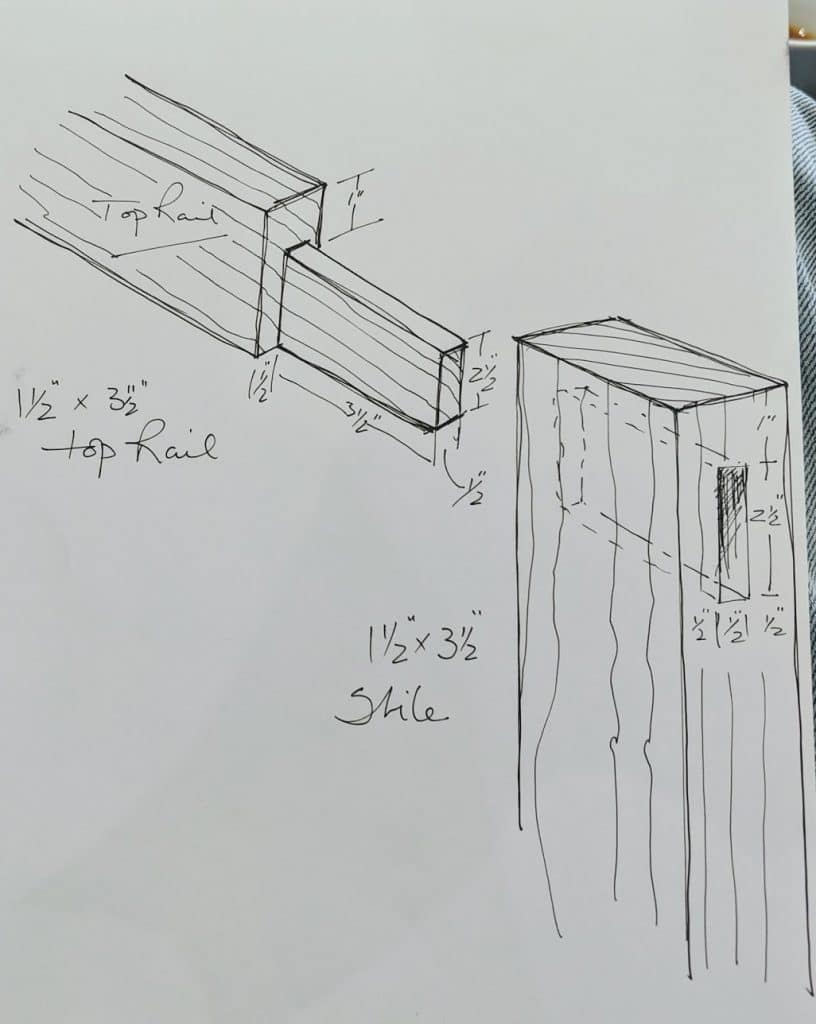
My studs came with the standard ‘eased’ corners as in the USA style studs – also called comfort corners too. I planed these off by planing the narrow edges of the meeting faces where the jointed edges or shoulder lines come together. That doesn’t take much effort with a jack plane. Then it is a question of choosing the mortise and tenon type for each rail. The top rail is a standard mortise and tenon for a corner. My stock is the standard 1 1/2″ by 3 1/2″ of a stud. Studs are the most inexpensive form of softwood available because they must be produced and sold at a competitive price. I needed custom sizing because of the reduced height at the eaves.
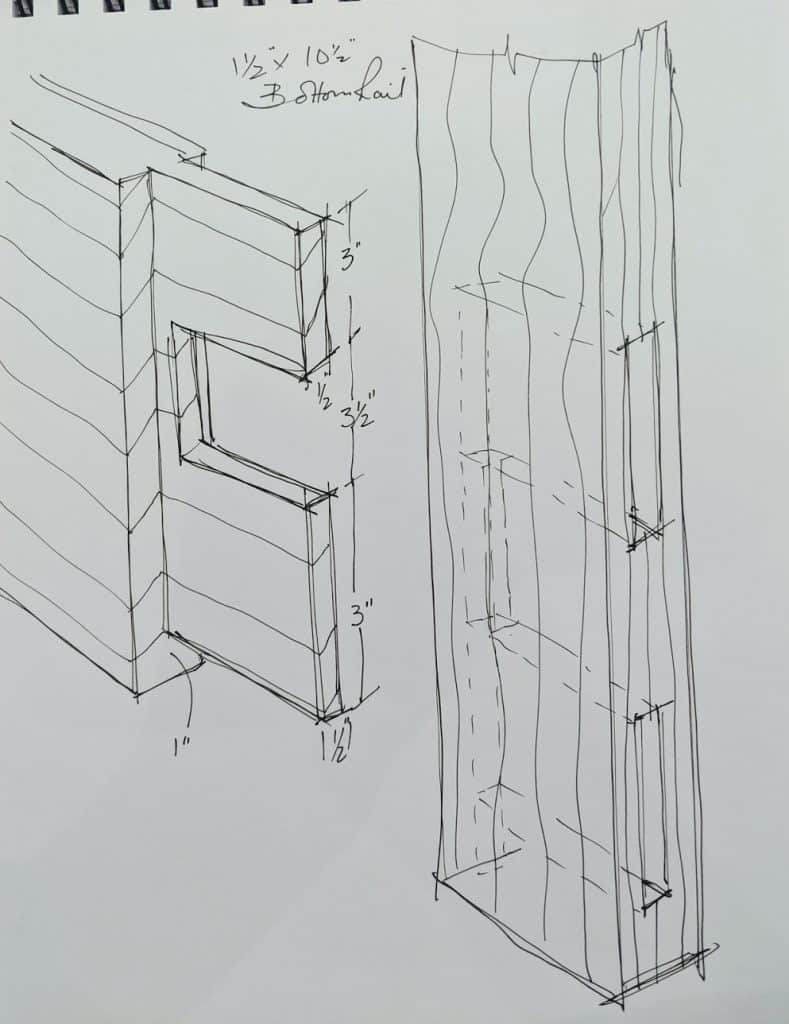
The stiles are 3 1/2″, top rail too, the middle rail is two stud widths at 7″ and the bottom rail is 3 studs at a total of 10 1/2″.
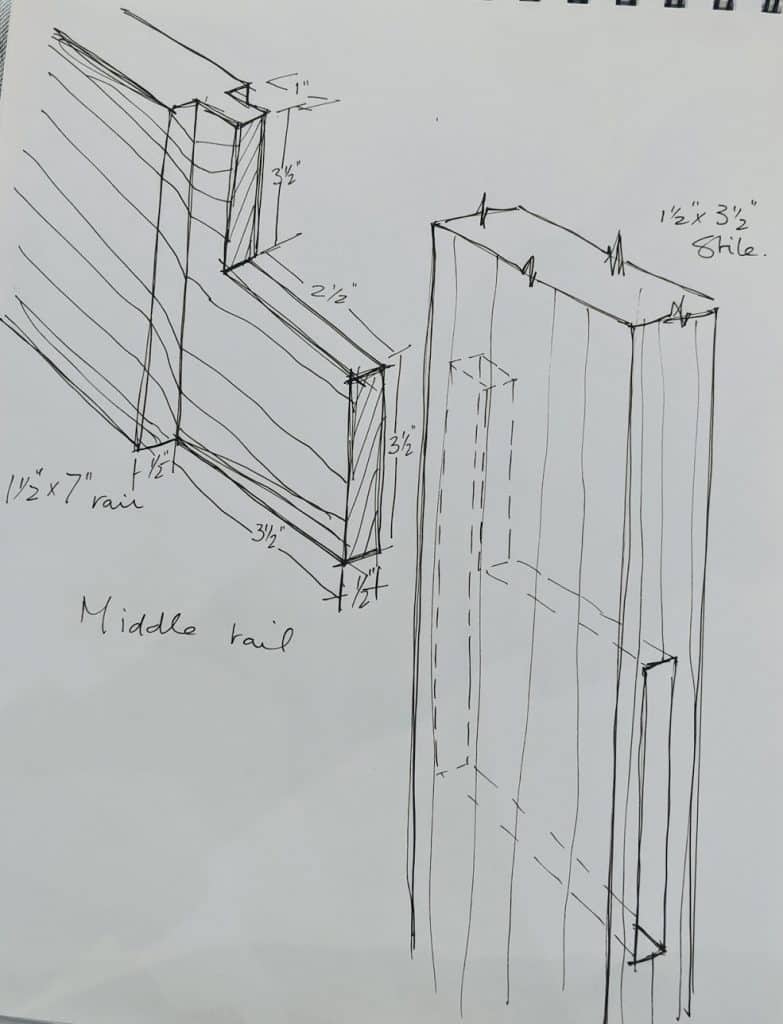
With jointing, the rails were about 1/16″ undersized per stud width. The drawings show sizing etc per joint.
The panels will be held in with what we call a planted stop or rebate (described above). That means that we use a piece of 1/2″ thick wood by 5/8″ nailed in to form a rebate that will take either glass or wooden tongue and groove boards or plywood.
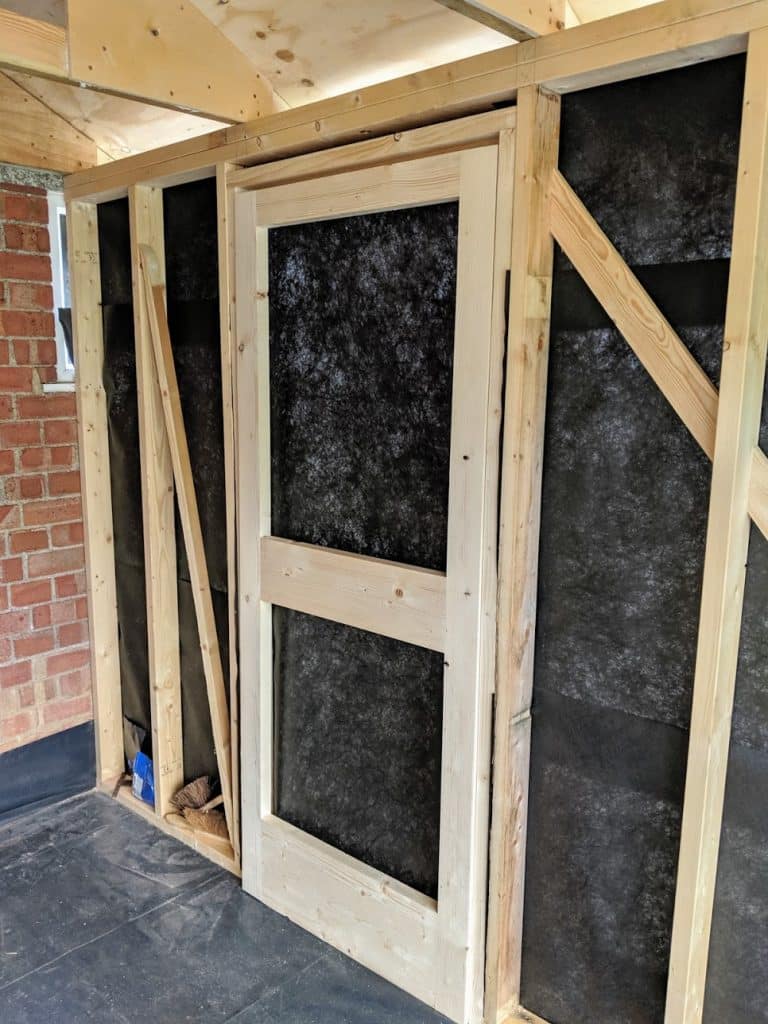
The door frame came from studs and that was simply creating a simple straddle joint as shown and then screwing same together with two long screws. This prevents any toque movement and of course it is screwed to the main frame structure too.
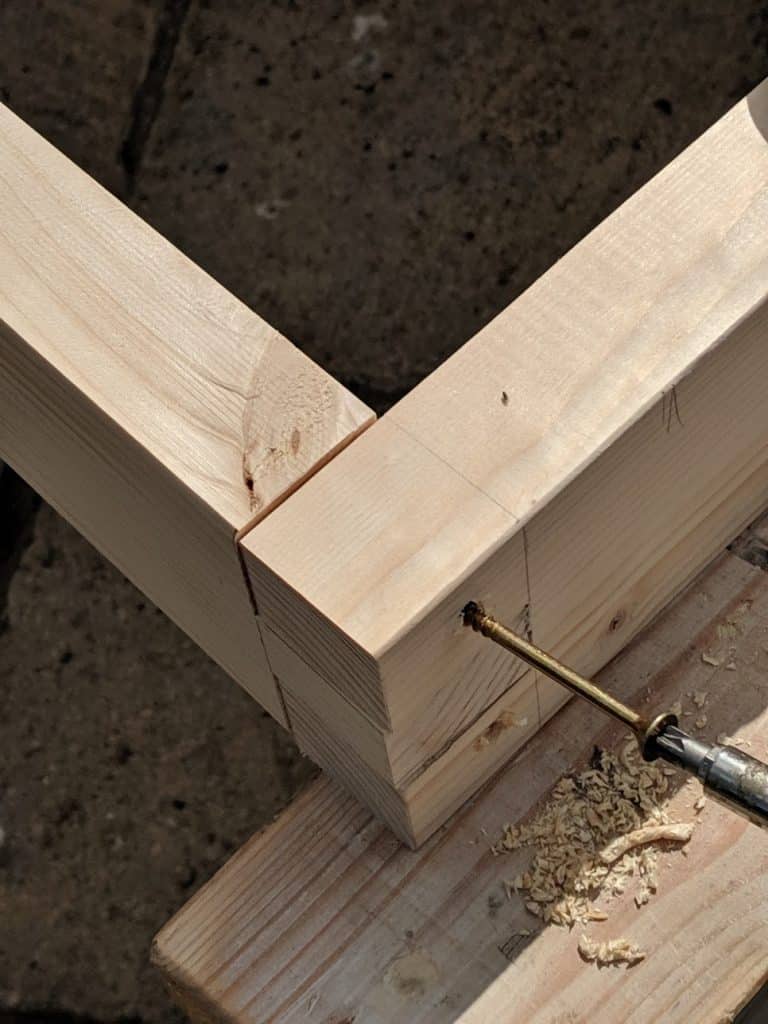
These simple joints take only a few minutes to make with a chisel, a hand saw and pencil lines.


Thanks for details, Paul. Would be interested in further information about making doors and windows for my home, shop, etc,
Me too!
Hi Paul,
This post made me realize that I’d really like to learn more about the different joints in woodworking and when to use them. Is there a book you might recommend to people new to woodworking that covers the most common joints, when to use them and how to make them? There is undoubtedly a structural theory behind this that I’d really like to learn more about.
I wish I could have taken one of you courses but I live in California. I have yet to find any in-person being taught in my area that teach how to use only hand tools.
Thank you for what you do. It’s a gift.
Ian, where do you live in California? There are a couple I know of in So Cal
It’s all on our woodworkingmasterclasses.com site and also our commonwoodworking.com online training videos and if you listen to our audience nothing seems to come close for modern day inspiration and instruction at the very lowest cost which is mostly free.
What is the difference between this straddle joint and say a bridle joint?
I thinks this would make a great video also. I have often though it would be too difficult, but your description seems to be easy enough. I have ofter taken the easy way out an purchaced similar doors.
The sketches are helpful also.
Please thinh about the video.
Real shame you didn’t film this shed build as a series
Not really, I’m a furniture maker.
I see several people asking for a series on door making but as I recall, Paul has already taught us how to make doors. Not that I’m opposed to any further instruction of course. The only difference I see between this door and the others is the size. My point is (and correct me if I’m wrong Paul) it seems to me the fundamentals are the same in a cabinet door as they are in a larger door like the one here. Physics is Physics. Its only a matter of scale.
OOps. I meant to post this in the previous blog post. My point remains.
What was the reason for using a haunched tenon in the middle stile and not in the top stile?
Noneed for the haunch in the top because there is no groove. The mid one is to leave more ‘meat’ in the wood though it’s a stepped tenon and not a haunch per se.
Paul,
The “sheeting” on the exterior of the shed appears to be radius-ed. What is your plan for the reveal or moulding on the door frame? There will not be a flat surface for the moulding to be nailed to and wouldn’t that allow rain dirt etc. to get into the “grooves”?
Hi Paul,
How are the designs coming along for a house full of furniture. Where are you getting the inspiration for the designs ?
Thanks
Thanks Paul, there seems to be enough evidence now to go on and complete a shed like yours.
Best,
Nathan
I’ve always been confused about the double tenon joint of the bottom rail into the stiles. You’ve got 9 1/2″ of tenon that will move with seasonal moisture changes going into a mortise that will not move in that same direction. Anybody know why this won’t lead to the rail cracking or splitting over time?
More obvious than you might think. People, woodworkers especially, generally are of the opinion that would is always expanding and contracting which if left unconstrained is true.A table top for instance.If a cross rail is dried say to 5-8% and is fitted into a door stile, the mortise can constrain the expansion at no cost.If the rail is indeed wide this is also true.If the rail is however dried only to say 20% and warm, dry weather arrives for a few day or months, or it is a door made in the exceptionally humid region of east Texas and is shipped to be installed in a door frame west Texas, the shrinkage will be expansive resulting in splits. A mortise can constrain expansion but not shrinkage.A door at a constant humidity, without exposure to extremes, usually will not present problems.
Hi Paul, I really appreciate your excursion into carpentry since it’s really doors and windows we walk through and look through day-in and day-out at least as long as we are in a building and then it’s again doors and windows that attract our eyes when we walk past buildings on the outside. I find them the most challenging parts of woodworking because they have to be built well out of pure vital necessity. I always think of you when I am standing on the workbench planing a door clamped upright in the vise remembering you saying something like “…that’s real woodworking…we bring our bodies into the most akward positions to get the task done…”
Saw someone ask about the difference between a straddle or saddle or bridle joint and I think it’s just a matter of which side of the pond our host uh… straddled to share with us?
As a Texan I usually think of them as saddle joints but I grew up with horses and a slight drawl and whatnot.
Nice simple joint as long as you secure it with something from the outside, I like to use saddled ends with hipped stiles instead of a mortice/tenon for my little scroll saw bladed bow saws since they’re made out of drawer bottom plywood pieces like my saw vice: https://i.imgur.com/7FG1D2P.jpg so they’d split otherwise.
Wedged tenons seem to be a standard in door construction. Is there any particular reason why?
I think I explained it elsewhere. Wedging, 1: compresses the tenon against the ends of the mortise, 2: Frees up clamps as the glue sets so on as production run there is no down time, 3: Mortises can be opened out a sixteenth or so each end on the exit side so that the wedge then dovetails the tenon into the hole.
Wow, that #3 is great. Never thought about or realized this before, but now makes perfect sense!
Hi Paul,
It looks from the photo’s that the barrel board cladding has been ‘secret nailed’
since no fixing holes can be seen at 400 mm centres. The boards are laid in such a way that the tongue faces upwards to avoid water collecting in the grooves, potentially shortening the life of the timber. I imagine nails are driven in at an angle as close as possible to the tongue but without splitting the edge using a nail punch for the final hammer strike. Any preference between ovals or lost head nails in this particular instance with nail length being 40 mm to 50 mm ?.
regards Ian W. UK
Sometimes, there were 2 panels, back to back….a “plain” one for the inside of the doorway, and a fancier one for the outside “show side” of the door….
Nailed on strips are ..ok…for holding panels in place….except all it takes is one well aimed kick by a thief, to knock the panel out of the frame….
Reason I tend to use a groove all the way around, to hold the panels in place.
Where the rails meet the stiles, a 45 degree joint can be made, to let in the rails.
I also tend to add a couple pins in each joint…usually 2 per tenon.
A “brick mold” can be run around that door frame…merely rebate the ends of the siding boards, to let in the molding. Doesn’t have to been as wide as the molding..maybe a 1/4″ rebate, and rebate the back of the molding to fit around the door jambs.
Main reason for the double tenons at the lock/middle rail? To allow solid wood to drill through, for the door latch/lockset to be installed, comes in handy for the strike plate to be mortised in.
When placing the wall cladding, if it’s the tongue and groove style, should one seal the tongue and groove to prevent moisture and water from damaging the boards?
I’m going to be making my first shed(playhouse for my daughter) and posts luje this make me dream I can do it! Rhanks so much
Paul, this was perfect timing for me. While my shop is a bit larger than your shed, I’ve not been able to find doors that are the size I want. A set of double doors made in this fasion to a 6 ft opening is going to be perfect. Thanks again for another great tip!
I have a wooden garage door with panels set in rebates. One of the panels was damaged and had to be replaced. My only option at that point was to use a multi-tool to cut out the rebate. I replaced the panel and glued in some matching 1/4 round molding to keep the panel in place. I guess I could have replaced the entire section of the garage door but that would have been very expensive. If it works and it cuts down on the labor then it’s got my vote.
With respect to wedging tenons, on your door you cut kerfs into the tenons and drove wedges into the kerfs, splaying the tenon edges and locking them tightly into the mortise. This seems like a patently superior wedging method to me. However, I’ve seen numerous old books, and old doors themselves, in which it appears the tenons are not cut and the wedges are simply driven in on either side of the tenon–sandwiching rather than splaying. If splayed wedging makes a better joint, why would sandwiched wedging have been so common? Are there different occasions for which one rather than the other should be used?
Hi Paul,
I’m a set carpenter for the movie industry and that’s the way we make most of our doors, except we have Dominos and screws instead of tenon and mortises, it’s pretty damned fast!