Thick V Thin

I have visited this many times in classes, on my blog and in a variety of venues ranging from Monterey, Mexico to Canada, England to Israel, and then Wales to the USA. This one came by way of a question from a genuine enquirer not seeking to be argumentative but to understand the reason why. There we are in a class full of people learning the basics of woodworking and he pulls out a thick plane iron from a vintage English wooden plane, passes it over the bench, and humbly questions my saying that, “You don’t need to retrofit your Stanley or Record plane with a thicker iron. The one that came with the plane will work just fine.” You see, experience tells me to look into the history of planes. Seeing how ten decades of full-time woodworking craftsmen throughout Britain alone, as many again in the USA, and then others in other countries on other continents in different woodworking trades, would all attest that these Bailey-pattern bench planes worked well, and guess what? They never chattered when engaged in planing wood.
Well, I humbly responded, “What’s the difference between a standard Stanley and Record plane iron and the vintage wooden version?”
“Thickness!” he replies.
I ask, “Is that all?”
“I think so.” he responds.
“Doesn’t this plane iron taper from thick to thin?” I ask.
“It does.” he answered.
“Why?” I asked.
“To save metal?” he queried.
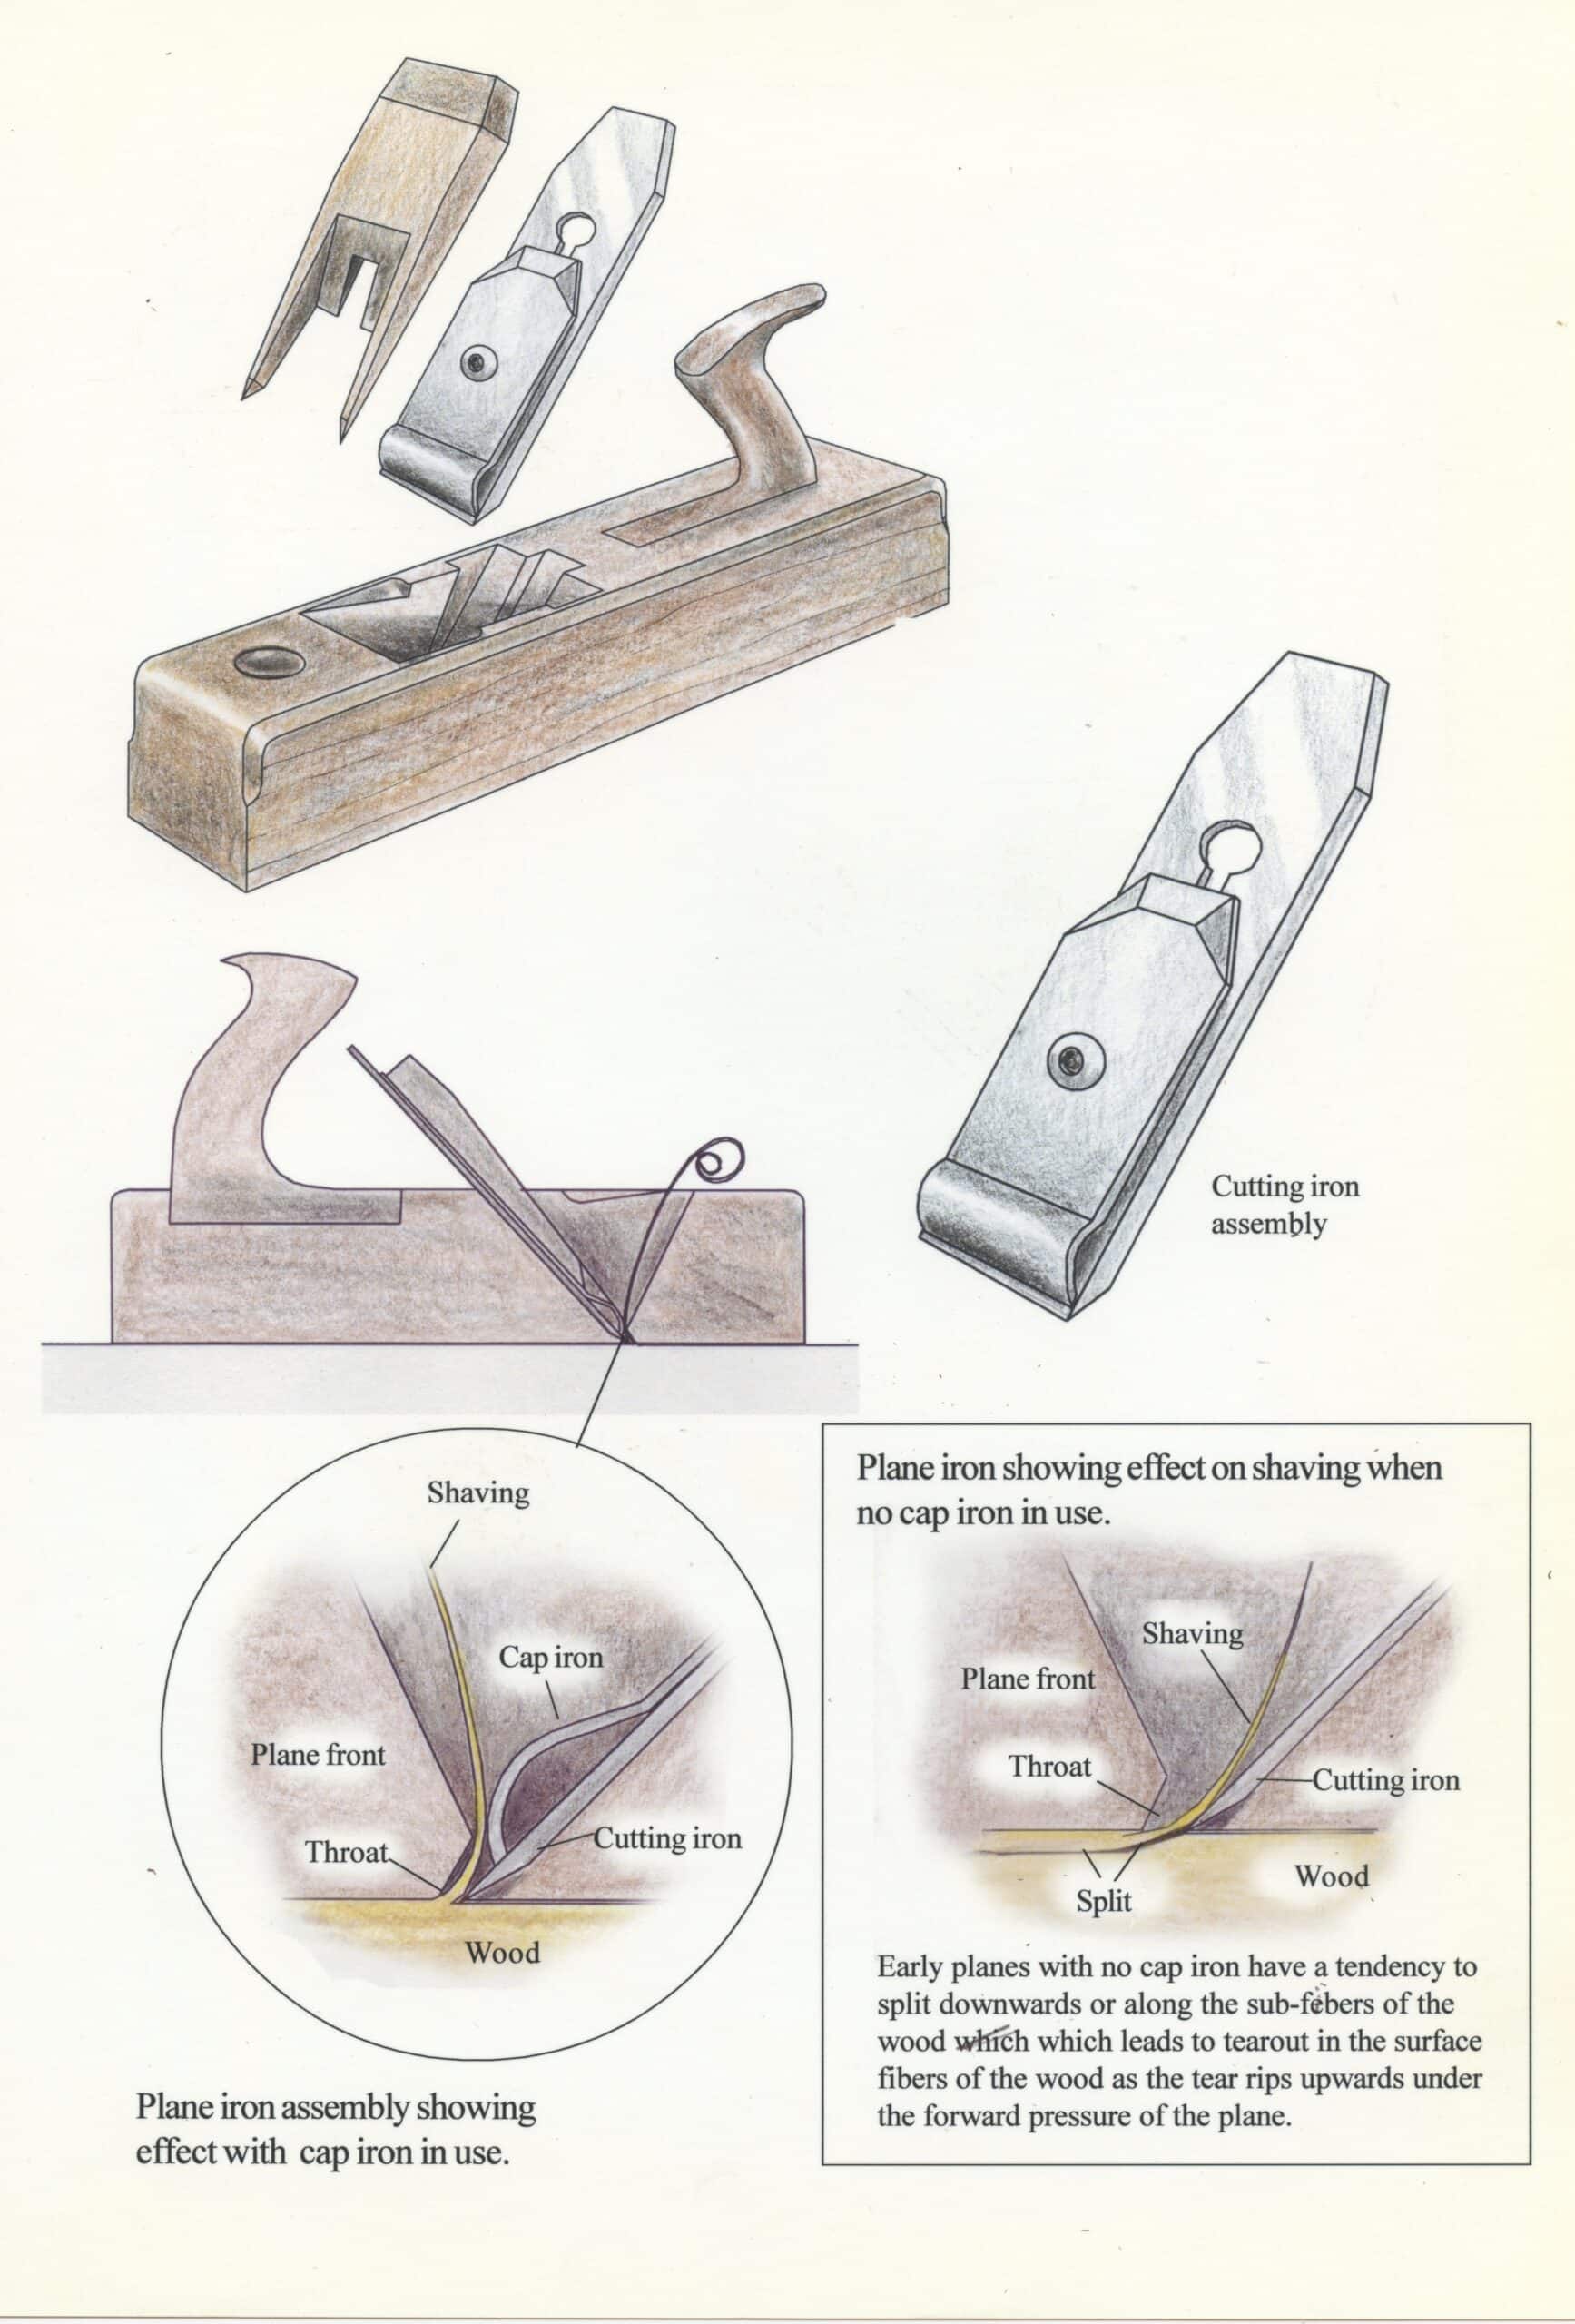
Well, it does do that, and it is easier to draw out the steel from thick to thin under a trip hammer or a sledge, but the real reason was to create a wedging dynamic when the plane is in action. The Bailey-pattern planes rely on the yoke adjustment mechanism to resist forces working against the blade when being thrust forward into the wood. Knots and hard grain will tend to and will occasionally push the blade back up and into the plane’s throat. No such mechanism was available to the wooden planes at that time, only a wooden wedge. Using a wedge on parallel steel blades would work most of the time but is unreliable as the wooden retaining wedge alone is already angled to back out under pressure. Adding the wedge shape to the cutting iron and then using a wedge to oppose and lock it in place was a perfect solution. Should that blade jar in a forward thrust for whatever reason, the wedge shape of the cutting iron retained by the wooden wedge would actually tighten with the thrust and lock it all the more in the recesses either side.
Leonard Bailey of Stanley fame developed the most perfect of modern planes in the Bailey-pattern series of bench planes for his day and time and really, nothing changed for over a century because no one really developed a mass-manufacturable plane offering the functionality his plane offered. Hundreds of thousands of planes went out through the century to practicing tradesmen who worked successfully with them, all of that without any retrofitting of anything on the planes at all. Don’t you think that it’s actually remarkable that all of a sudden, after a century of planes being used full time by craftsmen, we amateurs suddenly encounter planes that chatter so badly in the cut that we suddenly need thick irons to correct this newly developed malevolence in bench planes of the Leonard Bailey pattern? How could this be? Where on earth did this come from? Well, think engineer! Think a man in need of inventing something perceived as a need rather than an actual need at all. Think someone who made an additional improvement who takes a piece of steel, hardens it and then starts to sell it in competition. He cannot sell the same cutting iron for a higher price because, well, no one would buy it. But make the iron thicker, tell your future customer it stops the phenomenon of chatter, knowing that it’s not actual chatter at all, and suddenly you’ve got customers. The problem with this is that the plane iron was not guilty.
In a recent video posted on my FB/Instagram platform, someone made a commonly stated comment about their plane chattering. Of course, 98% of these planes sold never chattered at all. Most surfaces resulting in an uneven, washboard surface is almost always user-error or some other phenomenon that causes the plane to hop, skip, skud and jump over the surface. Too much force, too little force, a limp fist-to-wrist linkage, diffidence, lack of confidence, lack of experience, and so on, all lead to skudding as the plane negotiates a surface.
My thinner, standard-fit cutting irons do not chatter and they never have chattered for any of the above reasons. Chatter is a very unique and isolated occurrence in planing with a plane on so rare an occasion, it might happen only once in five years. So, where is the confusion? Chatter is very difficult to produce, sometimes difficult to evaluate and is so fine it barely takes more than two rubs with fine abrasive paper to remove it. In my own life of woodworking daily for 56 years I have witnessed chatter only a half dozen times under my own plane and from beneath the planes of the 6,500 students I have trained over the past three decades. Doesn’t that tell you something? Look, you are having struggles planing. The questions you might not be asking of your bench plane are:
- Is the blade sharp?
- Is it set precisely for the appropriate depth?
- Is the blade the right way up with the bevel down?
- Is the lever cap set firmly but not too tight and not too loose?
- Are you using a firm and positive grip without bulldogging the plane to the wood?
- Do you in particular have enough strength, upper body mass, developed ability for control?
- Have you developed the confidence to land the plane to the wood at a level parallel to the surface?
- Is the wood itself even-grained or is there fibre that counters your effort?
- Is the plane presented in such a way that it engages the grain with the ability for you to apply even pushing power?
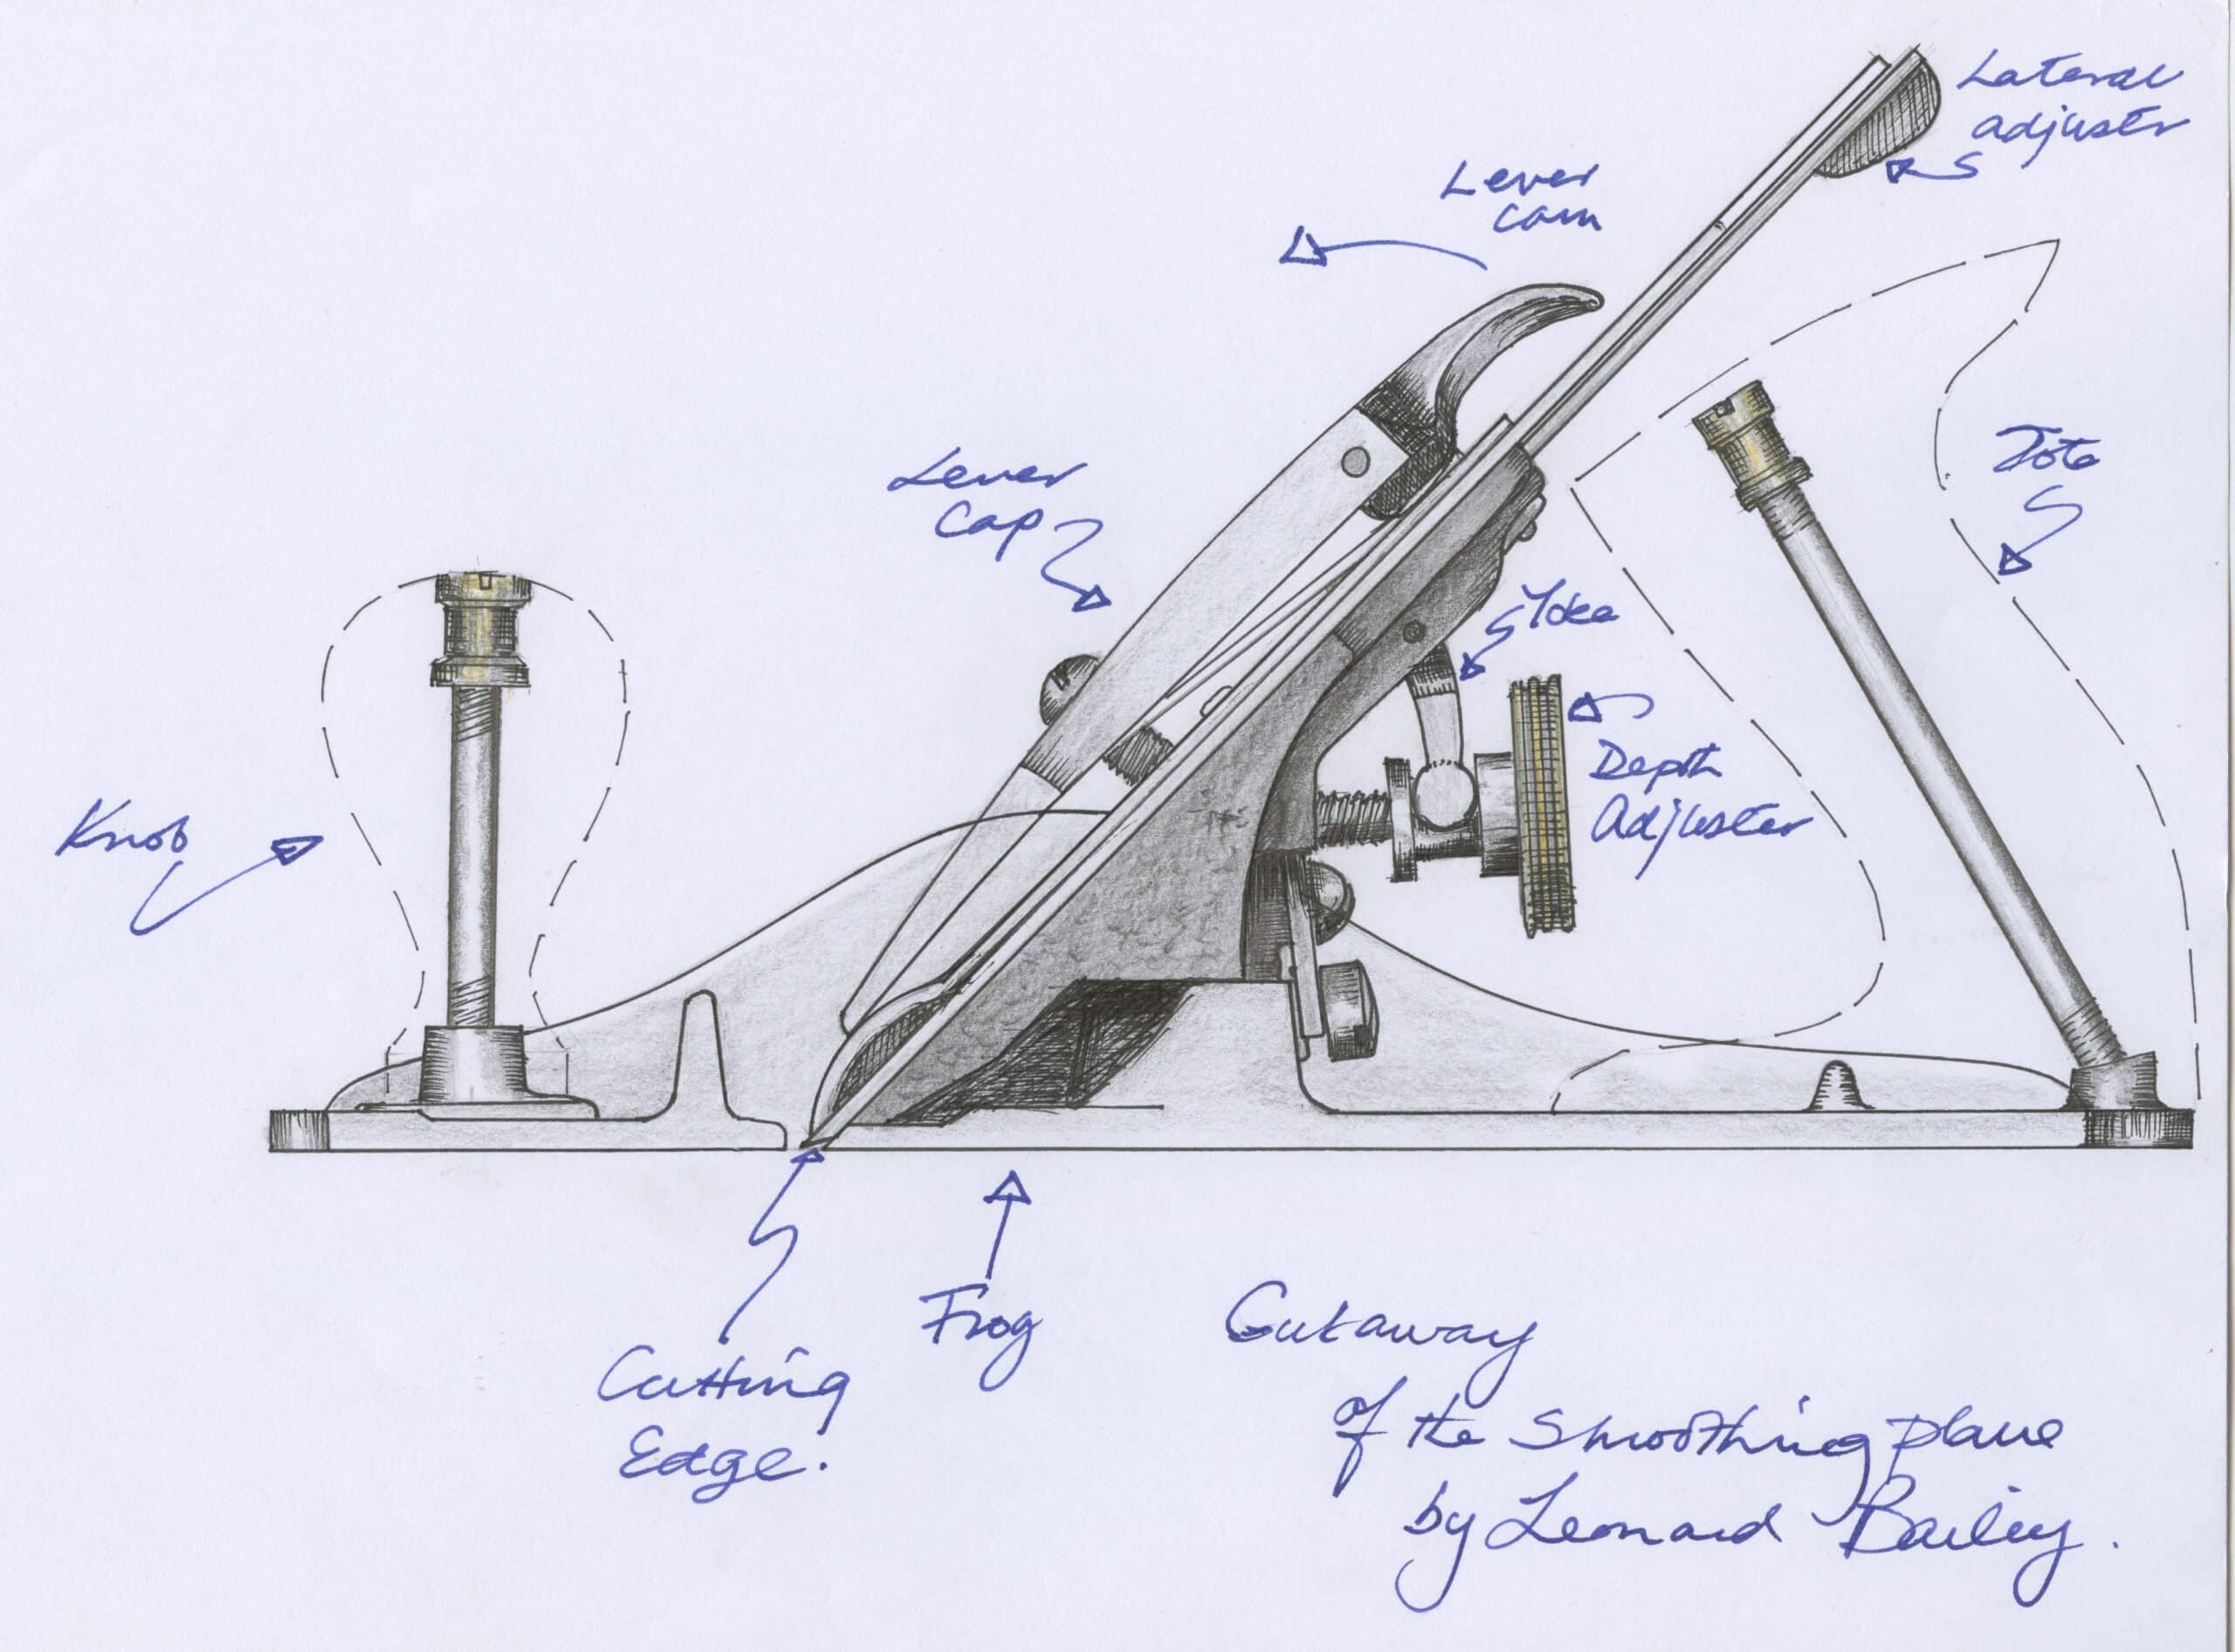
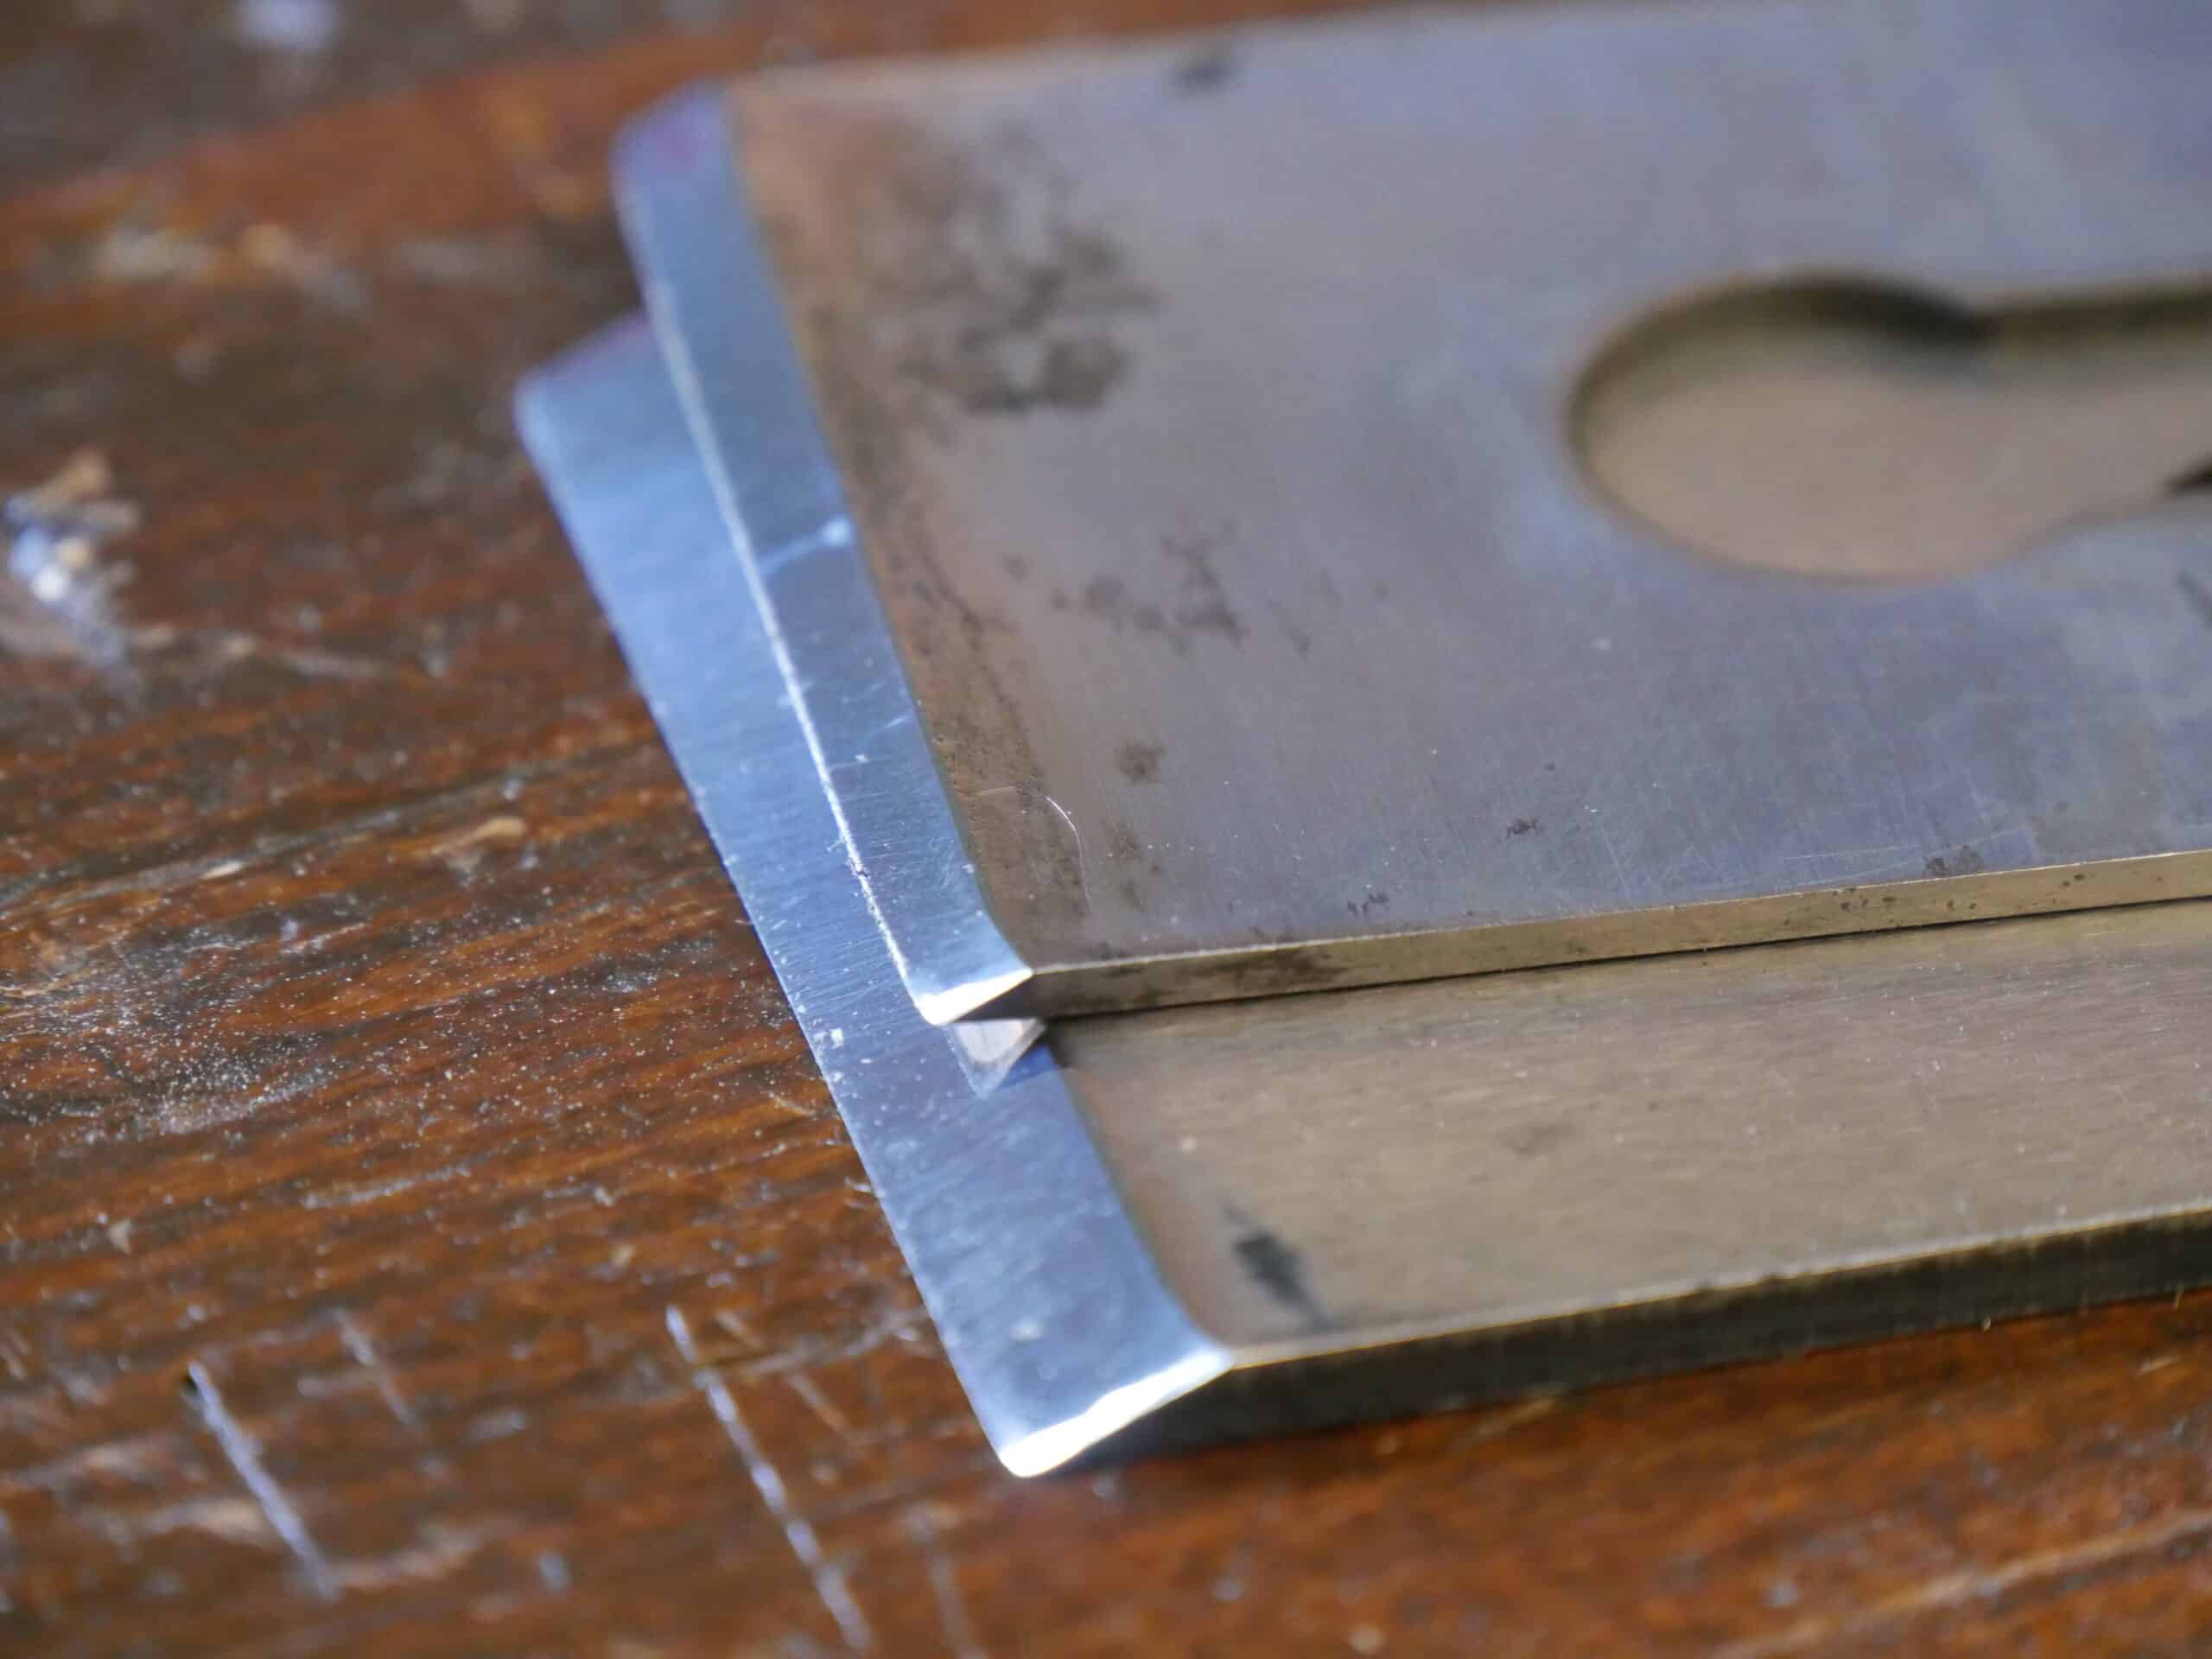
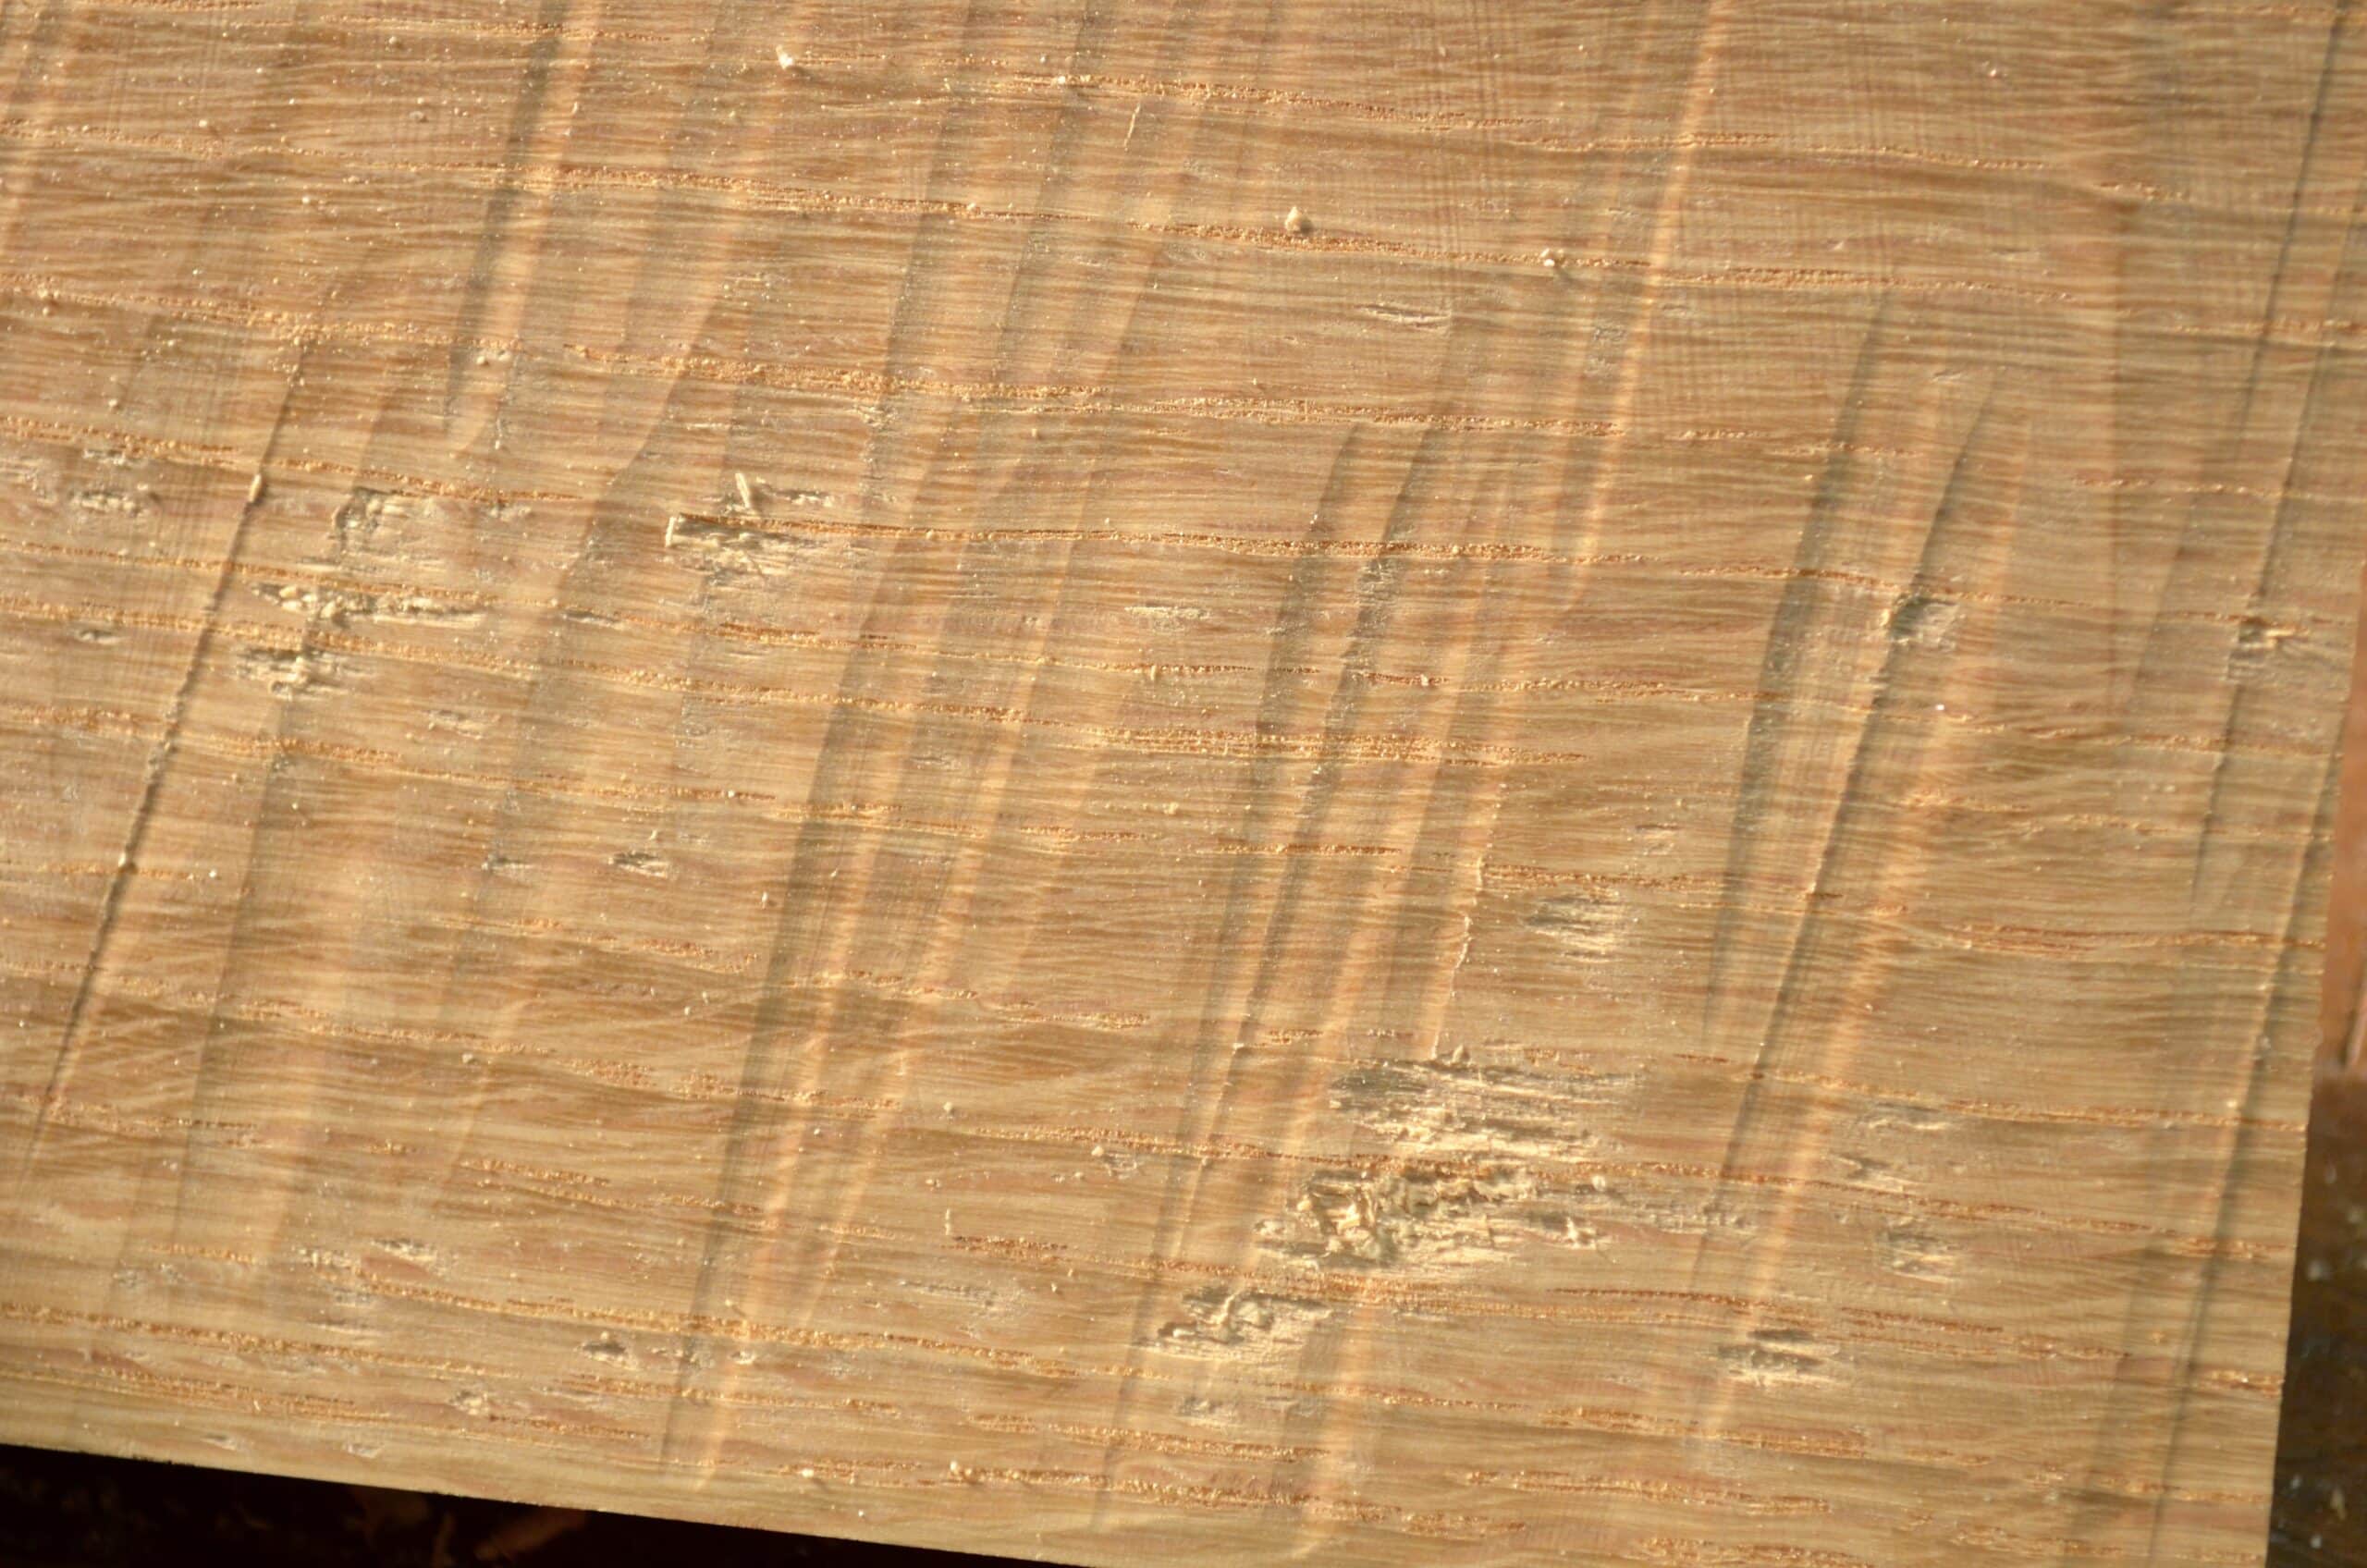
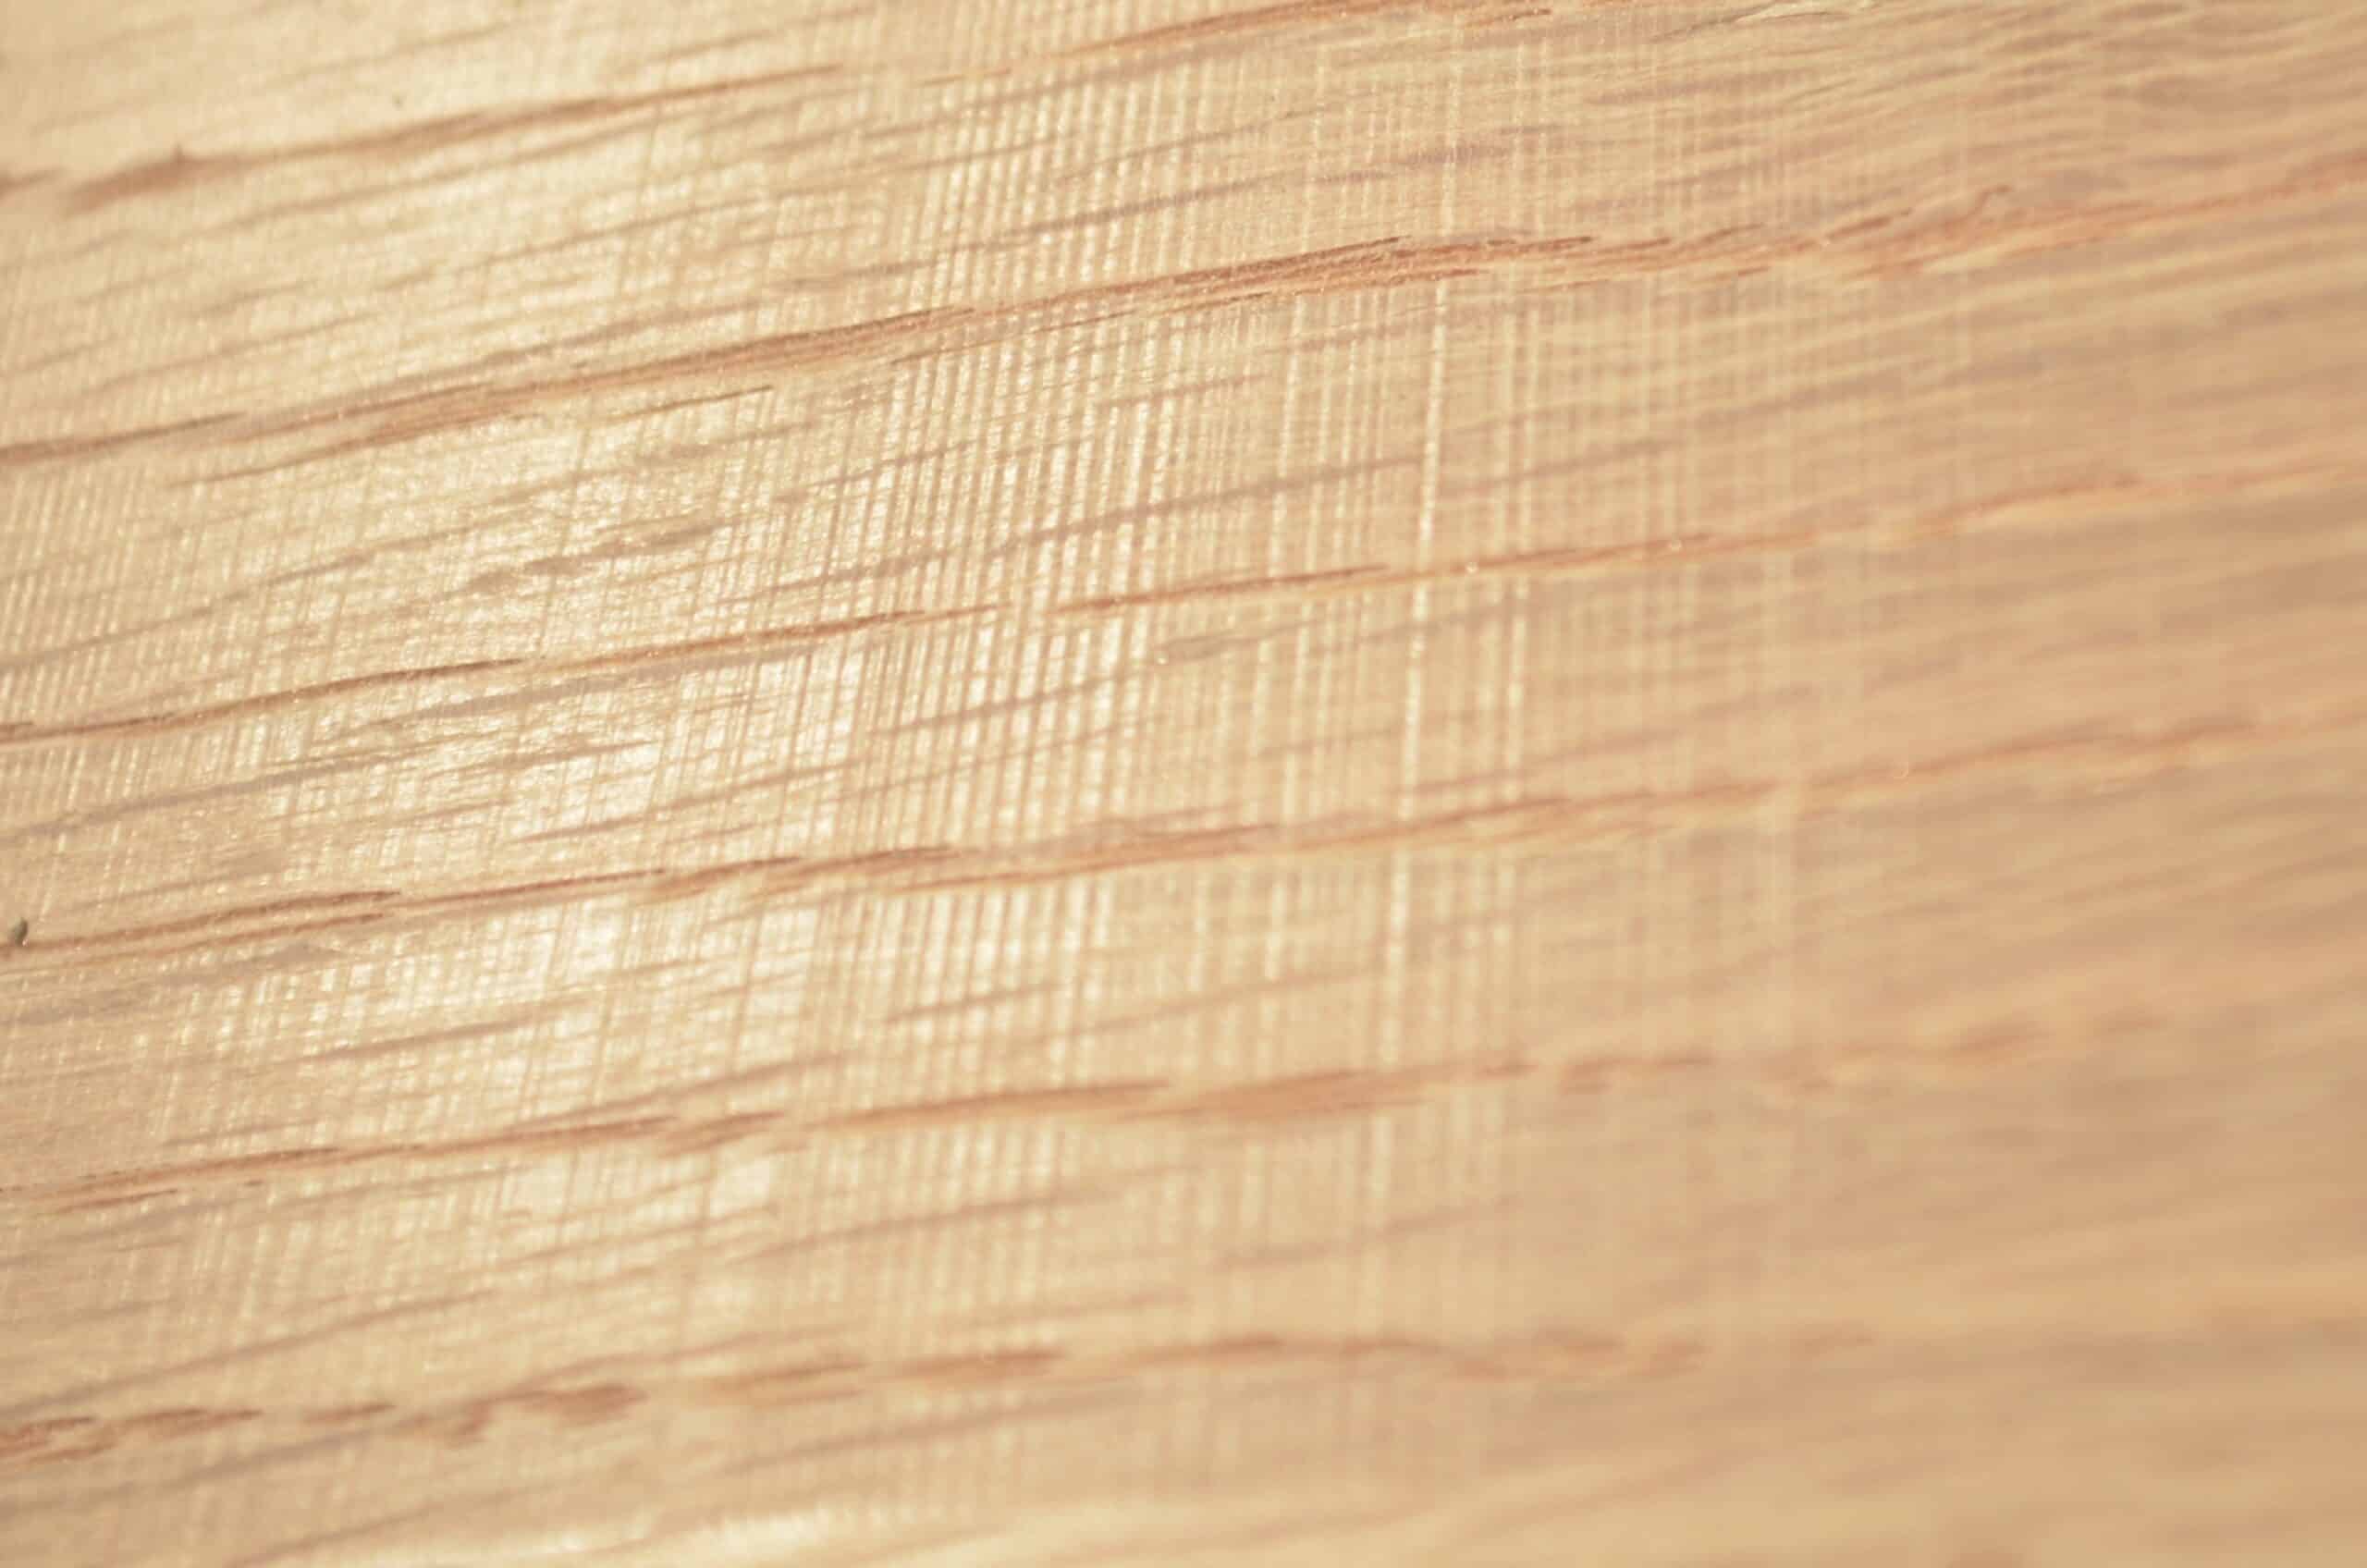
It is a sad thing that makers and sellers of planes can sometimes be a little low on integrity and fail to admit that any and all Stanely and Record plane irons worked well, work well and never needed any replacement. Now, low-angle planes might need thicker irons by their very nature. Were they made from thinner steel they might indeed flex as they pass over the surface of the wood. Take a close look at my cutaway plane picture above. Leonard Bailey’s strategy was incredible in that it answered the need with superb measure. The strategy? The tension between the cap iron (erroneouly called the chip breaker) and the cutting iron. This inbuilt tension twixt the two tackled all and any grain with no issue. In 98% of cases, the corrugated surfaces produced by users are due to inexperience, lack of confidence, and several more already given above. Manufacturers are good at not stating what chatter actually is but use chatter as a catchall term for several surface defects left after planing. It is easy to blame thin irons for causing this phenomenon not so much by proving that that is what caused your dilemma but by simply saying thick irons eliminate chatter. Let me say this: if you can visibly see staggered steps on the surface of your planed area that are anything from say 1/8″ to 1/2″ apart (as in pic below), this is NOT CHATTER! Chatter is apparent as iterent steps on a super-fine level not dissimilar to the surface of say a very fine file.
I recommend not fitting thicker irons in your Bailey-pattern planes. All you will end up with is twice as much steel to remove each time you sharpen up. The amazing entrepreneur/inventor, Leonard Bailey, pegged everything to do with the plane with exactly what was needed at the point of his developed prototype through to our present-day and this was all that we needed in an all-metal plane – In the words of Bert Lance, “If it ain’t broke, don’t fix it.”
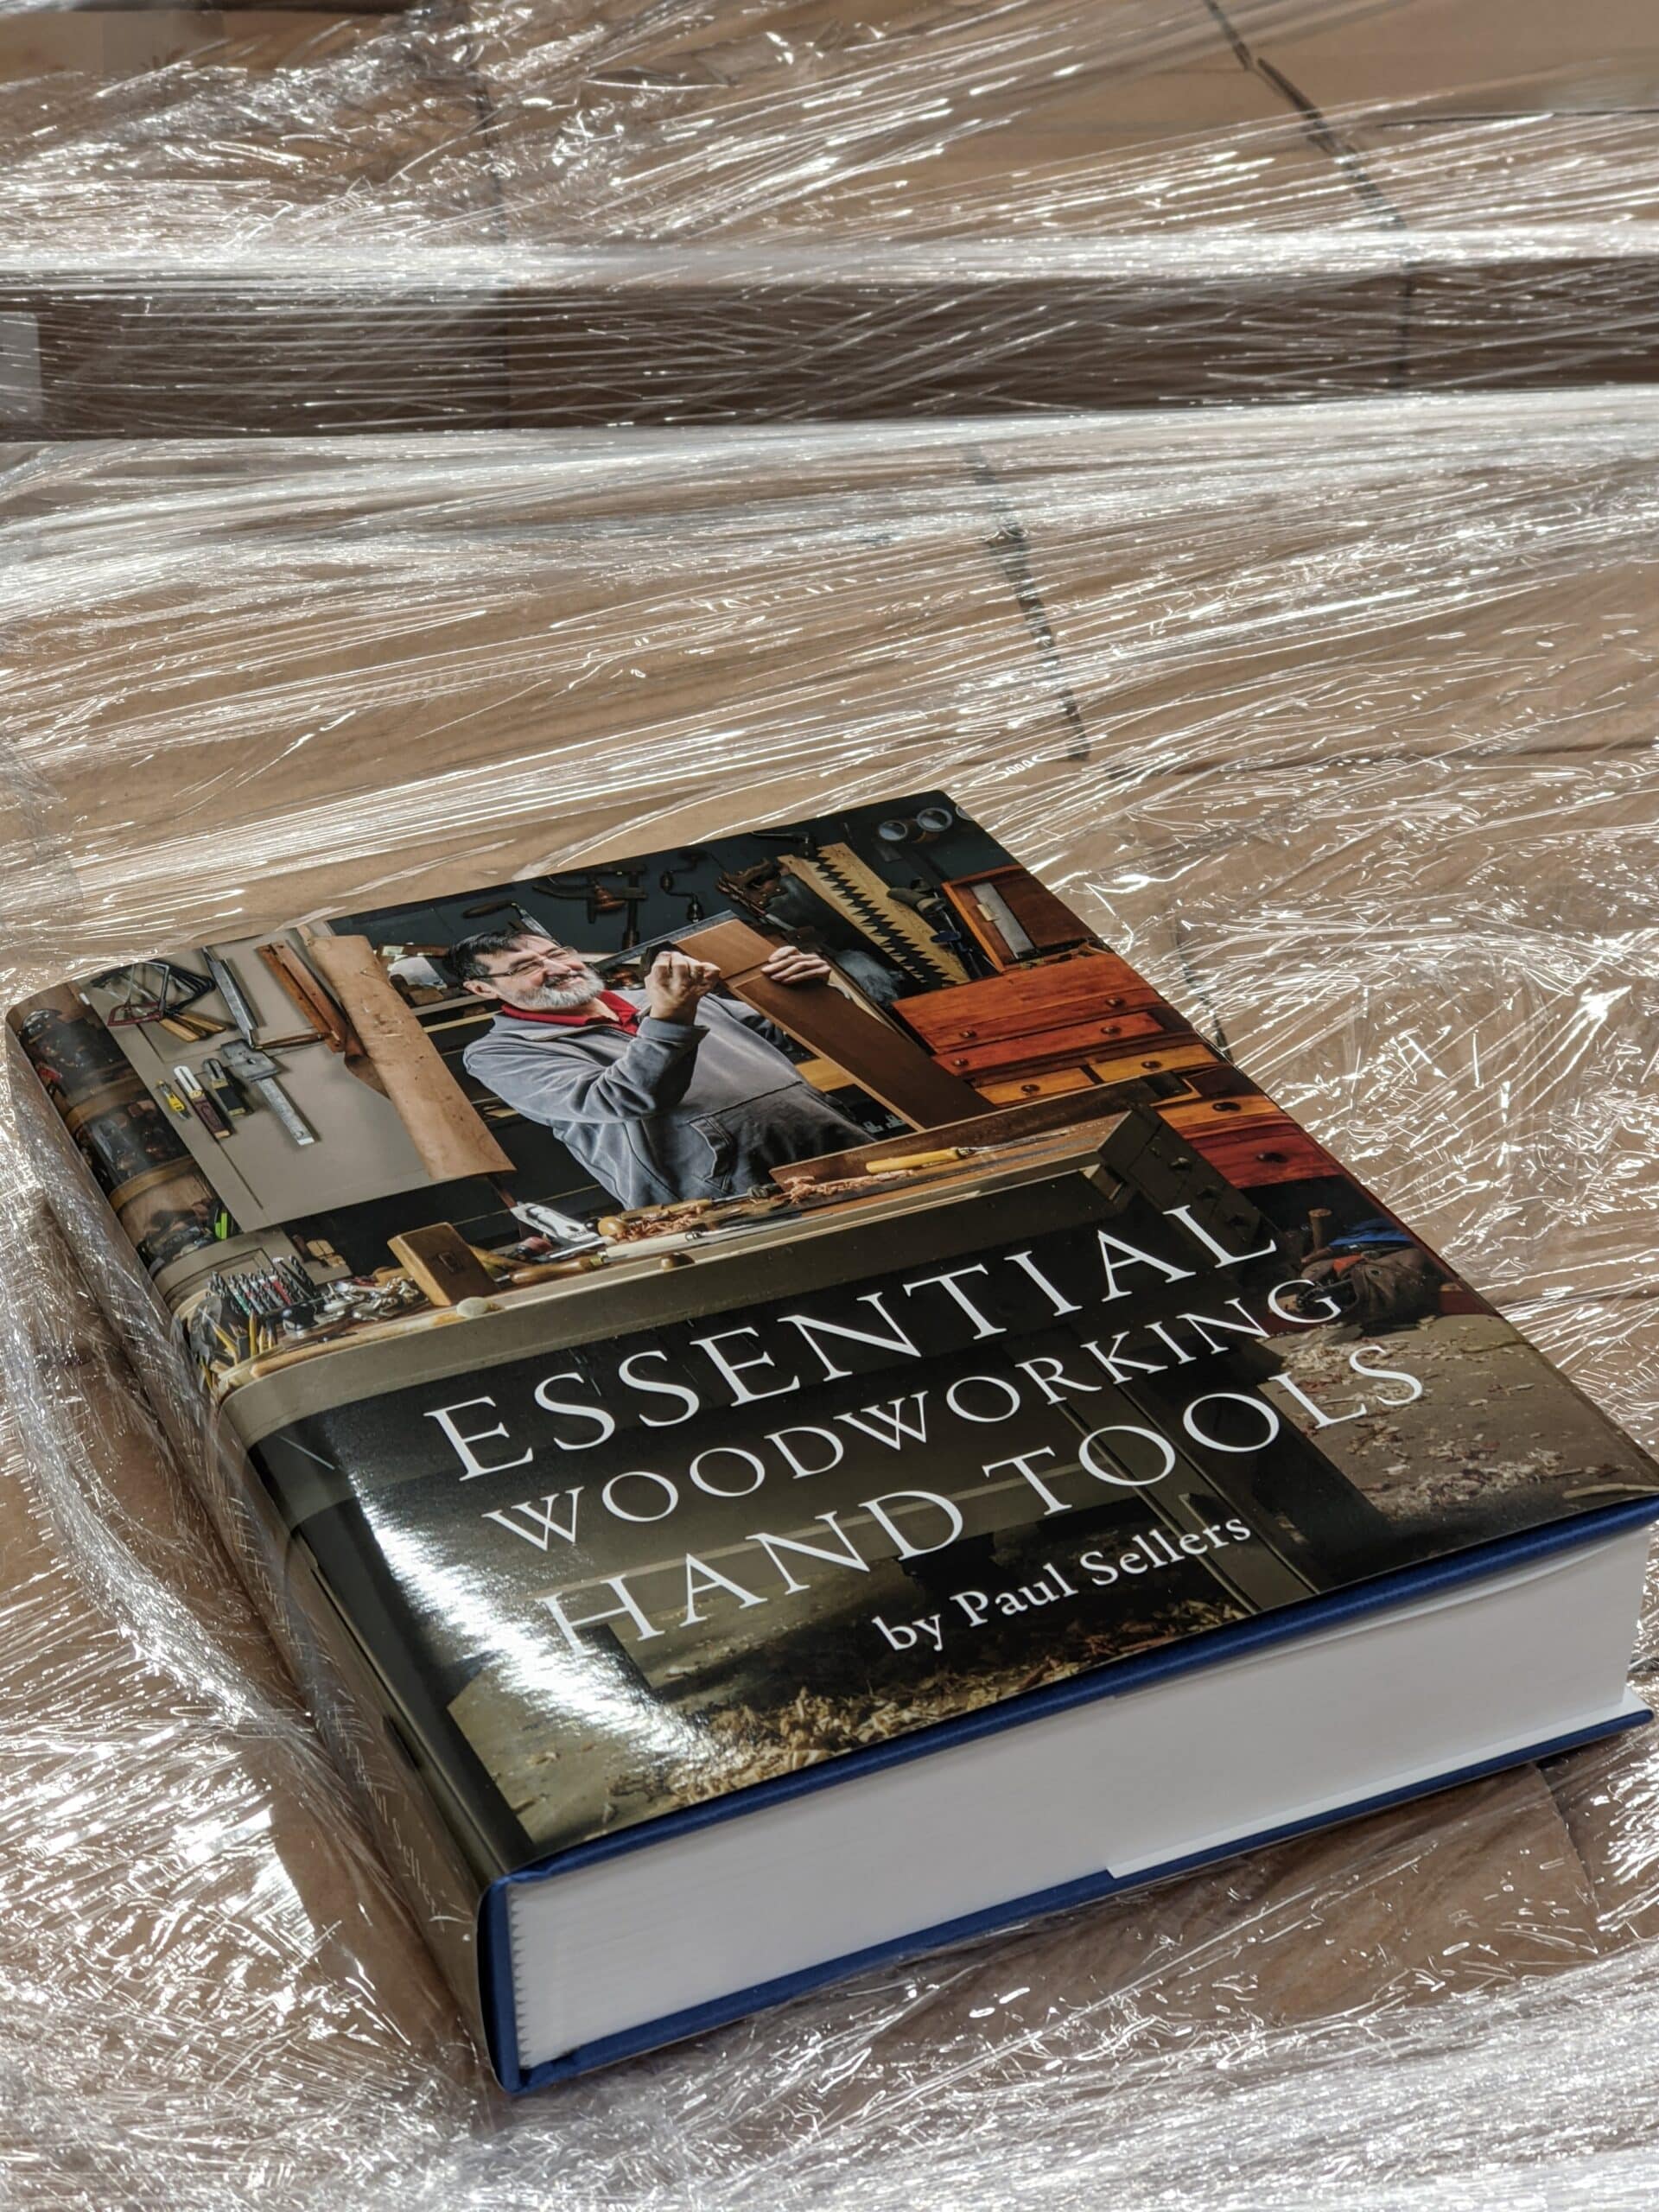
For more in-depth understanding of a wide range of planes and all of the tools I consider essential to my woodworking, get my book Essential Woodworking Hand Tools here. It might just change a chunk of your woodworking life!
Thanks Paul,
I’m a learner and pretty much just starting out. I like first principles so decided to restore an old plane (Falcon Pope – Australian Bailey pattern) – thus learning how they work/ fit together etc.
.. it was rough! Lots of skidding, jumping and skudding I think (rather than chatter I now realise). Lots of trial and error and I discovered that
1. The cap iron was not seating on the blade properly
2. The frog was not mating on the body properly (miscasting or poor machining?) with very little contact.
Once I abraded down the mating parts of each and got good contact the plane stabilised enormously and I was suddenly in happy planing land.
Thanks so much for all inspiring lessons and work.
Hi Paul – on an unrelated subject you addressed a few years ago on plane stops. You might just be the only person I know of who can answer my question. I am restoring a very old traditional work bench in beech with a centre well and 2 old Woden vices set at opposite corners. It must be at least 70 years old or more and belongs to my son – in -law who I am encouraging in his carpentry skills. There are 2 rising bench stops, one at each end, which are lifted by turning a cast iron snail wheel bolted to the bench legs. One of these is broken, but I have sent the other off to a foundry to be recast in brass. I can find no information on these anywhere. I can upload a photo if you let me know where to send it. Have you any information on these – and any idea where one might find one for my own bench – apart from another casting?
Your teaching has been inspirational and I still restore metal and wooden bench planes for use after watching your channel.
I cannot help you on the rising stops (that sounds like a neat thing!), but I am very pleased with my veritas planing stops. Of course, one can make them easily enough from a bit of gash, but I do prefer the metal ones. I’ve made 4 dog holes for the two stops to sit at 90 degrees to eachother, which supports the piece in two directions. The dog holes are great for my hold fasts, and I can use a dog, a holdfsat and a batten for longer pieces. Lightning fast – slap the piece down and plane away. Grab it and check it. No winding of handles or anything.
I’ve placed the stops around the vise, and if I lift the dog in the vise jaw I can pinch a long board between the stops and the dog – perhaps using a bit of scrap as a filler piece.
Just one more trick up the apron sleeve, so to speak. 🙂
I can’t help with a commercial source of thumbwheels, you might have a look round your local boot sale or market for an old lawnmower – these often had cast thumbwheels for adjusting the cutting height. You might need to replace the bolt in the bench with one with a thread matching the thumbwheel but since you need to remove the bolt to replace the stop this should be easy to do.
When I was taught woodworking at school all the benches had a rising stop like this. Most of the force is taken by the mortice in the bench top so there should be little if any strain on the thumbwheel. I think you need a penny washer under it due to the slot in the stop.
The stops had a 45 degree bevel on the far edge to prevent them splitting when the top got accidentally planed. Far better than metal stops if you accidentally hit them with the plane – hit a metal shop and it is back to the sharpening station.
Have two Falcon planes myself, dirt cheap on Ebay, they perform beautifully, quite a few around still, which is surprising as they were only produced for around 3 years.
Failed to mention for non Aussies, Falcons were the Australian made Millers Falls.
I rehab old tools as a bit of a hobby. Someone handed me a Falcon/Pope No 4 that was the ugliest, rustiest piece of junk I’ve ever seen. I thought, ah well, I’ll clean it up and flip it. Anyway, after stripping, cleaning, derusting, sharpening etc I put it back together and tested it. Wow. My benchmark is the type 19 that belonged to my father in law. I’ve been using and loving that plane for years, but there is something about that Falcon that just works noticeably better for me. I’m stalking a couple more to see if this one was a fluke.
Paul—let me first say that I completely agree that the thick iron craze was made by modern manufacturers to sell tools. I totally agree that the standard “Bailey” thickness eliminates chatter in all but the rarest of cases.
However, in my experience, irons thinner than the standard “Bailey” irons can cause chatter. I have a Stanley-Steel-Siegley plane (Stanley bought out a smaller manufacturer, as they often do) with a very thin iron. I’d say it’s 2/3 the thickness of my other standard irons. That plane occasionally—still relatively rarely—has chatter problems. They can be easily fixed with a refreshment of wax on the sole. Of course, this is on the very extreme end! Just my 2 cents (pence in the UK?)
The book is spectacular: its the Hand Tool Woodworking Bible. Well worth it.
But that’s not its name! It’s Essential Woodworking Hand Tools. Just to be sure.
I think what you’re saying is that the wooden plane blade tapers back from the sole to the end of the blade so it locks against the wooden wedge (so called folding wedge). Am I correct here ?
Thank you for a very elucidating blog entry, complementing so many other informative articles.
You often like the Stanley #4 to a thorough-bread – forceful but nimble and light. I wonder if I may ask a not too important question: What is a normal weight of a Stanley #4? The reason I ask is pure curiosity, I am lucky enough to have two #4, one prewar (1473g) and one from the late 50’s (1587g), so quite a weight difference (both have corrugated soles, and are weighted in without the iron).
There really isn’t a universal standard weight. I have a number of Stanley planes from different periods and they are different. Makes sense when you think about how they were manufactured over decades. They all work great and if you have the luxury of multiple Stanley planes I think you just decide which one feels right for you. My go to users are a 4 and 5 from the world war era. They are slightly heavier than some other Stanley’s I have but not to a degree that is impactful. I don’t favor these because of the weight so much as they came to me in a nice condition. People on eBay seem to not like the black plastic knobs and bid up the prewar planes more. So it is harder to find the prewar types in really nice condition for the best price- at least in my experience. This is not to say you can’t make most Stanley’s you find work wonderfully and Ive spent plenty of time cleaning and tuning Staley’s across a spectrum of starting condition. To that end though you decide for yourself how much time you enjoy rehabbing tools versus using them 🙂
Thank you for your answer @Mike,
admittedly my question was silly. I tend to prefer my lighter plane, but the heavier one on long boards. Thanks to Paul my planes are now better than they have ever been!
“Knots and hard grain will tend to and does push the blade back up and into the plane’s throat.”
That is why after I backed the iron to take thinner shavings, I remove the backlash of the yoke mechanism.
Sylvain, I also remove the backlash of the yoke mechanism.
Here is a graphic example of what happens to the blade when you hit a knot or other harder portion of wood – look for the little red arrow http://www.supertool.com/etcetera/deadends/golds.htm
You hit the nail squarely on the head Paul. Totally agree with all you said.
Have been saying the same for years.
Carry on the good work.
I have in recent times paid strict attention to tools in use by woodworkers, in the many videos online I mean, with the woodworkers sometimes being from Asia. And so I have seen fairly crude-looking planes such as old English wooden block planes, coffin-style planes, Taiwan-style wooden planes… and what do they have for a blade? Sometimes it’s a repurposed Stanley No 4, that’s what. How they keep it from slipping back I don’t know but they manage.
Thank you Paul. An Excellent clarification. I hadn’t considered that plane irons in traditional wooden planes were tapered, but it makes perfect sense now why they would be and are.
I love my old Stanley No4 that I had when I was 11 years old over 49 years ago, and I restored it recently with some parts from eBay – including walnut handles rather than the plastic ones they made in the early 80’s! BUT I also love my Lie Nielsen planes I treated myself too when I returned to woodwork this last year. Their weight and the thickness of the blade makes them feel super-solid, and really great to control. I’ve really enjoyed the difference actually – I think both thick and thin have their merits. I guess it comes down to personal preference!
Whoops 40 years ago not 49! Early 80’s
There is no reason to not like both and I purposely do not name planemakers generally because indeed they too need to and have a right to making things to sell for a living whether better or not. I have several planes made by different makers of Bed Rock plane planes which I have trialled for working with on an hour-by-hour basis and found them just too heavy for full-time users like myself. They give no more quality to use or the result than a Stanley or Record, but that is no reason for anyone not to use them if they like them.
Well sure, you make a lot of good points and I do admire your work and passion for the good ol days of yore however after using my record #4 and #7 for the past 30 years (tuned to the best of my ability) and now using a #4 Lie-Neilson they are worlds apart in quality and build and performance. Maybe I just had a bad Record #4 but I did end up replacing the stock Iron with a Hock blade and it did make a small improvement, I also know that the record planes are not the same as the Stanleys so maybe thats the difference, anyways getting more into hand tool woodworking now that I don’t need to do it to make money, i even went to school for furniture making bit it was a pipe dream…spent most of my career with powertools…
Depending on whom owned Record at the time the quality of fabrication shifts dramatically, along with the tolerances of the parts. I had opportunity to compare an Indian made one with one manufactured under Bahco and it was like chalk and cheese.
Now don’t pick on engineers for thicker blades! Blame it on the marketing department where it belongs.
I went the thicker plane iron way for a time when I was first recovering and refurbishing old planes. I found I lost the ability to adjust the mouth of the planes because of the thickness and the new thicker cap iron combination would not let them fit at all without filing the mouth opening larger, which I would never do. Then with the new steel I found it hard to break the wire edge in sharpening and spent too much time trying to get the edge sharp. When I finally got the edge sharp I didn’t see any improvement in the finish or much extra life between sharpening. I gave the thicker blades away to people who wanted a plane to look at and not use.
I have only experienced this “chatter” issue once, and that was in my very early stage of learning to use and set up a hand plan. Up on watching your video explaining such things, I realized that, I had not flattened the sole, I hand not sharpened the blade properly and the cap iron was not in the right position on the blade. Once these issues were addressed to the best of my ability the unevenness of the finish left on the boards was eliminated. At no point did i ever think or say to my self, I need to replace this thin blade with a thicker one. My number 4 is not a Stanley or a record, is a Kobalt from Lowe’s. It’s cheap and the blade and cap iron need lots of fettleing to mate them properly with out gaps at the leading edge. But all of Paul’s teachings still apply and the result is a beautifully preforming smoother. Thank you Paul!
Thanks for this issue Paul. I put a thicker Veritas blade in my Bailey 5-1/2 but the screw is too short so I will have to make a longer one but this does answer a valid question. At a Lie Nielson demo the guy doing the planing used the thickness as a selling feature however I think it is more a matter of the steel being a lot better than it was back in the 30s. Just boggles my mind that something that old still works just fine. I get a kick out of dragging out my Bailey made in 1937 or so and putting it to work alongside my Veritas No 4. How cool is that??
Well, Paul, I am unconvinced about better or indeed the touting of harder steels as a good option because such steels are not sufficiently better to counter the compromising effort-increase in sharpening even slightly harder steels. As far as I can tell, and I believe I am highly sensitive in this area, every Stanley and Record plane has exactly the right amount of hardness. I also remember those venues with planemakers constantly dissing thin irons, soft steels and spouting about the constant occurrences of plane chatter as issues their planes resolve. It is highly disingenuous but if your income is always hinged to making sales as a plane, a plane iron, improved lever cap and so on, this is what governs your reason for being in the booth and convincing “the punters” to buy. I am so glad that they are there for those who just like to buy nice and new tools though.
I did my Cabinet Making trade in 1978, but left soon after and did a totally unrelated trade which I have now been teaching for over 20 years.
To determine if something is truly better, then remove the legalised lies spewed out by the marketing departments and look at the actual results.
Are the thicker plane irons in the likes of the overly expensive Varitas and Lie Nielson that much better quality that the results are that much more noticeable?
Where is the visible proof?
I’m not talking about the artificial situation created at trade shows etc (which I’ve done my fair share).
These are just “click bait”.
How many of the most magnificent ornate buildings around the world had their woodworking done with so called “inferior steel” ?
Answer: every single one.
How many many magnificent ornate buildings around the world have their woodworking done with overly expensive Varitas or Lie Nielson planes?
Probably none, unless Rob Cosman, who by the way made his living from selling them, made a dovetail drawer for one.
Why?
Because people no longer invest the time and effort to correctly learn their craft.
So manufacturers have dumbed down the skill required to accommodate the lowest common denominator (the user).
Hence why most of the woodworking YouTube channels are power tool focused.
It takes less time, effort and skill to slide a rip fence a set distance away from a blade than to learn how to saw a straight line.
It takes less effort time and skill to run a piece of timber over a jointer than to learn how to plane a piece of timber correctly.
Machines are great, but they don’t make a craftsman.
I’ll stick to my 1874 Stanley or, since I’m in Australia I’ll stick to my Falcon.
The problem with my No. 4 turned out to be a badly set edge. Too much angle. In other words, my own fault.
(It has a thin iron by the way).
My Stanley’s all have the irons they came with and I’ve never noticed a problem with them. I agree with the idea that any tool used over decades will already be optimized. Since I don’t have any new thick retrofit irons I don’t have a basis for comparison. It does seem to me that in a properly tuned Stanley the cutting iron, cap iron and frog all create a synergy and whole. The tiny bit of flex in the thin blades contributes to this in a positive way in my opinion. No part is ever 100% percent perfectly flat, square, true, etc and the thin blades combined with the other bits create a sum that is better than the parts. Plus who wants to fight with more material when sharpening!
your book is a bit pricey on amazon:
Essential Woodworking Hand Tools Hardcover – January 1, 2015
by Paul Sellers (Author)
4.9 out of 5 stars 114 ratings
See all formats and editions
Hardcover
from $747.50
5 Used from $747.50
I gave the link on where to buy it, Michael because you cannot actually buy the book from Amazon even though it looks like you can because we are the sole distributors and we don’t sell to anyone else anymore.
It is about 10 X the price.
go to https://rokesmith.com/shop/
Hi Paul – sorry I left a reply in the wrong place further up which you may have missed- relating to a snail wheel bench stop. Could you have a look and tell me what you think?
Hello Martin. I am afraid I can’t help you which will be as disappointing for me as it is for you. I know very little about bench stops and rarely ever use one though as you say I did install one. So sorry.
Another role for the wedged blade on wooden plane is that it allows to remove the wedge simply by taping the iron. Useful to know when using century old moulding plane with beautifuly shape wedge that would break if removed by a hammer.
I have a fairly recently manufactured Record No. 5 (plastic tote and knob) that had a really aggravating propensity to jump (or scud). The sole was flat. I modified the cap iron edge, which was sad looking and collected dust along the leading, so it had no geometery that would catch shavings. I even put a new bevel on the iron and got shaving sharp. Still no joy. You could retract blade and start carefully extending the blade, and suddenly it was jumping, creating short linear gouges and stacking the chips up in the mouth of the plane. Finally, I dismounted everything and very hesitantly took a mill file to the milled points where the frog seats on the body and the seating surfaces on the frog. I’m not at all sure just where the difference was, but the plane now works quite well. The tote and knob are plastic, so I might look to replace them.
One of the best and most rewarding aspects of woodworking is to make your own tote. Here’s the link.
This article is very interesting, in particular the point on tapered irons. I have one such iron on my wooden jointer; it is the best iron I have!
I am regulary hand planing from about three years now. My reference on hand planes has been the video “Restoring the bench plane” by Mr. Sellers, as well as his other videos and articles on the topic. My planes can plane anything, be them metal ones or wooden ones, with thin or thick irons. I remember the difficulties I had in the beginning: skudding, skipping and jumping, much like in that picture here. But sharpening the blade, tuning the plane and setting the blade for non agressive planing resolved the problems. Ah, don’t forget the oiled rag in the can!! … sometimes I still start with my tote a bit low when planing the beginning of the board and my plane jumps, but I’m getting better.
Thick iron? It makes the plane havier; sometimes this may be an advatage, most of the time for me it is not. But, as the article clearly lists, good planing depends on a dozen variables and the iron thickness is not one of them.
The seating of the frog onto the sole needs to be correct. On many of the Stanley Handyman series, the underside of the frog is painted and there is no contact at the front part of the frog, just under the bevel, where the downward force is highest. Once you work out what the problem is, some careful filing will fix it. Otherwise you’ll pull your hair out with chattering, divots and dig-ins!
Actually, if the frog is set at a manageable working distance from the front aspect of the sole, it really doesn’t matter much if the frog is needed perfectly because if the bevel of the cutting iron is sharpened between 25 to 30-degrees the iron rests quite firmly and very nicely on the fore-edge of the rear aspect of the plane’s sole itself. No one ever mentions this and most seem to believe that cutting iron is utterly supported by the frog. For a plane to work successfully in 95% of its work will need a more open throat and by that, I do not mean a gaping throat, just a working throat.
For typical users, for trimming doors, I agree. The problem on the Handyman series comes when I move the frog forward for a tight mouth for a fine finishing cut. Then because the front is unsupported, the edge dives in, and I get divots! Enough to make me fetch the belt sander…
I have looked at 3 examples that all had the gap under the front of the frog. These were Stanley’s “global” planes so one can only wonder how many are out there.
Do you know, thinking about it, I never movie my frog. It’s just not worth the effort for the benefit. With a well-sharpened plane and precision as far as force goes, I never get what you and others speak of.
I don’t know it Stanley sold the “Handyman” version of their planes any where but Canada and the USA. But the compromise was definitely the lack of support (lack of steel) left on the frog. Many of these planes just had support on the outside edge of the frog. This is significant when compared to planes manufactured in previous eras.
At the same bevel angle, the thickness of steel at, say, 1/8″ behind the cutting edge is the same no matter how thick the iron becomes after that. So the final thickness of the blade makes no difference to the amount of material supporting the cutting edge. The thicker blade actually contacts the frog farther from the cutting edge.
Looking back, I wish I’d spent all the time I used trying to “fix” planes improving my sharpening.
And in many cases closes off the throat far too much and the fore-edge of the sole then needs filing??? Hmmm!!!
Let’s say all you can get your hands on are thicker irons. Can you do a secondary bevel to make sharpening somehow easier. All i
Can get are these slabs of iron for my even planes…
I meant e c e woodenplanes
Paul, thank you for your insights on chatter. I’ve been using planes only since last December so I’m not all that experienced. I sometimes wondered when I would encounter the chatter phenomenon that I read about so often! It really is a non-issue, at least for the planes that I own — one of them a ‘lesser’ Stanley Handeyman model.
I hollow grind my plane irons on a bench grinder so I do not have to remove more material when I hone them. But to do that does take some gear. That’s the downside. I’ve made a couple grinder tool rests that can do it. If you do a web search for Adjustable Sliding Bench Grinder Tool Rest you’ll see one I made. It’s kind of famous. I’m pfredx1 I like to metal work too. It’s just like woodworking, only slower.
I advocate that no one uses a bench grinder for many reasons but the main one being that, as you say, and what seems positive to you, you are more than likely removing ten times more steel than you need to, you risk overheating the steel and there is no benefit to it at the end of the day. Also, it does waste space and time in my view. Hollow grinds too seem tome totally unnecessary and very slow when compared to freehand sharpening.
When where you in México?
Would have loved to meet you, though I’m practically beginning woodworking myself since the pandemic.
Thanks for sharing your knowledge.
I just came into a #5 plane that was manufactured in Sheffield, England.
It is in the original cardboard box, cutting iron has not been initialized, and I don’t think it ever took a cut.
The plane is pristine without a speck of rust.
How long was Stanley making planes in Sheffield and were these tools normally imported into the USA?
One thing I notice in woodwork videos when the planing happens is the plane comes up slowly to the wood and then a pushing battle begins. I always have the plane moving before it reaches the actual cut. Surely there should be some momentum before the cutting starts .
I actually had a chatter quite often.
And the reason is a wooden plane (german style). I hate them. Really. With all my soul. I am new in woodworking, but I am clever enough to undestand that setting the depth by knocking with a hammer it is the same as fine wood carving with an axe. A master, having experience of tens of years, probably can do it. Both set the depth with a hammer and carve with an axe. But newbie will have all kind of planing problems one can imagine..
The reasons for chatter in wood planes are:
1. Wrongly set depth. The depth again is set too big – bigger force is acting on the iron, it bends deeper, breaks the fibers, force is released, plane jumps, iron straiten itself back, stuck again in a wood, bends, breaks, and so on.. Chatter.. And yes – the thicker iron will partially solve the problem, because the iron does not bend anymore. And to set a depth on wood plane is a pure pain. To fix the iron you need to hammer. Because of the friction between wood wedge and iron iron will go deeper during fixing. If you fix too much, you can not control the depth anymore or you need to knock harder. And then the tilt will change.. and you need to knock here-there-outwhere. Front, back, wedge, iron. All together. With a perfect ever alignment tool – a hammer.
2. The wooden wedge. It should be just perfect. It is fixing the iron all over the plane surface against another plane surface and if it is not really plane wedge (nice one 🙂 ) it will not homogeneously press on the iron. Or left side will be loose, or right one. Or nose of the iron, or tale.. If it is wedge with a rod/strange holder that wedge push against, you always have a big lever between real fixing point and cutting edge. Planed wood will “press and release on the iron”, it will bend (the big lever allows it) and jump, and if it is in resonance with the lever size and force applied, one will have a chatter. Chatter actually IS a resonance oscillation of the iron.
If the wedge is fixed with the sides wedge-shaped cuts in a wood – once again – the wedge should be perfect to fix equally left and right side of the iron.
And thicker iron partially solve it. It just does not bend and allows for unhomogeneous fixture of it. However, instead, the force will go to the weakest part of the iron and your cutting edge will be broken 😉 Take it out, sharpen and knock-knock nex hour again in a hope to find a best combination of all this knocking parameters.
In the Bailey/Stanley planes the iron is fixed almost at the cutting edge. In order to let it vibrate (chatter) with so small “lever” between fixing line (the frog push down just a line, not all the plane) and cutting edge, you need or really small sharpening angle of the iron, when the edge will oscillate itself, or extremely high force applied+big depth+hard wood+too firmly fixed iron. Or the paper-thin iron.
That is why I fully agree. From physics point of view I don’t see any reason to buy a thicker iron for B/S style planes. And from technological point of view I don’t see a reason to buy a wooden plane 🙂 they were outdated already a century ago..
Totally disagree on wooden planes being outdated. You are very wrong on that point Dmitry. I will put that down to your being new to woodworking and indeed your plane irons did not chatter either. Maybe I might suggest you just think that they did?
Hi Paul,
Probably. I just was really disappointed with adjustment of wood planes. I have two (“whom” I promised many times to burn them..). I stuck for the last project using a router with sanding because I hated planing with those. Recently I just bought a relatively old, but “as new” Anant Nr4 for just 20 Euros. And “prepared” it following your awesome video. Step by step.. and in just 2 hours (most spent on sharpening both an iron and cap iron) I could easily make transparent chips 1 meter long.. It is just another level of planning, imho. Reproducible, fast and reliable. And if one needs to shortly renew the cutting edge, one just takes iron out and does it. Without thinking that it’s adjustment will take another half an hour. Using wood planes I had always defects, cuts, lines on one side and so on because if wrongly set depth.
And that is why I think they are outdated. And also my long explanations about chatter reasons there are still applied. The iron is fixed way further from the cutting edge than in B/S planes, that allows him oscillating with a lower frequency, that could result in a chatter.
If after correctly sharpening and setting the blade, you still get chatter, dig-ins, etc, I suggest you check how the blade is bedded to the ramp on the sole. It may be that it is not properly supported at the bottom.
Paul. I have a beech jack plane with a missing wedge. Fully plan to make one in pine then mahogany ( other suggestions welcome ). The picture here is great for a sense of how it should look. Any chance of a video on how u would make the wedge, or you can have the plane and make it ( I’m just down the road in Shropshire).
Hi Paul, I’ve been following your mortice & tenon method. Thank you for that as a complete beginner. My question is how would you cut a mortice in non square wood such a rough lumber (eg 4″ x3″)to be used for an outside bench or table support? Or would you even try without being able to use a square all round?
You only need two adjacent faces to be squared up and straight. They become the registration faces for the gauge and the square, so all references are established from these two faces.
“Of course, 98% of these planes sold never chattered at all”
How could you possibly know this?
Personal practical experience! Research, experimentation and the examination of thousands of workpieces over 55 years, Plus, why would professional users by the hundreds of thousands over a century and a half, tolerate a plane that supposedly substantially chatters in use? It’s quite, quite silly if you just think about it. But, if you want to sell planes hot off the press that do no more than the originals developed in the mid-1860s, why not use a simple phrase like “Our thick irons resist chatter” even though they rarely if ever actually chattered? And guess what? They still don’t chatter if sharpened and used correctly. I defy anyone to intentionally cause this plane to chatter in front of me!
Reading between the lines is critical thinking and if chatter was never ever mentioned for centuries, how come we suddenly have this exceptional and very specific phenomenon affecting everyone who uses a plane? What people say is “chatter”, most often if not always, is usually just skudding, skipping and jumping, nothing more!
Sir, I would like to first congratulate you on your devotion to your craft. Indeed it is a pleasure to see. An old high school teacher of mine once said, “A man that works with his hands is a handyman. A man that works with his hands and his mind is a craftsman. A man that works with his hands, his mind, and his heart is an artist” “Man” is of course in context of man as a human race, because ladies are without a doubt included in this message. Thank you for the inspiration and knowledge you pass on to those in my position who is an extreme beginner.