Experiential Learning
Taking wood from the tree before going to the timber suppliers is called conversion. Conversion is the specific process of cutting the tree stem down its length in different ways to produce beams, boards and sections of wood before the drying and seasoning process begins. After conversion, the wood goes through a period of seasoning to reduce the mass of moisture held in the cells of the tree and it is this that then stabilises the wood and prevents the wood from becoming diseased through what would otherwise be the process of gradual and progressive decay. Tree stems, when left wholly in the round and with the bark on, begin to naturally decompose throughout their inner fibres and no part escapes the effects of decomposition. Slabbing the tree breaks the continuous outer skin of the bark which then exposes wider surfaces of inner wood which allows moisture to be released into the surrounding atmosphere; this can be by the natural process of air circulation around and in between the now exposed slabbed boards, or through force-drying methods using some type of kiln that controls the environment within a chamber and then uses heat to force moisture out of the wood fibres.

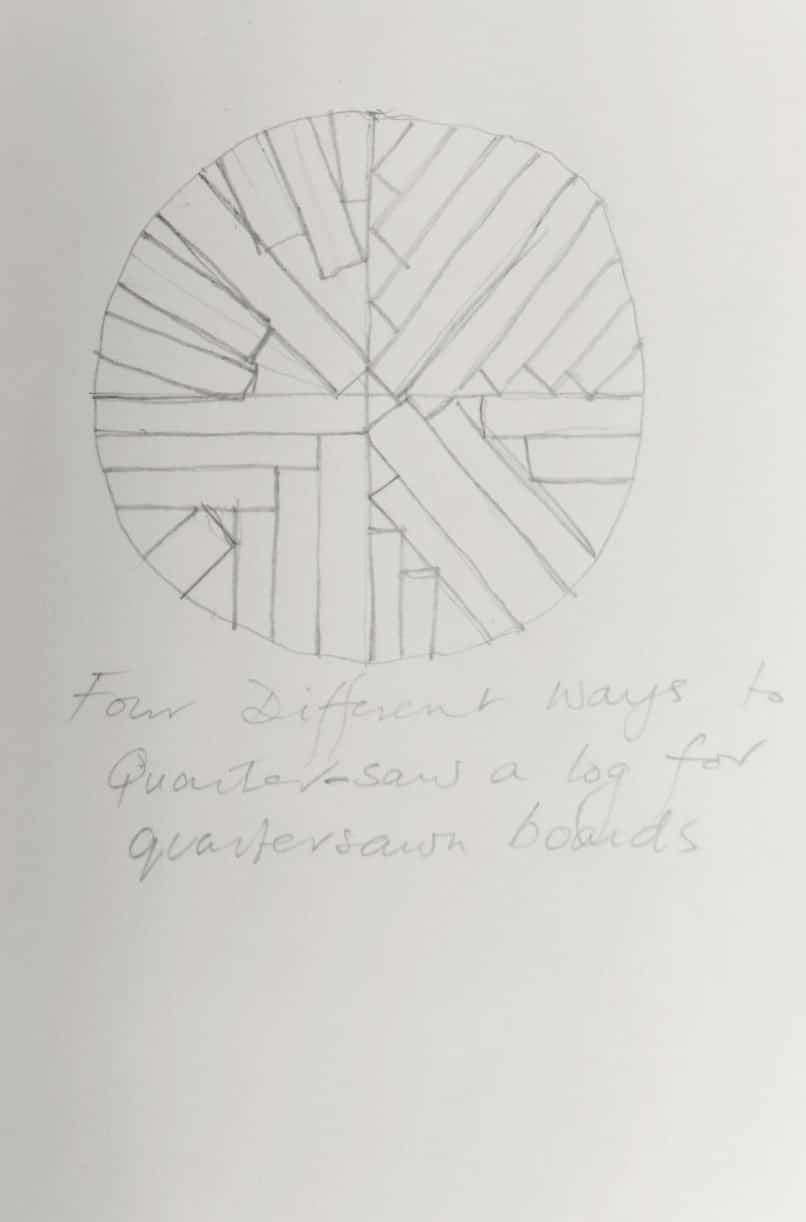
When trees come into the sawmill for milling, the tree stems are placed onto a carriage and the carriage either carries the stems forward into the cutting blade that cuts vertically to create one flat face, or the machine moves along a track and the blade passes into and through the wood as it cuts. From this point on, the stem is further cut, usually, in one of three ways; through and through, quartersawn or around the centre. Commercial millers rely on these three methods mostly, but smaller millers can be inventive to get the best or most versatile yield from their logs or indeed to get a particuar grain feature from the wood.
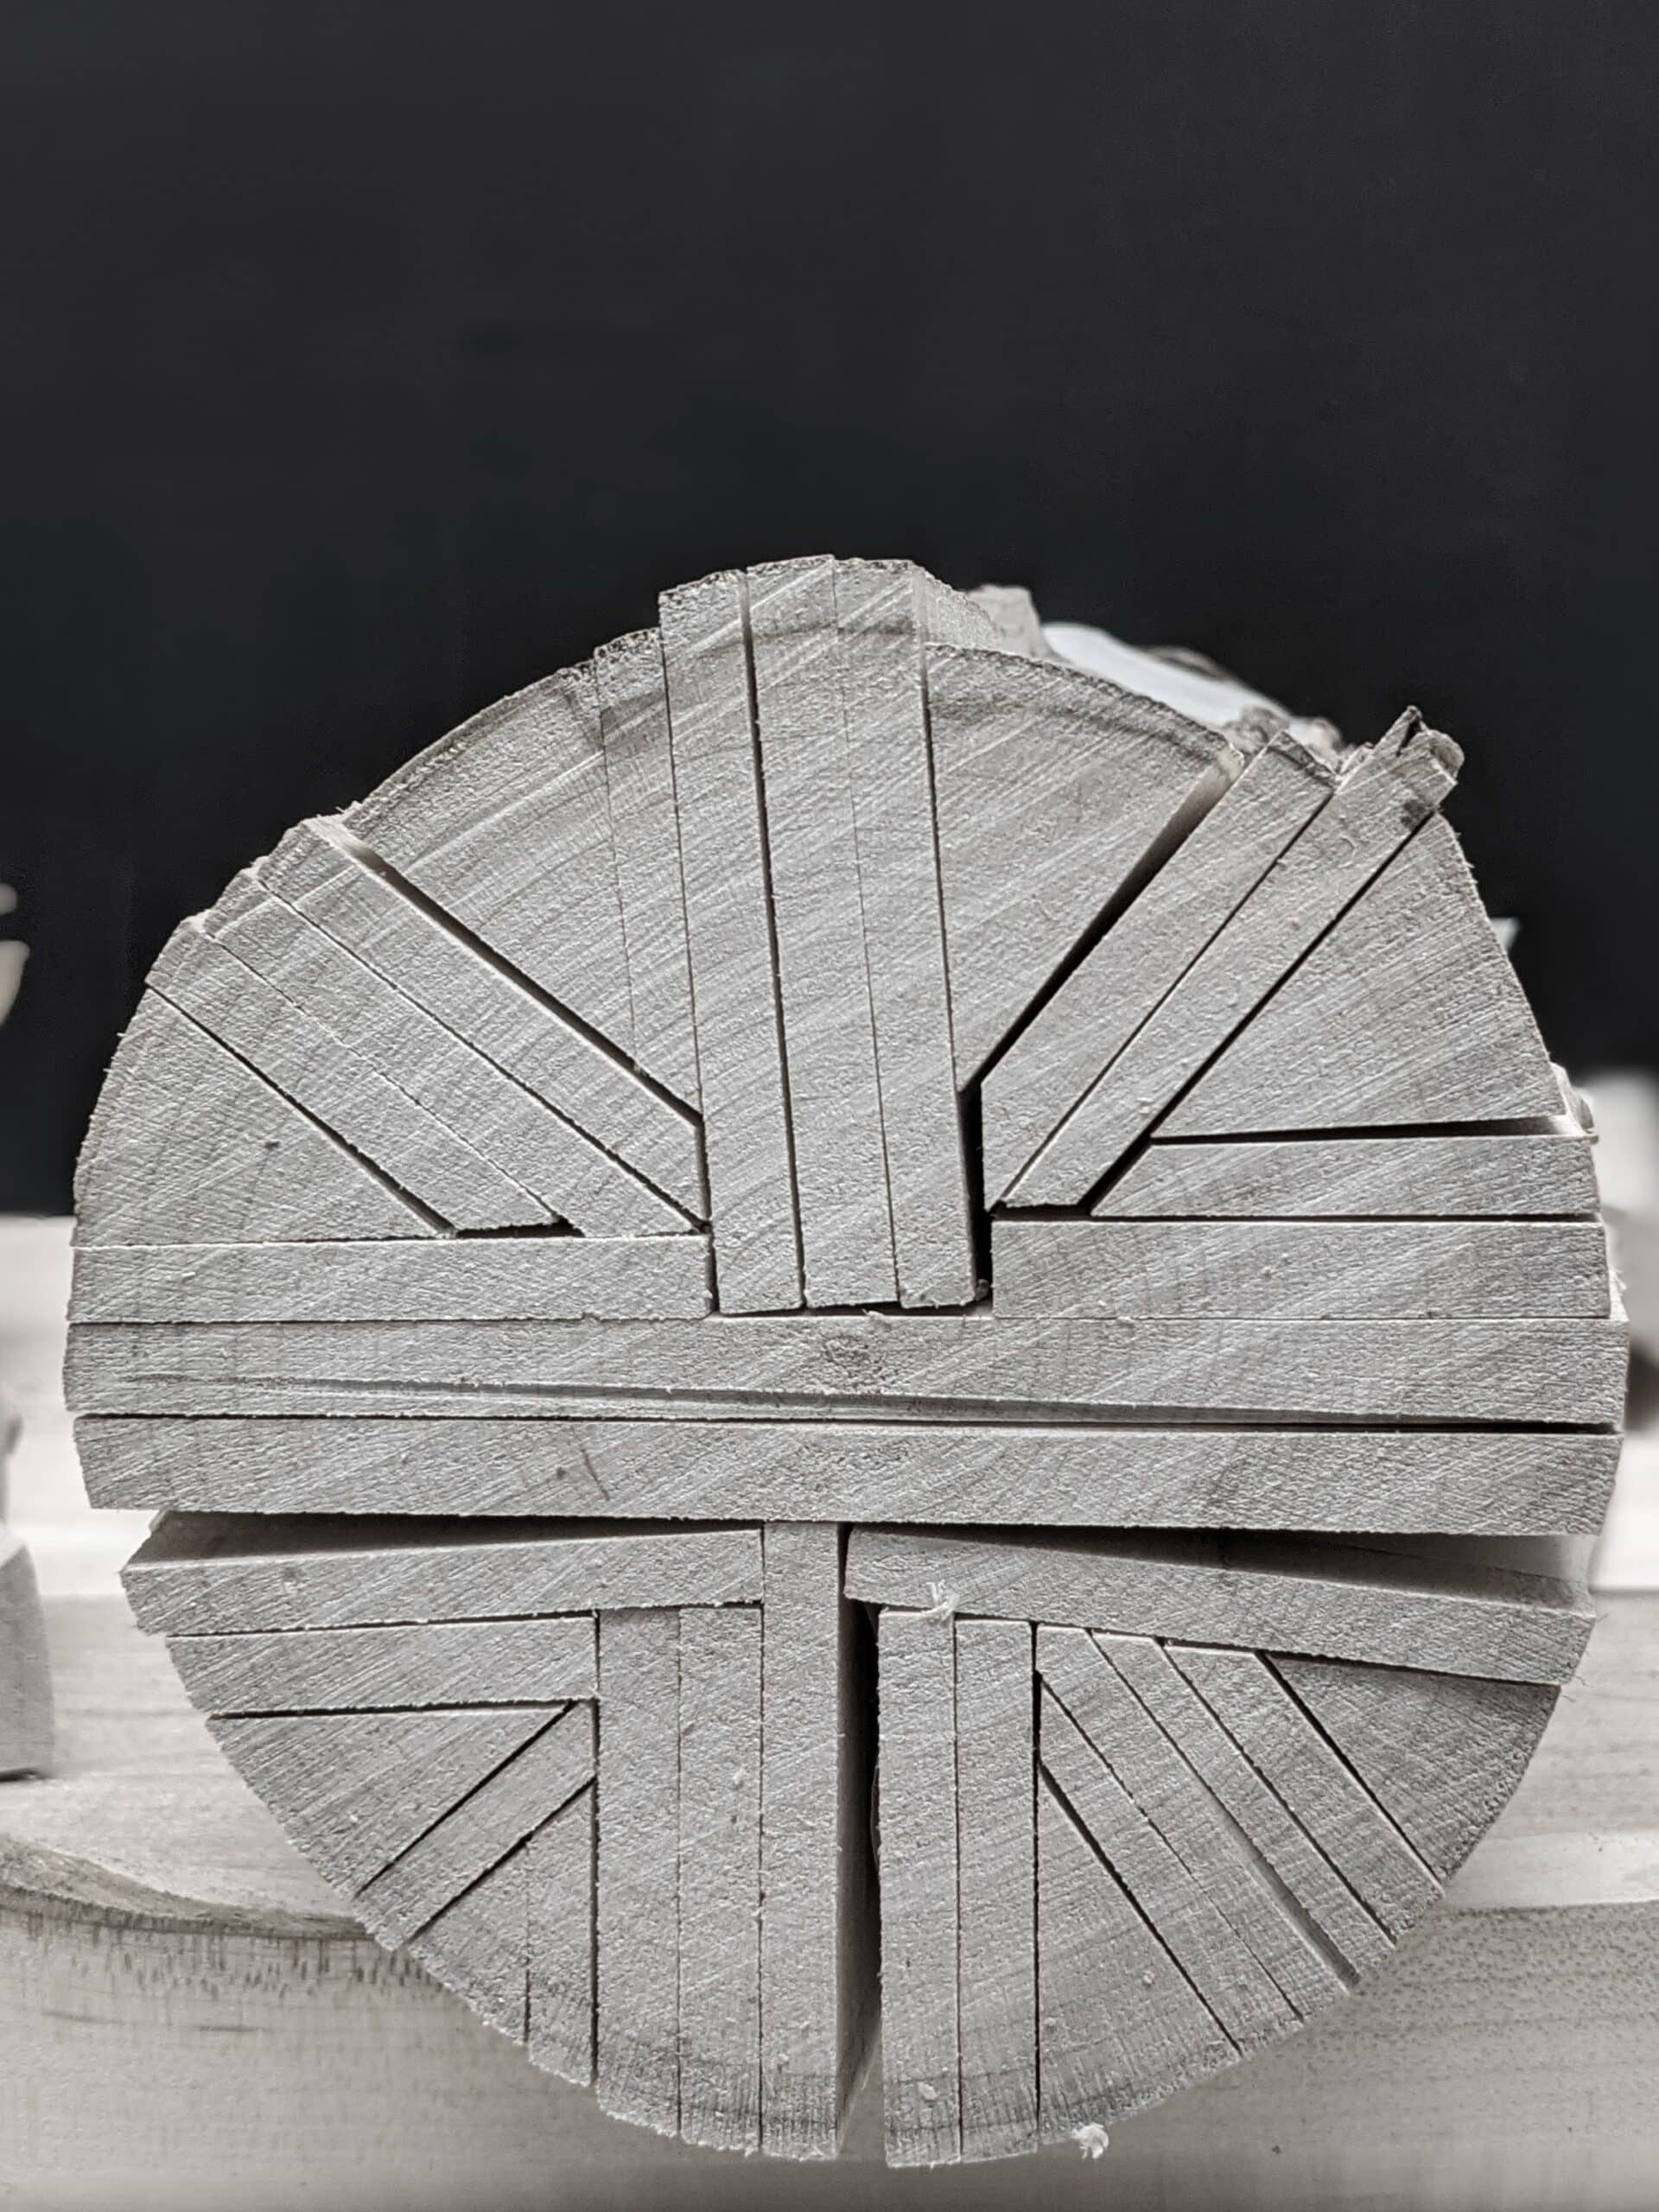
This drawing shows different ways of quartersawing that can optimise particular features in certain woods known for their distinctive grain patterns. Each one of these methods of quartersawing gives a marginal advantage over the other, be that grain exposure, the efficiency of cut, maximising yield or whatever.
Experimenting is exhilarating but I am not sure if many do experiment so much these days. Investigation and experimentation are not the dominions of scientists, writers, teachers, etc alone. And research is not goofing on google, tubing is not you doing anything much beyond entertaining and can mean that you never do anything but watch content for hours on end which is then as productive as gaming is. Better this time be spent on developing skills because watching alone cannot do much more than make you think, “Yes, well I know that!” In reality, you knew something about it, but less than you could have. If you and your children can do some experimenting it will exponentially expand both of your understanding.
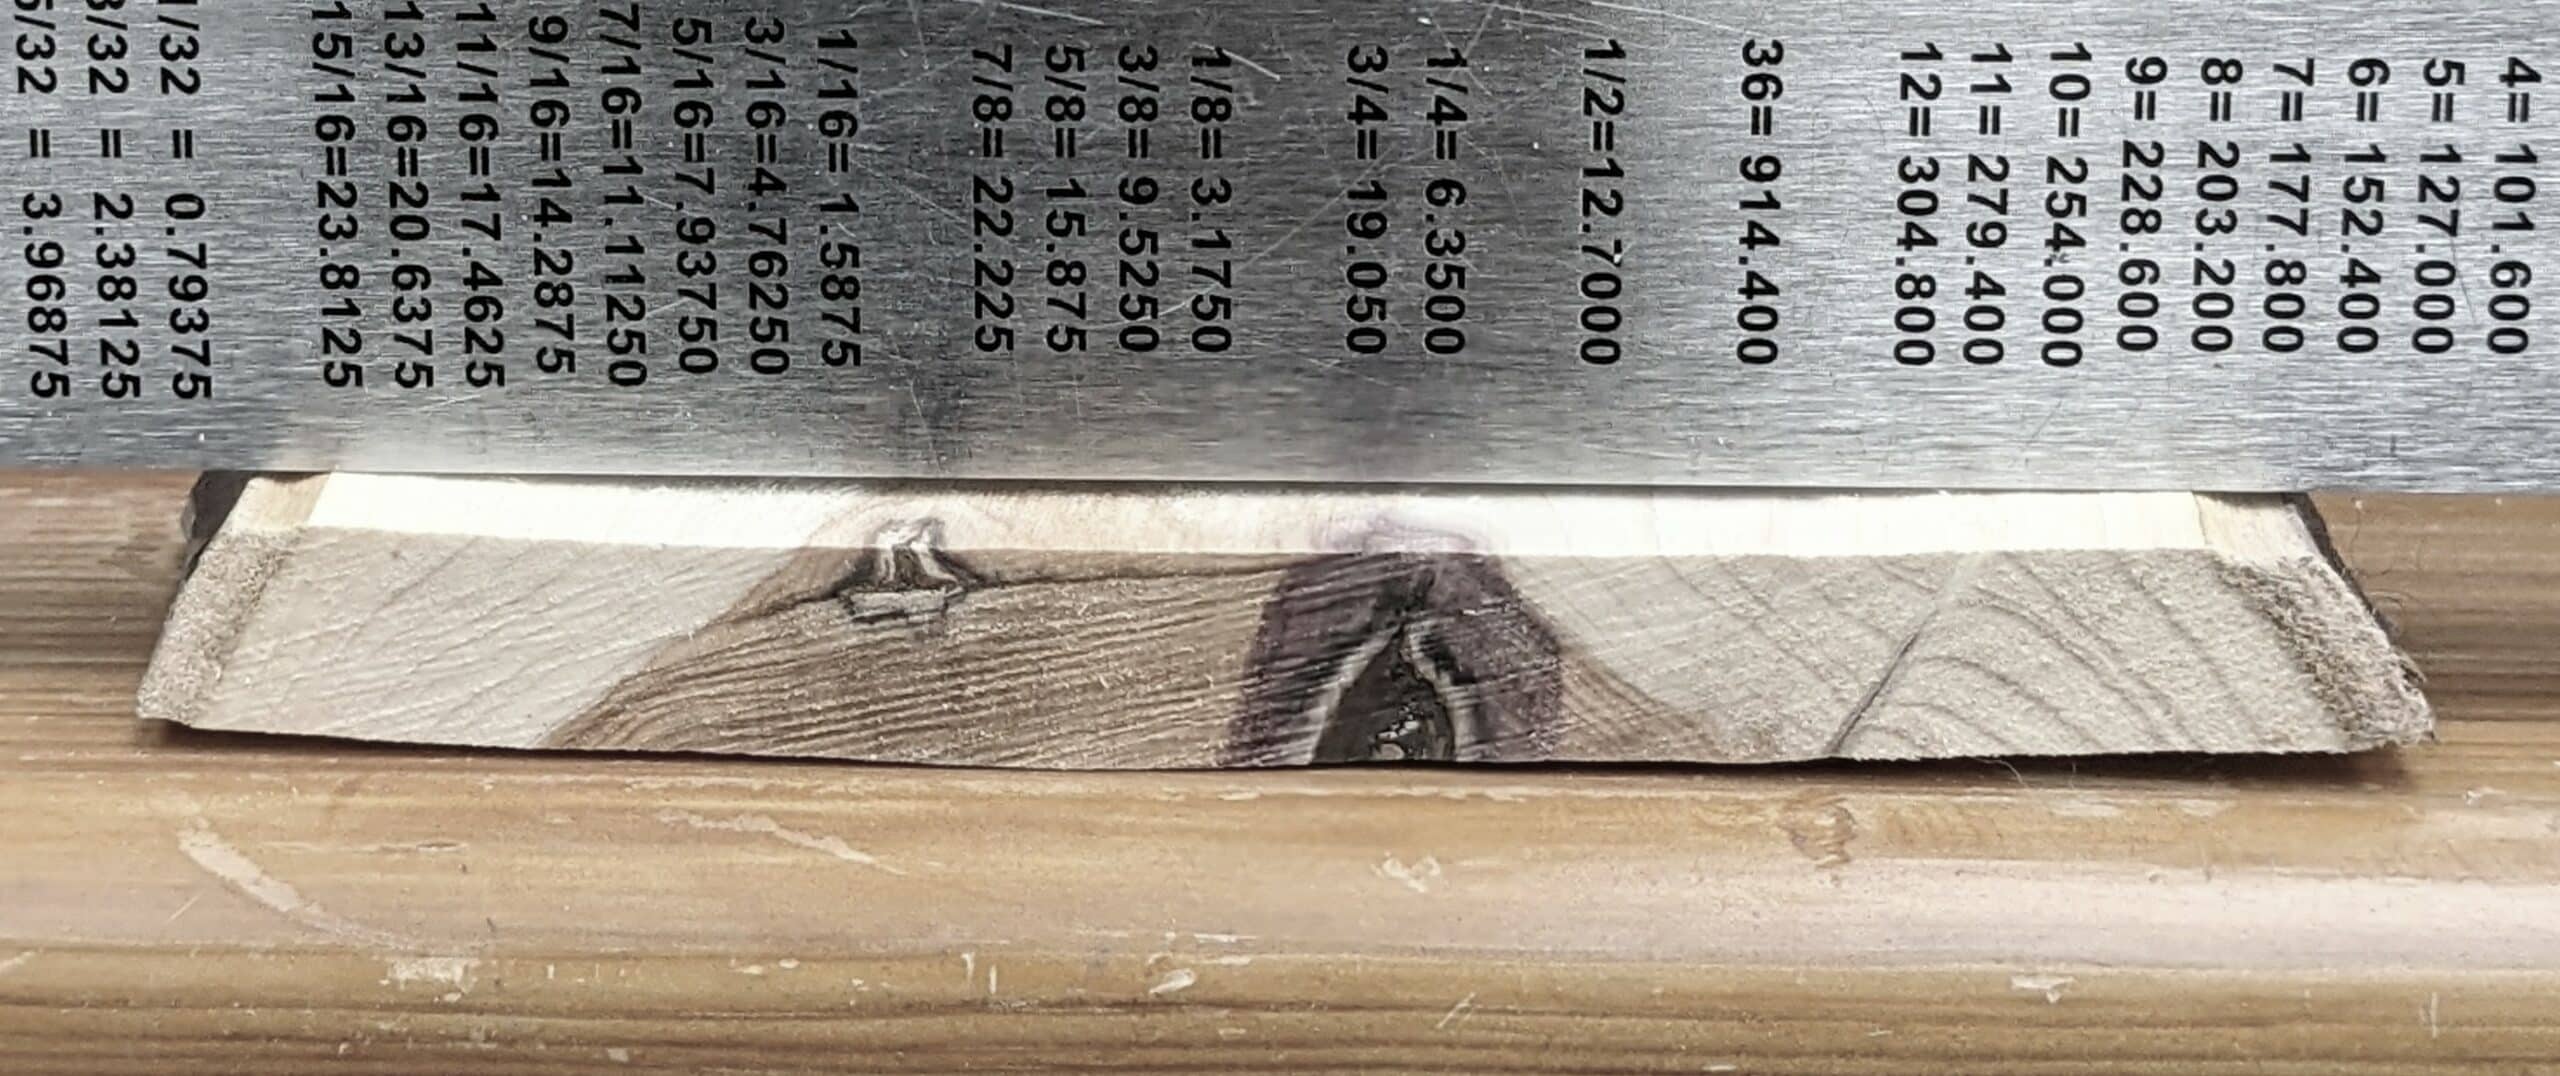
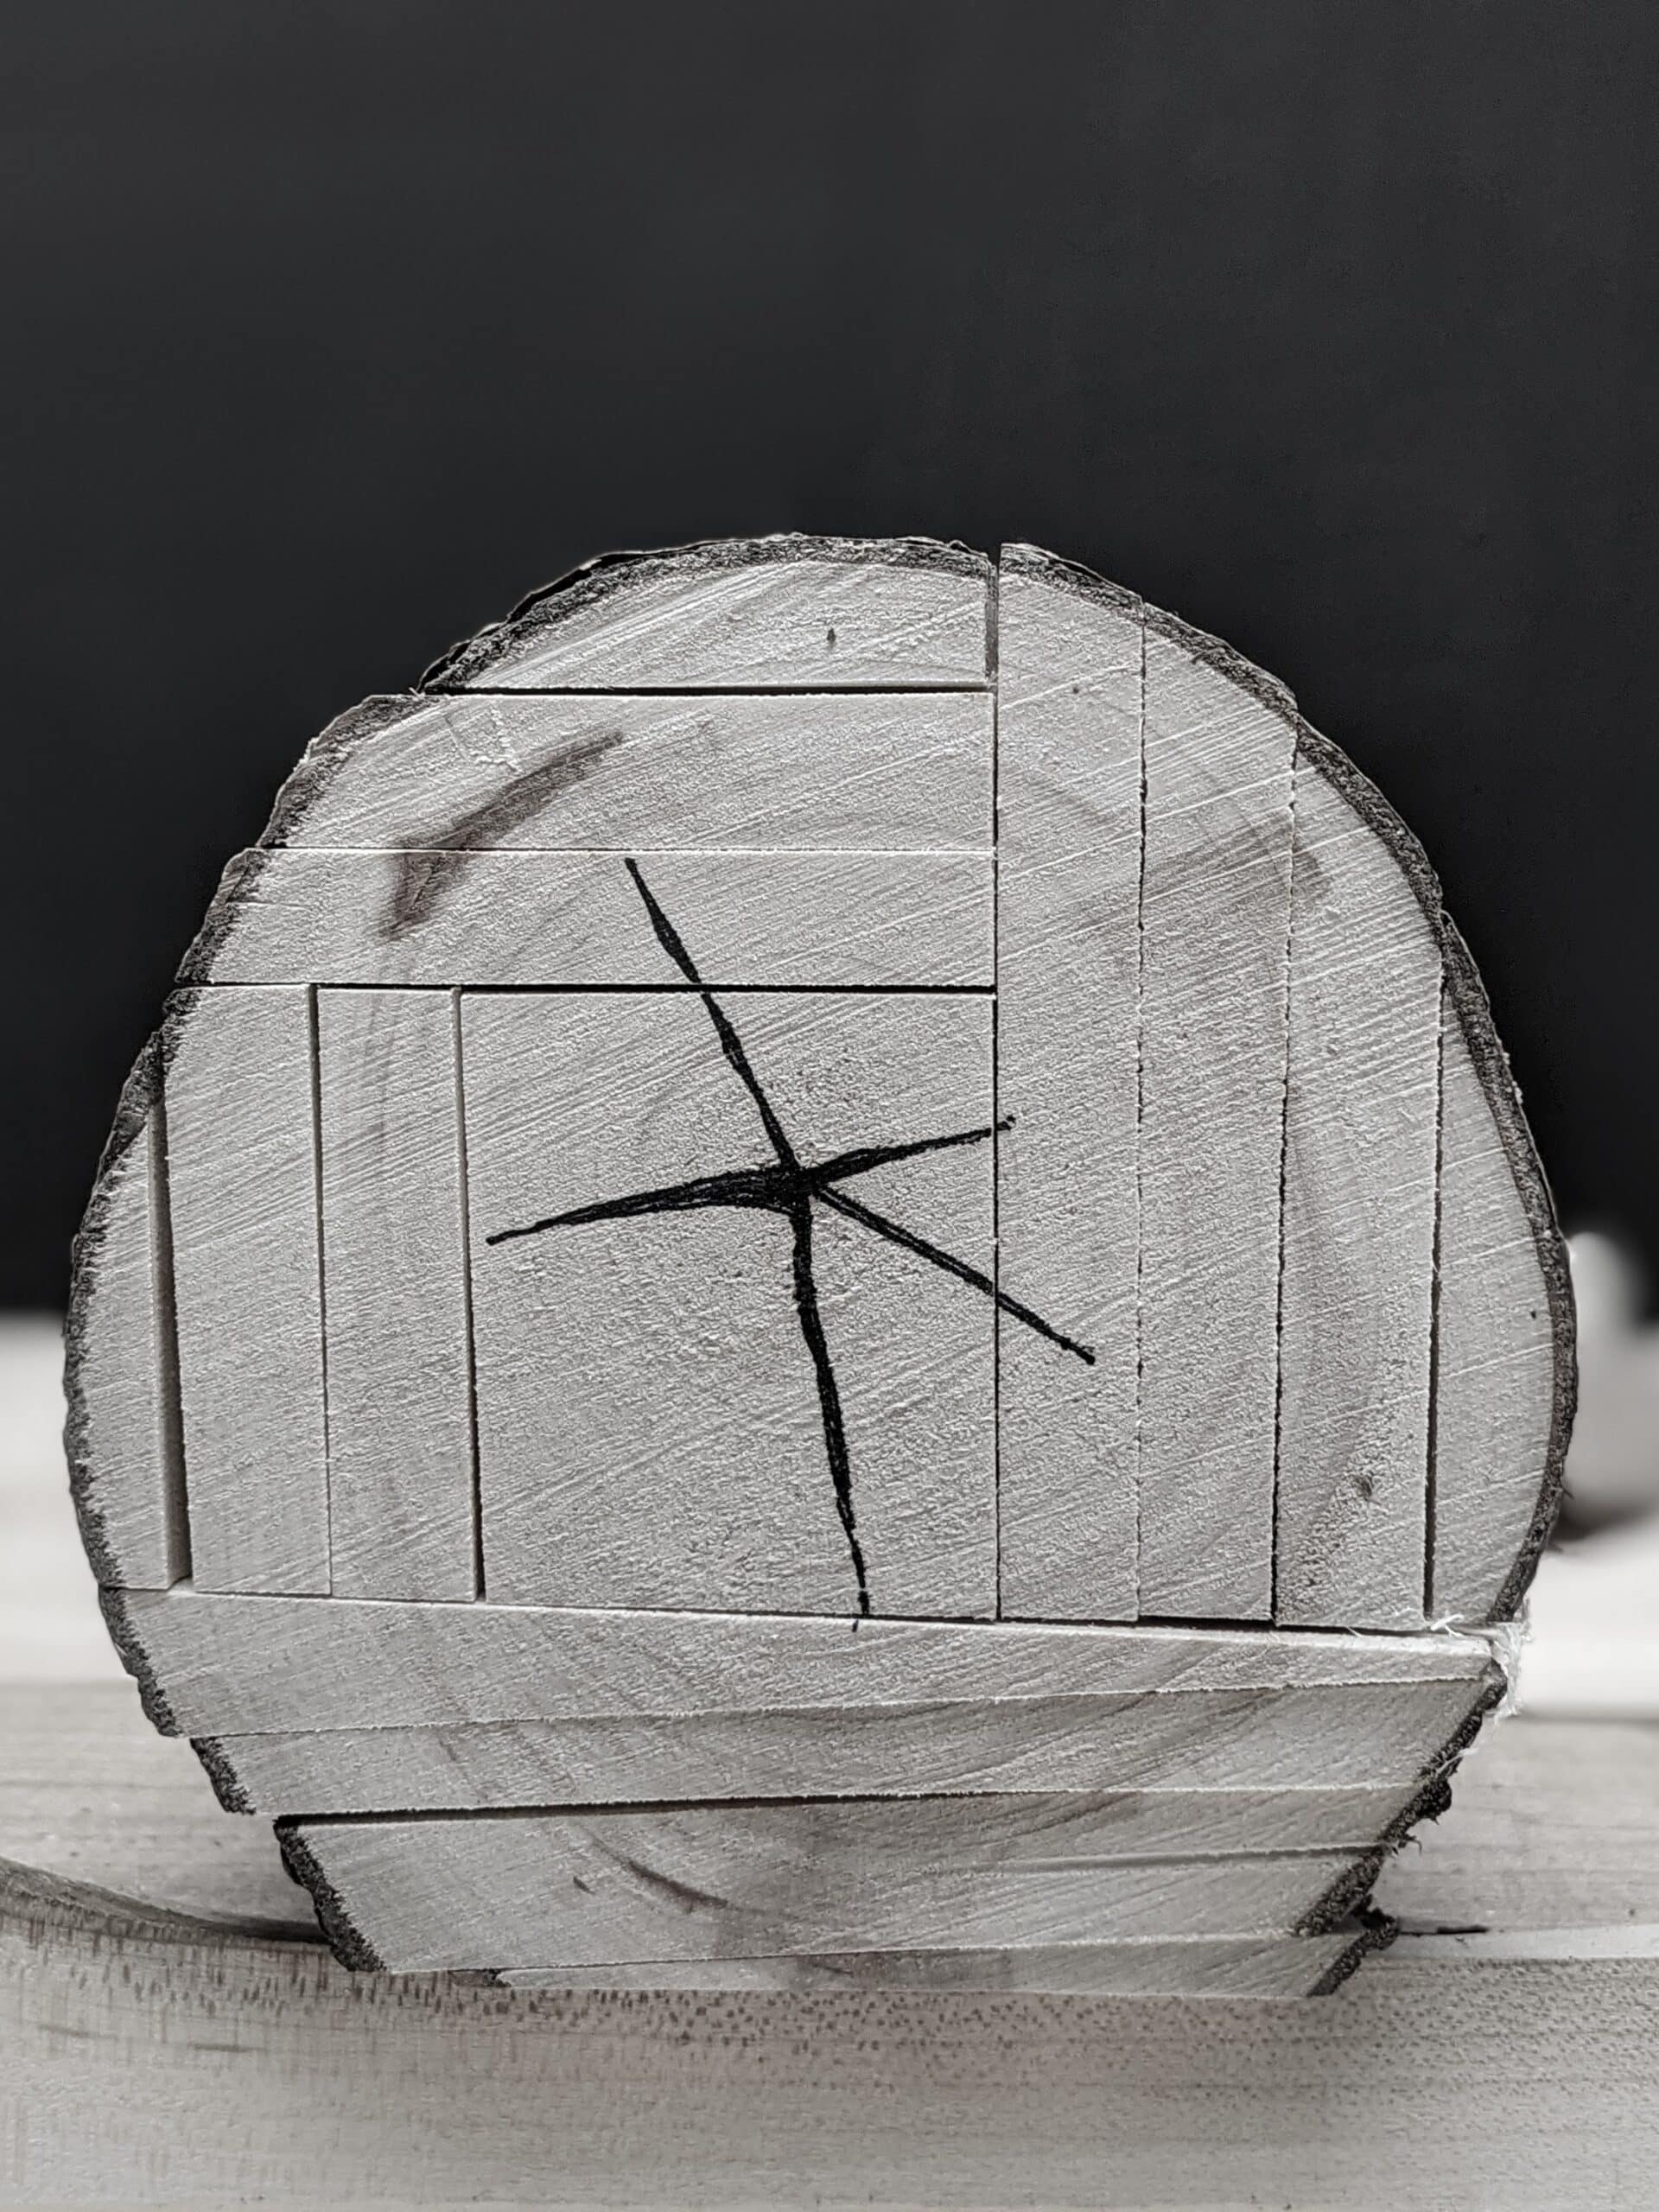
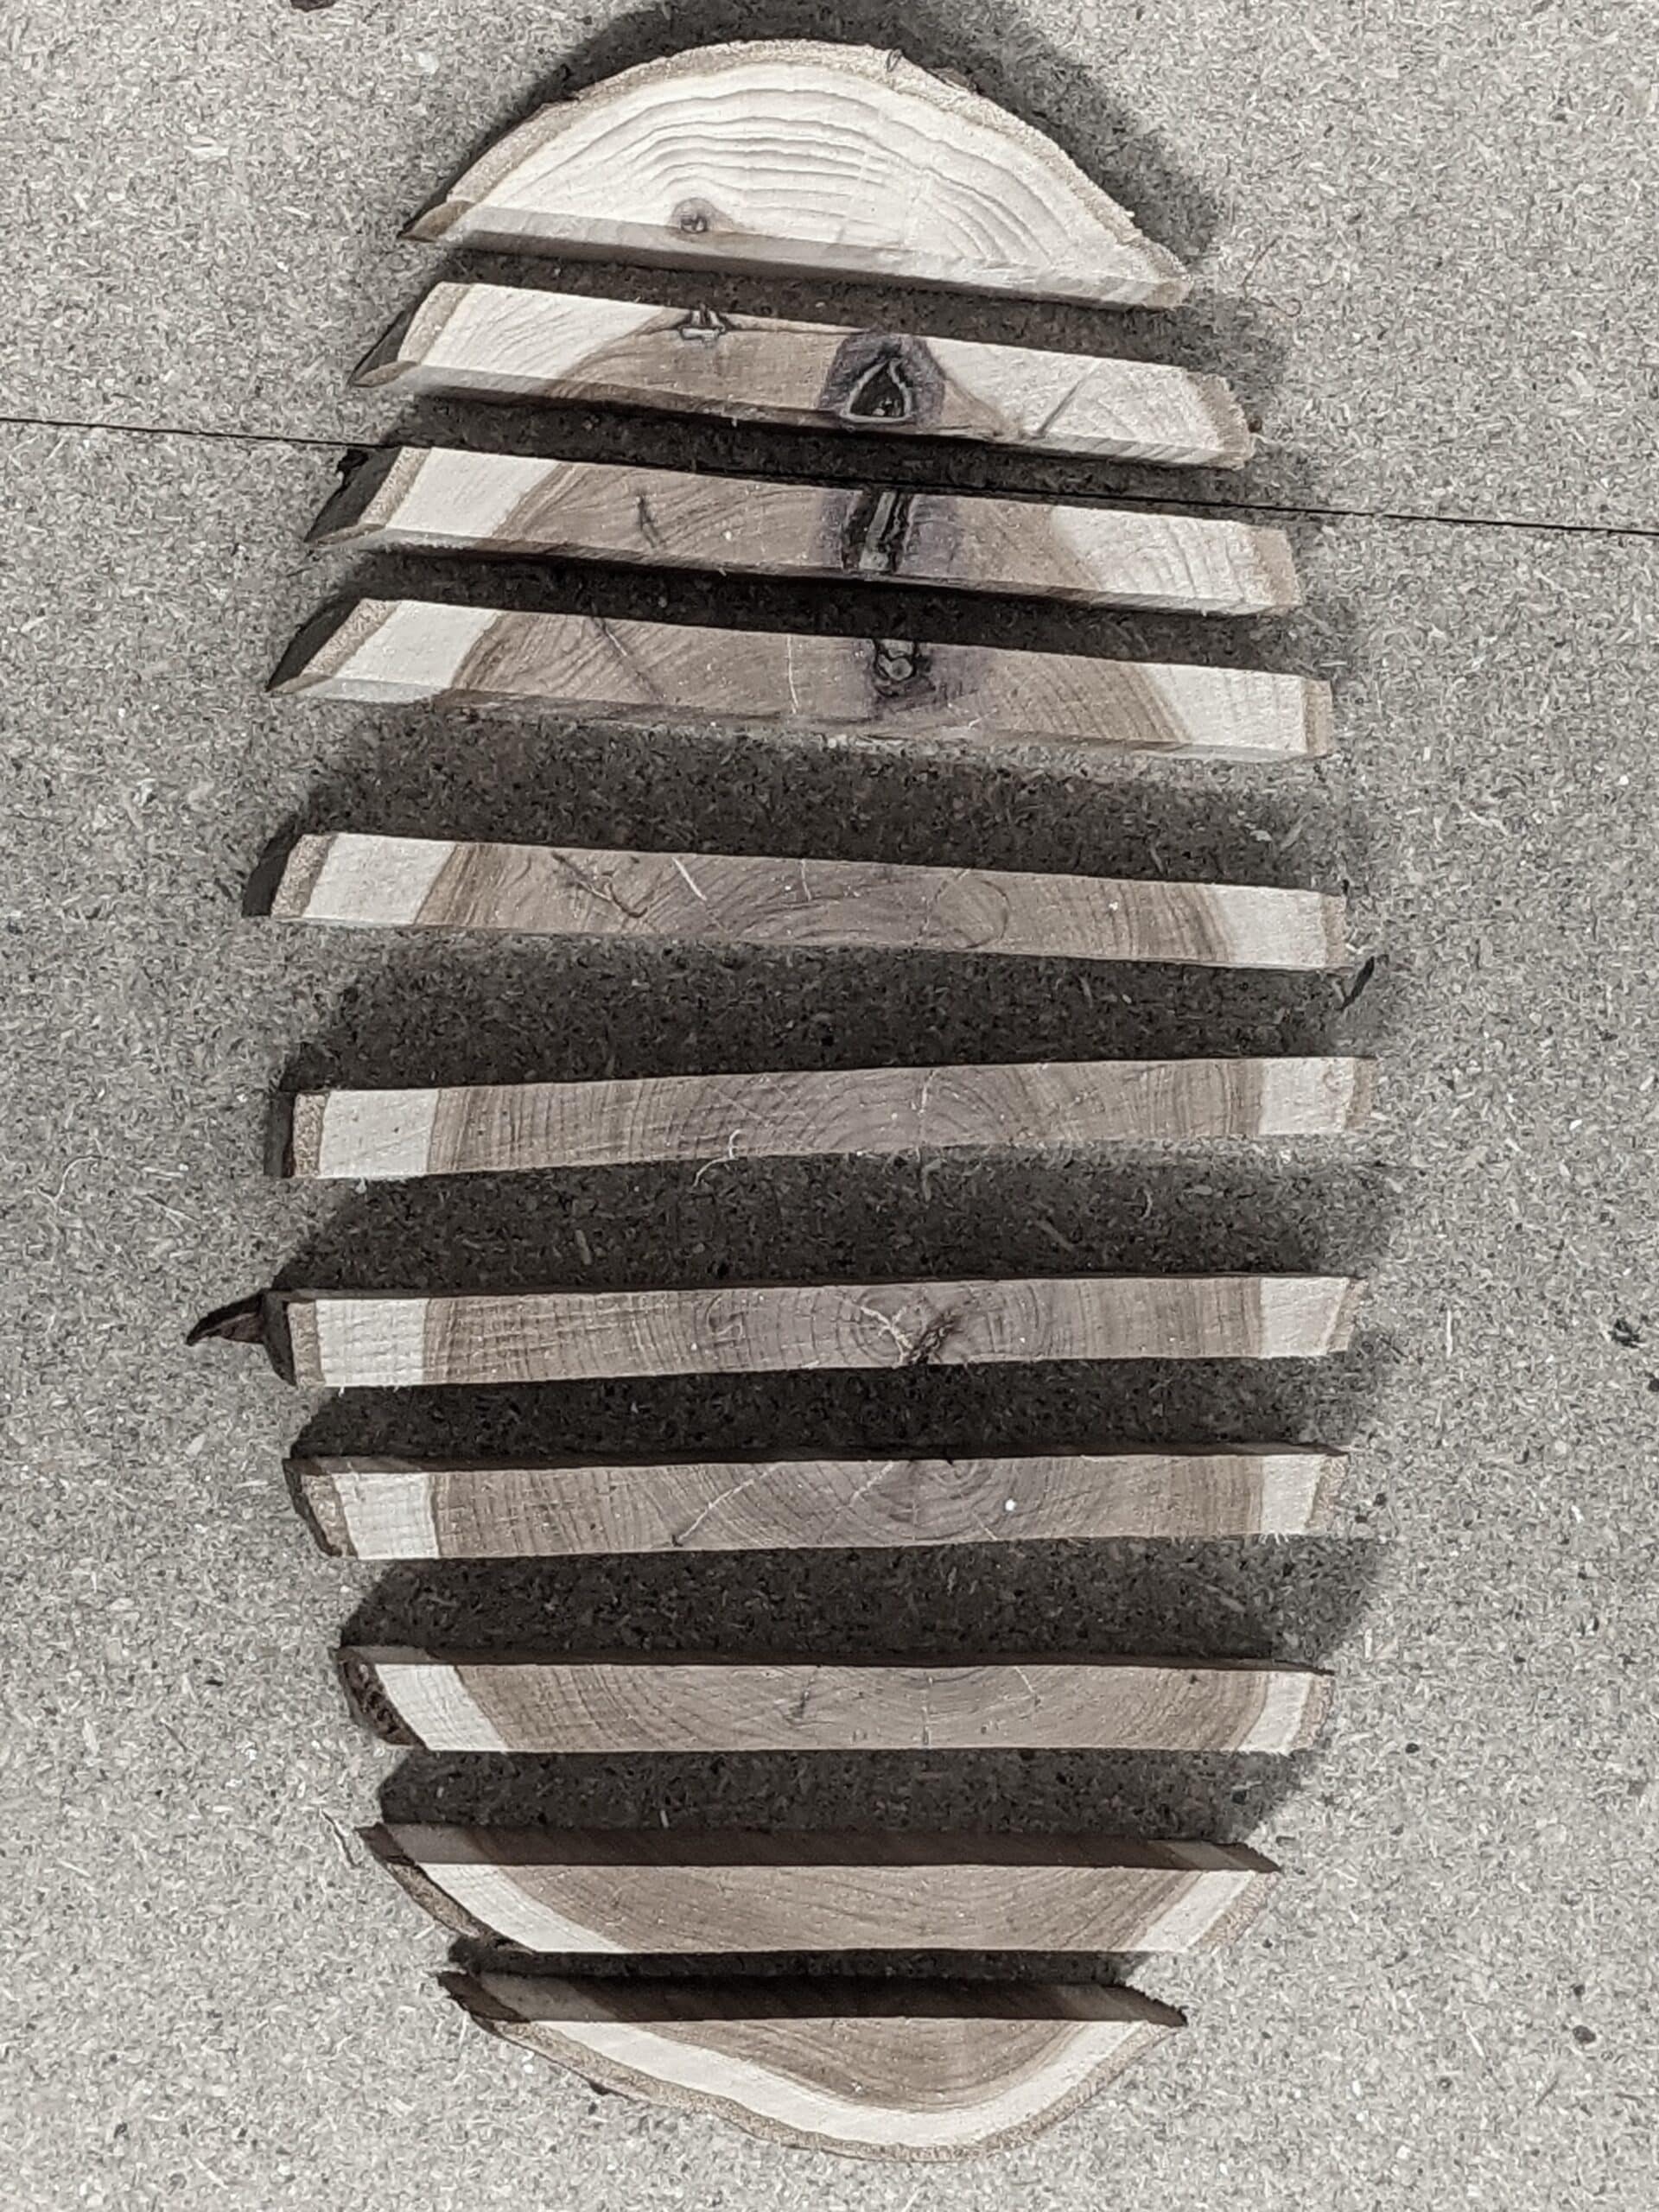
I still can’t resist walking over to a pile of logs and looking at the splits in the round ends of felled logs and lopped-off limbs.

I like taking a magnifying shot with my cell phone to see things I cannot see with my naked eye, splits, moulds, fungi, insects and larvae. It is all too easy to rely on the book or the blogger and especially the sensationalist tuber that can mesmerise you into thinking you can learn more from an expert than you can with experiential learning in the field. We are so used to being informed by abstract methods these days that we can read a book about how a potter throws a pot on the wheel and we think then that we understand pottery throwing completely when we only see with our eyes but never fathom the depths of what really took place. It is no different with wood. It is very different to learn about something rather than experience the in-forming by doing it. The former should lead to the latter; it’s this that puts real flesh on the bones.
My experiments are generated by my inquiring mind. I see logs and limbs piled everywhere I go and most of them are destined for pulverising or burning. As my boys grew, they came with me and we made drawings and notes to help them to look at what they saw. Remember, I have said it in the past, “If you haven’t drawn it you haven’t seen it!” Drawing and writing helps you to enquire more as you look at what you see.
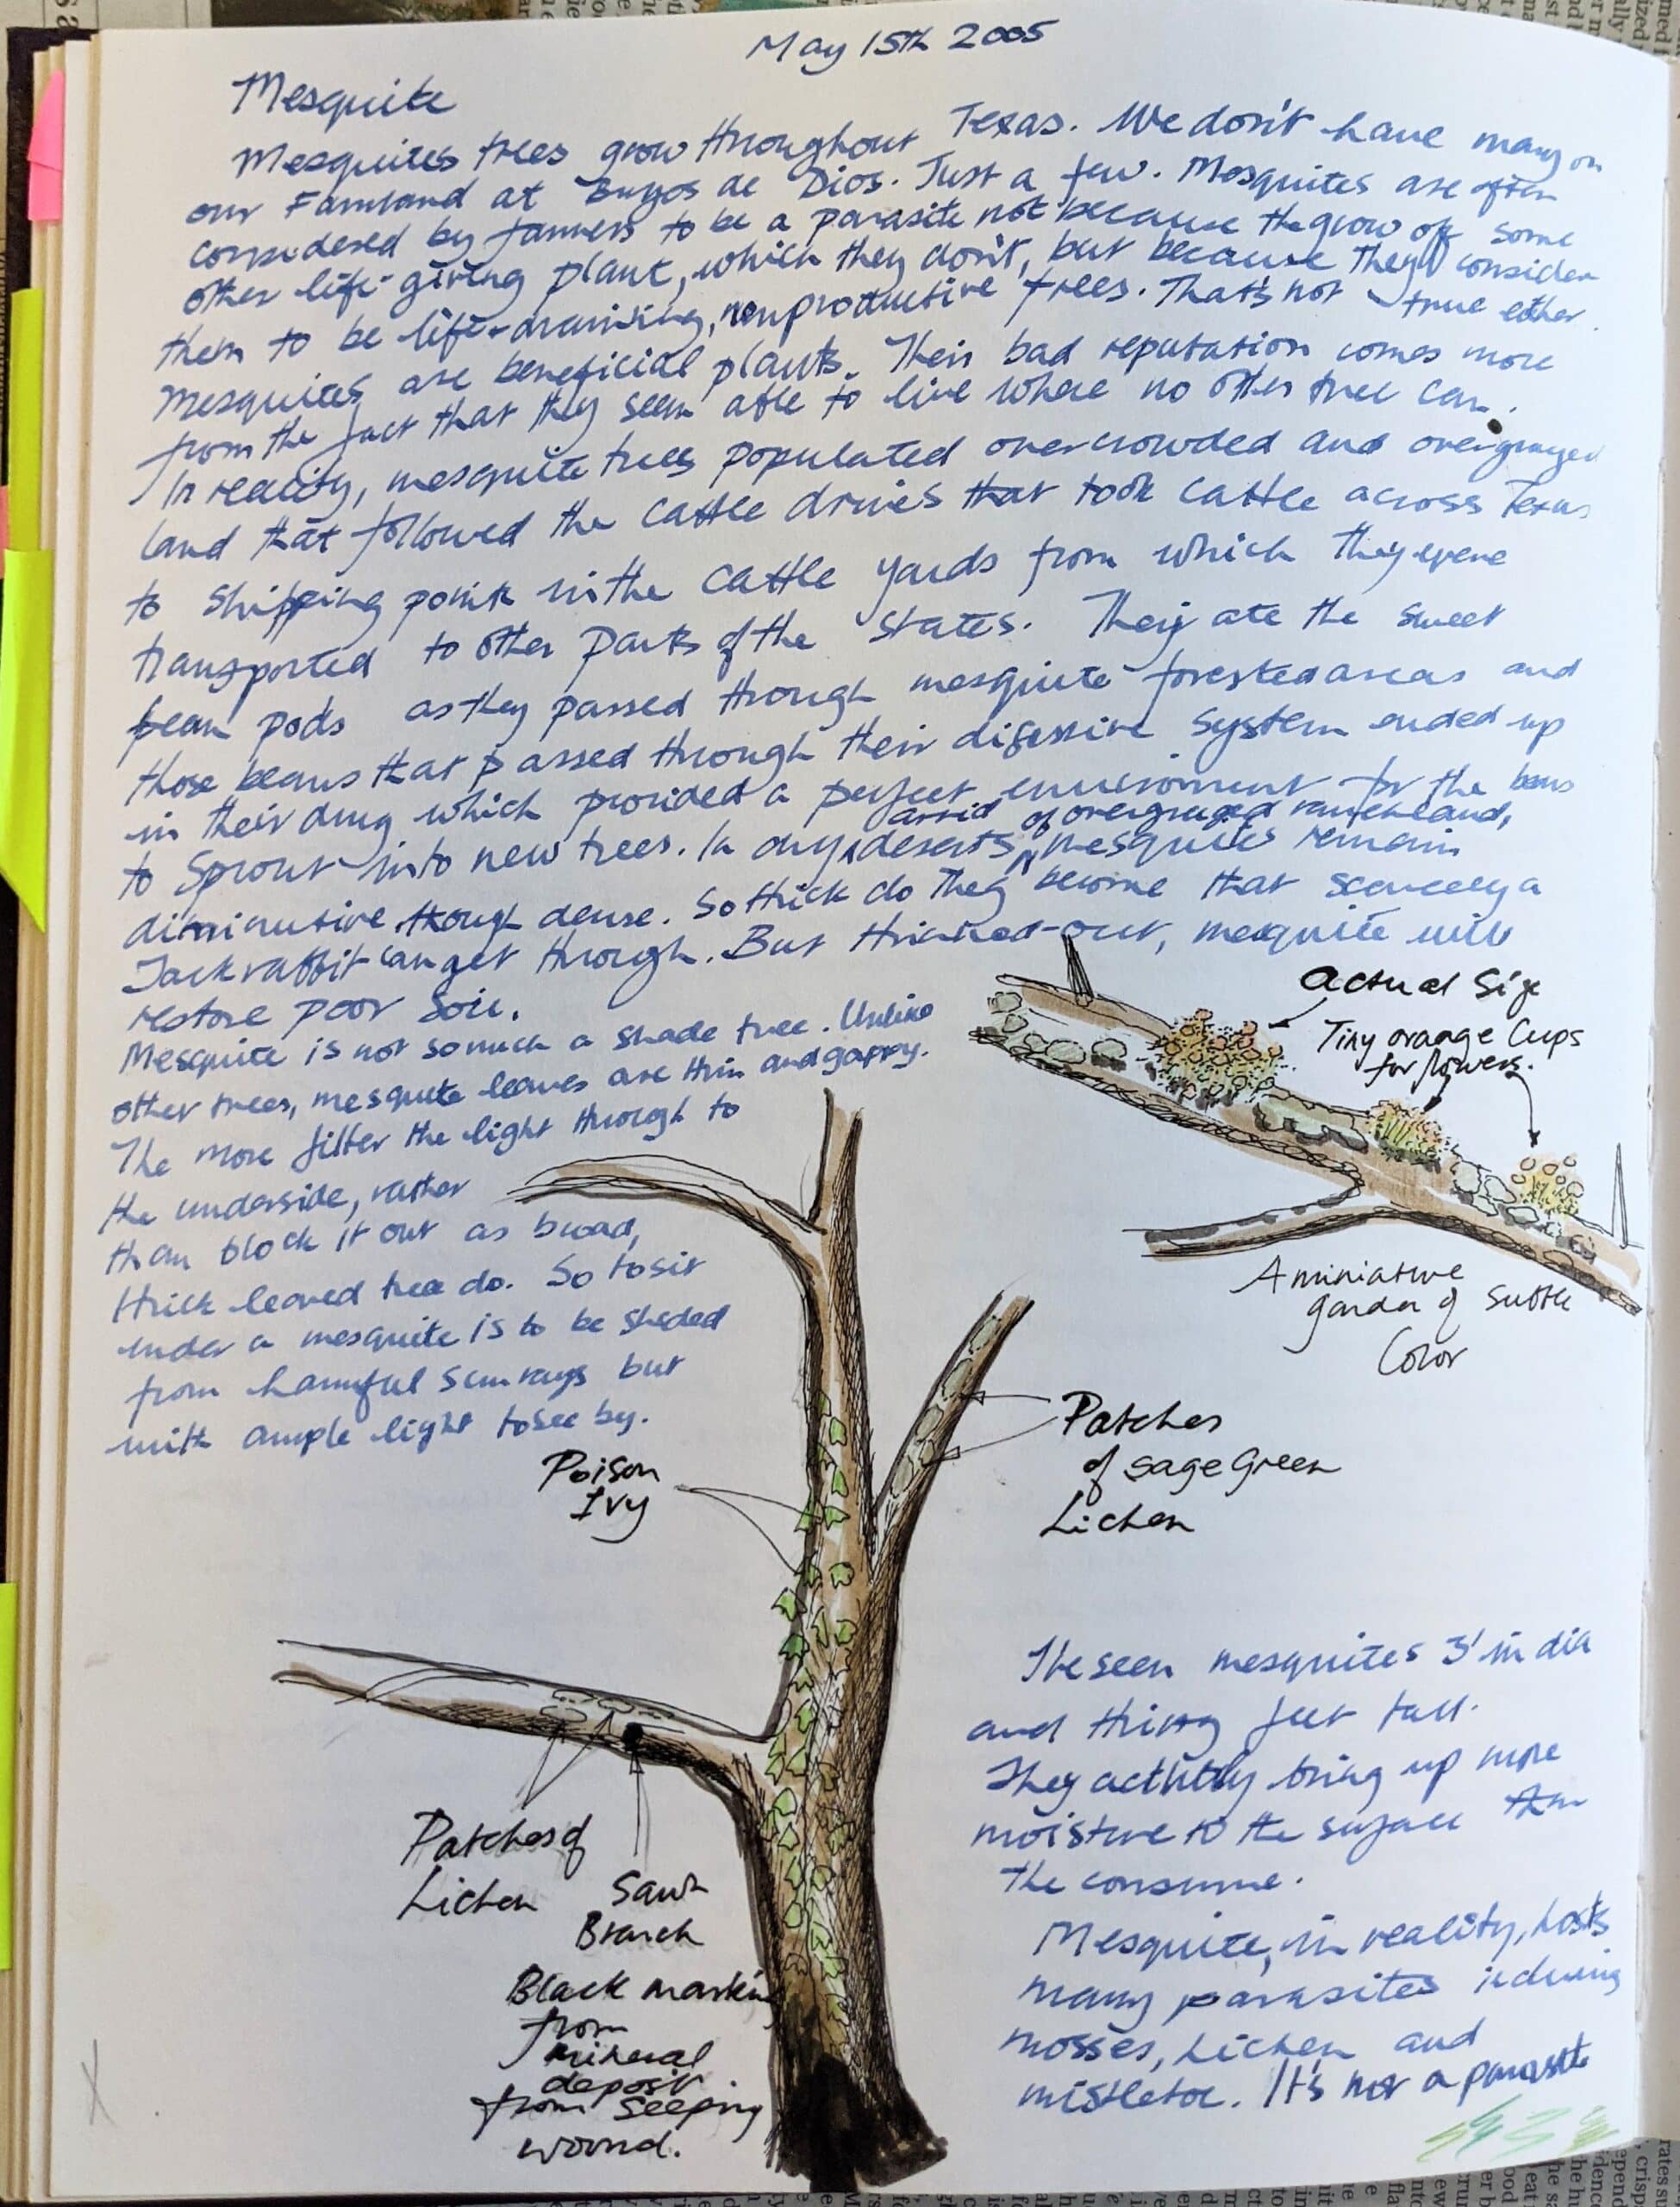
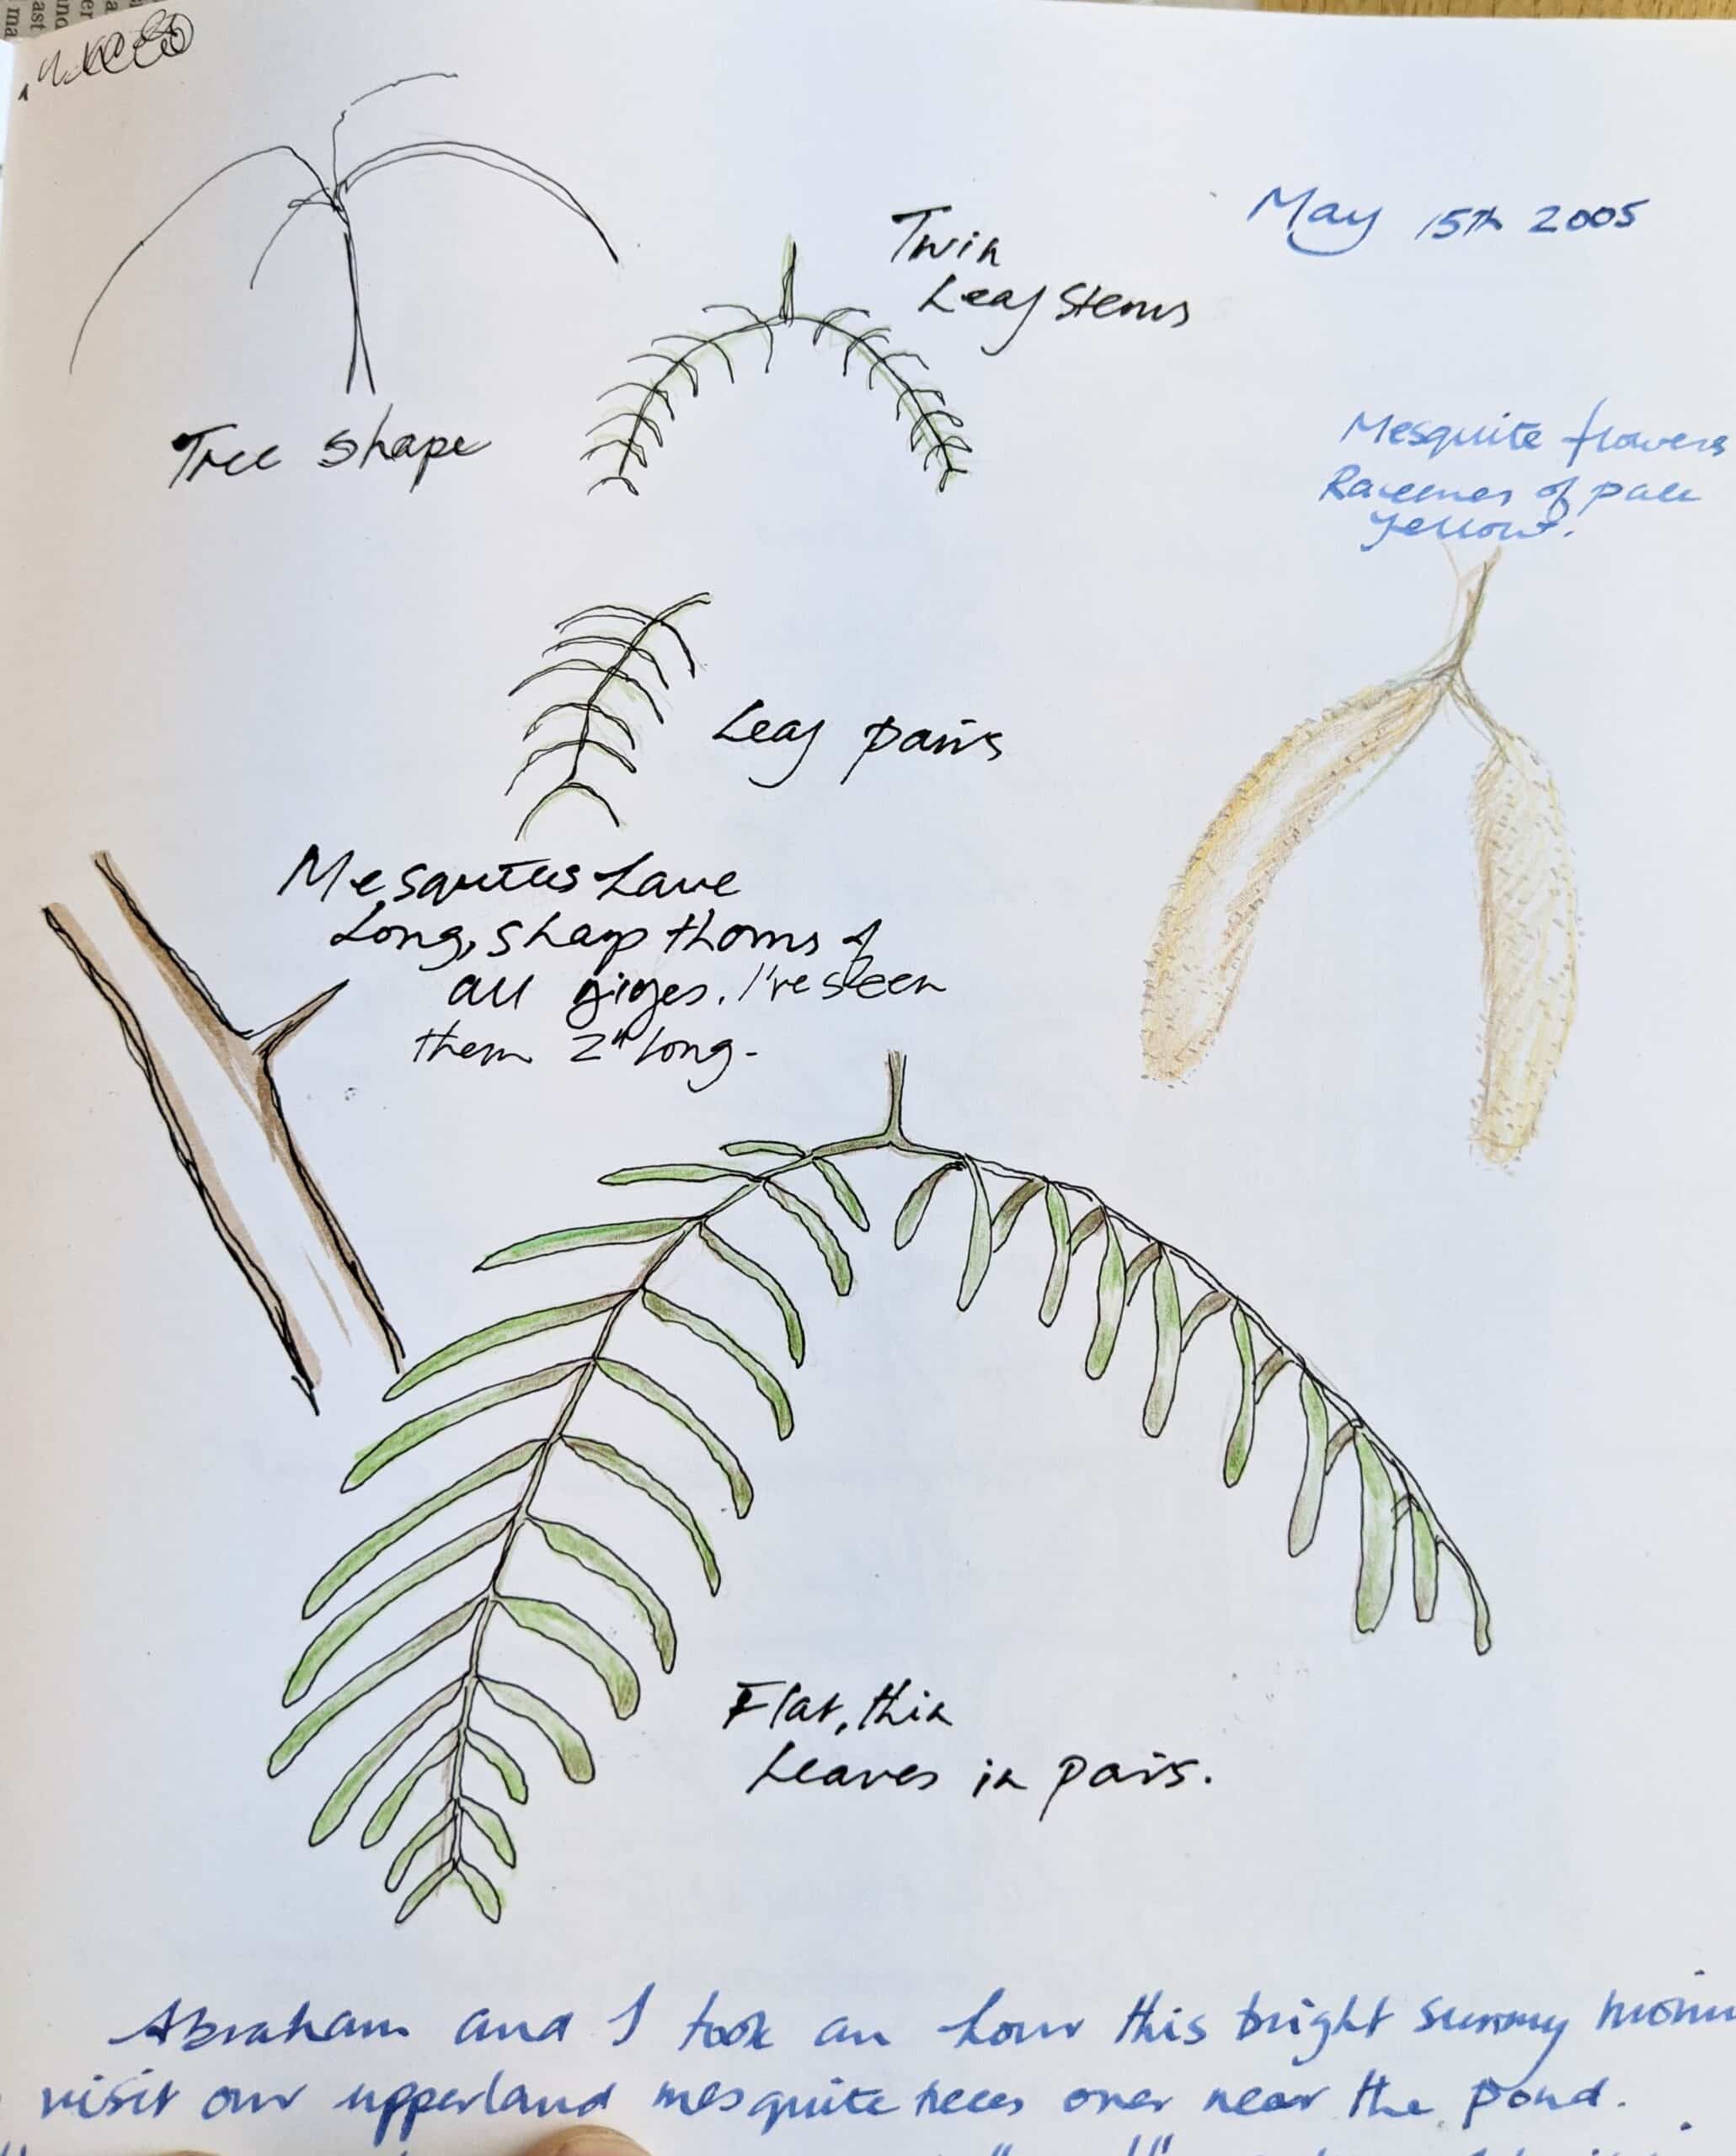
Do as I did and take walks with your kids, but, while jumping and dodging in the trees is part of the fun, so too is sketching with an inquiring mind. I take my granddaughter of two and a half years old to the woods and the log piles and we do dodge and skip on the way but then we stop to look at fungi and toadstools.

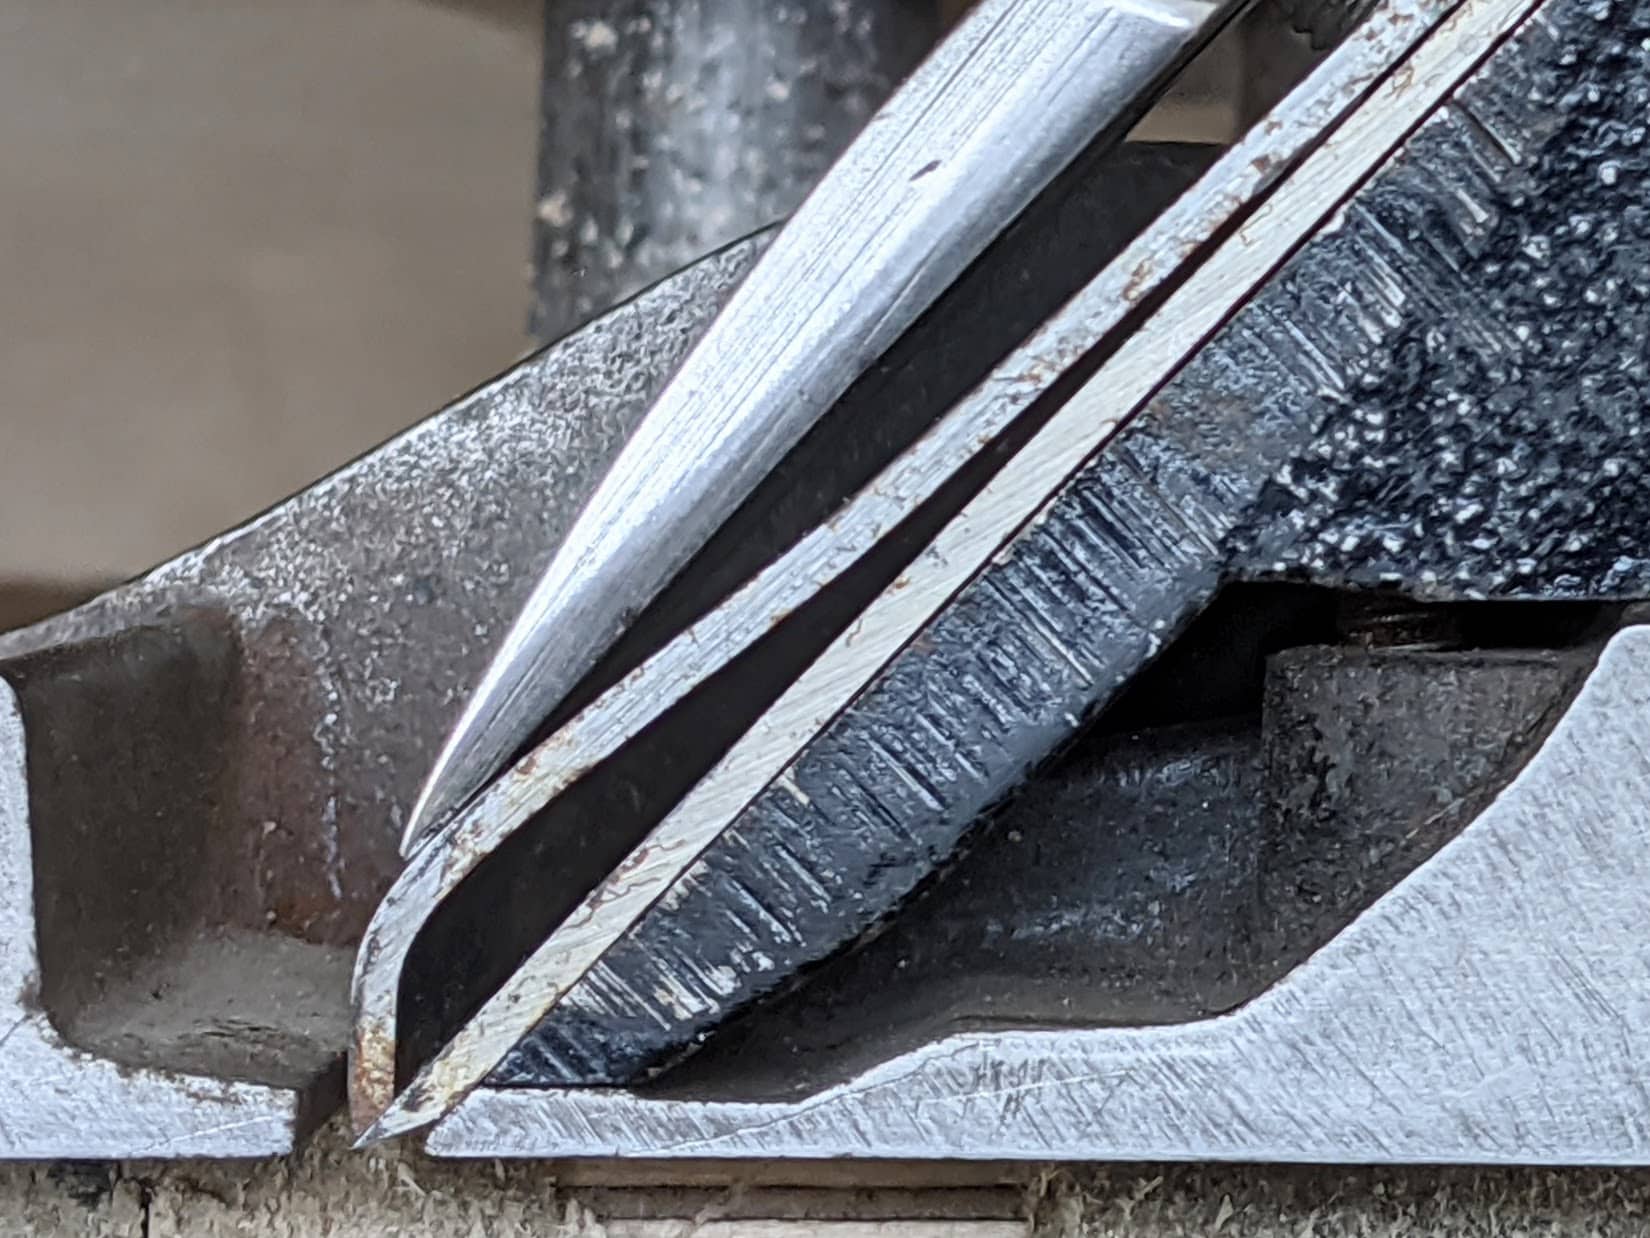
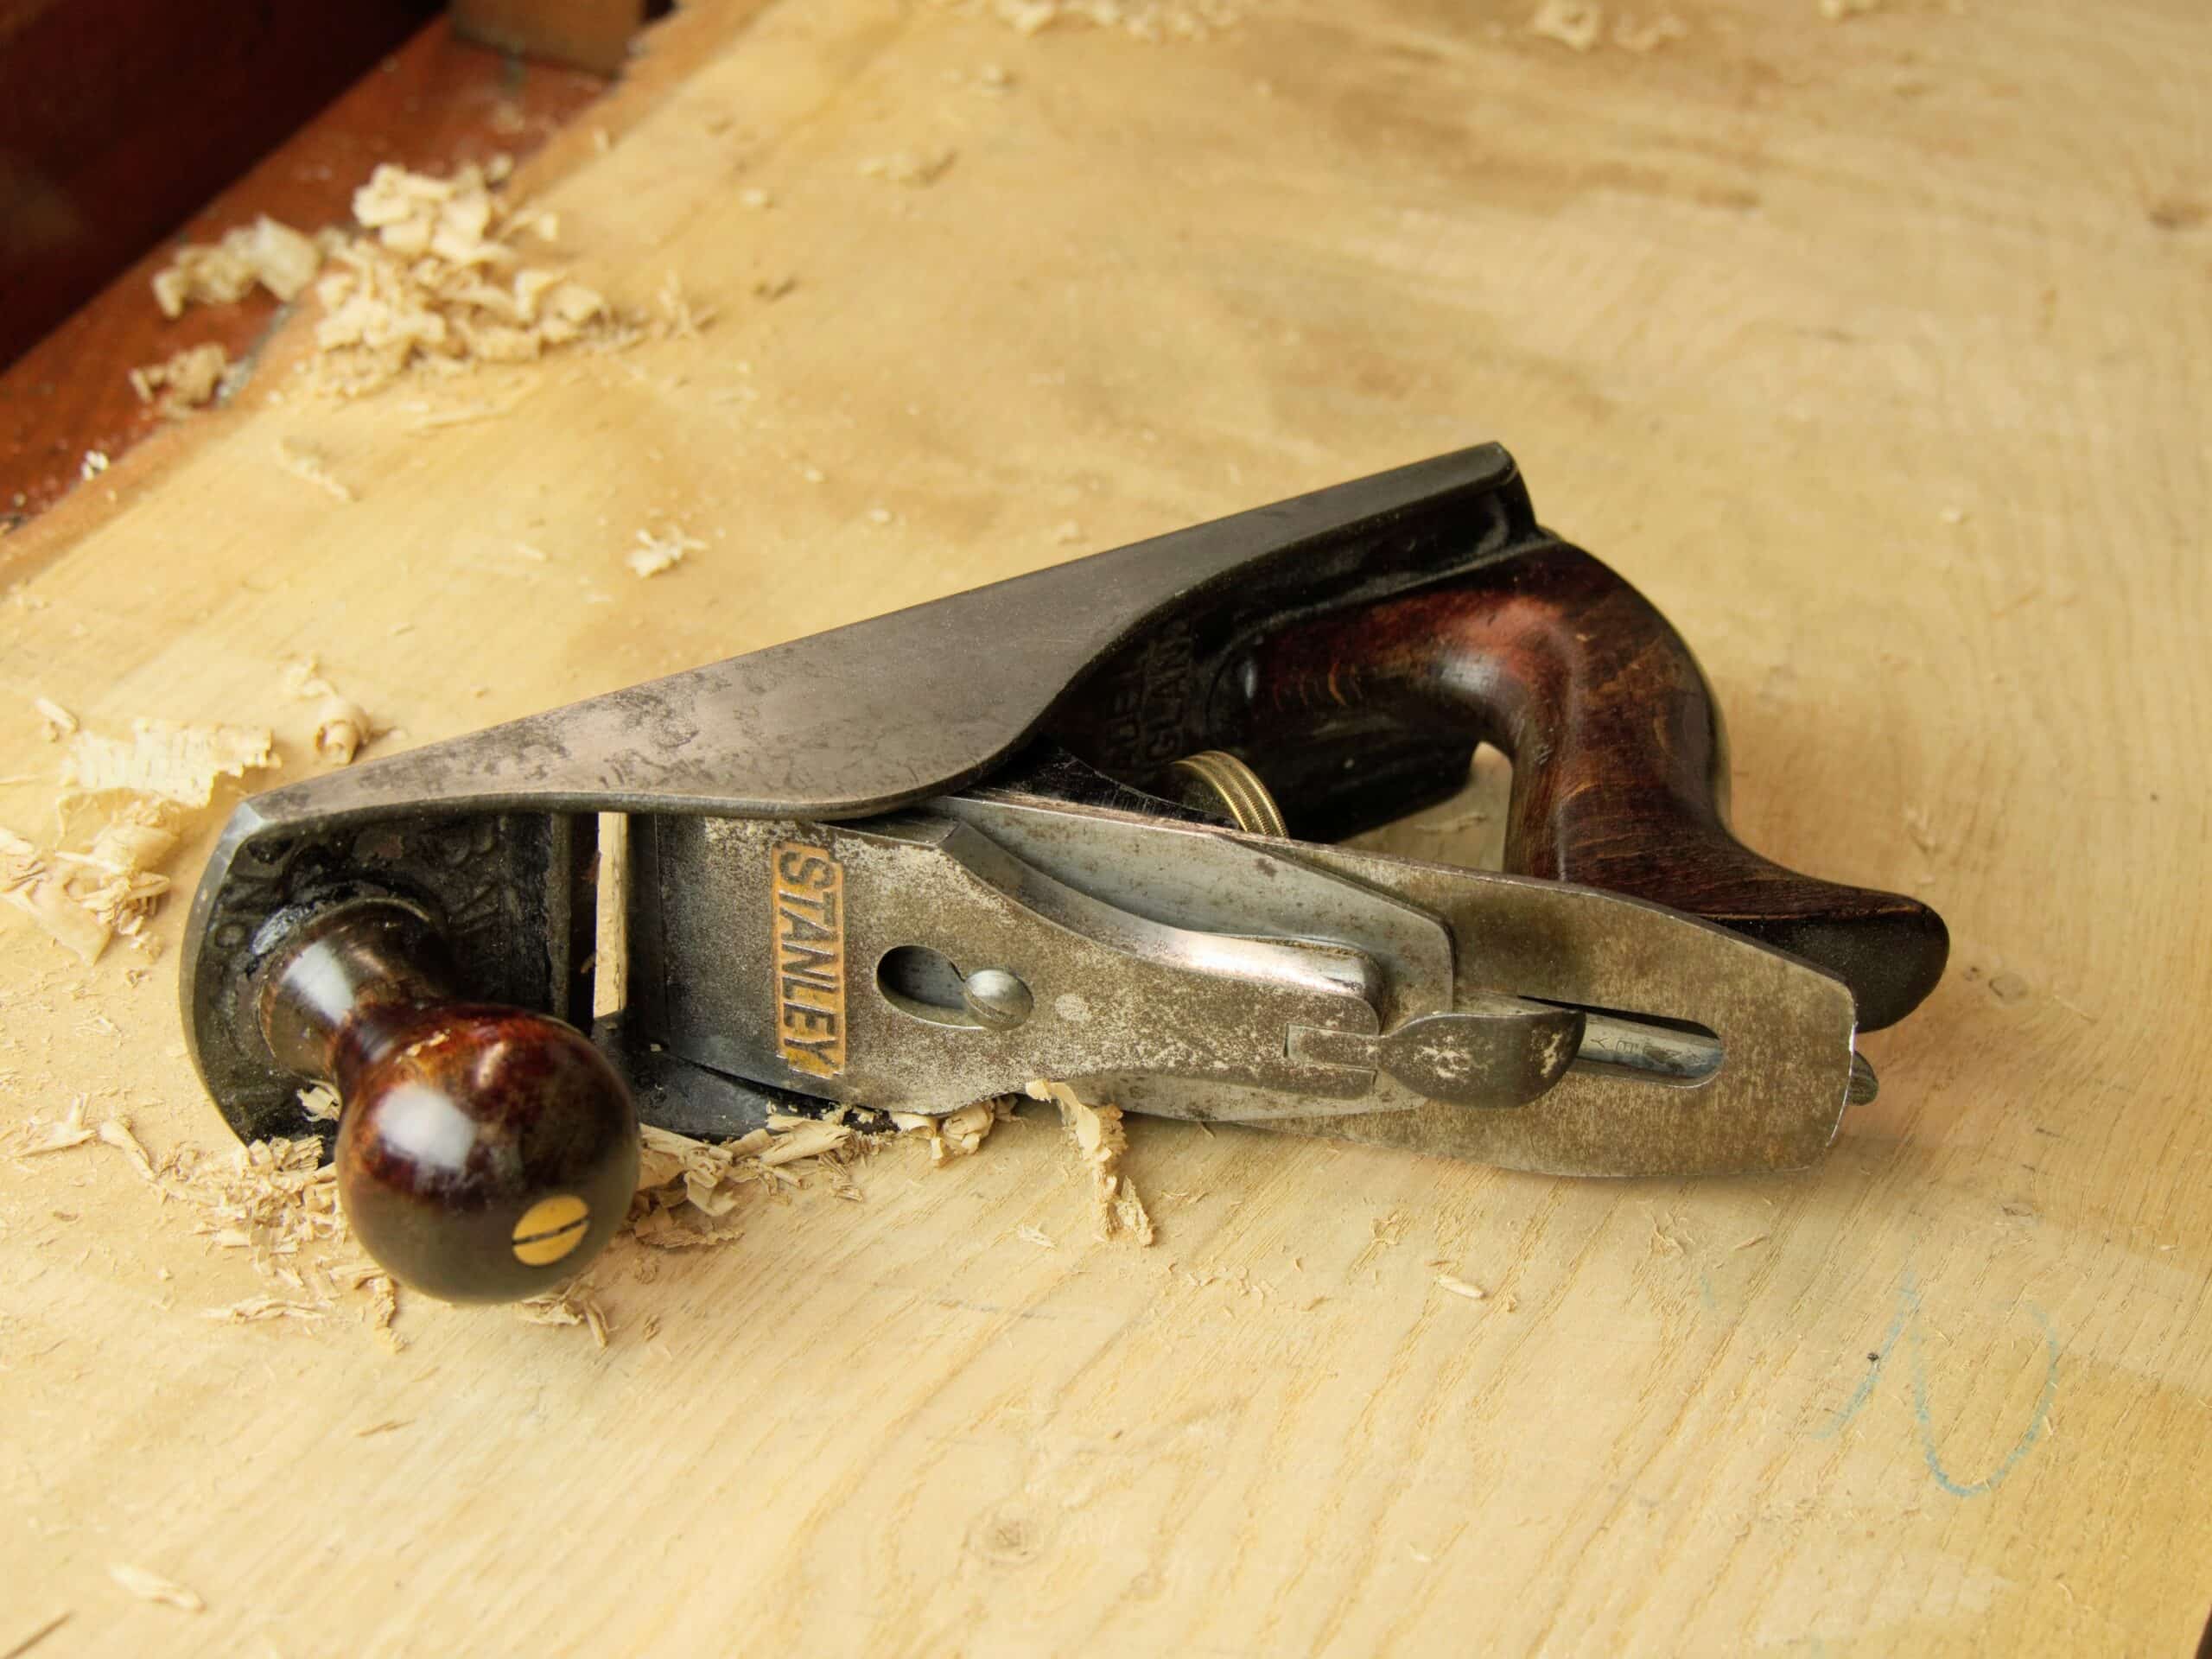
I wrote my books on woodworking and tools and developed my websites as primers to preface getting oil, sap and sawdust on the pages in the basements and garages of woodworkers around the world. Though it’s helpful to have reference materials, it can be all too easy to rely only on secondhand knowledge and not to additionally find out firsthand for yourself. When I cut the side off of a #4 Stanley plane with a hacksaw, I suspected that no one had done this before. That’s of no consequence whether they did or not because I didn’t copy the idea anyway.

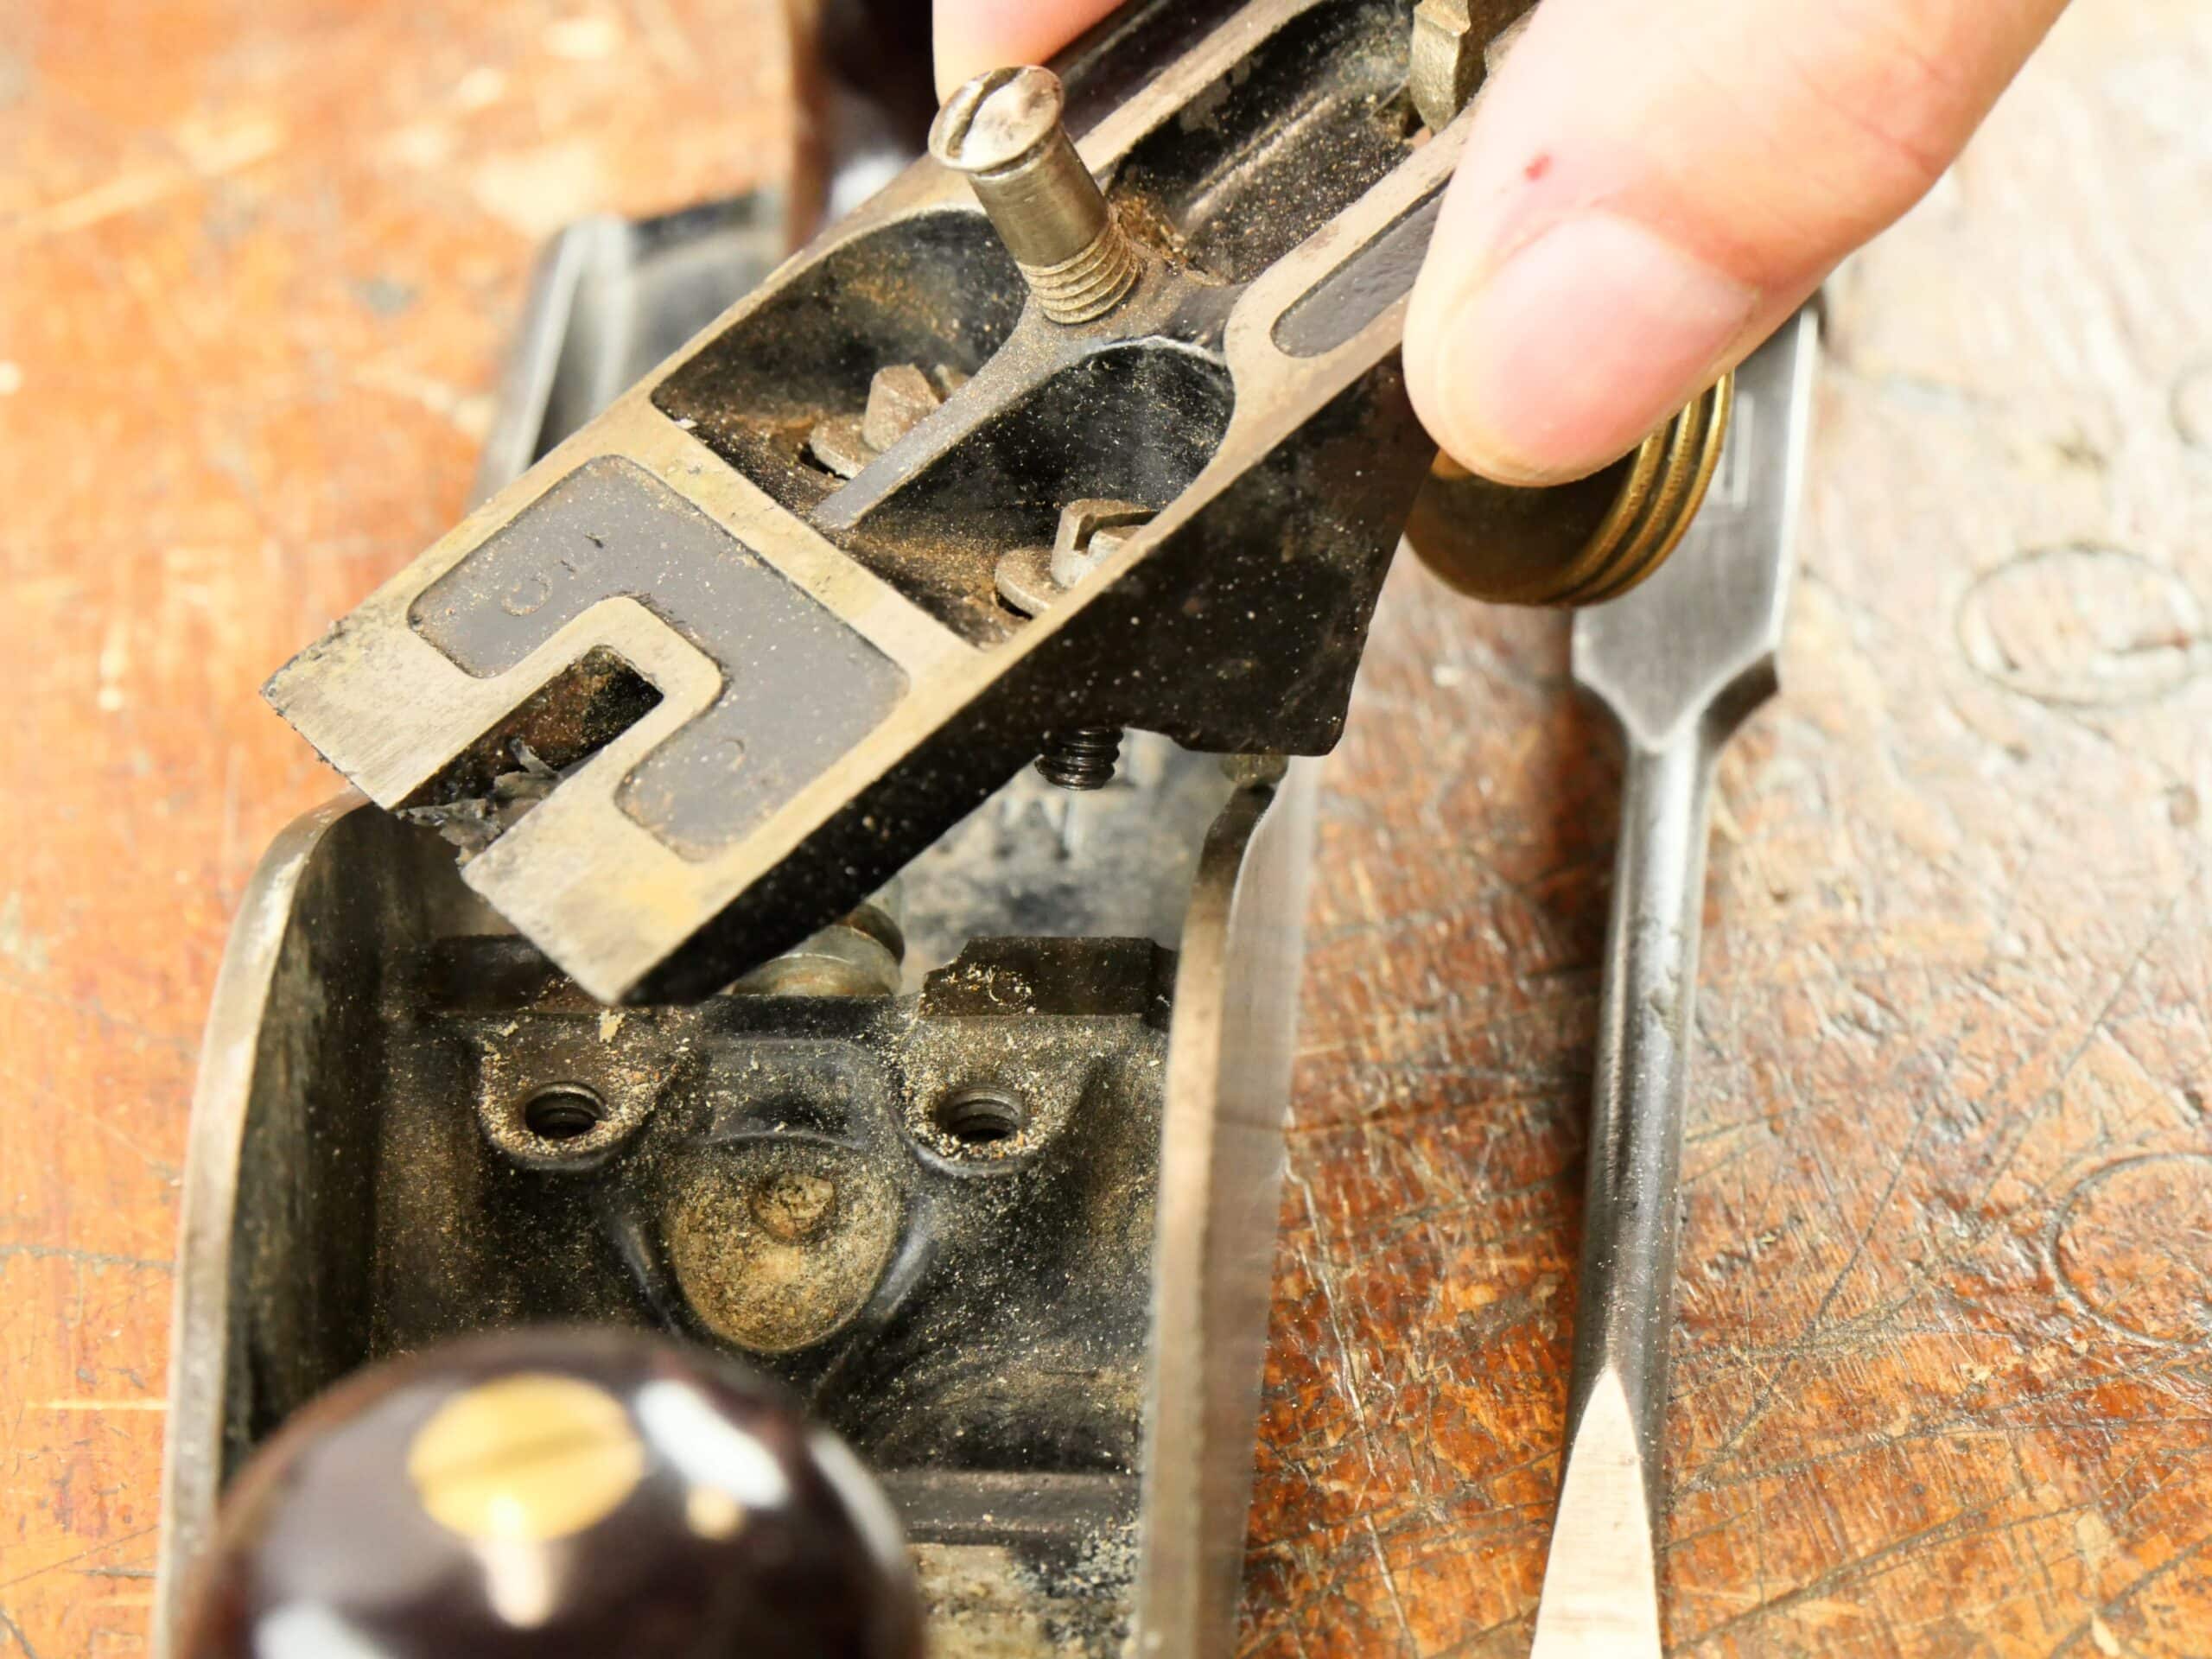
I just wanted to find out what was actually happening right there near to the throat where the direct action of the plane cut was taking place minute by minute. Just what was it that was governing the plane cutting iron in relation to the sole, and then to the same with the cap iron in relation to the lever cap or the combined effort expressed at the focal point of the cutting iron assembly in action? These were pinch-points planned to pre-tension the cutting iron assembly by Leonard Bailey in his developing the Stanley-model bench planes. It was not that he invented the cutting iron assembly as a union between the cutting iron and cap iron, that came a century or two before, it was that he added leverage to these three components against one another with the common and united goal to create a physical tension that would then resist any and all pressure from any encounter with opposing grain as much as possible. The cutting iron is supported only in part by the plane frog: the main body of the frog undergirds the whole cutting iron assembly to maintain consistency of angle presentation and to enable the assembly to be locked in place by the lever cap.
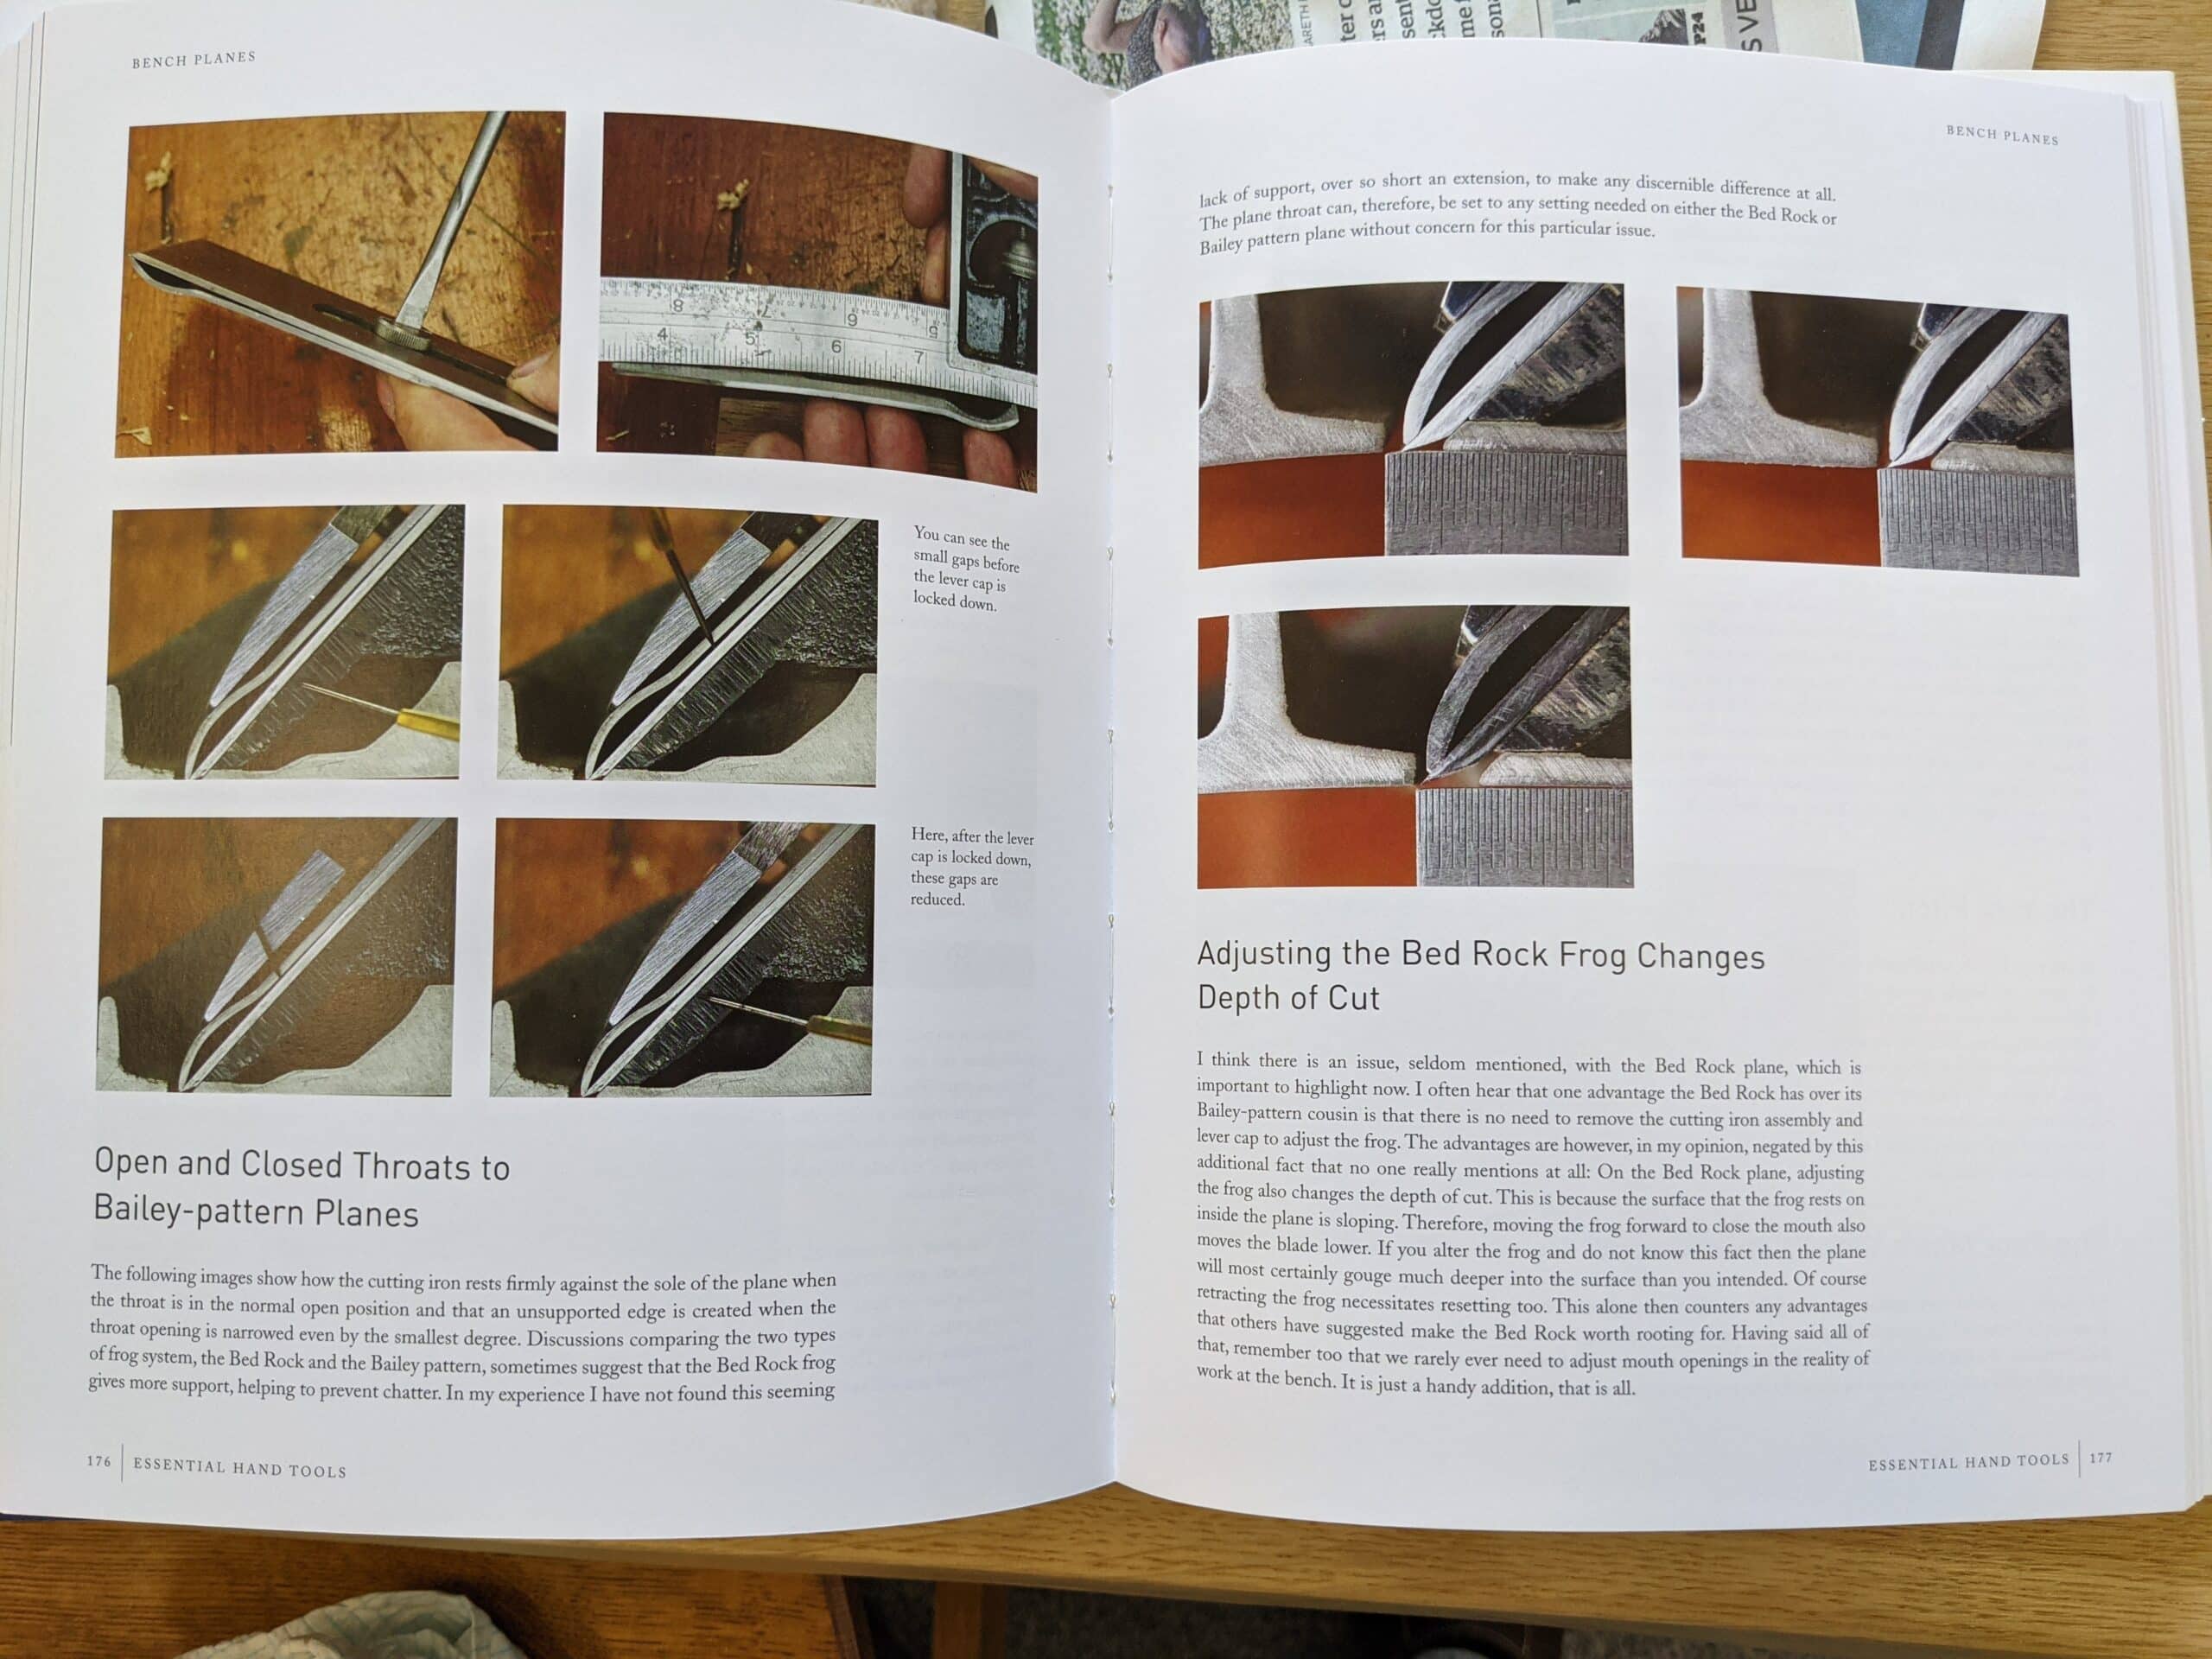
What is also very important to know and is never mentioned anywhere is the mostly ignored reality that the fore-edge of the rear sole itself, in most 95% of cases of plane use, connects to the cutting iron assembly directly behind the bevel itself. So the back of the cutting iron has no margin for flex and only does this change when the user closes up the mouth of the plane by moving the frog forward to narrow the mouth opening. If, and this is so rare no one really ever experiences it in truth, the plane iron “chatters”, it is when the frog is set forward away from the leading edge of the rear aspect of the sole; a position rarely used by crafting artisans, in my experience, but often written about from time to time for no apparent good reason. We also see that the cast body of the plane, despite the outer flanges designed to resist such bending, bends under the pressure of the lever cap when the lever is forced to its locked-down position. This shows how much effort is exerted by leverage in the lever cap. Though the bend is only small, and probably not readily discernible, it is there and it can create enough of a hollow in the sole to severely impair the sole of the plane from allowing a straight outcome on the wood. Beyond that, the cap iron beneath the lever cap at the very foredge of the whole cutting iron assembly is tensioned by the same single lock-down action. We then see that this intentional tensioning ‘tunes’ the plane’s future ability to make it perform in the hands of the competent artisan. This strategy lies mostly undetected and is generally unrecognised anywhere. And I don’t care altogether what scientists prove so much as what I know happens as a result of my actions and my actioning the elements that were designed a century and a half ago as I use the plane either through my working or through my then experimenting. Here you see that my experimenting led to much greater knowledge about the most common of woodworking planes but then too, and much more importantly, my understanding.
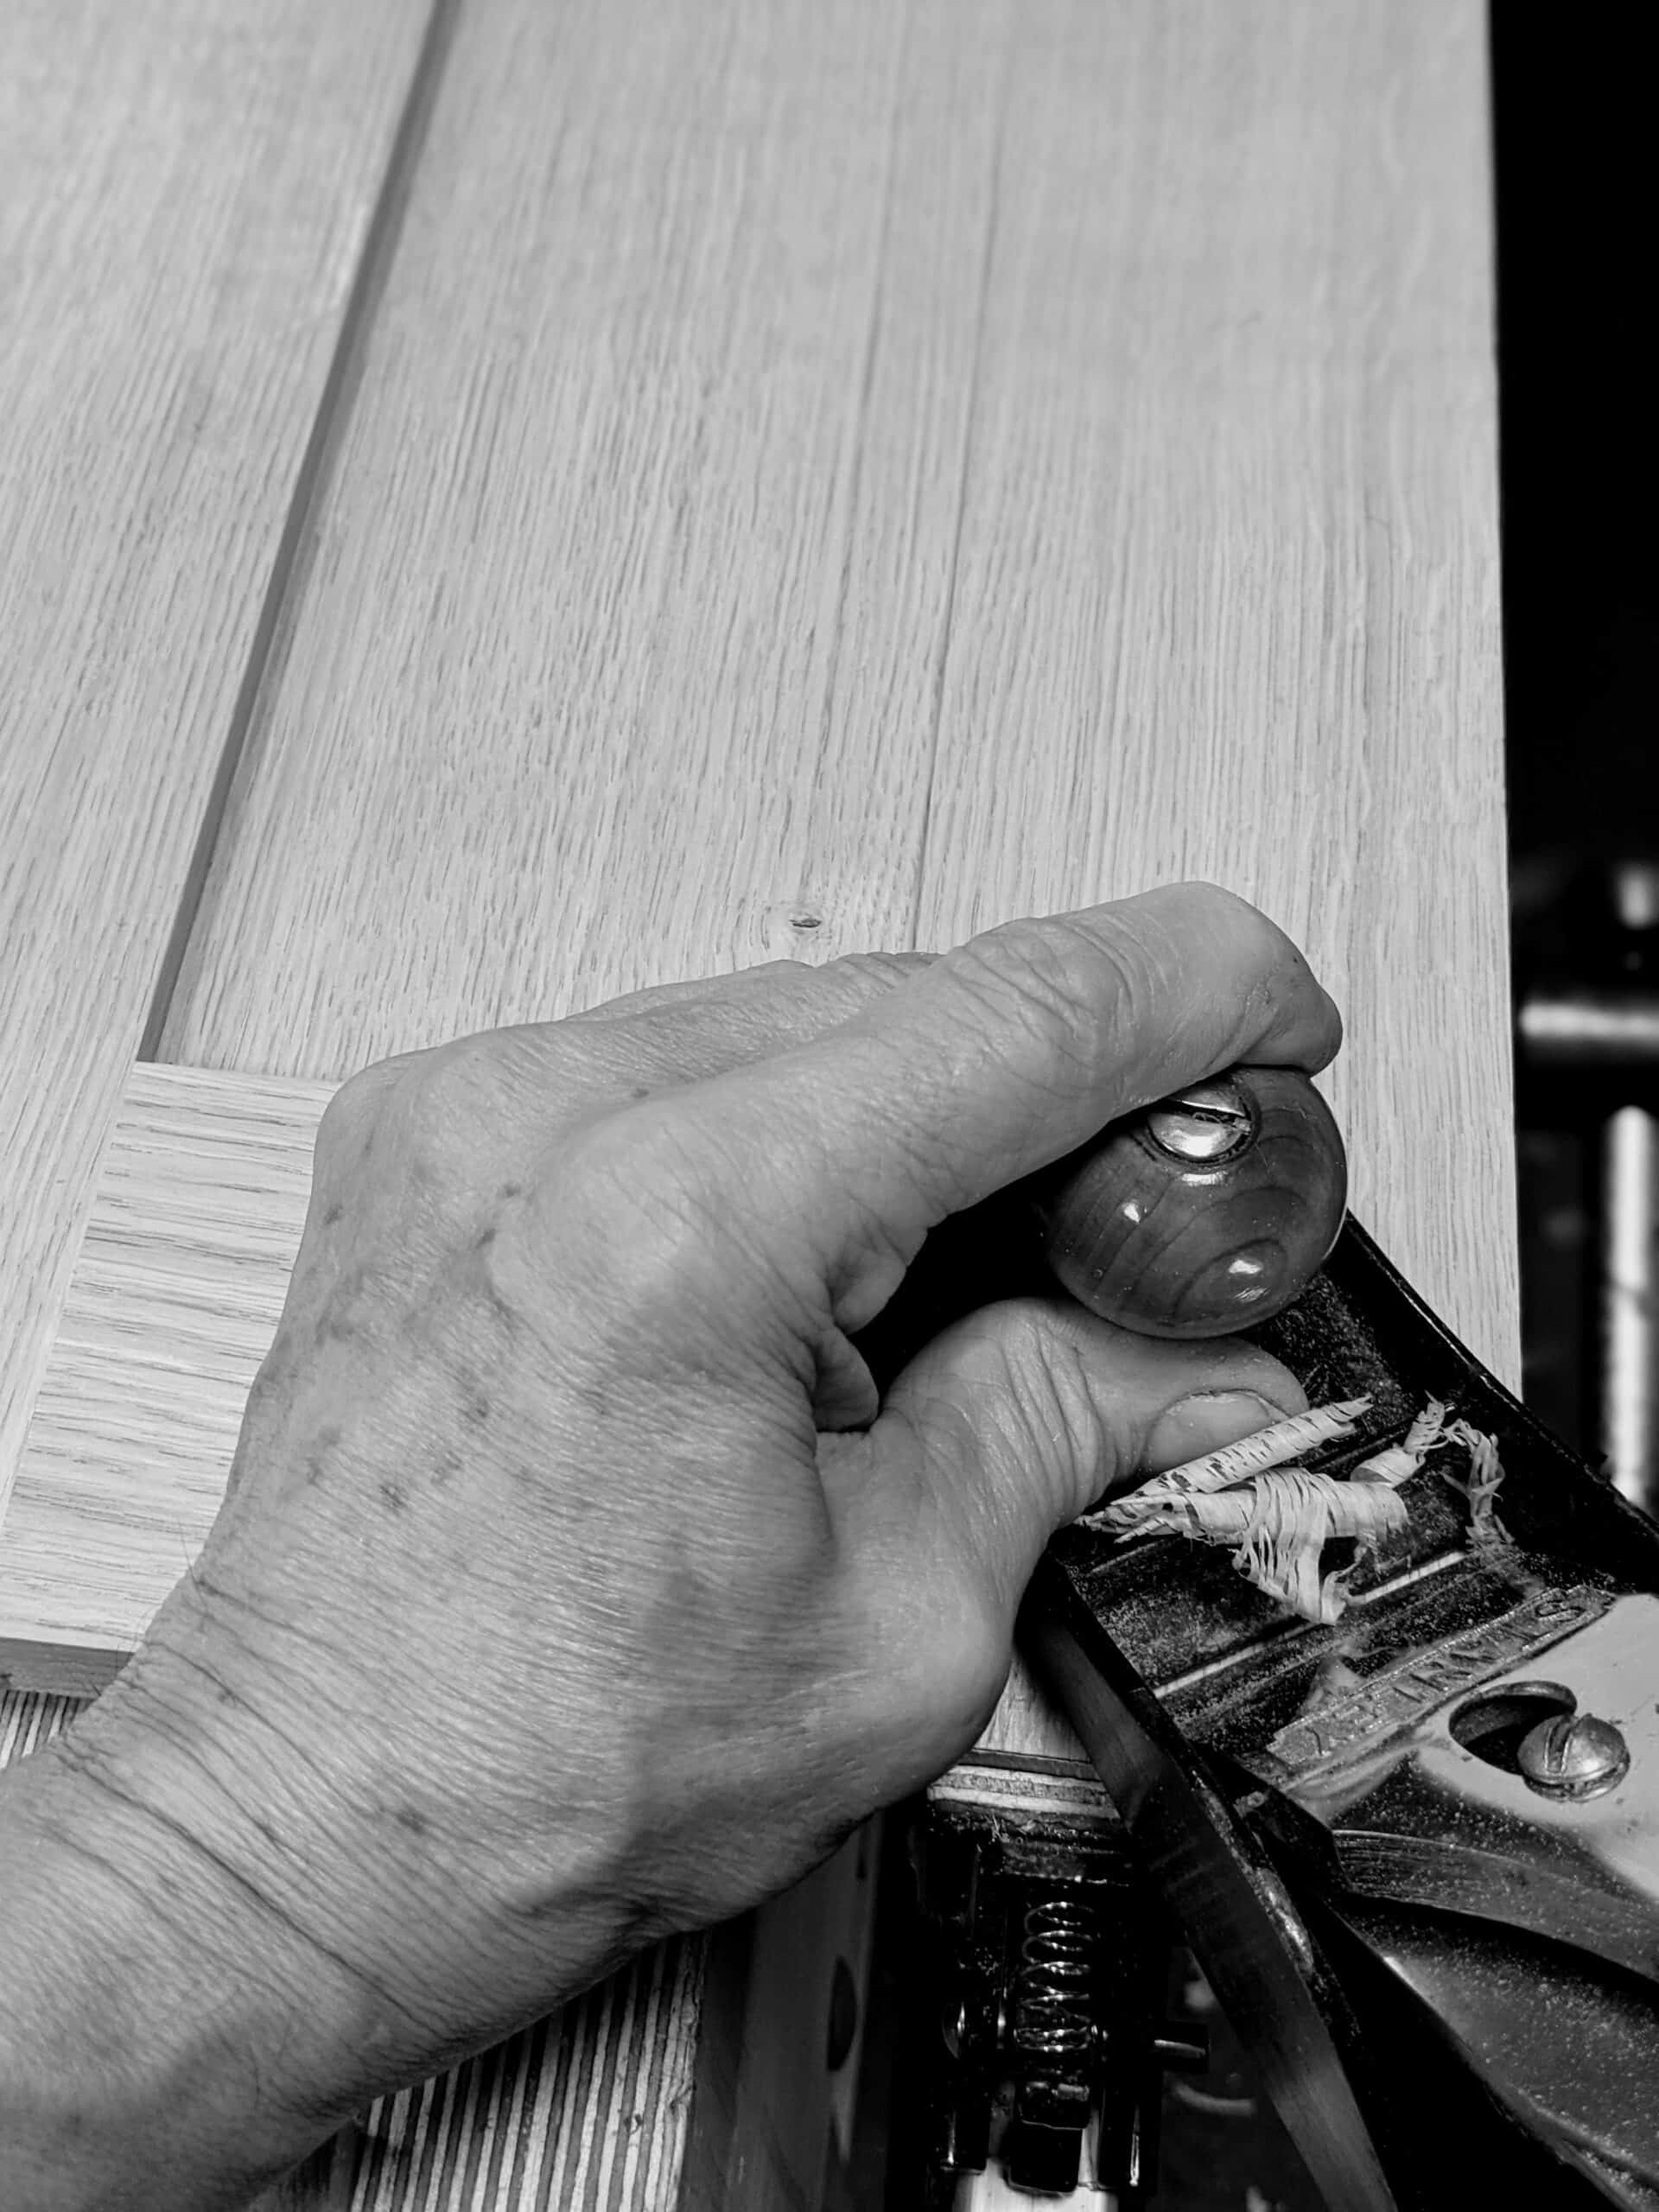
There are too many actions in the hands of a user like myself to compare to a machine-fed cutter mechanically traversing the surface of a board to effect a cut. Such soulless mechanisation often used in experimentation is of little true value beyond, well, just an interesting but limited insight. In my world at the workbench, every thrust I make can hold within me a thousand slight differences flexed through my body to the wood, an amount no science can detect with any value at all. Hence there is no planing machine able to replicate the human body with the intrinsic diversity of a skilled crafting artisan.
Furthermore, to expand your understanding: George shouted, “Push!” as I faltered mid-stroke for a split second over some awkward grain. He sensed my diffidence before I did by reading the grain as I planed the door stile. When the grain tore just a little, he said, “Sharpen up, lad!” and I did. “Let me see,” he said and took the assembly. “Too far off,” he said, and moved the cap iron closer to the edge. With the plane set thus, I took that stroke but took it as he said, “Slowly, slowly, give it time to cut!” The surface was perfected by a single pass. The working knowledge became mine.
Often, too often, woodworkers with a few years experience, say, do it this way or that way, as though it is indeed a rigid uniformity that makes this or that tool work. It’s not, thankfully. Each and every plane and saw stroke becomes different according to the felt interaction between the man-being and the work in the vise or on the workbench. It’s not the kind of thing that craftsmen talked about around the bench, so I am saying it now and that is why I wrote my first books Woodworking 1&2 and Essential Woodworking Hand Tools. I can cite 25-degree ground angles followed by secondary or micro-bevels of 30-degrees as a reference to my point, just as I can laying a plane down on its side on the workbench when not being used. Let me ask you this. Why did no craftsman ever lay his plane on its side for two centuries at least? Wooden planes and metal ones were never laid on their sides, ever. Why? Because they never needed to be, there was no point to it, it slowed them down in their work and they did not just follow a practice blindly and without questioning even what might have seemed a good reason to. Oh, and it was silly too. Now in schools, it was different and this is where it first began and became the common practice we know in school-taught woodworking. Anyway, I digress.
You can sharpen your plane with a single bevel anywhere between 25- and 35-degrees and it will work as well as any plane with two bevels to the cutting edge area. Furthermore, you will never need ever to grind that bevel on a grinding machine again if you do not have the ground angle as part of your sharpening regimen. You can also establish a very natural cambered bevel to your bench plane irons that will arc from say 30 degrees at the honed cutting edge and drop to 20-degrees. You can also hone at 28-degrees and it will make no difference to performance, or 27 or 26-degrees.
Going much lower will start to weaken the cutting edge, so optimally we shoot for between say 25 and 30-odd degrees into an ovalised quarter ellipse that comes from the natural body movement when sharpening and do so in a matter of a few seconds freehand. Prior to magazine articles coming out since the 1970s, as far as I know, no woodworker ever took out a protractor or a sliding bevel to check the angle to their bench plane’s plane iron to check the angle of the bevel, and neither did they set the tool rest on their grinder either. Everything was eyeballed and developed intuitively for efficiency. Now I am not saying no one should do this either, just that mostly they can be safety wheels to start out and that when removed you will improve your riding freedoms and nothing more.
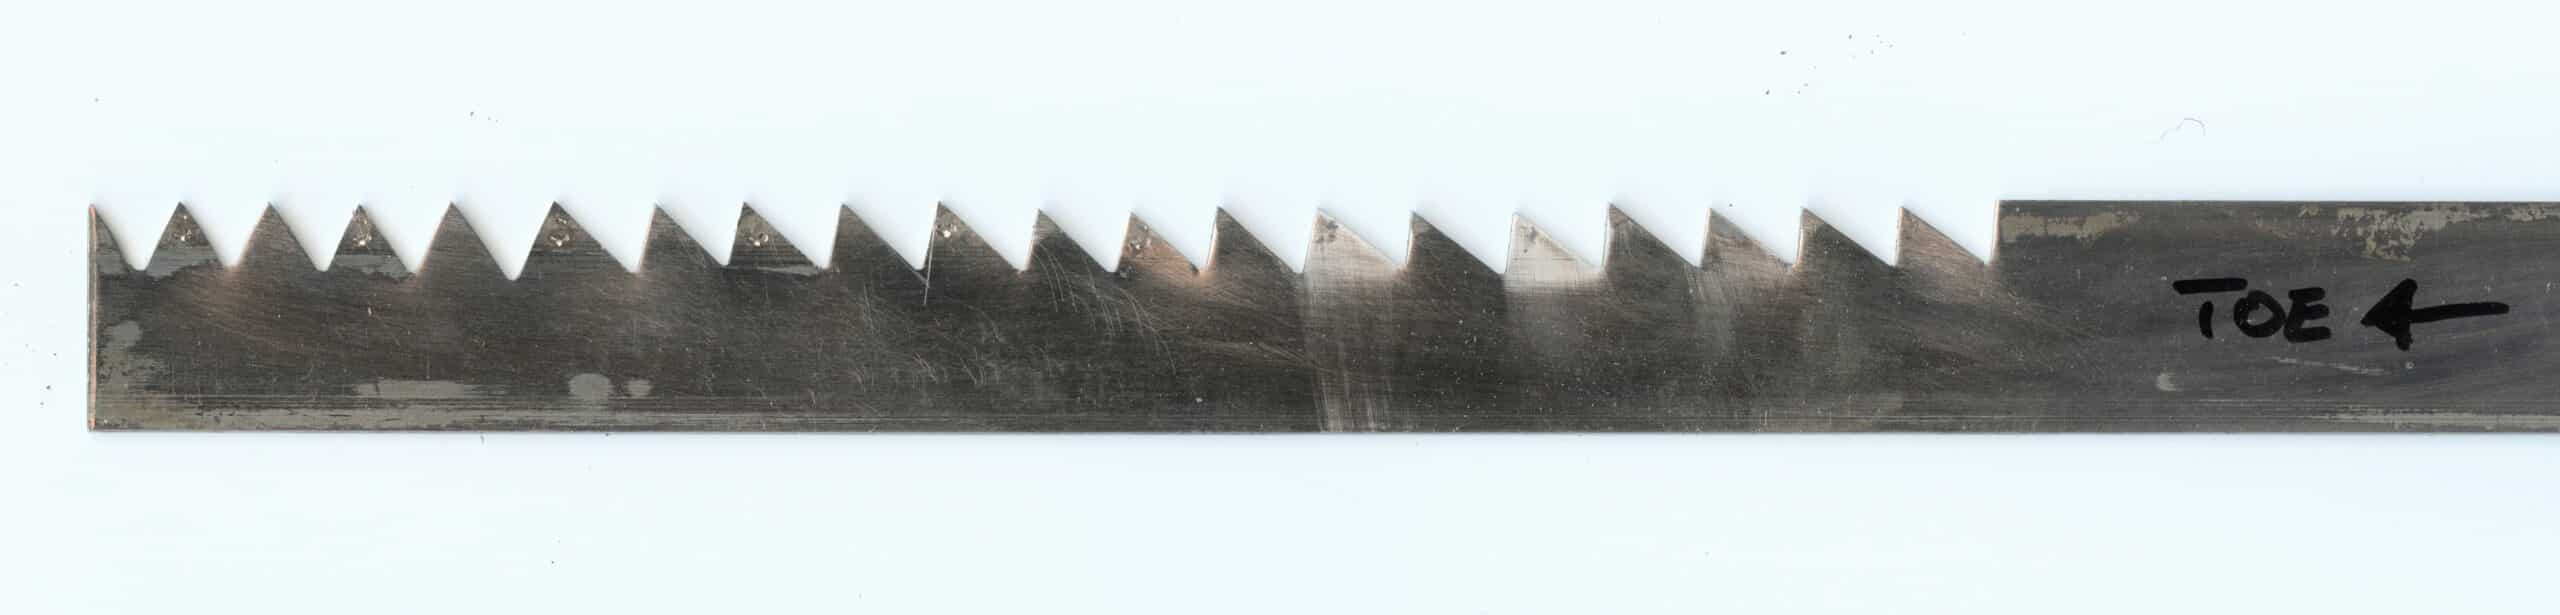
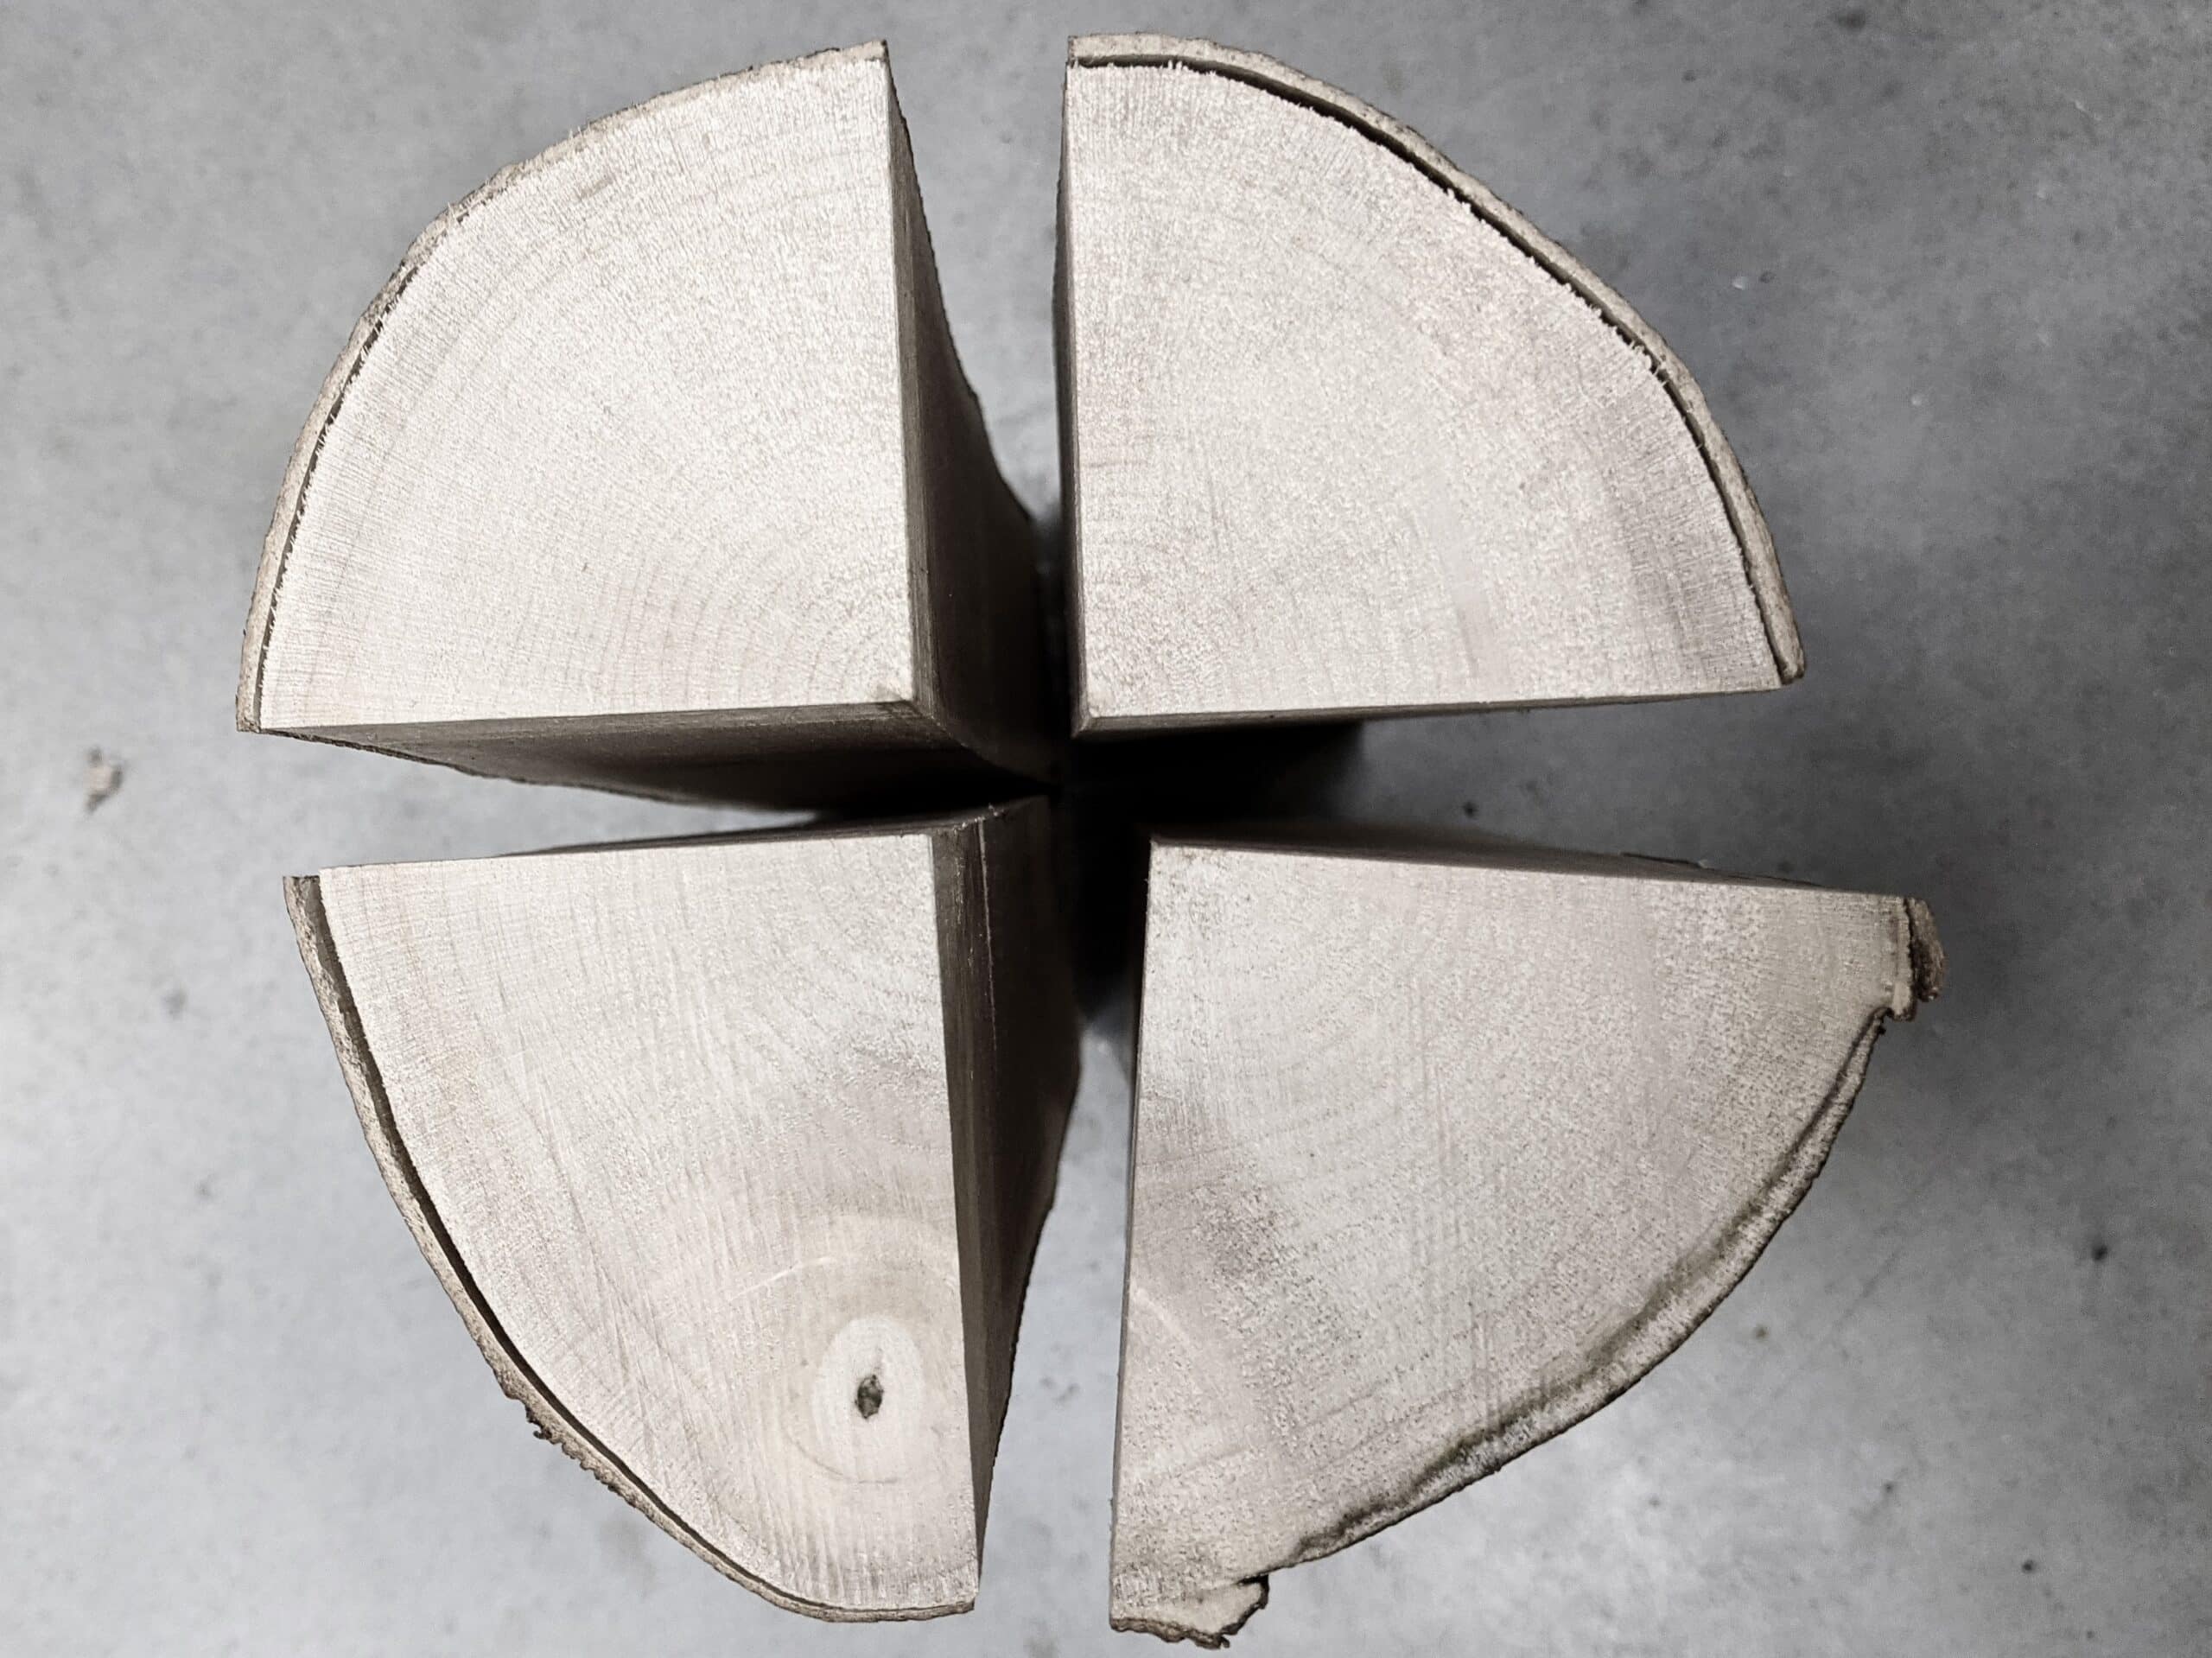
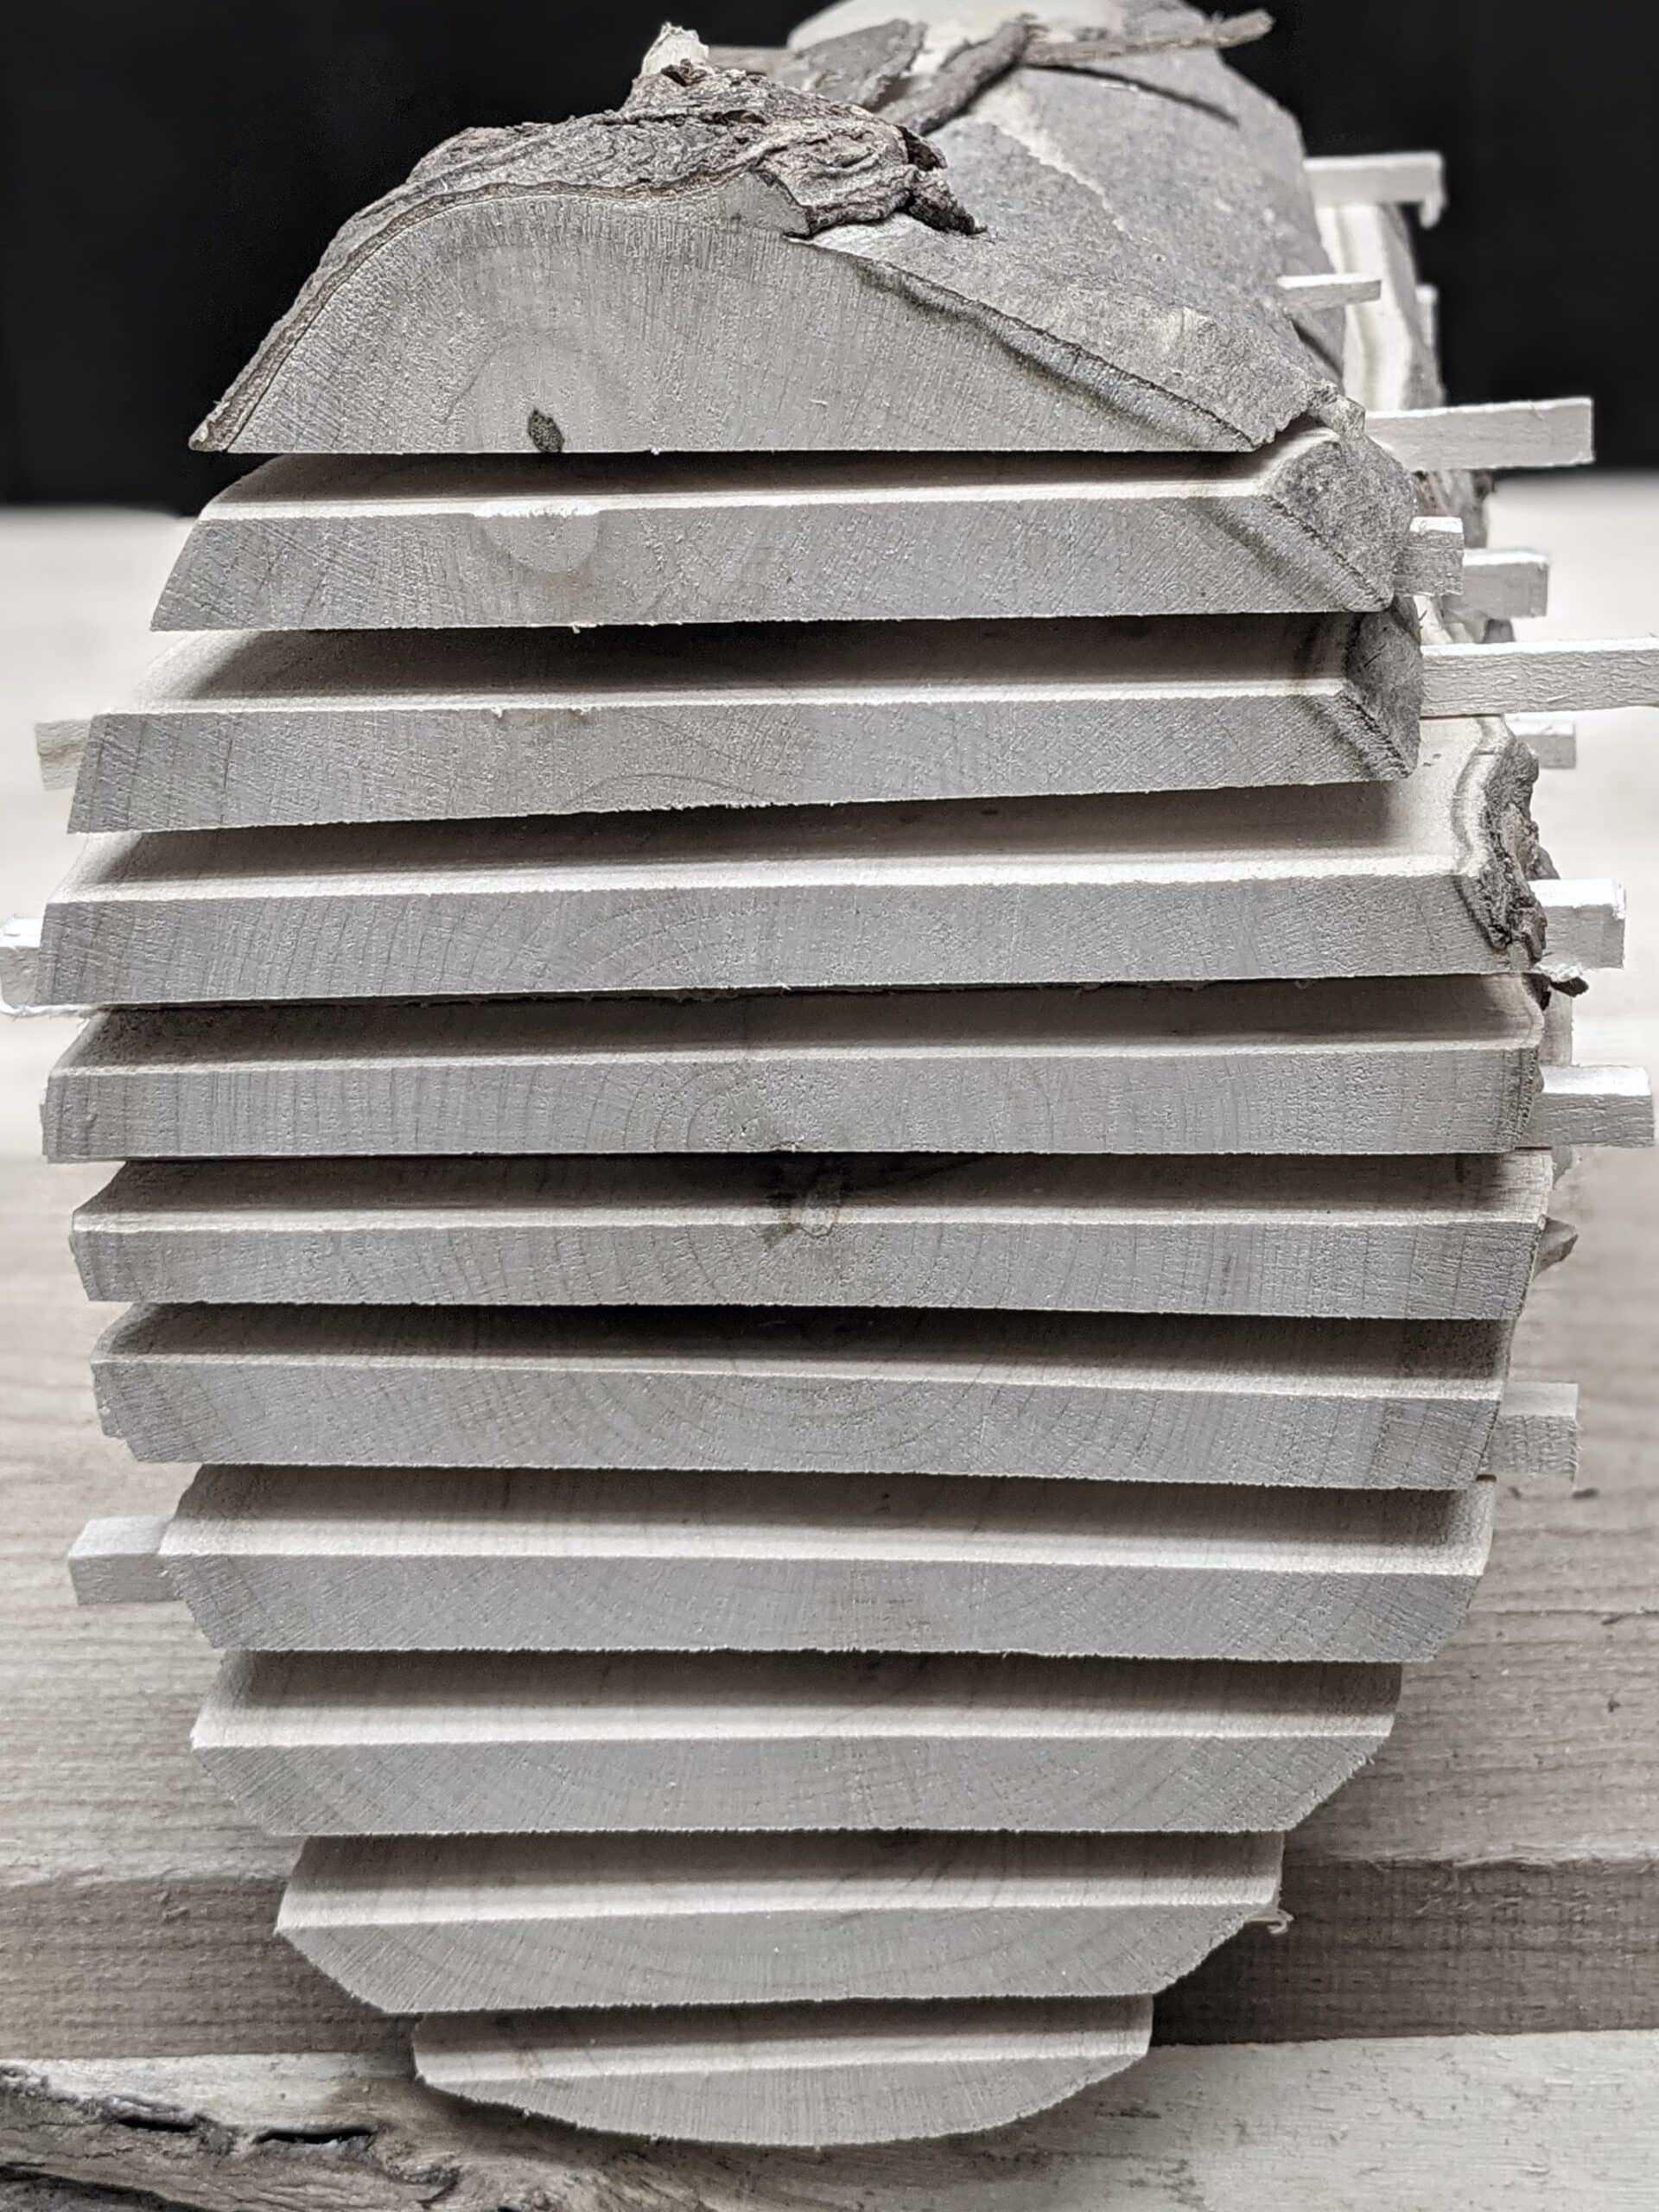
I slabbed the limbs above to show that I do still experiment and to say that if you have children you are instructing it is a good thing to show them as you take time out in the garage. This is no different than having a sawn in half a cast metal plane to show how the cutting iron assembly works in unison with the lever cap. I recall never being able to get woodworkers in classes to understand the differences between crosscut and ripcut saws until I made oversized models from both wood and metal. What a difference when I slipped a wooden triangular mock-up file into the gullets to show how the file created a chisel tooth in one saw and a pinnacle point in the other by simply reorienting the file in the gullets of the two saw types. Eureka! Experimentation can result in priceless examples. We should never forget that is a good thing to become as a little child when we truly want to learn something! Don’t just take my word for it, use it as a launching pad and take off into the world’s open university of laboratories.
I enjoy reading and learning from your writings and videos. Your Essentials of woodworking book is a must have for every woodworker. I refer to my copy often.
Thank you Sir.
Experience is the best teacher in the universe. You sir, are a close second. Your wisdom shared with us is truly a gift. Thank you
I have always tried to retain that child-like sense of curiosity in learning and discovery, but sometimes life gets in the way. Thank you for the reminder.
Beautifully written, Paul! This particular post makes me want to be more questioning and less accepting of “common knowledge”. If I haven’t experienced it myself, what basis do I have to say, “Do this.” or “Do that”. Thank you again for always sharing.
Wise words – as usual – Paul! About the only thing my woodwork teacher ever drummed in to any of us was to alway lay the plane on it’s side, and it really did stick! I’m now 76, and am delighted to say that I have finally “unlearned” the practice!
Your encouragement to research the wood we use-as opposed to simply using it and taking it for granted is something few teachers touch on and is a most welcome reminder. As for planers versus hand-planes, well, I can see that commercially they probably make sense, but they ain’t for me, mister! I was left a Coronet Machine which came with a jointer and thicknesser, and if anyone wants ’em, they’re free!
BUT I won’t be there when you switch on that howling lump of rapidly-rotating iron, nor will I pick up any bits of you that got in the way, and I DEFINITELY won’t be loaning you my 1900-ish Stanley #4 to smooth out the corrugations!
Thanks for the wisdom.
Chris
One thing you learn using machines Chris, where you hands are concerned they don’t take no prisoners. There are many operators who are short of fingers. So it is a wise decision to go over to hand tools and more satisfying when you get good results. By the way, I still lay my planes on their side and I am now 77. Best wishes Bruce
My Mentor, when I was a youngster starting out in Luthiery had a saying I never fully understood until I gained a few grey hairs…
“It isn’t knowledge until you share it”
You remind me of him so much, Paul.
Thank you.
Hi Paul, Just wondered if it makes a difference if you split the limb with a fro through the center and will that keep the wood from cupping since all the sections split that way would be like a quarter sawn section?
Thanks Rick.
I can’t really answer this too well because splitting logs and limbs is not a practical approach for many and most in our day and age for various reasons. First, you must find the logs and limbs. Most limbs would not be suitable for much woodworking unless you are knife-carving spoons and other cooking utensils. The wood is no more stable when split than when sawn. What you may be thinking of is splitting so as to quarter and then to keep splitting subsequent sections in two but, again, that’s fine for small treen, woodturning and turned parts and chair bodging but not for general woodworking. Also, the splitting would need to be of green wood fresh cut too. Too many complications of most woodworkers, I think
Splitting green timber into staves is also useful for those making the likes of ‘self wood’ bows (archery), walking sticks and staffs, and some tool handles…
look for the blog of Peter Follansbee.
E,experimentation always works doesn’t it. It comes naturally too. Once on a vacation to Cape Breton, I asked the kids to go down to the ocean beach and pick up rocks that intrigued them. When they brought them home we all looked at them and through experimentation we put together a sculpture of a woman holding her child. Another time it was drift wood made into a whale pod. And so on and so on through life.
dear paul (and other readers),
just wondering if by chance you have you had much experience with new (US made) starrett combination squares?
i bought one recently with the satin finish beam, and the beam is readily scratched/etched along it’s length by movement of the head. there is no grit etc in it. Is this normal ‘wearing in’ in your experience or something that may affect long term accuracy and warrants swapping it?
(I presume other readers might have the same question, after gulping and splashing out like i did…!)
ps – if there is a better place to ask questions not directly related to your blog topic, my apologies and please let me know
pps – your book is most helpful, with some very useful drawings and the binding is holding up well
kind rgds and thank you, paul
Wow! That was really educational, can’t believe how much I just learned here. And the pictures made it very easy to see the different ways. I’d heard them explained before but its hard to visualize in Your head. Thank you!
Even when fully dry some wood is still not fully stable. I had a thick iroko plank to make a long boat’s ‘rubbing strake’ about 30mm square and the rest of the wood went to make slats for a couple of benches. My goodness that wood writhed and twisted as it was sawn. Fortunately the strake remained fairly straight and the bench slats gave the benches a ‘rustic’ look.
Learning for understanding is the golden road, whether abstract or experiential, in my mind. I think both styles are useful adjuncts to the other. Understanding through being able to explain, interpret, feel both emotionally and physically touch, relate to prior experiences and thoughts, imagine, and recall and extrapolate are all ways to understand. Understanding cannot be rote. You can’t really be an accomplished person in a field without being able to engage the knowledge through various modes of learning.
I loathe poison ivy and that was distracting from your beautiful sketch. @%$^@#$% poison ivy! I need a goat to eat every leaf of that damn plant.
I hope not but I will look into it. Thanks for letting me know.
I appear not to see new content unless i refresh all of the links for your site. This has only happened recently. Not a problem since I realised, but others may nolonger be seeing newer posts.
I really appreciate the excitement and spirit with which you write. As a young person getting started in woodworking with handtools, it’s very exciting to read your posts and learn along with your experiments (and then now do my own!). It feels like a lot of that curiosity is lost in those around me I see who mainly rely on power tools/machines. You remind me that woodworking is more fascinating when it’s all about the process instead of the outcome.