OBSERVATIONS SERIES POST 2
Gauging Gauges
Another consideration from my workbench musings.
In the pandemics dogging the world, working wood and being creative has become even more than ever the safer place to be. My small garage space, 18 square meters, is, to me, my certainty of greater sanity levels. It’s here, mostly, where I feel that I continue to grow the most. Currently, I am working on a series of blogs on the tools that I have found work best for any woodworker to use. What I look for in that process is any new work coming to light in the enhancement of what already exists or indeed, though quite unlikely, any new tool that didn’t exist in some form or other before. An example of this might be the Shinto rasp which I naturally would compare to more traditional rasps.

Some tools are a false economy but might still provide that necessary step for many to get going. I think of the four-in-hand rasp that have recommended to people starting out in woodworking and especially woodworking with children. My reasoning? I felt that spending pots of money on a tool might not be practical for the majority. A good rasp can cost up to and well over £100. If you are just making a spoon or a cutting board for a one off or for the first time, this would make rasps for woodworking and especially woodworking for children prohibitive. And it should also be considered that someone exploring the possibilities may find that woodworking is not for them. It’s unfortunate, but using a good tool with maximised capabilities might actually be the tipping point that many would-be woodworkers never know, yet, had they known good tools to start with, they might have found a rewarding craft for life. Monied people often access the best from the beginning, others cannot stretch beyond buying from the so-called bargain shops like Harbor Freight and the Pound Stretcher. Now that we have the Shinto option that compares very favourably as a highly effective tool as an alternative, it’s good to be able to recommend them even if they are one of the ugliest tools on the market.
I want tools that improve on what is established but still has needs. Many innovative designs seem to result in an ultimate failure. As another example, the disc marking gauges that look like a bearing on the end of a rod is very innovative-looking. I see and hear how people swear by them as the best thing since sliced bread but in the hand and at the bench I have found them to be neat-looking tools but less practical in actual use. Why? Well, the cutting edge of the wheel beds itself into the wood with a wedging action according to the wood type that grips the disc as it moves forward in the marking. This most often stops the marking capability in its track. This is a very natural propensity of the disc-type gauge. Add to this the same proclivity to follow grain lines rather than ‘surf’ it means that if the tool is pushed, it’s often apt to form a wedge of the wood between the stock of the gauge and the disc, tightening all the more if force is used. Alternatively, if the grain goes the other way, the disc can steer the gauge out of parallel following the grain with the stock away from the edge of the wood. Though the disc does look as though it rotates in use, it is not actually rotating… Perhaps if it did it would help but the wood resists this possibility anyway. Lightening up on the applied pressure is the answer, but the fineness of what is effectively a cut line is often too thin to offer the guidance we rely on as the grain closes up behind the cut as the gauge passes along the wood. You can read more that I have written by going to a blog that still holds good today here.

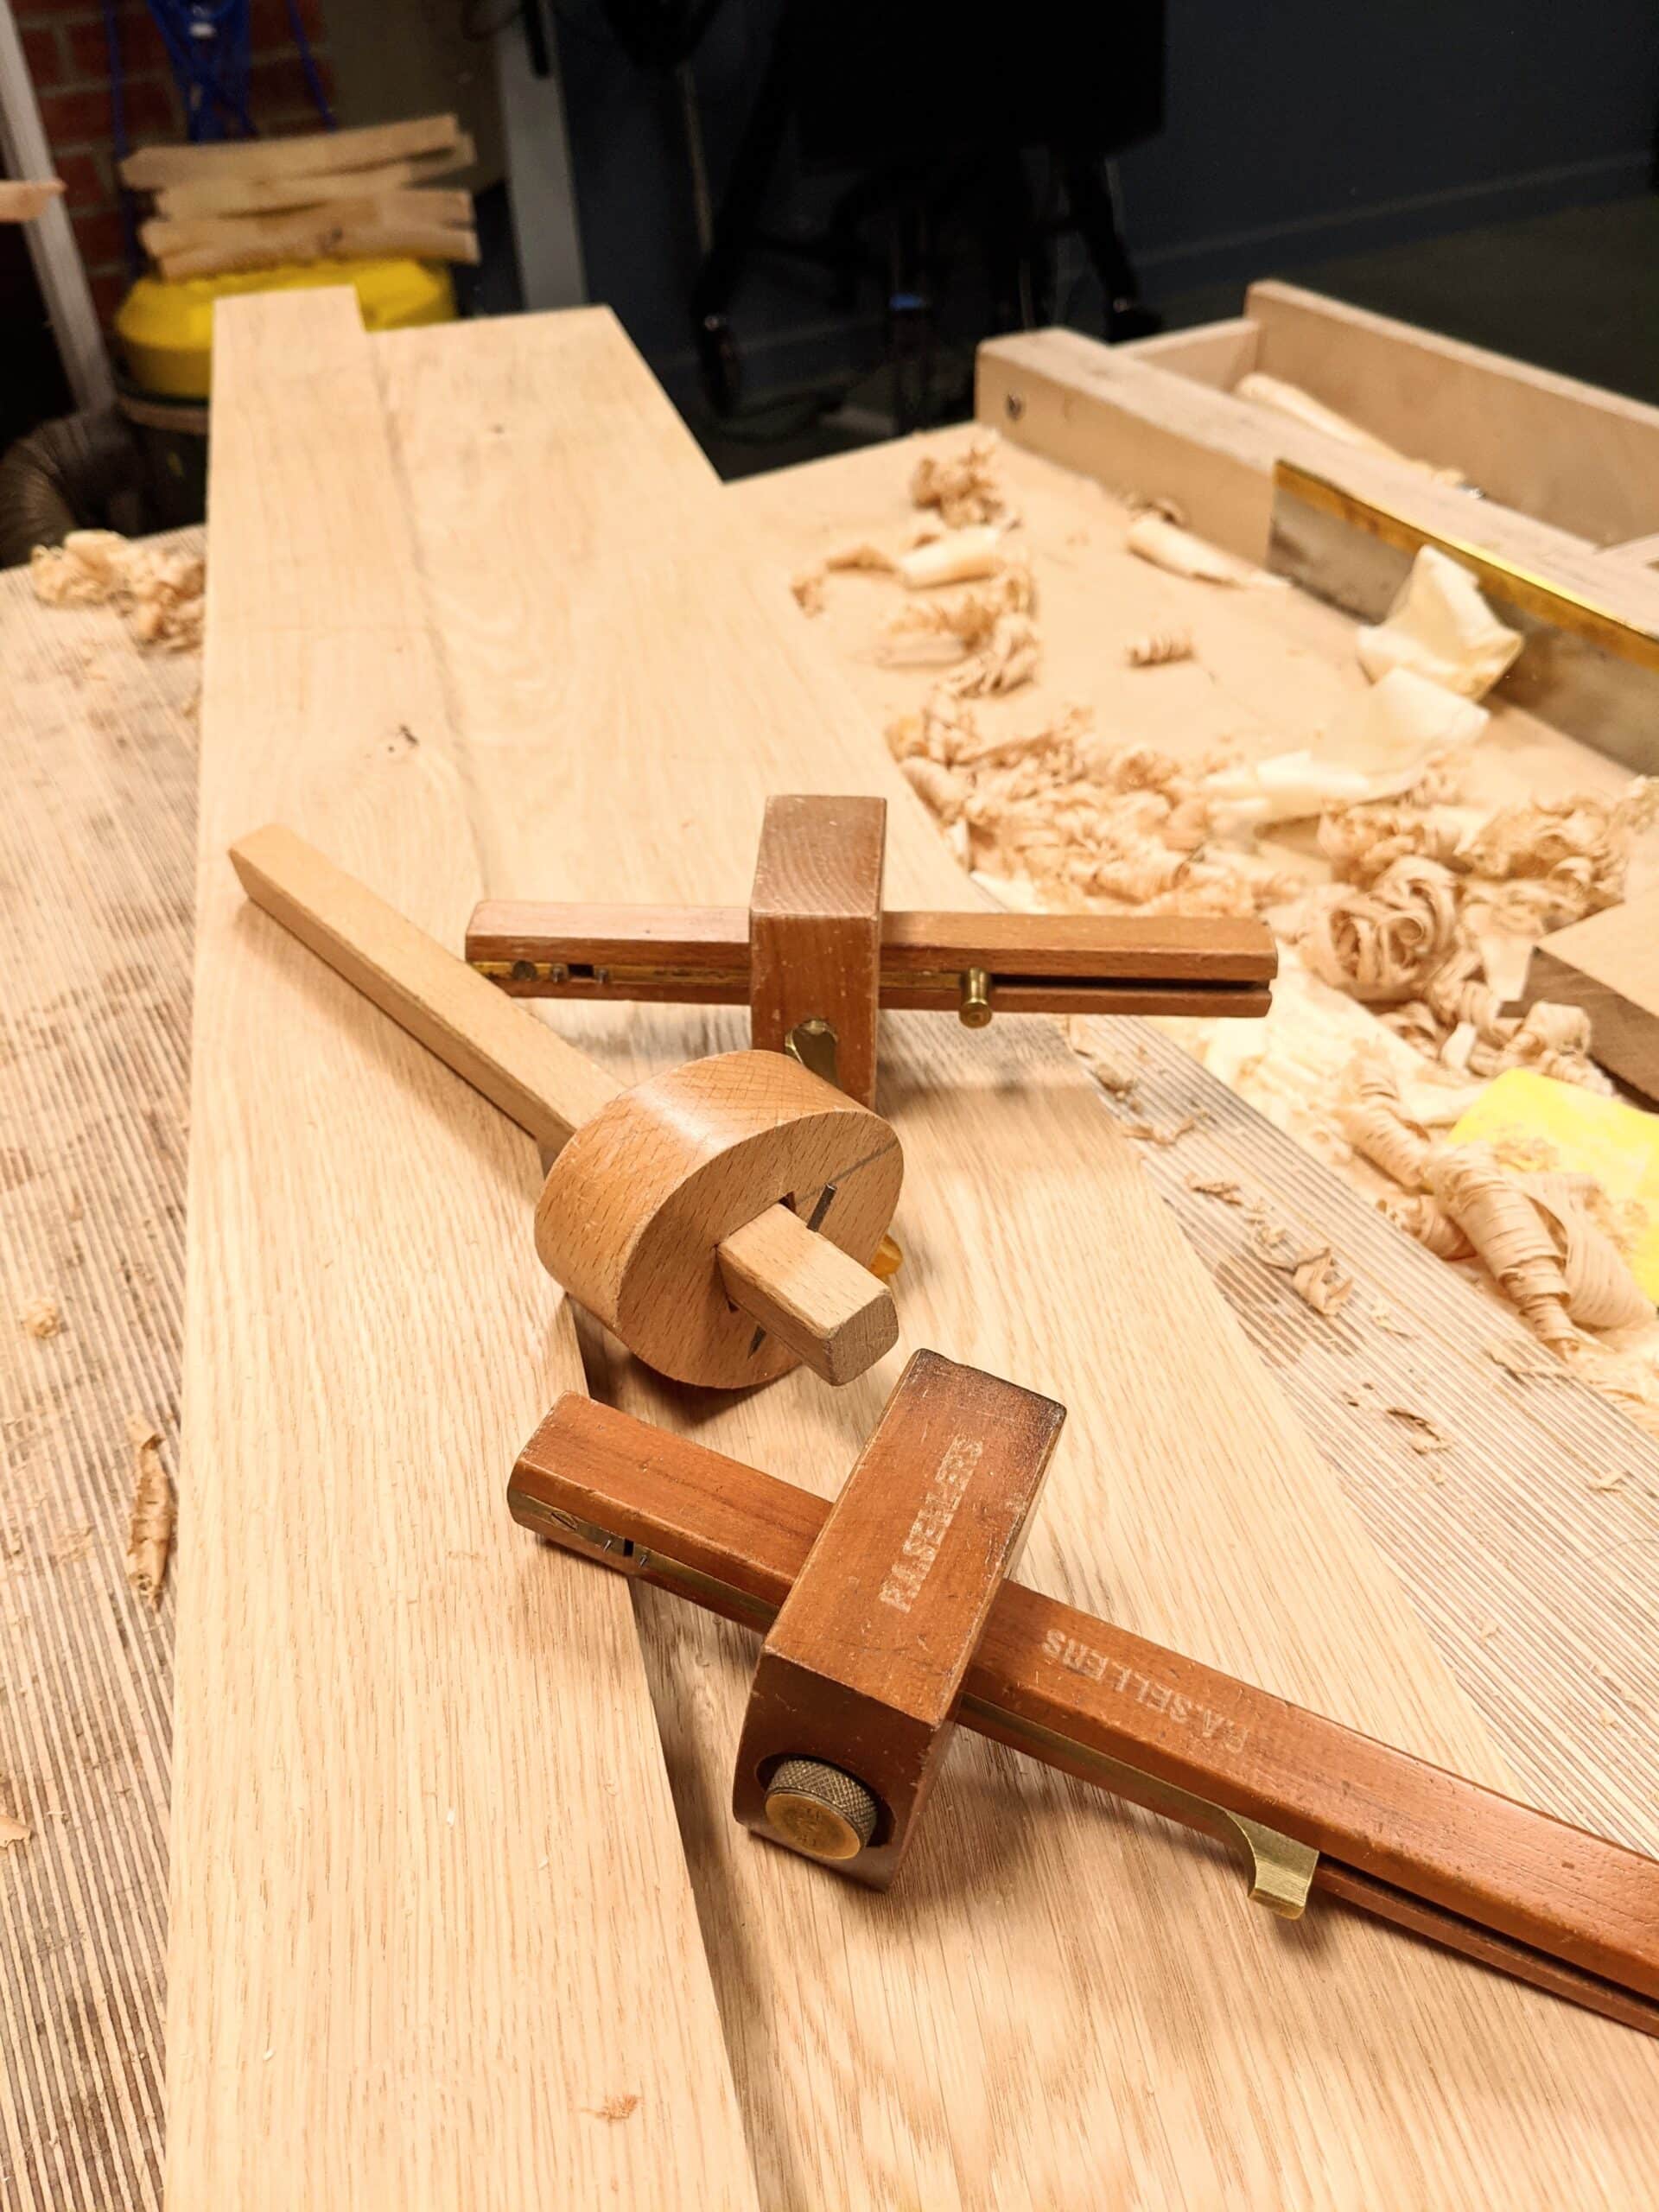
Another serious factor to be considered, in some woods, with the grain sometimes having that sticking element as we push the gauge forward along the wood, the disc begins to ‘bed in‘, tightening as said, leaving part of the disc edge embedded in the wood. This then cannot be corrected by any amount of sharpening. That said, the gauge is still fully functional. So, what many might see and consider to be innovative, is often misrepresented as an improved version when a well maintained vintage version with a well honed conical point will deliver exactly what we really need. My favourite marking gauges are varied. I mostly use the standard combination gauges we’ve come to know and love; two gauges in one, the marking gauge and the adjustable mortise gauge. I have spoken recently of the Chinese-made version made from hardwood with well-fitting brassware and steel parts. Unfortunately, because of disingenuous marketing wordage used by the Chinese manufacturer, you can no longer look up such gauges as vintage as in times past because the Chinese makers list their brand new ones as vintage too. If you don’t care where your gauges come from you have many choices. A broken-in, genuine vintage gauge operates smoothly and efficiently, but you can introduce wear and tear into a new one with a little abrasive and some shellac to refinish before waxing same with furniture wax. I am far from convinced that hardwood gauges made from more exotic and dense grained hardwoods work better than say beech or similar. I have gauges I bought in 1965 as an apprentice that will likely outlast me. I have many others twice and three times that age still in daily use.

The important things about traditional pin-point marking gauges are how to maintain them, and how to use them. Short pins are less versatile than long ones. Why? Well, the longer the pins the more you can ‘trail’ the pin by leaning the gauge so that the pin slides along the surface. When the pin is nearer to perpendicular, the fore-face of the pin is more abrupt because of its uprightness and the more the pin tends to dig in. Trailing the pin as shown makes the passage along the surface much, much smoother, easier to control and crisper too. Notice the length of the pin in this picture of the Stanley 5061 marking gauge. I have written on this amazingly well thought through design here. This pin trails easily and because of the geometry of the design of that gauge, the trailing pin can be readily followed by eye all the way through the process. In most other gauges the pins are often if not always obscured from view by the gauge stem. If you want to convert an existing marking gauge to work exactly as the 5061, I show how in another brief article here.
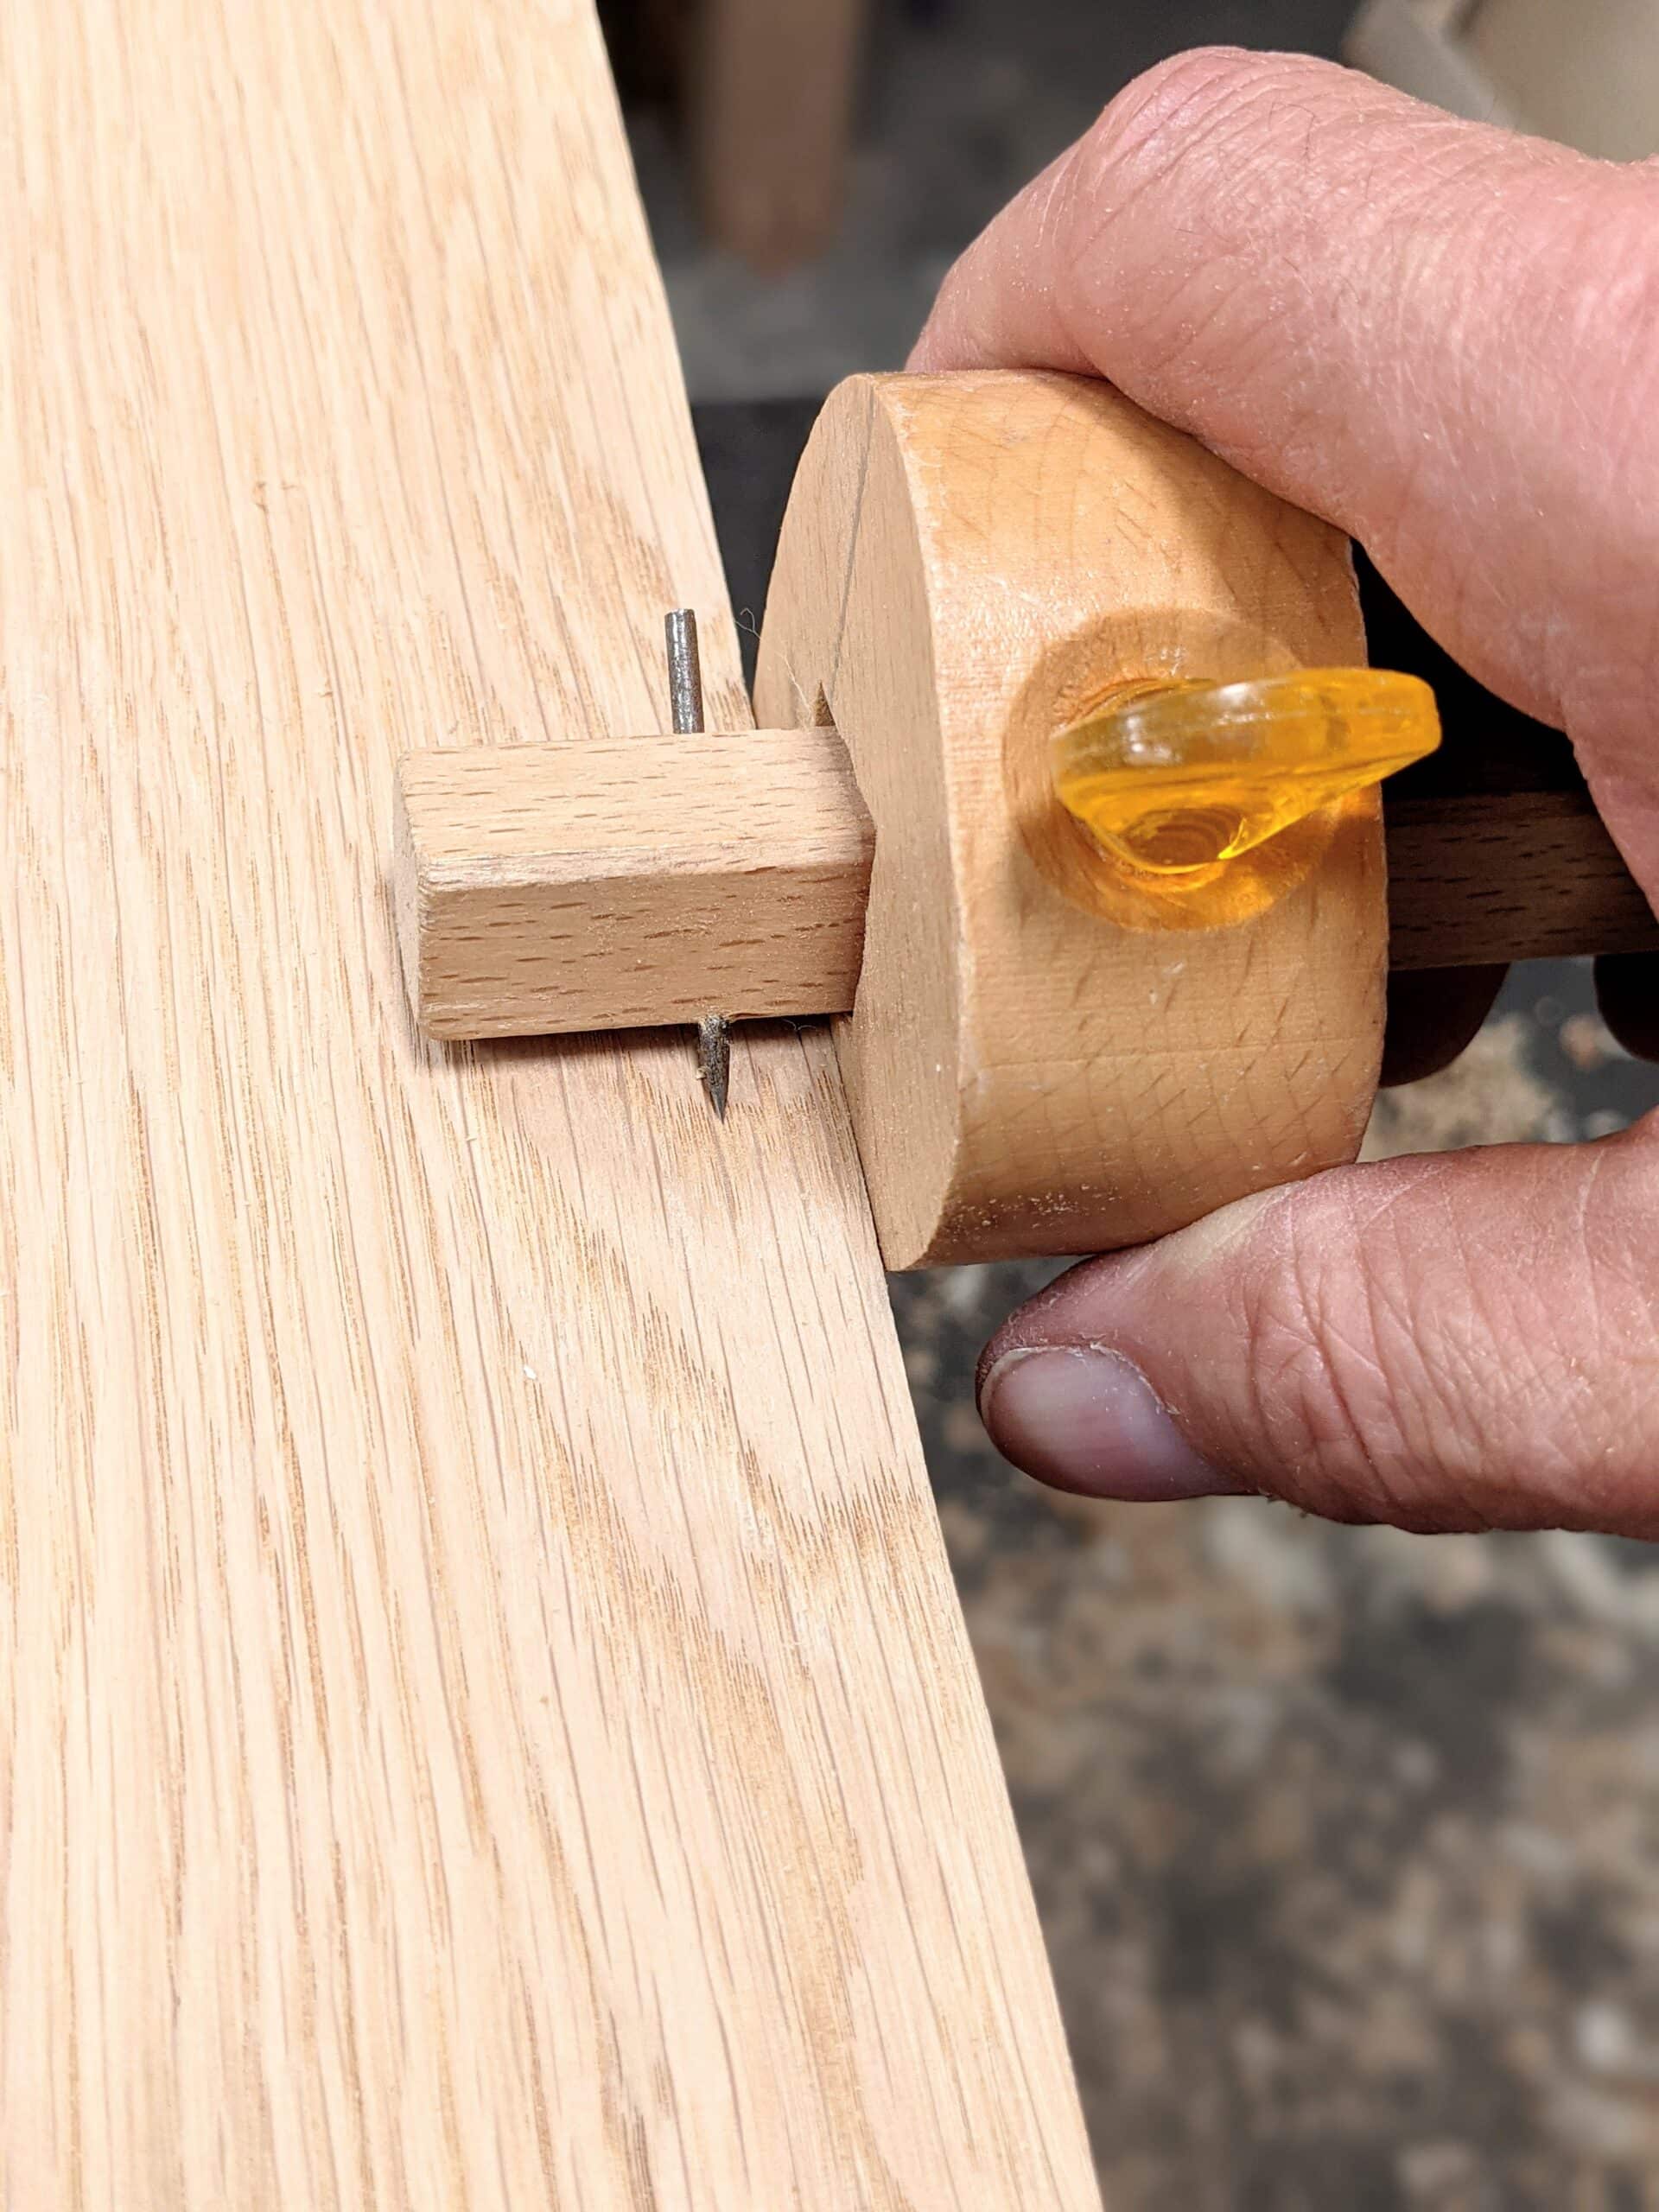
Worse still than that though! How come for two hundred years before did no one think of sending the pin through corner to corner as above rather than through from mid flat face to mid flat face? How come no maker today sees the efficacy of this improvement? What an amazing oversight.
Paul next time you do a tool giveaway you ought to give away one with your name stamped onto it.
I think you’d get people flocking to own a tool bearing your name.
Never thought of that although some have had my name stamped in with my name stamp and engraved on too.
I dabbled at woodworking as a teenagerbut follwed a diferrent path as the years FLEW by. Now at 62 I begin again. I suppose the real tragedy is that not only do I have to start from scratch, I must learn patience. My mind sees what I want to achieve, but the skill level is elementary. Such a shame. As you say so often ” never give up”.
Thanks Paul. Hoping to achieve intermediate .
Thank you Mr. Sellers!
You saved me from the question of purchasing a rotary marking gauge. I thought maybe they are better that the two pin gauges in my shop. One old, one new.
The first one my son found at the town dump. Scraped it, oiled it and waxed it. Works perfectly.
Second one I made after touring the circa 1650 museum woodworking shop in Midland Ontario. They had very nice wedge marking gauges in that shop and I modelled mine on those old ones. And it works just fine.
It is a pleasure to use them as it is a pleasure to read your thoughts.
Thank you.
We shouldn’t call it a rotary disc or marking tool because nothing about the disc rotates either. It gives others the impression of a tool more sophisticated than it really is.
Sadly, I bought one for that reason. I thought it rotated and showed a sharp, fresh edge all the time. It sits in a drawer, nowhere close to my marking gauges.Most expensive gauge I bought and pretty much worthless to me .
I bought one of those disc gages, I had all the issues you described. One more issue was the cost of a new disc when the tool is dropped, the shipping cost just for the disc was about the same as a new tool. It’s very pretty as it sits on display on my tool wall.
Stanley 47-065 gauge also has a diagonal pin.
I thought I was crazy with those wheel cutters. I bought a couple, including a mortise gauge, and I find them hit or miss on whether they produce a good line in a given piece of wood. I bought a pin style gauge on a whim when I was building Will Myers’s Moravian workbench, and found it generally much easier to control.
I think I’ll build a few marking gauges with your diagonal pin idea. That sounds like a lovely modification. I’ve seen some other designs as well that allow for a larger registration surface which might be nice to have a few of.
I have a combination pin/ mortise gage. The lines are not as fine as I would like and it also tends to travel with the grain. I think I would still like to try a round gage or better a regular cutting gage. I’m just not sure if I’m using the tool incorrectly (applying the pressure in the wrong spot or direction). If that’s the case a different gage wouldn’t make any difference at all would it? Any one got any thoughts or advise?
So many variables, Jon. The most common problem I have found with users I have had as students is getting them to both lighten up on the pressure they apply and then to settle for less by way of what they are able to see. Think lined writing paper where, as a child, the lines were heavy and thick and then postal paper where a lined paper guide faintly shows through the paper from the other side. The variables? All woods respond differently . . . beech, cherry, maple, poplar, those with even texture and invariable growth aspects to their growth rings score the best, coarse-grained woods such as oak, ash, elm, not so good at all. Soft grained woods such as softwoods with hard and soft aspects to each growth ring fair the worst. If the growth rings are running out of parallel, the gauge point will slide along the path of least resistance and run parallel to the growth ring rather than along the intended path and well before you know it your line is compromised. A light pass conquers all, in my view. Absolutely in no way will you do better with a round gauge as a better option and a cutting gauge is intended for cross-grain cutting, generally.
Thank you Mr Sellers. I will not spend the money on the round gage but the cutting gage will be helpful with my dovetails. You input is as always well appreciated
With you all the way on that disc-type marking gauge, Paul – especially as I parted with thirty-five quid earlier this year. When will I ever learn? The line it leaves is sometimes not as distinct as one would wish and I find it a little ‘thin’ when marking long grain.
It’s a cutting gauge by another name, and although it’s more useful across the grain for that reason, so is a square and a knife! I thought it was just me being a grouch, as they appeared to be “all the go”, but your comments reassure me – as usual.
Chris
Interesting. I’ve got both types, and enjoy using them both. I specifically use the pins for my mortise gauge work. Still, the points made by you Paul are valid.
The only benefits I can see to my disc marking guage are that you can use the disc one as a quick and accurate depth stop. Sitting it half on top of a board and allowing the cutter to drop to the benchtop, and easier to take a measurement off a combination square or whatever. Secondly, I find it a bit easier to roll round a thin edge of a workpiece as the cutter cuts on all sides. With a pin guage, I find it harder to mark a thin piece without the guage going beyond the registration face and wobbling a little. Are those points clinchers? Absolutely not. If it’s cheaper to purchase a pin guage – which it is – go for that. The benefits are outweighed by the points in the article, but I do find times when the disc is easier.
I also have a cheap japanese marking guage, with two flat bits of metal about 10mm bent at 90 degrees and sharpened like a knife. I like that one the best, I find it easy to sharpen and it seems to cut better when I use it. It has an exceptionally unreliable scale on the shaft!
The amount of Groupthink in the comments section of this blog is discouraging.
This is why Paul is the master and I’m not! I thought the round blades felt superior when slicing wood. Thank you for educating me on their flaws. I have not spent a lifetime in the shop making masterpieces. I was tricked by Veritas into buying another pretty paperweight. Good thing I buy most of their crap on eBay used at least. I feel like Charlie Brown getting duped by Lucy to run for the (American) football.
Much obliged!
I have no problems with my disc marker. I use a light pass followed by a heavier pass. I don’t remember where I bought it. Perhaps Lee Valley. Anyway the disc seems rotate fine. Maybe the cheaper ones don’t work well.
The discs don’t rotate, Dan.
Actually, they do, on some versions, Paul. I have one that the disc does indeed rotate – quite literally, a wheel marking gauge – It does have its uses, and if it is tuned up (much like tuning a new plane) and nice and sharp (diamond card to sharpen) they actually do slice through the wood fibers very nicely instead of following grain. Sounds to me like the only one you had a look at was one of those cheaper chinese knock-offs (my first one was a Mr. Pen version – cheap!) which do not quite have the same fit and finish as a quality wheel marking gauge – Note- on the models where the disc DOES rotate, it is also necessary to check every so often for any run-out and/or wear in the retainer screw- much like with a knife or pin marking gauge if not checked or maintained can have the knife or pin “wobble” ever so slightly in its hole. (I had a couple that did that, though I got them used, and they may well have been abused) In short, a quality wheel marking gauge with a nice sharp cutter, whether the disc rotates or not (it’d be better if the disc did NOT rotate on mine, IMHO) can be very nicely accurate. Like any tool, you don’t want to be dropping them or abusing them.
I was referring to the Lee Valley one that he mentioned.
Paul
I agree about the Shinto rasp, it is ugly but it is very effective.
I have looked at the rotary disc gauges and resisted them so far, as I had got used to the pin gauges; your comments make sense to me.
Please keep the musings going.
John Latchford
I bought the disk type gauge because so many seem to be using it now days.
I find it absolutely terrible for long grain but works ok for cross grain.
I think it’ll be ok for dovetails because of the ease of setting to the exact depth of the stock.
For everyday marking I don’t think it works as well as my combination gauge I got as apprentice back in 1977.
I did recently purchase a Shinto Rasp because my rasps, like me, are well worn and don’t function as well as they did in their prime.
Best new tool I’ve bought in years, I absolutely love it.
I do have a couple of things I’d like clarification of in this blog.
1) I sat through your 2:34 min tutorial on making marking gauges; I did enjoy it and do plan to make my own.
I re visited the tutorial after reading this post because when you placed the pin you put it on the flat and not the diagonal like the Stanley.
Just wondering why?
Have I missed something?
2) Why are your daily use gauges not those you have gone to the effort of making?
Jamie Hall
Thank you for your insight on this issue Paul. I have to make a marking gauge soon and will keep what you’ve said here in mind as I do. Take care.
Doug