On Routing Out
Some months back, maybe a year or so now, I became troubled to the point that I felt awkward. Something had slowly but gradually happened and not by any particular intent. I take it on the chin because I think it was mostly caused by something very innocent that I did. Some are now calling it the ‘Paul Sellers effect’. Ten years ago, I hardly saw anyone anywhere using a router plane. At that time I think many had abandoned hand router planes and had accepted power routers and jig making for cutting their dadoes, or then again a dado cutter set or head that fitted into the tablesaw.
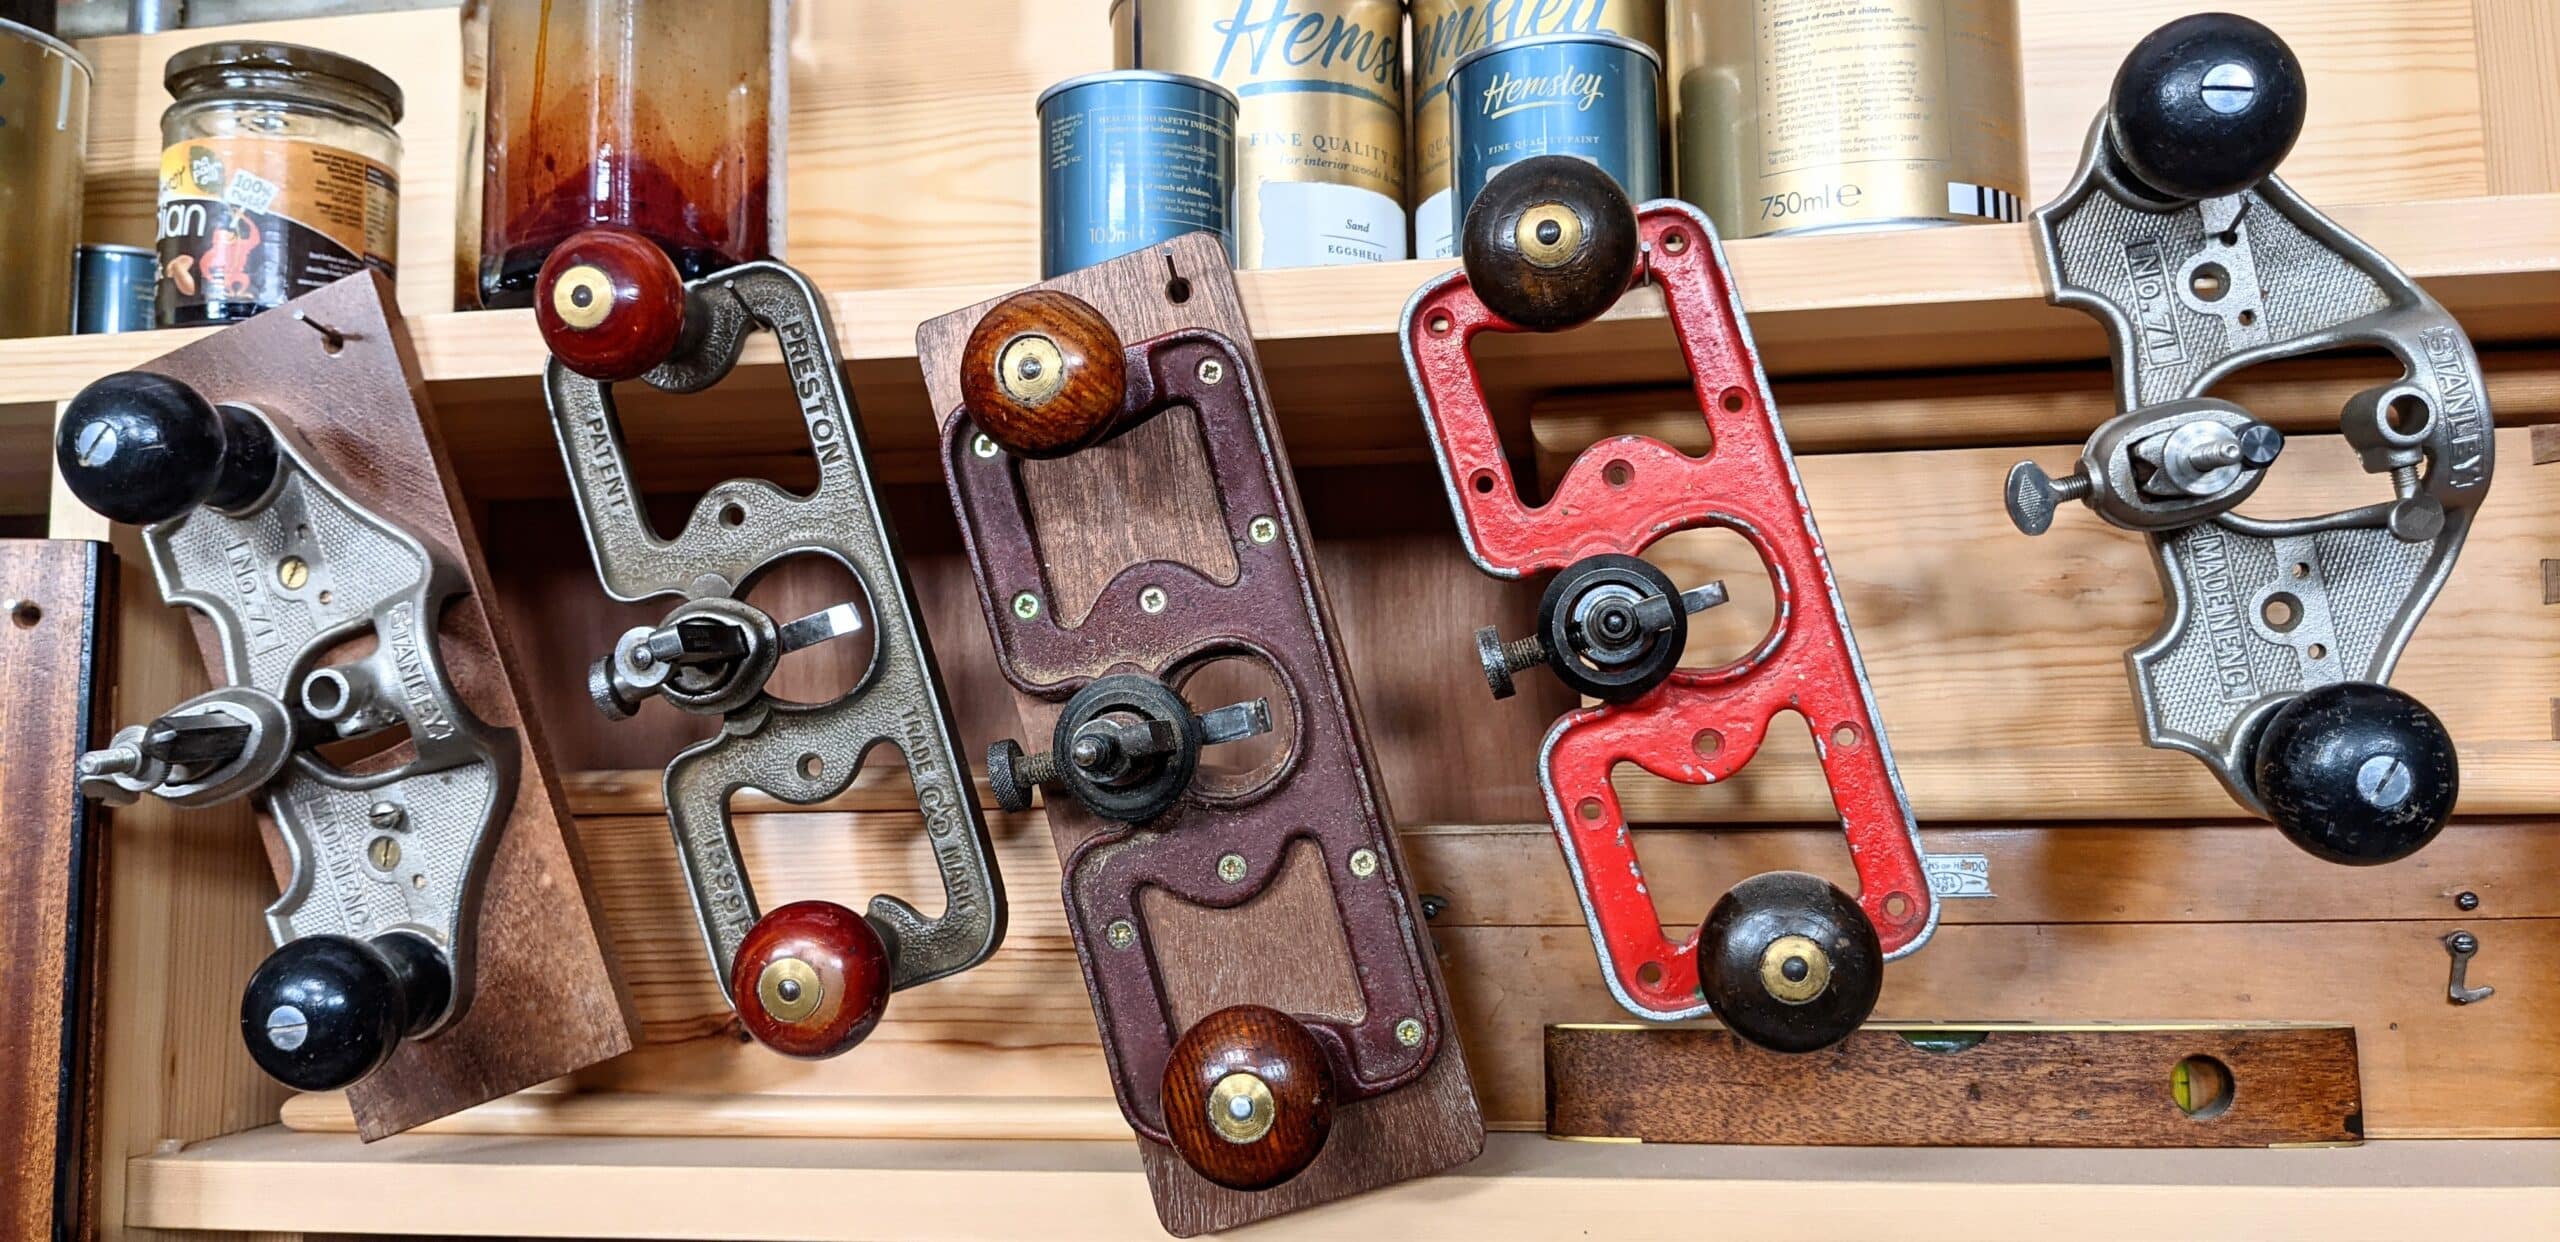
When I started teaching online and in my hands-on classes I introduced students to the hand router but not just for dadoes but for truing up the faces of tenons and such. Online, I introduced a full system for creating perfect tenons that fit perfect mortises too. No one had done such a thing and it meant anyone could make perfect doors, tables, chairs and much more by using a router plane and my mortise guide system. Though today this seems to be taken for granted, what happened was that router planes, which were already a more scarce plane, gradually went up and up in price and even the premium makers benefited from my work though I never had anything to do with them nor took any benefit from them. The secondhand router planes like the Stanley and Record #71 sell for as much and often more than the premium maker new ones weighing in at upwards of £150 whereas a decade ago they were a mere £10 on eBay.
I think you will understand my dilemma. Here I was, for years now, telling new woodworkers and those new to hand tool methods that this is an essential tool; one as essential as any plane, chisel or saw, yet the tool would cost them as much almost as all the other tools put together. A temporary fix early on was my poor-man’s router plane which comprised a simple piece of wood bored through to receive a chisel protruding through the opposite side. A great starter for any new maker, but lacking the ideal control necessary for finer quality work.
My concern was about something I felt responsible for yet didn’t have an answer for at that time! Another plane, one I have collected for their unusuality, is the Edward Preston and the Tyzack-type router plane with its rectangular platten. This too skyrocketed in price mostly because I use one and have written about them but not because they work any better than a Stanley #71-pattern router plane. Currently, I just looked, they are offered as an eBay Buy-it-Now at around £700 and go up to £1900. They are an unusual option but they do not work any better than their Stanley and Record cousins. Of course, there are always new planes too, both the Lie-Nielsen and Lee Valley Veritas versions of the router planes are solid options and they sell here in the UK for around £165 (when they are available to buy).

A little while back I sat down with my notepad and sketched out my possible options to help resolve a situation I found intolerable. You see, I have always sought answers for those who were looking for hand-tool methods of woodworking together with skilled methods and techniques of working. These were the people who were not looking for an industrial process but an industrious way of working with their hands. `They didn’t want to substitute for skill by using machine-only methods. They wanted to master skill.
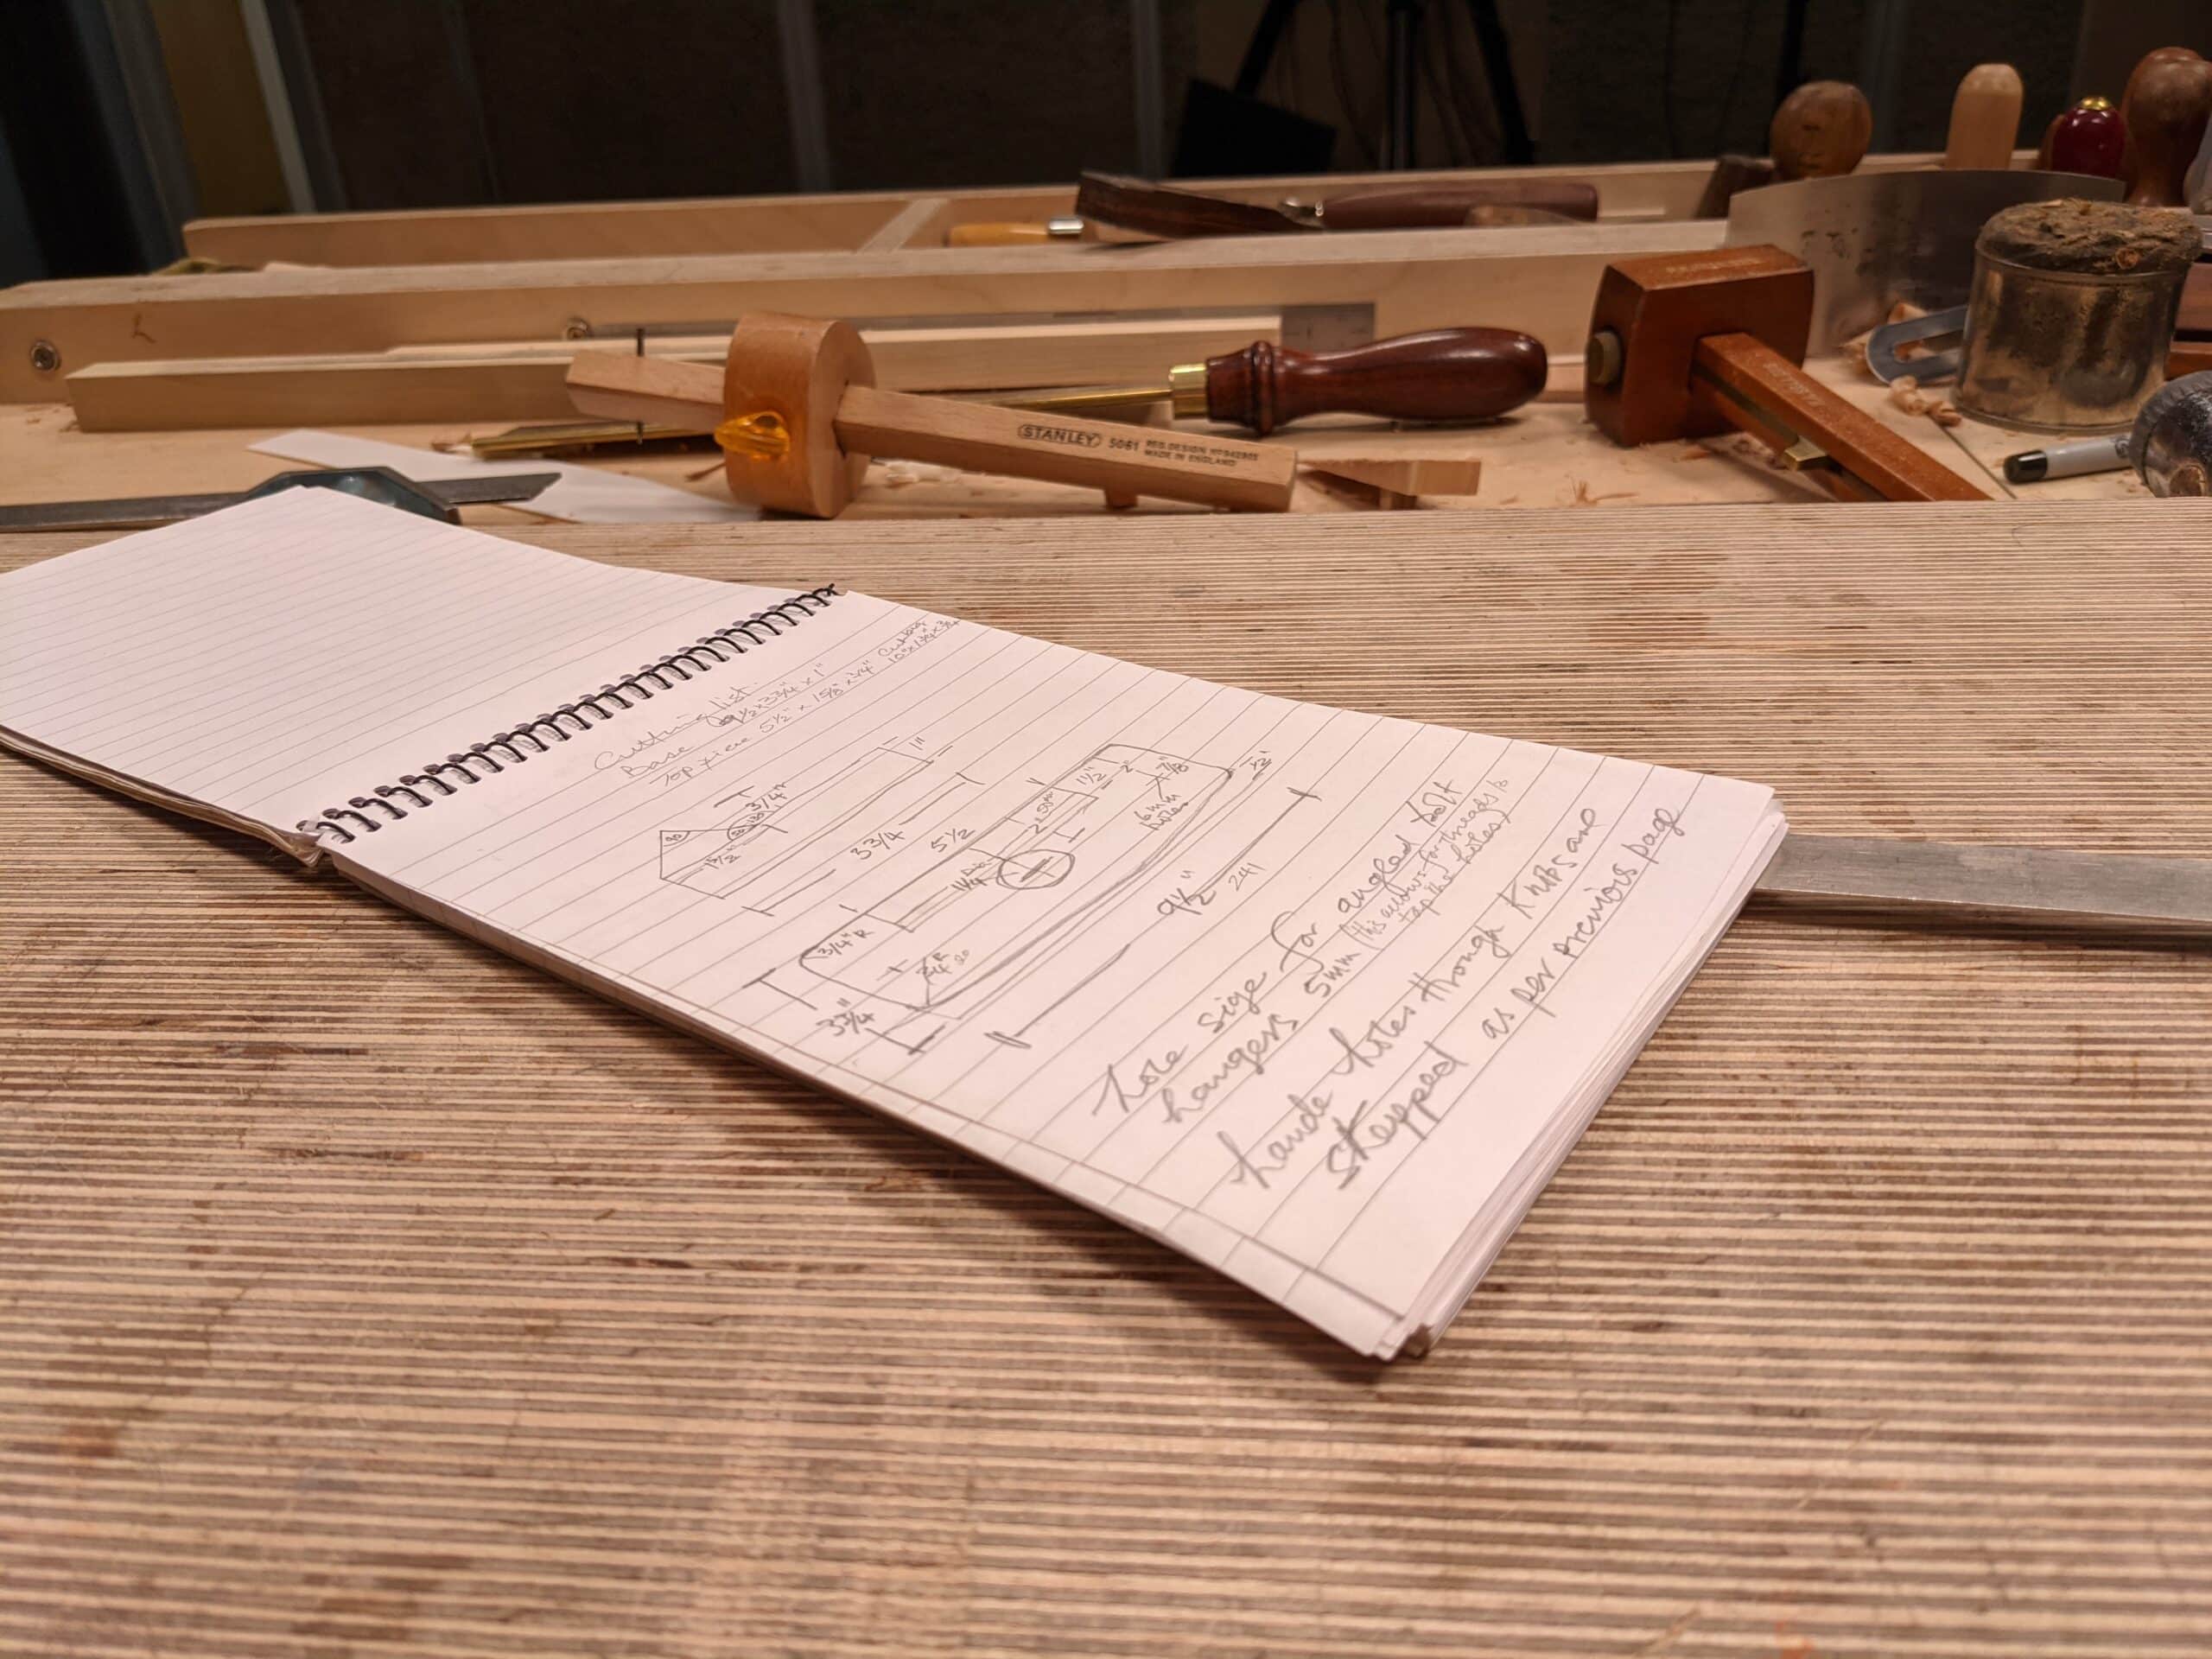
My first example of my idea came in the form of a cut down piece of wall stud — a 10″ length of two-by-four spruce if you will. At first it was a thread with filed nuts, wood screws and such; crude but working. Searches revealed the availability of a variety of components and with a blowtorch, a hacksaw and some O1 steel I came up with a cutting iron that worked great. I have come up with a wooden bodied router plane that has metal adjusters made from off-the-shelf components. It relies on sourcing a few components and making a wooden body and two metal components (a retainer bar and blade). I believe most woodworkers will be able to get the parts and build this for themselves. Since then, I have abandoned all of my metal router planes to use my wooden versions for everything. Why? Well, for some good reasons. I don’t know about you, but I found that the vertical shoe-type cutters always manage to vibrate loose and that is the same with all versions no matter which. I have also found that the linkage between the adjusters and the cutting edge can cause the blade to move both up and down in some measure. That’s not the case with my new router. What you set at remains firm and rock-solid all the way through at the setting you set — what you set is what you get. It is mainly to do with the wood-to-wood negotiation of the plane. Wood absorbs and dampens the vibration and rigors of routing, whereas metal seems always to loosen what should remain firm.
I am going to make a bold claim here. I have never used a better router plane than the one I am introducing to the woodworking world. It is one you can build yourself using inexpensive components. There is no compromise in quality or usability. You can make several and have interchangeable parts to cater to different needs should you so wish; that’s what I have done. We needed a direct answer to the problem of the price of router planes and we now have that because even a novice woodworker can make and use their very own with a small amount of time and effort sourcing the components and then perhaps a day’s work to make the plane itself.
Tomorrow we will be releasing part one of two about how to make the plane but I wanted to write this beforehand to explain the problem being solved here. I think you are going to love this. Stay tuned!
You think that we are going to love it. I’m sure we will love it. I must travel to Rome in the next days, but I’ll carry my tablet with me to see what you have created when I .come back to hotel. I don’t want to wait a week for knowing it.
Seriously: thank you very much for all you do.
By some reason or another I believe I will not be alone in sneaking away from work for some minutes tomorrow! Just now I feel like a pampered, spoiled, child.
Thanks, Paul! Can’t wait to see what you’ve come up with!
Hi Paul,
Yes, it’s very complicated now to find old qualited tools on lower prices.
But, you formed us to buy less ; just tools we need. So we won !
Cheers, Ludovic.
I’m not a regular commenter, but since this post epitomises everything I appreciate about the way you go about it Paul, it seems as good a place as any to say thank you for all that you do. And it’s not just about woodworking. In a world where vested interests (whether commercial or just the closed club of conventional wisdom) seek to make knowledge and opportunity exclusive and expensive, you strive to demystify, democratise and share both of those things to bring more people in. I love that you challenge the assumptions, misplaced obsessions, dogma and consumerism that can cloud our view, and take problems back to first principles so that the solution actually addresses a real need, and does so in the most efficient, affordable, understandable and accessible way. It’ s an approach that the world needs more of in almost every area of endeavour. Did I mention thanks?
Beautifully put Irv…
Hear hear, I wholeheartedly agree with this. Thank you Paul, for not just offering knowledge and inspiration in the woodworking area, but to me also in the area of being a downright honest person with some actual morals.
Very well put Irving
Hi Paul,
I wondered what a router plane would be like, but couldn’t face the cost. So I built a sort of sophisticated poor mans thing with an allen key ground down for the blade.
It was revelatory to use ….. ie even a very crap version of a unique tool will do something your other tools won’t.
Most importantly, it feels great to use a tool you made yourself.
So massive support from me.. I would love to make a better one.
Greg
Paul – Thank you for your genuine concern for all woodworkers in noticing the prices for these router planes are out of reach for many. You relate so well to your audience needs and it never comes across as a “hustle” to buy more things. Thanks for that. I love your design and plan to make a few. It is one of those projects where “Why didn’t I think of that?” but you saw the need and filled it. Thanks!!
Seen it on Instagram this morning. Simple (like the Columbus egg) and effective.
I just have to find where to buy knurled adjusting knobs.
Hi Paul, long time follower here. Can you tell me where I can find the adjusting mechanism for the bit? Thank you for all the great episodes. Tom D.
Hey Paul,
Thank you so much , i’ve been looking for a router for a year now, despite being wealthy i focus my money to my house and familly and my hobby get the least.
So i m thrilled about the idea of making one following your insigth.
Have a nice day, thank you so much for what you are doing to this craft.
I did wind up springing for a new router plane, since the used ones didn’t seem to be much of a savings. But I may try building yours as well, for comparison and as a learning exercise.
As others have said, thanks for seeing the need and looking for a way to address it!
Like Loxmyth, when I needed a router plane 4-5 years ago to build kitchen cabinet doors, I ended up with first a Lie-Nielsen, and then a Veritas — before they became outrageously expensive. It is handy having the 2 of them, but recently working with the Veritas on red oak for tenons, I noticed that sometimes when I thought I had adjusted it, the blade didn’t seem to have moved; adjusted again — still nothing; 3rd adjustment — way too much. I have since found that the post to which the blade is attached has just a bit of give in it; before tightening the lock screw, I give it a push back to make sure it is in place. So I was also very interested in building my own when this series started. I’ve found the tool steel on Amazon; will have to see if I can get the other metal components (especially threaded studs and knobs). Looking forward to the project.
Another possible factor: The first bit of motion of a mechanical connection may just be shifting contact from one side of the contacts to the other, an effect sometimes called “lashback”. This is why we’re advised to always adjust metal bench planes by bringing the blade forward toward the desired position (if you want to bring it back, overshoot and then come forward to dial it in). That way the contact side is the one that the blade will be pushed against when you start cutting, rather than the being a gap for it to shift back into. Your “nothing, nothing, oh there it goes” sounds a lot like the first two were just shifting the slack from one side to the other and only on the third were you actually getting contact and force in the right direction to move the blade, then when you push on it you’re moving the contacts back to the upper side. In that scenario your push is doing roughly the same thing that overshooting and coming back would. To confirm this: Does it happen only when moving the blade in one direction, not in the other?
Of course wooden planes, which don’t use threaded adjusters and clamp the blade directly, dodge this issue completely.
(I have an old chisel which broke off its plastic handle, which is waiting to be tried in one of Paul’s plane designs. Too many projects, too many interests, too little focus… I really need to start setting some priorities and schedules.)
Yet another reason why you are legend…Thank you Paul.
Champion.
Great work Paul by you and your team.
Well done.
All the best Jim.
Thanks Paul, really appreciate your guidance and will be building your new router plane. When I first read your posts regarding old Stanley 71’s about 6 years ago, the price was too much, but recently I decided that I needed a full sized router (had bought a mini one from Axminster), and was looking at coughing up the £160 for a Veritas/Lee Neilson, but found a ebay listing for Stanley 71, which I acquired for about £60, and is in good condition and works a treat (with new veritas blades). thanks again 🙂
Dear Paul,
This is my first reply to your blog.
I am new to hand woodworking and discover every day what, here in France, craftsmen seem to have left apart.
Your blog is really a source of inspiration. I am collecting, step by step, second-hand tools, and some new clamps. I am now ready to start building my workbench. The wood is drying in my garage for two months now.
I fully support your view about router planes and the prices reached on eBay… For sure, your design exactly fits my needs. The main issue will be now to find tool steel in a reasonable quantity, and not too expensive.
I have a question, relative to my limited knowledge of English language subtleties, and US variants… When you write two-by-four, does it mean two inches by four inches section (roughly 50 x 100 mm) or two quarter-inch by four quarter-inch (12 x 25 mm)? Or does it means two quarter-inch thick (i.e. 12 mm thick)?
Same question for four-by-four, is it 100×100 mm section (which is quite big) or something else, or 25 mm thick?
While reading other “experts” in translating English into French, I get confused.
This will not change my life, as I use reasonable stock sizes, but it will comfort me.
To conclude, I really appreciate your work and enthusiasm to share your knowledge and thoughts. Thirty years ago, this may have changed my professional direction. I have been working as an engineer for thirty years now and discovered recently that I missed something. I need to build something with my hands! It’s complementary to “intellectual” construction. And my direction may still change now…
Thanks again. I am looking forward to viewing the full router video series.
Best regards,
Yann
Hi Yann,
I’m not Paul, but a 2×4 refers to wood that is 2″ thick by 4″ wide in cross section.
Cheers,
Jerry
I will add to Jerry’s comment to say that in the states it gets even more confusing…the actual dimensions of a 2×4 (like you would purchase in a store) are really closer to “1.5 x 3.5”. By the time the milling from the log is done the board is reduced in size, but they still call it a 2×4. The original boards from quite some time ago were actually 2″ by 4″, but with modern milling that is no longer the case.
It isn’t just that. The wood is cut to a 2″ x 4″ size and the shrinkage, as well as the milling, must naturally be paid for by the consumer.
Paul:
Again, you’re right on point. The fact that worry about the so-called Paul Sellers Effect speaks volumes as to your character.
I was able to purchase a Stanley 71, almost in new condition, off eBay several years ago, when the prices were more reasonable, around $40 US as I recall.
One more technical question/comment. I wonder if placing a rubber o-ring might absorb some of the vibration, allowing the router iron to remain more steady?
I’ve just watched first episode of your new router build, i’ve been looking for second hand router but out of my price range, so so glad i didn’t manage to by one yours looks absolute quality and better and the thought of making a few myself is so exciting i cant wait to build one any chance you could mention were we could buy the parts from.
Thanks again Paul for everything you do.
Sean
Mi hobbie era solo la tornería en madera; al ver tus videos me entusiamé y conocí el mundo de la carpintería a mano; y estoy apasionado por ha hacer mis cosas a mano; me fascinó…ahora con tu nuevo enrutador, agradezco haberte conocido on line. Haré los míos seguiré gracias a ti. Muchas gracias.
Hi Paul,
It looks like it might be a good time to update the Router Plane Buying Guide on the Common Woodworking site here: https://commonwoodworking.com/buying-a-router-plane/
I’m slowly gathering the bits and pieces to build my own now. I have knobs, 1/8″x1″ flat bar, and will be ordering the tool steel soon. Shopping around for some hardwood as well, I might grab a piece of Cherry firewood from a friend…
Thanks again for being such a great resource for the woodworking community!
Stephen in Long Beach, CA
Just downloaded your plans for the router plane. I really like the design. I only hope my skills are up to the task. Your videos are very informative and inspire me to do better work…thanks.
The local timber yard sells CND beech. Never used beech before. Their webside mentions steaming to change its colour and improve workability. will need to buy a 8ft length of 6 by 1, but it is only £11,
Looking at what I already have initially, before the kit is available. Have some WTM dowels but only 40mm, but should be OK to hold the retaining bar. I have some 6mm inserts, so may use one of these with a length of 6mm threaded rod rather than WTM dowels. Using threadlock to stop the rod turning. might make my own adjuster nut from with some steel bar or cut a slice of a brass dowel and tap it. So might only need to buy the wood and 01 steel. Although I do have some 6mm sq, so might make one with a smaller cutter. thinking that I could add a slotted collar for the adjuster nut to push against.
I know that Paul didn’t have an issue doing it, but I don’t like the idea of holding threaded rod in a drill chuck. So will add a lock nut and threaded rod connector nut (locking them together) and then chuck the long nut. Adds to the time, but feel happier doing this. I can see that drilling them in will make them more likely to drive straight, a spanner on a locknut cut drive them in out of square unless very careful.
It sounds as though there was a problem for either the chuck or the threaded rod here but I can assure everyone that there was no issue. I found alignment much better and almost flawless. Just for clarity!
Cheers Paul. Yes I could see how well it worked in your video. I wasn’t being critical. You are not the first person that I have seen chuck a threaded rod. It just grates with me when I see it.
I can see that if it bottoms out in the chuck then there is no room for it to turn. I have also seen WTM dowels online with a torx screwdriver fitting on the end. Which is another way of driving them.
Paul
having thought about using threaded inserts and threaded rod i thought i might struggle to get them central and driving straight. Today I was in B&Q and found some 60mm 6mm metal dowels, so bought a pack of 5. when i opened them i was disappointed to see that there is only 20mm of 6mm thread, there being a 10mm hex section below this. However, a thread joining nut will pass over this section, and as the recommended adjusting 466 nut as a long thread it will do the same, I assume without any issue
Really rather than thinking about it, I really need to drive to the nearby timber yard, buy some beech, and shape the timber section. Buy the 01 steel and a din 466 nut online(planning on using wing nuts for the retain bar – have loads, plus all of the other bits).