Hinges and Hingeing
Hinges come to us in a wide range of highly sophisticated types ranging from the kitchen cabinet, 35 mm hinges intended for mass-making cabinets and giving multidirectional adjustability for face-fixed, overlaid doors via mechanics built into the hinge via several cantilevering setscrews to simple, traditional and basic butt hinges with zero adjustability once fitted.
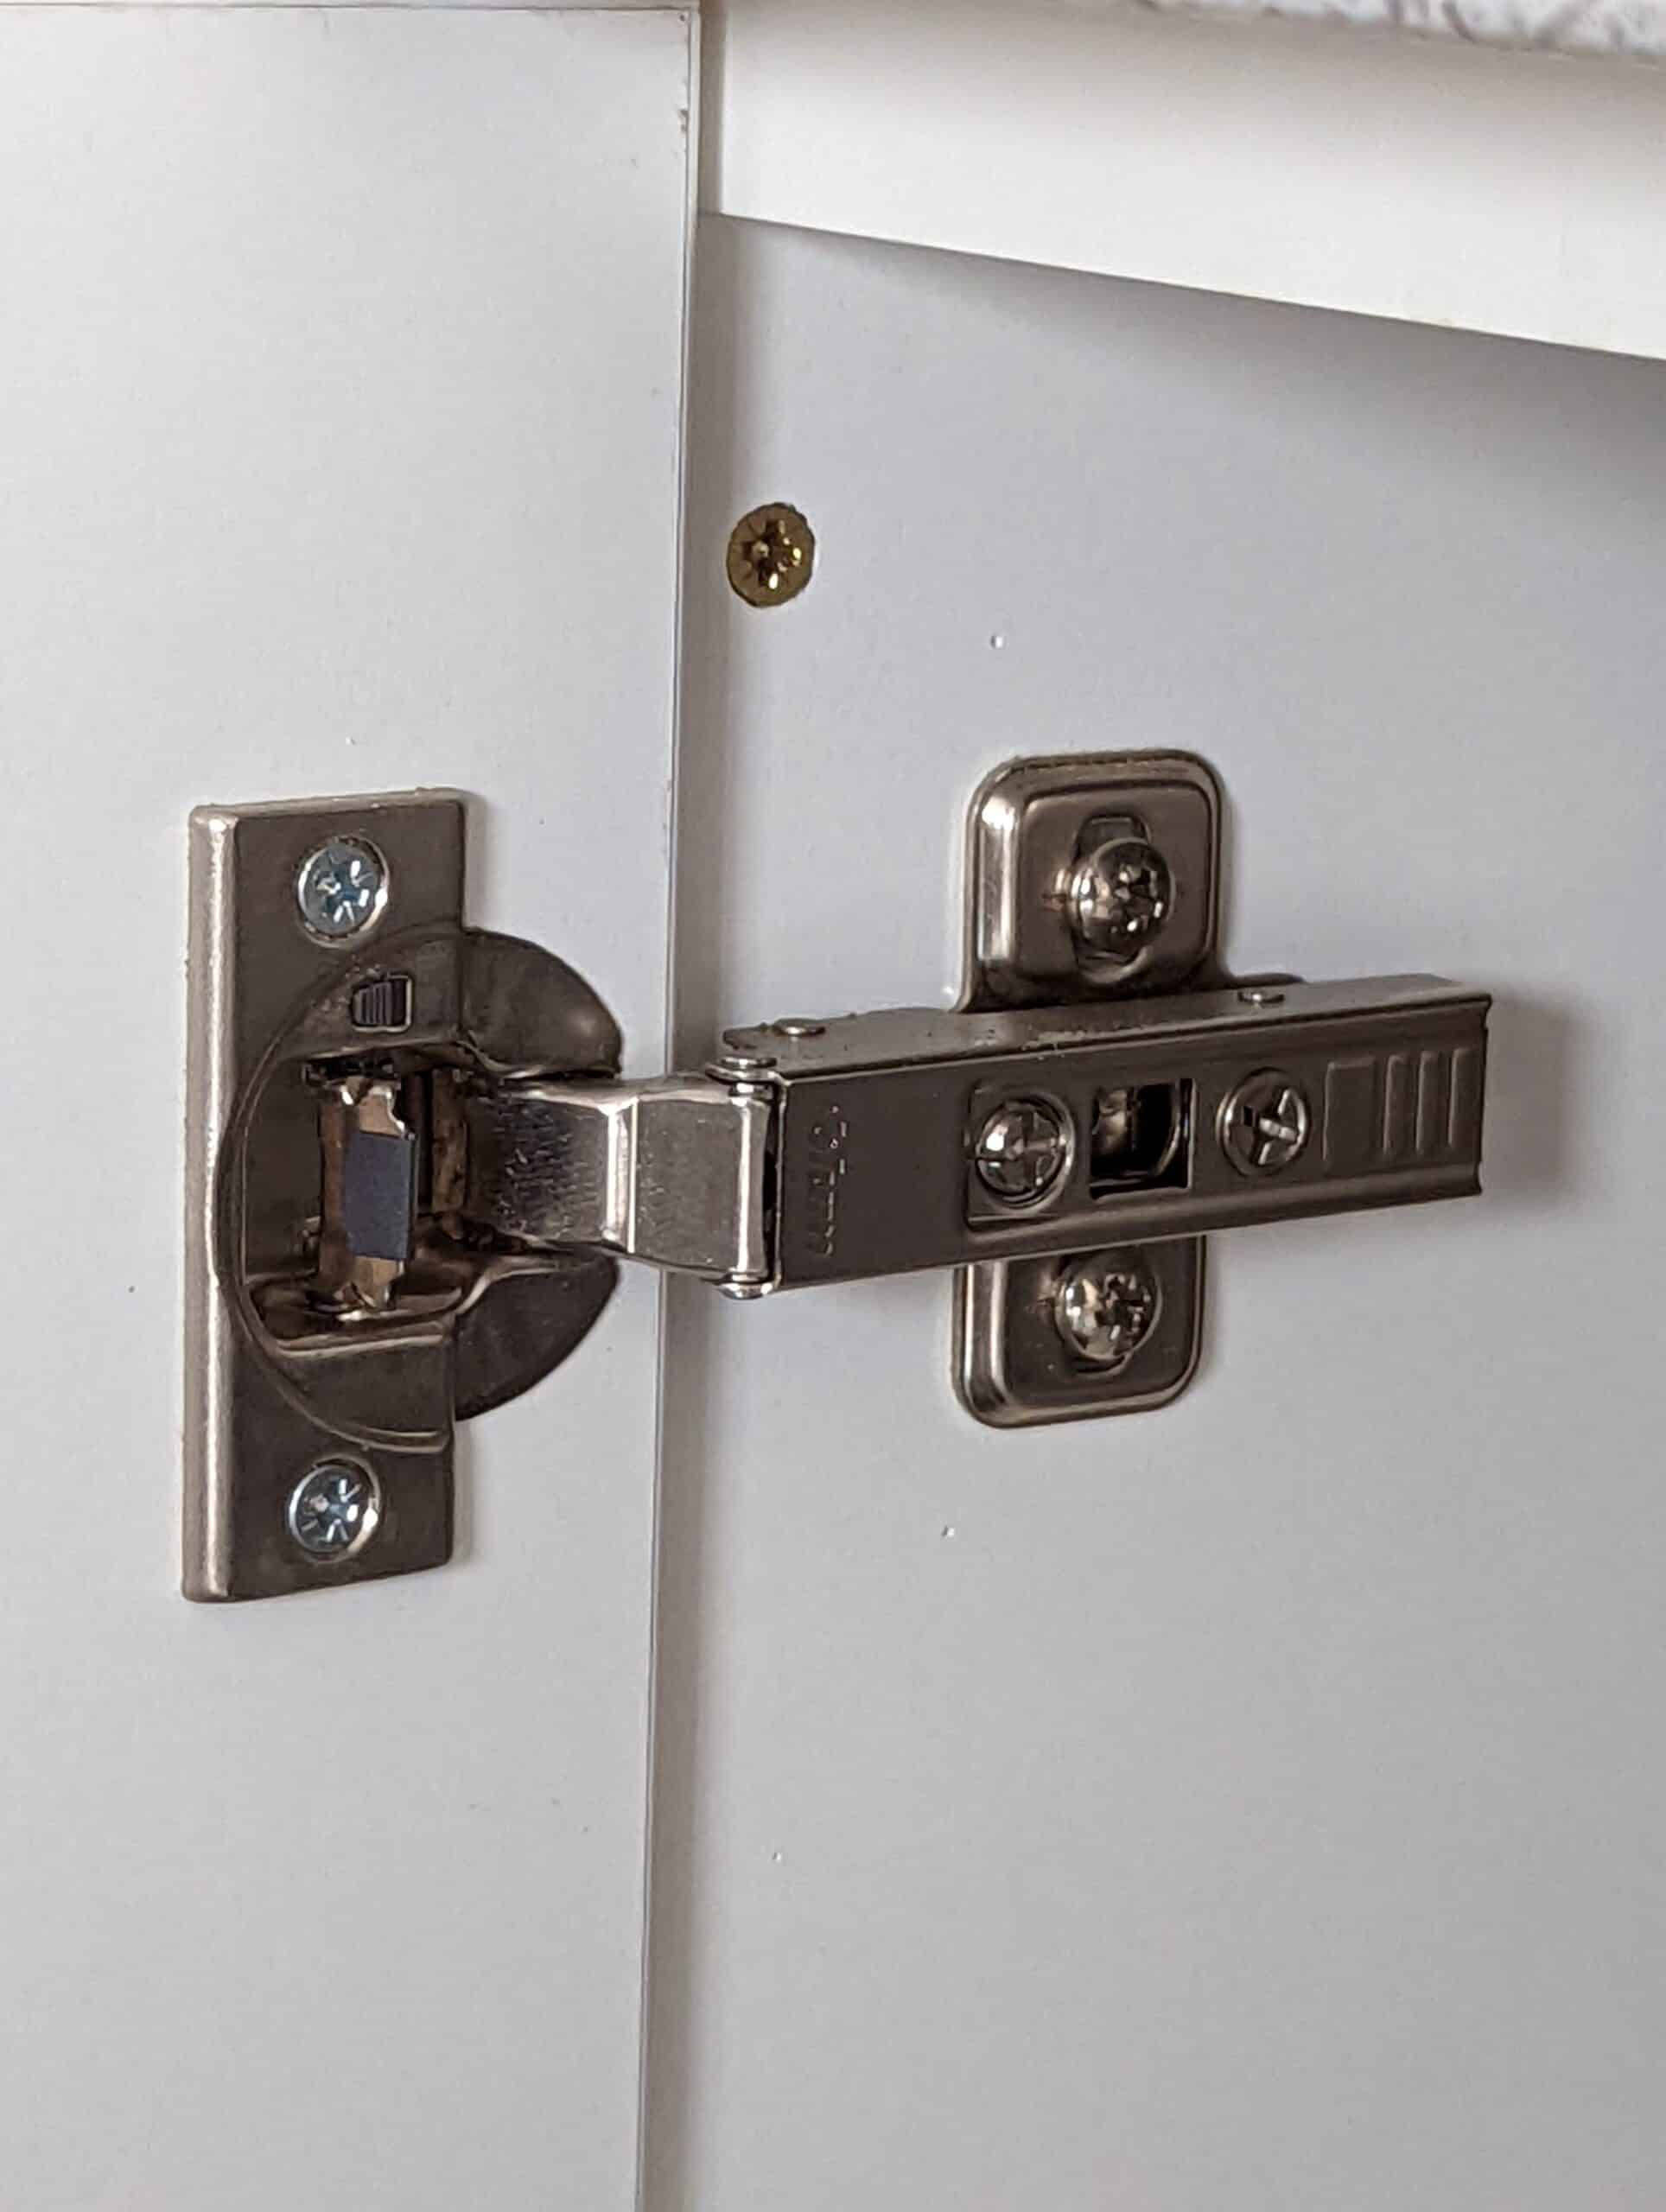
The first provides (above`) permanent realignment possibilities catering to twist, drop, sag and parallelity and just about any other shifts that take place in the lifetime of heavy-use cabinets. In general, these hinges have become ever-more sophisticated by adding soft- and self-close mechanics that barely make any noise when opened and closed and when fitted and maintained properly. Would I use these adjustable hinges on fine furniture? No, at least I doubt it. I have made cabinets that used them in the past, primarily because it was what my customer wanted at the time. For several reasons, mostly adverse extensions within the hinge that increase leverage, these hinges don’t last too long. perhaps three decades but generally less. I also have some pieces of office furniture that are fitted with these hinges and though they are perfect for their application, I wouldn’t like them in the furniture I make. But of course, hinges span the gamut from small boxes to massive entrance doors.
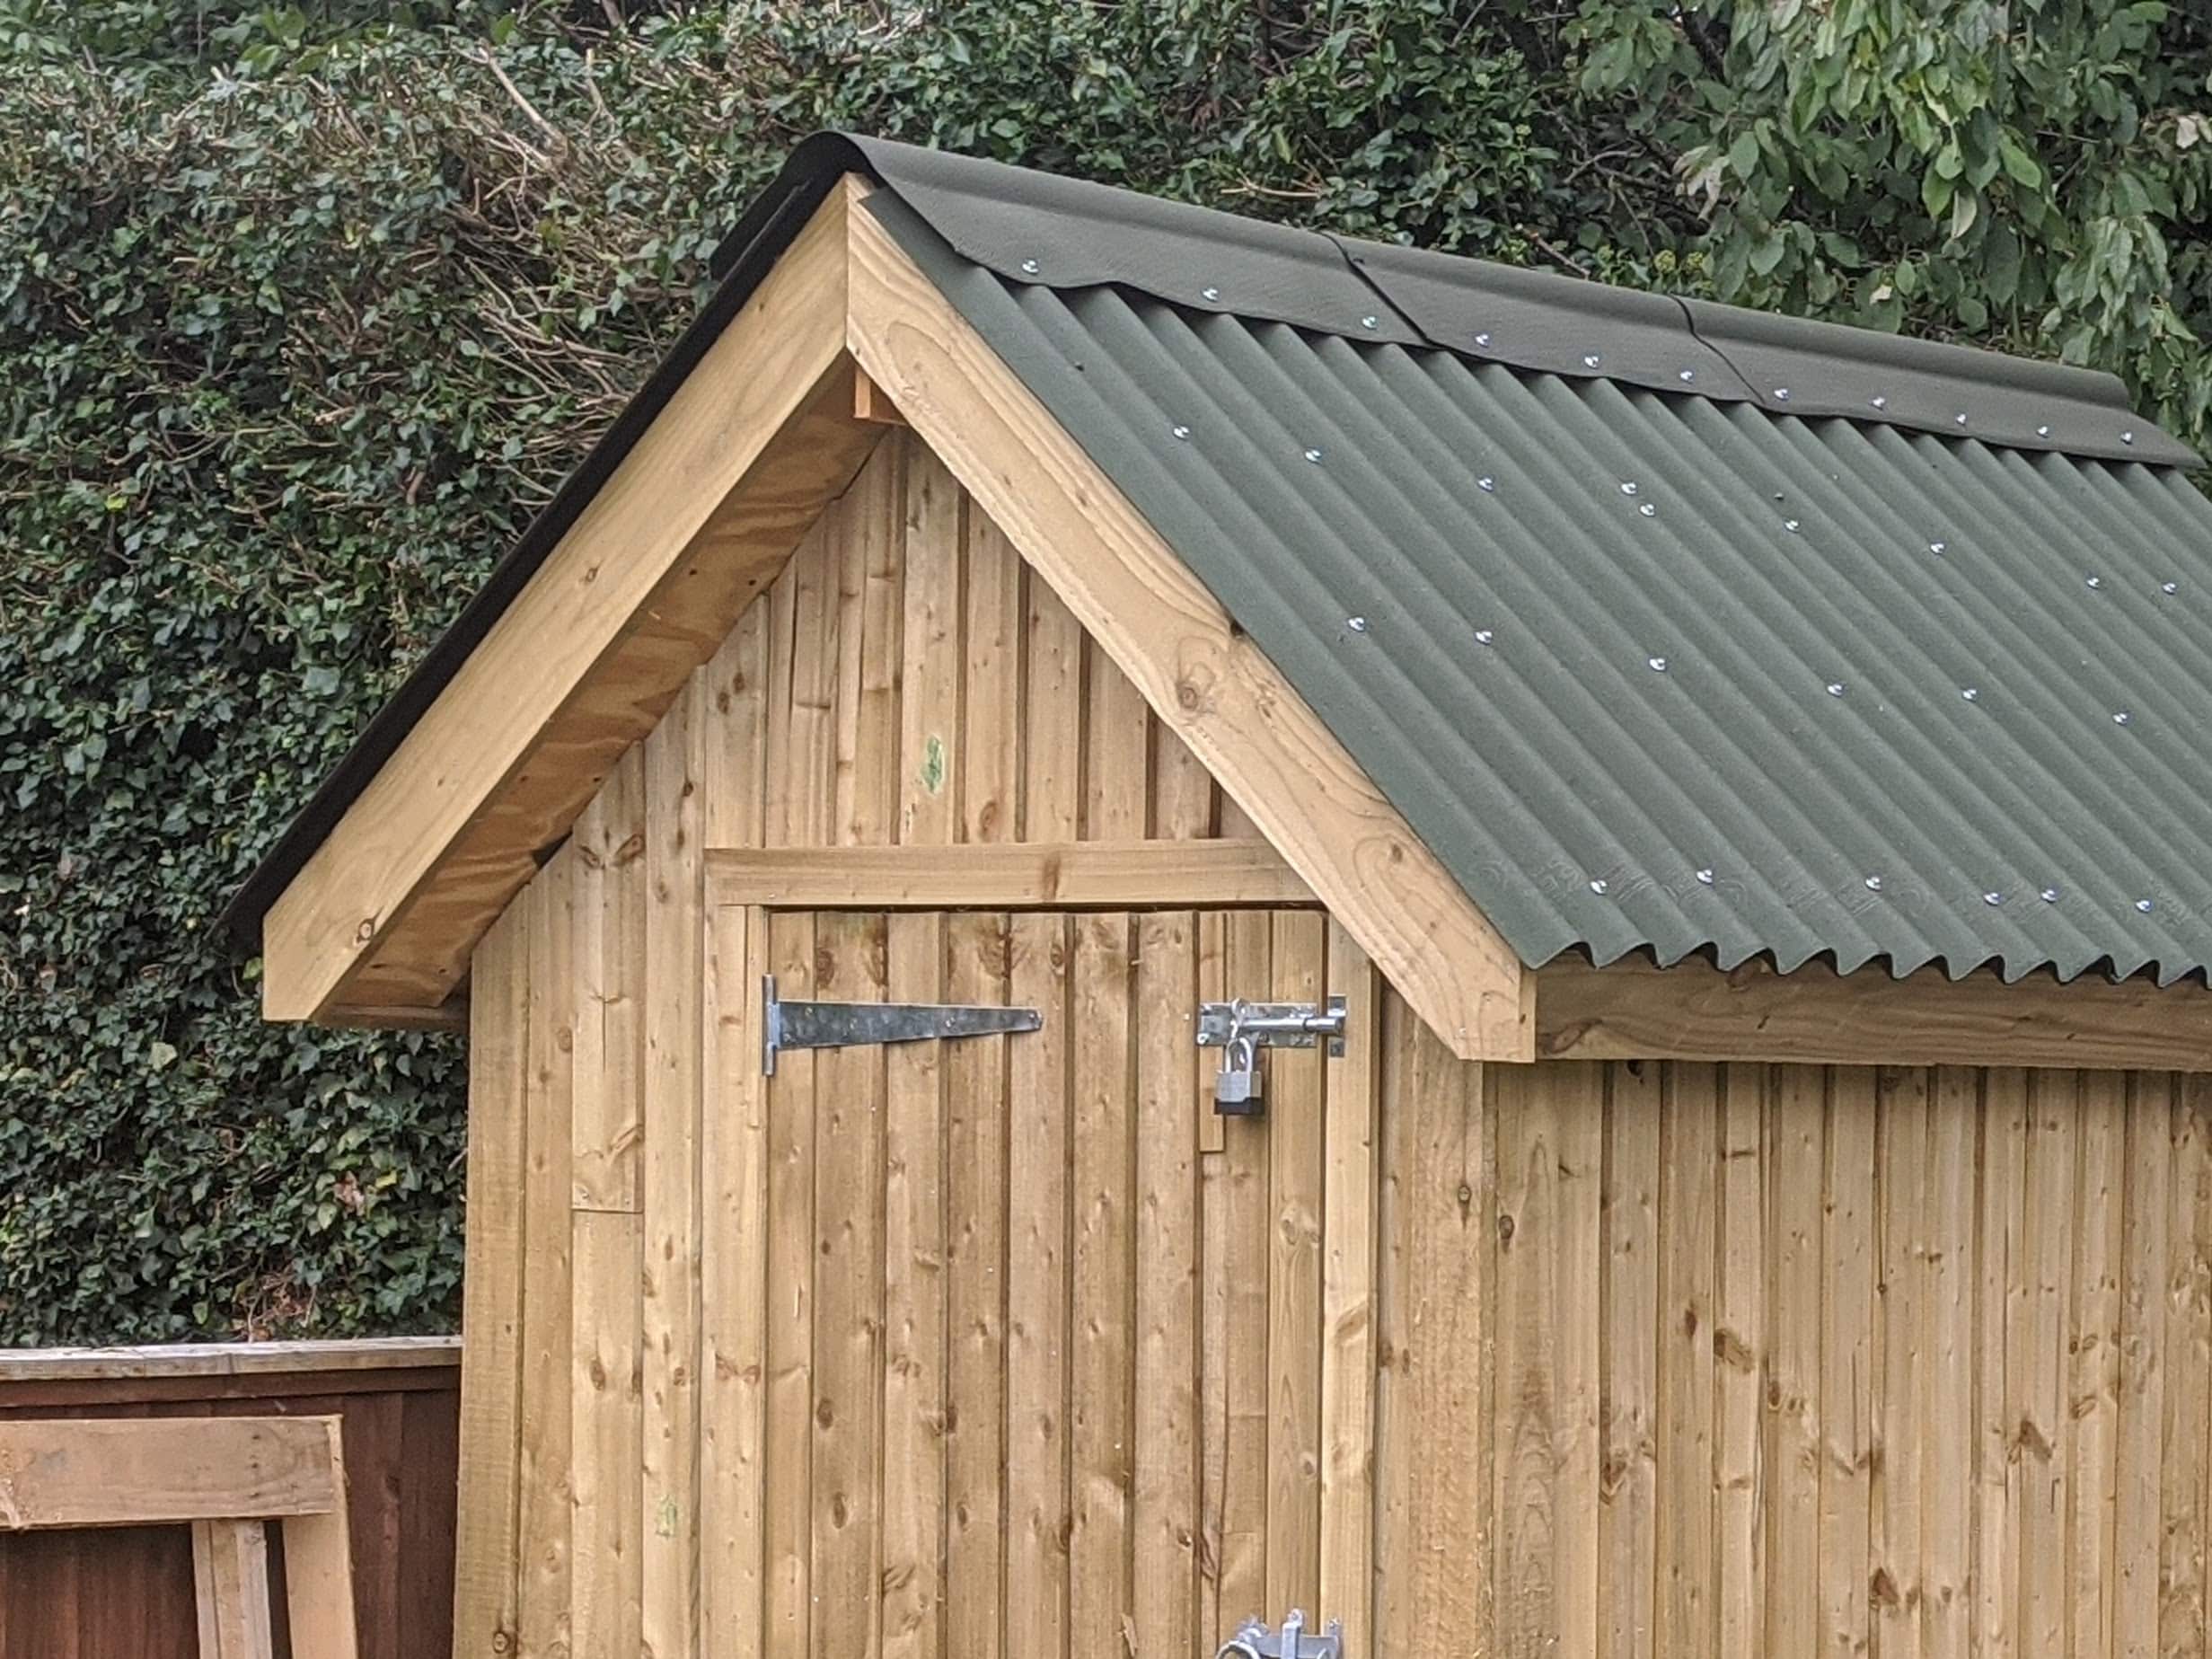
Hiding hinges is not part of my objective in making. A well-fitted two-flap traditional hinge, recessed into stile and frame or case is a lifetime probability intended to and likely to last for at least a hundred years. Some such hinges have hardened steel anti-wear washers fitted between the moving contact areas for improved longevity but this is usually on heavy doors, but even the softer metal brass hinges will still last for a hundred years of ongoing daily use. Face-fixed hinges are usually the most evident of hinges in that usually they fully face the outside elements on the door’s most evident face. Some face-fixed hinges are indeed purely utilitarian whereas others combine ornamentation and strength and include an overall structural support even to a whole door. These too have their place. Garden gates exemplify the functionality of face-fixed hinges and other fastenings. These are the easiest of all to fit. Wedge the door in place, place the hinges carefully and drill holes accurately and the hinges will function just fine. Again, decoration is not usually what I want on my furniture but `I do like my hinges to be evidently present.
Recessed hinges
Recessed hinges are very often avoided by woodworkers, especially in commerce, mostly because they can seem a fussy way of hingeing a door or a lid. In general, you must work within quite tight tolerances to get everything to align well, usually within hundredths of an inch or centimeter anyway. Many assumptions surround the recessing of hinges and it’s this that I want to talk about because it is these assumptions that often lead to our being misguided in our fitting.
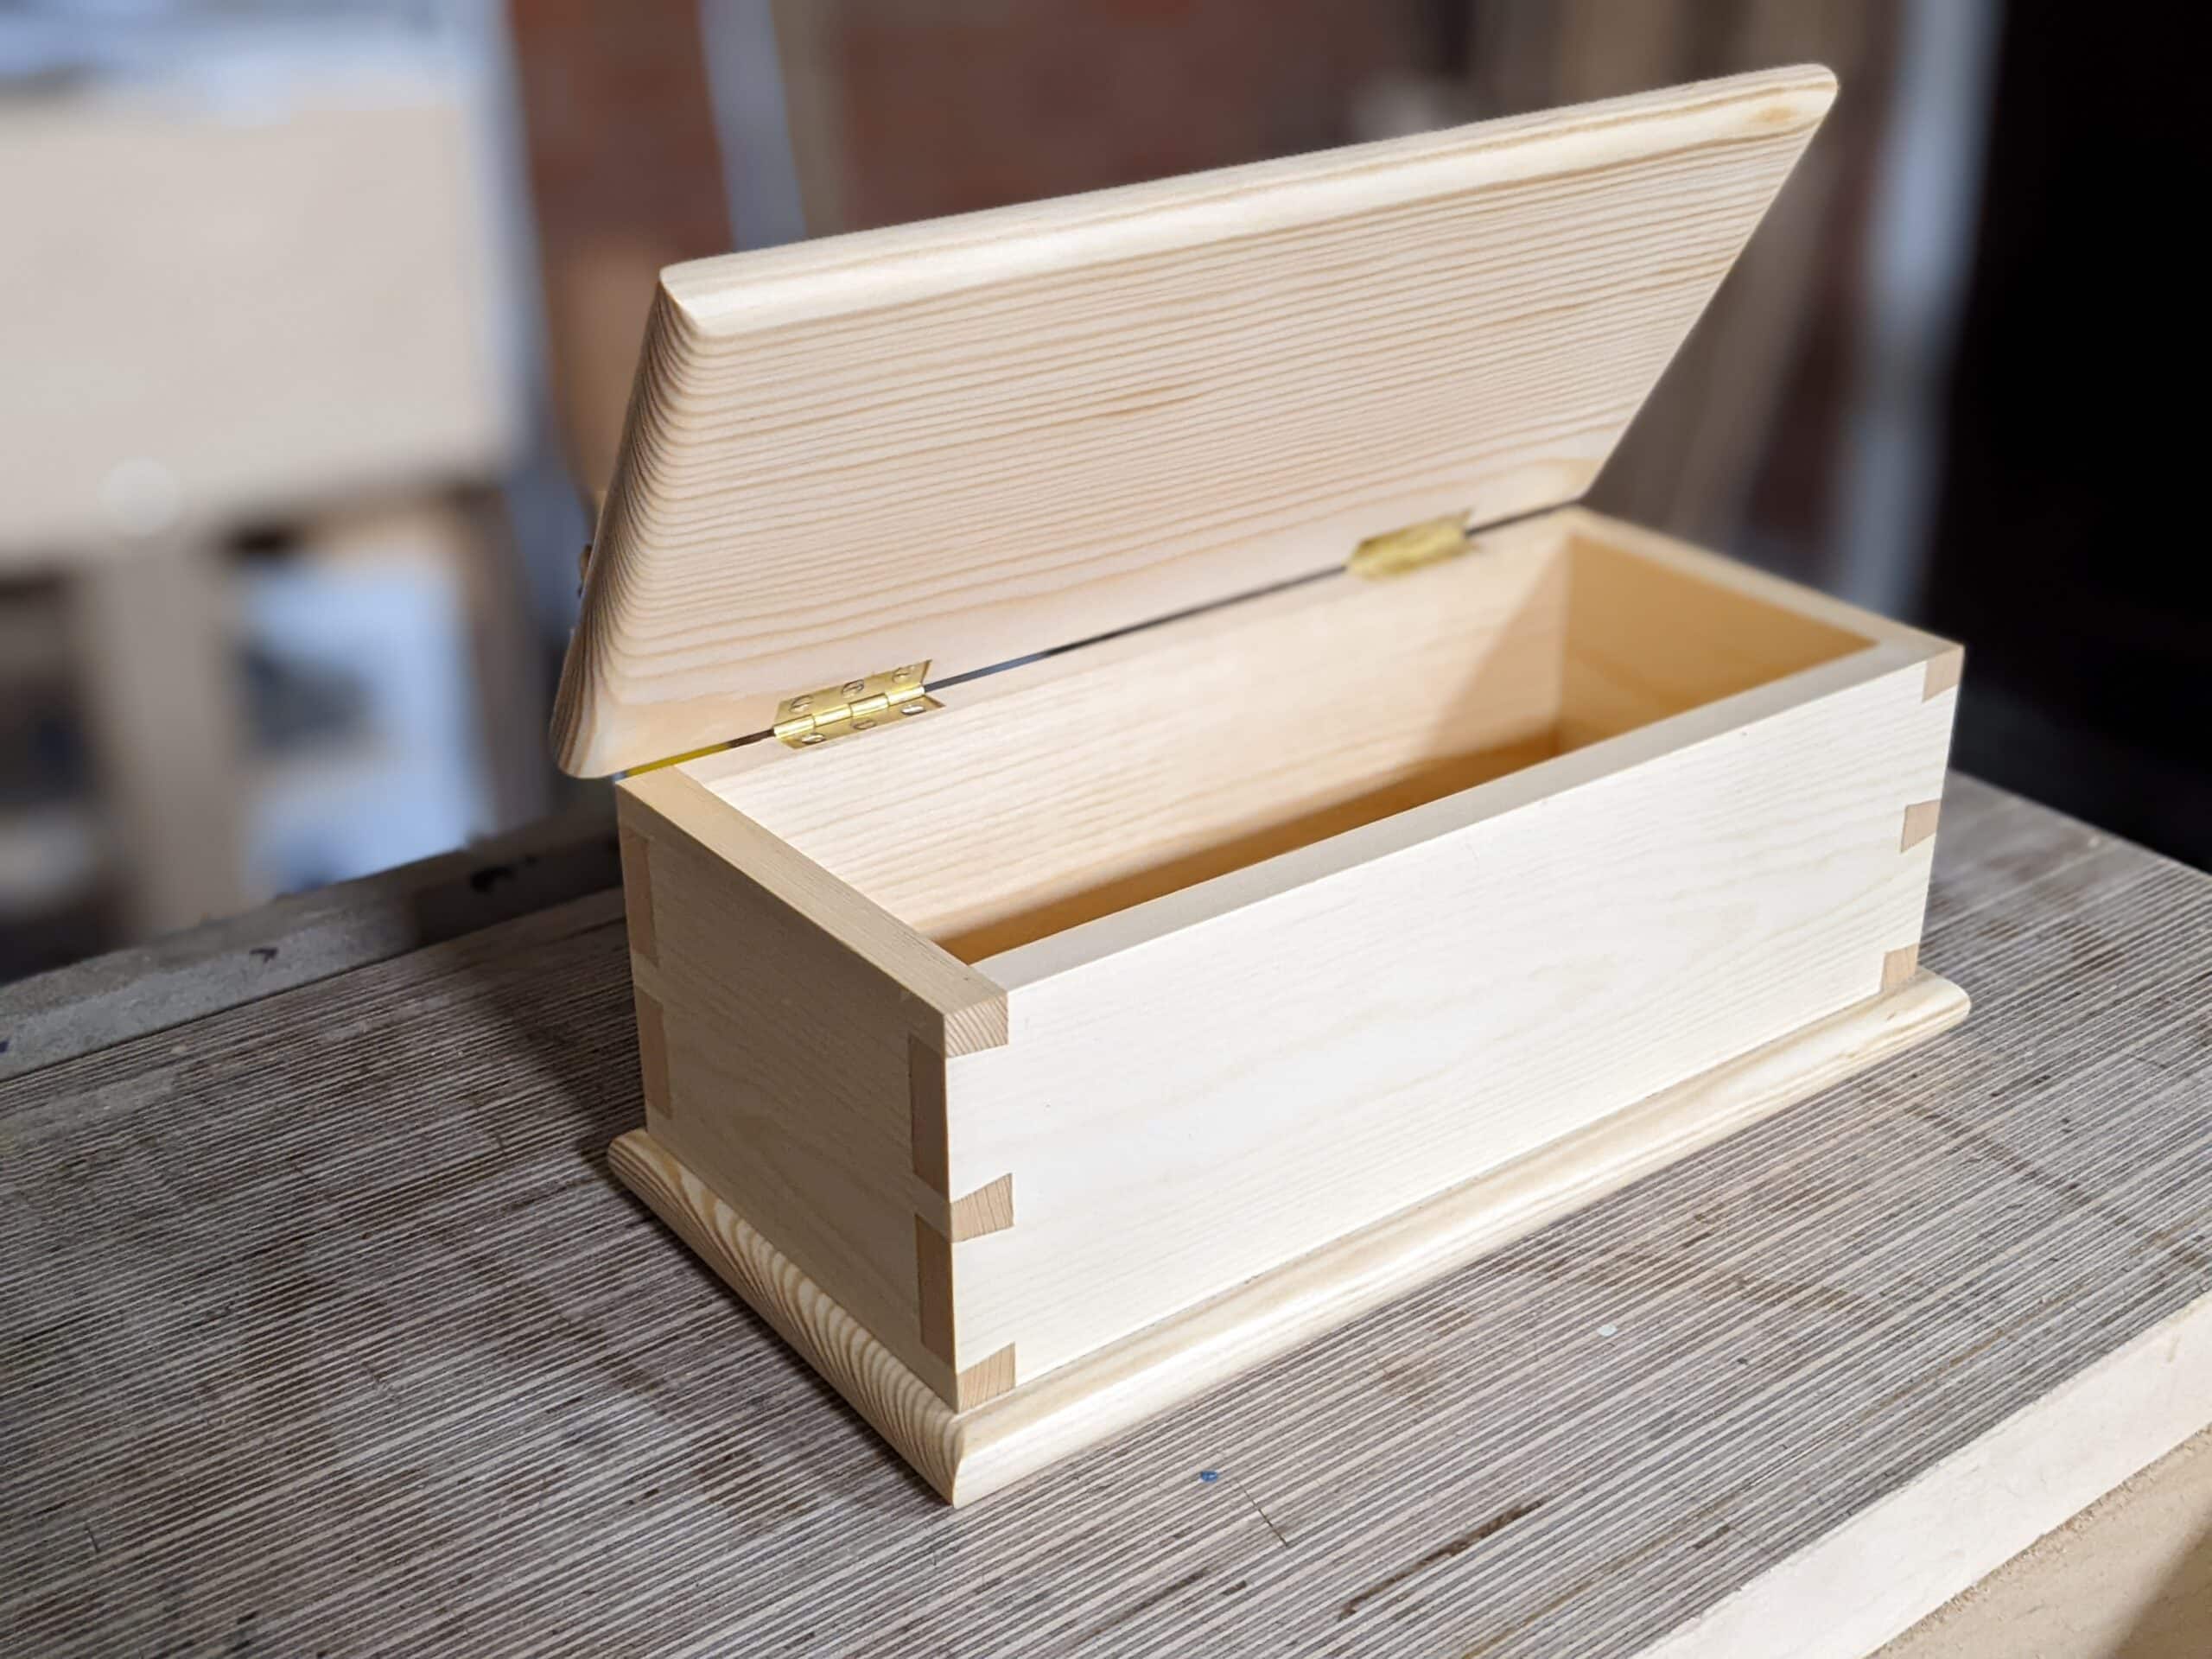
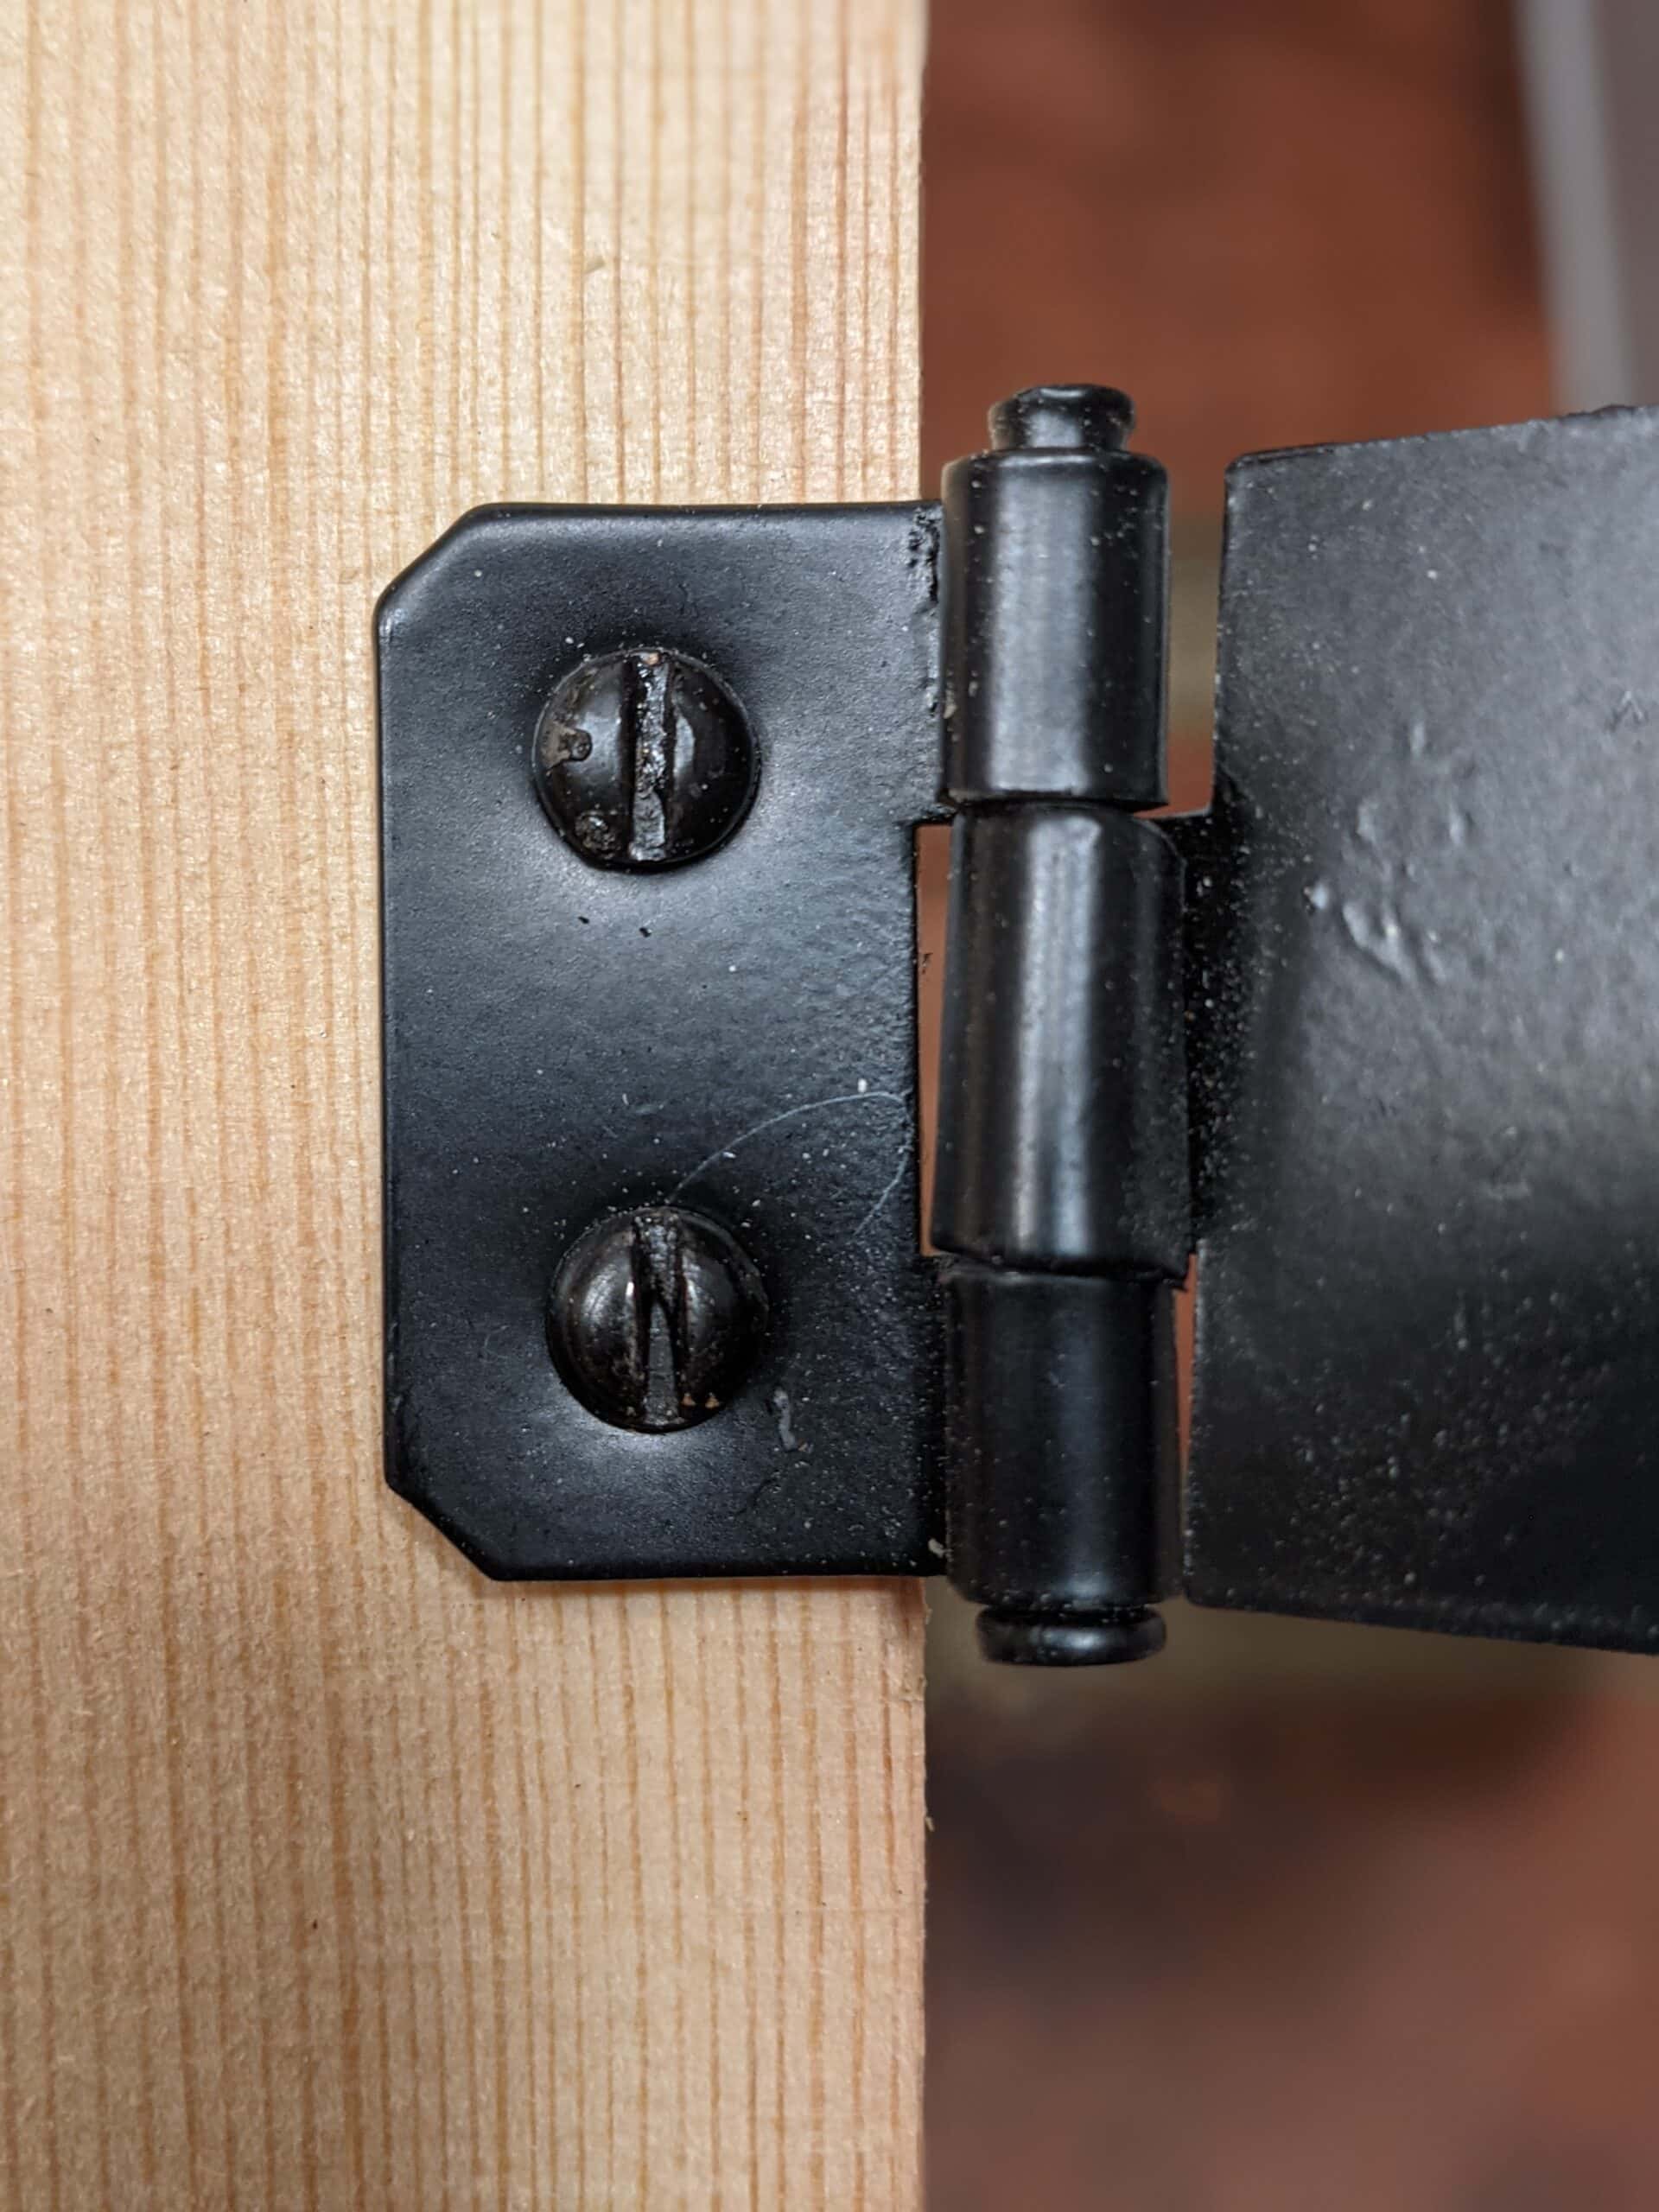
The recesses are usually chiseled or power-routed into the edges of doors to receive the flat hinge plates with one being attached to the moving element and the other to the fixed immovable one. Of course, as always, there are strays from this. A box with a face-fixed lid for instance, can have the hinge recessed into the underside or inside the face of the lid but then recessed into the rim of the box. That’s quite common and it’s easiest to do too. Whatever way you develop your hingeing, an important element is the amount of gap there is between the hinge flaps when closed. Unfortunately, there is no such thing as an industry standard. This then needs for us to decide what gap we want, whether we want the hinges deepened to a depth deeper than the thickness of the flap of the chosen hinges and things like that. Our greatest concern is the gap distance. Too much looks ugly even though functionally it will work well, too small and the wood can swell closed the gap due to humidity and the door or lid will stick and jam.

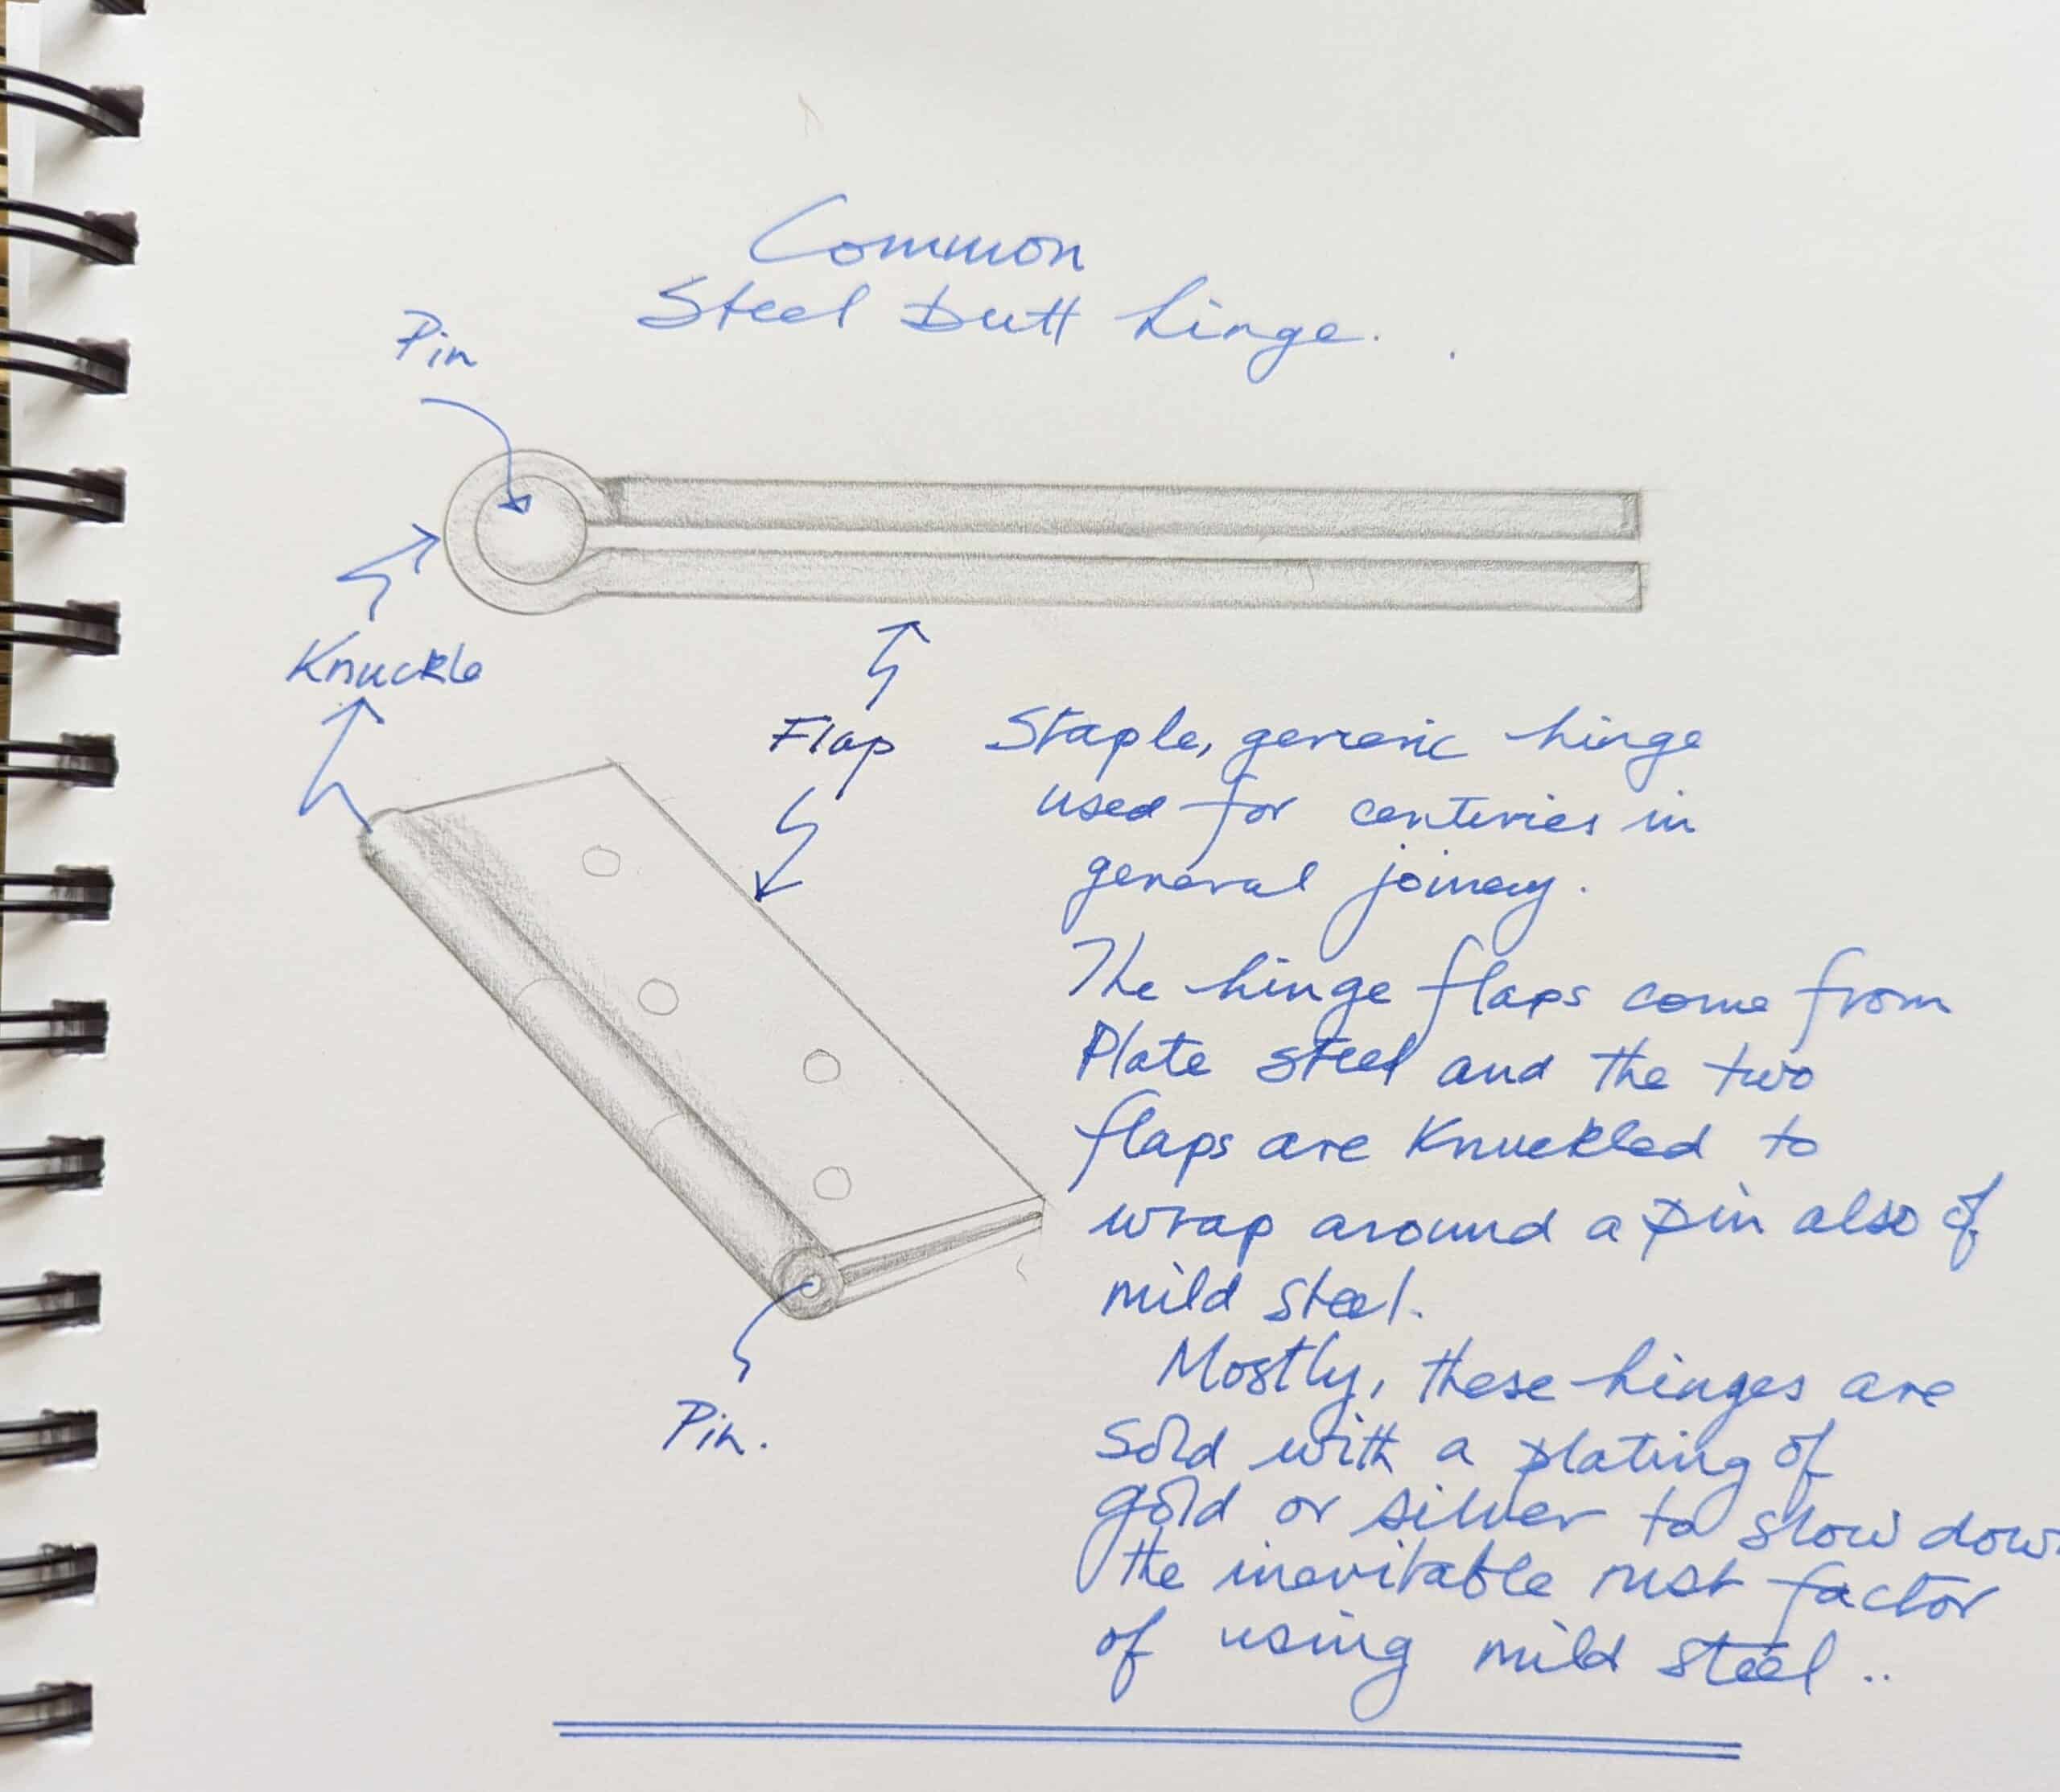
I often found that my students wanted the flap of the hinge perfectly flush with the surrounding wood. The hinge type affects how this will look. The common, steel butt hinge commonly used in hingeing larger doors for say a house or an office room door is stamped out from plate steel and tongues cut into the steel then fold around a central pin we call the hinge pin to interlock the plates or flaps together permanently. These hinges tend to be more utilitarian in function and appearance rather than attractive or decorative. When the hinge is folded to, it often has a large gap with thin steel of say 2-3 mm. The gap between the two flaps when folded can be somewhere around 4 mm. When you close the door shut, the gap will indeed be 3-4 mm if you did set the hinge into a recess where the plate steel lays flush with the surrounding wood. On an internal door, this gap is too big for a refined fit. The advantage of so big a gap is that the wood will usually not bind or stick when the humidity is high. But a more accepted gap will be about 2 mm down to 1 mm.
The thickness of a vintage UK penny was often used as a standard to reach for. Inserting the penny into a gap on a hinged door to make sure that the door was even all the way around the door was often espoused by old-timers who talked of a skilled craftsman leaving a door where the penny would self-hold at any point when the door was closed. That wasn’t at all true. I would that wood was that stable. It’s not. Wood expands and contracts considerably and especially softwoods such as is used in the manufacture of general house doors.

Recessing hinges in house doors means gauging the hinge gap, the thickness of the flaps and determining what gap you want in the finished hung door. If the gap between the two closed hinge flaps by the knuckle is 4mm, and the flap of the hinge is 2mm thick, when the hinge is in the closed and parallel position as shown, the overall distance from outside flap to outside flap will be 8mm. If you want a gap of 2mm then you will recess both hinges to 3 mm each. However, if you did indeed want a flush appearance to the most visible of the flaps, possibly the door hinge plate, then you can recess this one flush to the door stile wood and recess the doorframe/casing flap to 4 mm to compensate. This less uniform but the practice was quite common enough and joiners I worked with either on-site or at the bench usually set two gauges to establish the depths of the two different flap recesses. When a door was planed undersize by mistake or indeed made undersize by mistake, the joiner wood either not recess one of the hinges or half recess them equally so that at least the hinge had a retentive and registration ability. They might also scotch the hinges.
Scotching hinges
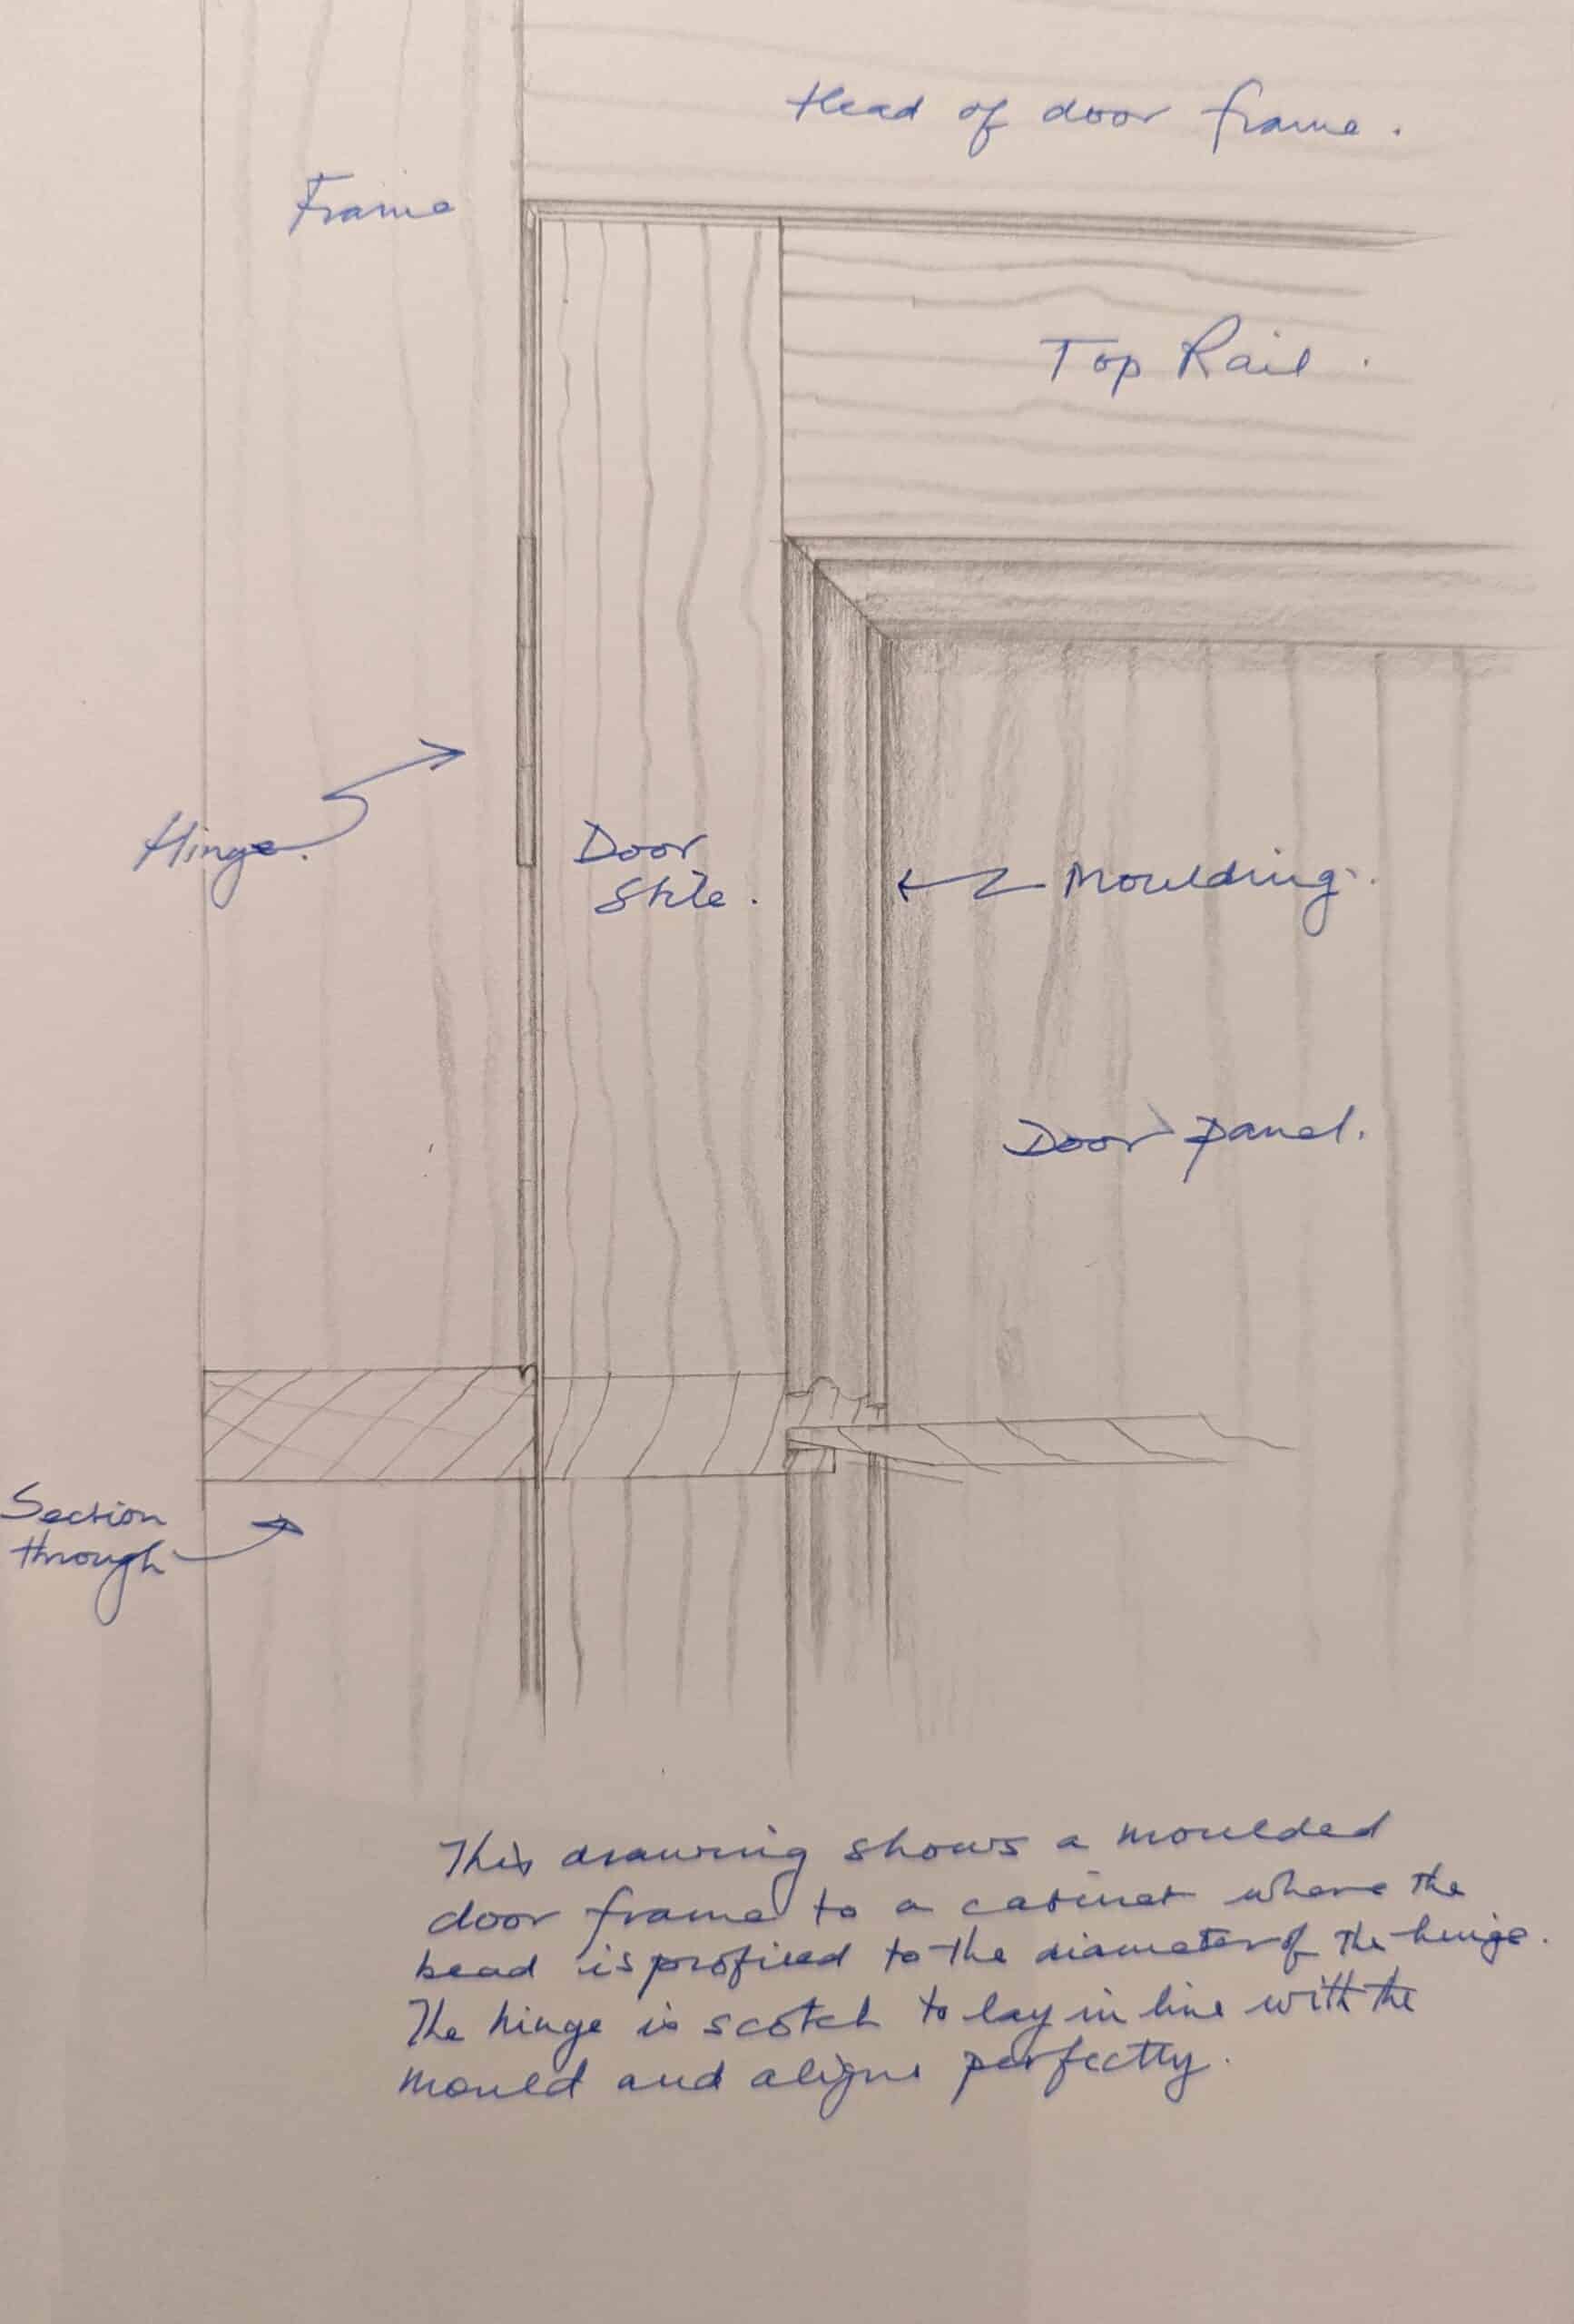
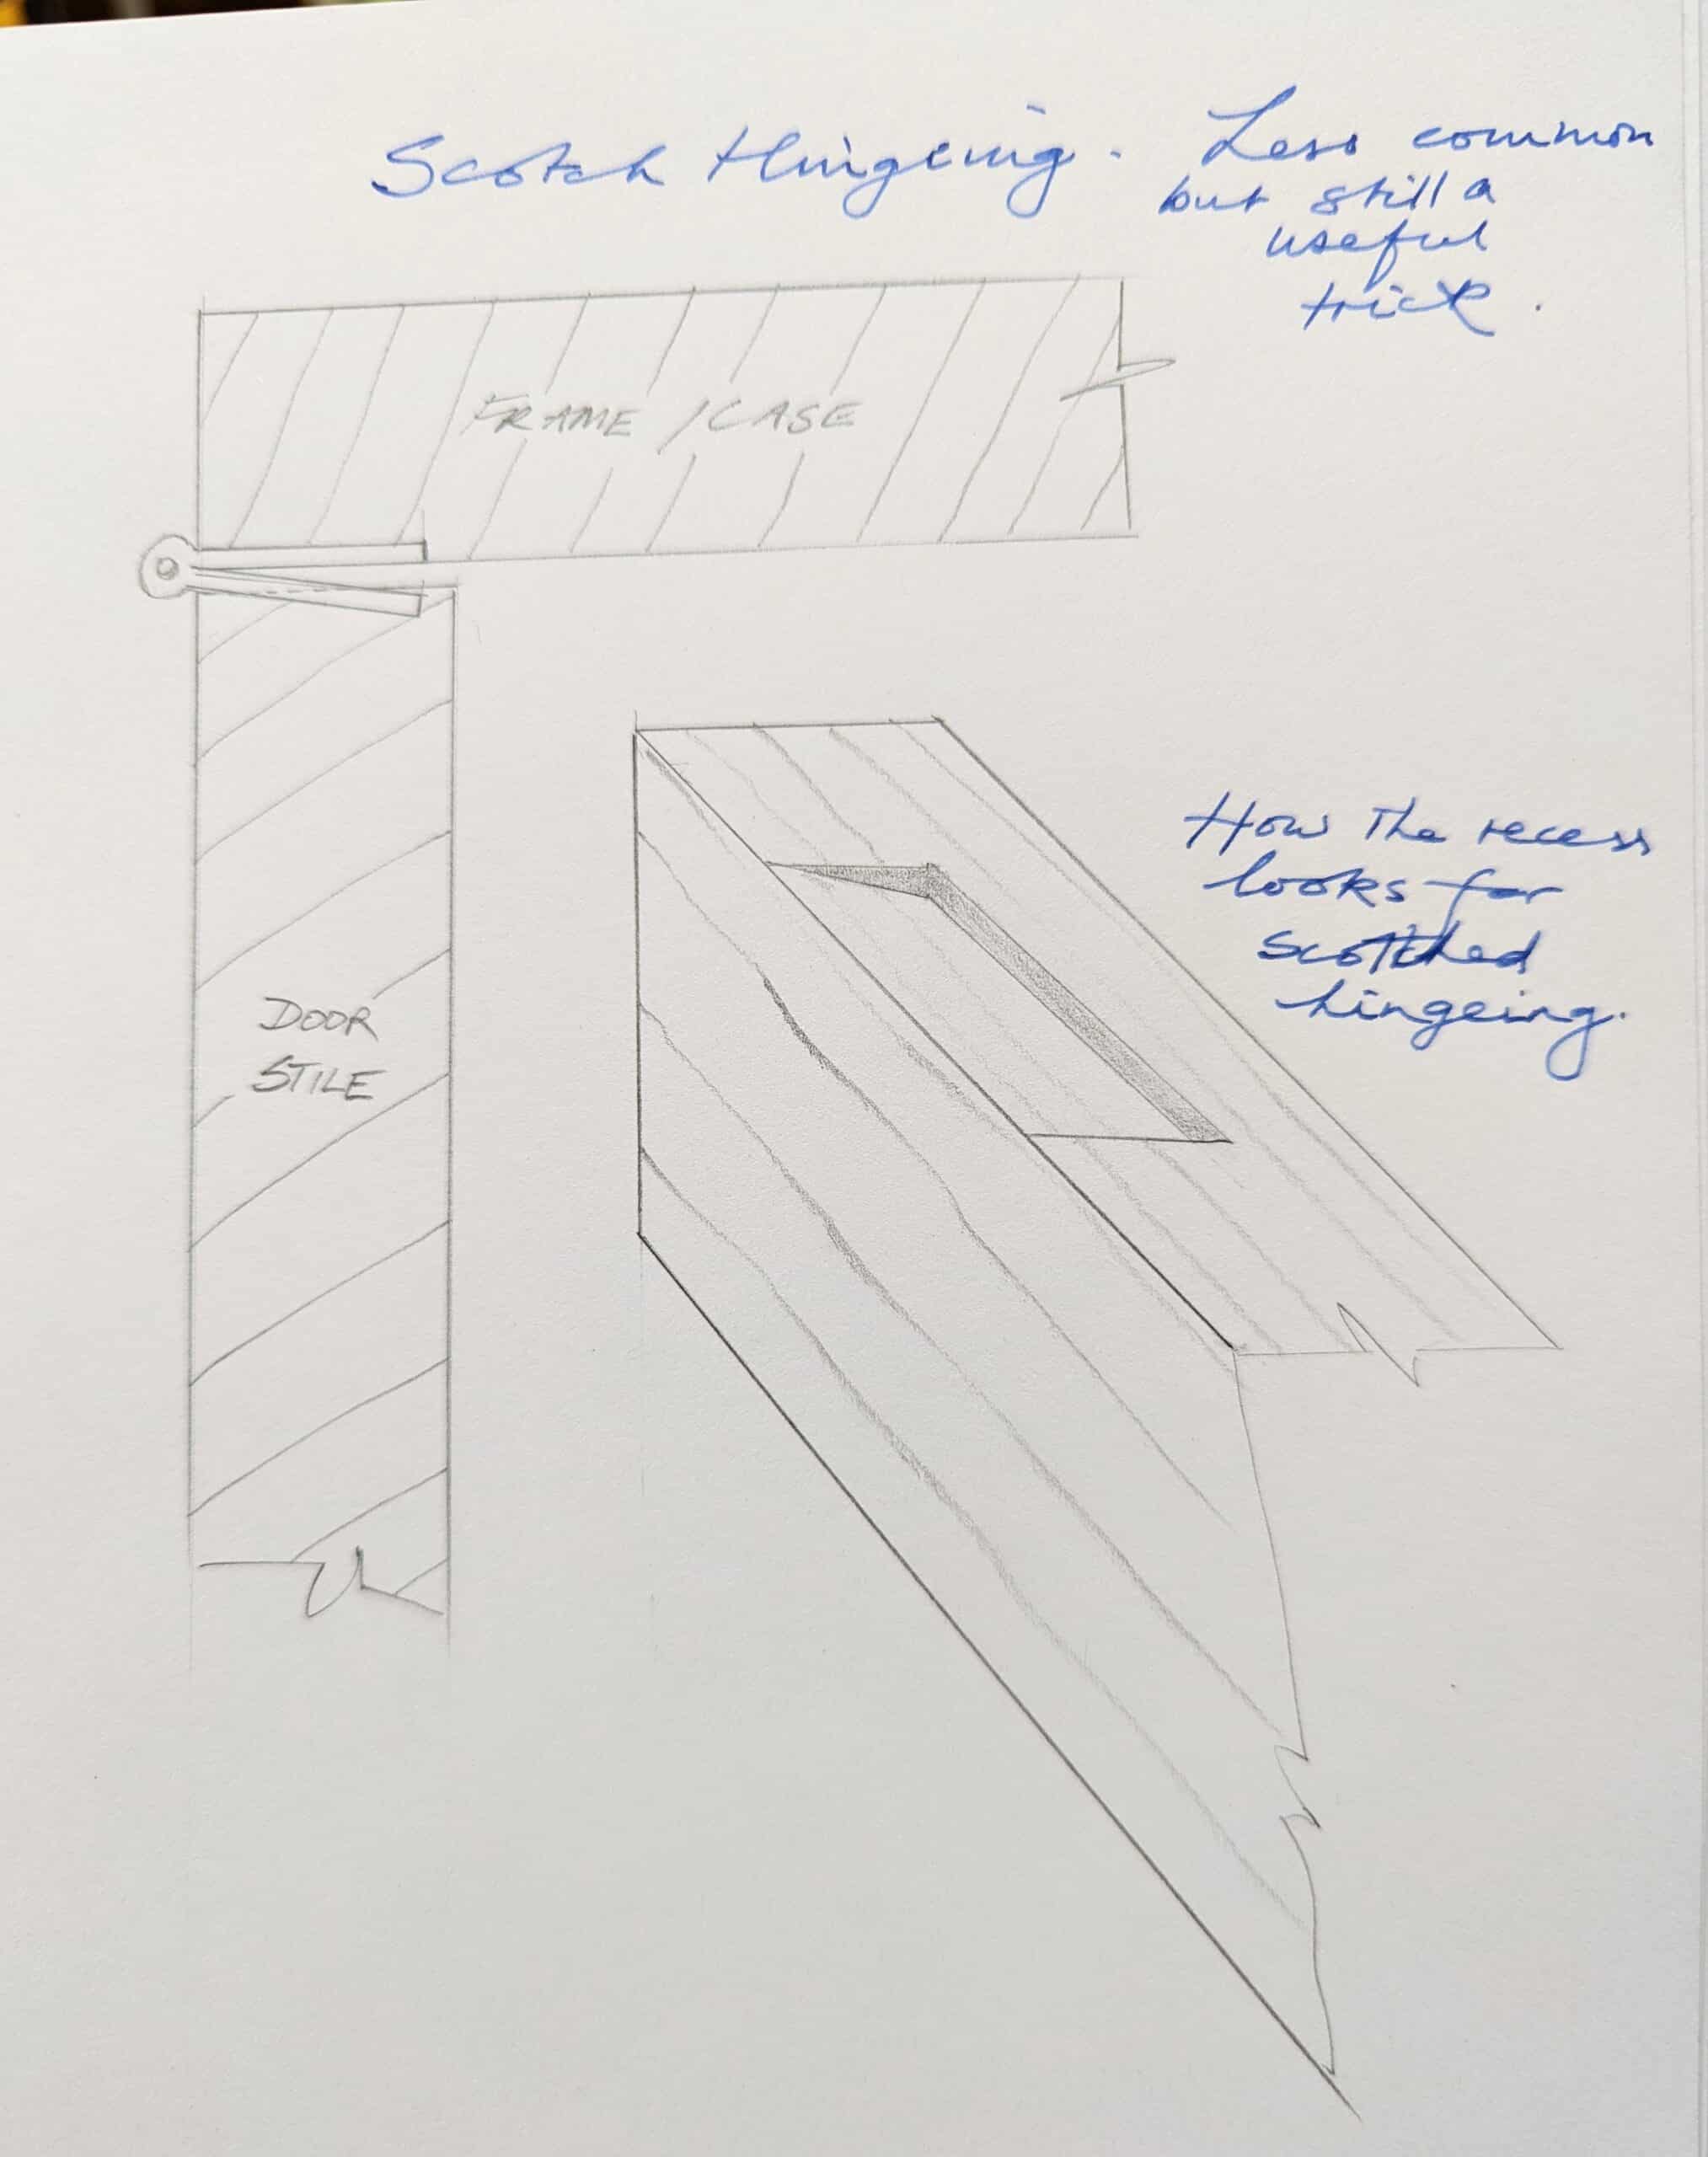
Somewhere recently I used a term we use in joinery called ‘scotching‘ the hinges. We usually scotch the hinges when we have made the mistakes described above, but we also use it to offset the knuckle of a hinge so that rather than it being centred on the gap between stile and frame or case we line up the knuckle of the hinge with a side bead in a moulded frame as per drawing above or with a planted cockbead the same size as the knuckle. This feature is a choice decision as part of the workman’s endeavour to a perfect resolution of a feature.
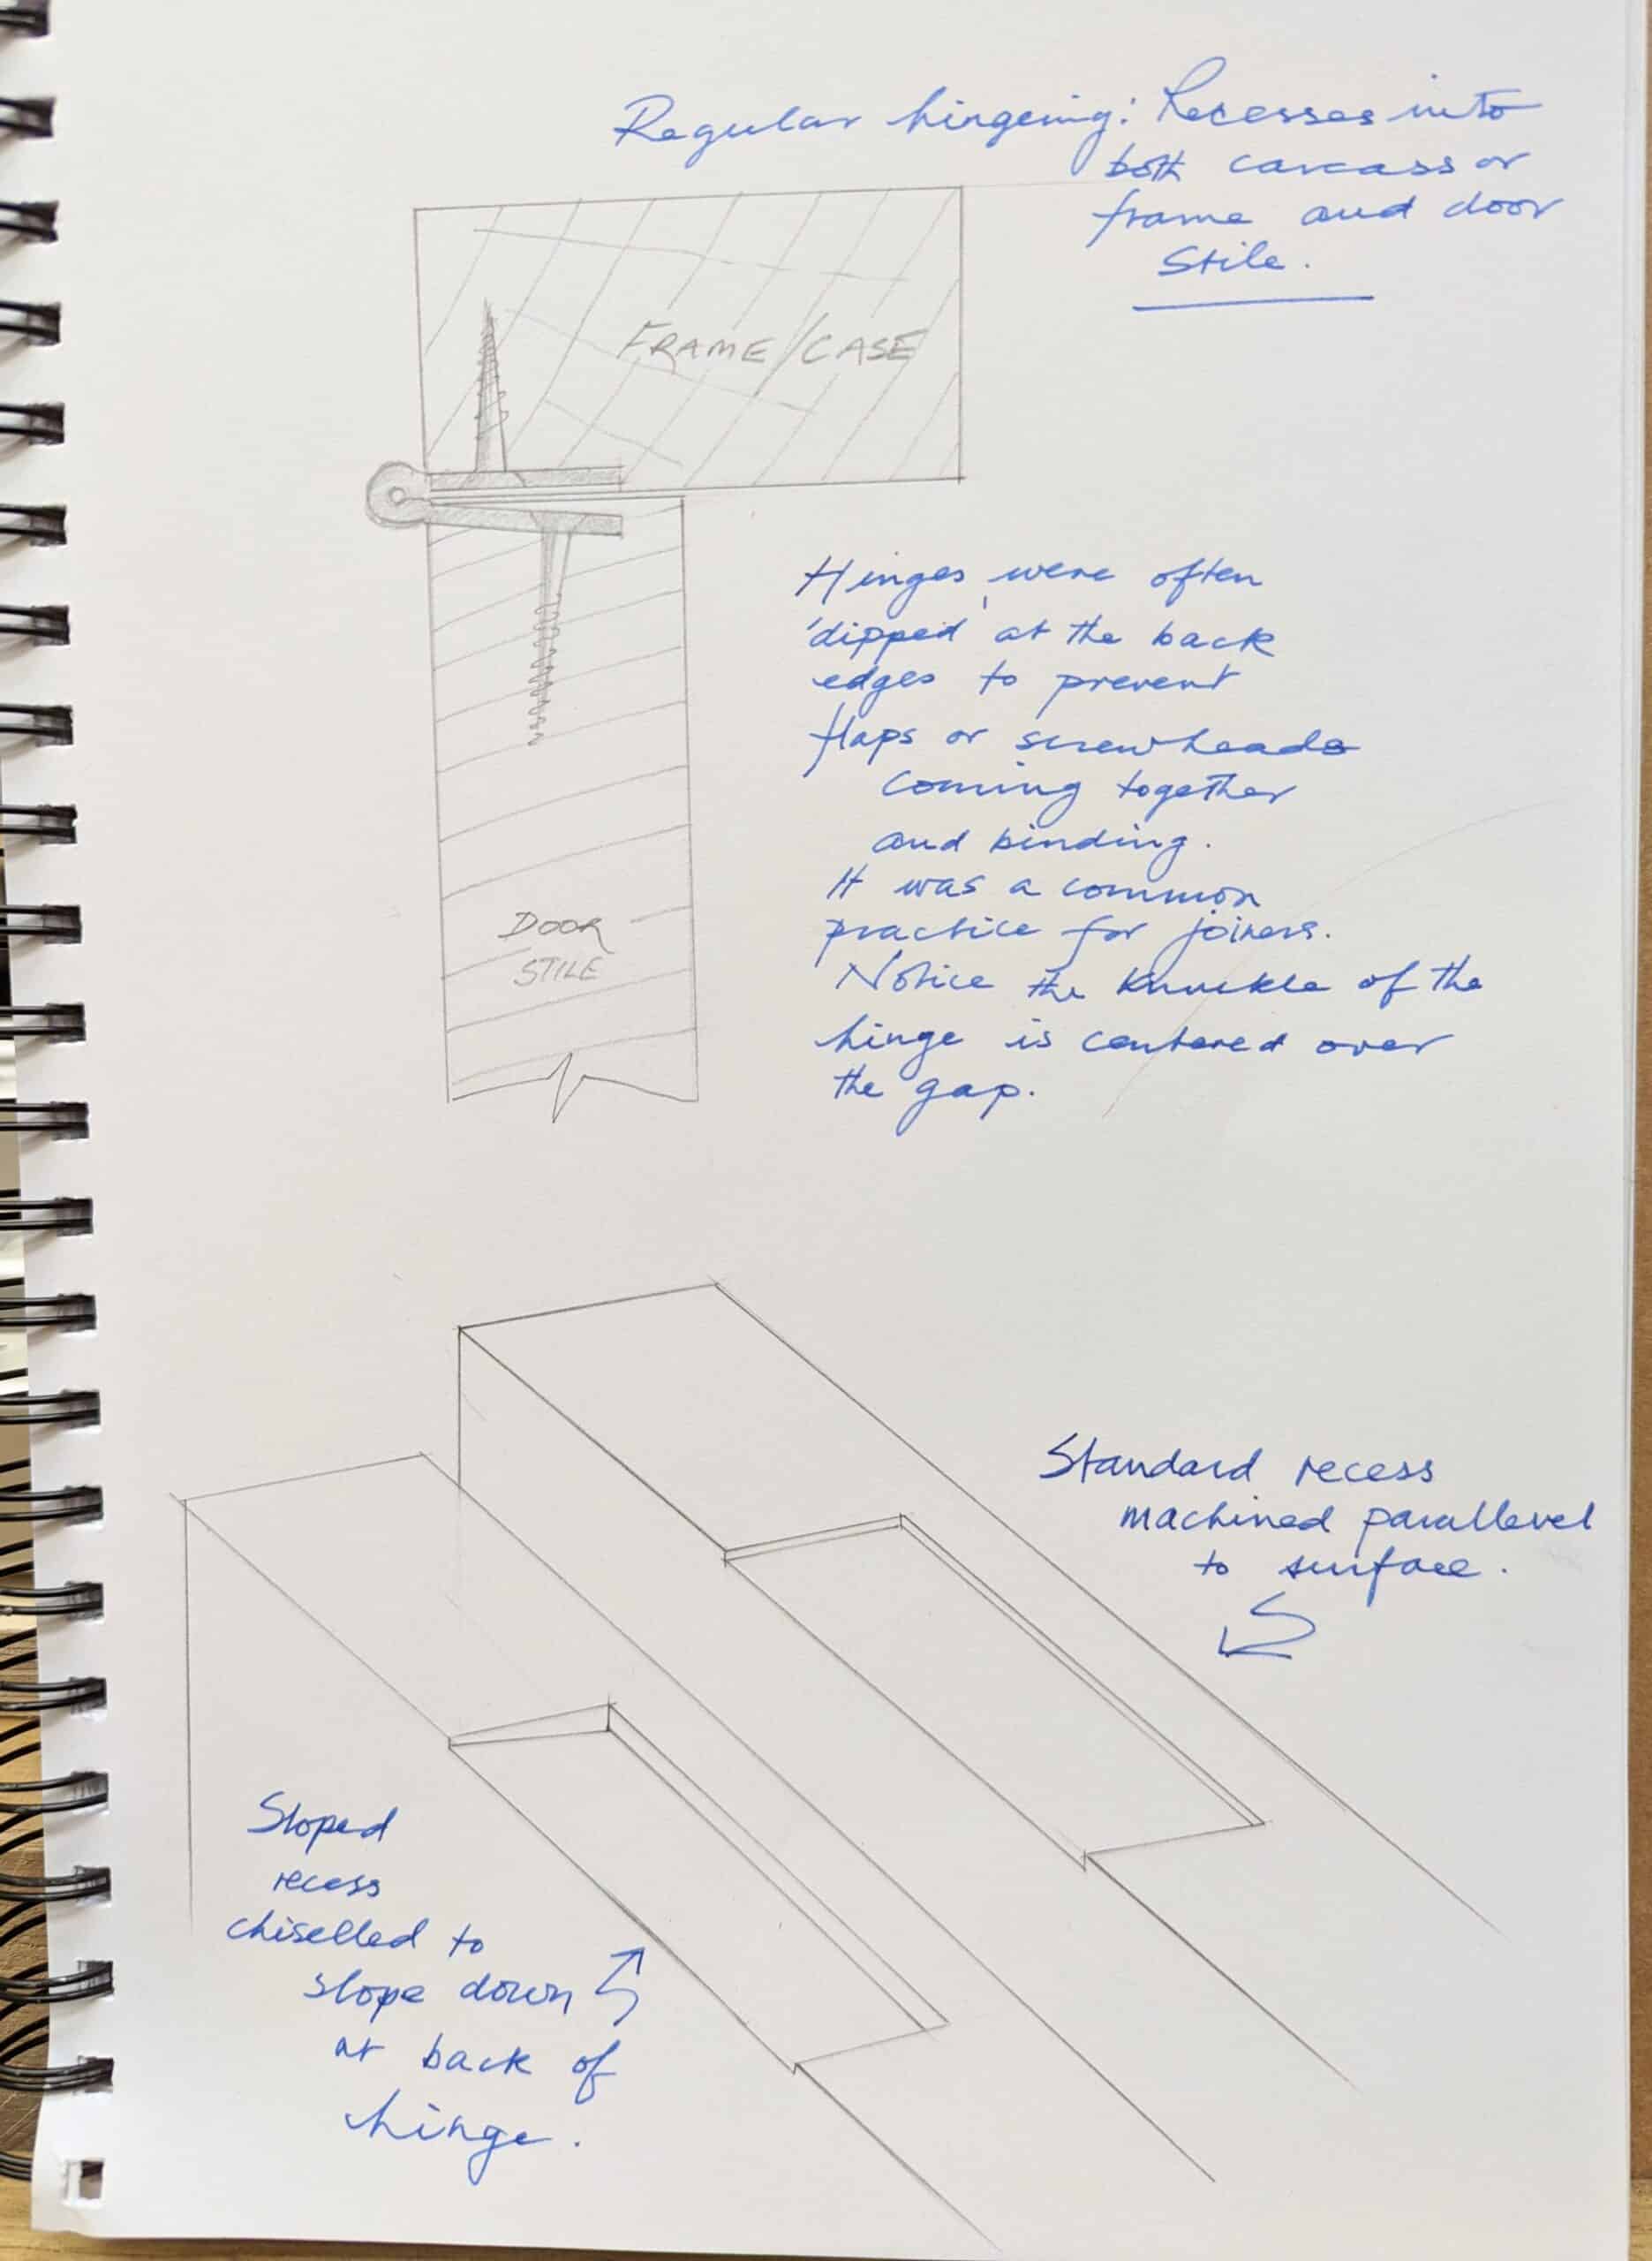
In the case of the door being made too small by overzealous planing or making the door undersize in the first place, the scotching is to fix a mistake, error or flawed thinking. Of course, it’s not always faulty work. `Doors can shrink considerably if the moisture level in the wood originates at the beginning of making when the wood is at say 15% and then the door goes to its final destination elsewhere and the humidity level is much lower where the wood then shrinks. Such things can and do happen, and it’s not just doors either, window sashes can also suffer the same calculation mistakes and you can’t usually just throw such units away. Scotching a hinge is to deepen the cut hinge recesses to a steepened incline within the recesses. One hinge recess, the one on the stile of the door or sash if a window, is barely recessed on the outer edge but quite deeply recessed towards the back, internal edge. The opposite recess on the frame or casing is recessed enough to receive the knuckle of the hinge but then recessed partially to register the hinge plate. Additionally, by ‘scotching‘ more, if the door is markedly undersized, you can scotch the hinges to throw the door further over still, to make at least the closing stile look good. I have seen hinge recesses only half cut halfway across so that a bevel midway gives additional leverage via ridge left in the recess which serves to throw the door further over still. Nobody really talks in these realms any more so at least this record will be there if, though doubtfully, it ever comes up.
Let’s now talk about gaps. I recall a time in a class when a man insisted that the hinges of his box must lie flush with the surrounding surfaces after recessing. no matter how I tried he insisted that this should be the case also I left him with his intent. Unfortunately, the gap on the hinges, between the two flaps was massive and the plate of the flaps was pathetically thin. When done, his box lid sloped and he had a 4mm gap on the hinge side and zero at the closed side. It looked ugly. He finally understood the principles of calculating the hinge recesses and changed his ideas.
A one- to two-millimeter gap between the rim of a box and the underside of the lid is acceptable though 2 mm is a little too much. I would most likely shoot for 1mm. Why any gap? Wood surface swells first, before the inner wood, as this is the most exposed to the atmosphere and even with finish on it still absorbs though to a lesser degree. Rarely are environments regulated to perfect stability and in most family homes and offices, with an increased volume of occupancy can fluctuate markedly. That means that both the adjoining wood faces can come closer together albeit very fractionally. When it does, the swelling can cause the lid to bind and elevate the lid or door beyond the inner faces of the hinges leaving the box with an open gap on the edge opposite to the hanging side. Our task is to consider this possibility and then too anticipate such things and cater to them. Better the one-mil gap than for pride to say ultra-small or even no gap at all.

Recessed doors too will stick if the gap is insufficient to allow for a swell, even a small one. Again, when in construction you can move for a small gap of a millimeter or so but before applying the finish you should consider its long-term home environment when delivered. Two millimeters is very acceptable but still be prepared to go back and take some shavings off. If the door is recessed on all four edges, then the free edge, the opposite edge to the fixed edge or hinged stile, will be planed with what we call a ‘leading edge‘. This is where we plane the edge slightly out of square. This is because corner to corner the door measurement is greater than the width of the door. Planing the edge out of square allows for this closure and the outer edge can be left quite tight, a millimeter is a good starting point but it might need more off after housing in the final destiny. Of course, geographically you may not be able to go back to take that shaving. better to take a millimeter off and have a slightly bigger gap on that closing edge.
A face-fixed hinge plate might need no recess. This then relies solely on the screws as permanent locators rather than the recess supported by screws for added security. Door weight and use inevitably lead to slippage eventually and then the door starts to catch.
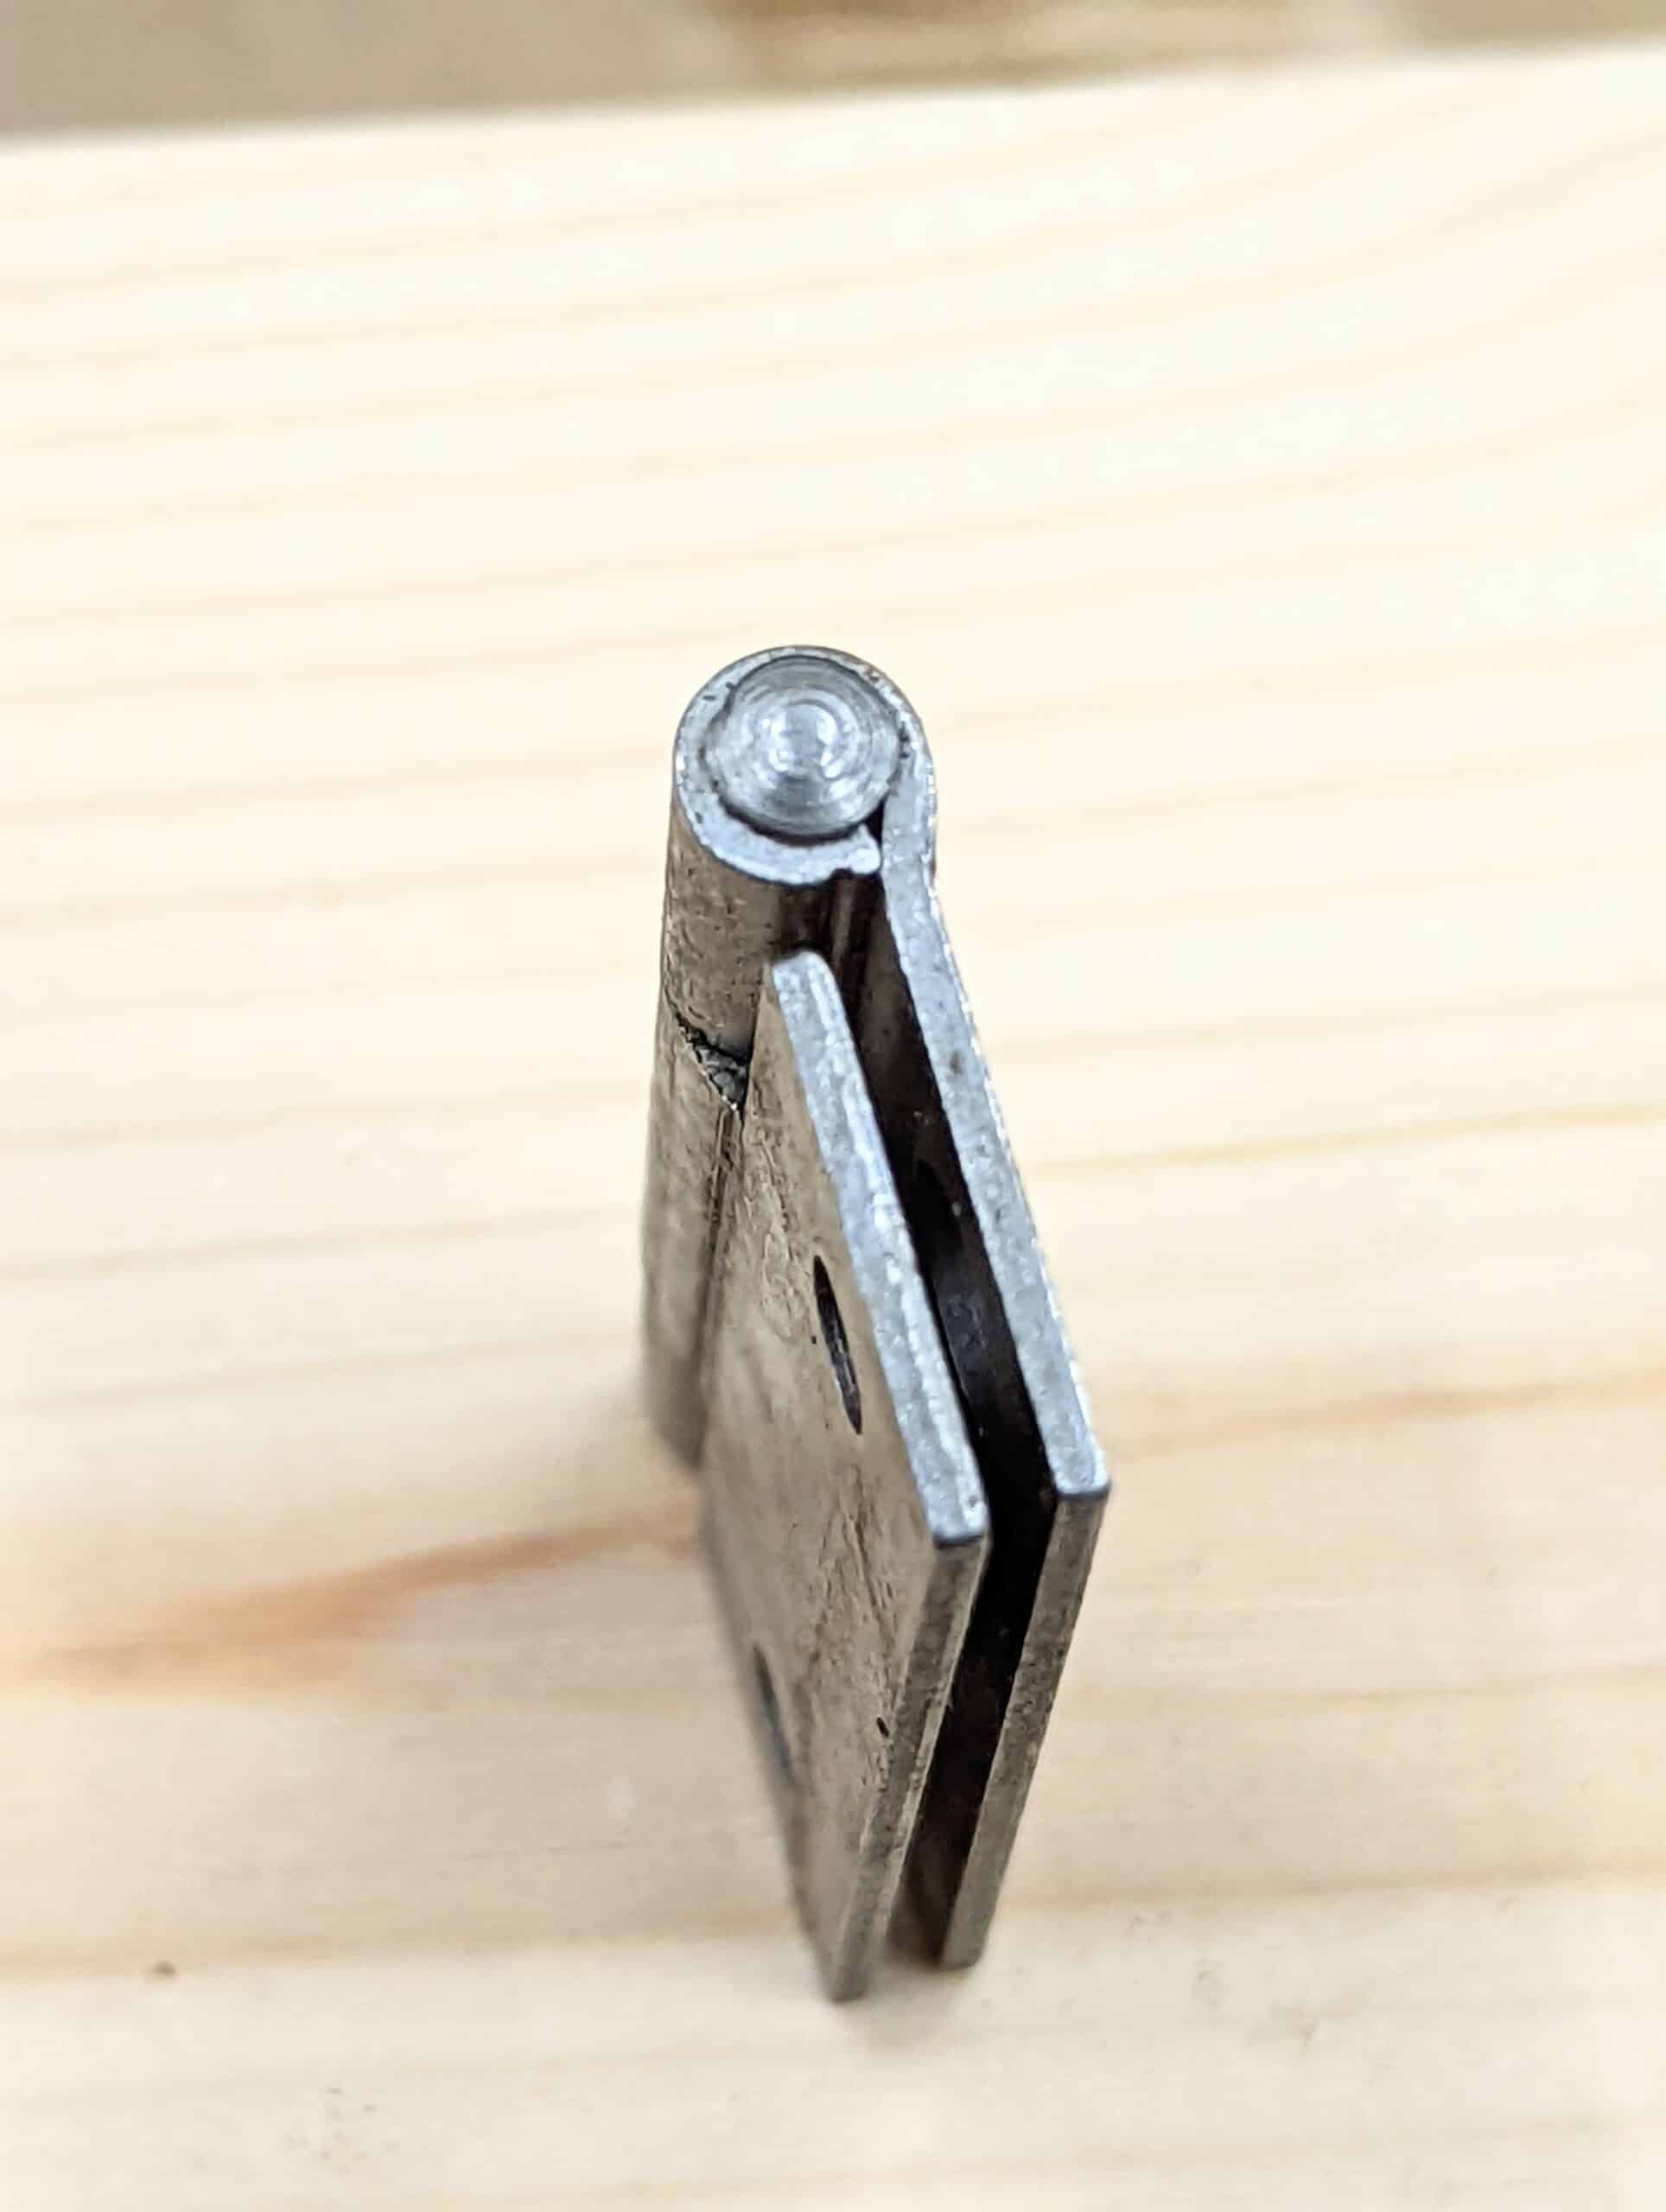
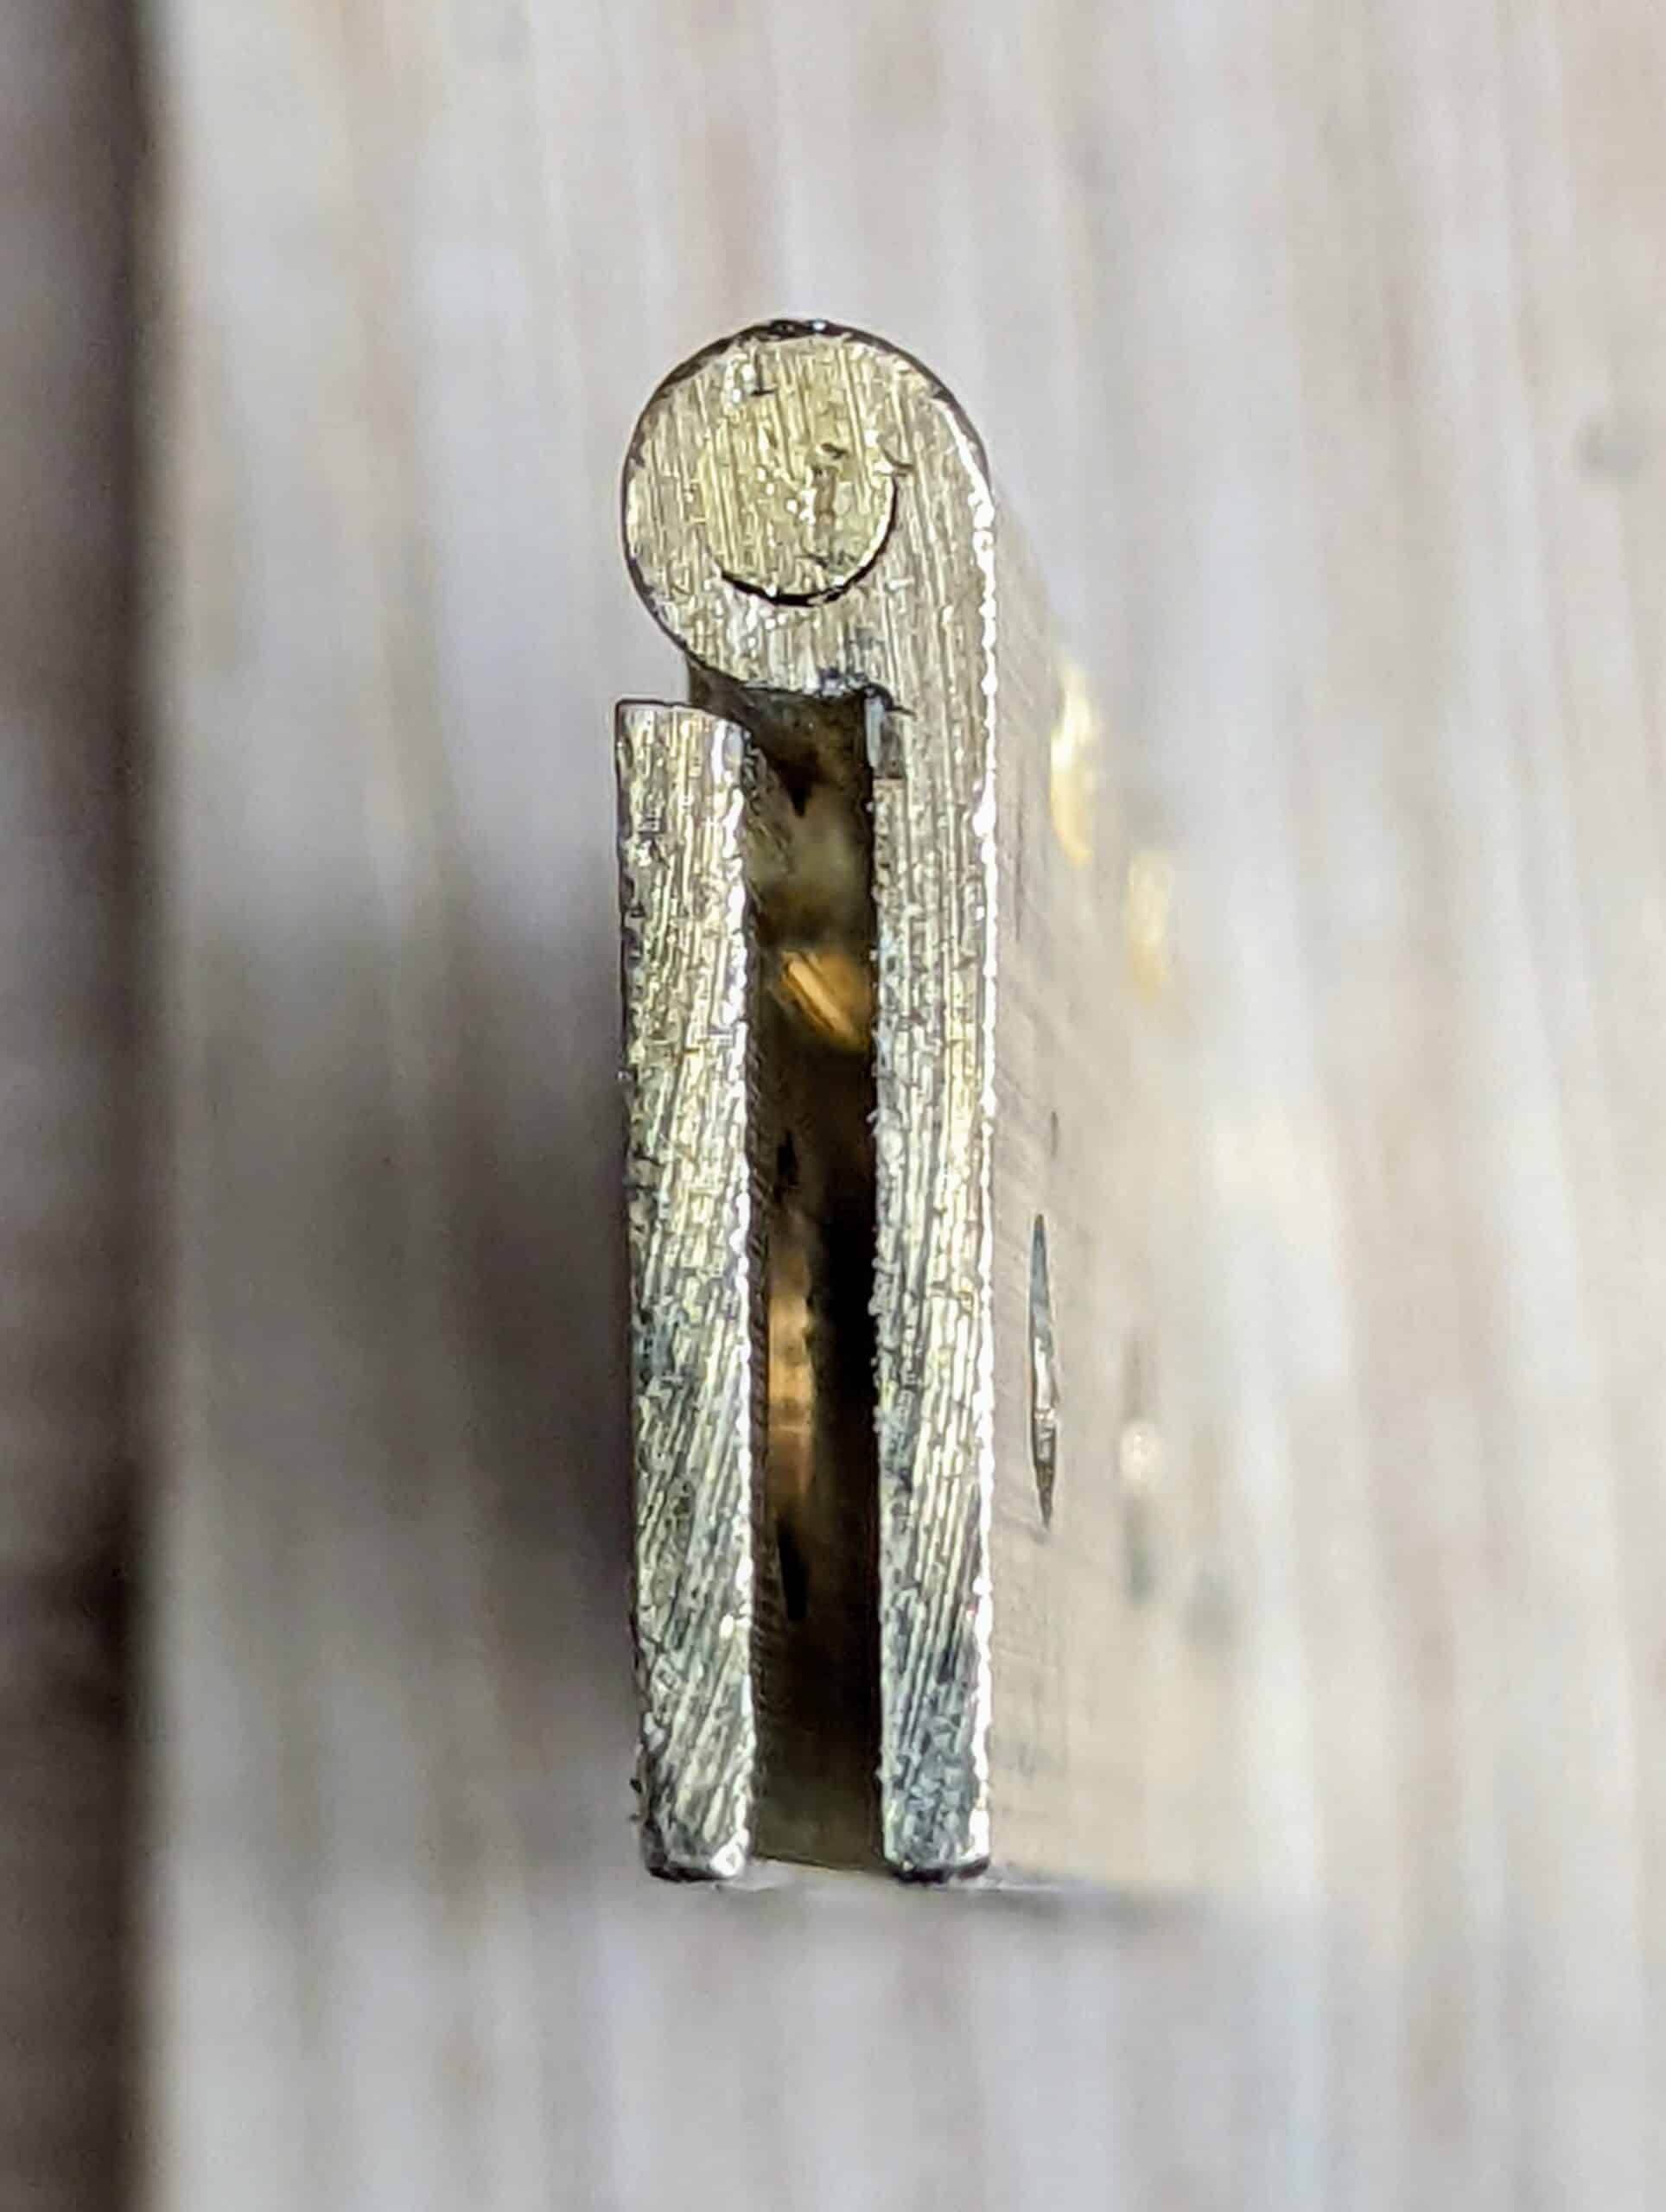
These images show that the flaps of drawn hinges are often not parallel across the width of the brass but tapered from thicker to thinner to the outside edge.
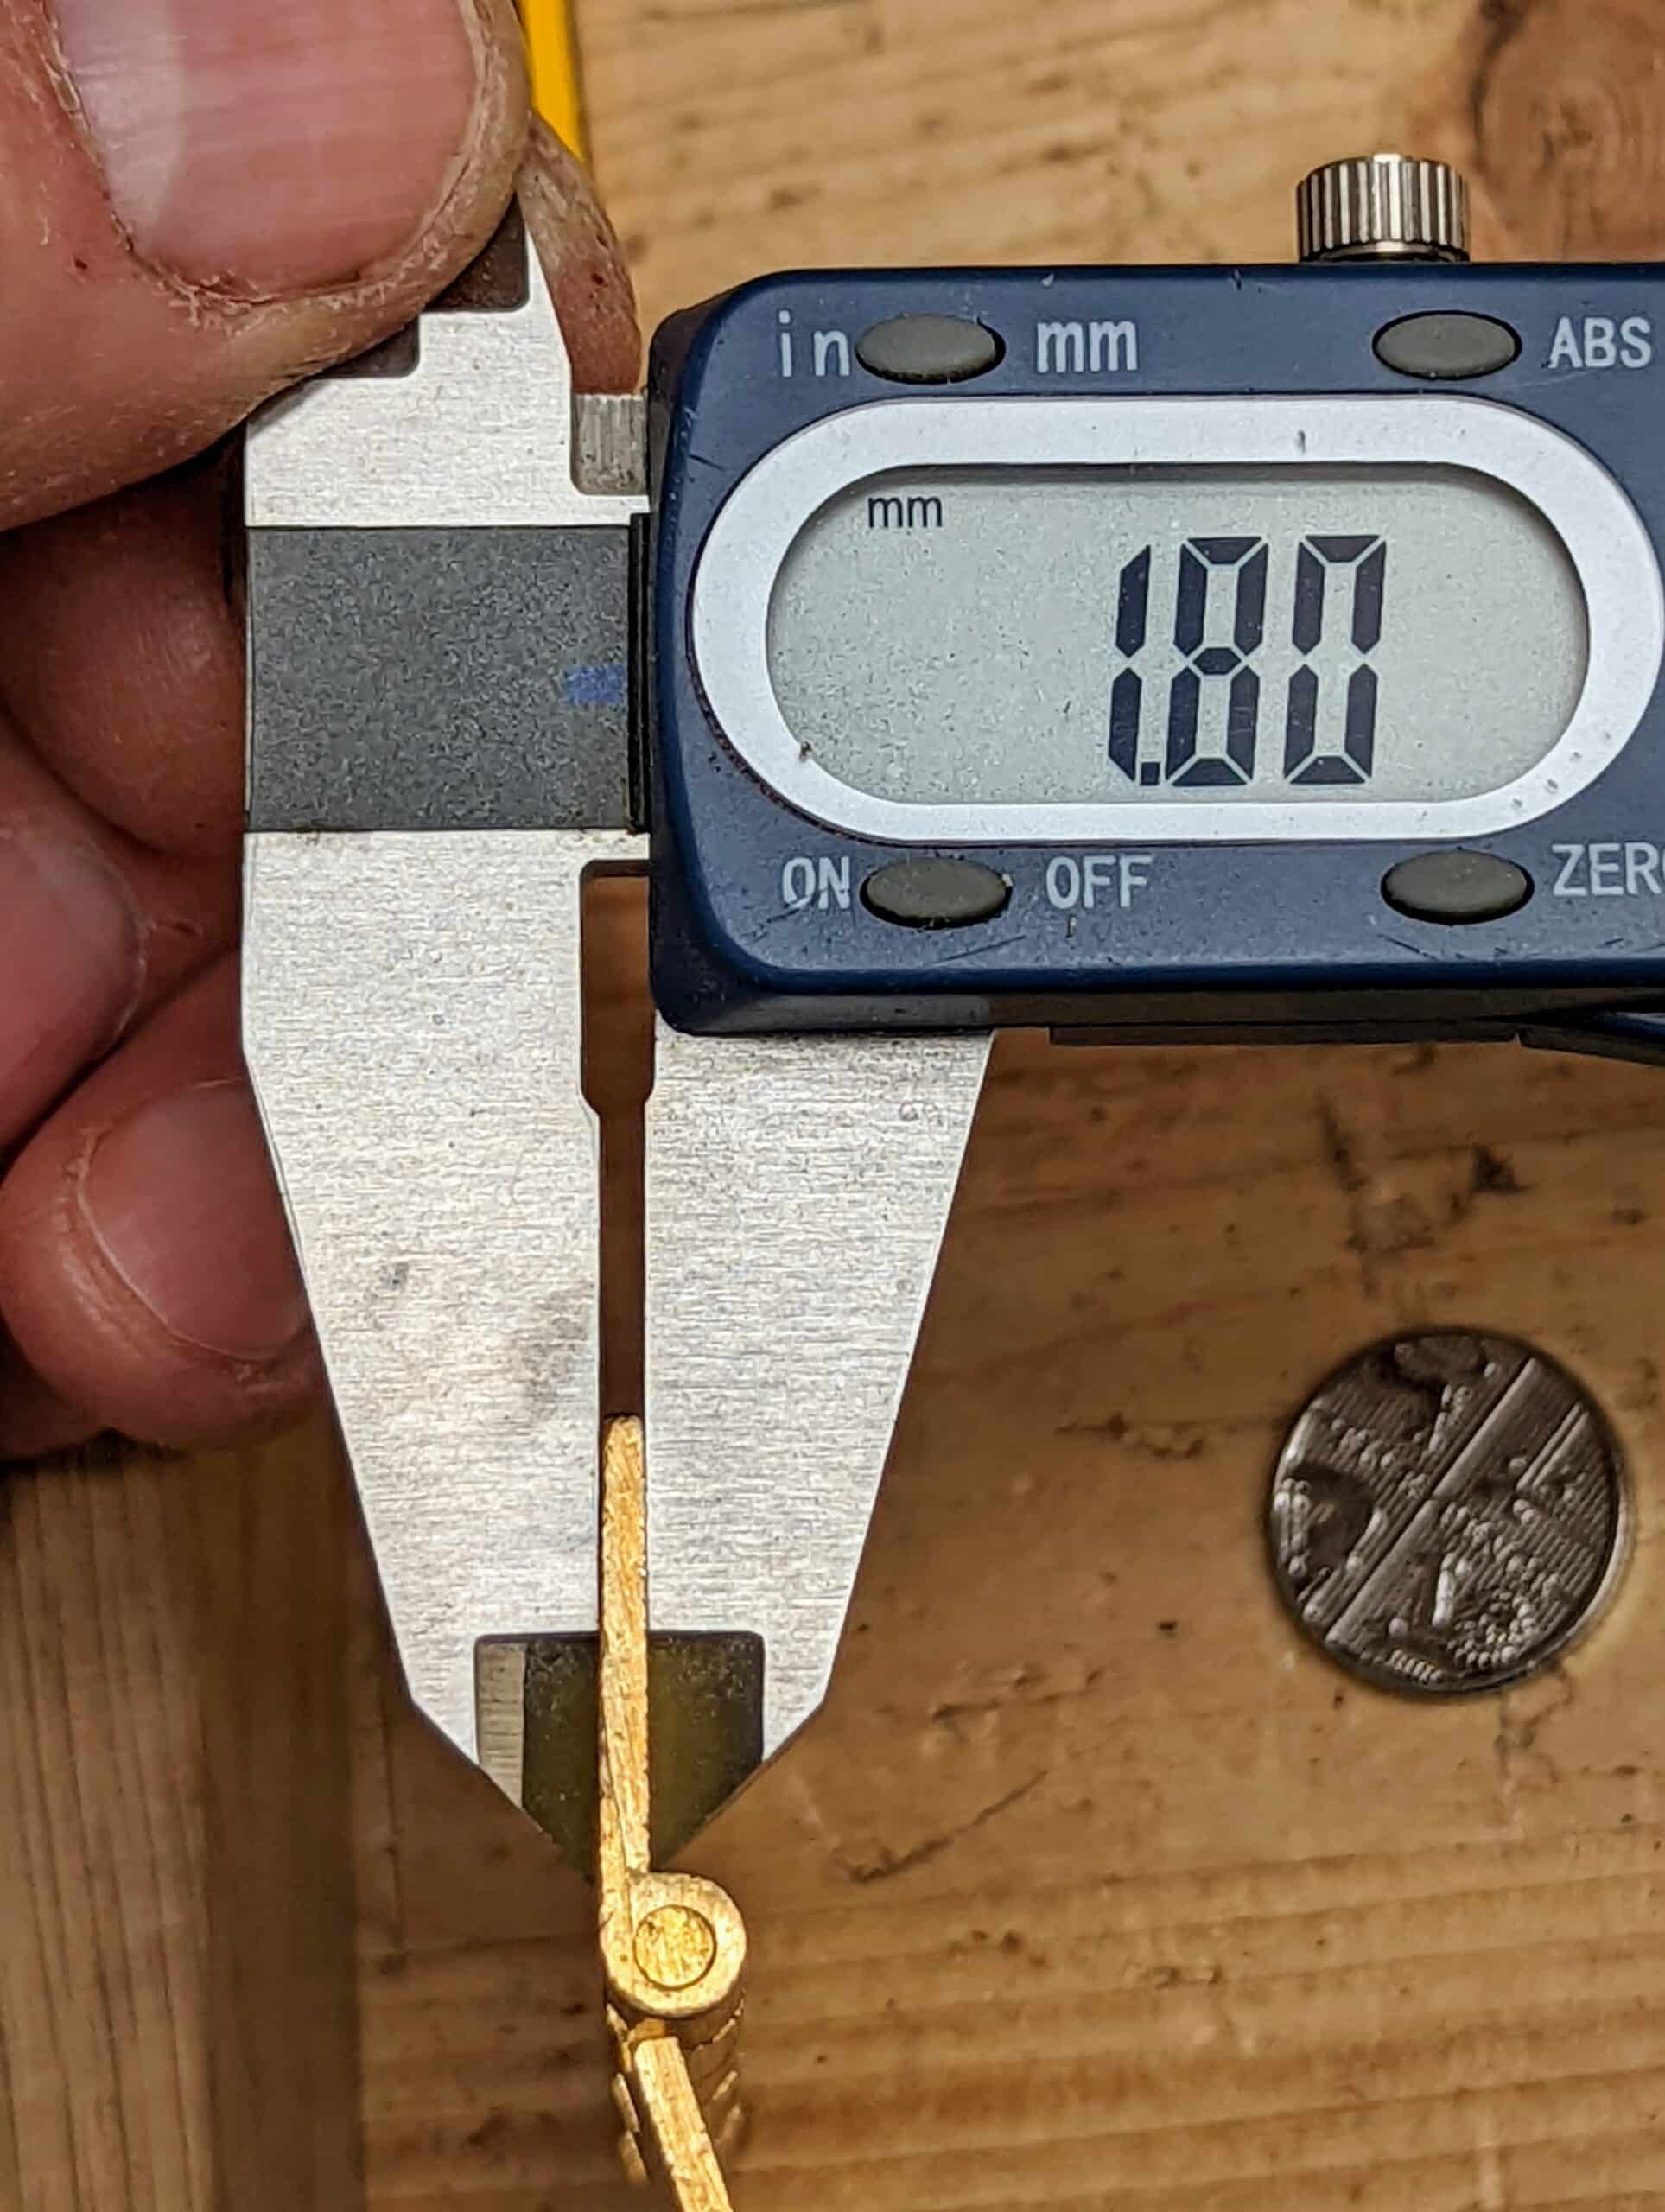
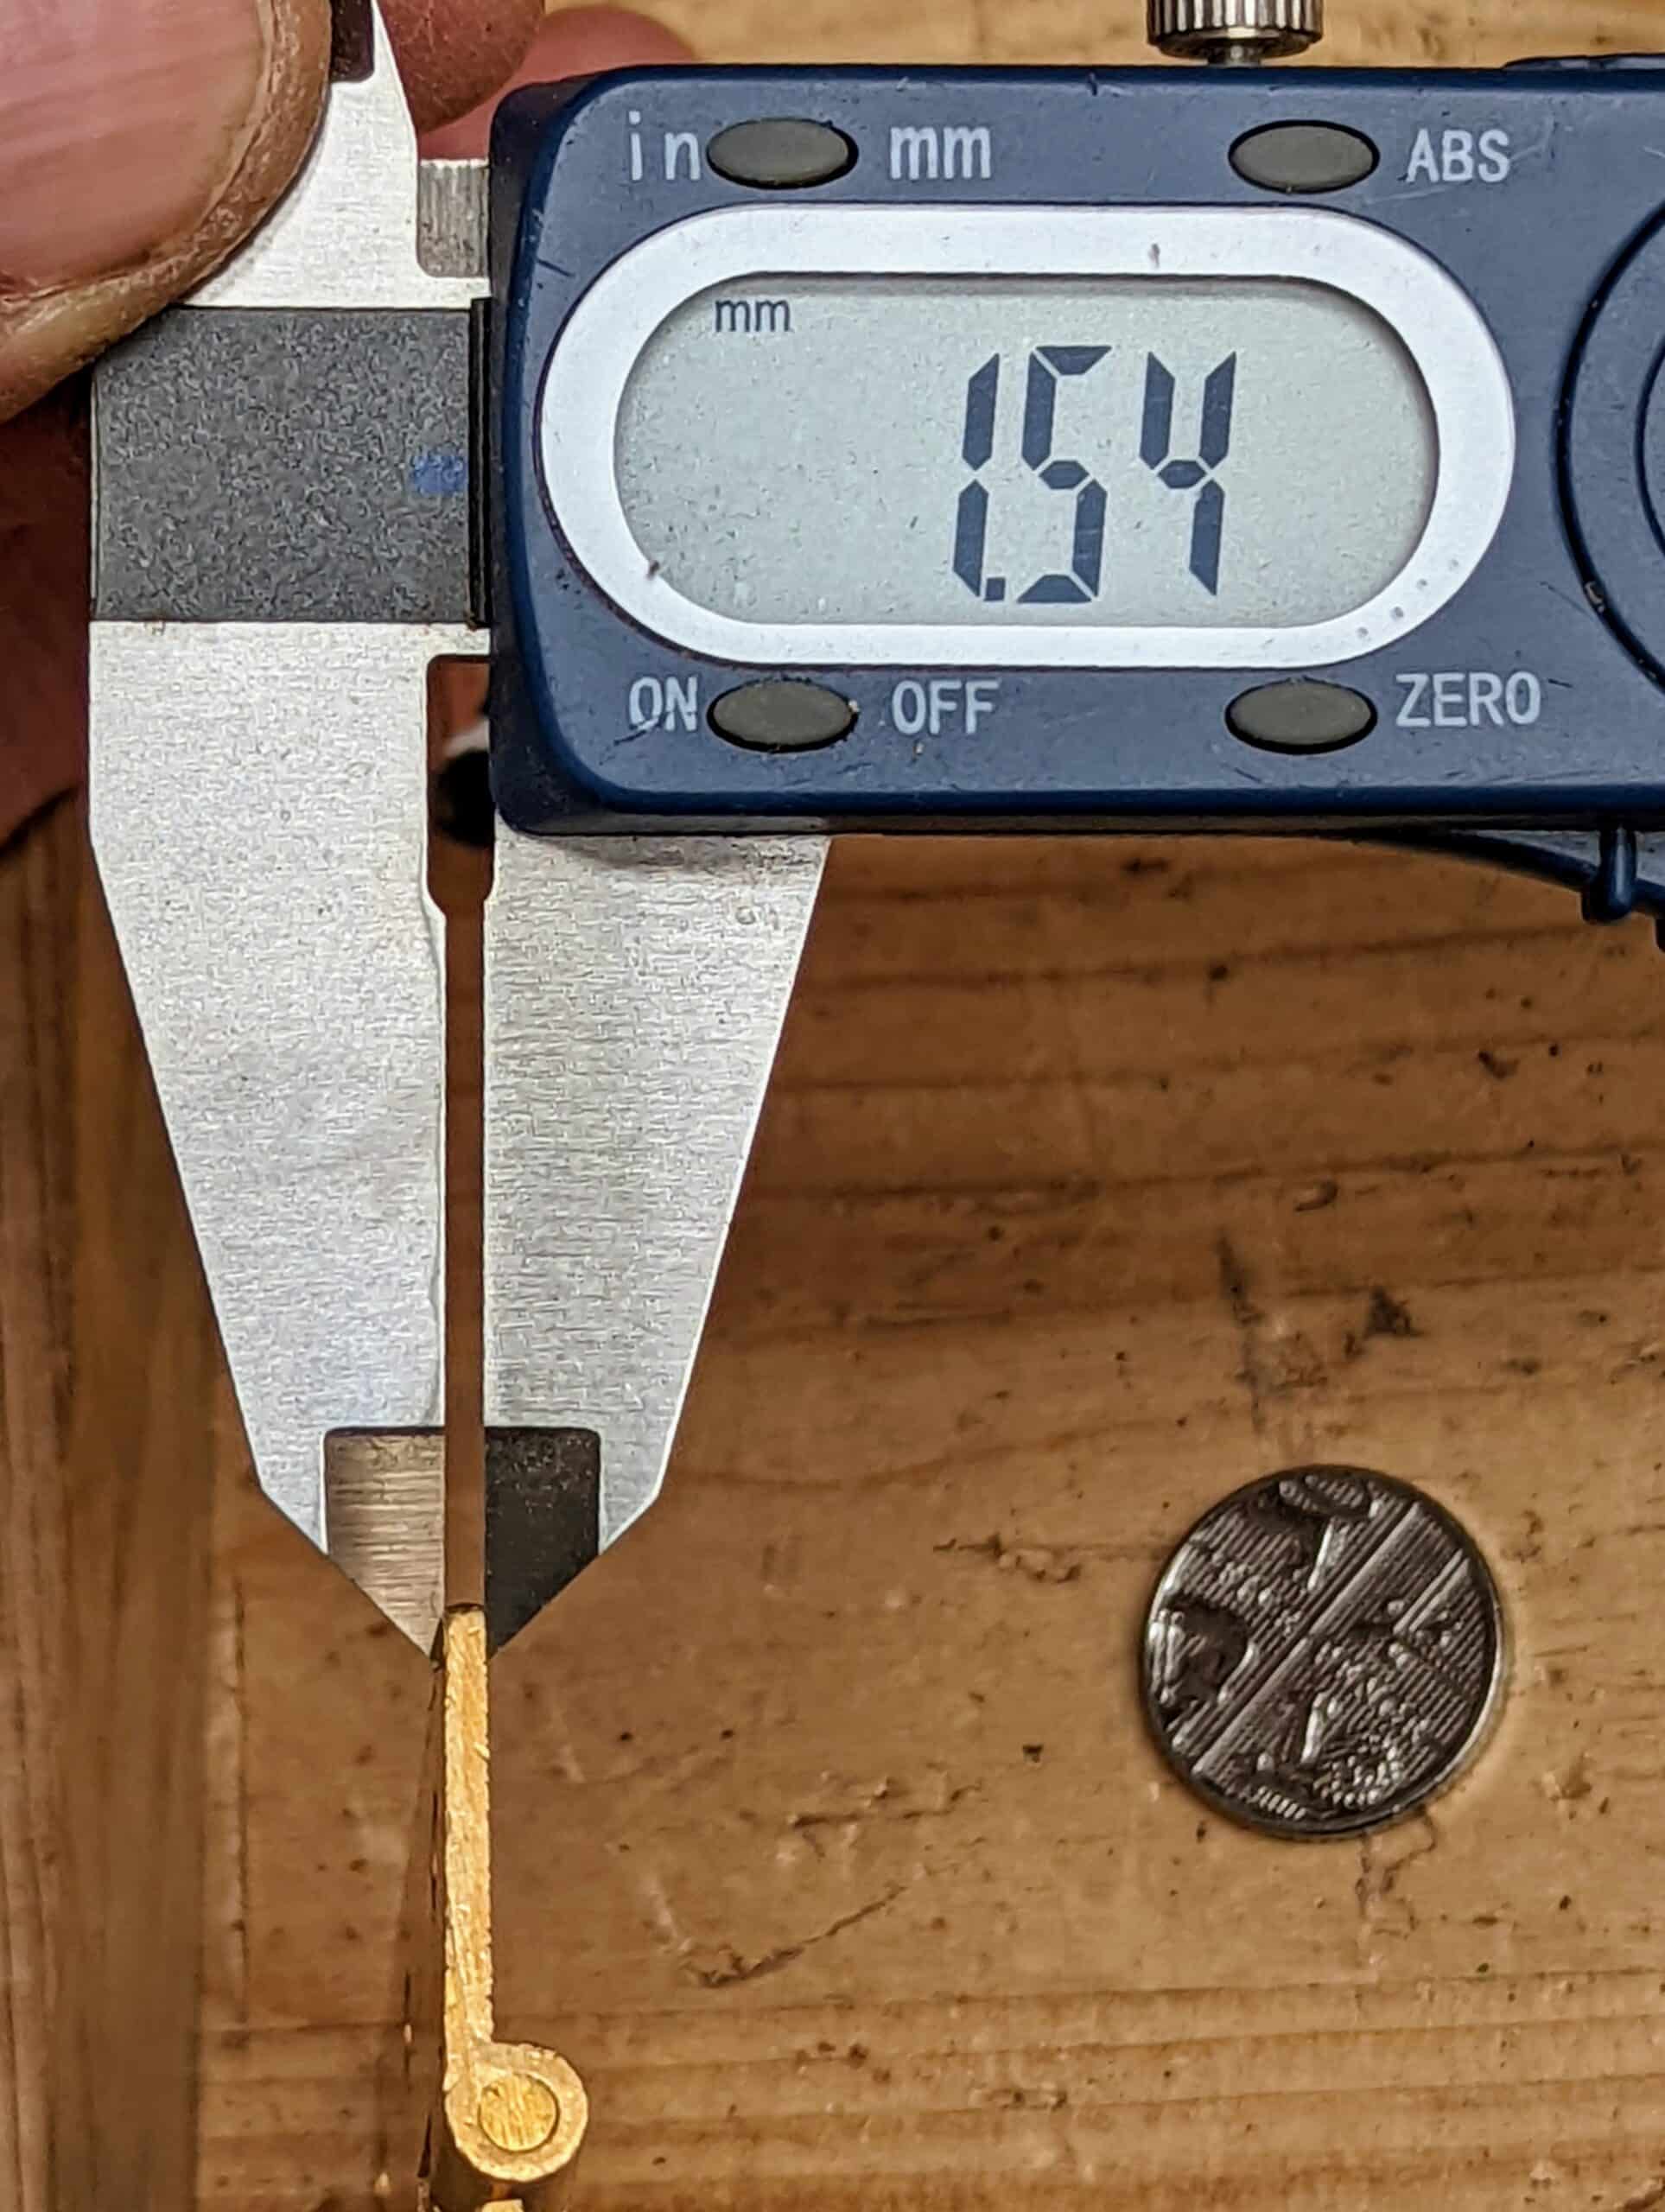
In general, drawn brass hinges have a consistently good quality though progress seems always capable of making things like hinges thinner and less robust.
Thanks Paul, I have a hinge related question:
I’m building a shaker style Chimney cabinet – the upper door is 24 inches high by 16 inches wide, and the lower is 30 inches high and the same width.
I have higher quality drawn hinges, but they are only 2 inches long. Will that be sufficient?
I also have lower quality hinges 2-1/2 inches long – they look nice, but don’t feel as substantial as the 2 inch hinges.
I’ve seen that in your tool cabinet project, you used 3 hinges per door.
How does one determine the best option?
Aesthetics, aesthetics, aesthetics! Not always easy. Personally, I would prefer the 2 1/2″ to both doors. Neither are tall enough for three hinges and 2″ hinges would look too small whereas 3″ would be too long. On a shaker cabinet, the hinges might more likely be the lesser mid-level quality anyway.
Thanks Paul,
I appreciate the feedback.
I found that Horton Brasses has 2-1/2 inch for 32 USD/pair.
Given the cost of the cherry I’ve invested in this project (as well as the time), I’m going to skip on a few lunches and go for the quality. The last thing I want is to be repairing it in 5 years.
Dear Paul,
This Blog has taught me quite a few more concepts of using hinges – thank you for sharing this. One question remains for me:
I have recently finished two slightly larger shaker-style boxes following your Masterclasses videos and Artisan course book. Where I deviated was the lid design in that I wanted all 4 sides of the lid overhanging ~1/2″ just like the bottom. Now for the lid to still open despite the overhang behind the hinges, I decided to only cut recesses for the hinges into the box’s wall so the hinges are flush with the wall’s top level, and the screwed them to the lid without any recess. While the mechanics works fine this way, I wonder if you would advise for “scotshing” them into the lid for aesthetics? Is there a good practise here?
Scotching was rarely purely for aesthetic reasons, though there are one or two that I know of. Even so, they were slope-recessed as in scorching mostly for the advantage recessing gives to reduce the reliance just on screws alone.
Paul, another option we use for door hinges to “adjust for issues” is to bend the hinge knuckle. I have never tried this on a small hinge, but it might work.
Thank you, Paul! Very useful article that gave me lots of new insights. And as usual, everything is just so simple and easy! 🙂
One of the things I enjoy the most about woodworking, is all those “but of course” moments. I read about a technique or watch a video where the technique is being used, and immediately I “know how”. Of course I need to actually perform and practice the technique to master it, but I do know how to do it – how it is supposed to be done (at least one iteration of it), I should say.
I am not sure if the world needs more dovetail how-to’s, but I am certain we need more articles like this. The other day I saw a lengthy discussion on Facebook about how to attach a handle to a fruit basket. Simple construction where two battens joined the two short ends, and a coarse metal wire mesh made up the bottom and long sides. The handle was a piece of broom stick or dowel through two short pieces of wood. The handle should be able to pivot as per the requirements. How to attach it to avoid wear to become an issue?
Suggestion plethora! From ball bearings via delrin thingamajigs to brass pipe inlays… for a fruit basket hinge. Thankfully, a few people suggested to just use a wooden dowel, as it won’t wear down fast enough to become an issue. I suggested to answer this overthinking and overengineering by a simple question: “how long will it take for any significant wear to become a problem?”
Knowing how to scotch a hinge and what the technique can do, will probably be very useful for me at some point. Showing the difference in thickness of a hinge flap too – making a power router jig to make perfect flush mount recesses for such a hinge would be a bear….. 😉
Well there you go. Every day is a school day.
I didn’t know about the variation in thickness of the hinge flaps so I have just been into The Shed with my trusty vernier. Lo and behold every hinge I measured had the taper.
Don’t suppose it matters much but it’s nice to know.
It can of course matter if you were aiming for a flush hinge yet kept wondering what you were out.
dear paul, these sort of articles are very useful, as this sort of knowledge just isnt otherwise readily available. a few questions please to help understanding, if you get time.
Q1: is there any benefit to leaving a bit of room around the hinge (eg 1-2mm) so it can be jiggled to fit? or is this actually a negative because the hinge is then only supported by the screws and not the wood around the edges?
Q2: when cutting the sloped recess, is it correct that – without being silly about it – you could actually cut quite an angle on the recess. (ie – you dont need to be too precise about the degree of slope). cutting an overly steep slope would be ugly, but still functional, because it would just create the situation where the leaves of the hinge are a bit further open when the door isin the shut position.
Q3: why does one scotch the frame rather than the door? or does it not matter which?
Q4: looking carefully at the oak box (2nd image in the article), the cut out for the recessed plate has angled edges at the short ends. was this a deliberate choice to stop splitting or something when the hinge plate was pushed in, or decoration, or just a quirk of the day?
q5: leading edge on a door… darn it – so obvious (and simple/ elegant) once someone explains it… so frustrating if you don’t know about this and have splintered the corner of the door. not that i have ever done that 🙂
thanks for this, i can absolutely see where all this will be useful.
This post is just in time! I was just contemplating how to put hinges on a small box for chisels which I am making from logs in my woodpile this winter. Thank you for all the information – it will make the chisel box look even better.
after googling, (and making no claims as to the veraciy of this statement (!), i believe the brass hinge MIGHT be deliberately tapered to prevent a door binding:
“as the leaves are tapered, the hinge…minimises the risk of a door binding against a doorjamb….The rear faces of the leaves each fit
against the respective door or jamb (it does not matter
which leaf is chosen to fit against the door) and the rear faces of each leaf are
substantially parallel to one another. However, as the
leaves are tapered their front faces are not parallel, and
thus there is a clearance or nonbinding gap between the
front face of one leaf and the rear face of the other leaf.
Thus, if for some reason the door orjamb is warped slightly, or the end of the door is not square, this tapered effect will provide a clearance which will tend to
minimise binding of the door against the jamb”. (extract lifted from a specialised hinge patent, number 4,543,687)
Of course, the drawn brass hinge is in general deliberately out of parallel, but not all “brass” hinges are drawn brass and some are made from brass plate which is rolled to an even thickness, so hinges made from plate brass will always be parallel and usually from much thinner stock. Steel butt hinges are almost never tapered so, so the hinge needs tO be recessed ‘away‘ to take care of any potential problem. Both steel and brass hinges made from plate are treated exactly the same way when it comes to recessing.
Many years ago i thought that I was using old steel tapered hinges when I replaced a door. i realised that they were cast iron after I managed to crack one. If I remember correctly it was just a corner that broke off be the screw hole and I managed to still use it, the screw and recess holding it in place. Moved from that house many years ago, I wonder if it is still in place
“we also use it to offset the knuckle of a hinge so that rather than it being centred on the gap between stile and frame or case we line up the knuckle of the hinge with a cockbead the same size as the knuckle. ”
In my old house (1895?) There is, not precisely cockbead but, some cylindrical moulding on the stiles. The moulding is cut where the corresponding hinge knuckle replaces it. The knuckle has the same diameter as the moulding. In fact the door is pivoting around the moulding. There is no visible gap on the hinge side of the door. The knuckles don’t protrude as they are confused with the moulding.
I hope it makes sense.
It does, and this is as much as what I should have said as most often the bead was to match the dia of the hinge knuckle, so not so much a cockbead though equally referred to as such.
What we have lost to MDF trims and brad guns… Sad, really.
Thank you Paul for an excellent overview of fitting hinges, but as with most things nothing is as simple as it first seems.
Another reason you didn’t mention for leaving a gap between the door or window and it’s frame, is to allow for the thickness of paint or varnish finish. This may not be an issue for a new door/window, but subsequent layers do build up over the years of repainting.
Also on exterior doors and windows having a tight gap can cause water to pump though to the inside. This is usually relived by a 3 to 4 mm deep weather groove around the edge of the door and frame rebate.
The size and weight of the door or window is yet another consideration to take into account when choosing what size & type of hinge to use. Usually two hinges placed top and bottom is sufficient. But for an extra heavy, tall, wide or high use door/window may require an extra hinge, or more, placed in the middle. This is commonly seen on commercial doors, but can apply to kitchen cabinets like pantry doors as well.
Making windows and door water tight and minimising air draft is a subject in itself.
Multiple grooves will cause the air to swirl at each gap-width-change and augment the resistance to the air flow.
But for minimising noise transmission, real air-tightness is needed which usually needs some synthetic material.
Elimination of inside condensed water on single pane widows was also to be taken into account.
I remember you using the Scotch term a few years ago in one of your episodes. I have used this process a few times after a light bulb moment. Not as a way of fixing an error in the fitting, but more because the screws that come with the hinges have heads far bigger than the countersink recess that they are supposed to fit into. Yes I have bought smaller screws at times, but I find by using the ‘Scotch’ method, I can lower the plates to allow for the oversize screw heads.
I really wish I had read this article a few months ago! I made a box for my wife with a couple hinges I was trying out. I wound up with exactly the problem described above – no gap in the front but a gap in the back.
I didn’t think to take into consideration that the hinge does not need to be completely closed when the lid is closed and to recess the hinge to allow the box to close neatly.
Next one will surely be better!
Making your own wooden hinges is also very effective and can be very accurate. I have been making boxes large and small for several years. And almost exclusively make my own wooden hinges. I start with two pieces of wood which are finger jointed together. A hole through the joining fingers is drilled to take a thick wire or better a piece of stainless steel rod. It takes further shaping of the fingers to convert the two joined pieces to a functioning hinge. Once created a small rebate is cut up to the level of the now recessed steel rod. The hinge is used to mark the position of the hinge on the back of the box. I usually make my boxes with the lid still attached so it is east to cut a recess to take the hinge. Once I have cut off the lid (not for the faint hearted) there is a bit of planing the surfaces to ensure an accurately fitted lid and perhaps some lengthening of the recesses to compensate for the loss or material via saw kerf and planing. The hinge should now fit into the recess and the pivot pin should now be in line with the opening of the box. Once everything is fitting I will lubricate moving parts with wax and assemble the finished box. Holes are drilled through both parts of the hinge and through the box. These holes are used take a coach bolt with large washers which are used to hold the hinges in place for the glue up. Once glue is set, the coach bolts can be knocked out and the holes filled with small dowel made from the same material as the hinge and the box. Wooden hinges in a contrasting wood can be very attractive and can be further shaped once glued in position.
Dear Paul,
Thank you for this information as I am installing a pair of hinges on a small box!
I was wondering if you would provide instructions for installing the little knife hinges both straight and L shaped in a cabinet door such as used by James Krenov?
Many Thanks for alll of your kind and informative help over the years!
Stephen
“I do like my hinges to be evidently present.”
Hahaha 😆 what a beautiful sentence, and wit. Loved it.
I’ll do my best to use the insights and tricks presented here. But I hereby commit to also use this sentence at some point between now and the day I go feed the trees.
how about 5mm barrel hinges? any tips?
there is a pretty interesting book called “woodworking joints” by william fairham (available free via the gutenberg project https://www.gutenberg.org/ebooks/21531 if desired). it is written in 1920 or before, and it has a decent section on hinges, and most of them are … scotched!
fascinating to also see so many of the techniques (and philosophies) in this book are used by paul s – and kindly taught to us (thankyou). although paul s – i havent noticed you getting your “pounce-bag” out of the bottom drawer recently to help mark your dovetails…!