Garage upgrade ‘N’ More
In my other real garage workshop, the one at Sellers’ home, I found myself fighting several issues surrounding systemic dampness permeating everything from the single-skin brick walls to concrete floors with no damp proof membrane, a bad drainage system that simply stopped at ground level and the internal level of the garage floor being at exactly the same level as the ground surrounding it and that ground having nowhere to take shed excess water to. I could kick myself now for not taking any photographs of the existing condition of things and then too the work we did to correct the whole. All I can do now is tell without showing what we did and hope that this will help.

Within a few weeks of my first moving in, I saw a light, surface rusting come onto my planes as first evidence of atmospheric dampness. After a few months, my bench drawer became stuck fast and completely unopenable; I needed a hefty crowbar and blocks to leverage it out. This was despite the drawer having a good 1/16″ gap before moving it into the garage. When I came to put it back it had swollen by a massive 1/8″ over the width of the opening. But it’s not just the dampness on the tools so much as the damp atmosphere that makes it less inviting a place to work in. I know many of you have to do that and there are for some of you no other options — for instance, you rent your home or the finances just don’t permit upgrading things. I have had to do the same over the years of my return to the UK having landlords who didn’t want any expense nor to improve the lot of renters.
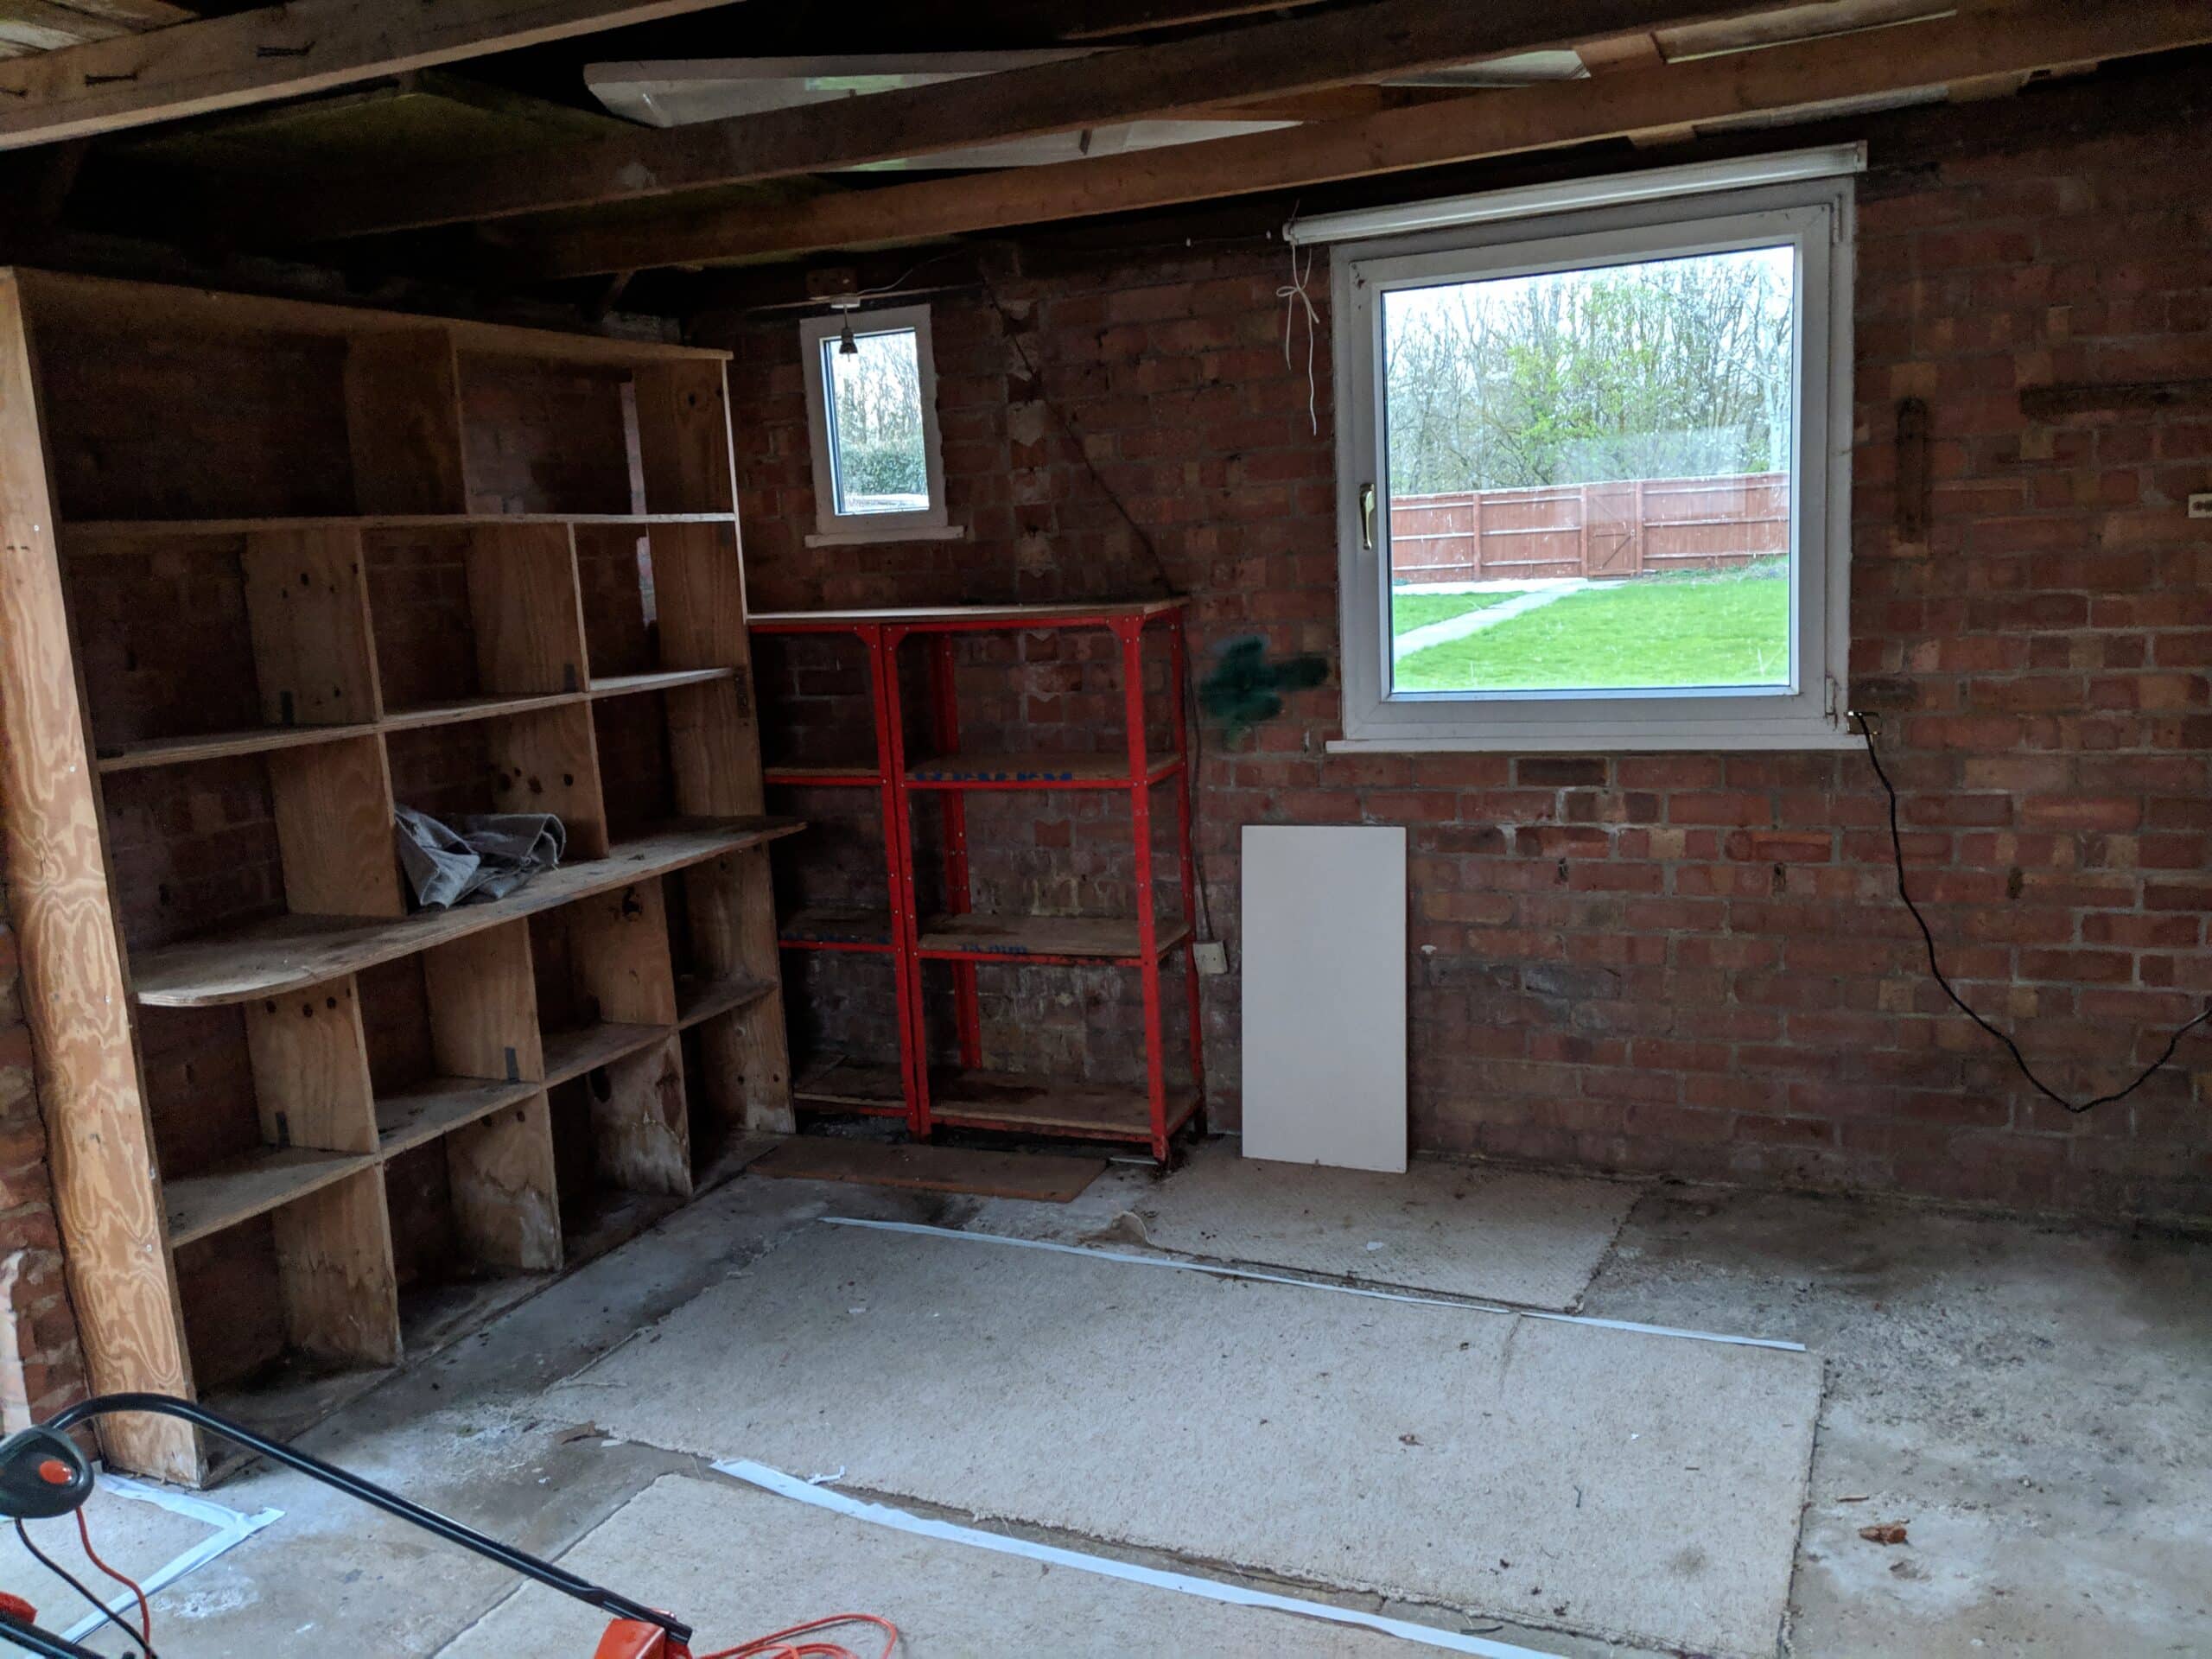
One of the things I liked about living in the Texas Hill Country was there were no such issues. Secondly, wood-framed structures are not so subject to damp transfer when built properly. I talked with Joseph and we decided to tackle the problem at its core. The drainage we thought was going somewhere was accumulating in the footings and beneath the slab and with the slab having no damp-proof membrane between the earth below and the inside of the garage we decided to remove the slab and make good with 6″ of underfloor protection and insulation by way of a damp-proof membrane enclosing the protective insulative barrier before pouring new concrete with reinforcement. To simply try to dry out such a confined atmosphere on a permanent basis would be cost-prohibitive and also less likely to achieve a good result. Dealing with the rising damp was a non-negotiable. The single brick walls needed a cavity, damp-proof course and a vapour barrier so we introduced new protection behind a steel framework of studs followed by a damp-proof membrane and then fiberglass insulation and venting.

On the underside of the ridged roof rafters, we added insulation again followed by reflective insulation ready for the plasterboard (sheetrock) and then the electrician moved in to give us the sockets and lighting I needed. From here on I saw everything dry out remarkably well and within a few weeks, the whole of the inside was dried through and through. On the outside, we dug trenches leading well away from the garage and dug reception tanks to take the rains. We also connected proper lines to the existing drains and along with additional lateral lines for dispersing any extra where possible. It seemed quite a big job at the time but I look forward to my papers, drawings and manuscripts not curling and keeping everywhere comfortable year around.
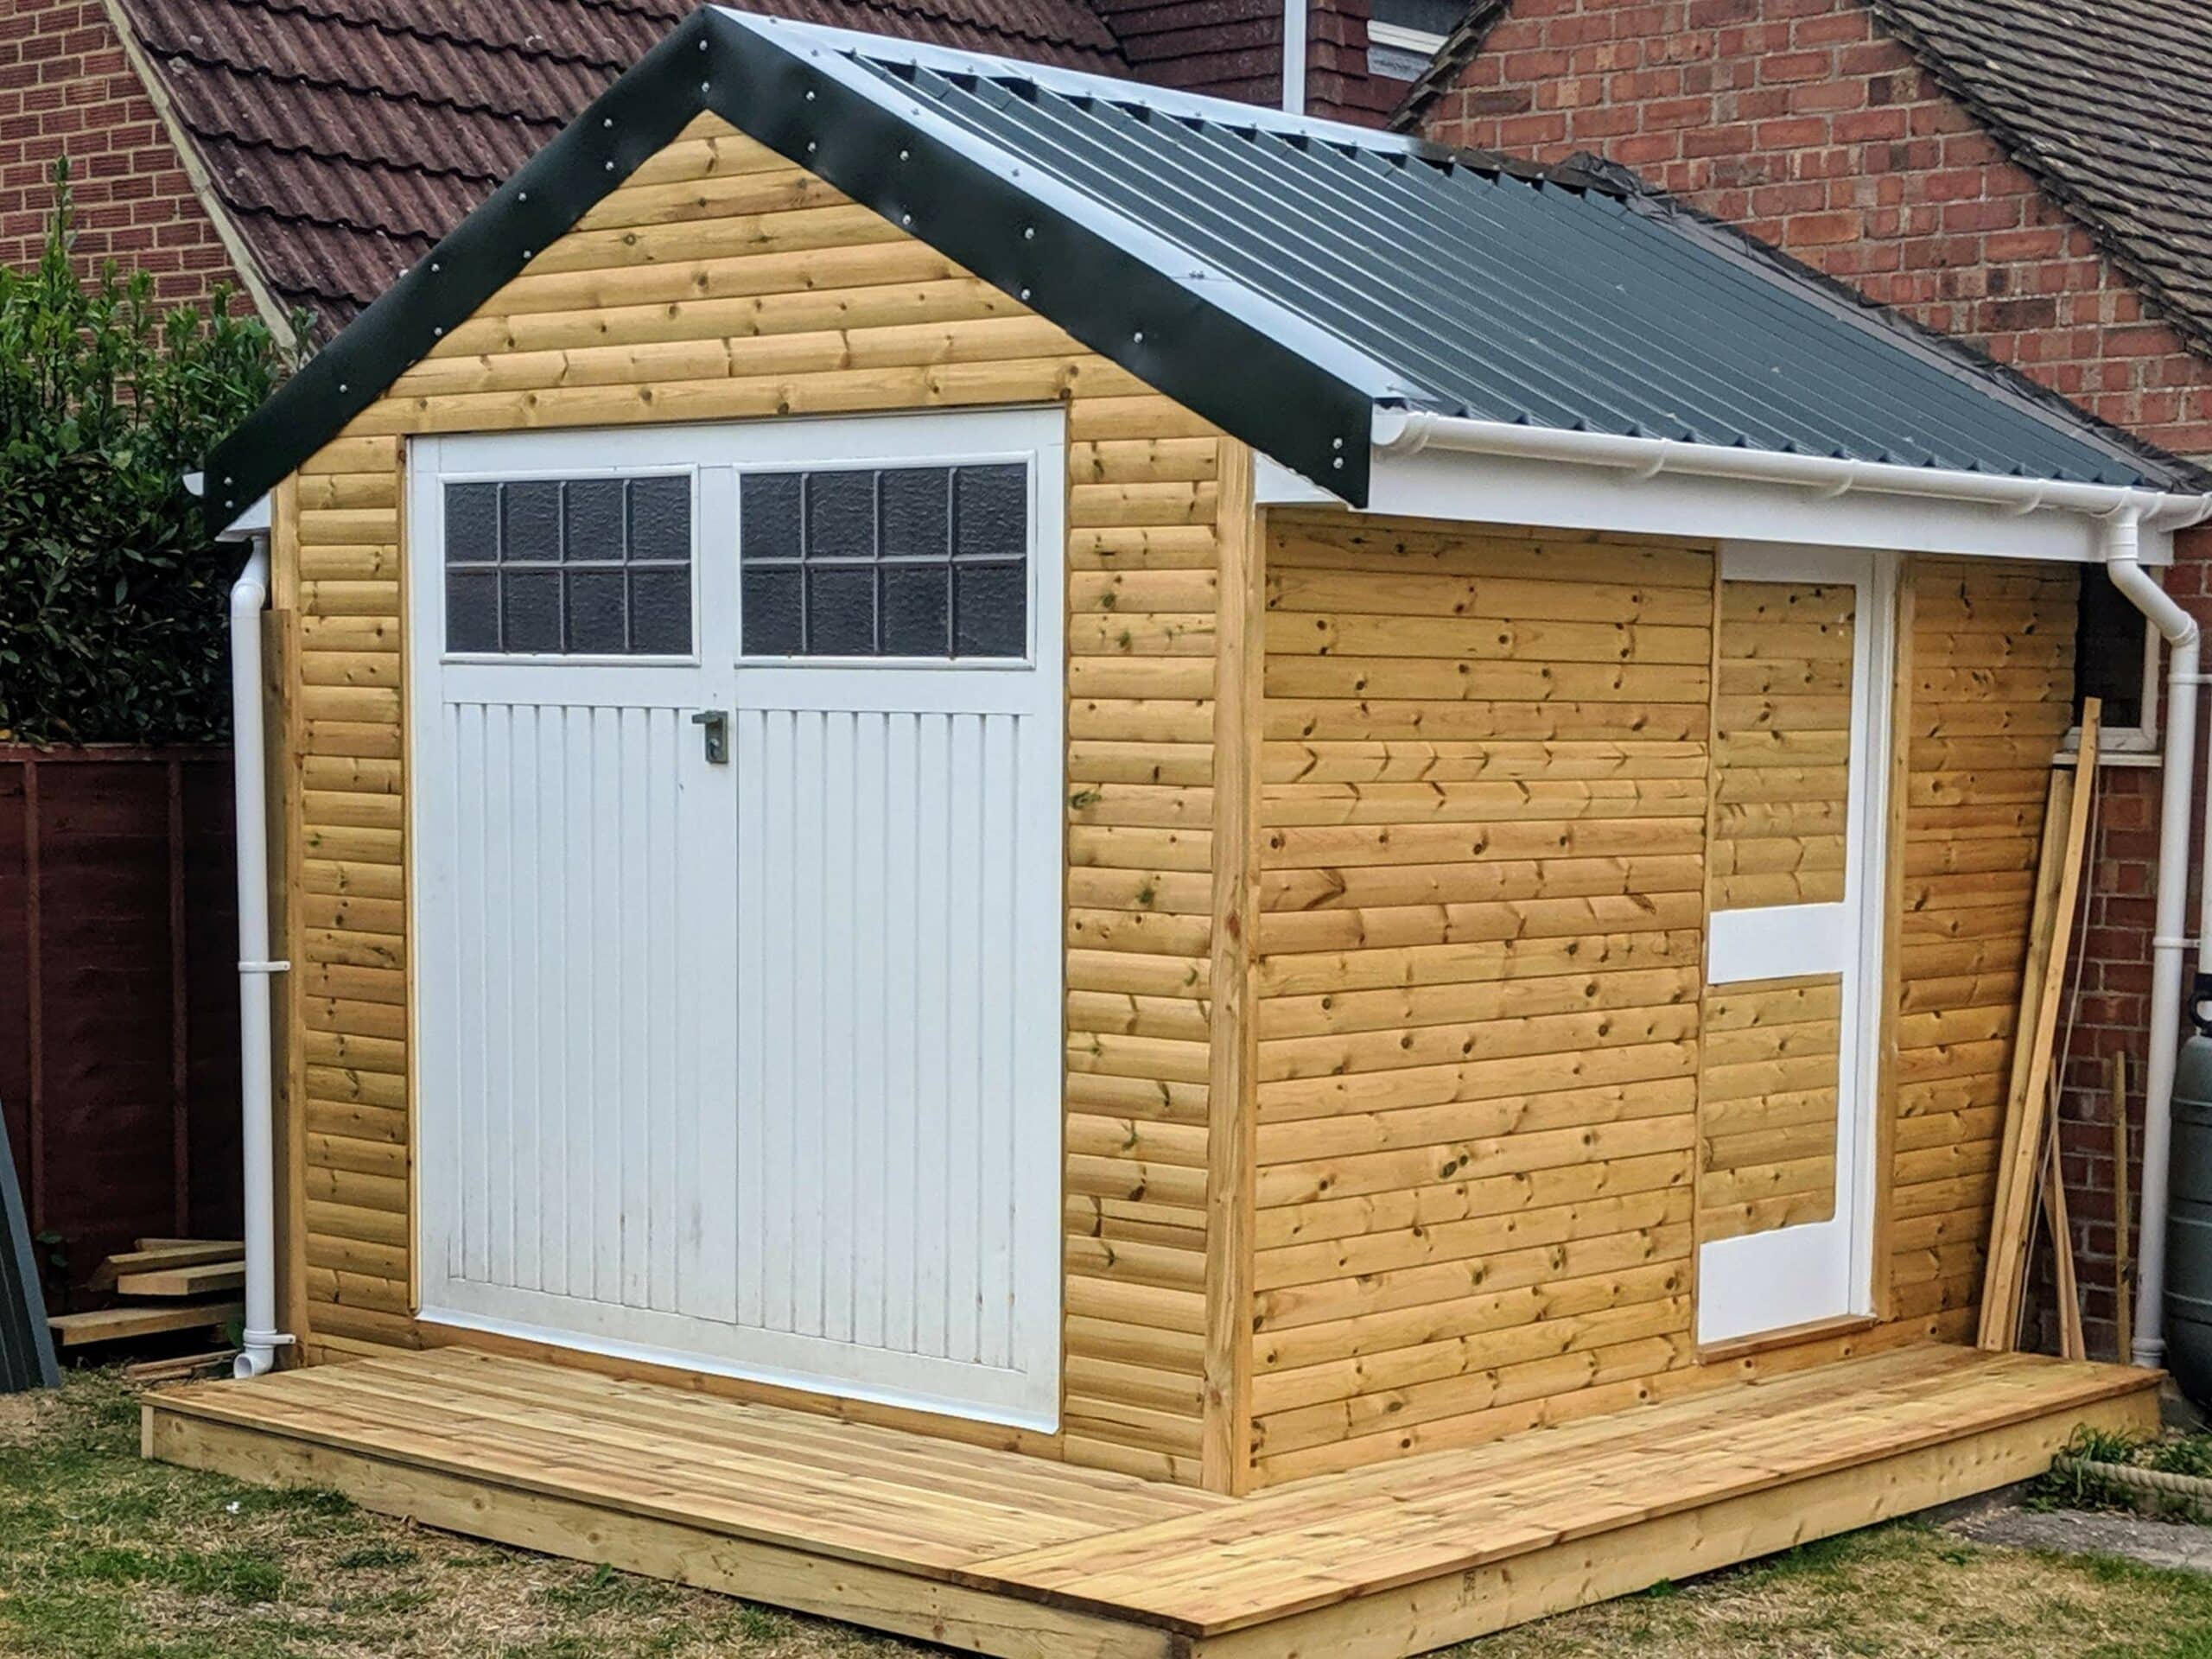
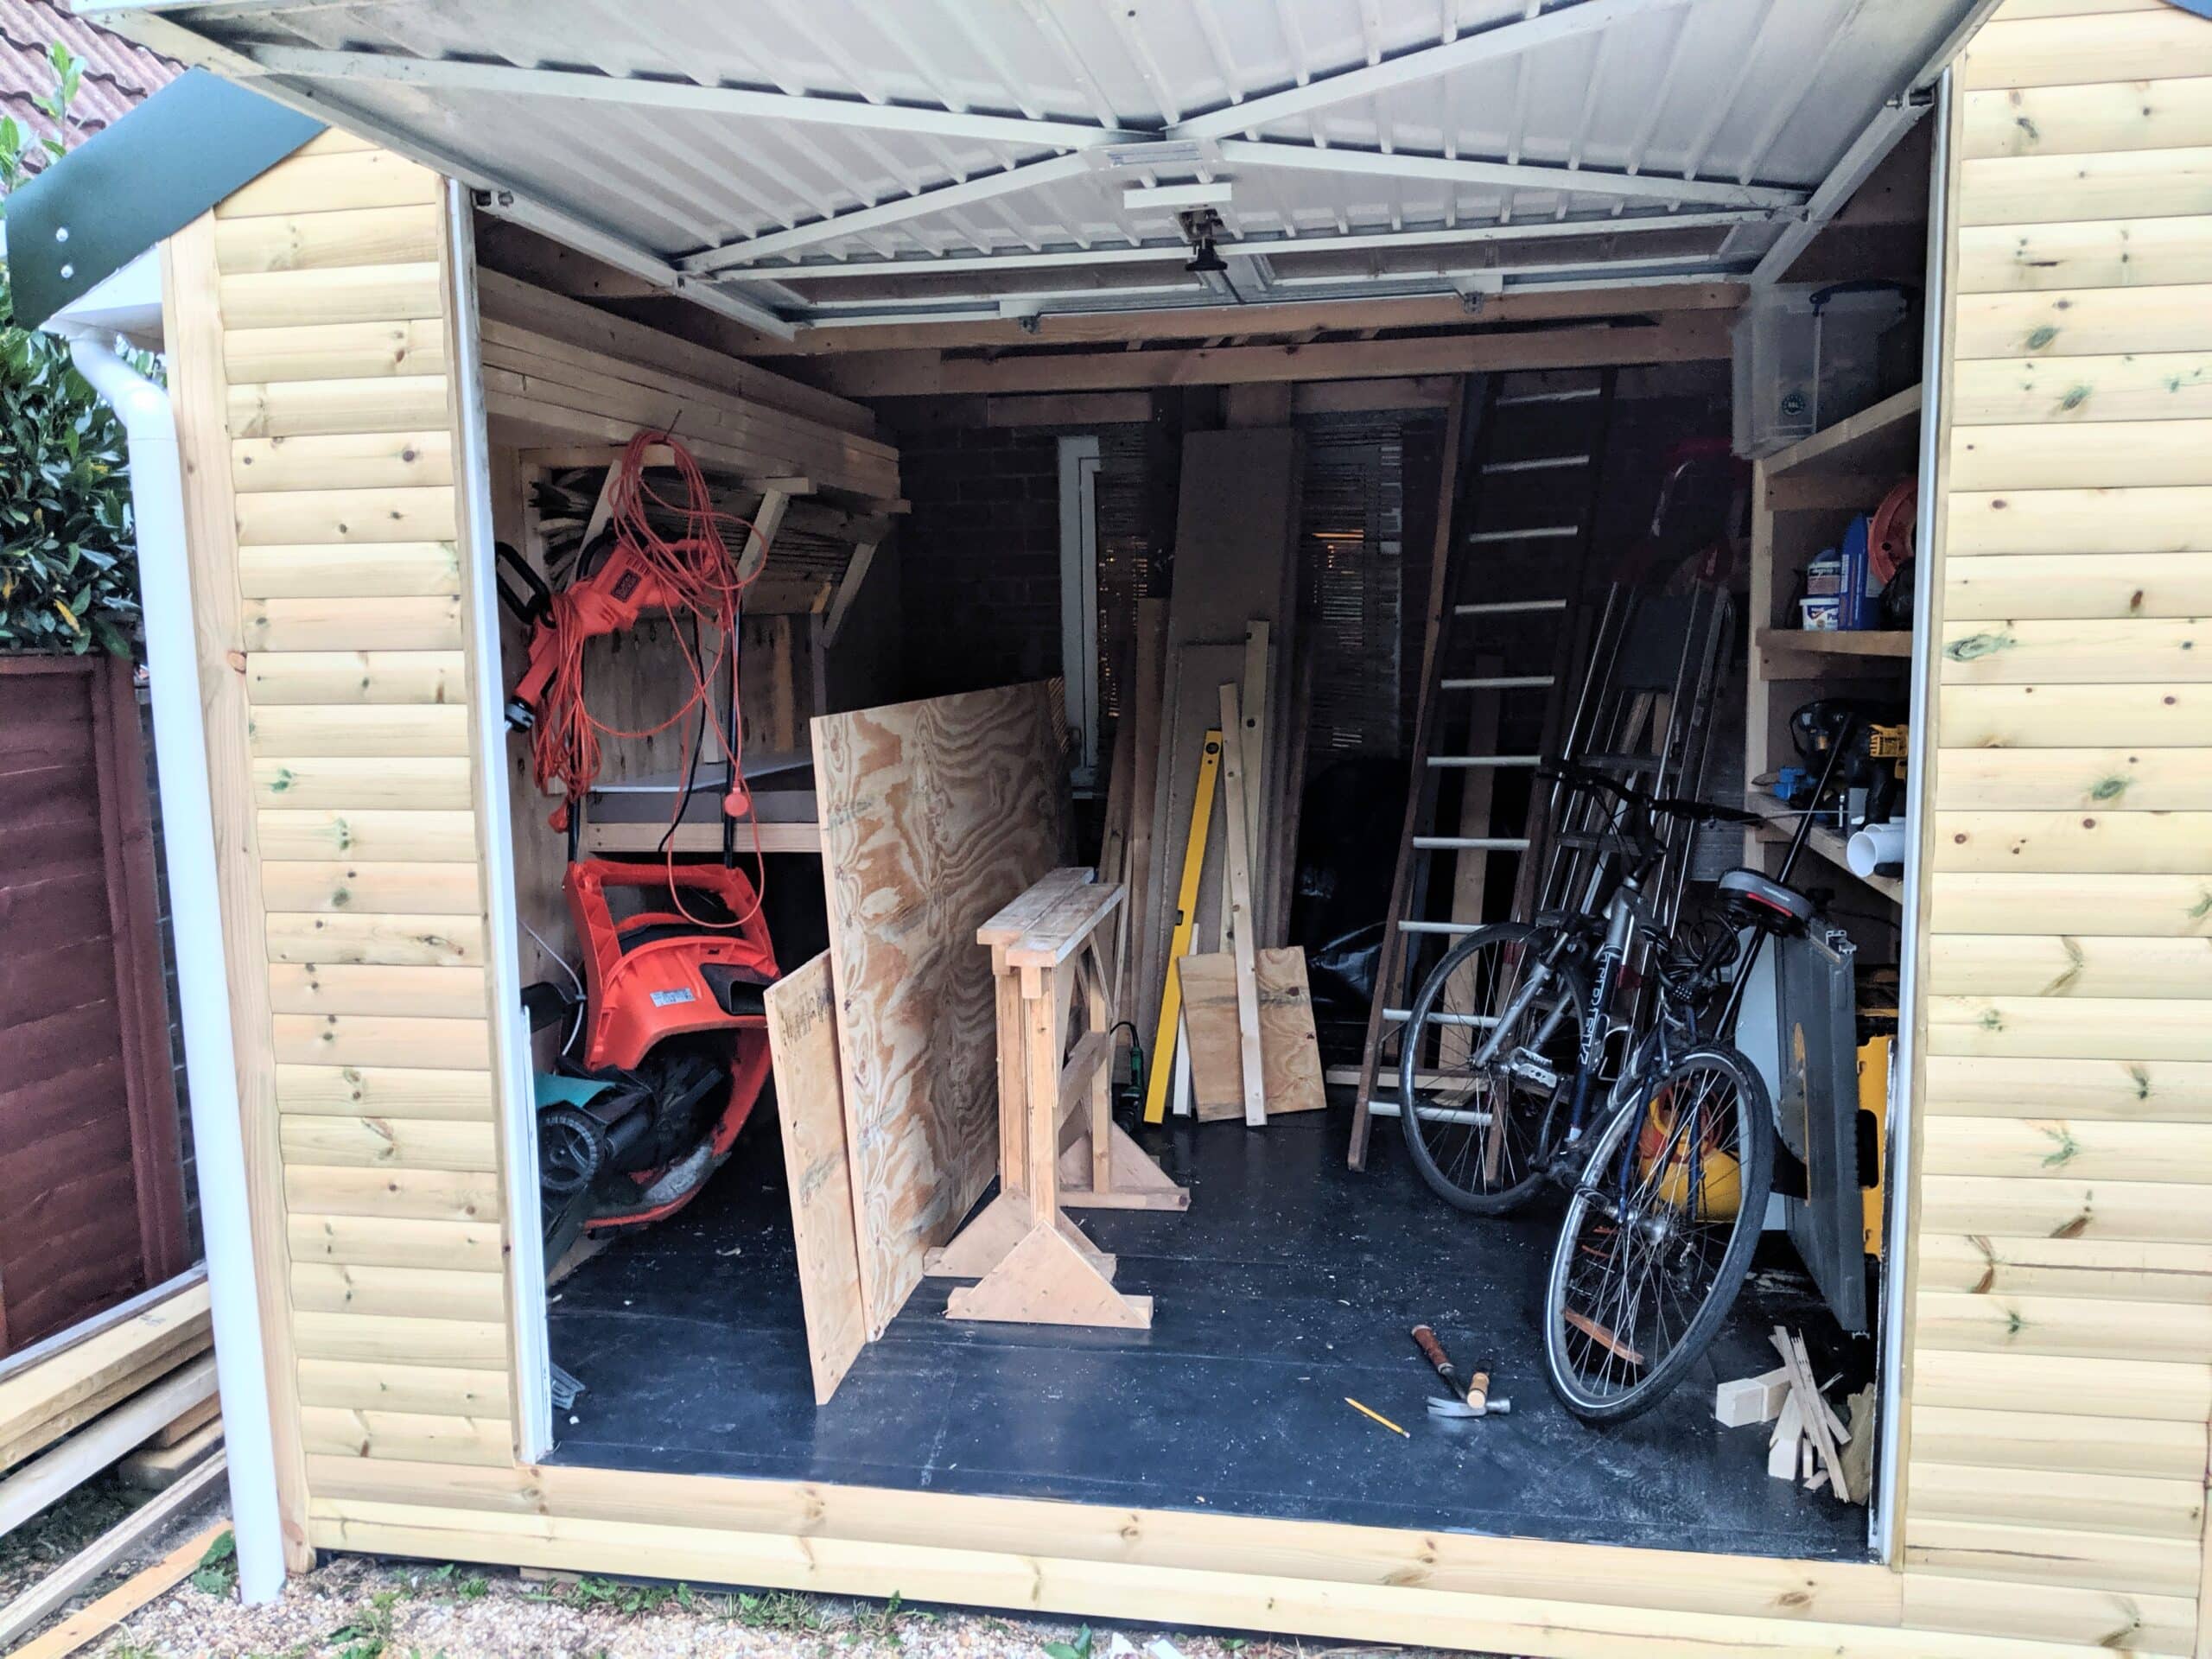
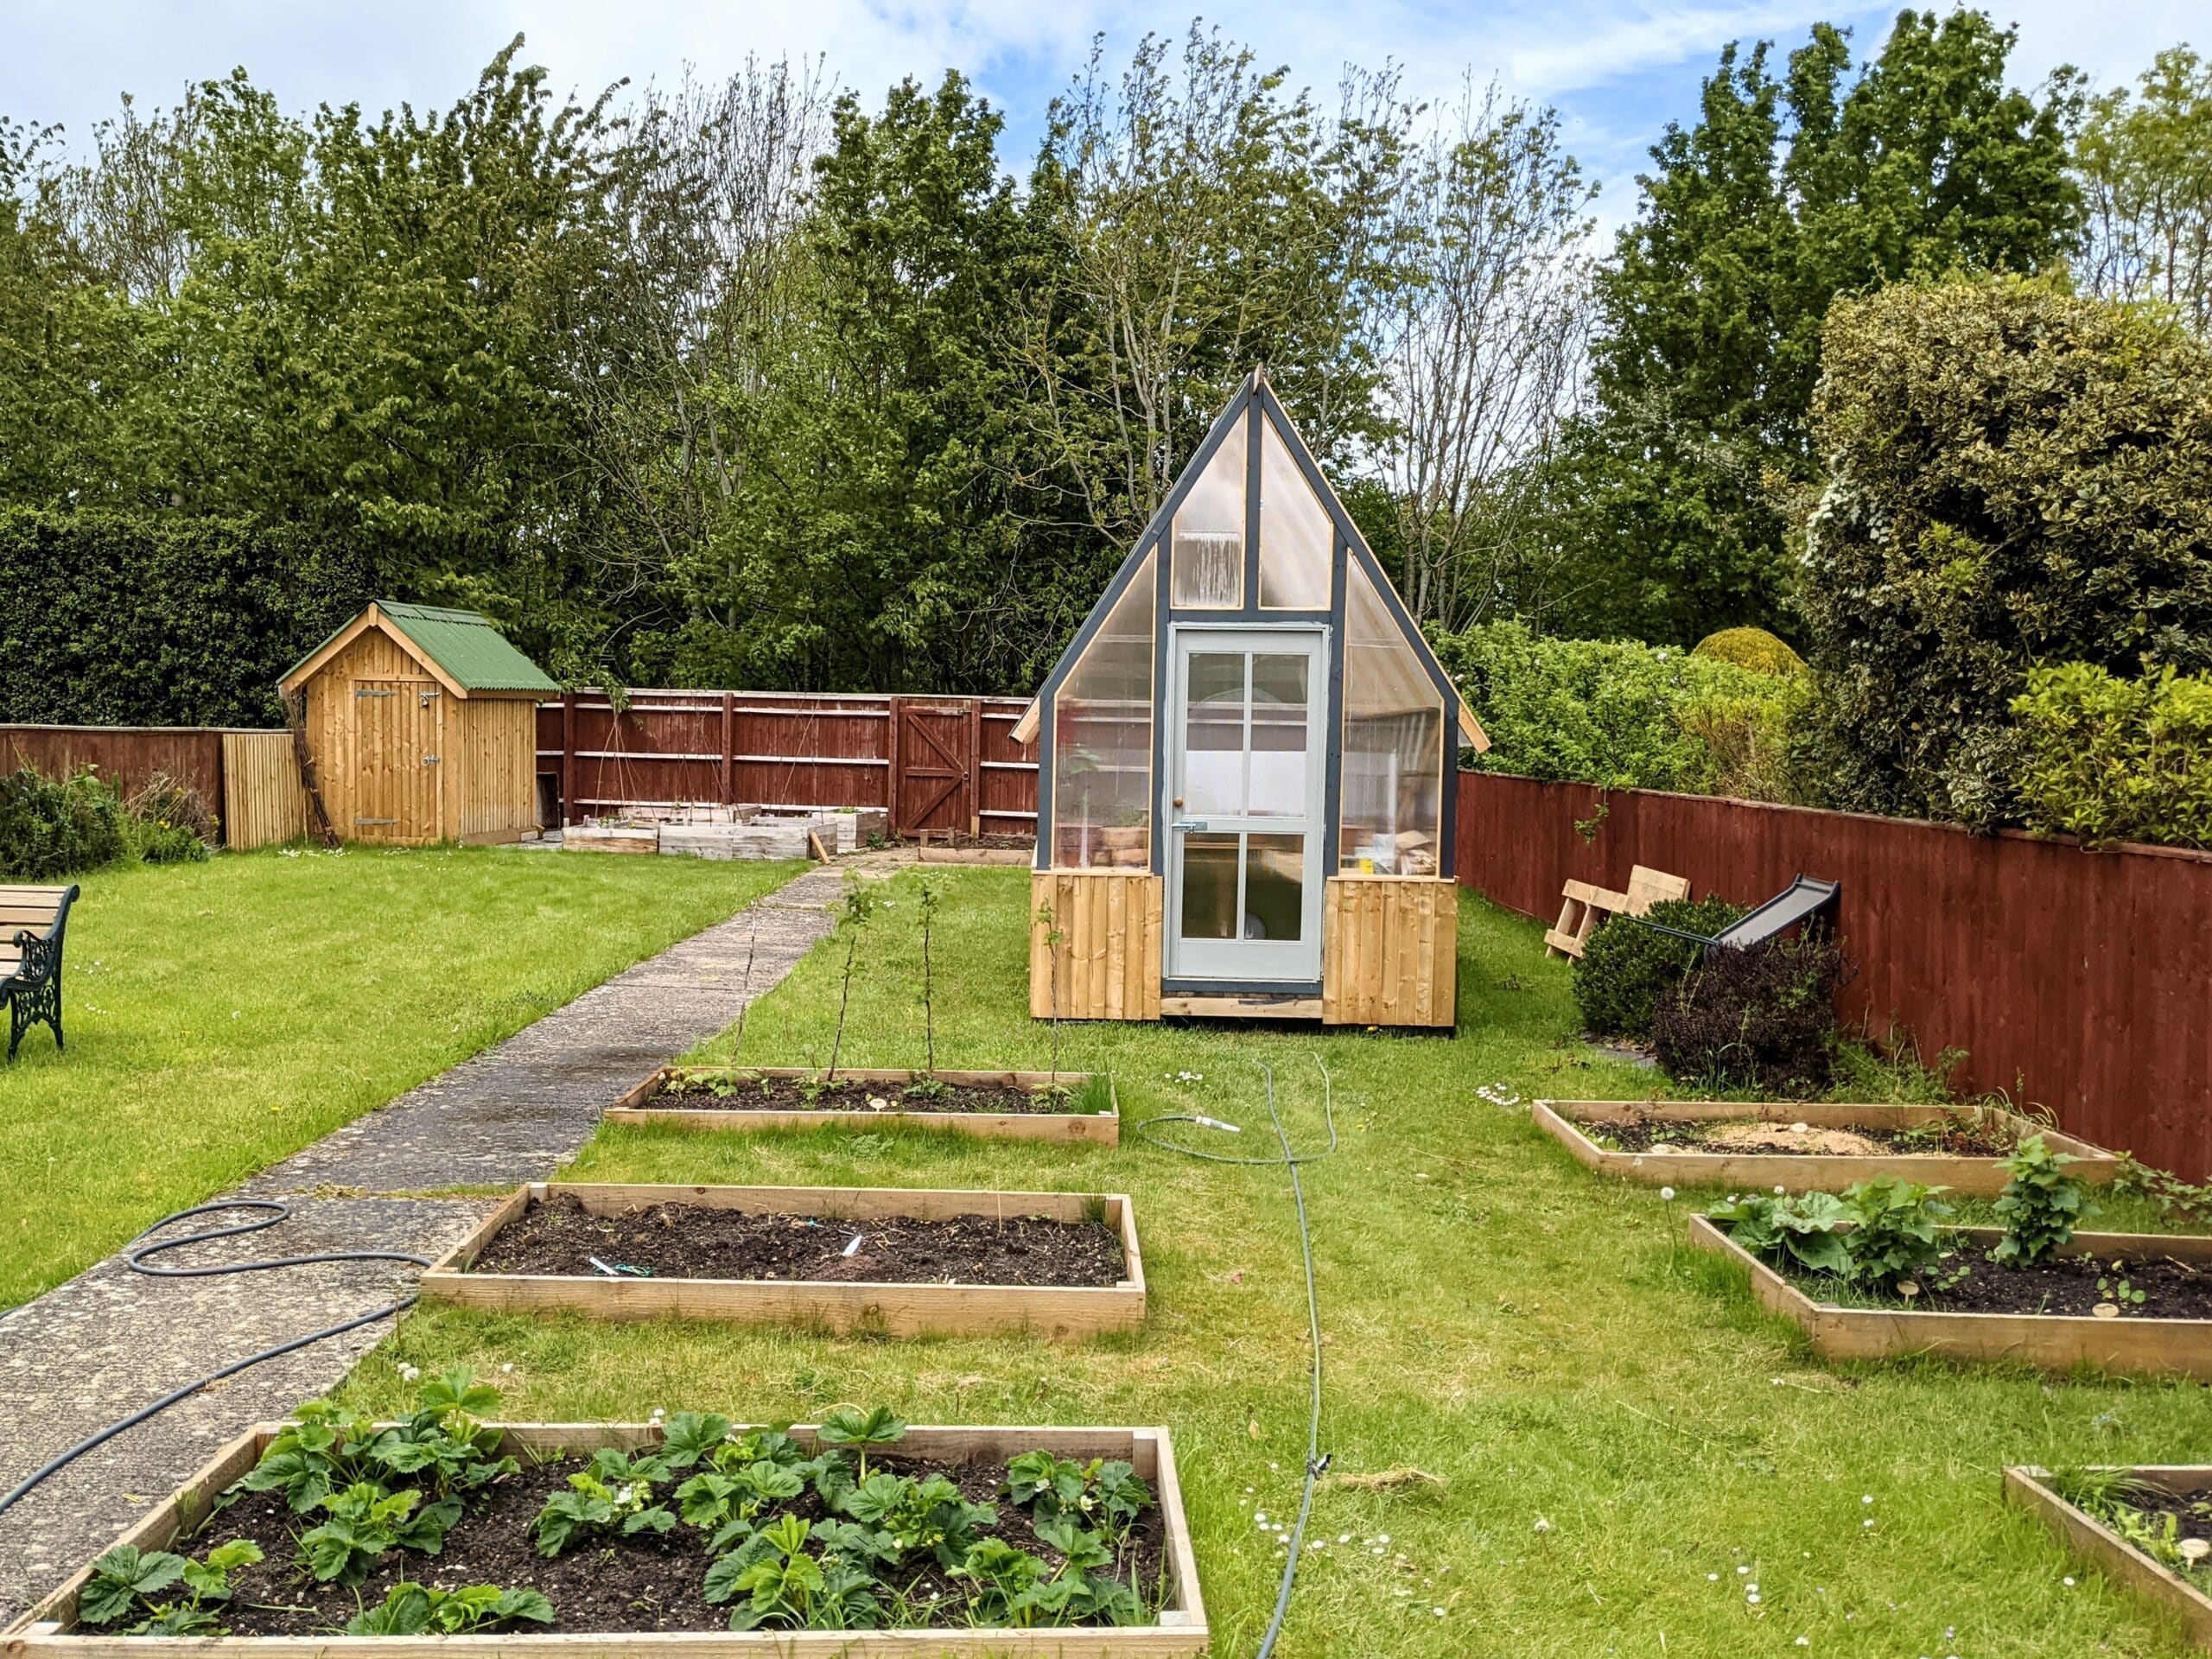
Soon I will be reinstall new shelves and my workbench, my tools and my wood. It has been very disruptive but such things always give you time to rethink what you really want and it’s a good time to get rid of the excesses. New lighting, new work desk, tools in place and a creative zone are pretty much intrinsic to who I am. No bikes, no lawn mowers, no washing machines and tumble driers, spare fridges-freezers. That is why I built the two sheds and the greenhouse over the last couple of years. I will build one more shed for outdoor furniture storage through the winter months I think. It will have a small, general workbench in there for household repairs and fixing equipment.
I’m not actually moved back into the garage just yet but in a couple of weeks, I will begin replacing everything that I have temporarily had in storage.
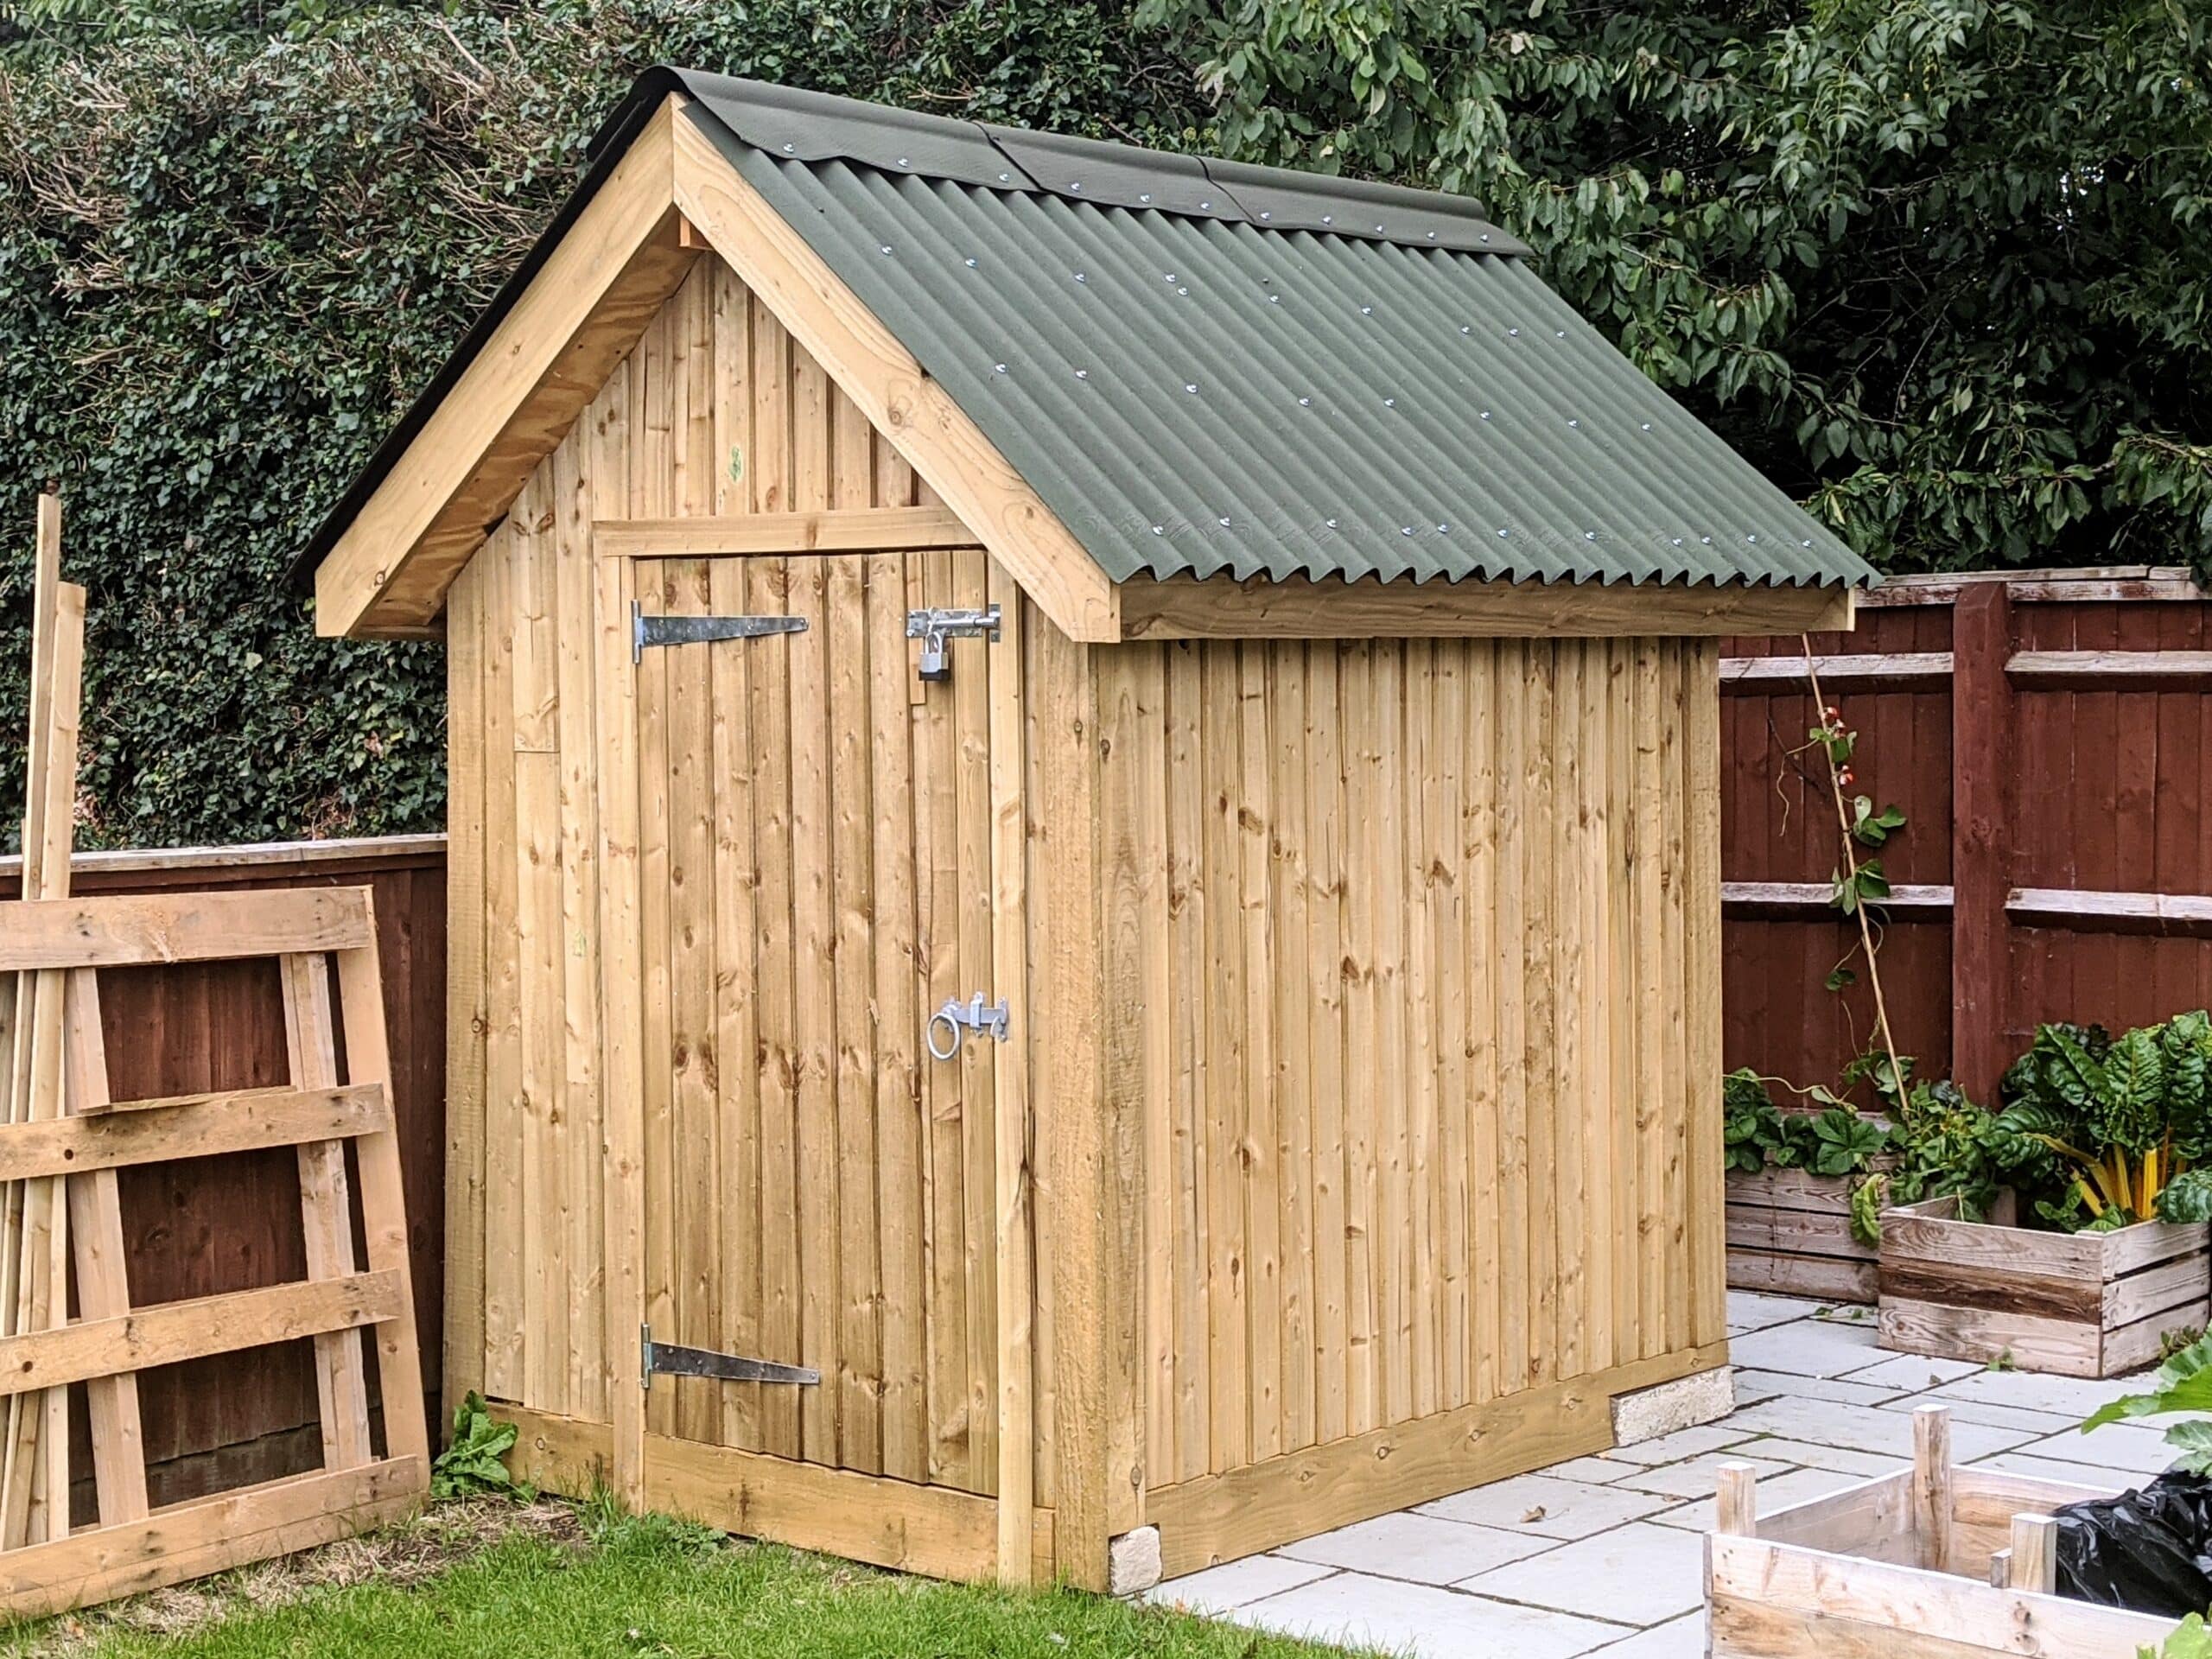
My second shed came from mainly pallet wood for the framework. These pallets were the ones used for delivering 4×8 plasterboard (sheetrock USA). They’re robust enough for the walls of a shed and can readily cut for alternative sizes. I bought the treated cladding for the uniform look I wanted but the shed cost around £150 to build and is very robust. In the inside corner, I installed a birdhouse with the entrance hole on the outside under the eaves. In the last two years, we’ve seen four broods raised.

The greenhouse extends my growing season markedly and is especially good for tomatoes which are very much a part of my daily intake of fruit and veg. I began veg gardening in 1989 and never looked back. I keep it simple because of time constraints but as a long-time vegetarian, I prefer my own grown wherever I can.
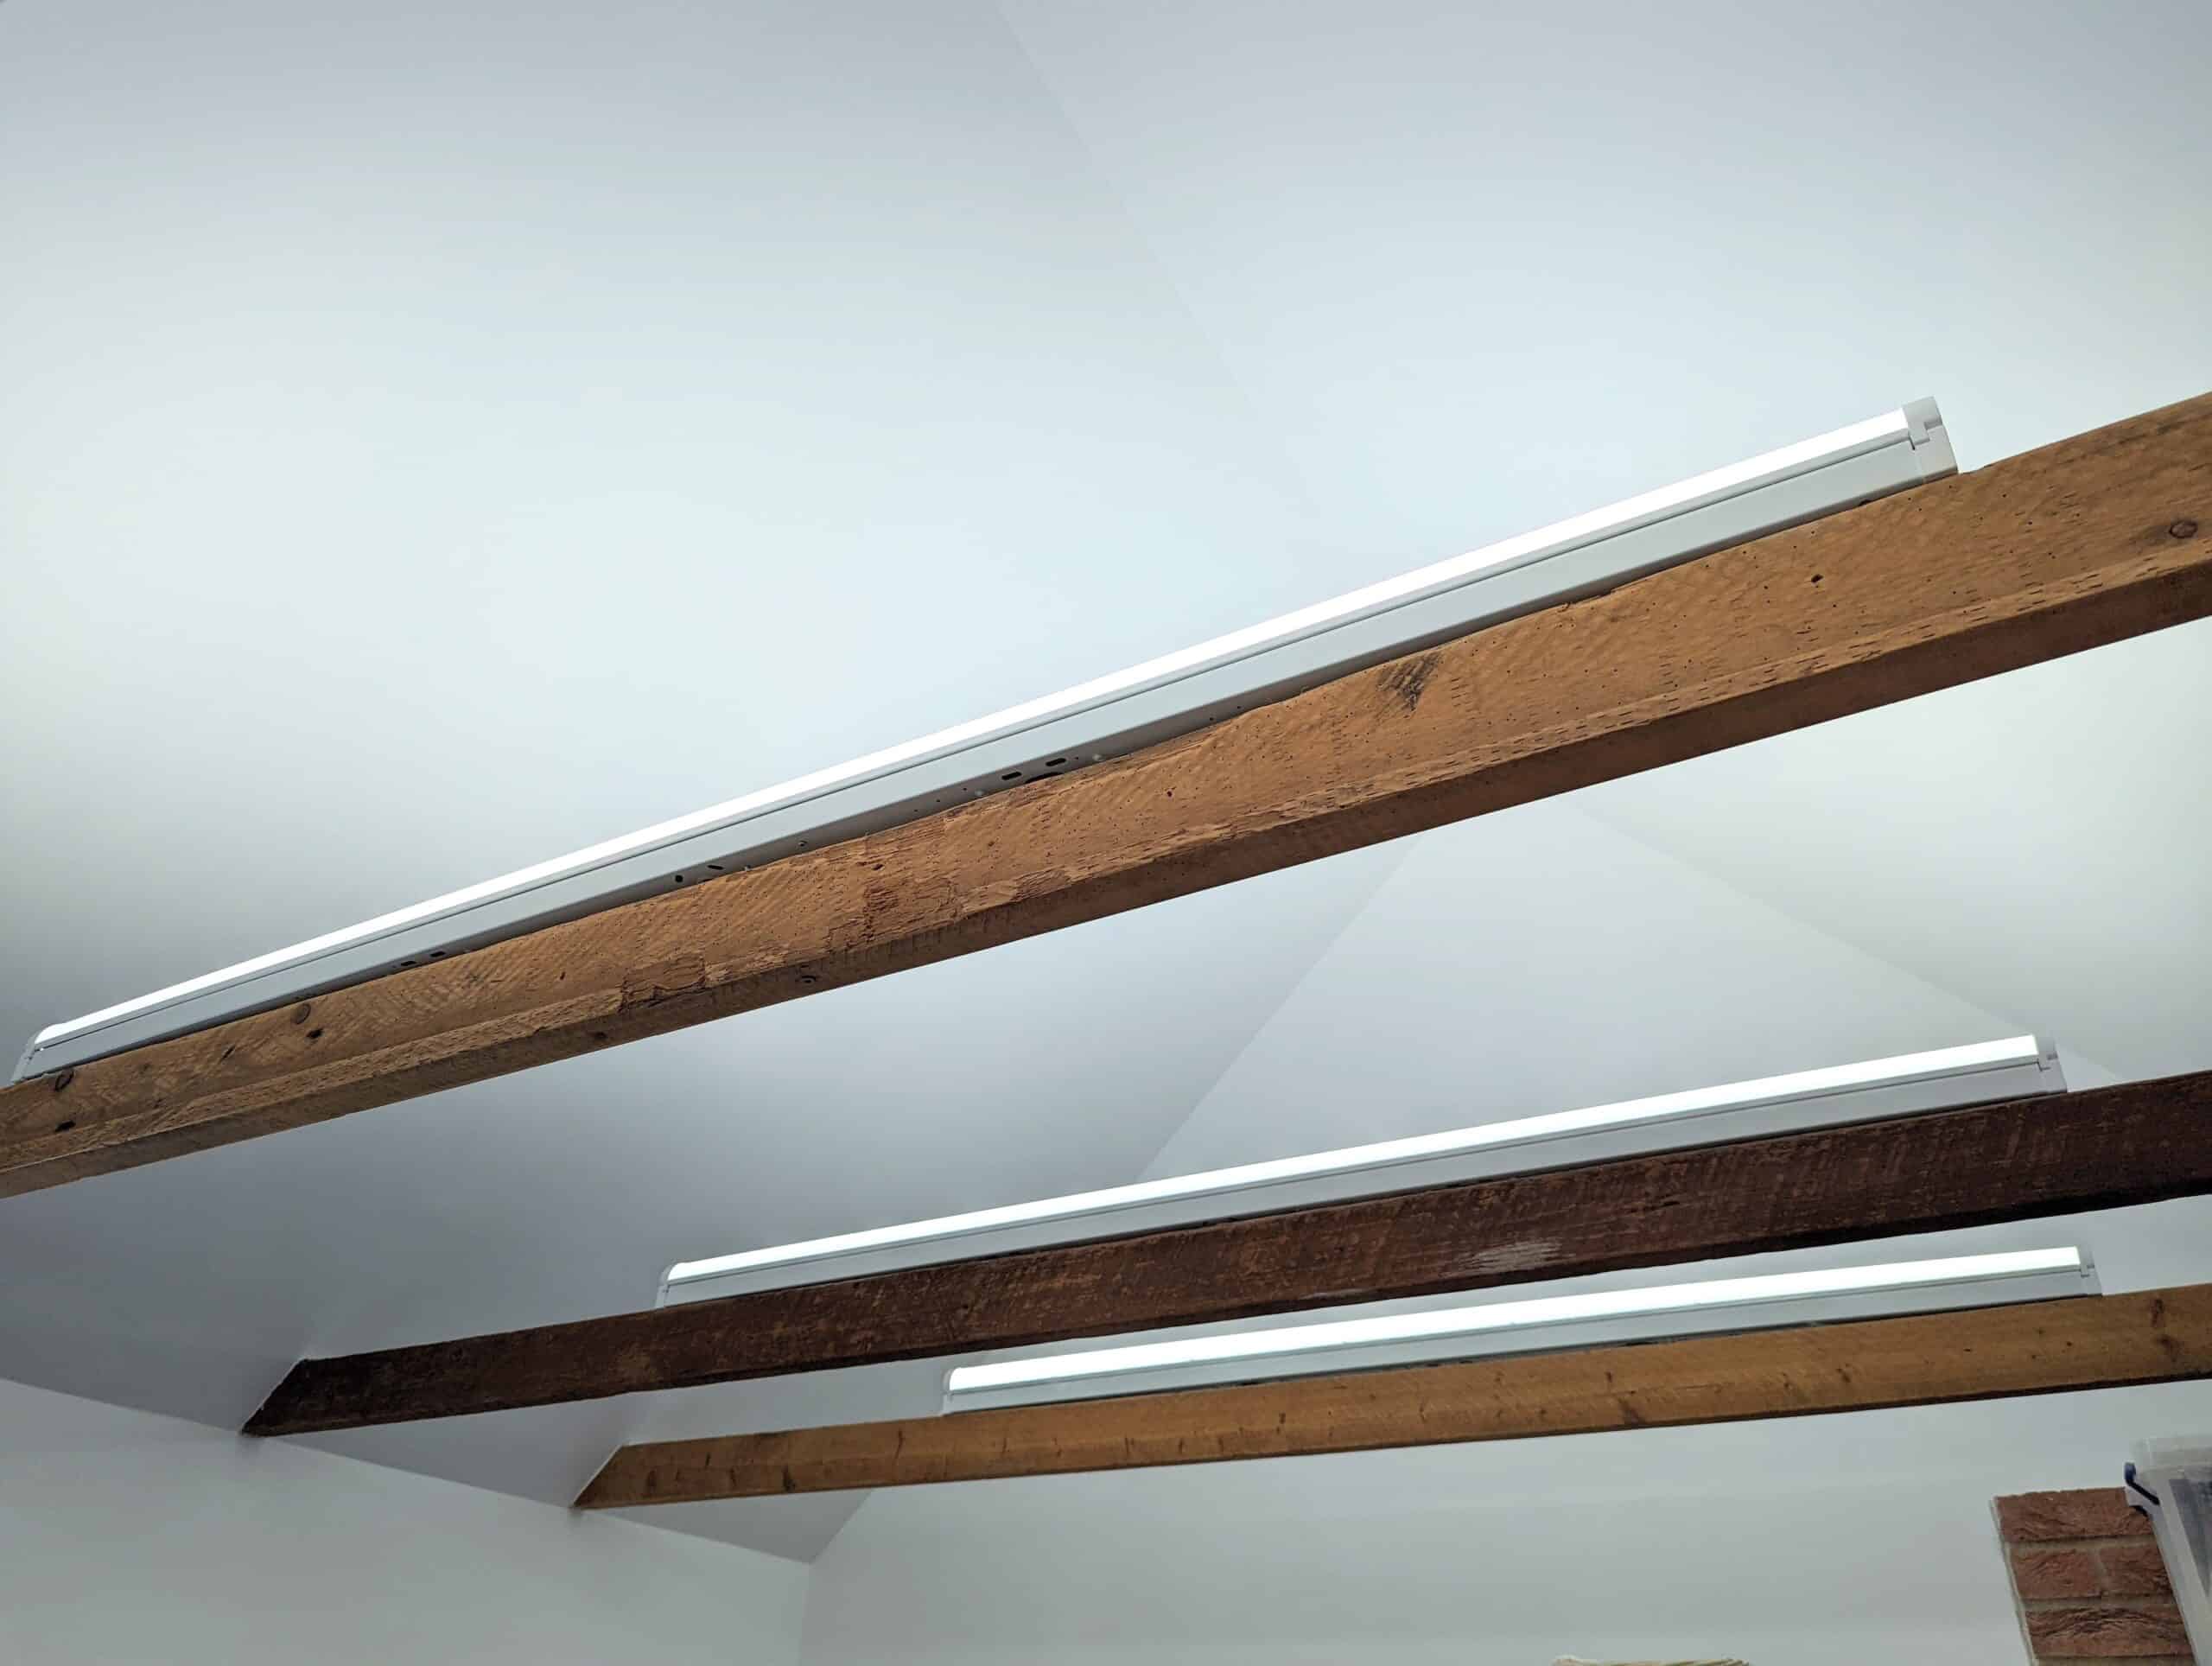
“Lights located on the top of the beams reflect the light more evenly over the workshop from the underside of the roof rake and also keeps them safe from lengths of wood I’m working with. It also gives me the extra couple of inches of headroom.”
Another ‘brilliant’ idea! I’m changing mine today!
Now why didn’t I think of the light trick? Having had a long-term illness, I spent oer a year away from my little workshop at the bottom of the garden, and when I did pluck up the courage to go there, I could have wept.
Damp? Oh, yes, I had damp alright; at some point the roof had started to leak, and had rotted the back wall to the extent that it had to be replaced! I will not dwell on the state of my beloved tools, save to say thatI am still cleaning them up. They’ll never look as nice again, though.
But you’re right, Paul, many people have a problem with damp without having a catastrophe like mine, so this article, I feel, will be tremendously helpful. Thank you.
Chris
I’ve just started growing some of my own vegetables in raised beds 30” high.
I don’t think I’ll ever be a vegetarian but I will say there is nothing like your own home grown food. When you pick a tomato fresh off the vine you can smell it, there is a flavor you just can’t get anywhere else. In the states we get our vegetables from thousands of miles away. What they had to do to ship and store it for that length of time to get to our local stores takes the flavor away. I had forgotten what things are supposed to taste like. Doing things yourself is very satisfying and good for the soul.
I couldn’t agree more.
I love this time of year for all the fresh produce I can grow or buy at local markets. I’ve built some raised beds too and the first tomatoes of the season are just starting to ripen. Much better than the supermarket.
Taking care of a garden and enjoying the results is a very satisfying feeling.
I’m sure many of us would enjoy learning more (construction, waterproofing, and locating) about nesting boxes. They are a popular item, but the birds don’t always realise what is good for them!
So many options to place cavity nest boxes. I like them near to the house because I can keep my eye on them. I was spoiled living in the USA where I placed so many Bluebird cavities and regularly saw three broods raised by the most diligent of birds.
I’m definitely going to try a nesting box in my yard after reading this. I’ve been trying to attract some birds to my property to watch without much success.
I tried setting up a bird feeder but I’m in the state of Michigan in the US and our squirrel population always seems to find it first.
I get my Cub Scout pack to make bird boxes. When I say “make”, I mean “cut along the lines and screw together in the holes I have already drilled and countersunk both sides”.
“Why both sides?” you ask – Because the Dads who come along to help do not follow instructions (“Dadesses” are far more diligent!).
Why screw it all together? Because after taking the register and doing the notices etc. I have about an hour and a quarter to get up to three dozen cubs ready to go home with the bird box that they have made.
Better that they go home with a feeling of achievement at what they have done than disappointment at what the have not.
It takes a lot of preparation but is a good evening that gives an introduction to a couple hand tools.
Yes but blue birds are mean, they eat other birds eggs and broods.
If you have issues with dampness, move to Utah. I believe that our humidity rate is about 2% at best.
No issue with rust here.
I think perhaps you mean blue ‘jays’ are mean, no?
I have a damp shed. I keep my tools in plastic boxes and coat them in Vaseline. The parts I can’t get at I spray with Lanacoat, which is a lanolin spray. It smells of shearing shed and is great. I first used it on my old sailing boat and it resists rust at sea so fine for the shed tools. When I want to use the tools a wipe with Methalated spirits get it all off and away I go. I wish I had a drier shed but needs must.
My shop is in the basement garage of our split level. I live in Ohio and the winters are cold and damp and the summers are muggy. The garage area is comprised of cinder block walls and fiberglass garage doors. It gets damp enough to rust tools if not looked after, and the humidity in there can be at around 65 to 75% depending on weather and season. I sealed everything up and insulated it well and with the addition of a dehumidifier the area is at at steady 45% humidity and the temp is usually 65 to 70 degrees. I can work there comfortably in 3 seasons, with a small heater in winter. The rust issues are much better now. The use of the dehumidifier has not really caused a spike in out electric bill either.
You might find this interesting Paul. The San Francisco Bay Area town I live in is a mixture of modern and traditional activities. The traditional activities include cattle as well as vineyards. The vineyards need to control the vermin and wanted a natural way to do it. Their solution was to put owl boxes on in the vineyards. Owls have taken up these boxes and the rodents are under control.
Wonderful, Joe! Just common sense cures.
(Forgive me posting this question here. I could not find any other place to send it.)
I believe I have found a discrepancy in the videos and plans for the making the PS router plane. Where can I send the information? Thanks.
Brett, if it’s what I think it is then follow the plan.
We might be thinking the same thing. The plan is right, but if one starts with a 3/4″-thick piece of wood (the piece into which the notch is cut), then the width of that piece of wood comes out narrower than is shown on the plans. Thanks.
Paul, if the drainage problem recurs a french drain system may be the answer.
Bob
I am lucky to have a large shop (24×36′) with a good wood stove, but of course, I only heat it when I’m working. The concrete slab it’s built on is quite a heat sink, making it slow to heat, but keeping it nice and cool on these hot summer days. The problem comes on very hot humid days in spring (90-degree days in May used to be unheard of in Michigan) when even the tools are still holding the winter cold and I get condensation on every exposed metal surface. I keep hardboard covers on all of my cast iron surfaces, which helps a lot, and of course, keep those surfaces waxed. I keep hand planes and chisels, etc., in drawers and use Paul’s rag-in-a-can liberally. It works!
24 by 36? That’s a whole house here in the UK! I can’t imagine what I would possibly do with all that space and for one person.
So just a note to all.
In humid spaces, I have had nice success using those little packets of desiccant that come in almost everything that’s imported.
I just throw a couple of them in every tool drawer and shelf…..so far I think they retard moisture buildup and do keep metals dry. I have even purchased bags of 100 on Amazon….for almost no money. I replace them yearly.
I live the South Carolina jungle. Humidity? It rains in my shed and never dries. My rust has a surface coating of steel. I like Johnsons paste wax and beeswax but I’d be lying if I said anything works for long.
“a bad drainage system that simply stopped at ground level and the internal level of the garage floor being at exactly the same level as the ground surrounding it ”
That made me laugh out loud. My home is similar (concrete plate), there’s a 50mm rise (over ground level) but at least there seems to be the waterproof layer underneath. I’ve had no trouble with rusting at all so I am very happy.
Love the sheds. I also deal with constant rust on my tools Paul, although in my case it is sub-tropical humidity in Brisbane.
I am lucky. I used to live in Vancouver, on the west coast and moisture was always a problem. I now live in in southern BC, in a desert, humidity and moisture are never a problem here. My shop is in the basement , well insulated, heated and comfortable.
I also spend time in Arizona and although mu collection of too.s there is much smaller, again… moisture and humidity are foreign concepts.
I commend you for taking out the slab!
I have a similar garage in the Netherlands, replaced the roof, added wall insulation, later added in a moisture repelling floor layer on top of the concrete, put in chemical dehumidifiers that I replace every 2 months or so (if I remember on time), put in extra ventilation and it all helps.
However with the foundation not being good I just had to accept a certain amount of humidity and light rust on steel surfaces like the drill press and my bandsaw blades and anything I don’t coat sufficiently after a while.
Still I feel really really happy to have a proper place to work with my hands when I have the time. Thank you for all the inspiration!
Did you do all this with hand tools, Paul?
The sheds, greenhouse etc, yes. Not much to it.
Sounds great what you have achieved with the damp garage. Would be handy if you could show a rough cross sectional sketch of the floor and walls, showing the new construction.
I use a couple of things to combat dampness and resulting rust.
First, I save all the silica gel packs that come in the various things I purchase mail order. These are sprinkled throughout tool drawers and placed in containers with nails and screws. I also buy camphor blocks and place them in my tool drawers. For saws and planes and tools too large for contained spaces, I coat them with a substance that is a mixture of 1/3rd equal parts of melted beeswax, boiled linseed oil, and turpentine (or paint thinner if turps isn’t at hand). This does a good job of coating but it has to be removed from planes, saws and other tools that don’t do well with the friction the substance can create. It does work for the tops of my table saw, miter saw, and bandsaw.
The only real solution is constant vigilance and intervention, in my experience.
Could we get more detail on this project? I have a very similar shed and I’m just not sure where to start. Thank you as always!
I’m afraid it’s done and past now, Max. Mainly, I inherited issues when I bought the property that I knew I would want to deal with for sanity’s sake. Some were obvious at the outset and others were obviated later when heavy rains had nowhere to drain to and remained sodden for weeks. Wooden sheds off the ground are not really a problem as long as there is air passage beneath and drainage dug where necessary beforehand so that there is no standing water underneath or nearby. I had to bite the bullet by ripping out the existing slab but that was made easier by the fact that it was craked and crumbling. It also meant we could dig down to put in drainage hardcore and concrete to divert future drainage and or take away water in the natural landscape work adjacent to. We ripped up large sections of the stone patio, dug down three feet by two feet wide and provided hardcore for drainage surrounding drainpipes to connect to existing drainage systems. My sheds and greenhouse go straight to the soil as they are well up off the ground and I want the water to remain there even when it rains. It wasn’t a project to pass on so much as an anecdotal happening to let everyone know these things are worth doing if woodworking is a serious aspect of your lifestyle. Not really my area of expertise.
Good Morning, Mr Sellers.
I too had a (big) problem with water ingress, and I do mean water, seeping into my garage/workshop through the walls on two sides; built into a bank with no membrane or tanking. this problem was solved but it remained a garage, big electric up and over door Etc. The two areas are now split but, it is still cold/damp/humid as the seasons dictate. I have found one product to be superior to all others for protecting my tools both new and ancient, Metalguard ultra (usual disclaimers) it works for me.
I hope that this is useful and, as the saying goes, more power to your elbow.
Hi Paul, I just want to say I’m so grateful for coming across your blog and truly admire your craftsmanship. I’m coming up to 10 years in my career of being a site carpenter. With evenings spent creating pieces of various joinery at my leisure mostly thanks to your comprehensive and high standard of educational material your provide here. I am very fortunate to love what i do however i would like to ask your thoughts on Standards and quality in making. Should we strive for perfection in our work and cultivate a perfectionist mindset?. During my day job as a site carpenter, I find myself torn between quality and quantity as you’re expected to produce a specific quota if you will whether it be hanging doors, Fitting kitchens, Pitching roofs etc etc . I have empirically assessed my work output to others on site and I am significantly less productive than them by a substantial margin and its mostly down to the amount of time I give to the smaller details of the specific project. I want to ask you Paul, As you’re involved in more intricate work on the daily basis, are you a perfectionist? should we perfect the small details or should we allow for tolerances in our work (gaps in mitres minor splits , hairline gaps etc) and understand their should be a self imposed time limit where we say okay I must now move on so we can finish the project? or do you simply never compromise your projects quality and you only settle for perfection? Thanks
Not really so easy a question, Edward. I think most people place carpentry more squarely as a catchall for all areas of woodworking so when you say that you are a furniture maker everyone thinks of carpenter in the use of the modern-day use of the word as in construction. Go to certain parts of the world and a carpenter could be found intricately carving a door with complex designs and working for weeks on a square foot of a fifty-square foot design using only his hands and gouges and chisels, wooden mallets, etc. Not the same as someone decked out with tool pouches lopping two-bys with skilsaws and chop saws and air nailing same into stick frames to be clad with siding outside and sheetrock in. It’s hard to do but I have lived and worked in both camps and chose to get off the conveyor belt almost 30 years ago when I said I would never work for money again. That does not mean I didn’t need to earn a living but that my ambitions changed. As a sole earner in the household I stopped chasing work based on money and income and chose how I made what I made. My standards of workmanship improve exponentially and I became far more inventive to establish better levels of workmanship; yesterday I developed and invented a tool that as far as I know did not exist. That is not to say that it didn’t exist, just that I needed something to perform a certain task and invented it by making it. I think 99% of woodworkers would have used a power router and achieved the same result even though it would have been nigh on impossible to create the jig to guarantee the outcome I wanted. My new tool took me five minutes to create and five minutes to use it and it is was indeed perfect. It’s definitely difficult to hybridize living and working in commercial settings where compromise is a constant and skills are perpetually being dumbed down for faster production but that’s the story of industrialising people, workers. Most larger-scale operations have to have so-called professionals known as human resource people to manage personalities and bridge the gap between the dehumanised management chasing that might dollar and people who care about the quality of what they do and make. My work is to establish and remain in control of both what I make, how I make it and then too to educate my customers as to why they should buy from me and not a mass-maker producing artificial products that look like but cannot match my work or my working. I probably would never use MDF for anything except a panel to lay out my design on or support my work in progress. I recently saw a man’s intricate design work veneered onto MDF substrate and the man praised MDF. Thankfully, in my self-engineered environment, I can say and live by never using MDF for the whole of my life in my furniture. In this I choose the possibility that mitres might be perfect when I cut them and fit them but that changes in atmospheric moisture levels might cause shrinkage resulting in a hairline gap or even a big one. This I can well live with. What I cannot live with is the artificiality of a post-modern world where not everyone sees or accepts that many things have been and are being constantly stolen from us as a society, not the least of which is indeed skilled working in true and real craftsmanship. I firmly believe that the very finest levels of skilled work in every field of craft came to us over an extended period between 150-200 years ago and that we will never see these levels of crafting art again. That does not in any way mean that we are not capable of producing the same levels of workmanship but that the skills will ultimately be lost with the passing of time and need for then and the affordability of such skilled work will be prohibitive. Craft is preserved by individuals who prize their craft and constantly work to perfect their skills as productive artisans in the doing of their daily work. YouTube is a demoralising place to be when speed has become the entertainment value influencing craft work. Ultimately you will make your own decision based on your own values. My quest in the conservation of craft is to ensure everything that I know and do is passed on to the ensuing generations where it can be part of their lived life. i can no longer look to the so-called professional carpenter for the future of my craft. it is the amateur woodworker that will carry the work forward. these are the ones that will continue to work wood even if both their hands and feet are tied together, they have no tools to work with and the forests are all gone. You cannot stop a true amateur. Why? Their reason for doing it, and I am a true amateur, comes from the very root of the word amateur– to love: they ONLY do it because they love it. They don’t do it for money. Yes, I agree, it is idealistic, but that’s as good a reason as ever to live the lifestyle of a lifestyle woodworker. It’s why I get up in the morning
Hi Paul thanks for that, I think we both agree standards should be prioritised and should be the focal point of our making. I would like to hear your further thoughts on more of the perfectionism I alluded
to. Would you consider yourself a perfectionist in your work, I know you take your craftsmanship very seriously and clearly work very fastidiously but on projects even where spending more time may not be an issue do you still work to perfection? or do you have tolerances in your work. for example can a joint be 75-80 percent good enough to allow it to pass?. By this example I’m trying to present what I mean by tolerance. Some machinists that I know work to specific tolerances where if it doesn’t meet that required tolerance they simply do not use the part. However they also technically don’t work to perfection as their is a specific range of acceptable measures (+_ thou say) does this highlight the possibility that perfection or zero tolerance is too time costly to ideal? or would you say you’re more in the zero tolerance mindset and that you shall only accept work that is perfect?