Reshaping My Chisels
It takes about half an hour to reshape a chisel handle of the type I have been using for the past years. The ones I am using and changing here I have only been using for about a year but they are identical to my twelve-year-old Aldi chisels you seem unable to buy any more; these are the ones that cost a mere £2 apiece for a few successive years. MHG chisels are German made and nice to have but they are not £2 apiece even though they did make the Aldi versions for a number of years. Fine Tools carries a set of six chisels for around €62. That’s the set I have, plus a few individuals that are handy too, 2mm, 4mm and 16mm.
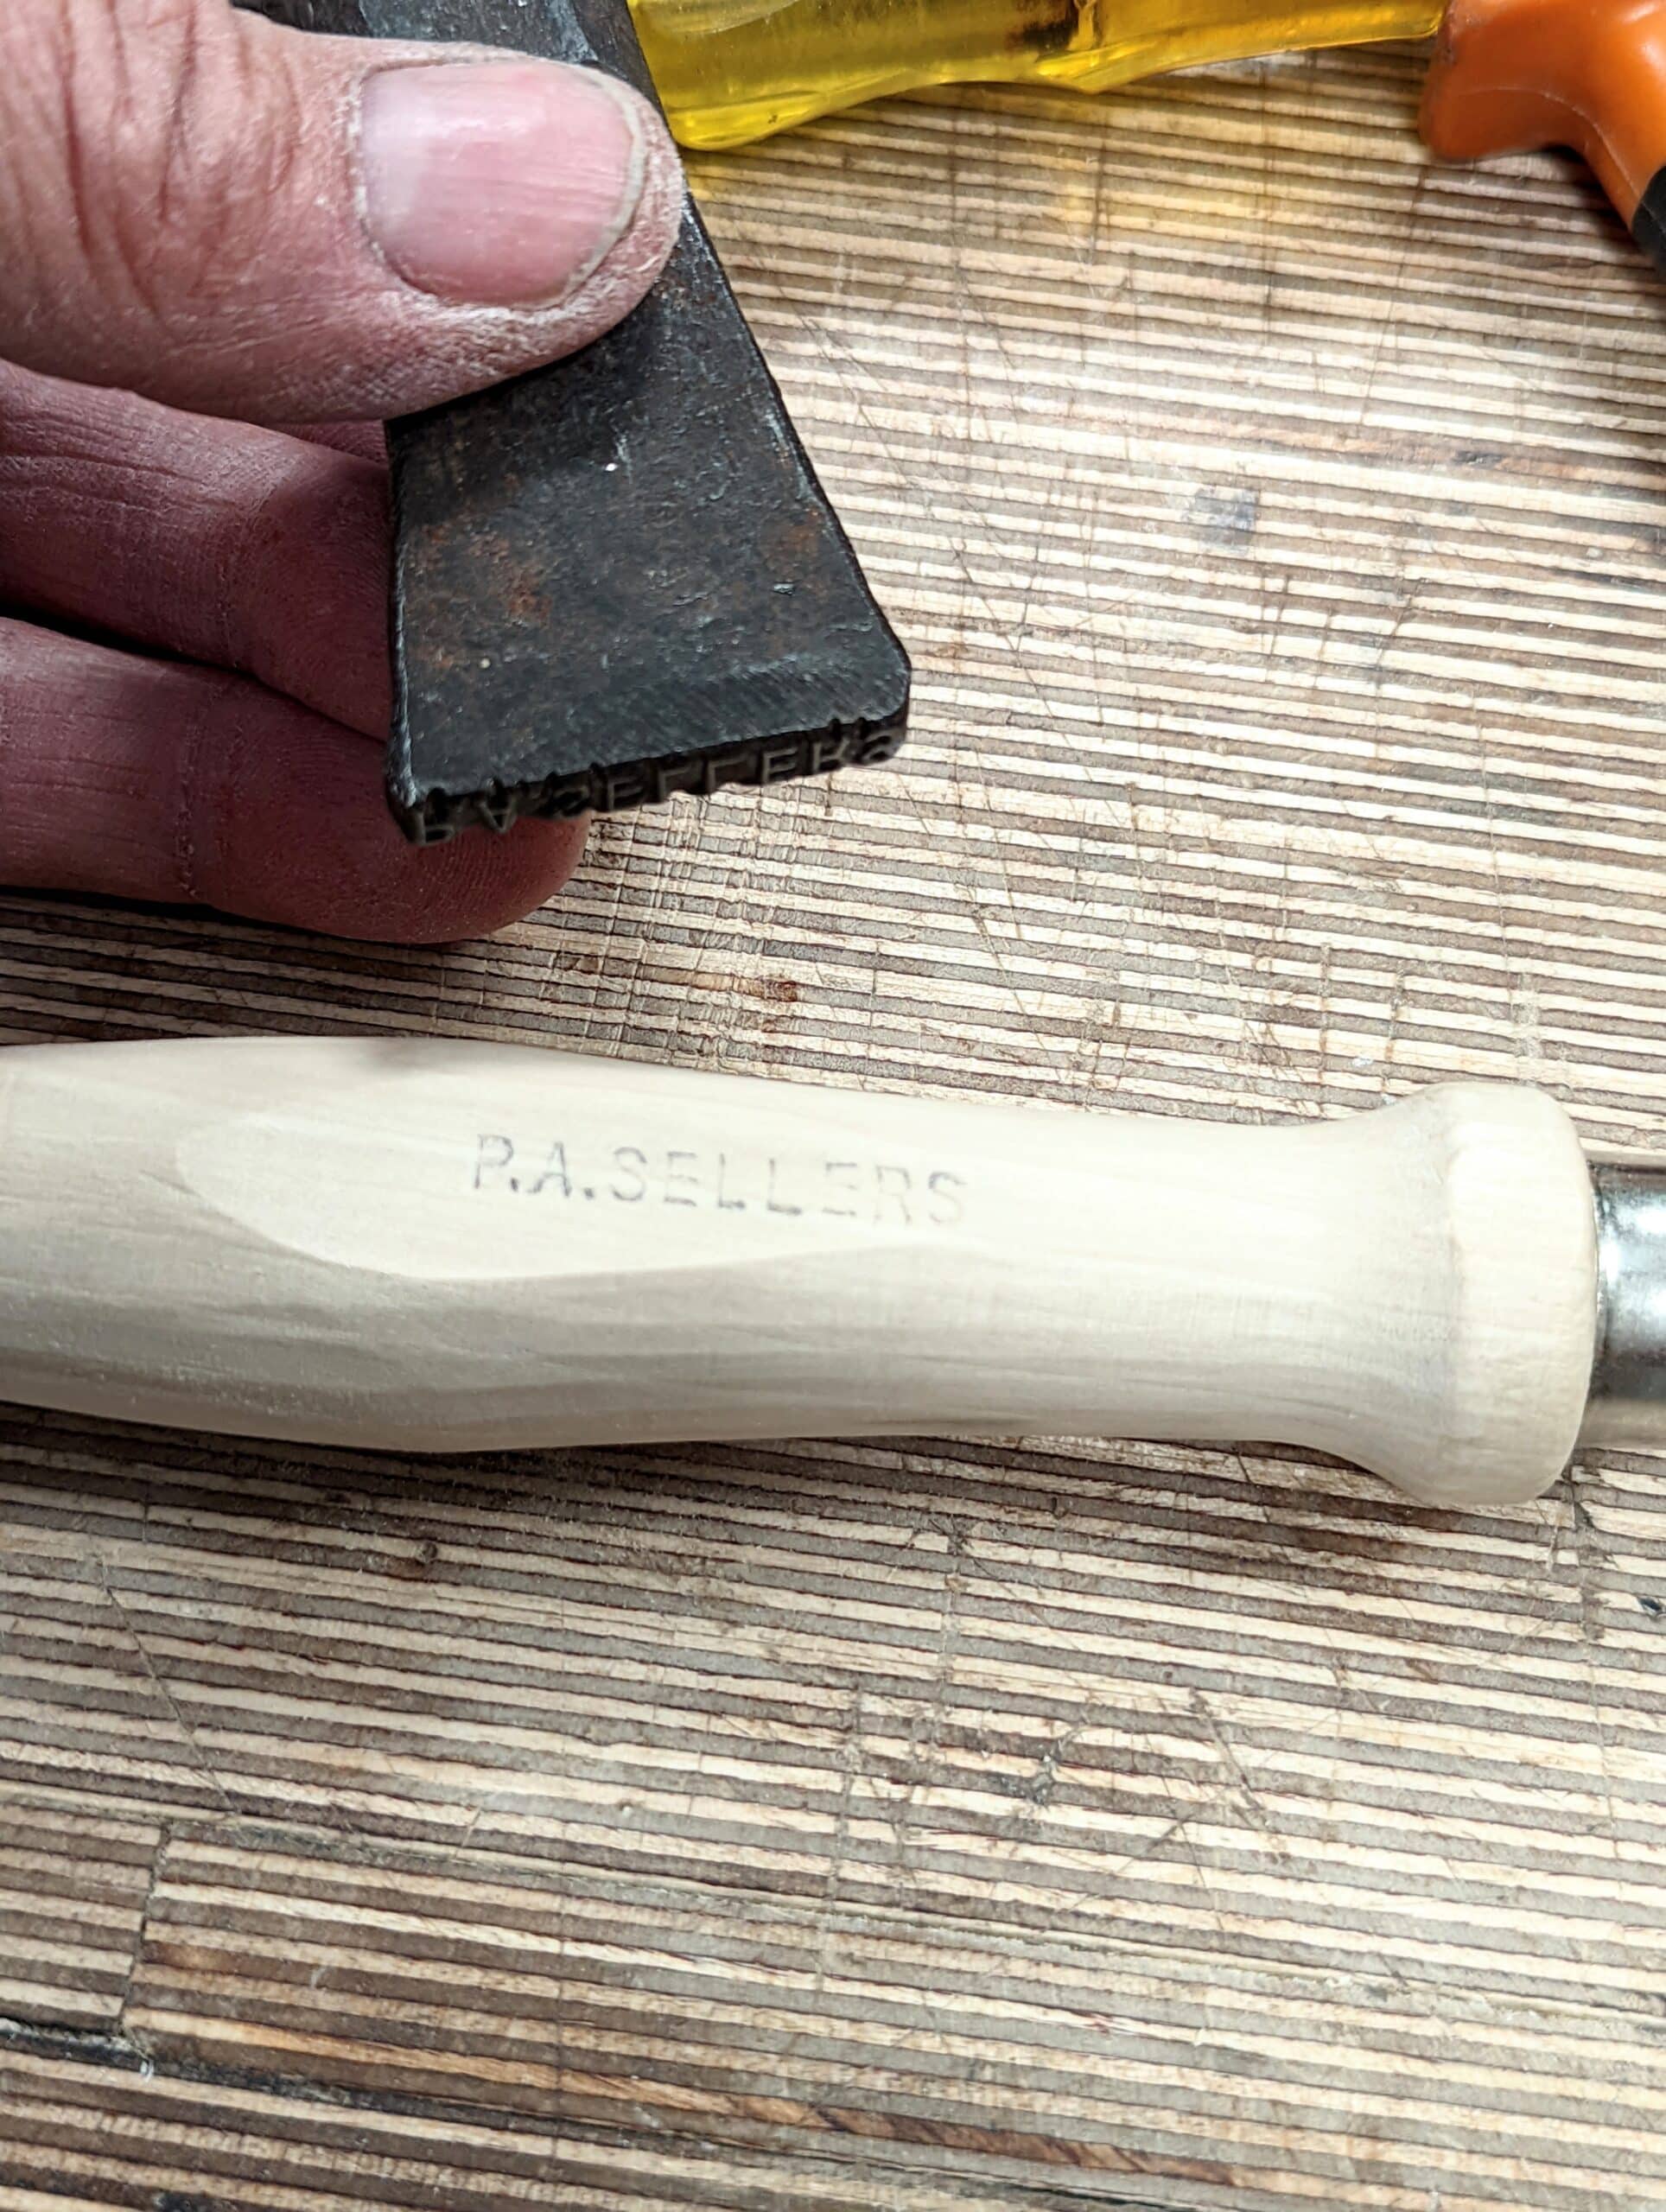
I am never too sure why makers add some idiot things to chisels. The hoop at the top is just such a cheesy and unnecessary thing and especially is this so on hornbeam, which, in my view, is better than boxwood and ash ten times over as a chisel handle. This wood is about unsplittable as it gets and using the method the maker uses on the tangs of their chisels, the solid bolster plus is perfecting beyond measure and will never twist in the handle no matter what you do to it.
Though the handles on my chisels are adequate, the hoops on the ends look ugly and serve no real purpose. Also, they do come loose if the handle shrinks inside the hoop and the rattle is annoying and really not fixable without adding a gap-filling glue which inevitably turns loose again. here are my steps to reshaping. It takes about 20 minutes to do and transforms the chisel to suit your hand. Funny thing too, they make chisels as more premium versions with bulbous ash handles instead of hornbeam and ash is coarser-grained and develops a rougher texture over time. Hornbeam on the other hand has a very tight grain with even texture throughout and so finishes to a wonderfully smooth finish with very little effort.
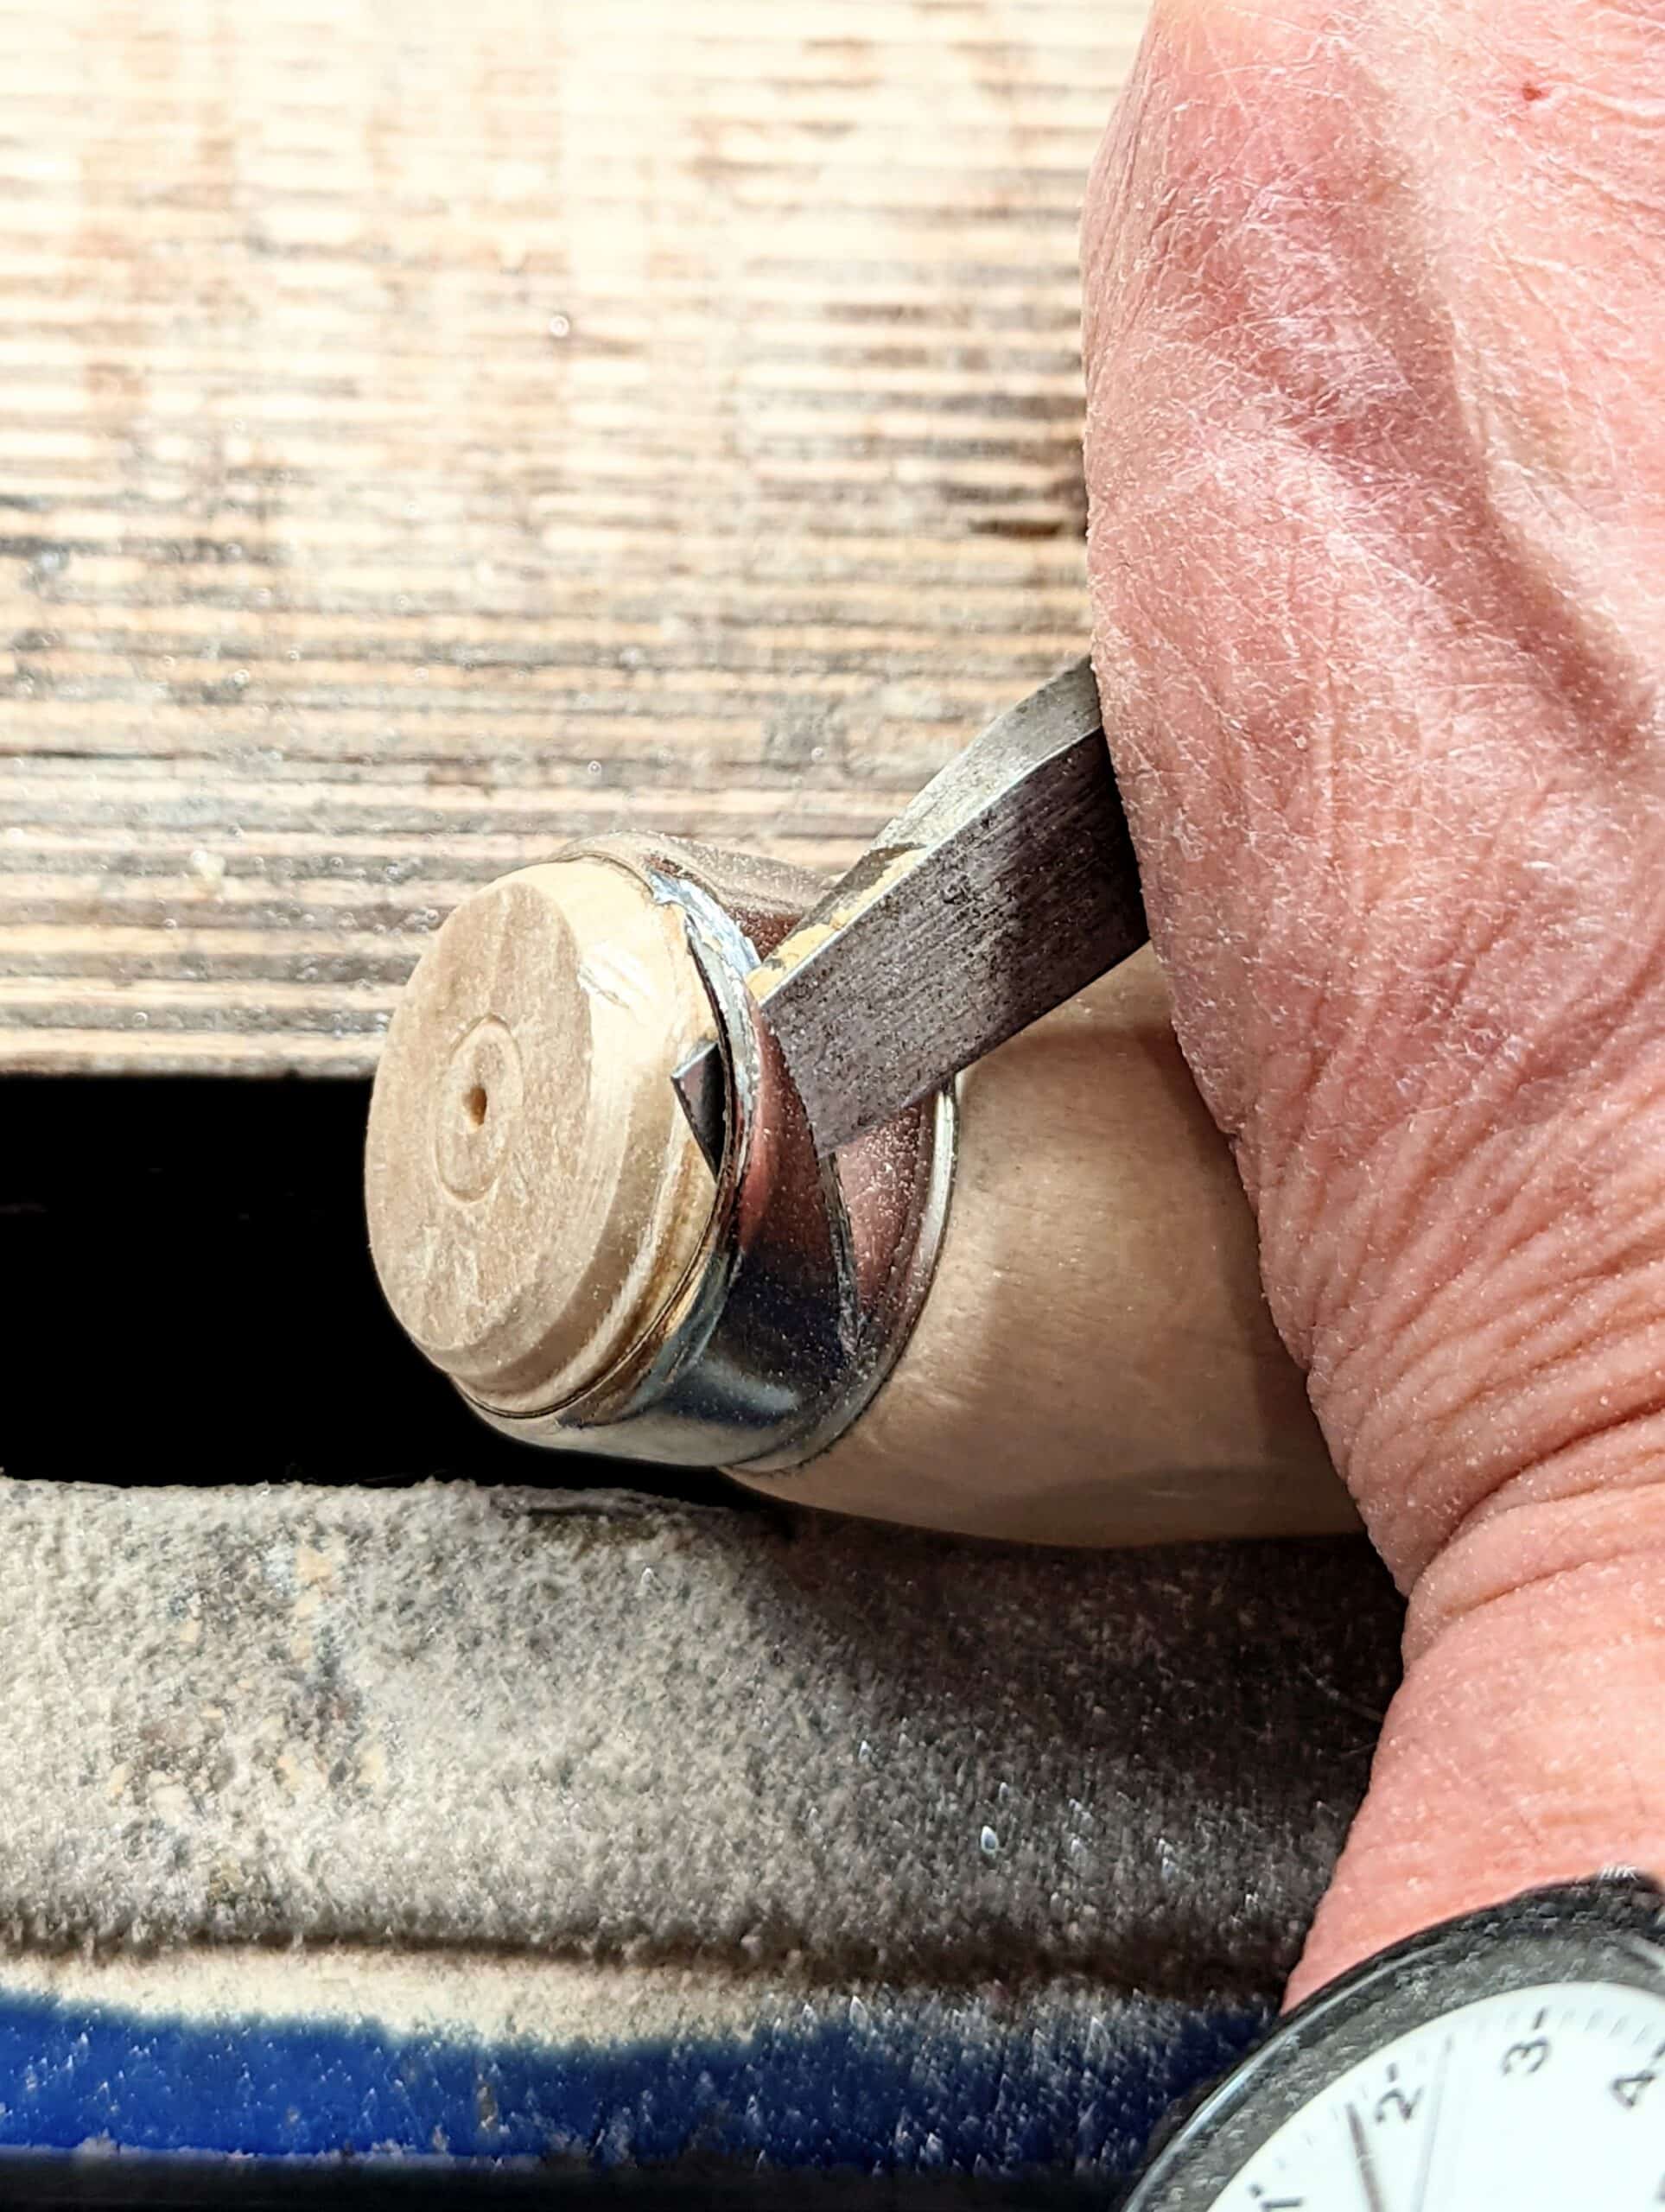
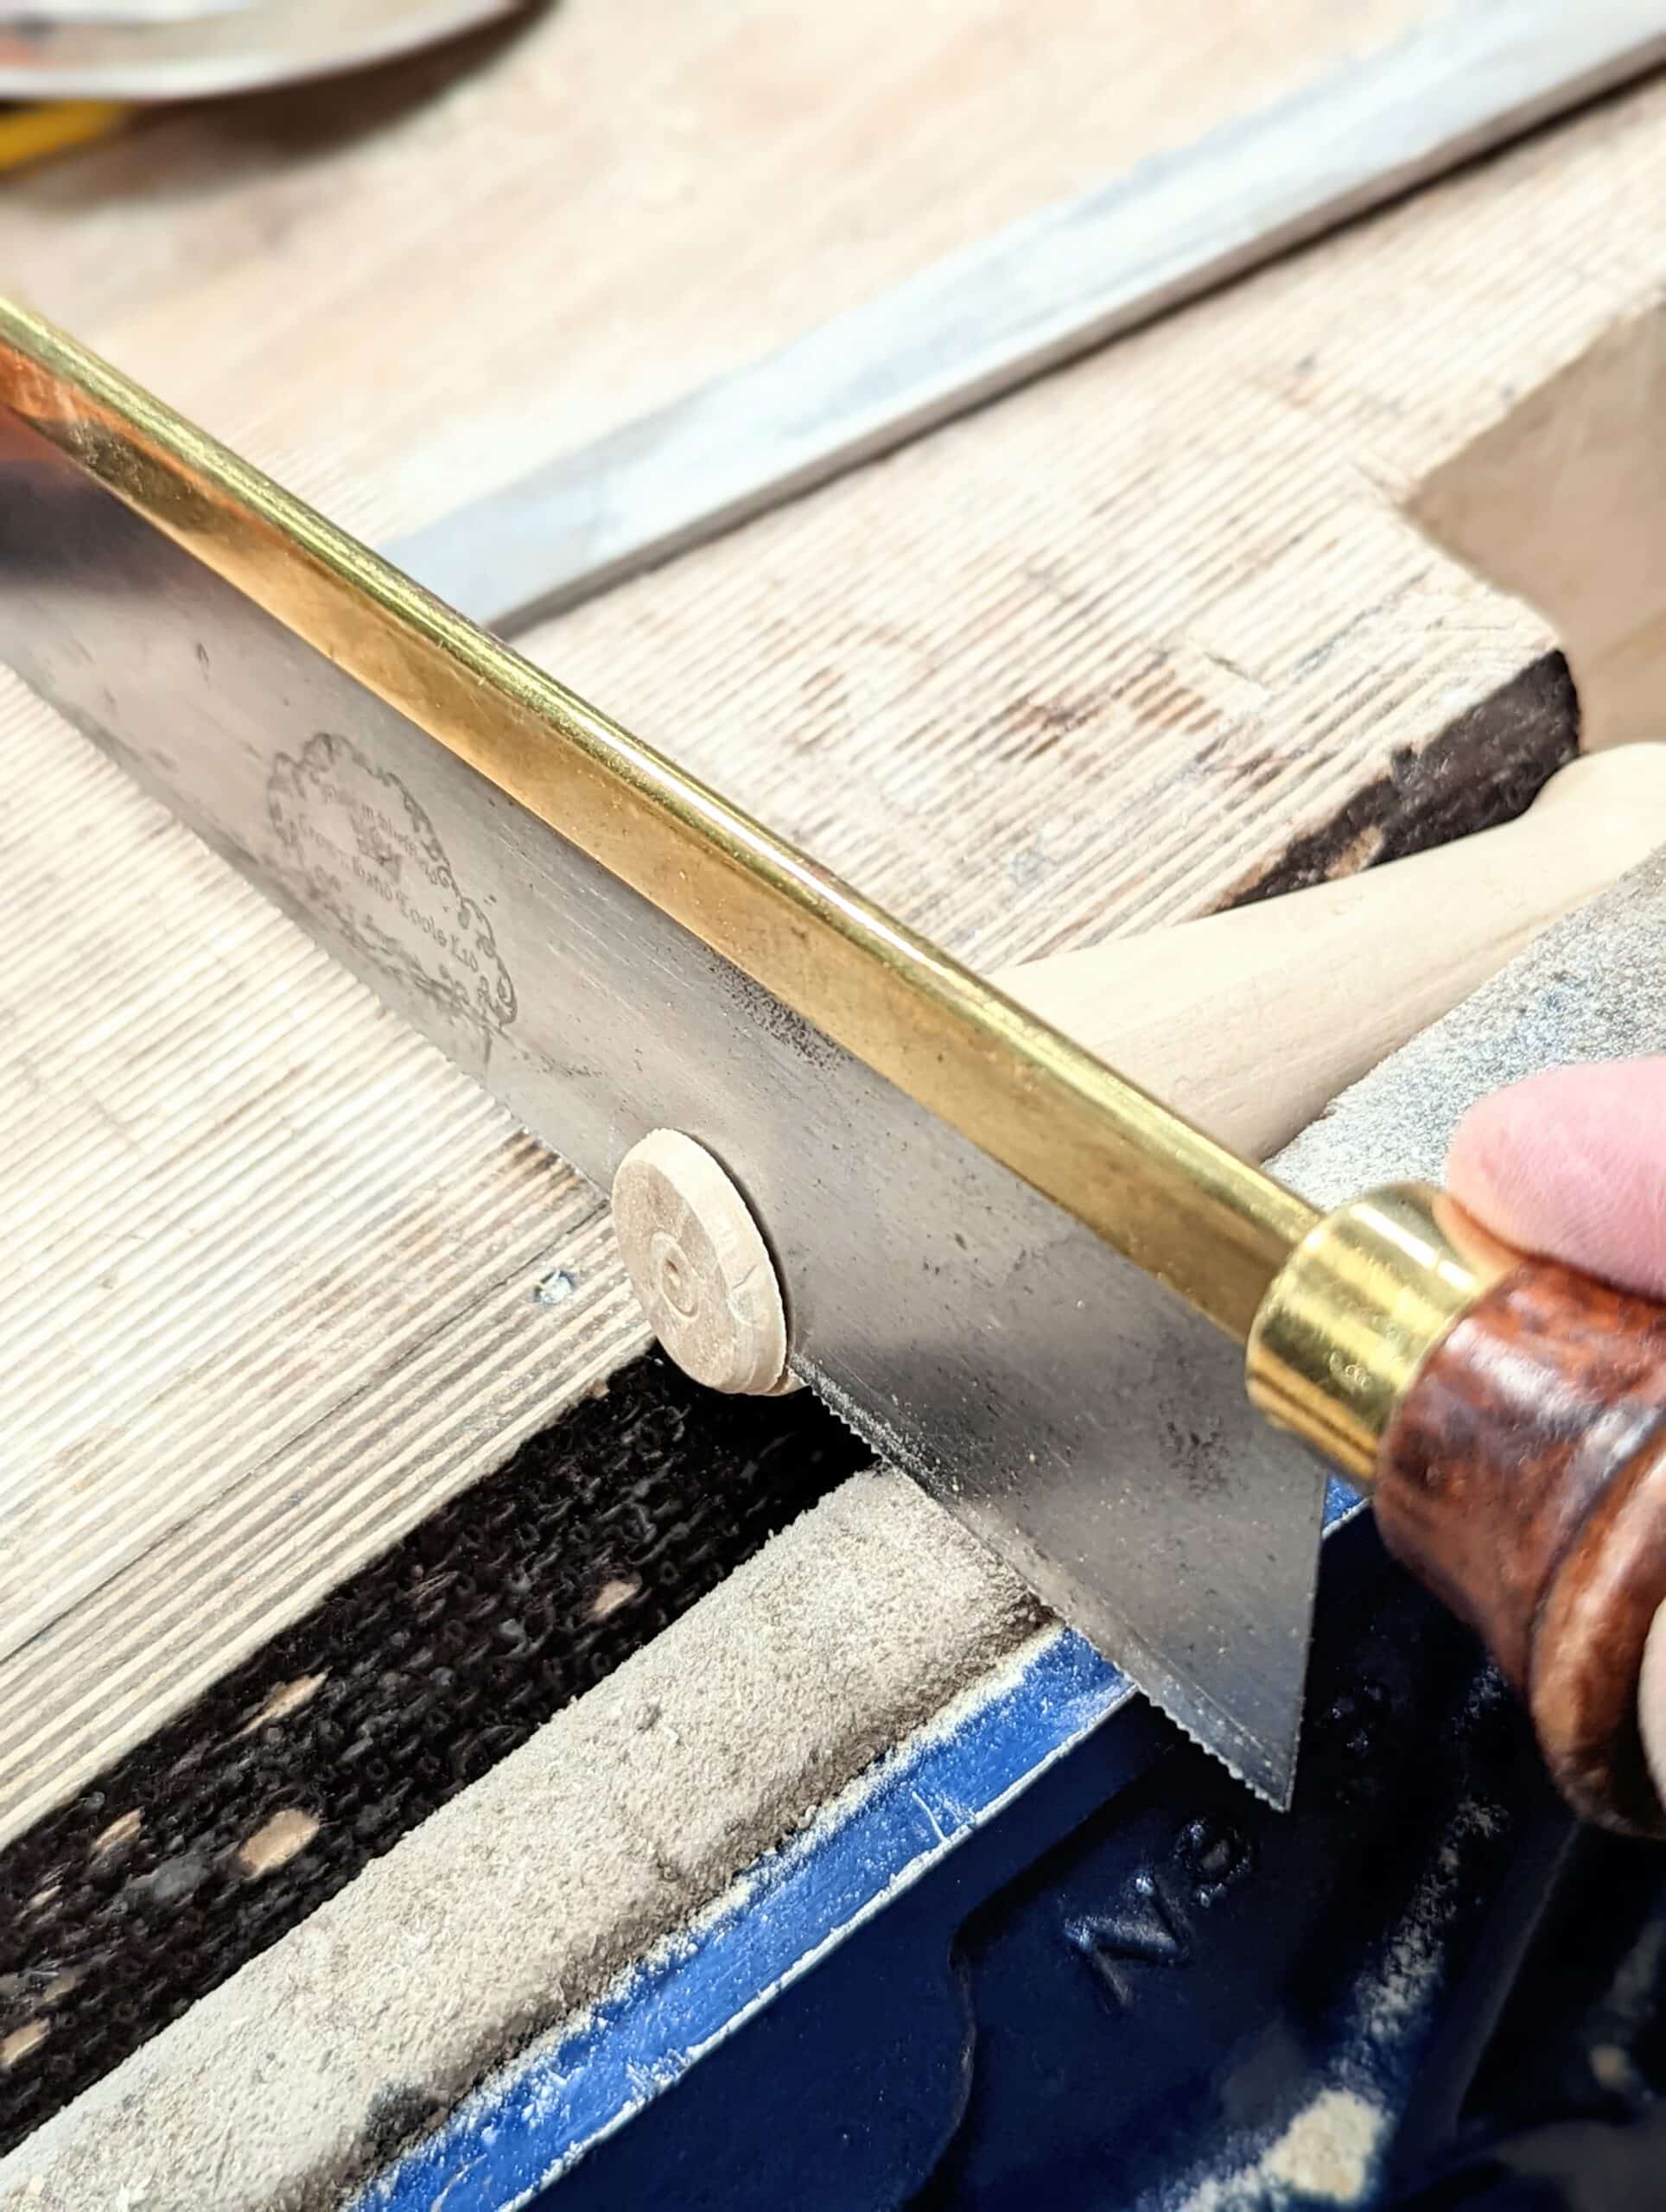
To remove the hoop I changed tactics because it is hard to tap off the hoop with just a hammer and screwdriver. By angling the chisel in the vise and then angling the hacksaw at a slope of around 50-60-degrees you can saw through the hoop almost all the way through. Try not to saw into the handle as this will necessitate taking off more wood than you want to. With care, you can just kiss the surface of the wood with the saw teeth.

You can’t saw all the way but enough to really weaken the hoop. Use a screwdriver tip to ease up the point of the hoop. Pry open as much as possible. . .
. . . take a pair of pliers and peel back the hoop until the remaining uncut edge snaps away.

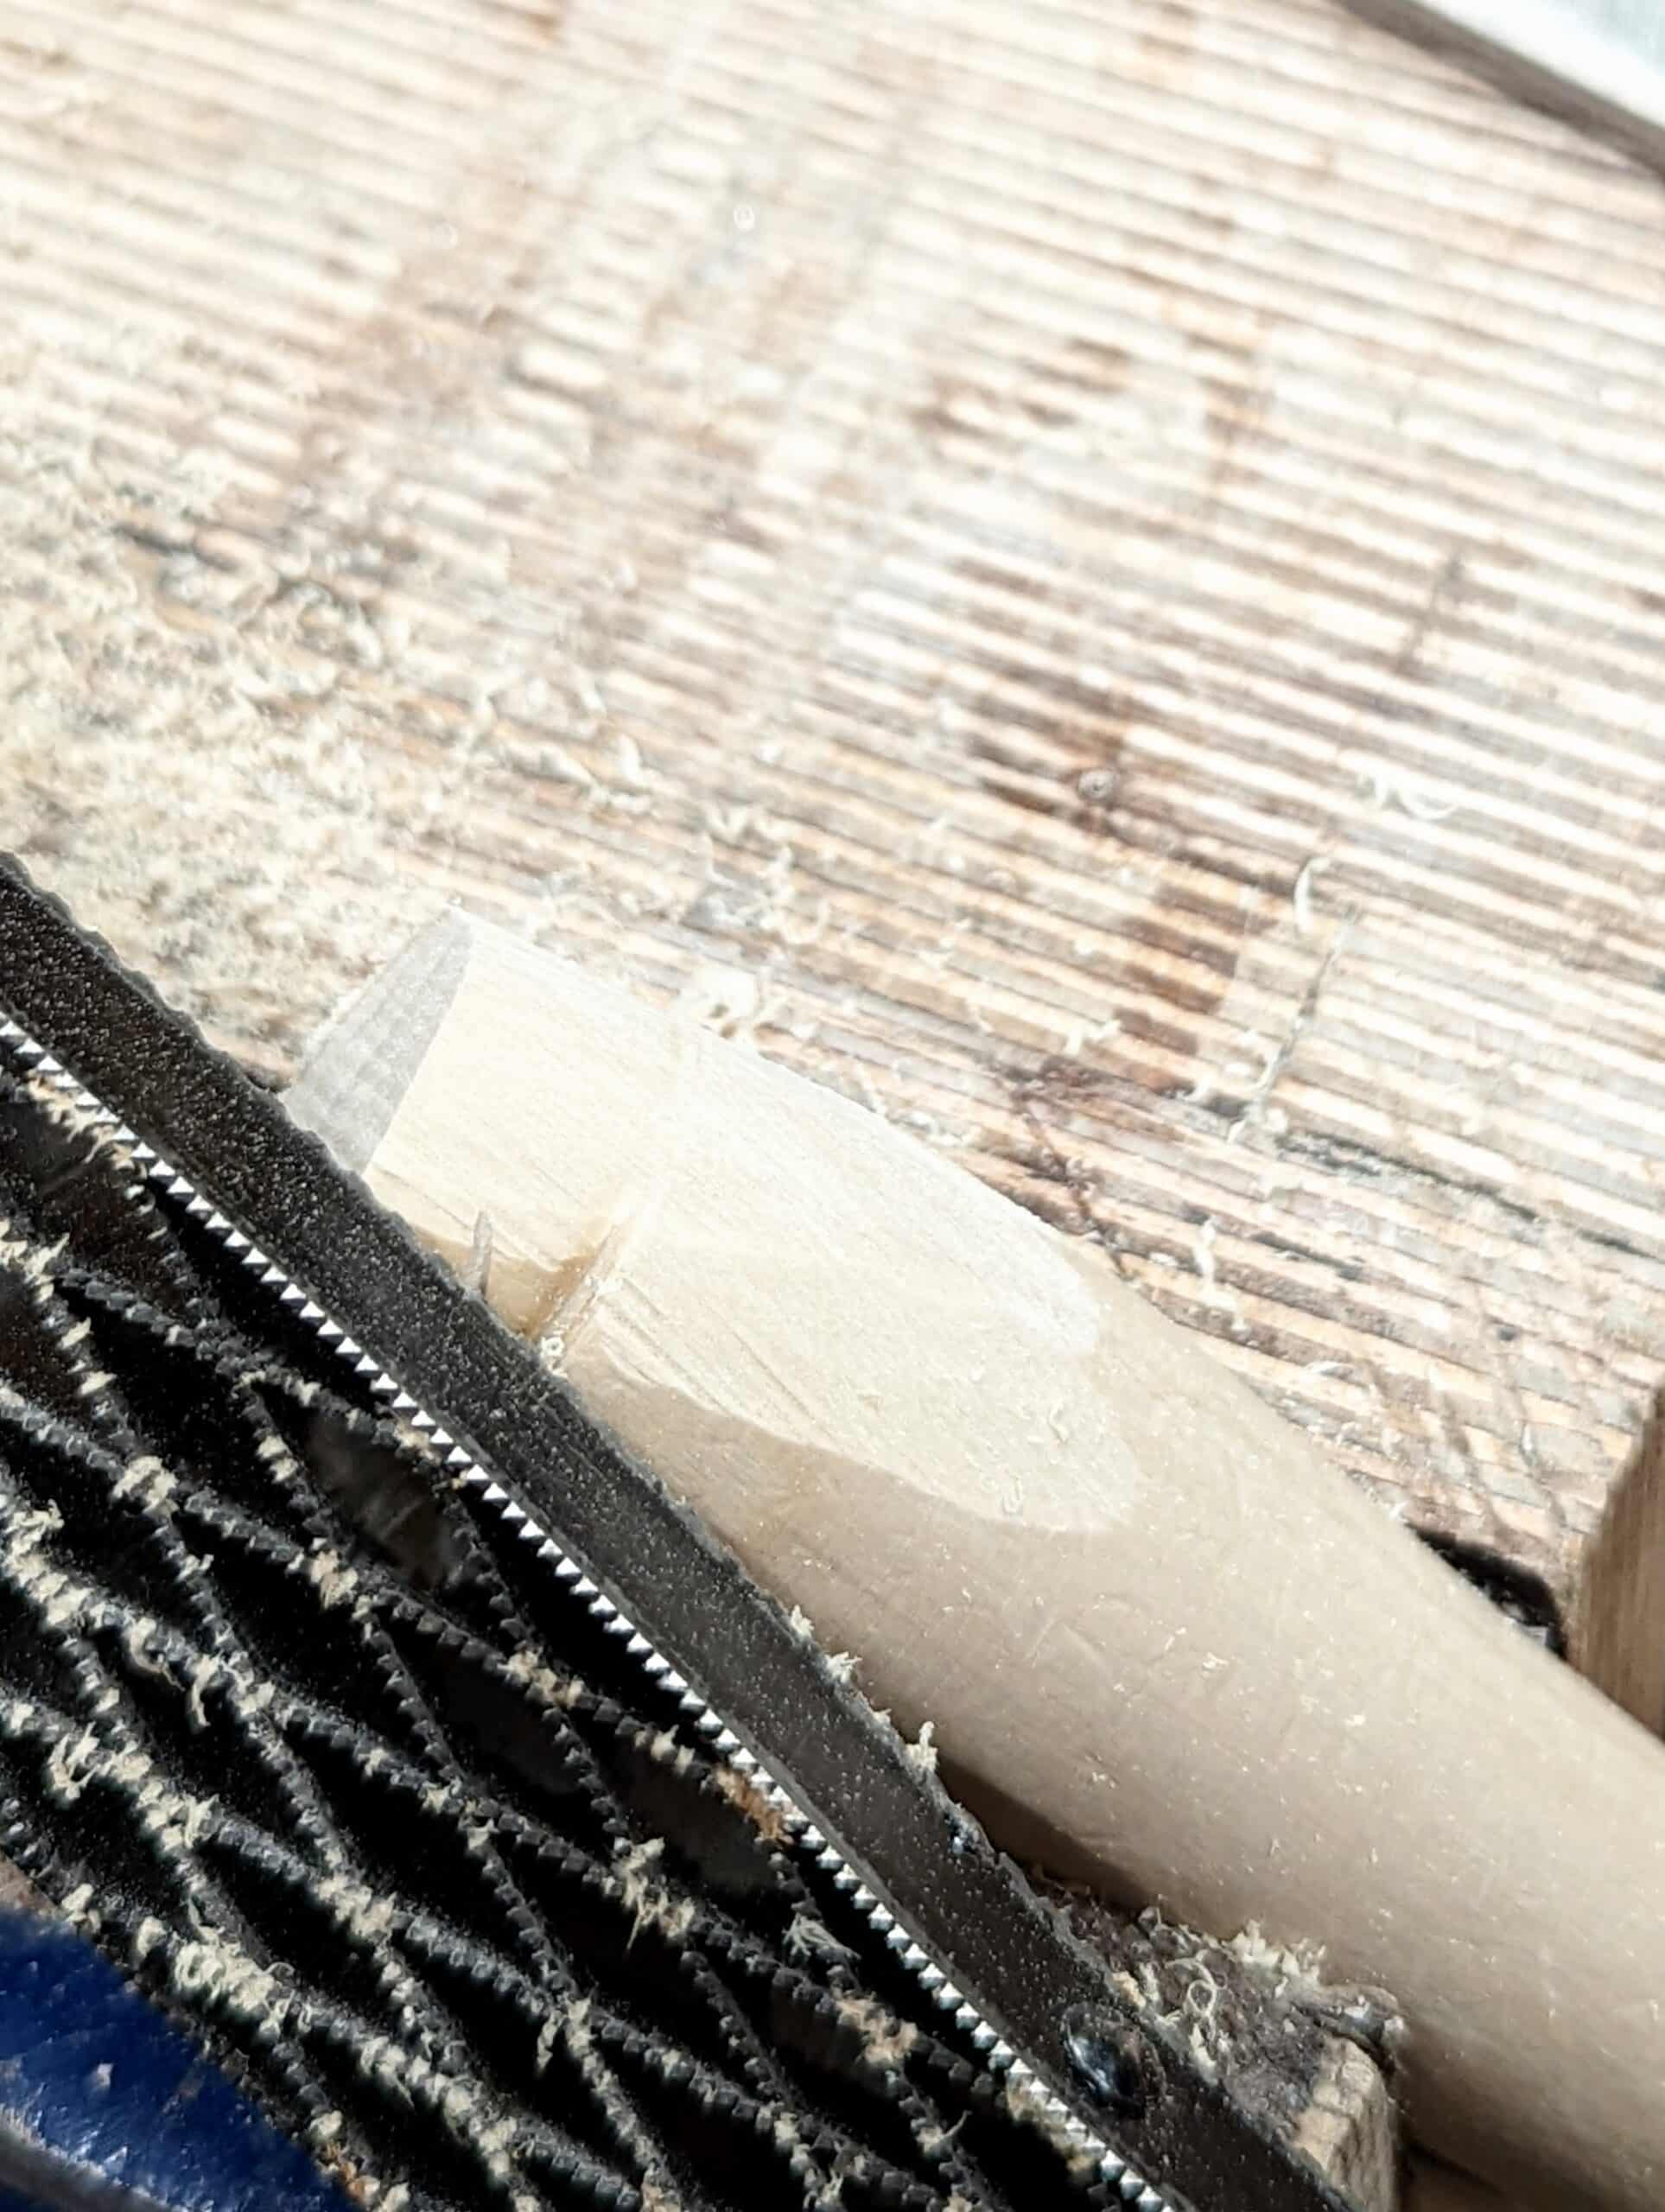
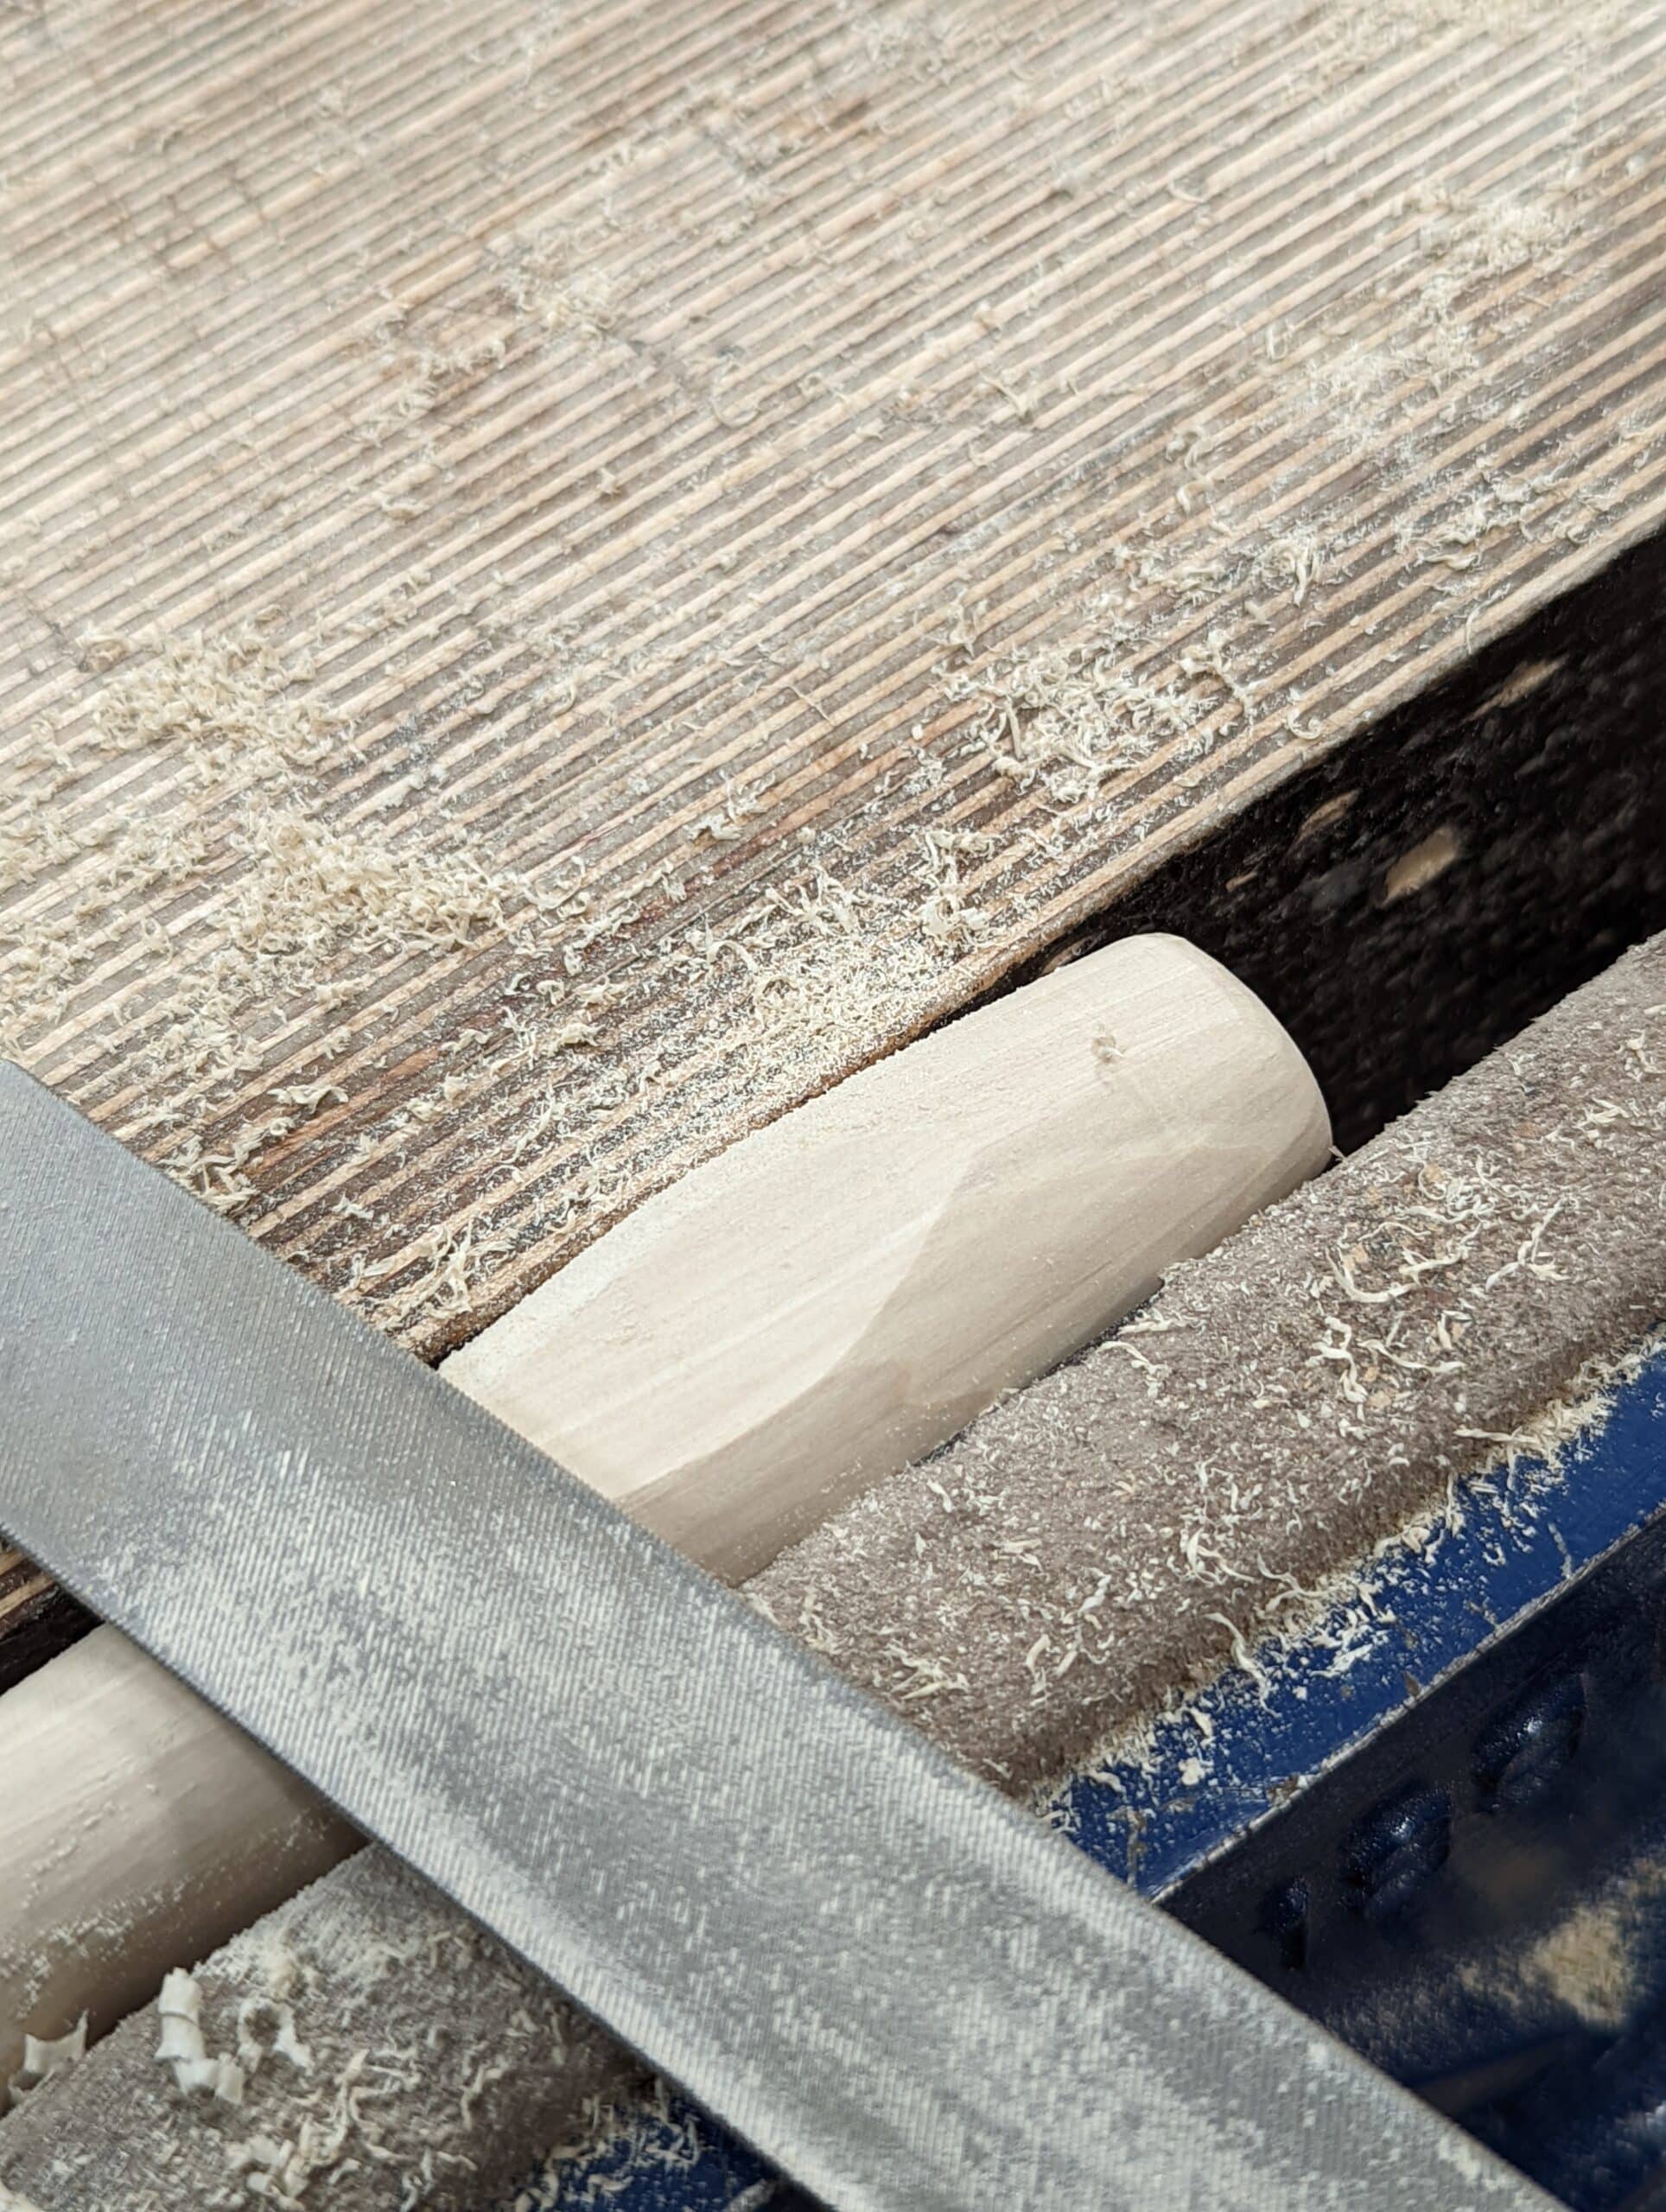
With the hoop removed you can now use a rasp to remove the bulk of the waste. I reduced the length of my chisel slightly first and made them all the same length whereas before they were different lengths.
I used a saw rasp by Shinto and that removes the wood rapidly and controllably too. Present the rasp at a low angle and work to an even amount by rotating the handle in the vise. I took my handle down to the indent in the wood caused by the hoop.

After coarse shaping, I followed with a thin scraper (veritas makes them) so that I could flex the edge. This minimises the number of flats you get in the surface and blends them to smooth, even contour.

Use a flat file on the end and the corner around the circumference to make everything even and slightly radiused.
Sand the overall with 250-grit abrasive.
I used the flat file to flatten the side scallops true. I planned to add my name stamp here.
I added three coats of shellac. it will keep the wood stain-free and feels good in the hand during long periods of working with them.
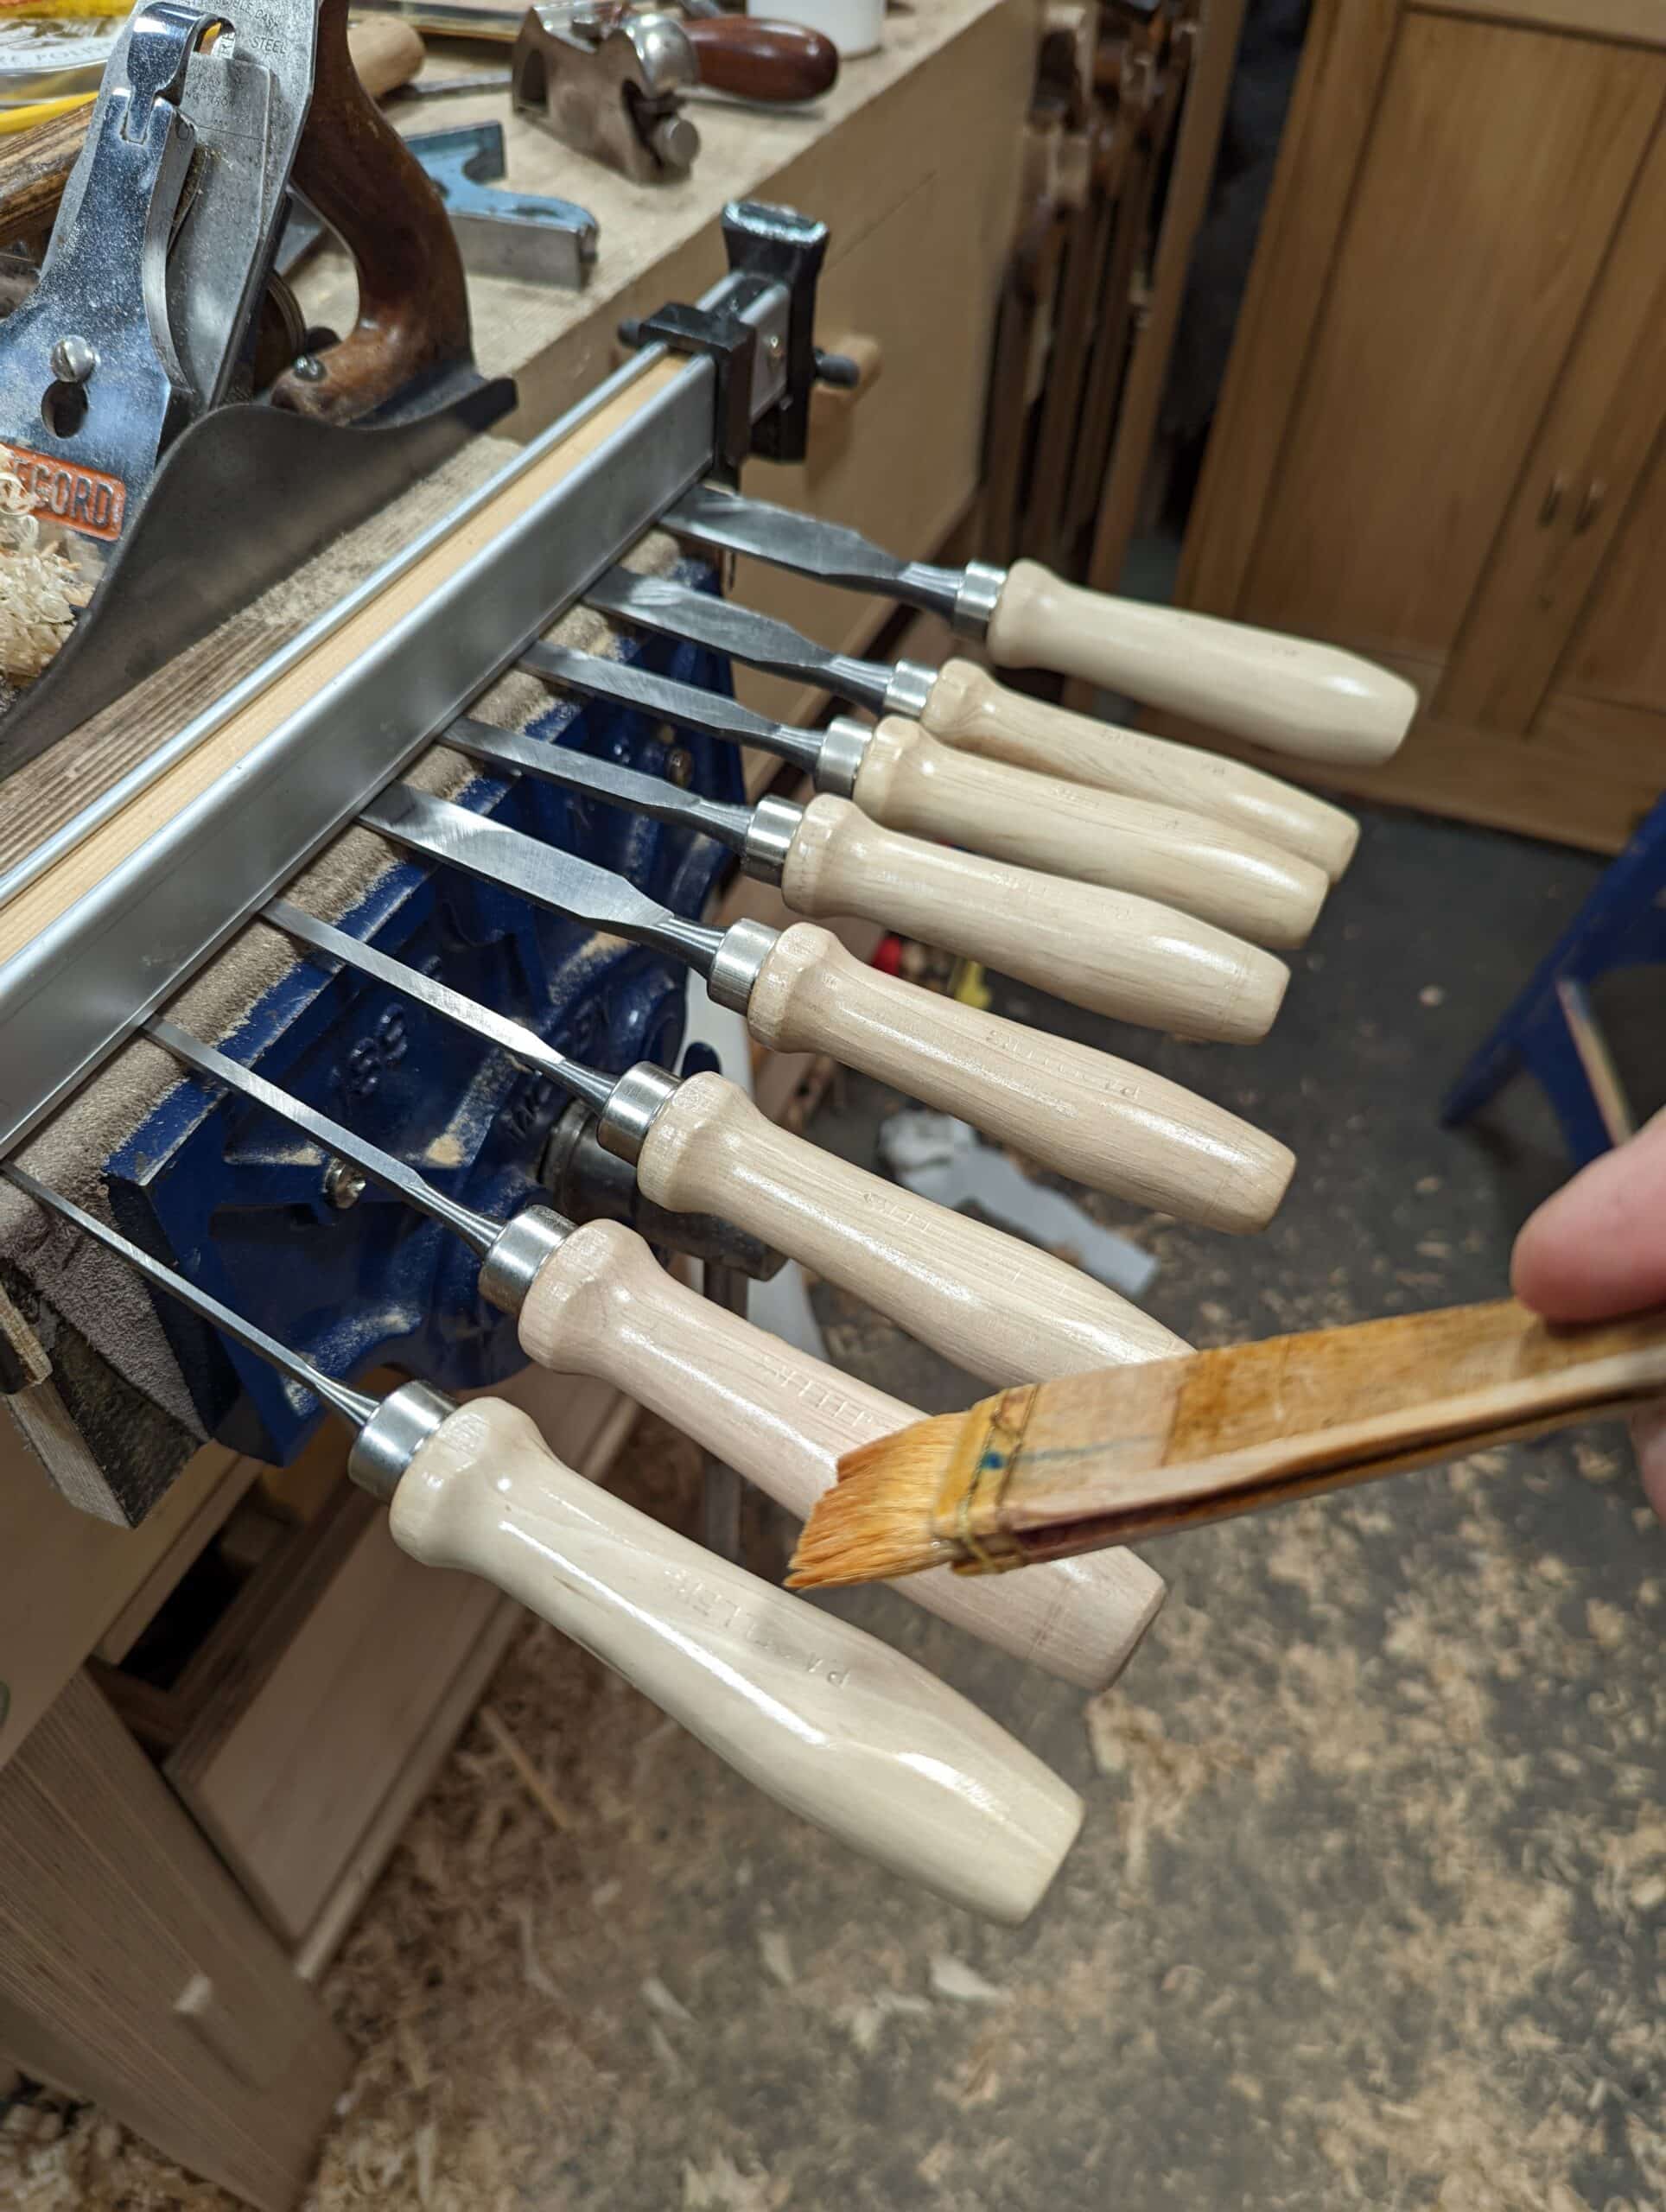
Clamping a sash clamp across the vise jaw with a small gap allows you to insert the chisel until dry when each one is coated.

Buffing out with steel wool and some soft furniture polish gives it the same feel as a vintage chisel right off.
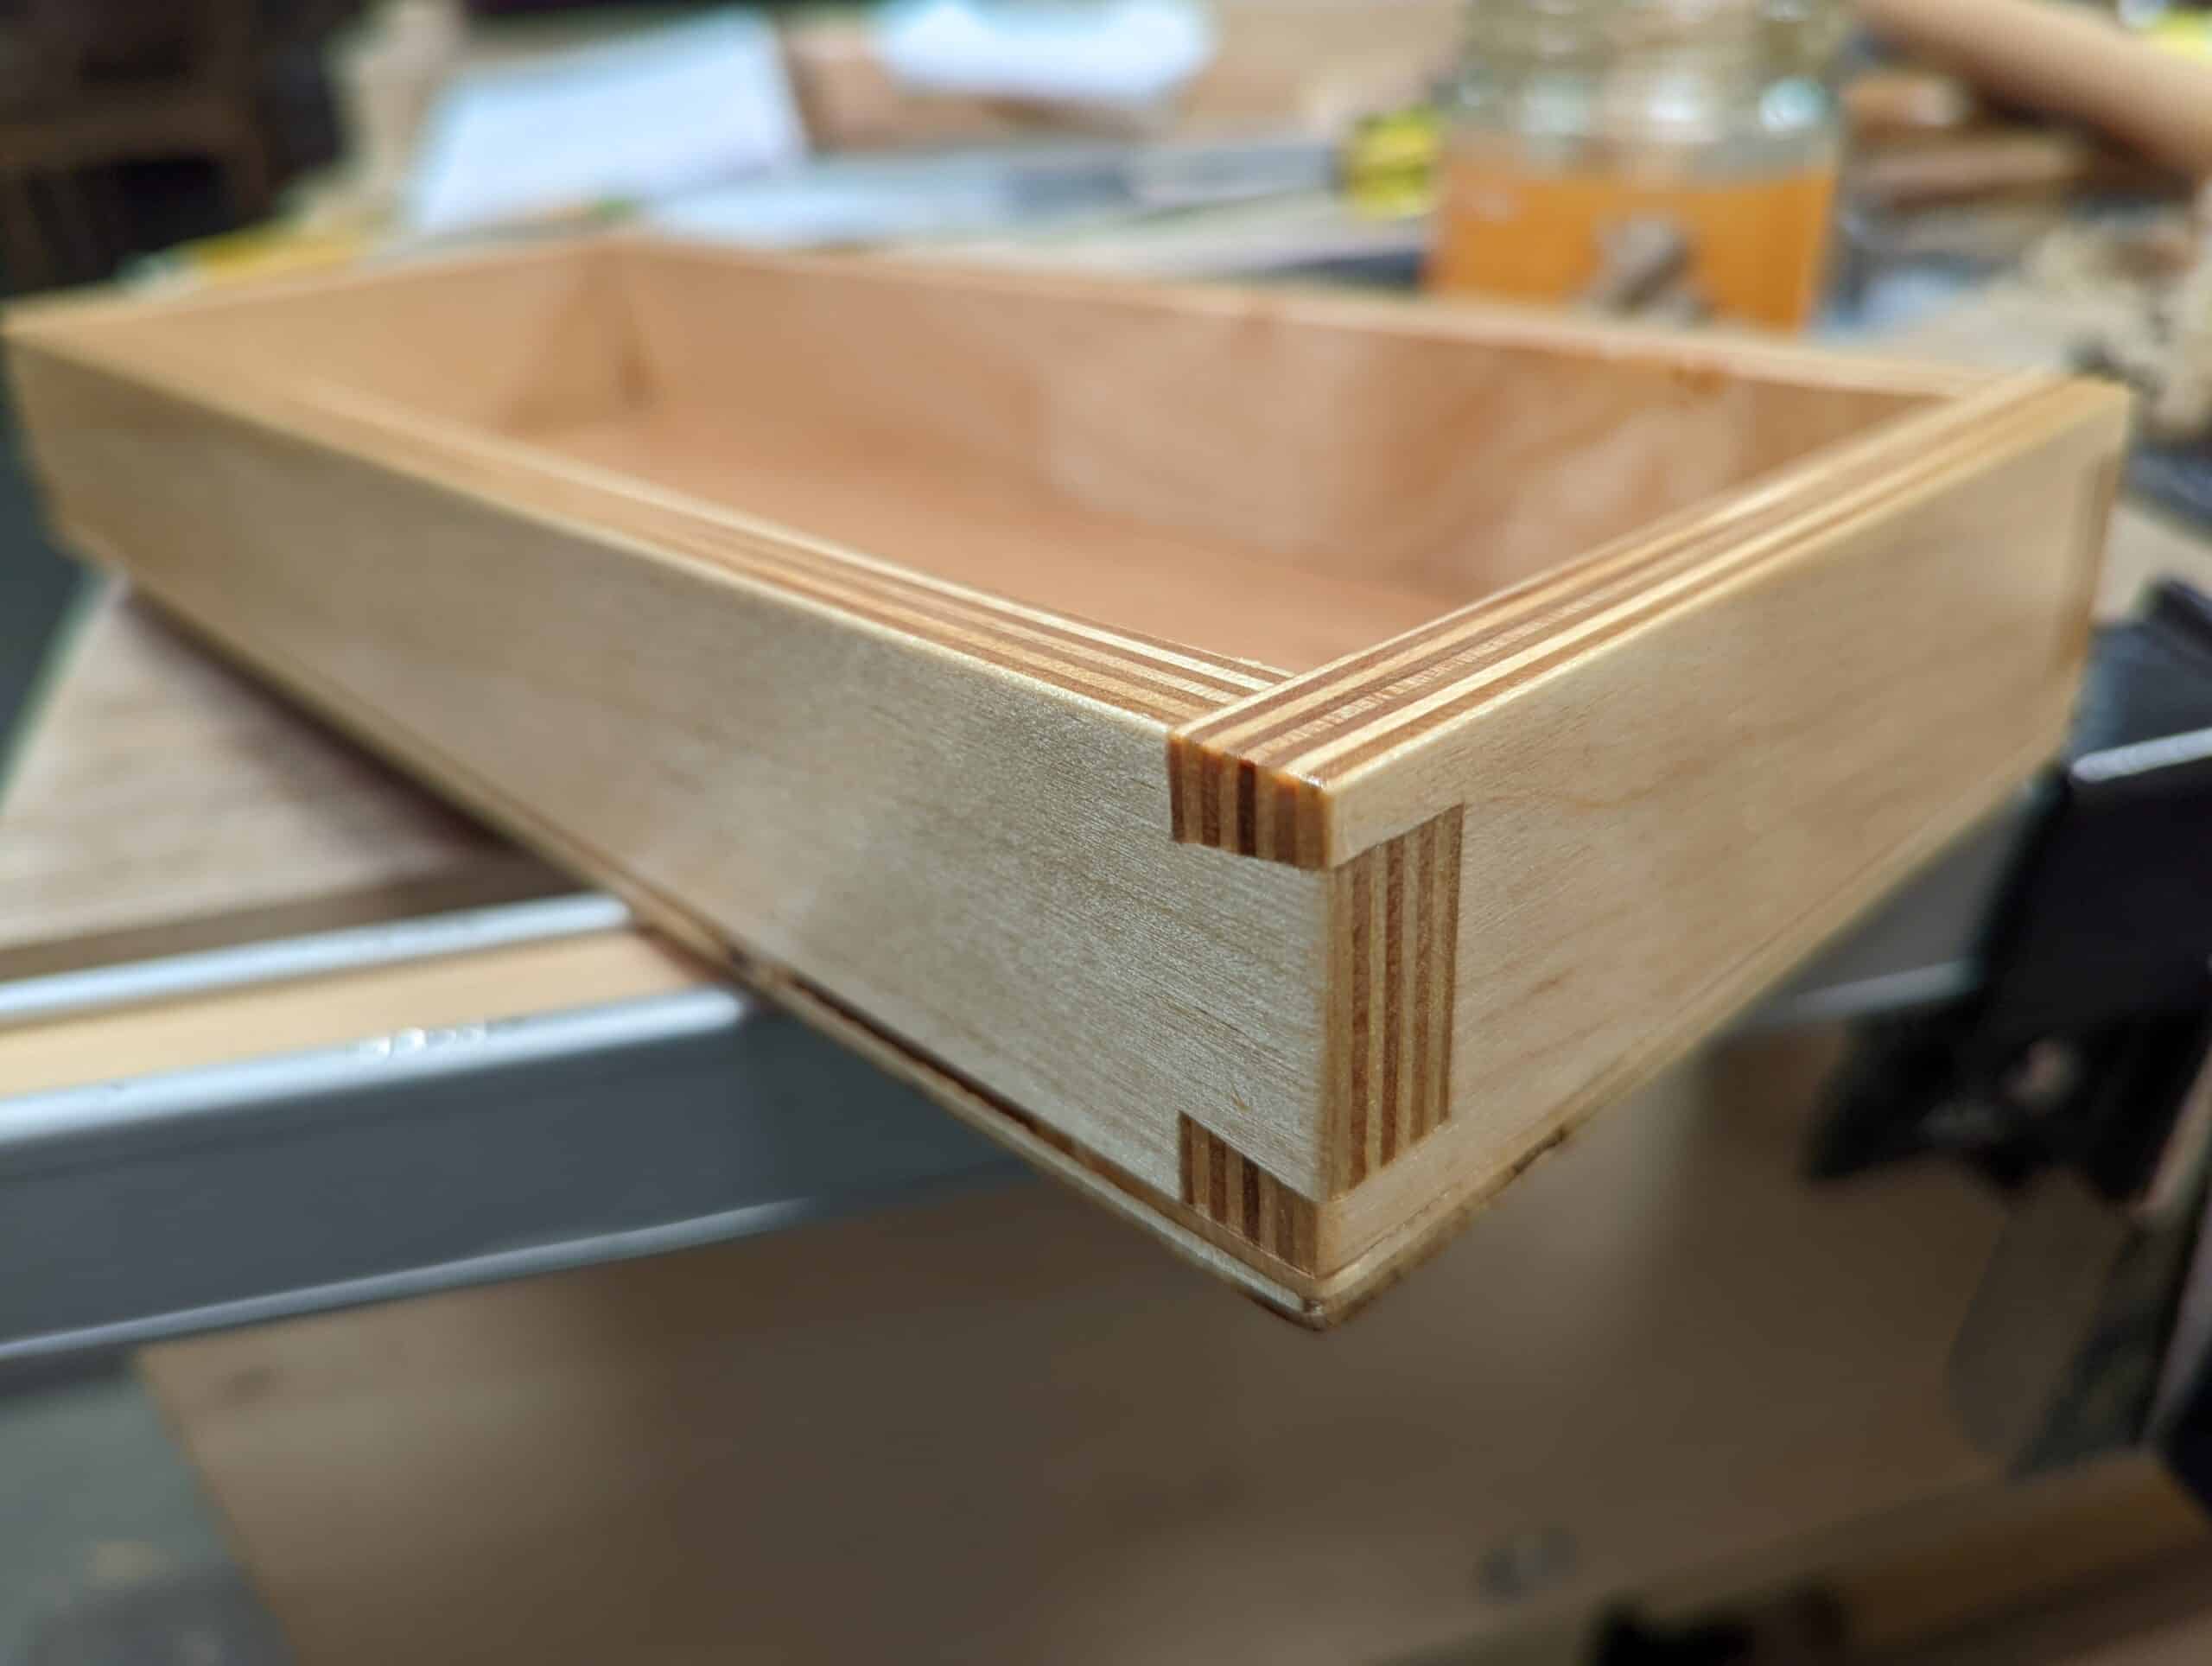
A plywood chisel tray matched my workbench where all parts to it are made from baltic birch. This tray fits into my tool well below the main bench surface.
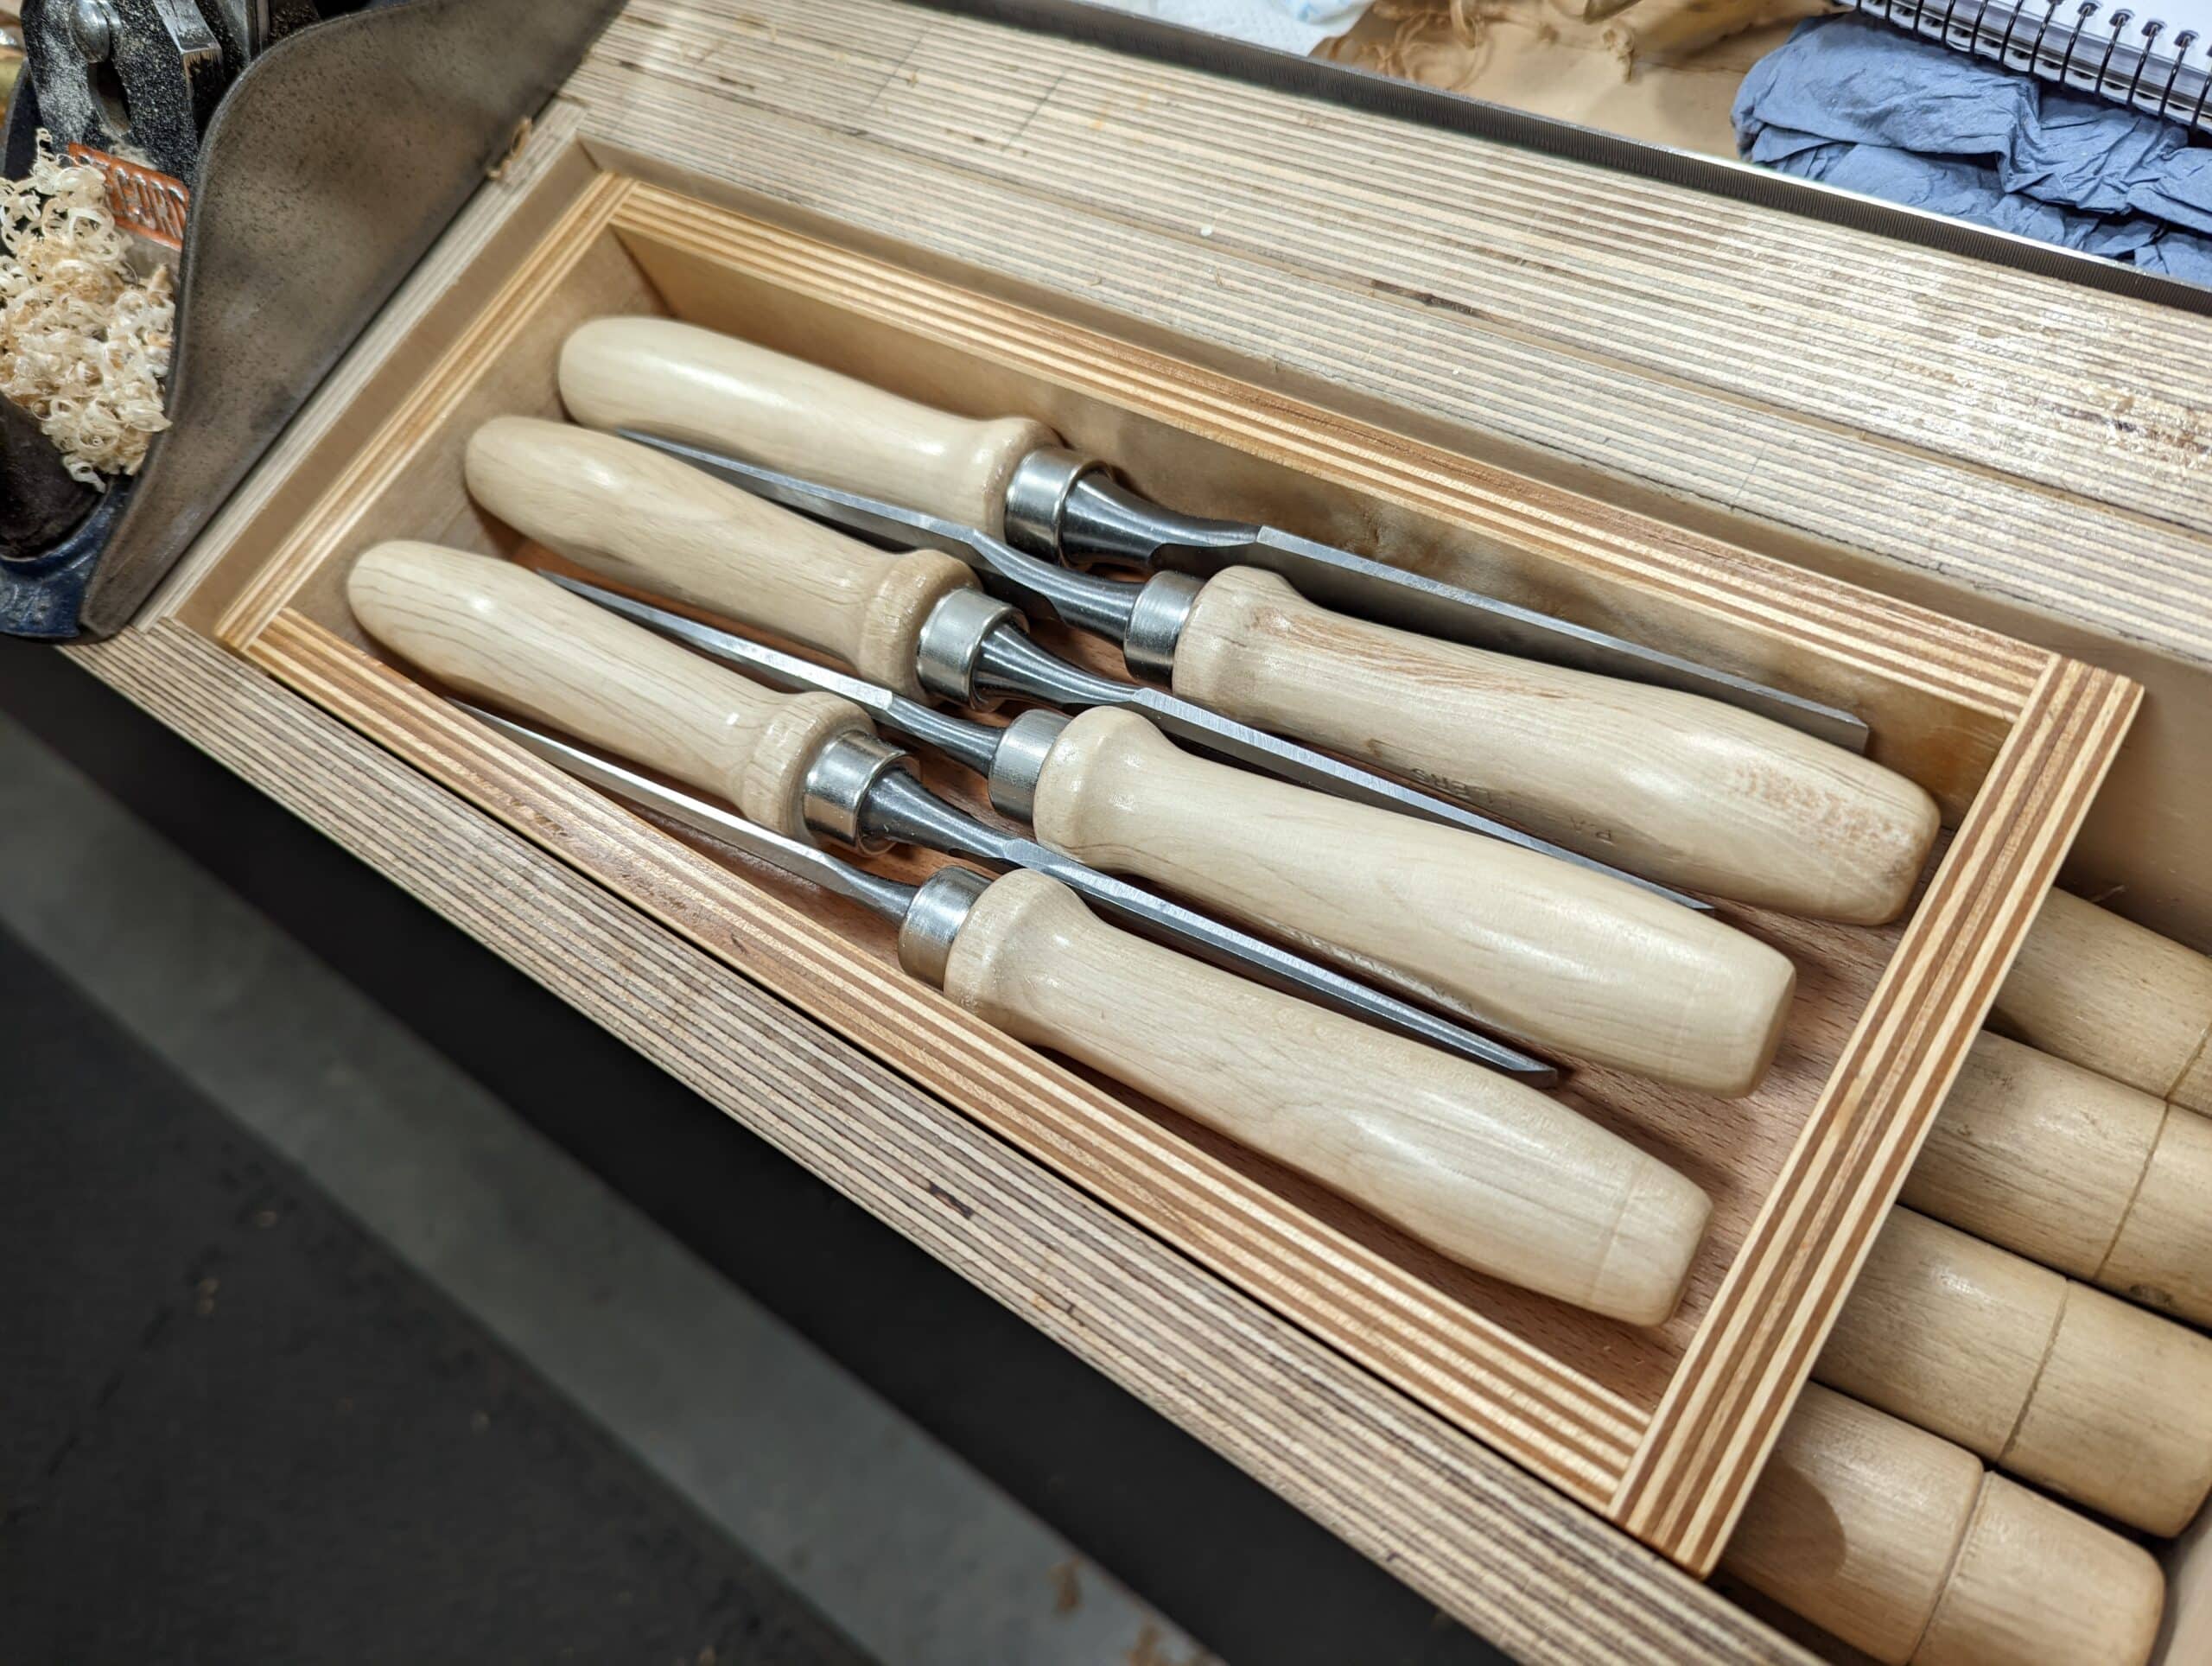
It also tucks neatly away into my rear tray holder when not in use and I can lift it to wherever I am working.
Hi Paul,
I believe the metal hoops are a concession to the reality that not everyone uses them in fine furniture work as you do. The common cabinet maker here in Germany will probably toss three of these chisels into their toolbox for on-site installation and take any hammer they can find to it. It might not even be necessary to prevent splitting, but possibly, people in these situations assume it does and they won’t buy any without it. Just an assumption, but based on some insight into tradespeople’s situation.
Kind regards,
David
I agree with you David ! I have seen carpenters use a claw hammer on site because mallets just take up too much space in their toolbox.
I would rather use a steel hammer than a wooden mallet, probably. It’s not a problem to use a steel hammer, it’s how you use it that matters. Waffle heads are out!
I’ve know people who used a crack hammer (sbort one handed sledge about two pounds in weight) with a chisel. Their chisel handles always looked fine. At the same time I’ve found high quality chisels in flea markets without handles, and mushroomed sockets. Some time with a grindstone and file restores the socket, then a new handle and a $2.00 piece suddenly can’t be replace with a similar item at less than $100.00. I have a 3-inch bevel edged chisel that I bought for $2.00, added a handle, and now can’t replace for a ridiculous amount.
Paul,
Could you give us the name of the chisels.
I have a set of the original Aldi chisels which seem to no longer be available and have been looking for an alternative for schools us in Australia.
Cheers
They are MHG in Germany but they ship and have distributors around the world. Take care not to buy into unnecessary bulbous handled chisels or butt chisels. Mostly these cause an unbalanced tool.
Hello Paul,
Hello Brett,
May I briefly introduce myself? My name is Anja and I work at MHG Messerschmidt.
I became aware of you, dear Paul, through Mr Rapp.
Now I have had a bit of time and have browsed through your contributions.
I see that you are already familiar with our chisels.
Unfortunately, I have not yet found a video or article where you have presented our chisels.
We would be very pleased if you would also test our chisels.
I already have the right chisel in mind.
A small remark:
I noticed that we are associated with ALDI.
We have not sold any MHG chisels to ALDI – ALDI is also not one of our customers.
We would be pleased if you would contact us.
Kind regards from the MHG Team
Thanks for the information update and forgive my associating you with Aldi/Lidl. Stripping the chisels to the basics, dismantling them etc, it’s hard to imagine them having no connection so thank you for clarification. I probably would not promote any hand tools as a way of business as my work is based on taking no sponsorship or income from any maker worldwide which includes free tools and or equipment. It just makes it clean and I like the freedoms I have to be as truthful and honest as possible. Your basic set of chisels. the six I bought from Fine Tools in Germany, closely match my favourite size and balance. I have simply refined the shape and size for my background as a furniture maker and any refinement is not to have the maker come up with a chisel shape that’s perfect but a great exercise for my following who love DIY but DIT Doing It Themselves. I am happy to keep telling people to go to your chisels as they are now well proven by myself. What I wanted was affordability without the excesses of paying €100 for a single 6mm chisel. I just don’t like pretension and your chisels indeed meet the best criteria in my view. It’s funny, I own planes made by Clifton, Lie Nielsen, Juumma, and more, I also have dozens of chisels made through the last hundred years including premium chisels of our modern age, which do I reach for? Stanley’s basic range of bench planes and then, of course, my MHG chisels that go from 2mm to 26mm. I change small elements to them, mostly for comfort as I use them for hours throughout six days a week. What I do with them in a single month is probably a couple of years for most other users so I work them so that they truly fit my hand. That said, the chisels don’t really need it, I am just fussy about the small things. I will most likely use them for the remaining of my life which I hope to be a long time to come.
I have a forged solid steel set of demolition/installation chisels for tough jobs when they need to take a pounding.
I bought them in France and they are made by MoB
Well worth the money to save the good chisels for fine work
“when they need to take a pounding.” What kind of work do you do in wood that needs any woodworking chisel to take a pounding????
The stylistic differences between English and mainland Europe woodworking tools always fascinates me. From the little I have researched it seems that the double hoop chisel handle is something common and somewhat historical on german chisels while never really being common on English chisels. I also find it very interesting that mainland Europe had drastically different styles of wooden planes that they never really gave up, and they stayed with wooden frame saws. Being American such drastic differences occurring within such close proximity is always interesting to me.
Yes, it is surprising that European makers never developed the cap iron (chip breaker USA. Not really correct but, hey!)on their wooden planes yet we both retained the using of wooden planes until World War II. “Progress” saw the complete demise of wooden planes in Britain as of course, the all-metal production models could be mass made with almost zero skilled workmanship and the metal was simply pulled up from the ground, melted, mixed and poured or processed by machine. No waiting for seasoning of wood for a few years, things like that, and bolt-on handles came straight off the spindle moulder (shaper) with zero handwork. I think that possibly the only reason America had the plate saw was because a young Henry Disston emigrated to the USA and started making plate saws to English patterns and developed his own steel production systems instead of buying English steel in from England. He developed his own steels and established the then named Keystone Saw Works before renaming it Disston under his own name Henry Disston. I think that Britain being the heart of the Industrial Revolution gave move to progressive development in Sheffield and Britain was not looking to Europe for advancing its already maxed out production of hand tools. if you think about it, not much came to change any hand tools after the mid-1800s and no new hand tool was actually invented that hadn’t existed for 300 years. Yes, there were changed mechanisms, the Bailey Pattern `hand plane as a good example, and then the range of Stanley all metal tools as in shoulder planes, spokeshaves, plough planes and such, but they all existed as wooden versions just fine but they did take skill to make them whereas bolting parts together that were cast and milled was much faster and cheaper to meet the demands of emerging dominating nations.
Hello Paul,
I may misunderstand what you mean, but since at least around 1900 German plane makers sell “Doppelhobel” (double planes) that do have a cap iron. Ulmia and ECE are making them for about 100 years. Other than the simple scrub, a specific jack plane (Schlichthobel) and the simple rabbet plane, the bench planes feature cap irons.
Kind regards,
David
for reference: fine-tools have a dedicated category for bench planes with single iron. kataloge.holzwerken.de has a collection of tool makers’ catalogs and lastly, we have a few photos up at wwwiki.org/en/hand-tools/planes#bench-planes-1 .
How was the length of the chisel reduced; working end vs tang? If the tang end, does that not affect the stability of the chisel somewhat?
I just took the extra length off from the business end and not the more complicated tanged end.
I’ve never thought about dovetailing plywood. It does look sharp. I’ll have to give it a go someday.
It’s definitely a different challenge by hand. Which way do you plane, pare cut and chop?
I have been down that road, thinking that plywood would make my life easier when building a large bookcase (rather toycase…) for the kids. I wanted to finish quite quickly, but… Well, I suppose it did /not/ make my life easier than buying laminated boards of real wood, where all the fibres go more or less the same way. Dovetails were not too difficult, but dadoes and mortises proved a real pain, and there were quite many of them.
Oh dear..
I have been happily chopping mortices for two years now with a claw hammer.. Have been meaning to make a mallet rather than buy one but haven’t found any suitable (free) wood. Mind you, I only have plastic handled chisels and use pallet wood. Just a couple of side tables and coffee tables.
I share your pain on this one. I’m using a mallet from Wilcos at the moment and it is barely adequate. I’ve finally managed to get hold of a big enough chunk of beech and sealed the ends in time before it starts to crack. Now I just need to wait 3 years or so for it to season! I had a couple of false starts, spending a whole day slicing bits off a huge log trying to find a bit in the middle without cracks, and ending up with a bit the size of an apple and some blunt saws… The difficulty involved if you’re not willing or able to buy wood is considerable, and if you are, how many places sell properly seasoned chunks of beech or oak that size?
Dear Paul,
I am rather surprised about this blunt statement “I am never too sure why makers add some idiot things to chisels”. As I understood this is a family run company that built up from scratch after Eastern Germany collapsed. They used to be a “VEB” (something like “Company owned by the people”) and for sure had a hard way to become a company offering premium tools. I am impressed what they offer for the price ¼ of other companies (the premium line is around 17 Euro a chisel). They also offer a premium line (seems you do use the standard line) that has very thin sides (great for dovetails) and the mirror face with very tight tolerances (can be polished to mirror like in some 5-10 minutes) and they guarantee 61 Rockwell. Among these there are also chisels without hoop. Besides that, thank you for your advice on improving the handles. I think that company would have deserved the be asked why they do what they do as a chance for a conversation maybe resulting in offering even better chisels.
Best,
Christian
Yes, I know all of that. I use their chisels and they are great. That’s why I tell the whole world about them. I’m doing my bit. They must make their chisels according to how they see fit. The hoops are chintzy though, quite unnecessary in the grand scheme of things and so add no real value to the tool’s functionality, appearance or longevity that’s all. I think so too the flimsiness of the ferrules. It’s their chosen path and my opinion of them isn’t that significant that’s all; the chisels need neither of them really, many makers do silly things to otherwise quality materials in their tools and then somehow drop the ball that’s all. And, of course, that’s only my opinion. the chisels work great and they are benefitting from my promoting them. I’m not looking for any conversation or wanting them to change anything. As I said, the chisels are great otherwise.
Thanks Paul. I am sure they could benefit from your experience! And it would be very tempting to have a more or less perfect chisel for less than 20 Euro. Also I found their service good – had an issue with a chisel and got a replacement within 2 days without having to send back the chisel.
Best
Christian
I managed to get the hoop off without the hacksaw, the metal is very thin, I used a flat smallish flat head screwdriver to lever the metal away from the handle at one point, I used a very thin scrap of wood to lever the screwdriver against the wood protecting the wood, the gap was big enough to get small side cutters in to cut the metal then lever a bit more and cut again, was a speedy process and no damage to the wood.
Is there anything interesting about building your Poorman’s tools using high grade plywood? Would that make it easier or harder for any of the tools.
I think a wooden plane made with that fancy plywood would look great.
I have seen some plywood with layers so thin that the very glue itself would have permeated every layers to become a solid mass of whatever glue they used. It was the densest material I ever saw and incredibly strong. Trouble is I could never find the material commercially made or sold. I am thinking that its layers could have been 30 layers in a half-inch.
Super cool. I want one!