I’m Still Learning
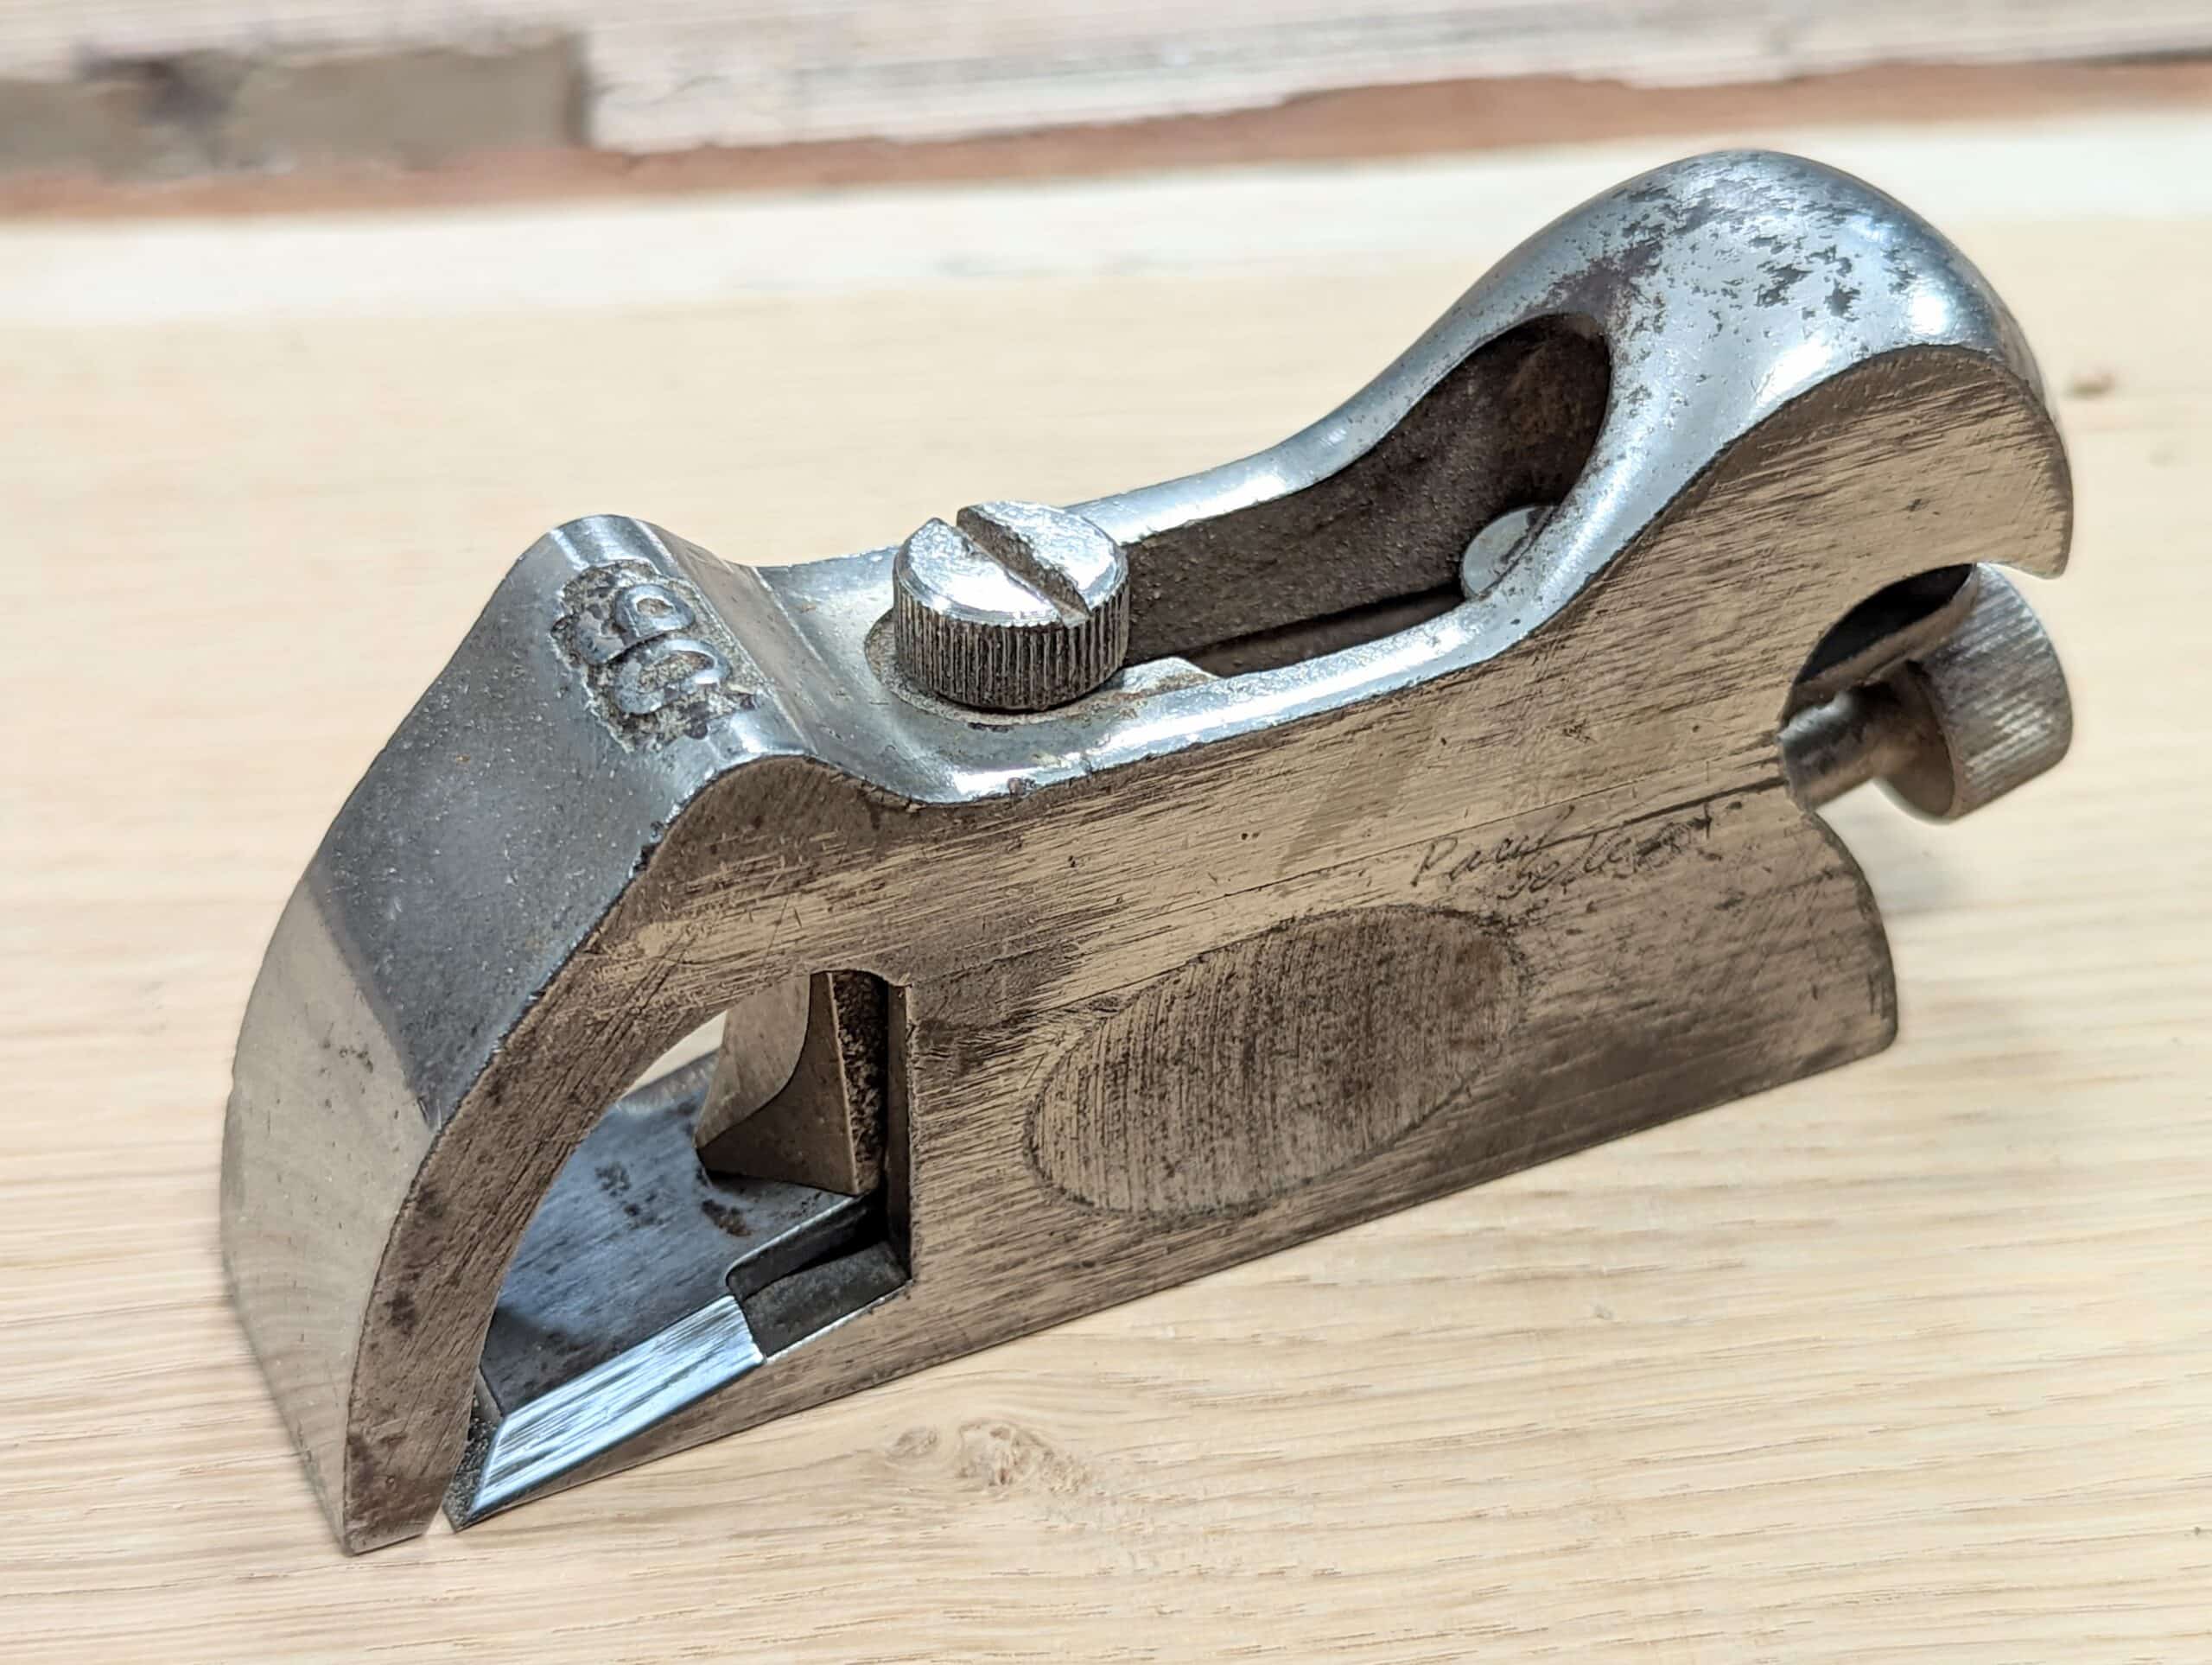
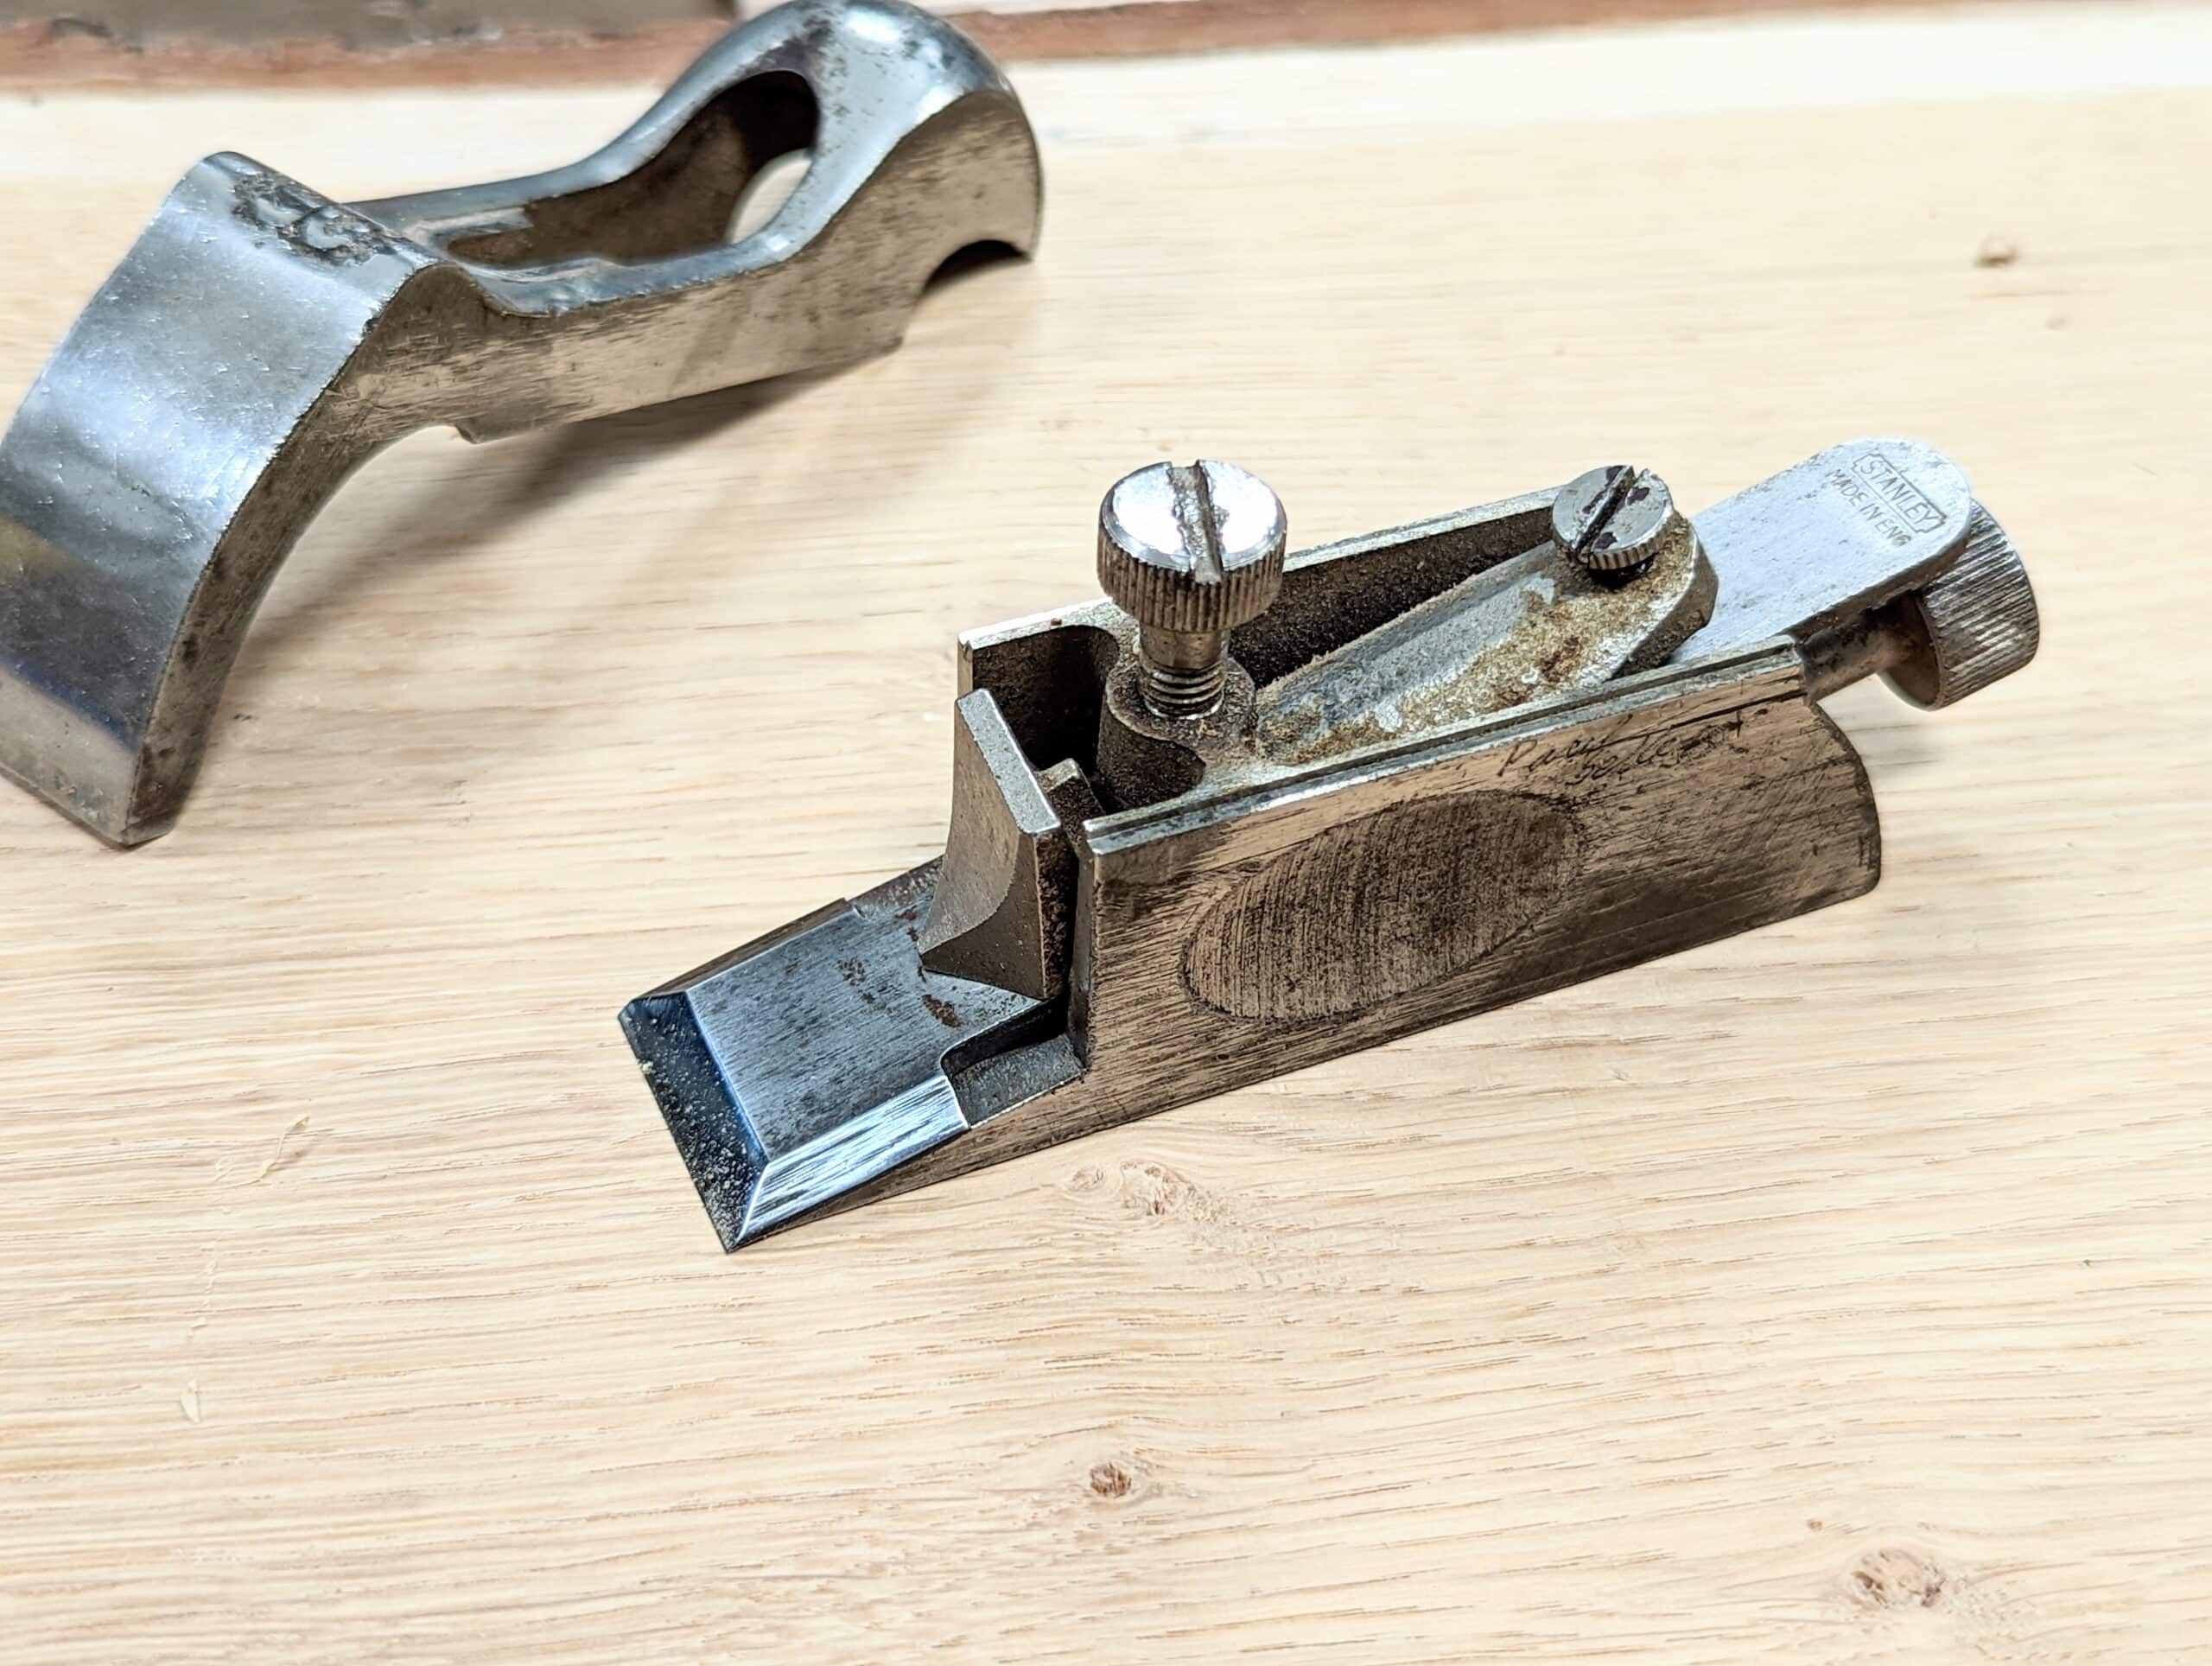
I see things I consider silly in woodworking magazines so a few years ago I felt it best for me to stop frustrating myself by reading them. I’m doing pretty well with it but sometimes I glimpse wonderment on pages somewhere and I become bemused by this or that. In recent editions, something new but not new caught my eye. I’ve seen snapped-off sawn-off #78 rebate planes now referred to as chisel planes regularly pop up on eBay these days and led to me seeing woodworkers buying into a relatively fanciful thing by modern makers at £170 to £200 a pop. Paying this much for a total non-necessary even pretty useless plane that’s actually not a plane we might recognise for planing wood is a bit scary. My recommendation is not to buy into them until you’ve had some experience that might necessitate such a purchase. You might discover you never do.. I think that it’s a mistake to think these to be a useful plane to have . . . you more than likely might have one and if you don’t here’s what to do. Chisel planes really are a truly questionable purchase especially as I say when you might already own a more seriously needed plane. Several bullnose plane have a detachable top-toe part that’s removable and make a really good chisel plane should you believe that you need one. The benefit of course is that a bullnose is a plane I would not live without. They need no retrofitting or alteration if you simply remove the top by slackening the retainer setscrew. The Stanley and Record versions as well as the Veritas bullnose planes and a couple of others already work identically to the so-called chisel planes. I think it likely that finding a use for a chisel plane will be more difficult once you’ve much of a need for . . . engineers need something to engineer whether we the woodworker need them or not.
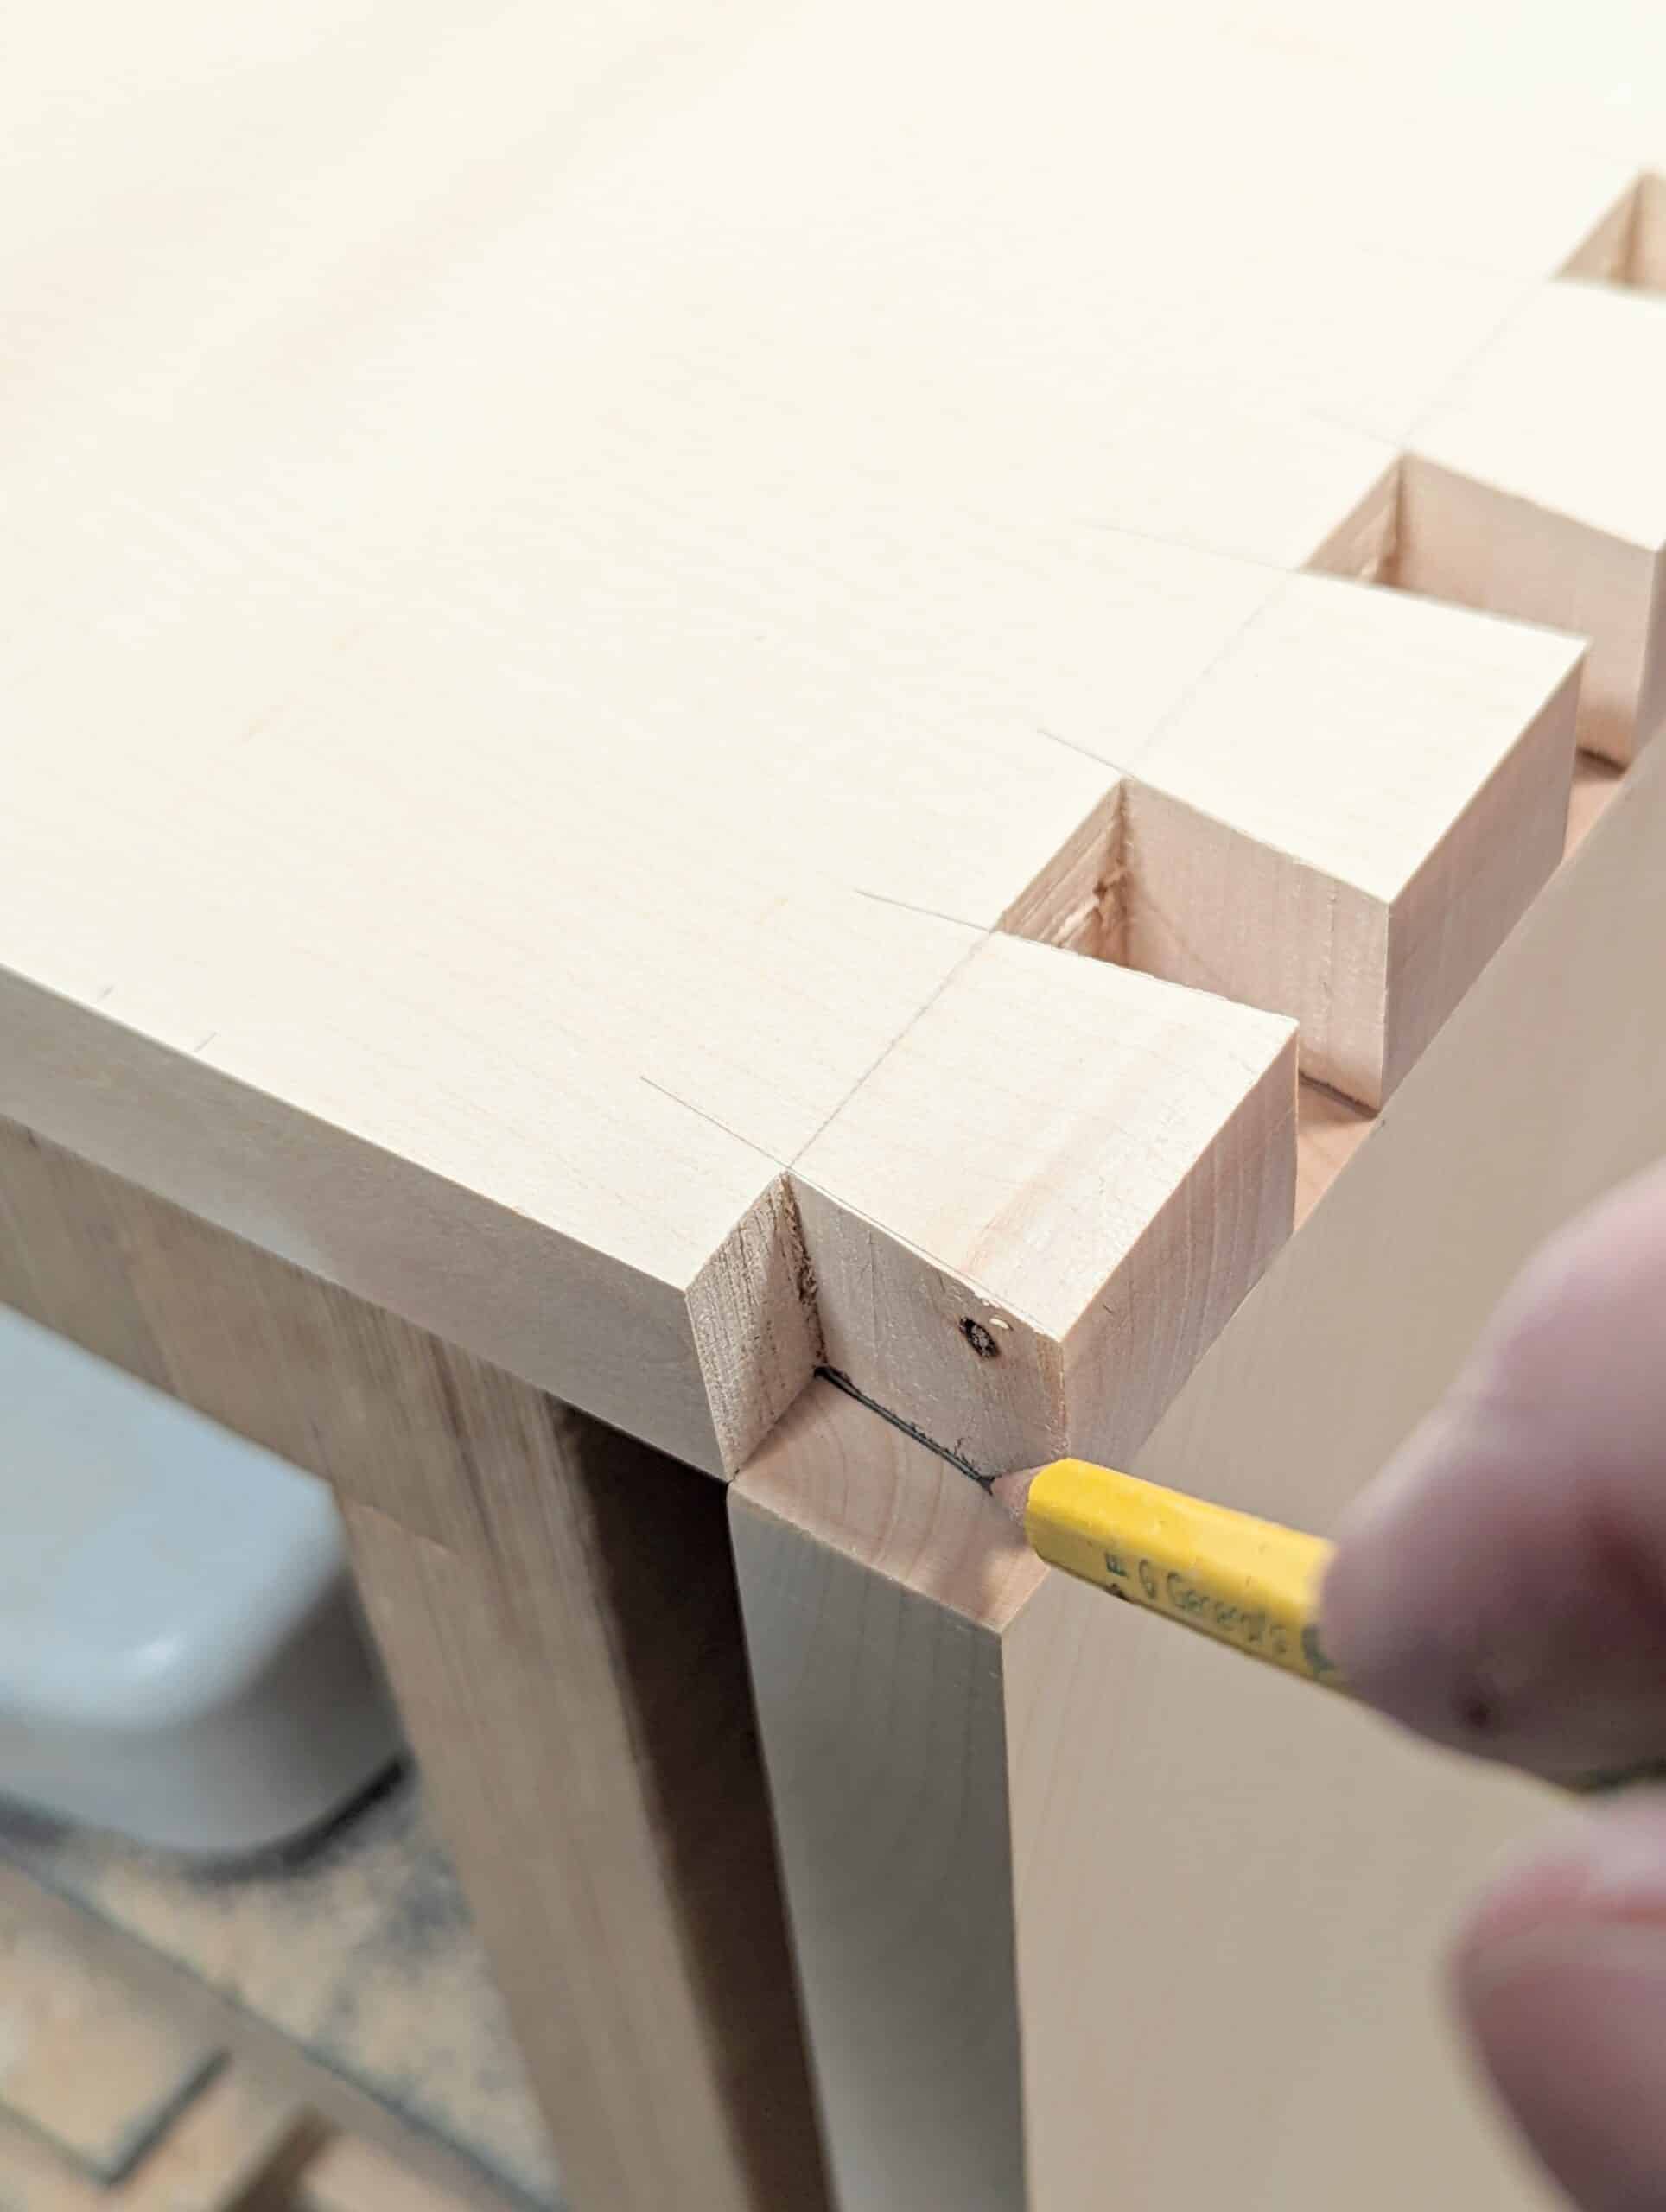
A perfect marriage for a well-fitting dovetail comes readily and quickly and ideally straight off the saw. Why do I say that and is it true? Well, generally, I think it is. I am probably being too general but I just saw an extract from an article promoting pare-cutting dovetails rather than getting it right off the saw. On small boxes, though it is pedantically painful, it’s just okay. I wouldn’t like to think that this might be taken as common practice or the better way because with practice and perseverance you will get perfect dovetails straight off the saw in a heartbeat and of course what is perfect anyway? There’s a reason it was never common practice and it certainly wasn’t because they hadn’t yet discovered the better way, it was that after cutting twenty or so dovetailed boxes, a few drawers and things like that, they had gained all the confidence they needed to set the saw to the line and just cut that wall dead true and that’s because, well, they’d become masters in the doing of dovetails. Please, please practice getting it straight off the saw cut and don’t give up. On larger projects, say anything bigger than trinket size on up to large chests and even cases like the ones I am making now, the saw kerf adds good advantage; there are the fibrous surfaces which translates into a unique gluability, a springy compressibility and much more. Of course, this depends on the wood types too, but these are the things no one speaks of and so I will try it here. I don’t put too much stock in dropping an anvil from lofty heights to see which biscuit, dowel or domino holds better than a M&T. I like my in-the-saddle testing in the making and development of various aspects. The other stuff, tool tests and such, is mostly interesting-poor stuff. Not much more than entertainment really. Anyway, the very best dovetails come from the saw alone and pare cutting them is more a procrastination in lieu of mastering aspects of our craft. I hope that the rest of this article will be helpful deliberation for you to consider and see that once you start learning about woodworking with hand tools the journey of learning is a continuance for the rest of your life in the working of it. most of you will only ever be able to put in the smallest fraction of the time I have done it. There will only be a very few living woodworkers with almost sixty years of full-time woodworking working six-day weeks and ten- to 12-hour days. I am constantly finding new things to learn and understand.
Traditionally, what I shared above about the slight fuzziness of the saw kerf being advantageous has always been the case and through centuries of woodworking and with good reason. It’s fast and creates a slight fuzz to the surfaces that take and hold glue and thereby the joint well for centuries. Traditionally, a good joint from the saw was and is the fastest and the least fussy and yet it never compromises the fit and look when made by a diligent craftsman. Experience tells me that super-smooth surfaces in joints don’t generally glue as well as the slightly fuzzed ones. Not a scientific analysis at all, but an experiential one through my dismantling drawers for the wood or repairs where it was the smooth ones that let off the more readily from the sockets and recesses. In our today, we have become unnecessarily obsessed by lessons in obsessing by gurus. Many haven’t actually needed to earn a living from their woodworking and have never had 10 woodworkers at the shop gates ready to take their place if they were too slow and shoddy in their work ethic. Such was the 1800s and the early 1900s for the working classes. I haven’t either, by the way, but I didn’t need threats and fear to get the best out of me. I just always loved my work (as you do) even when the conditions and pay were unfair. Times have indeed changed. It’s a 35-hour week for all here in the UK and few people make dovetails for a boss they work for using hand tools and hand skills.
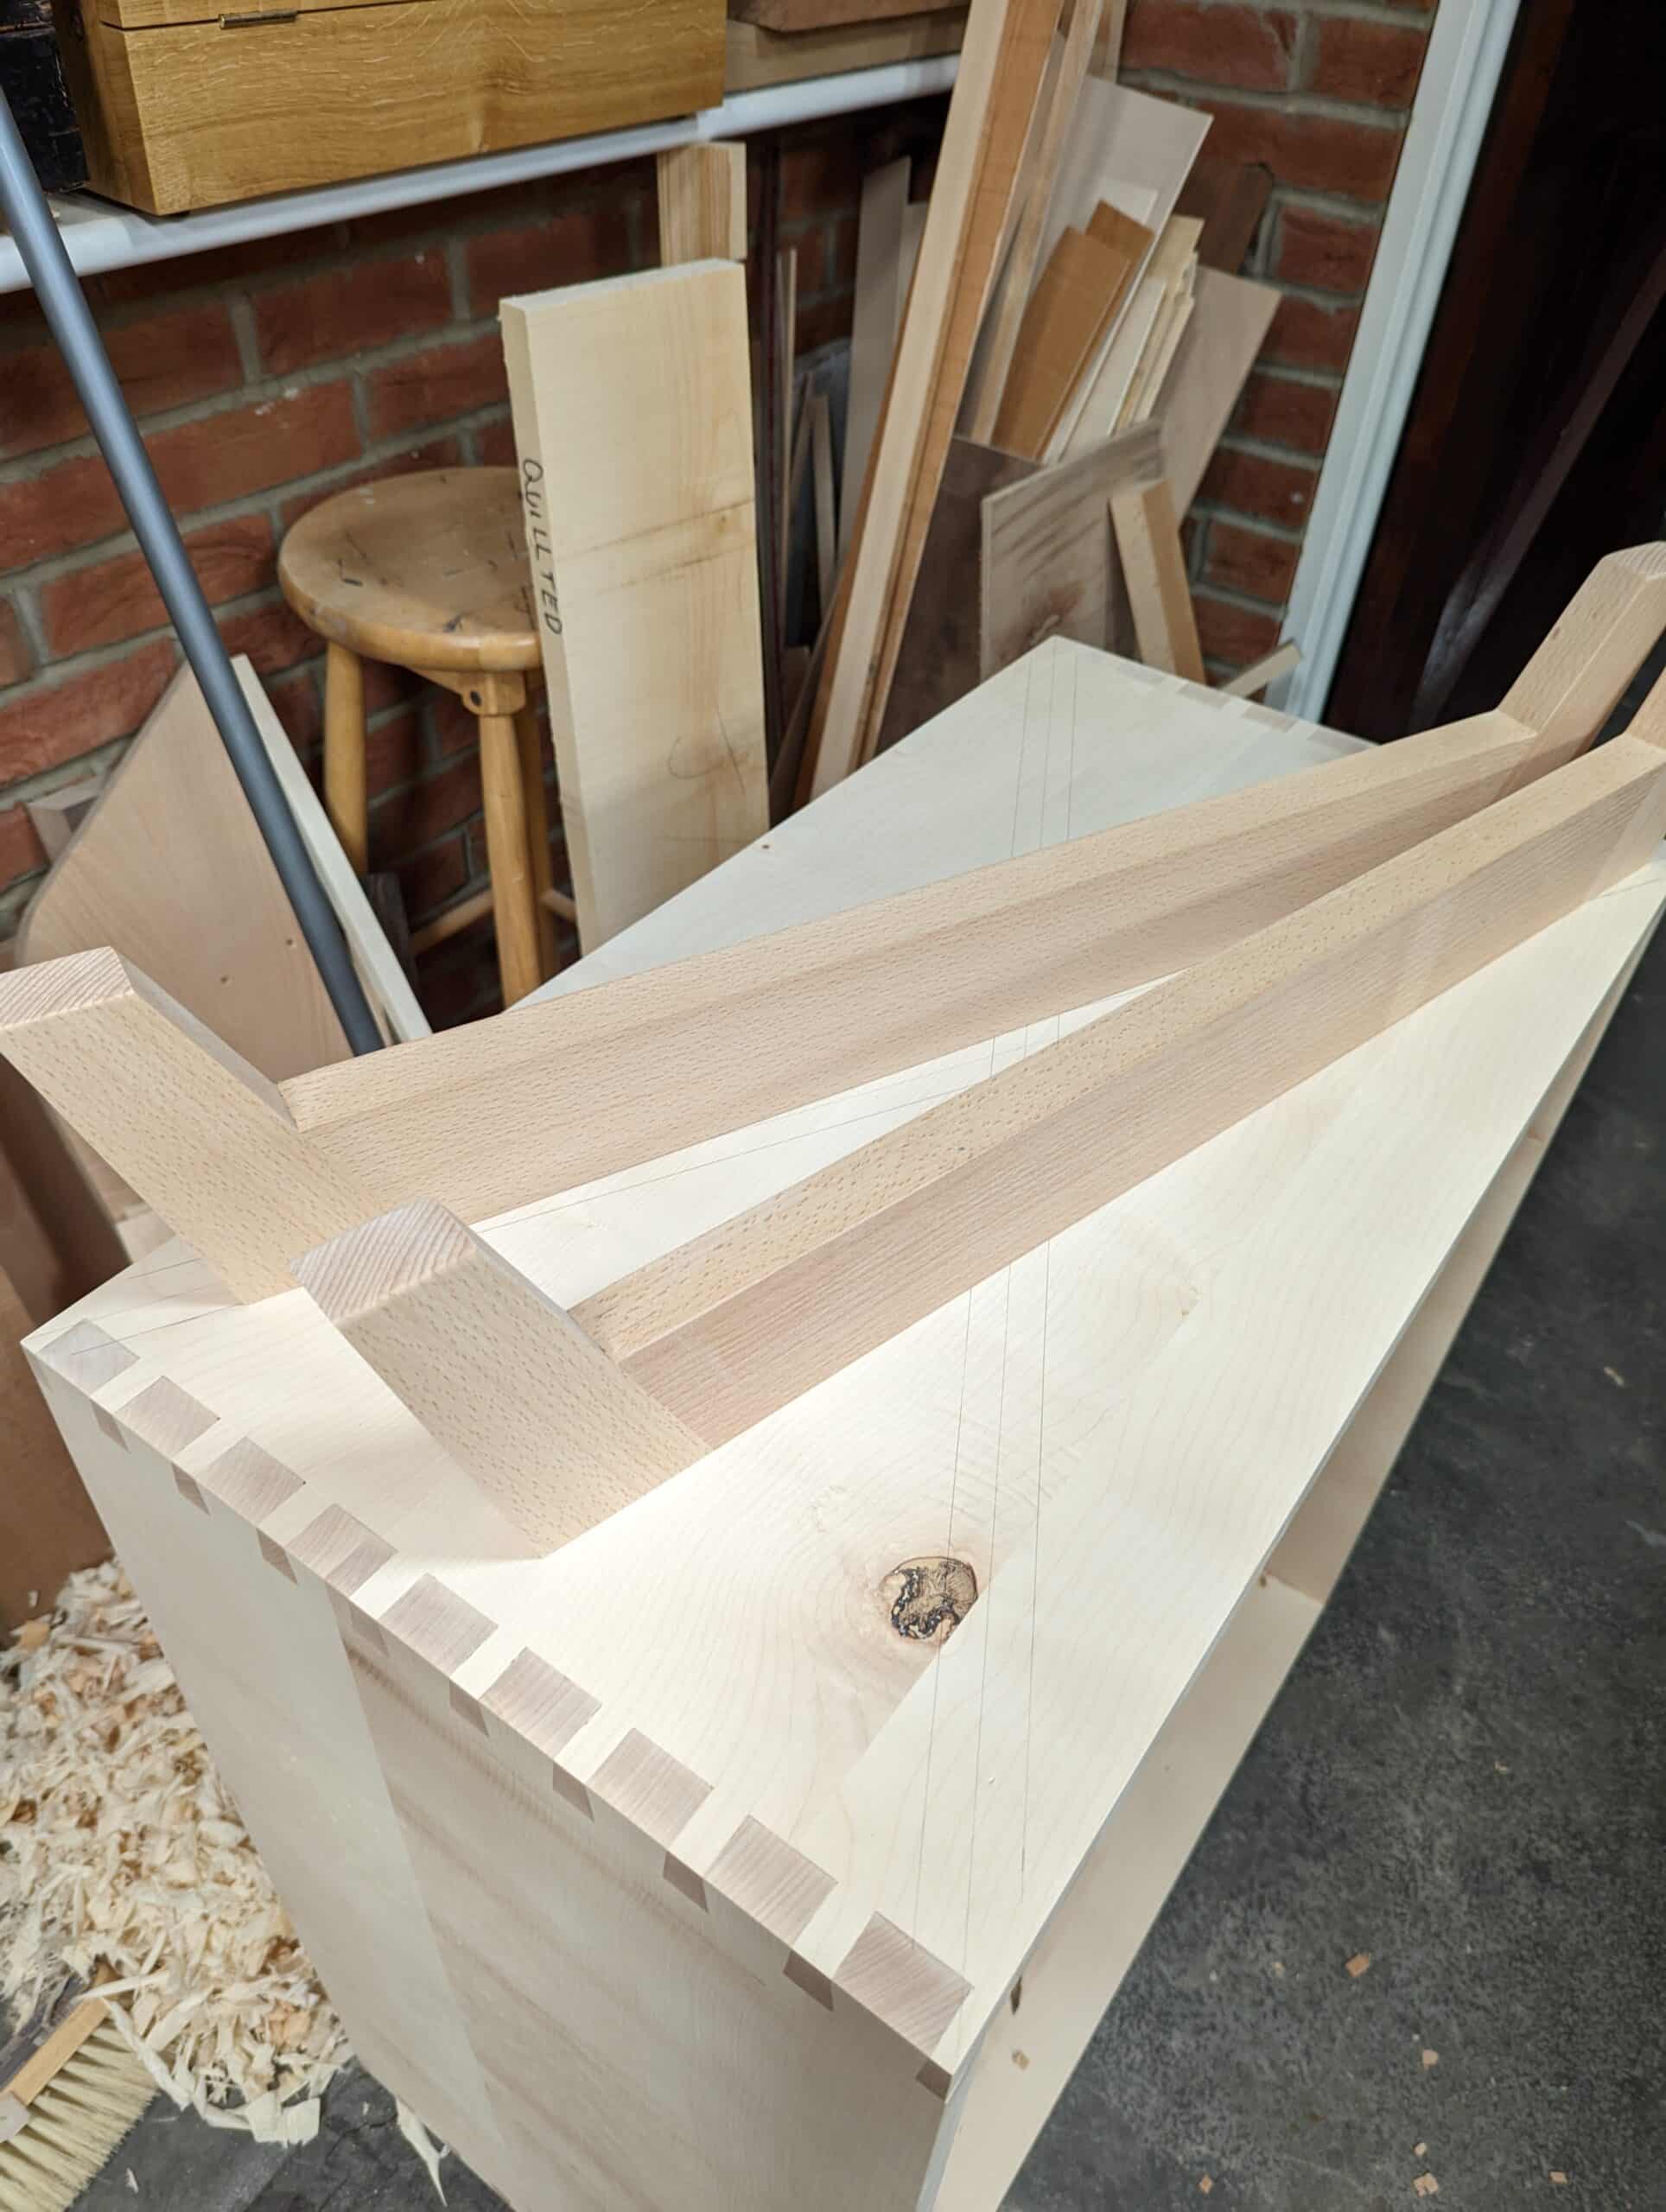
I have been making two identical cabinet cases from sycamore I bought a year or so ago and that has been ‘airing out‘ in my workshop in readiness for just the right project. I have used sycamore often enough to know its characteristics hence planing directly across the grain because of its propensity to tear the grain when planing longwise. The higher levels of friction on metal-soled planes affect the planing and the finishes surface too. Even within the species, there are variable levels of density, even in the same board.
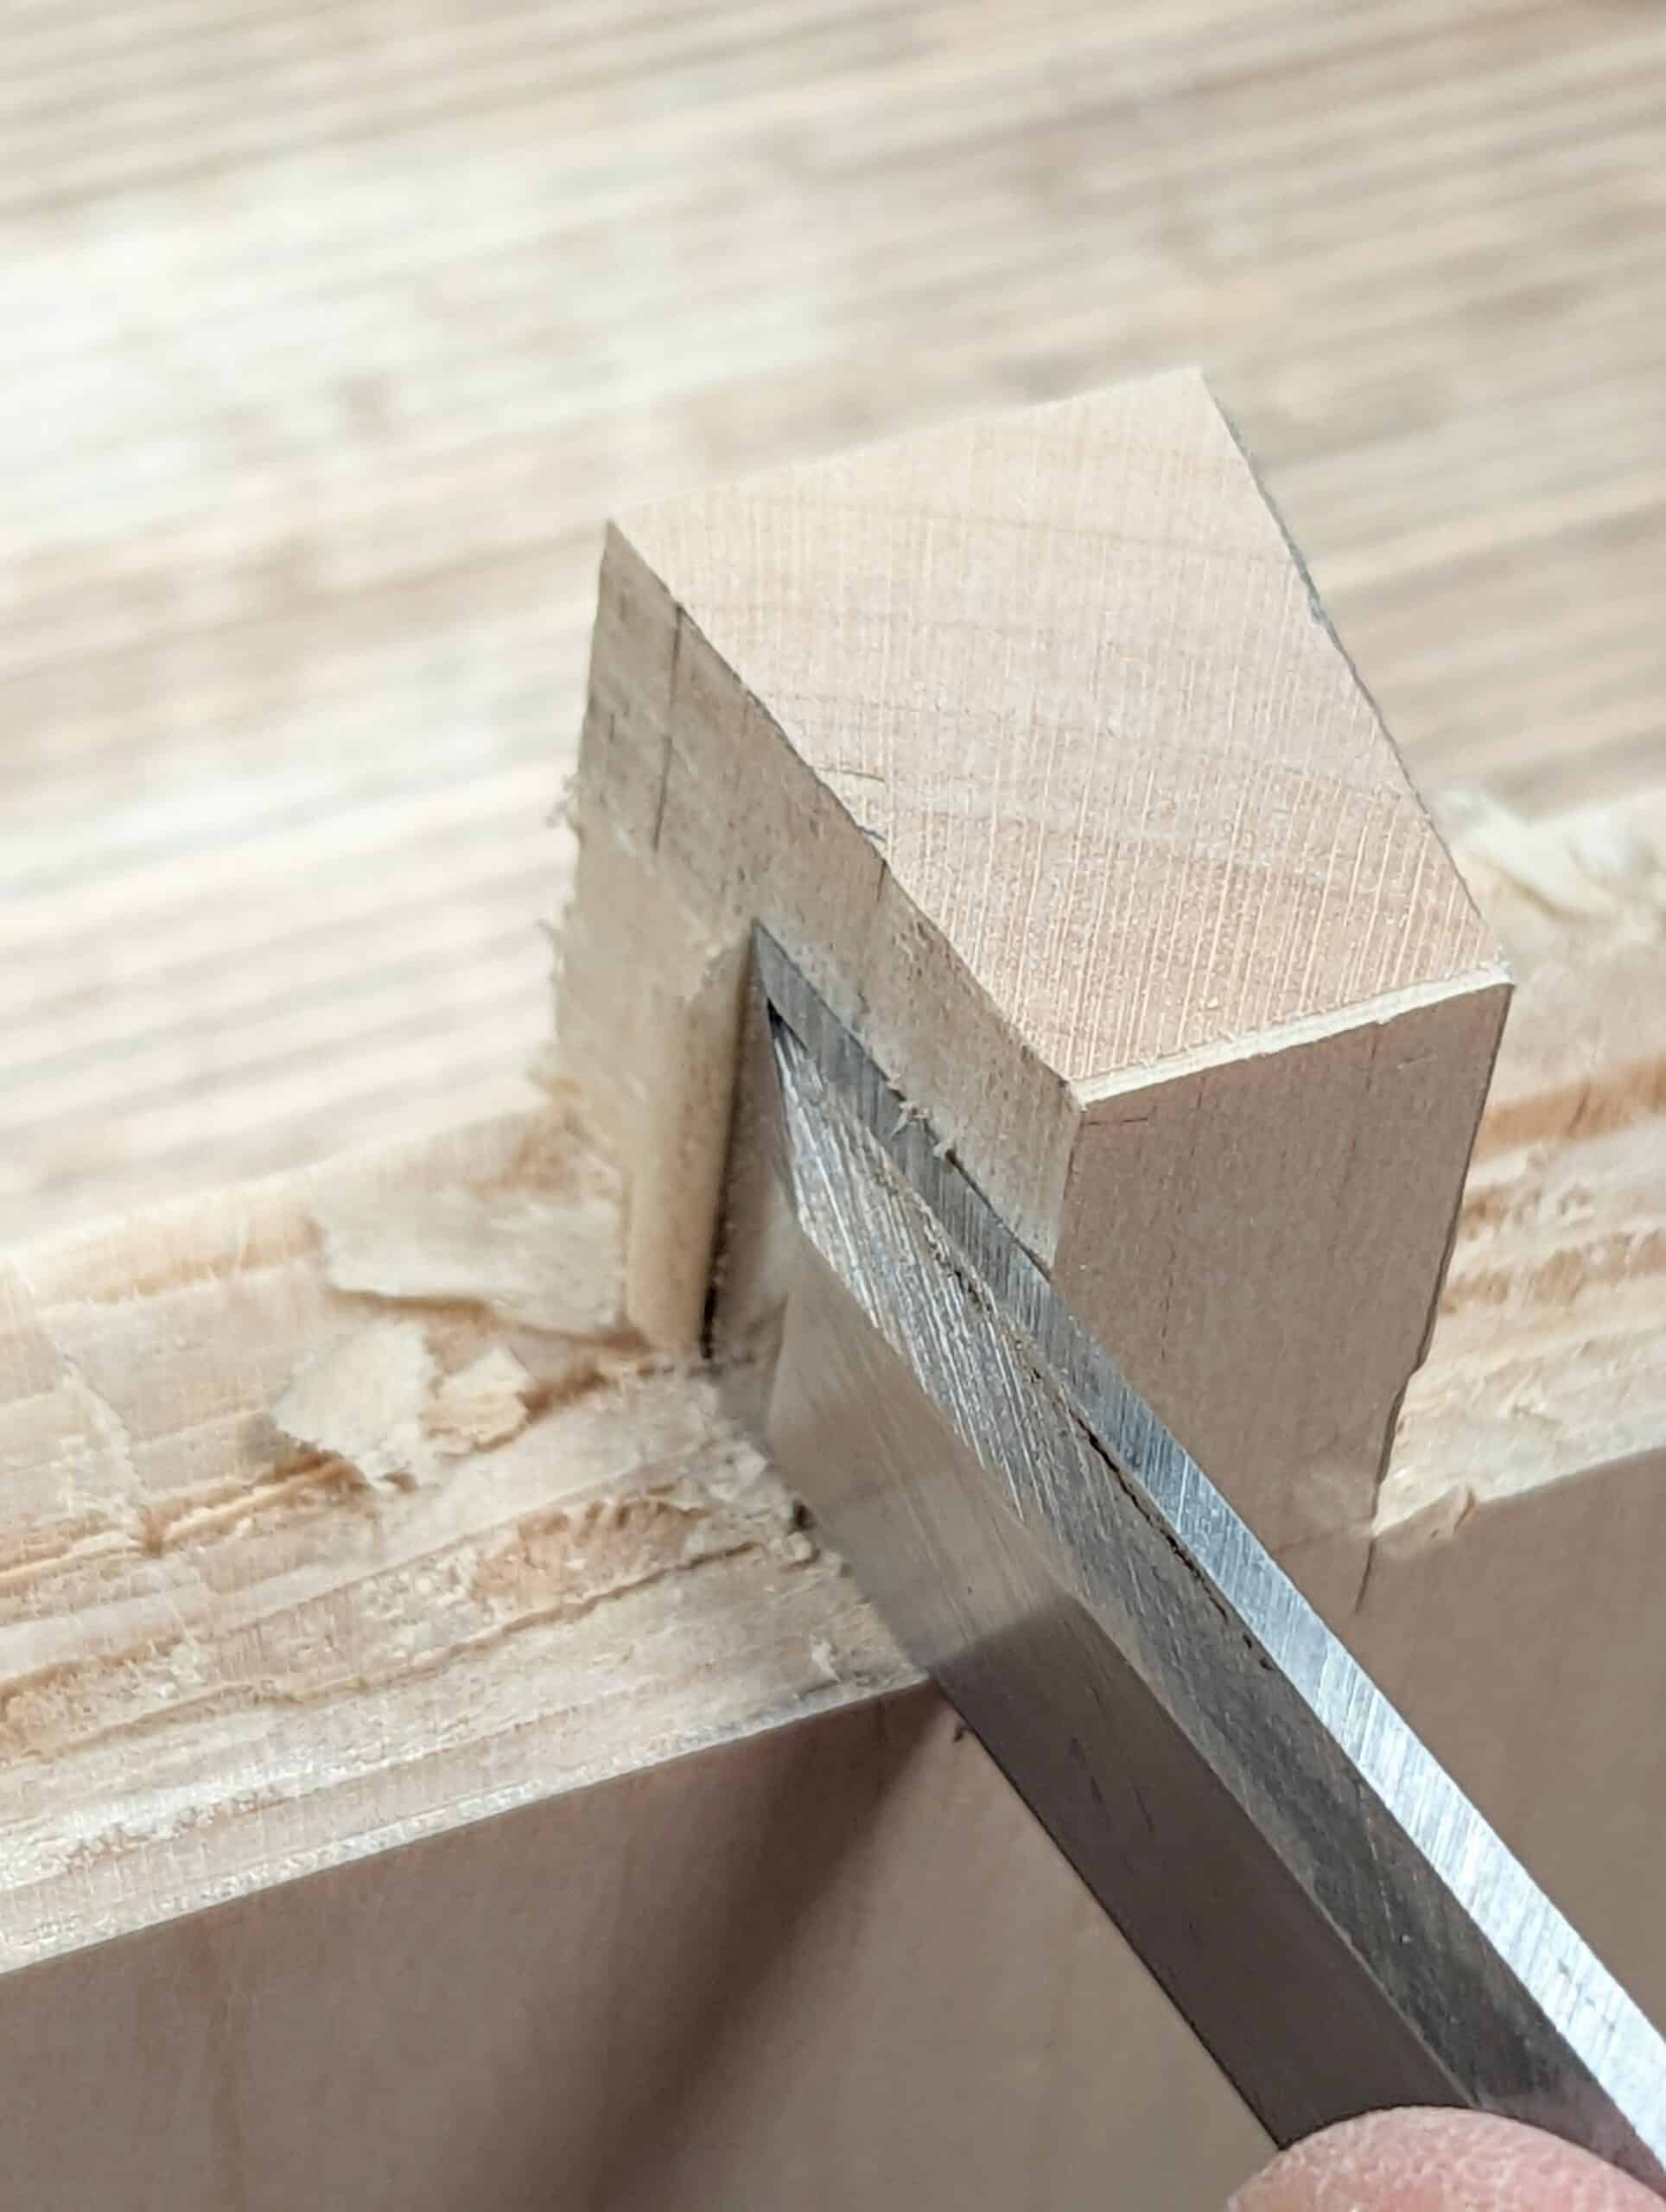
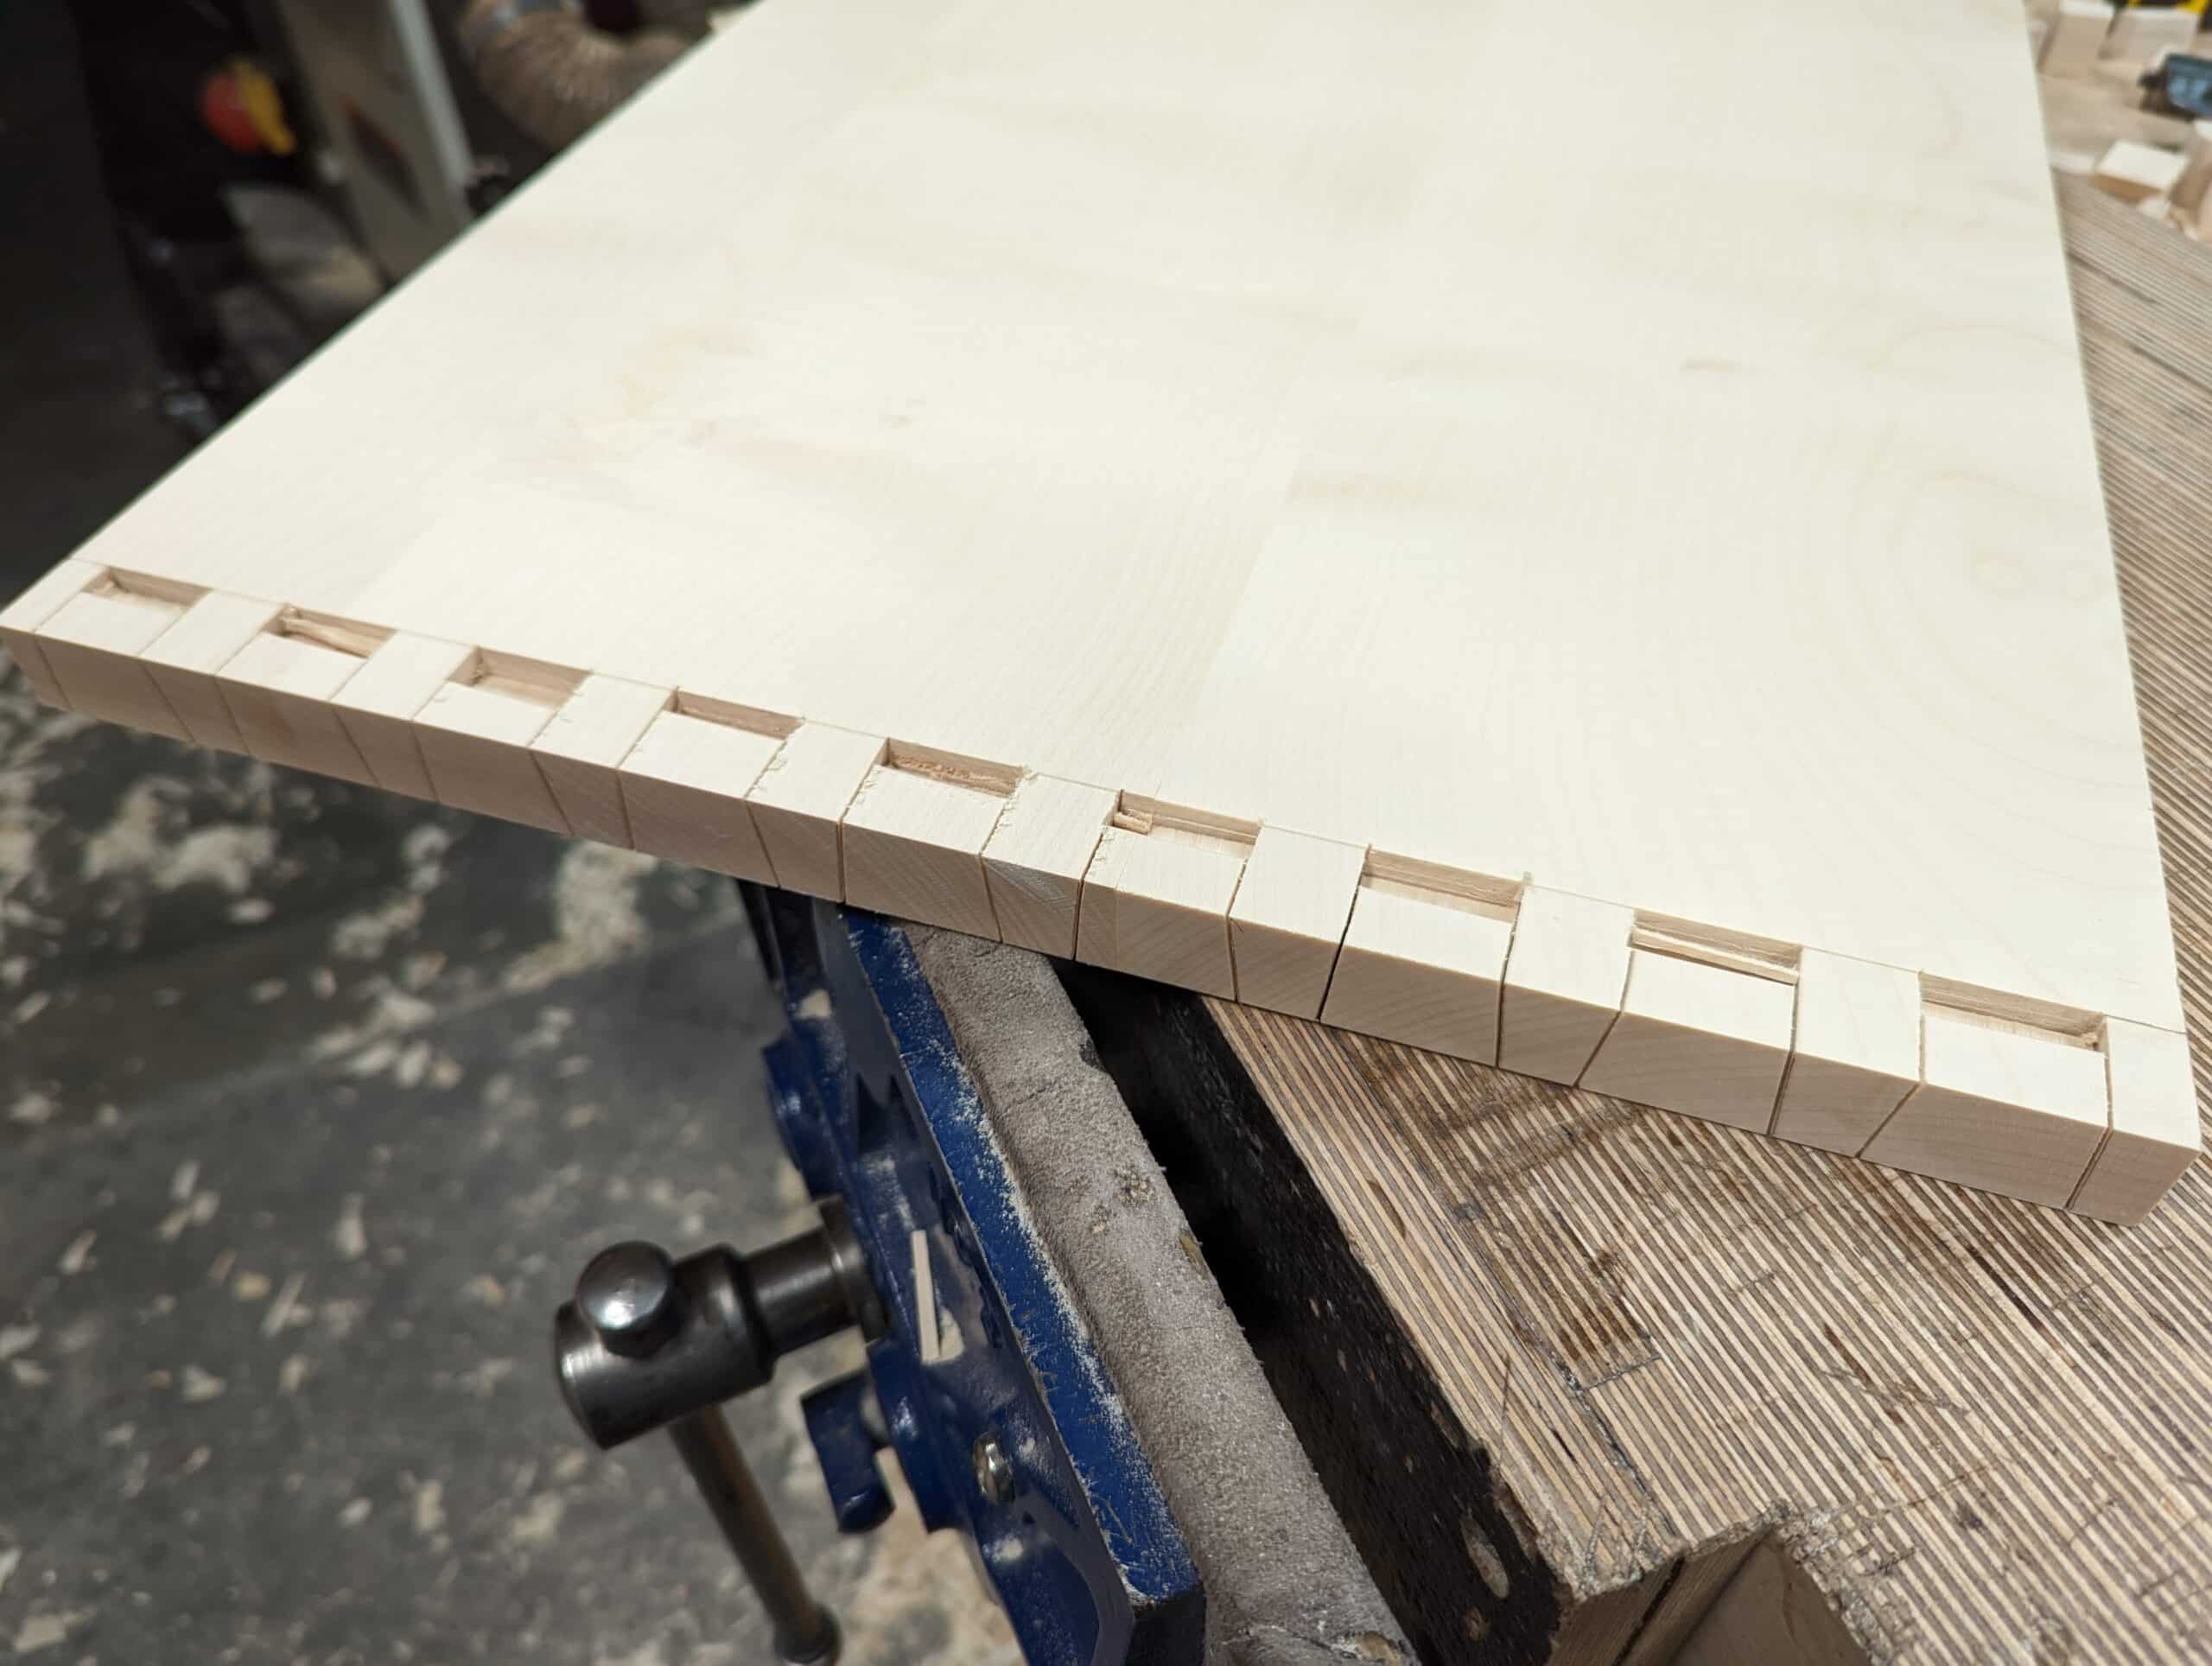
I think it to be more unusual than usual that I need to chisel-pare my dovetails and pins to seat a dovetail joint. In 95% of woods, the joint usually presses firmly together with my thumbs or a side of the fist bump followed by some fairly firm hammer taps to each tail. I have made eight corners to two cabinets across a 16″ width. There are nine dovetails per corner so ten pins to correspond to. Now, these extra-wide dovetails are my first in this size specifically in sycamore. I have done enough 2s, 3s, and 4s over narrower widths without any issues. By the time I concluded my eighth corner I had learned a great deal but it wasn’t just in the making nor was it at all in the caring to fit. It was in the questioning, in the thinking and in the experimenting and seeing my personal need to shift my thinking and reevaluate all that I knew to be best in guaranteeing a gap-free joint.
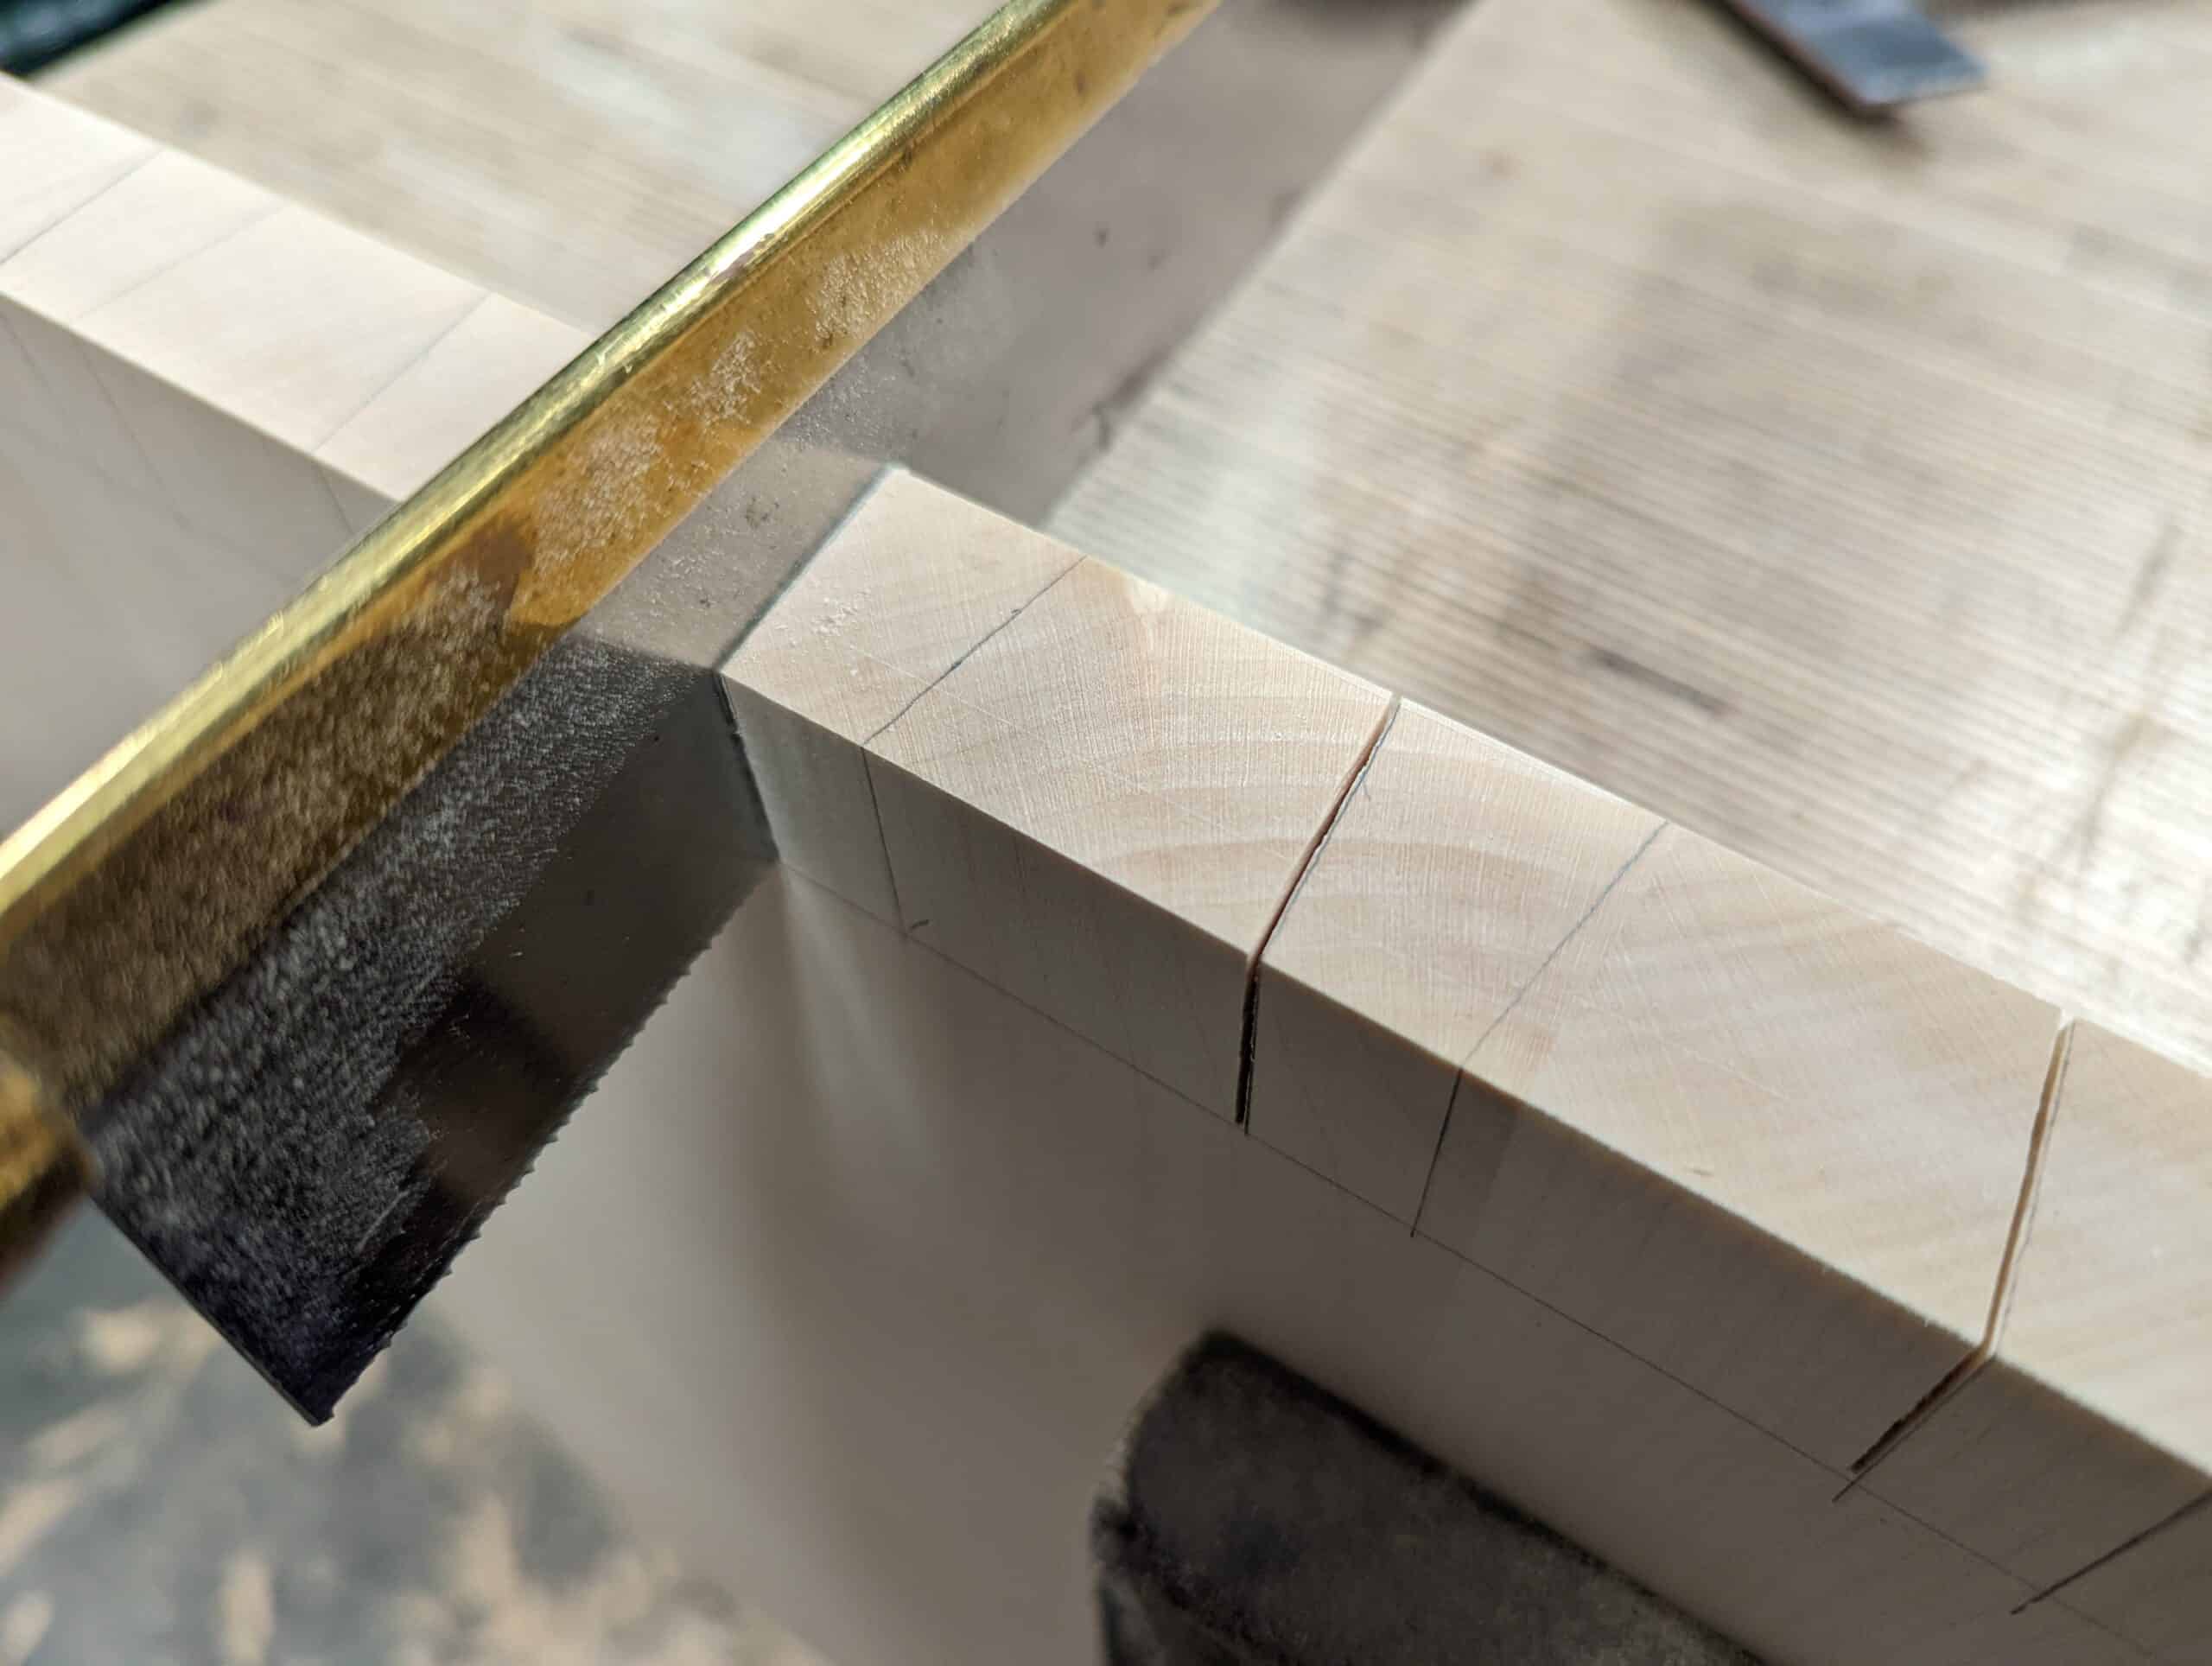
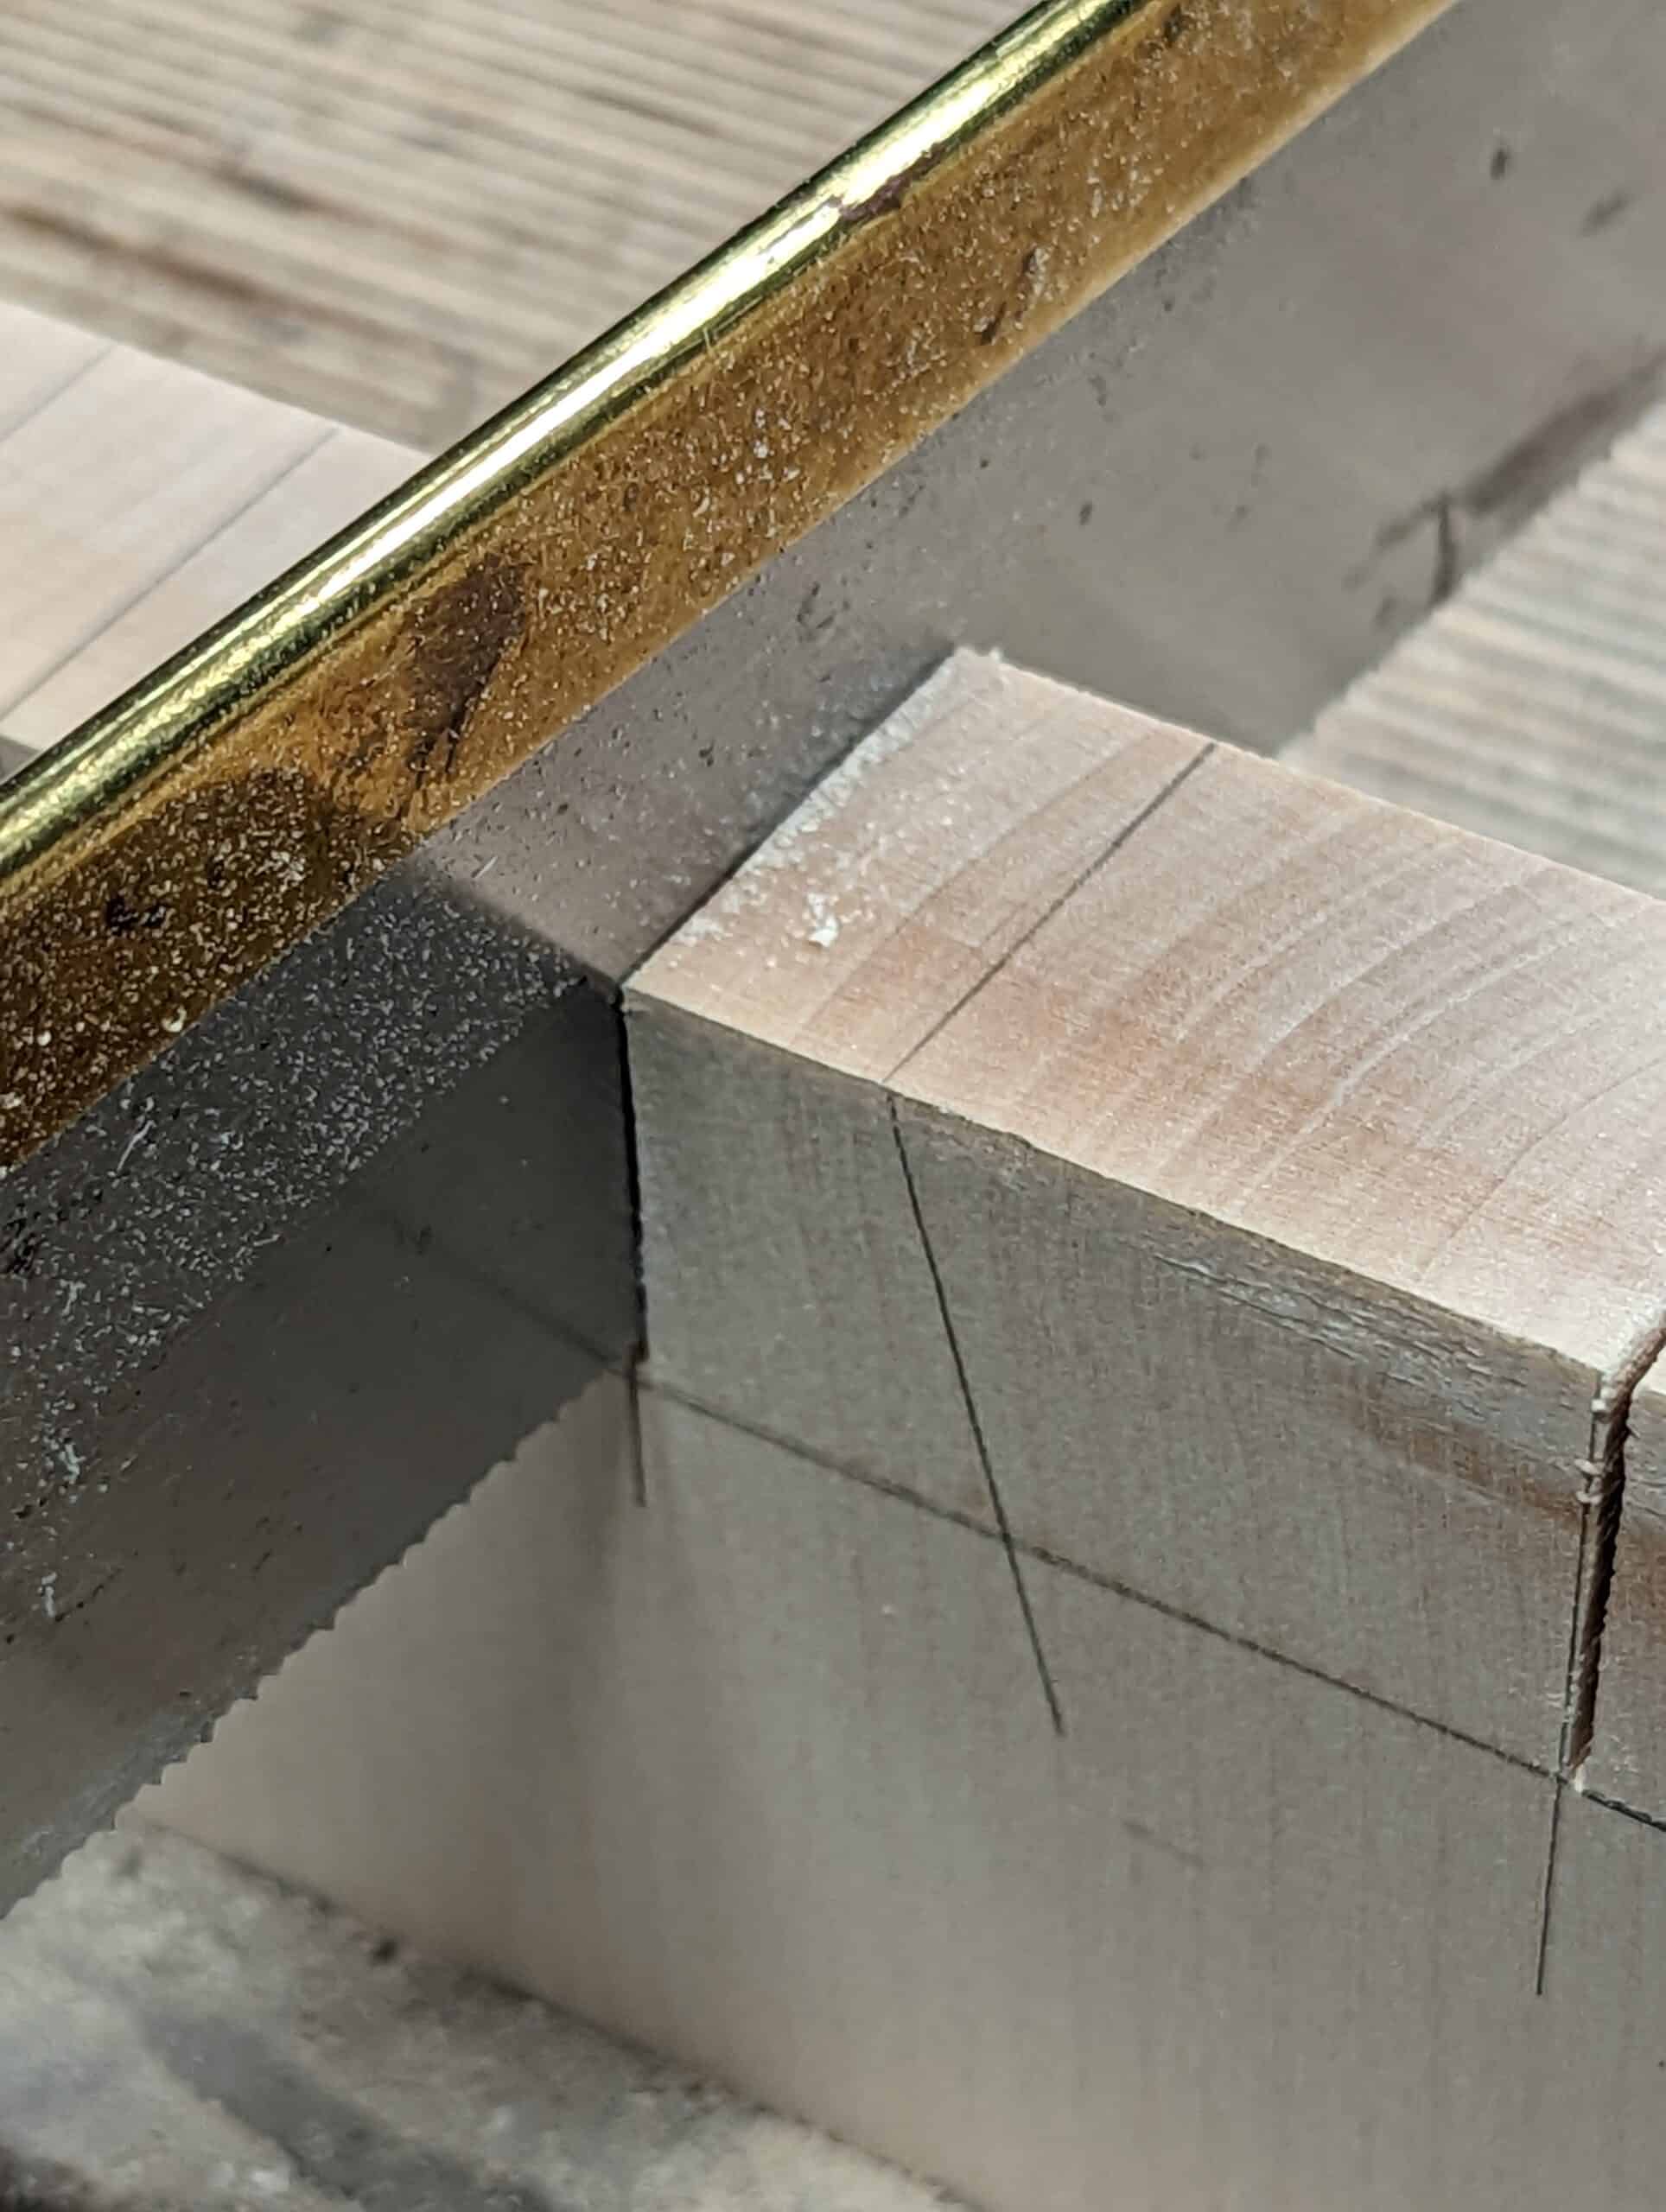
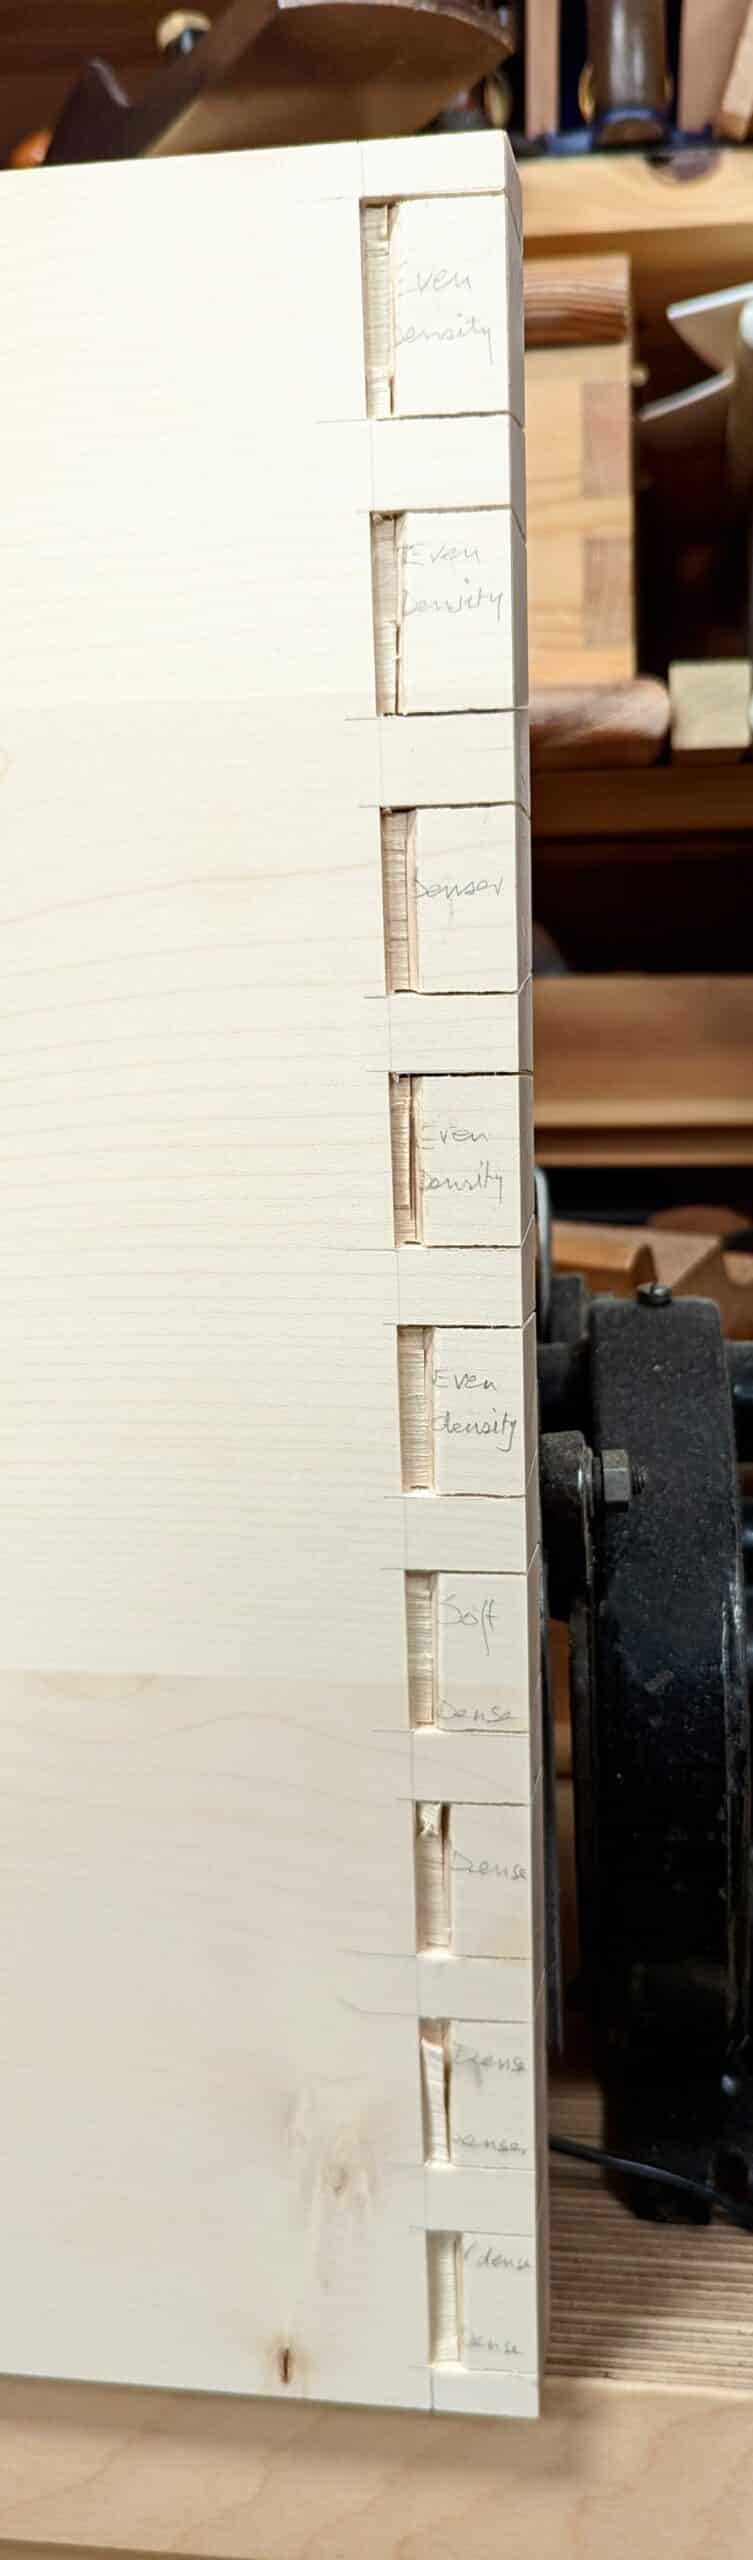
How we learn about woods and their characteristic properties is in the working of the fibres. Even so, even within the species and the same tree there will be minor and major differences that defy writing about. Reading about these properties from a book and timber supplier is like trying to know grain from a photograph of its surface fibres rather than the internal fibre of its structure. Describing a wood type as having even texture or open porous basically tells you that all of that species has equal density throughout the wood that comes from the whole tree. This is wholly misleading. Crotch-grain and the wood surrounding knots and so on is wood in tension and compression caused by the weight of the branches which in turn consolidates the region beneath the branch while the wood above is being stretched. In a recent video, I spoke of this as I chopped out the wood each side of the dovetails and pins. Across the 16″ width I encountered ten different densities if I encountered one. The most consistent thing I noticed was how evenly the knife moved through the wood to establish a clean-cut knifewall. But when it came to vertical chap cuts and angled paring cuts the whole thing changed. I could not in any way predict that the wood would do this or that.
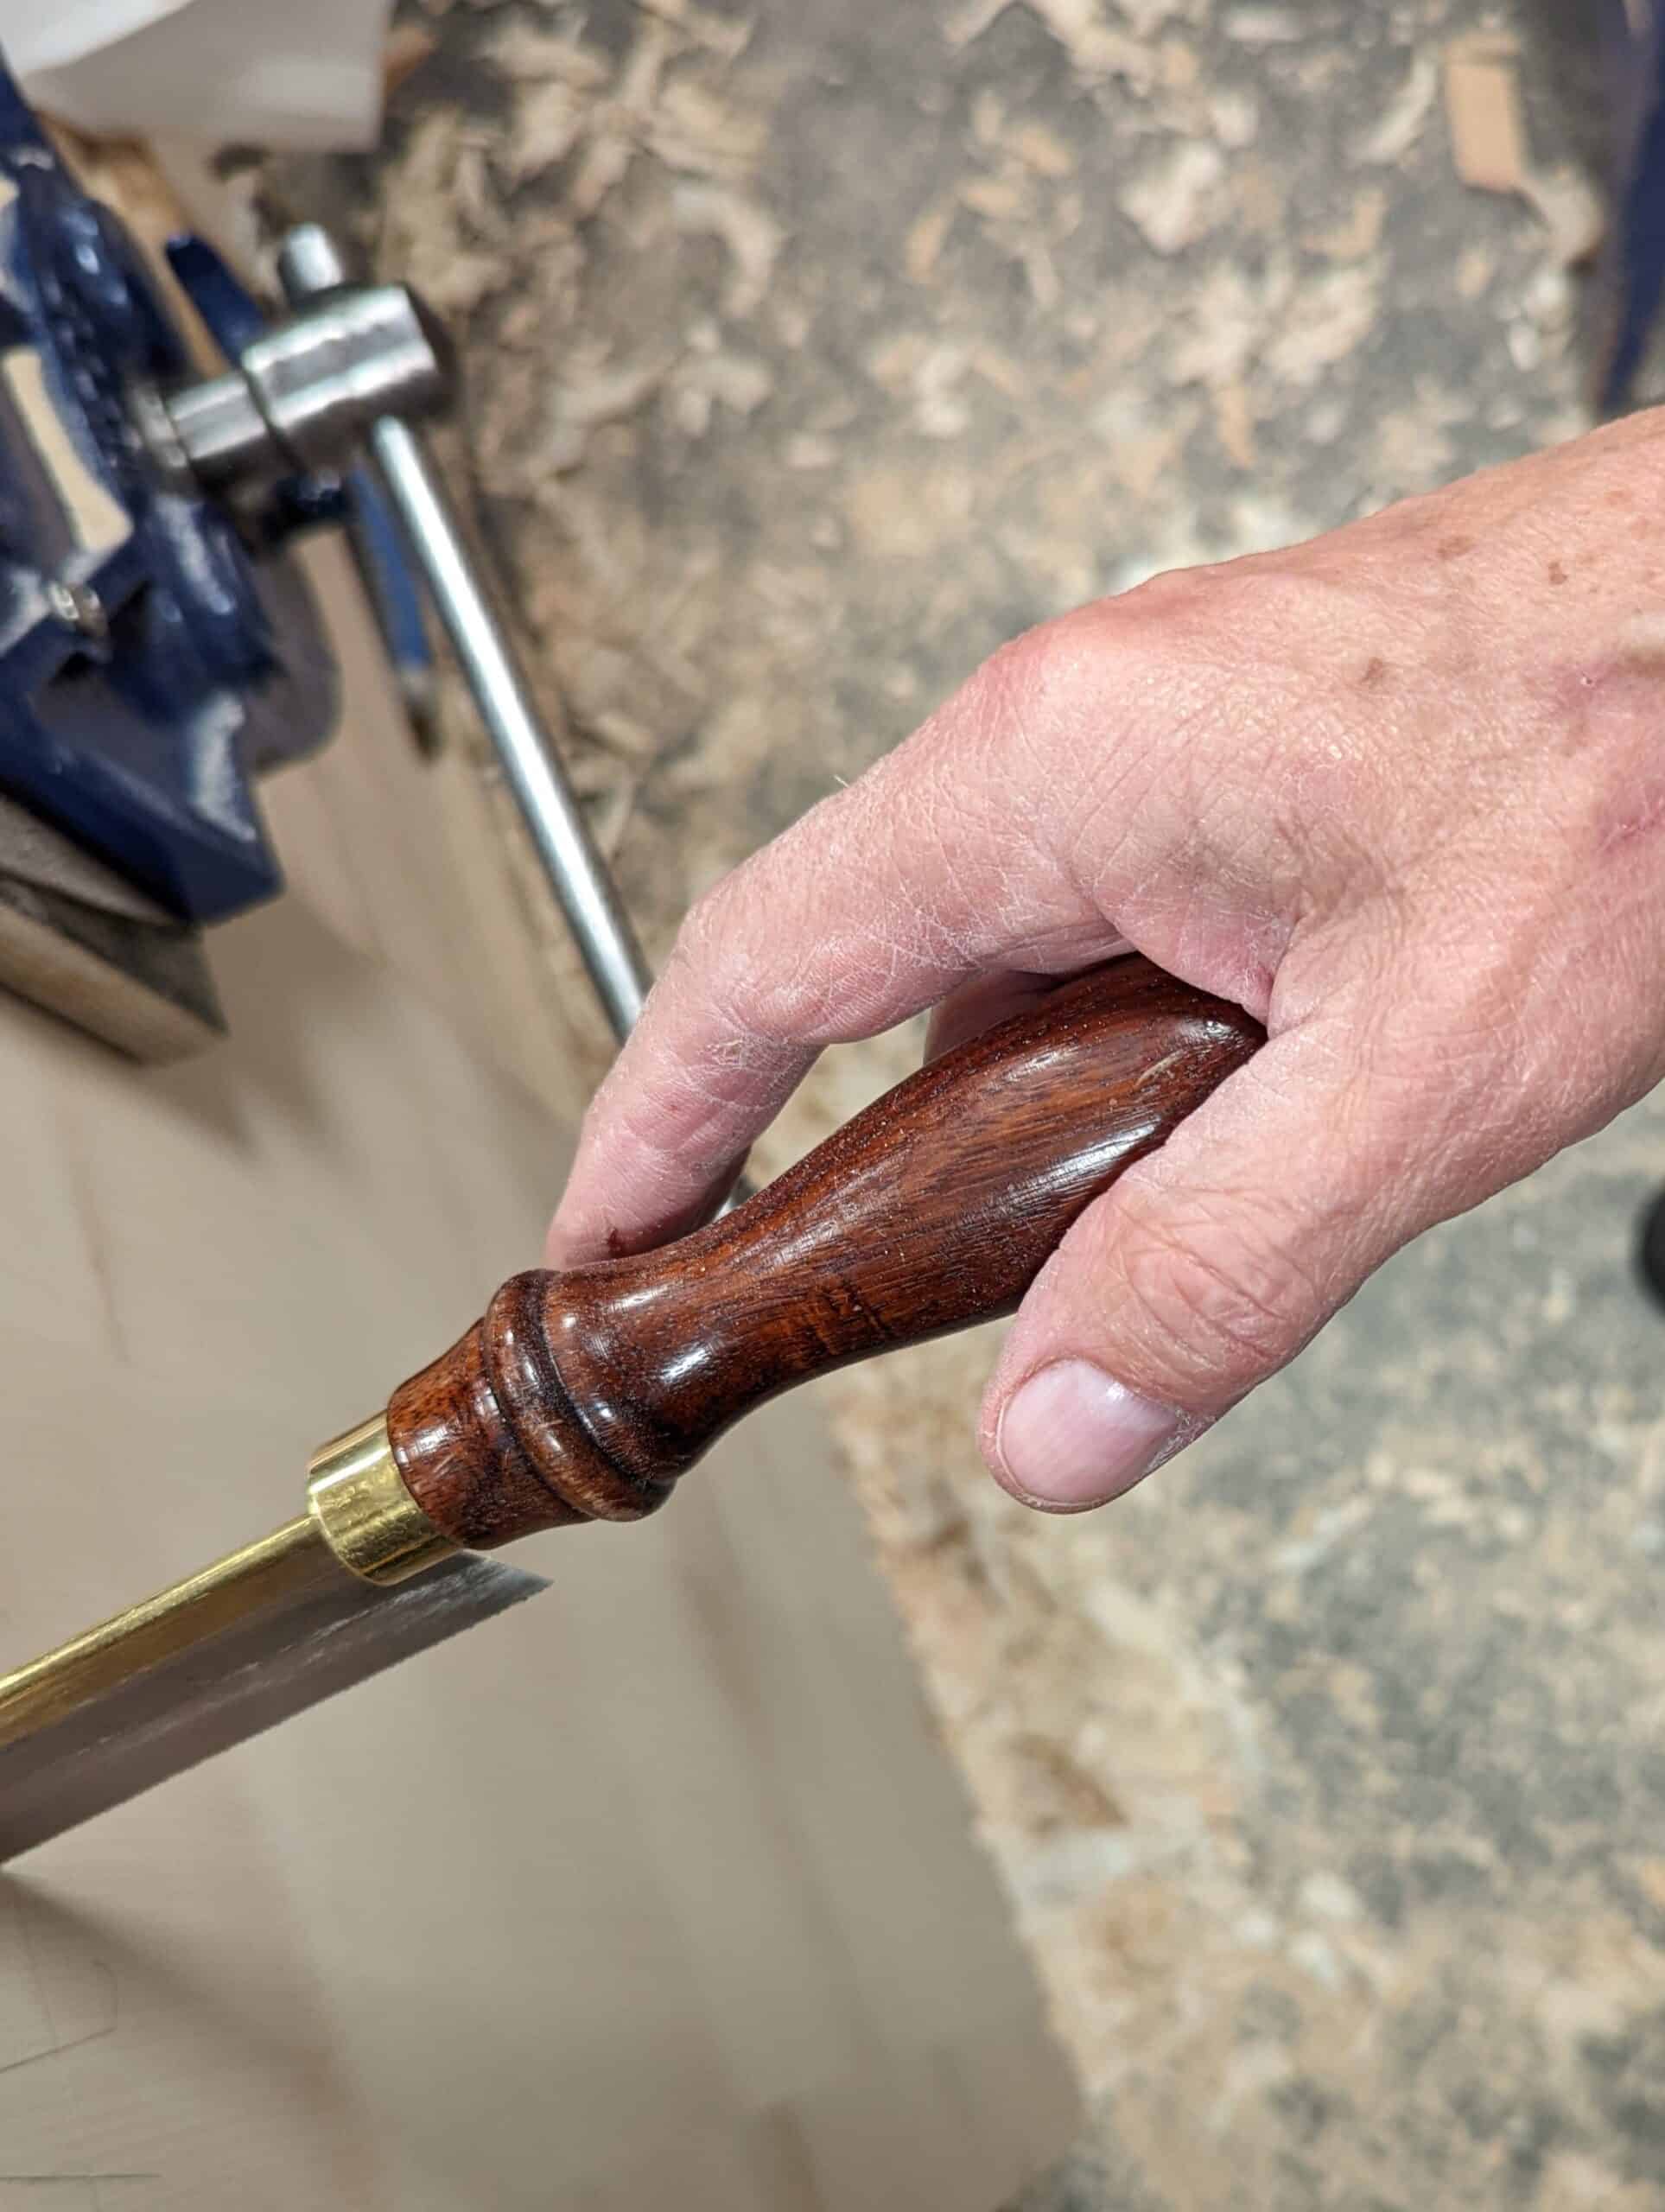
I used various saws and resolved yet again that the best saw for dovetailing will never be any pistol grip saw but the Gent’s saw. With 36 near vertical cuts 7/8″ long per dovetailed corner times eight I cut 288 times. That’s 252 inches or 21 linear feet and `i think that that makes my judgement a valid one. Anyway, the serious outcome was that all of my joints did fit but that I had to do what I absolutely try not to do and that is pare-cut the sides of pins or tails to seat the joints fully and precisely to their relevant shoulder lines.
In general, I always advocate using pencil lines for softer-grain woods like softwoods and other hardwoods with soft grain. There are dozens of these too, some softer than softwood pines, spruces and firs. Why do I say do this? It’s mostly to do with the compressibility of soft-grained, less dense woods. It’s something I have learned and adopted as a standard. You might find it different and argue differently too. This works for me.
As we videoed the first joint going together I decided we should keep the struggling parts in the video rather than the beginning and the end because, well, it is not always plain sailing and you need to know what it takes to overcome the obstacles. I ended up taking the partially seated joints apart half a dozen times before I was satisfied that the joint was good. Go back 150 years and I would have been sacked and another would have crossed the workshop door to replace me!
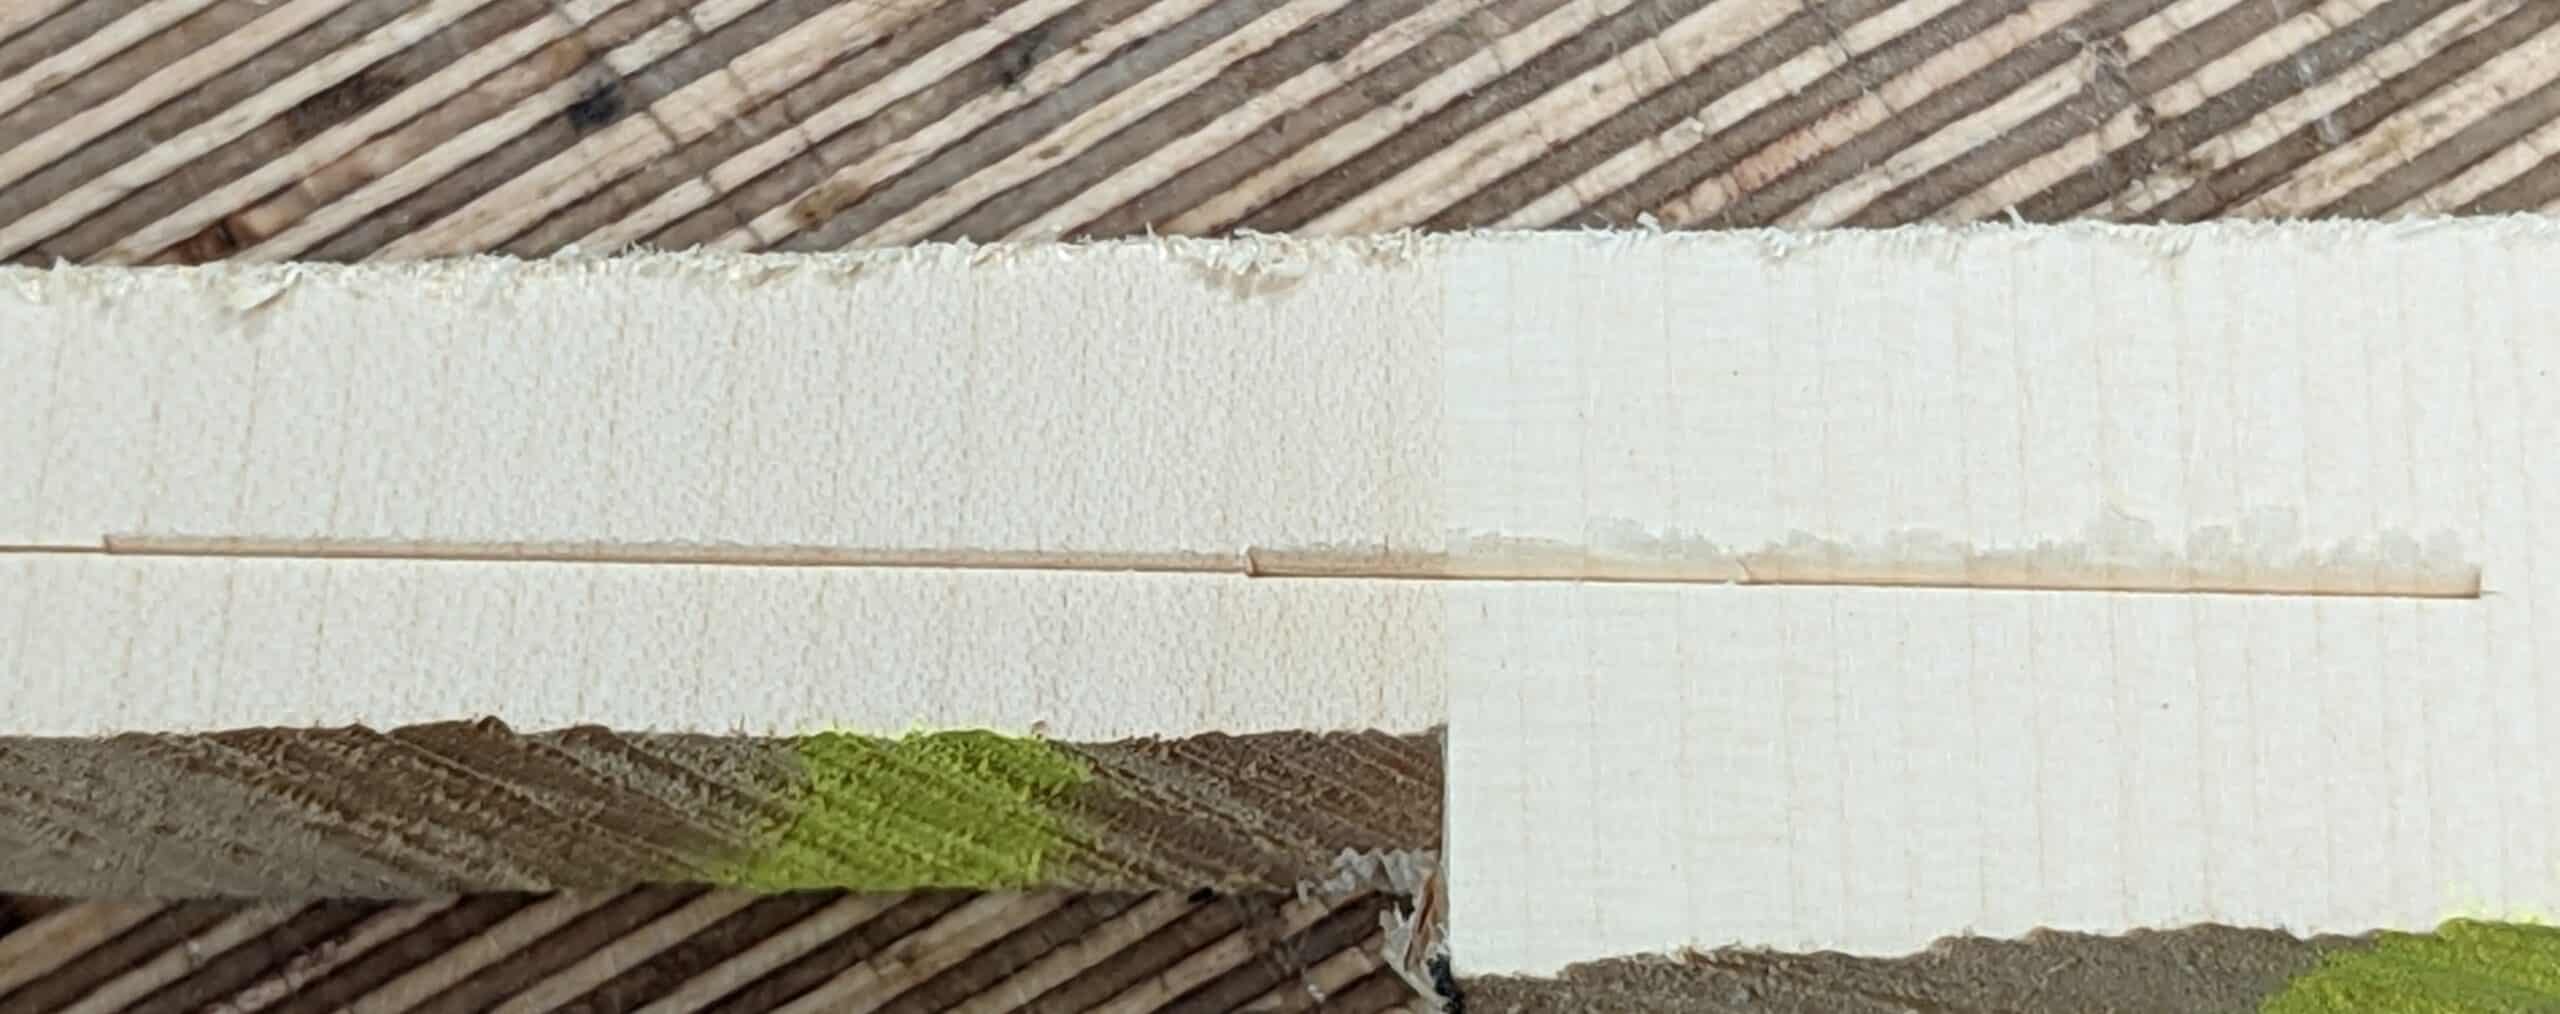
I cut two joints using the knife directly around the dovetails to establish the tail recess and the position of the pins. I sawed perfectly to these knife lines as usual and felt satisfied with the outcome. With the recesses done I set the adjacent tailpiece in place and started tapping the tails in. After an eight of an inch or so the joint was pretty well frozen even though all cuts were dead on. In oak, the joint would have seated just fine just as it would have done in several other woods, maple, ash, walnut, cherry and so on. Not that perhaps one tail recess to one side wouldn’t need a gentle nudge or pare cut, just that most of the joint would need no correction. In this case, every one of the dovetails or pins needed extra fitting.
I made my second set of dovetails the same way and then the third. They all needed the same fitting and by the third corner, I understood exactly what was happing. Sycamore has something I can only describe as ‘dryness‘. It seems to be absolutely resin-free. It seems too to be less compressible than say oak or ash, cherry and then the softwoods and soft woods. On my fourth corner, I resorted to using a pencil instead of the knife. I felt that this would give me a little more licence to vary my positioning of the saw and to rely on a more intuitive, freehand approach.
Es gibt nichts schöneres wie ein Stück Holz zu nehmen, es von allen Seiten zu bearbeiten mit all seinen Tücken und U regelmässigkeiten.Um seine ganze Schönheit aus ihm heraus zu holen.
Peter Pickel
Thanks Paul. I’m in the process of dovetailing a project out of Baltic Birch for my nephew similar in size to yours. Learning a lot in the process. Fun and frustrating at the same time. Getting quicker on each side of th box.
it seems that every “creater” as the YouTube age has come to refer to anybody with a channel and a hand tool, has the “expertise” to teach the right way or best way or dare i say only real way to do something. If I’ve read your info correctly, you always seem to establish the your experience has taught you well. Furthermore, readers should experience more for themselves. I agree with your approach and thank you for sharing, not preaching. I always take something from reading your take on things.
+1
One of the many things I enjoy about Paul is that he teaches multiple methods of accomplishing the same task. The method you choose depends on the situation, the type of wood, the grain in the area you’re working, etc. There is no “right” way, there are many ways, and our job is to determine which will work best in that moment. Thanks to Paul we have an arsenal of methods to choose from.
In a sense this is one of the advanced lessons I’ve wondered about. I have endless catching up to do and have not really touched wood for a few months.
Delightful. Thanks.
Brilliant observations, as usual, Paul, and I particularly liked your comments on so-called ‘chisel planes’. I have always thought they ranked high in the “World’s Most Useless” charts, and I don’t think – as you say – I’ve ever needed one or felt the need to own one.
I do have an old-but-good Record 311 that will, I know, convert to the best chisel plane I’ll never need!
Keep up the good work, my friend.
I enjoy split cutting tenons as well as the other techniques you’ve shown, but I’ve often wondered if, with discipline and good layout, one could produce tenons right off the saw that fit into their mortises rather than fiddling with router planes. Perhaps it depends upon the task, though, e.g., door frame vs. chair or table M&Ts?
Yes. Most of my tenons can come straight off the saw but that’s because I have likely cut more than most people living by hand. It’s important then to size the gauge to the chisel and not waver in the cut. I cannot expect that of new woodworkers or even those who have been making part-time at weekends for years so I cater to that.
Sounds like I have a new ambition, then! I’ll stay with the router, etc., for door frames, though. That method really does produce dead flat frames.
I’ve never liked gent’s saws, but you’ve convinced me to give it another go. There’s something about a standard tenon saw handle that helps me sense the angle of the plate that seems missing with the gent’s saw, but I didn’t give it much of a chance, if I’m honest. My tenon saw has almost zero set and no chatter in the cut, so it’s never seemed like I’m losing any precision, but I suppose the gent’s saw might feel more nimble? Do you put a more aggressive tooth (rake) on the gent’s saw for dovetailing?
You should give them a gents a go. I would encourage you to confine it to practice cuts on a stud offcut or shop boxes initially.
I love my gents saw. IMO, a standard or pistol grip is easier to put the saw to the task because of the feel the hand position gives. Gents requires a bit more hand to eye alignment at the start of a cut. But in the cut a gents saw allows you to rely more on your eye/brain steering (imperceptibly) rather than your hand/grip. I also think the ‘pointing’ grip helps judge dead across as alignment is more sensitive (but needs practice to recalibrate your hand)
Give it a go and good luck.
p.s. I’m with you on the router plane. It’s a fantastic tool but not for waste removal until all other avenues exhausted.
Is there some suggestion somewhere that the router plane is suitable and should be used for total waste removal?
“Is there some suggestion…router…total waste removal.” No, that that I have perceived. The instructions seem to clearly demonstrate rapid removal via chisel or saw, then tuning with the router or, rarely shown, bench plane and router. When I speak of slowness of the router, it is because it takes off such a small amount per pass and, when combined with any sense of playing it safe, one can leave too much work for the router when hogging off with chisel or saw.
I bought one of those chisel planes some years ago, I’m not sure what possessed me to purchase it. Now it sits in my tool chest mocking me. I should put it on eBay and maybe find someone who can actually find a use for it.
I made the mistake once with a set of chisels with the oil hardened steel. I have trouble every time I sharpen them, I just can’t seem to get the wire edge to form. I was reading about the different steels and a guy called “The Wood Whisperer” recommended the hardest steel you can get. His reasoning was “it takes him all day to sharpen” so he would just assume do it less often.
There is a lot of misinformation out there.
I can sharpen my “soft steel” in minutes and get right back to work.
Yet no one has ever called me a wood whisperer……
Oil hardened (O1) is what I use. That’s not the problem, I would wager. I made the mistake of buying some A2 chisels long ago. Not only do they take longer to sharpen, but A2 being harder means that it is also more brittle. Thus, I find I need a steeper bevel to avoid edge fracture in A2 vs. in O`1. A steeper bevel means more creeping across my knife line, more mallet force. I just don’t see the upside _except,_ for a few moments right after sharpening, one might have bit finer edge, but that is short lived unless working in softer, non-abrasive wood. It takes such a short time to sharpen (once you’ve practiced), that avoiding sharpening doesn’t motivate me much. I am very disappointed that Lee Valley is abandoning O1 blades in so many of their tools.
My thoughts exactly, well said. I get tired of seeing people go on an on about hardness. I love my Aldi chisels and they do my finest work. The Lie Nielsen’s I have Lie there gathering dust. Not to mention the hard hornbeam handle drops off just about every time I go to use it.
I make use of two “broken” rabbet planes. I prefer to think of them as adapted to the particular joinery tasks of my projects. I repair timber frames of barns and houses. The joints are usually too large to saw into final shape. A long rip of an 8″ wide tenon or a scarf in green timber is too difficult to keep true. Push or pull, a saw is prone to following the grain.
The best tool for refining a particular joint or grain condition could be a slick, my grandfather’s paring chisel, or a variety of planes.
One of the rabbet planes, not a coveted brand, was brazed back together with a gentle bend. It is well suited to cutting cross grain against the shoulder of a tenon. The other is broken off, which allows planing parallel to grain up to a shoulder.
I never run into uses for a chisel plan. I don’t have the decades of experience of someone like Paul. For me it’s more like seven or so years of hobby work nights and weekends. Still, I just don’t run into situations where I think: if I just had a chisel plane. . . Of course, there are always super rare exceptions. On perhaps two or three occasions I recall taking the top off of my bullnose plane and using it as a chisel plane. One of those was getting into an awkward corner on a set of built-in bookshelves after final installation. Stanley did make the no. 97 back in day. Seems these were used for tasks similar to the one I just described- piano or cabinet makers used them to clean up inside work on constructed pieces where there was not enough room to conveniently get at a spot with a regular chisel. This sort of explains these planes I think. They are just a device for holding a chisel at a stable 20 degrees in situations where you are up inside some cabinet and in an awkward position and can’t just do the normal and use a regular chisel with both hands.
I always like when you show us how to trouble shoot problems.
Oh lord that is the perfect description for sycamore.
Some of the pine I’ve got is rich with sap and smells like syrup when I’m cutting it, some is hard and knotty and absolutely refuses to cooperate, and some of it is so dry it seems fluffy and more brittle than it actually ends up being.
Walnut has a nice buttery feel, not sticky, but moist and rich.
Only maple I’ve worked is rock maple and it’s lovely, and if I do what it wants it isn’t so bad… otherwise it makes me work for every centimeter of kerf and any flat surfaces, yet it cooperates wonderfully when smoothing curves.
I’ve grabbed a few fallen sycamore chunks from around the neighborhood, it is a beautiful wood when cleaned up and scraped smooth, especially when it soaks up some “wood butter” (mineral oil+beeswax like you use) but I’ve never had to sweep shavings or dust off my pants after doing something with sycamore, it just falls off, no sticky, dry!