Running Your Bandsaw
Most of the time, once you’ve installed a new bandsaw blade and set it up correctly on the wheels, the bandsaw will just keep running trouble-free with little or no adjustment until the blade wears to dullness and needs replacing again. Unless something happens, it will generally keep running smoothly but the occasional need for a tweak will arise and you, the machine operator, should be sensitive to hear and see the need for a small change by adjustment of tracking or tension. The more you use a bandsaw the more you recognise changes in sound that affect the machine’s performance and thereby the quality of the cut. For most bandsaw work, the tension on the blade, that stretch between the top and bottom wheel, is the one most likely to throw you off. Too much tension puts much strain on all things and over-tightening can cause the blade to take the path of least resistance. If the top wheel tilts even slightly too far back or forward at the top, the blade will move off-centre towards one edge of the wheel or another. Whereas we do want a strong tension, too much puts undue pressure on the wheels and the bearings that allow its fast revolving and then too the blade itself which will usually snap at the often weaker point of the weld. When this happens there is an almighty bang as the top spring-tensioned wheel shoots up and bangs somewhere against the steel housing enclosure.
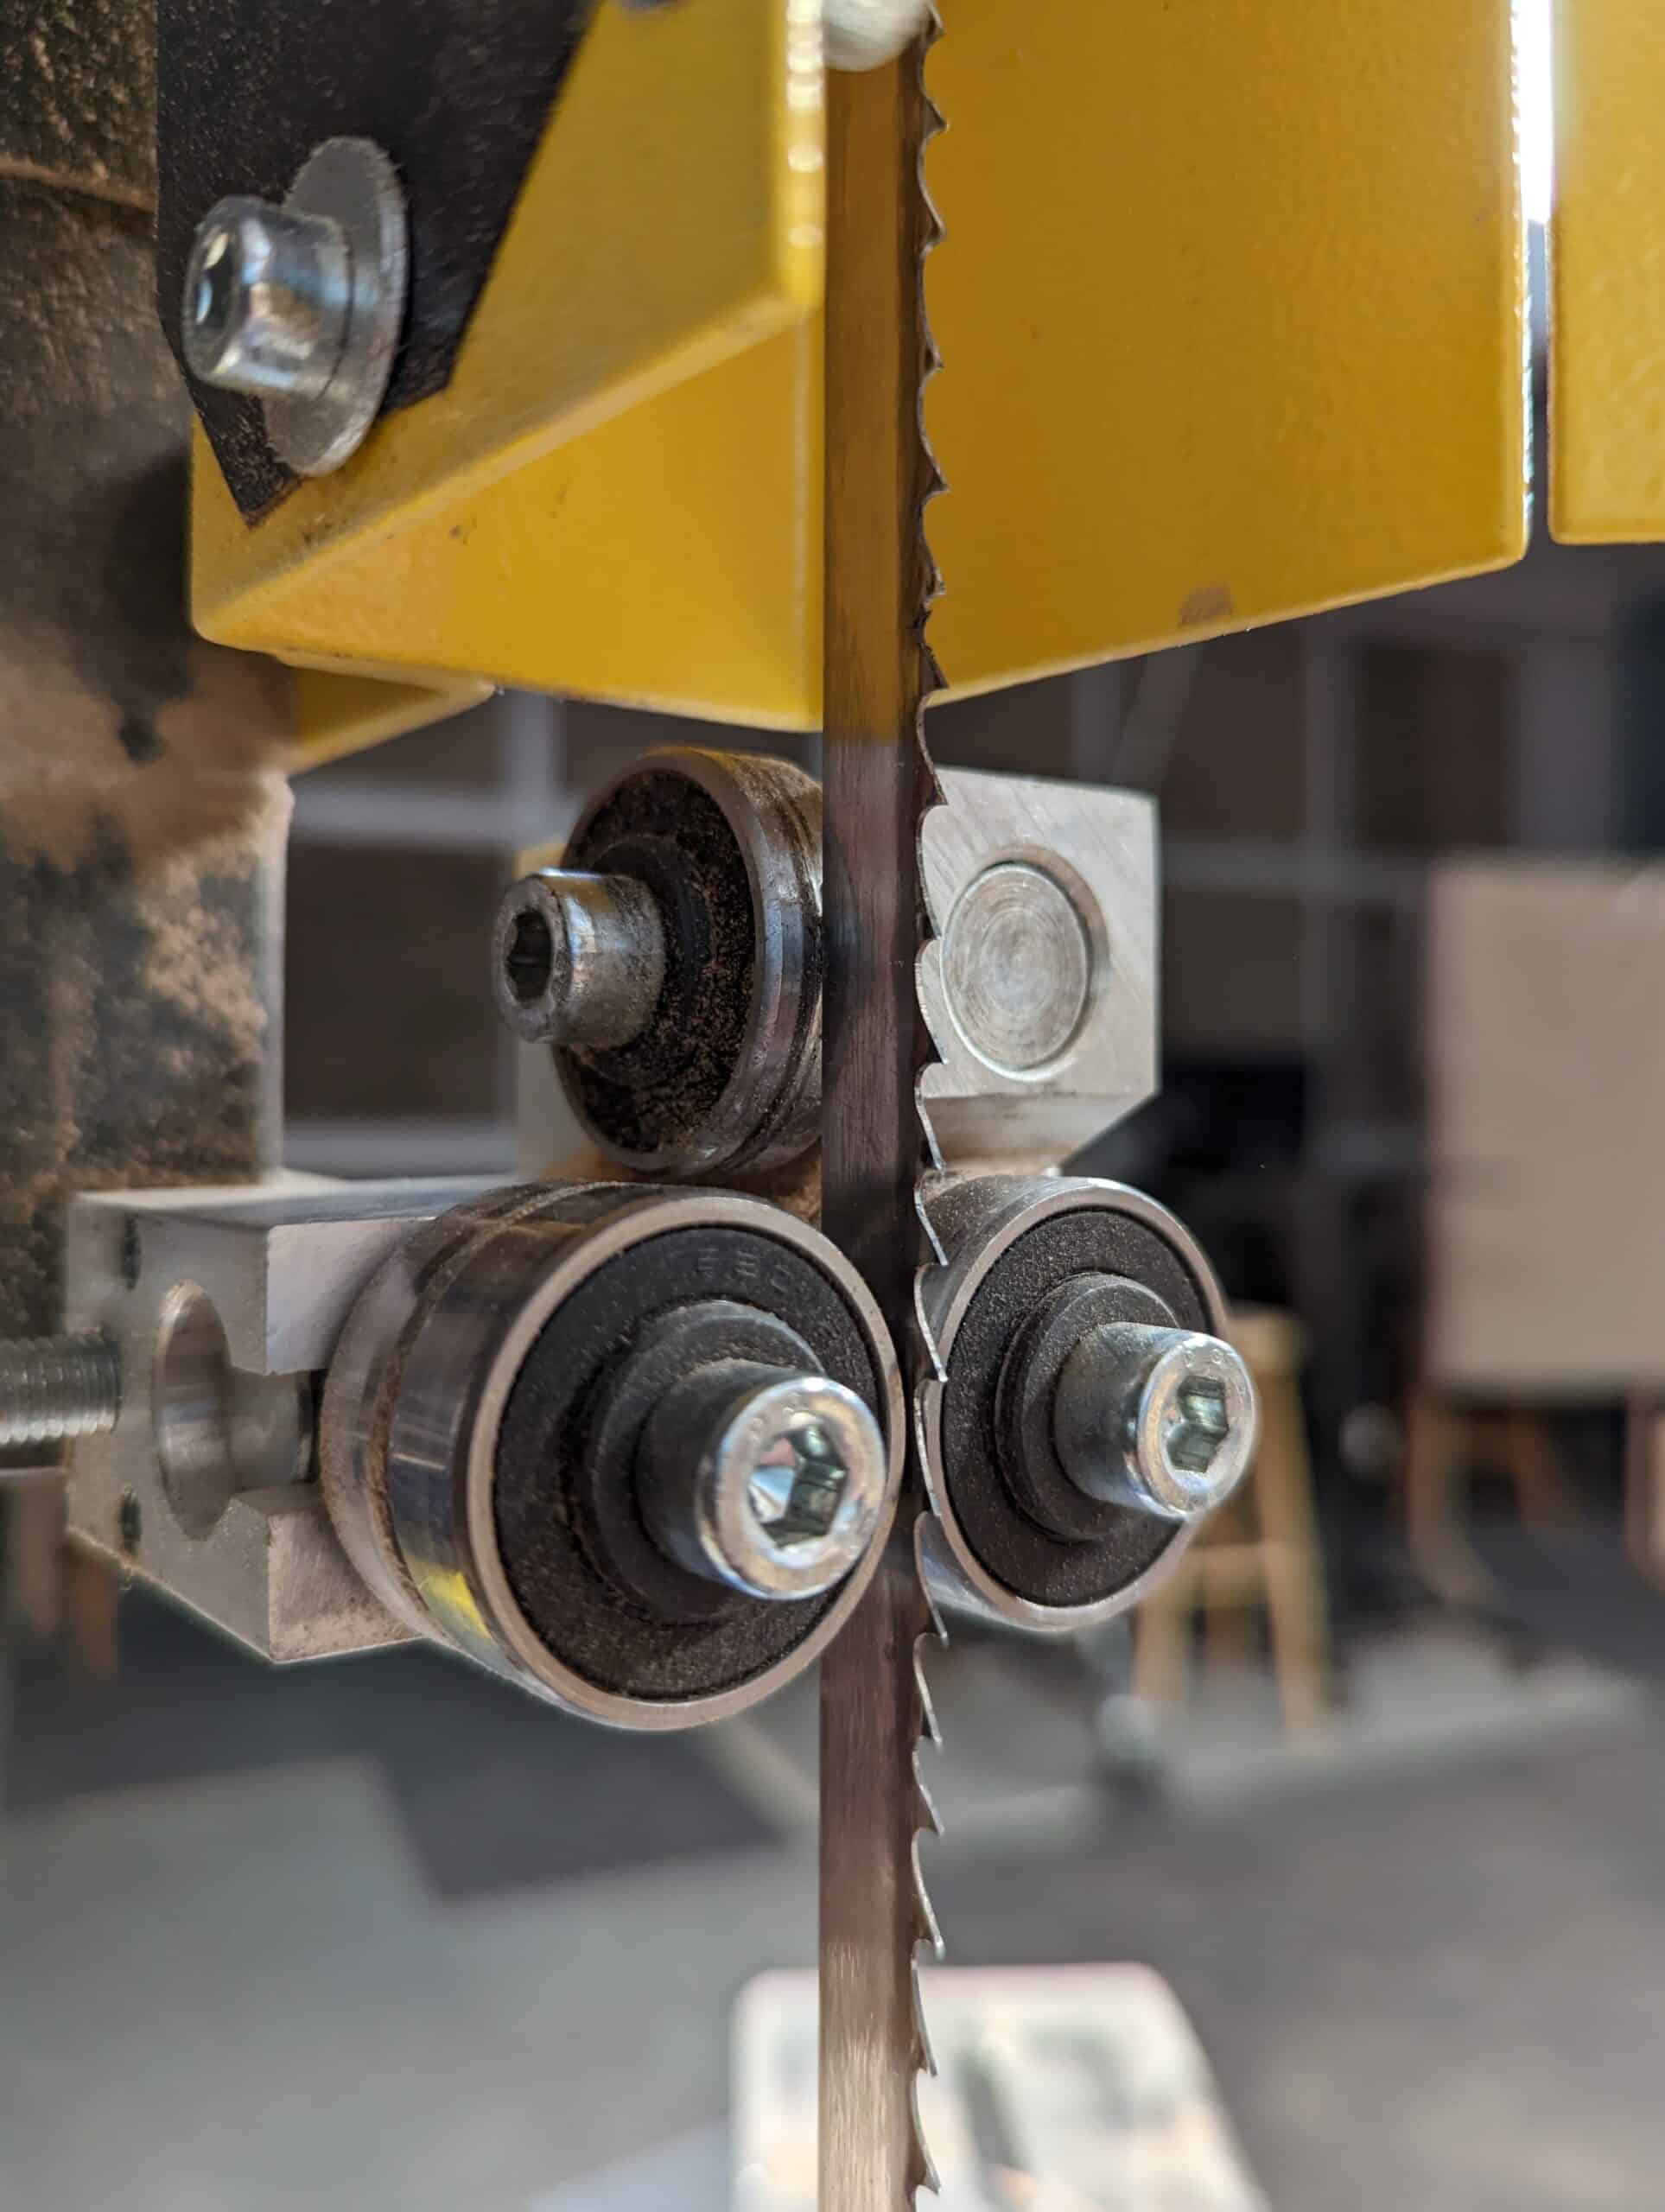
Go back 50 and more years and roller bearing guides on domestic bandsaws didn’t exist though they did have them as industrial guides for commercial milling bandsaws. Most domestic bandsaws were under 18″ and your machine came with 1/2″ square steel blocks for guides that sat barely touching either side of the blade and aligned just behind the kerf of the blade teeth. To stop the blade from deflecting under beam press, that’s front to back, and so keep the blade perpendicular under thrusting pressure, a further 1/2″ square block sat directly centres against the back edge of the blade so that the blade always presented perpendicularly to the wood. Below the table was an identical set-up. Aligning both sets top and bottom guaranteed square cuts. The downside of the square blocks in contact with the blade at any point for prolonged cutting is of course that the blocks are fixed and not moving, so with any friction, we also get a build-up of heat. Heat to the blade makes it longer and this can affect the tension by making it slacker on the two wheels. Because of this, we generally allow a breather-gap a paper thick between the guide blocks and the blade for safety as well as the tension issue.
Any flex in the beam front to back results in the blade bending to one side at the leading edge where the teeth are. When this happens, even for the smallest amount, the blade will usually creep more and more into a barrel cambering and such gain will ultimately increase in pressure to even bind the wheels and stop the bandsaw altogether. The cut itself will result in a cambered cut to one side of the cut on one piece and a convex shape on the adjacent piece. On my first two bandsaws in the USA in the mid-1980s, a 14″ American-made Delta and an 18″ Taiwanese-made Grizzly, the blocks lasted a long time and because they could be rotated to a new corner as needed and then too flipped end for end; thus they lasted through the 20 or so years that I owned them before selling them on for near what I paid for them. The steel blocks were just mild steel so refining them square-ended to remove worn areas or remaking new ones cost little time and only pennies to replace. The beam flex of a blade is somewhat constrained by both the block guides and the roller bearings depending on which are fitted to the machine. The greatest control against beam flex though is the alignment of the blade to the two wheels and the tension of the blade. The guide blocks only help, they are not the key components or the answer by any means.
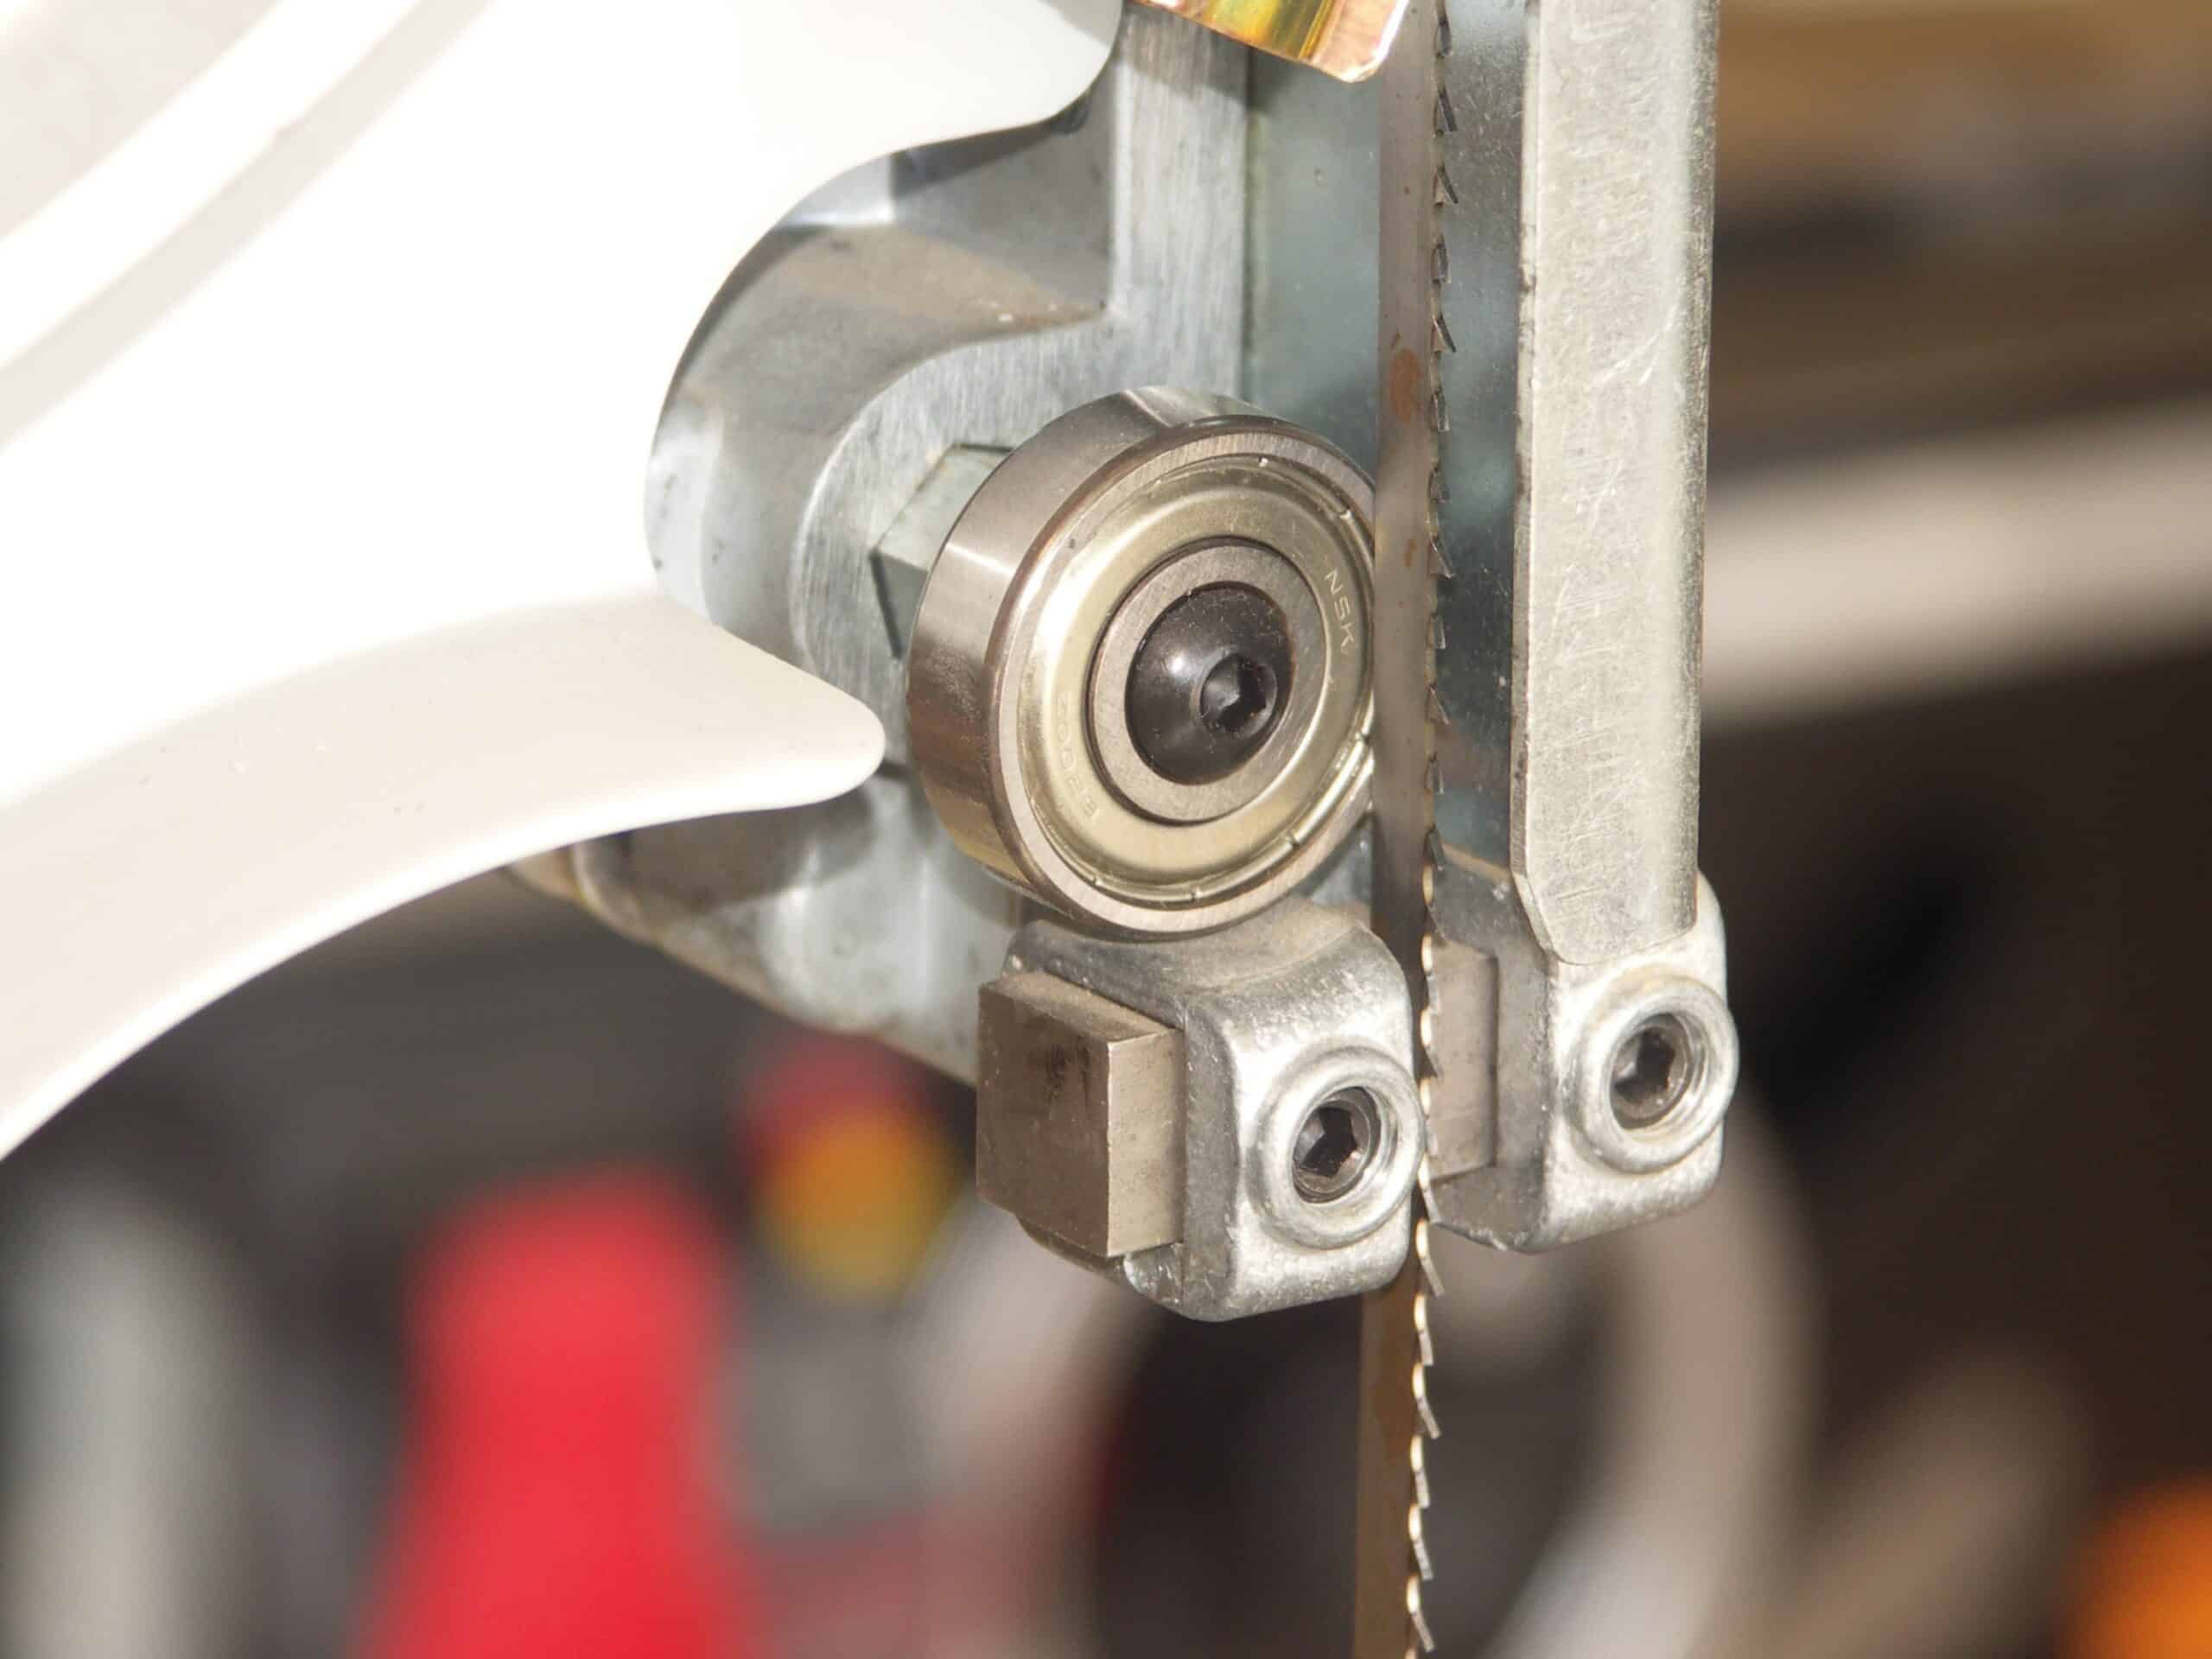

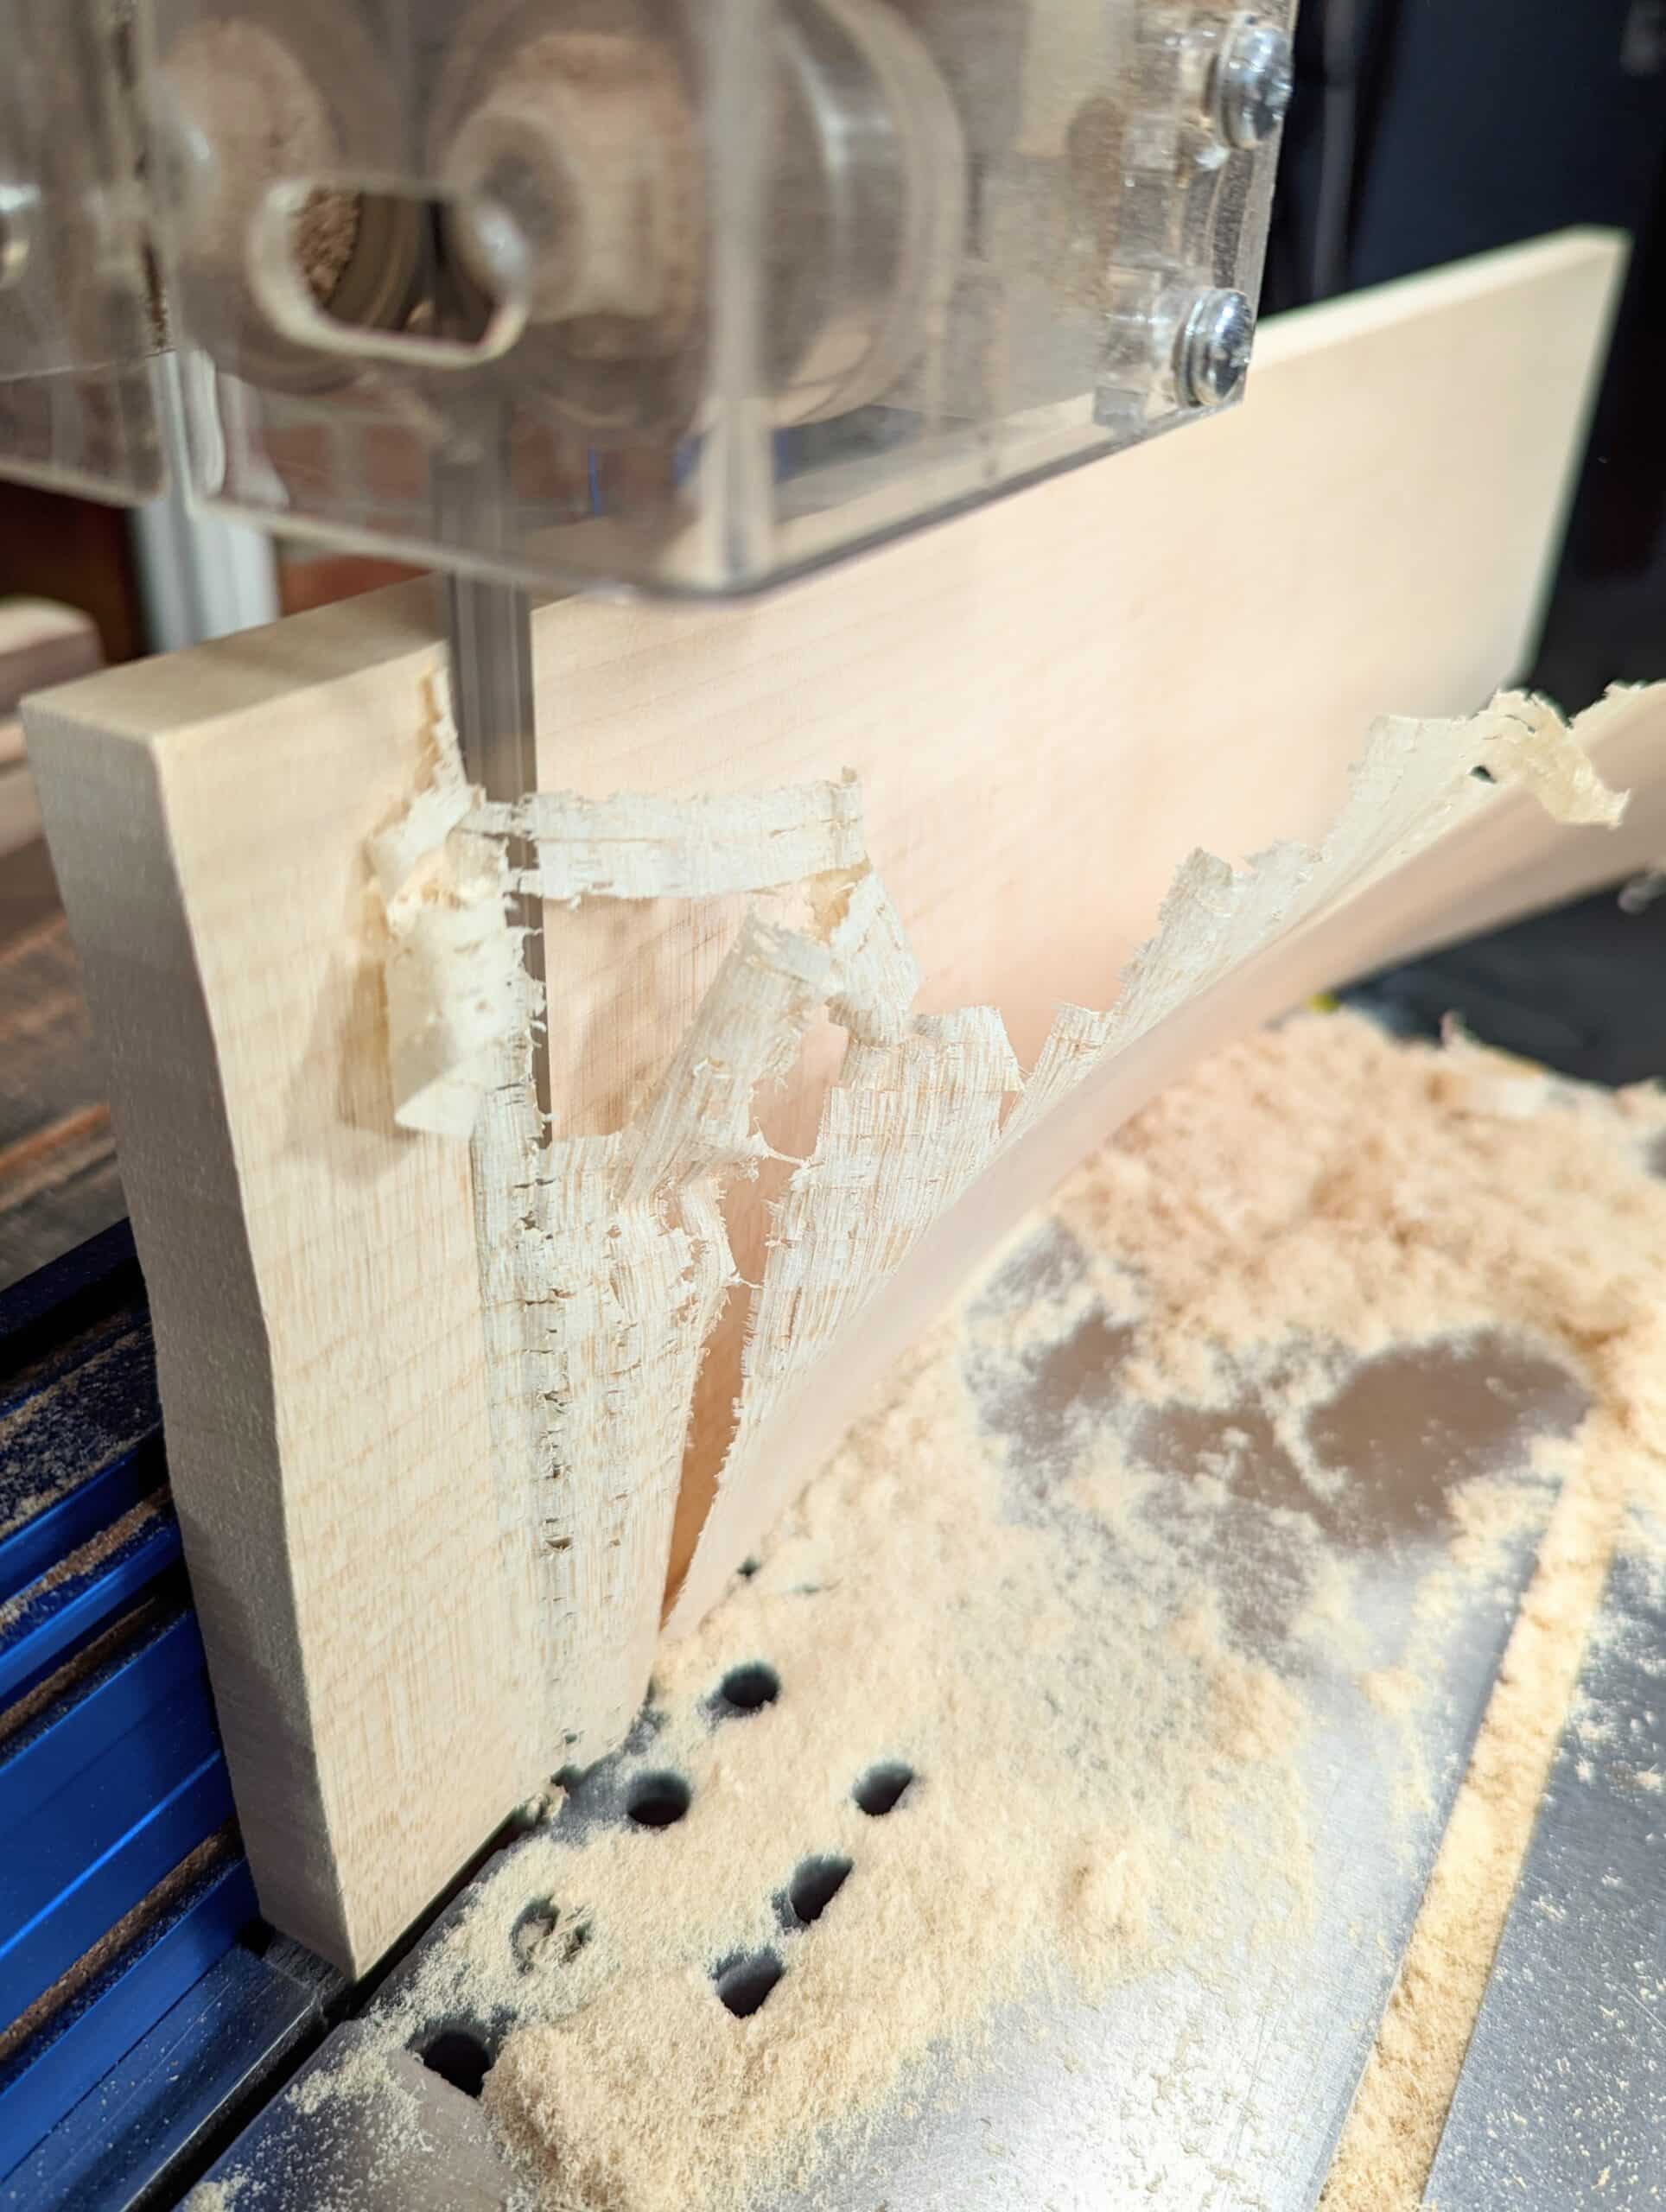
Creating some book-matched panels for my doors, seeing the smoothness of the cuts and the accuracy in the thickness of my finished board at dead on 17/32 (13.5mm), I was suddenly aware that not everyone enjoyed such results from their bandsaw. It made me think about encouraging others in their bandsaw working. The width of my boards were 8″ (20cm) across. I first hand planed true the initial registration faces of eight panels ready for glue-up. In using my bandsaw mostly for work such as this, resawing larger stock sizes for project components through five decades or so, I take my working knowledge of bandsaws for granted. In the midst of several longish long-grain cuts through various wood types this week, oak, beech, sycamore, walnut and then too some hard mesquite, I subconsciously fine-tuned the bandsaw mid-cut without hesitation and the adjustment was instant. It also struck me that there are in general only two key aspects to obtaining optimal performance from your bandsaw and no, it’s not much at all to do with the side cylindrical roller bearings or the square blocks I spoke of and neither is it the rear thrust bearings bumping up against the back of the blade top and bottom. The two important elements are blade alignment on the wheels and the tension applied to the blade. You can adjust these two at a macro level and then fine-tune them in the zone and even mid-cut as and if needed. Get these right and the guides will have very little or even nothing to do.
On the more common, two-wheeled bandsaw (three-wheelers are rare) the top and bottom wheels must be as coplanar as possible. The bottom wheel is the actual drive wheel driven by the electric motor. The top wheel is then driven by the bandsaw blade itself connecting the two wheels as a sort of steel driver belt. Aligning one wheel to the other is simplified if the bottom wheel is correctly aligned as then you need only line the top one to the bottom. Unfortunately, this can only really be done when the correct amount of pressure is applied to the wheels when the wheel adjustment is applied to the top wheel. And how much pressure is the right pressure? In the beginning, this is mostly guesswork as there is almost no way to convey the felt pressure to another user without the other user being there to feel what you set. I will try to help with that shortly.
On rare occasions, altering the fixed bottom wheel to tilt the bottom wheel into near alignment is a rare thing. Tilting it vertically forward or backwards at the top of the wheel in turn moves the bottom of the wheel in the opposite direction. This is usually quite a time-consuming adjustment to do but thankfully the set-up at the factory in this day and age is mostly done well at the factory of manufacture before it goes out. I have only adjusted one bandsaw this way and the only reason to do it is if the installation of a bandsaw blade resulted in the position of the blade being too far forwards or backwards on both the top and bottom wheels to where the blade is near to or even riding on the rim of one wheel and on the opposite side of the other wheel. This should be the rarity and hopefully, you don’t have this problem.
Each time you install the blade in a bandsaw the blade tension is relaxed and will need resetting. Reinstalling a new blade generally does not mean that you can simply use the same setting as before. Most modern bandsaws come with a quick-release lever that takes off or applies tension with the single sweep of a cammed mechanism via a lever arm somewhere on the back of or beneath the top bandsaw wheel.
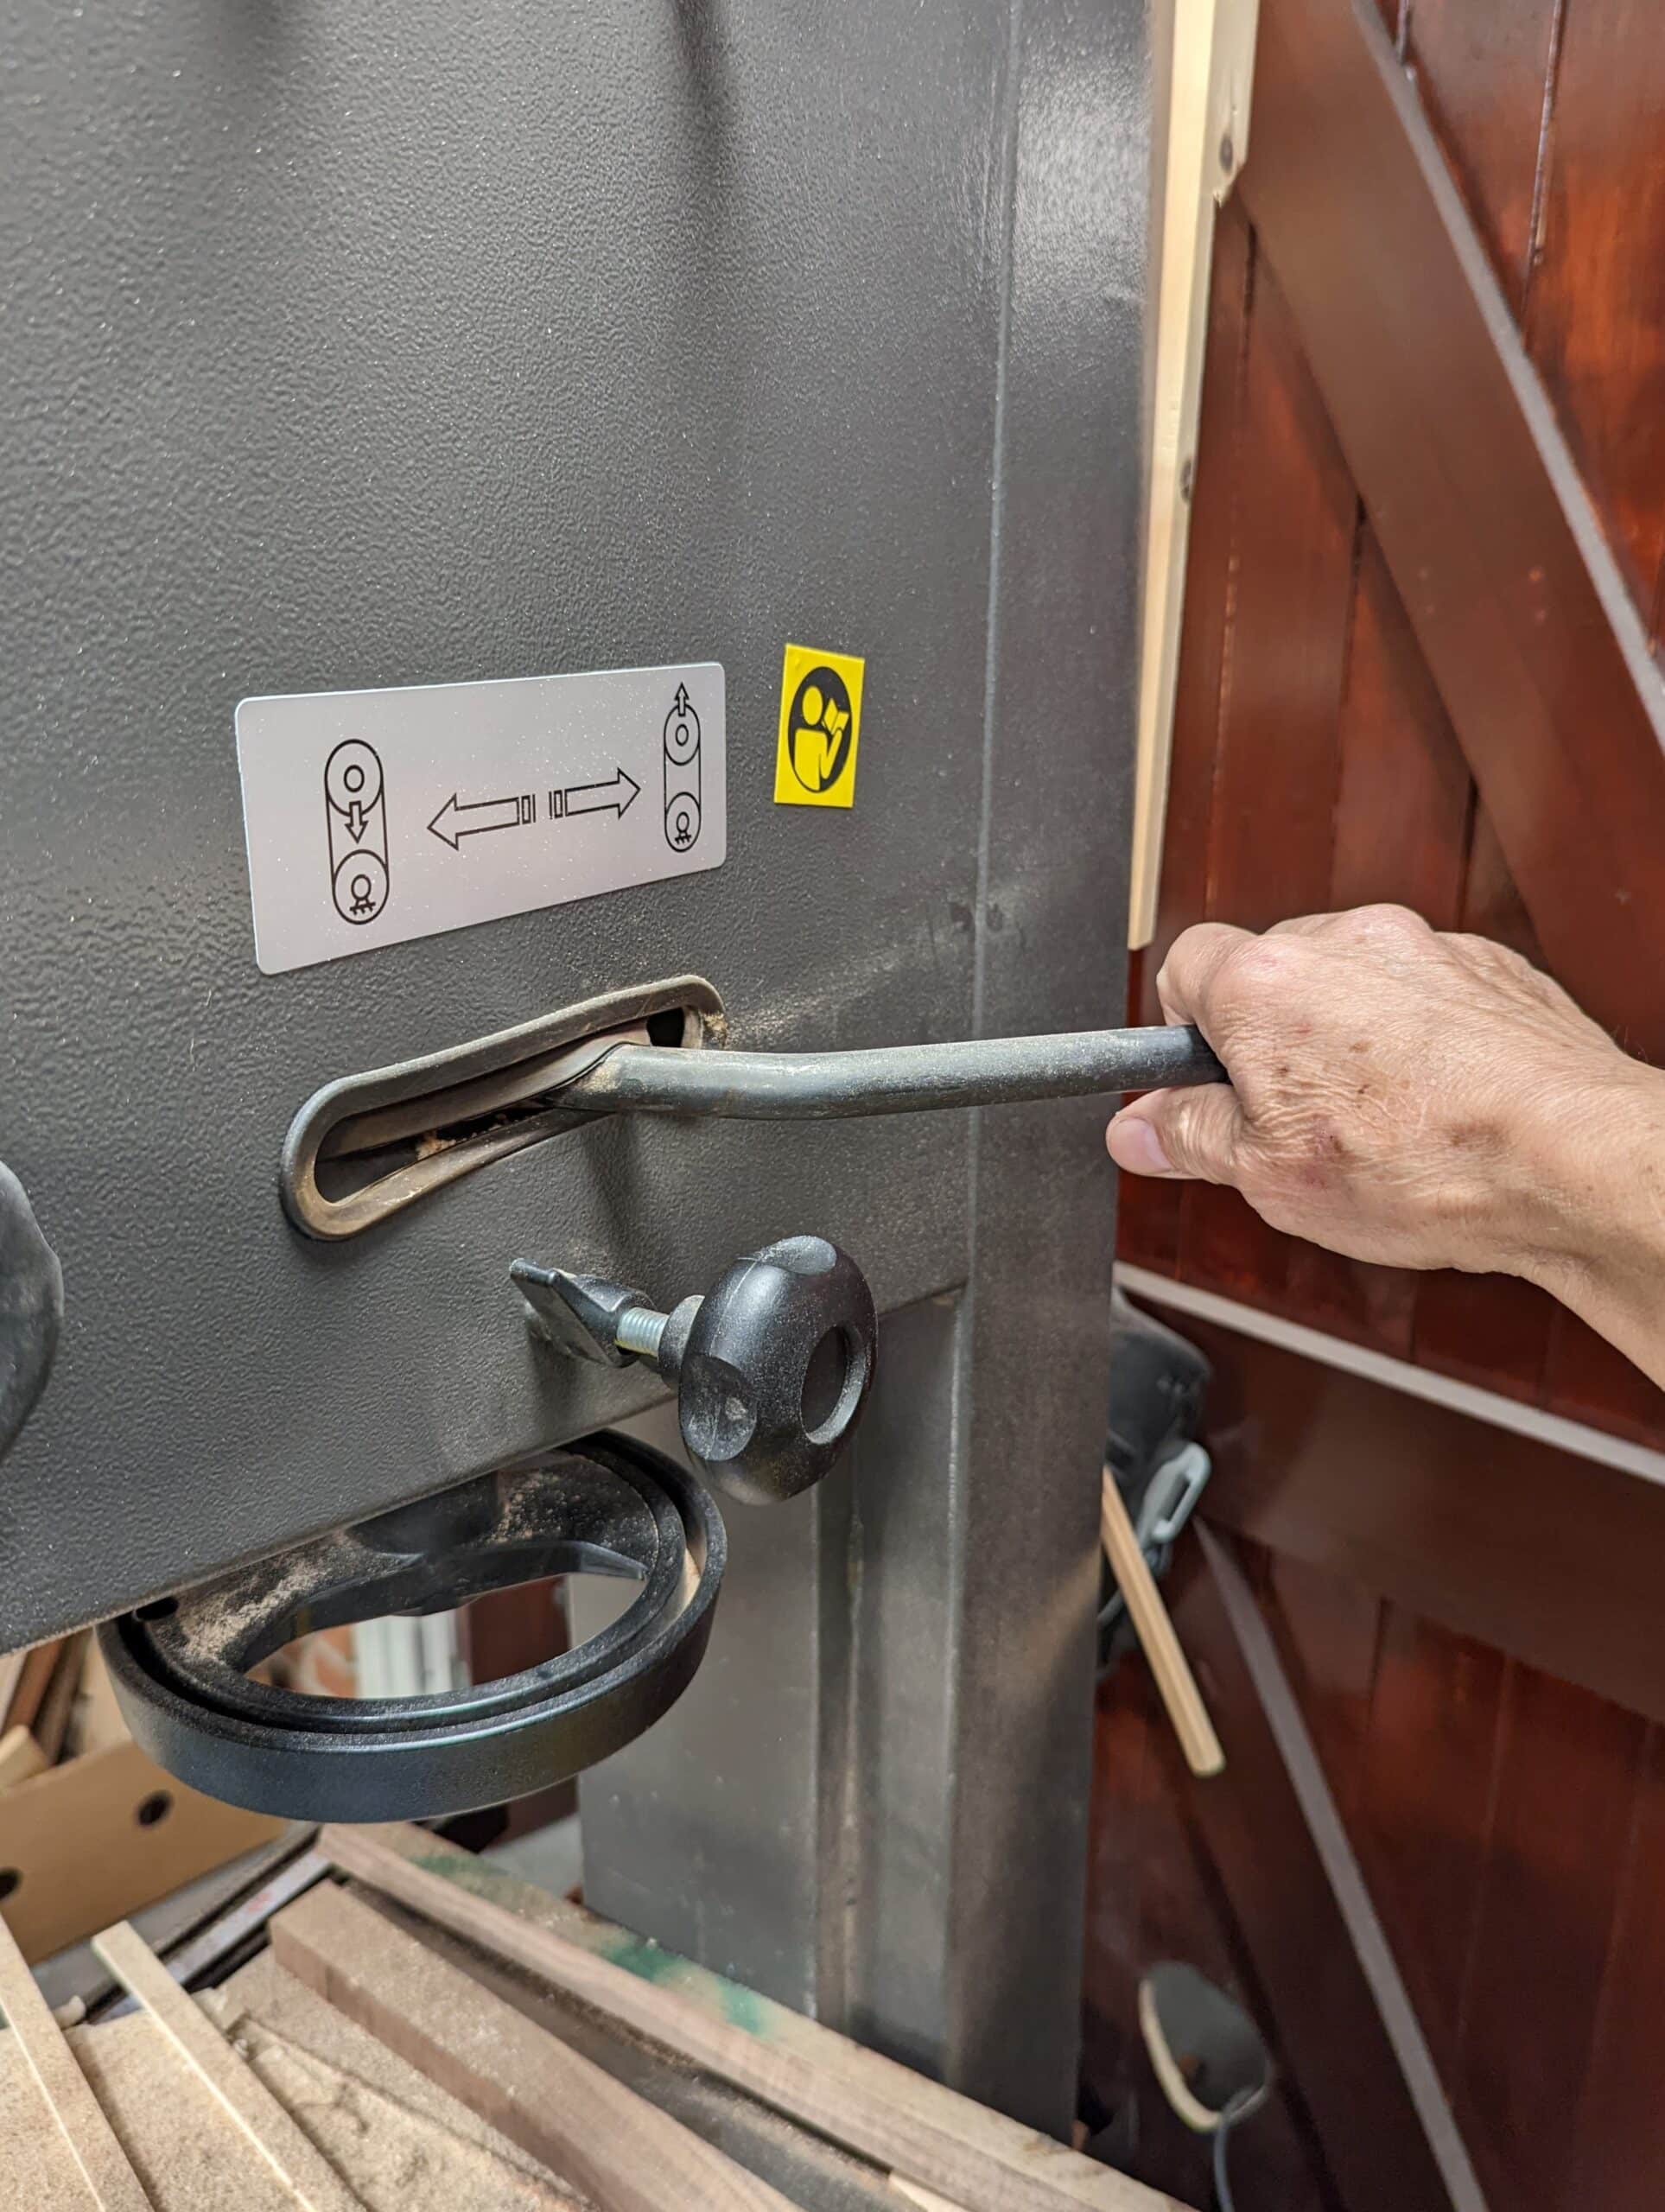
If it doesn’t have one of these, say on an older or less sophisticated machine, then there is a simple wheel somewhere that can be turned to apply tension to the blade. Though quick and effective, the lever generally does not reset the tension at all accurately. Various things affect the tension not the least of which is any difference in the length of the blade, the width of the blade and so on when manufactured to custom-fit your machine. With the best will, any maker can add or subtract a millimetre.
With the new blade installed, and most of the tension applied, rotate the top wheel by hand to establish the blade to its natural tracking position on both wheels by these initial rotations. In most cases, the blade should find its tracking on the same path as previous blades installed unless you have changed the width of the blade itself or if it is a different length. I rarely ever need to adjust the tracking of a newly installed blade simply because I don’t generally change the blade width. A half-inch beam width is good for a variety of tasks including all of my resawing. The weld holds well on this size whereas narrower blades have a higher tendency to break.
It’s now that we apply the right tension. The tighter the tensioning between the two wheels the less allowance there is for any lateral deflection side to side or beam-bend front to back in the blade between the top and bottom bearings. That said and as I mentioned earlier, it is not a question of applying as much pressure as possible as this will cause additional problems. On bandsaws, as with no other machine, it is critical to find the balance between tension and blade alignment in accord with the alignment of both the top and bottom wheels. It sounds complicated but with sensitive listening and continuous searching for perfect cutting, you will own the skills of setting up and listening to your bandsaw.


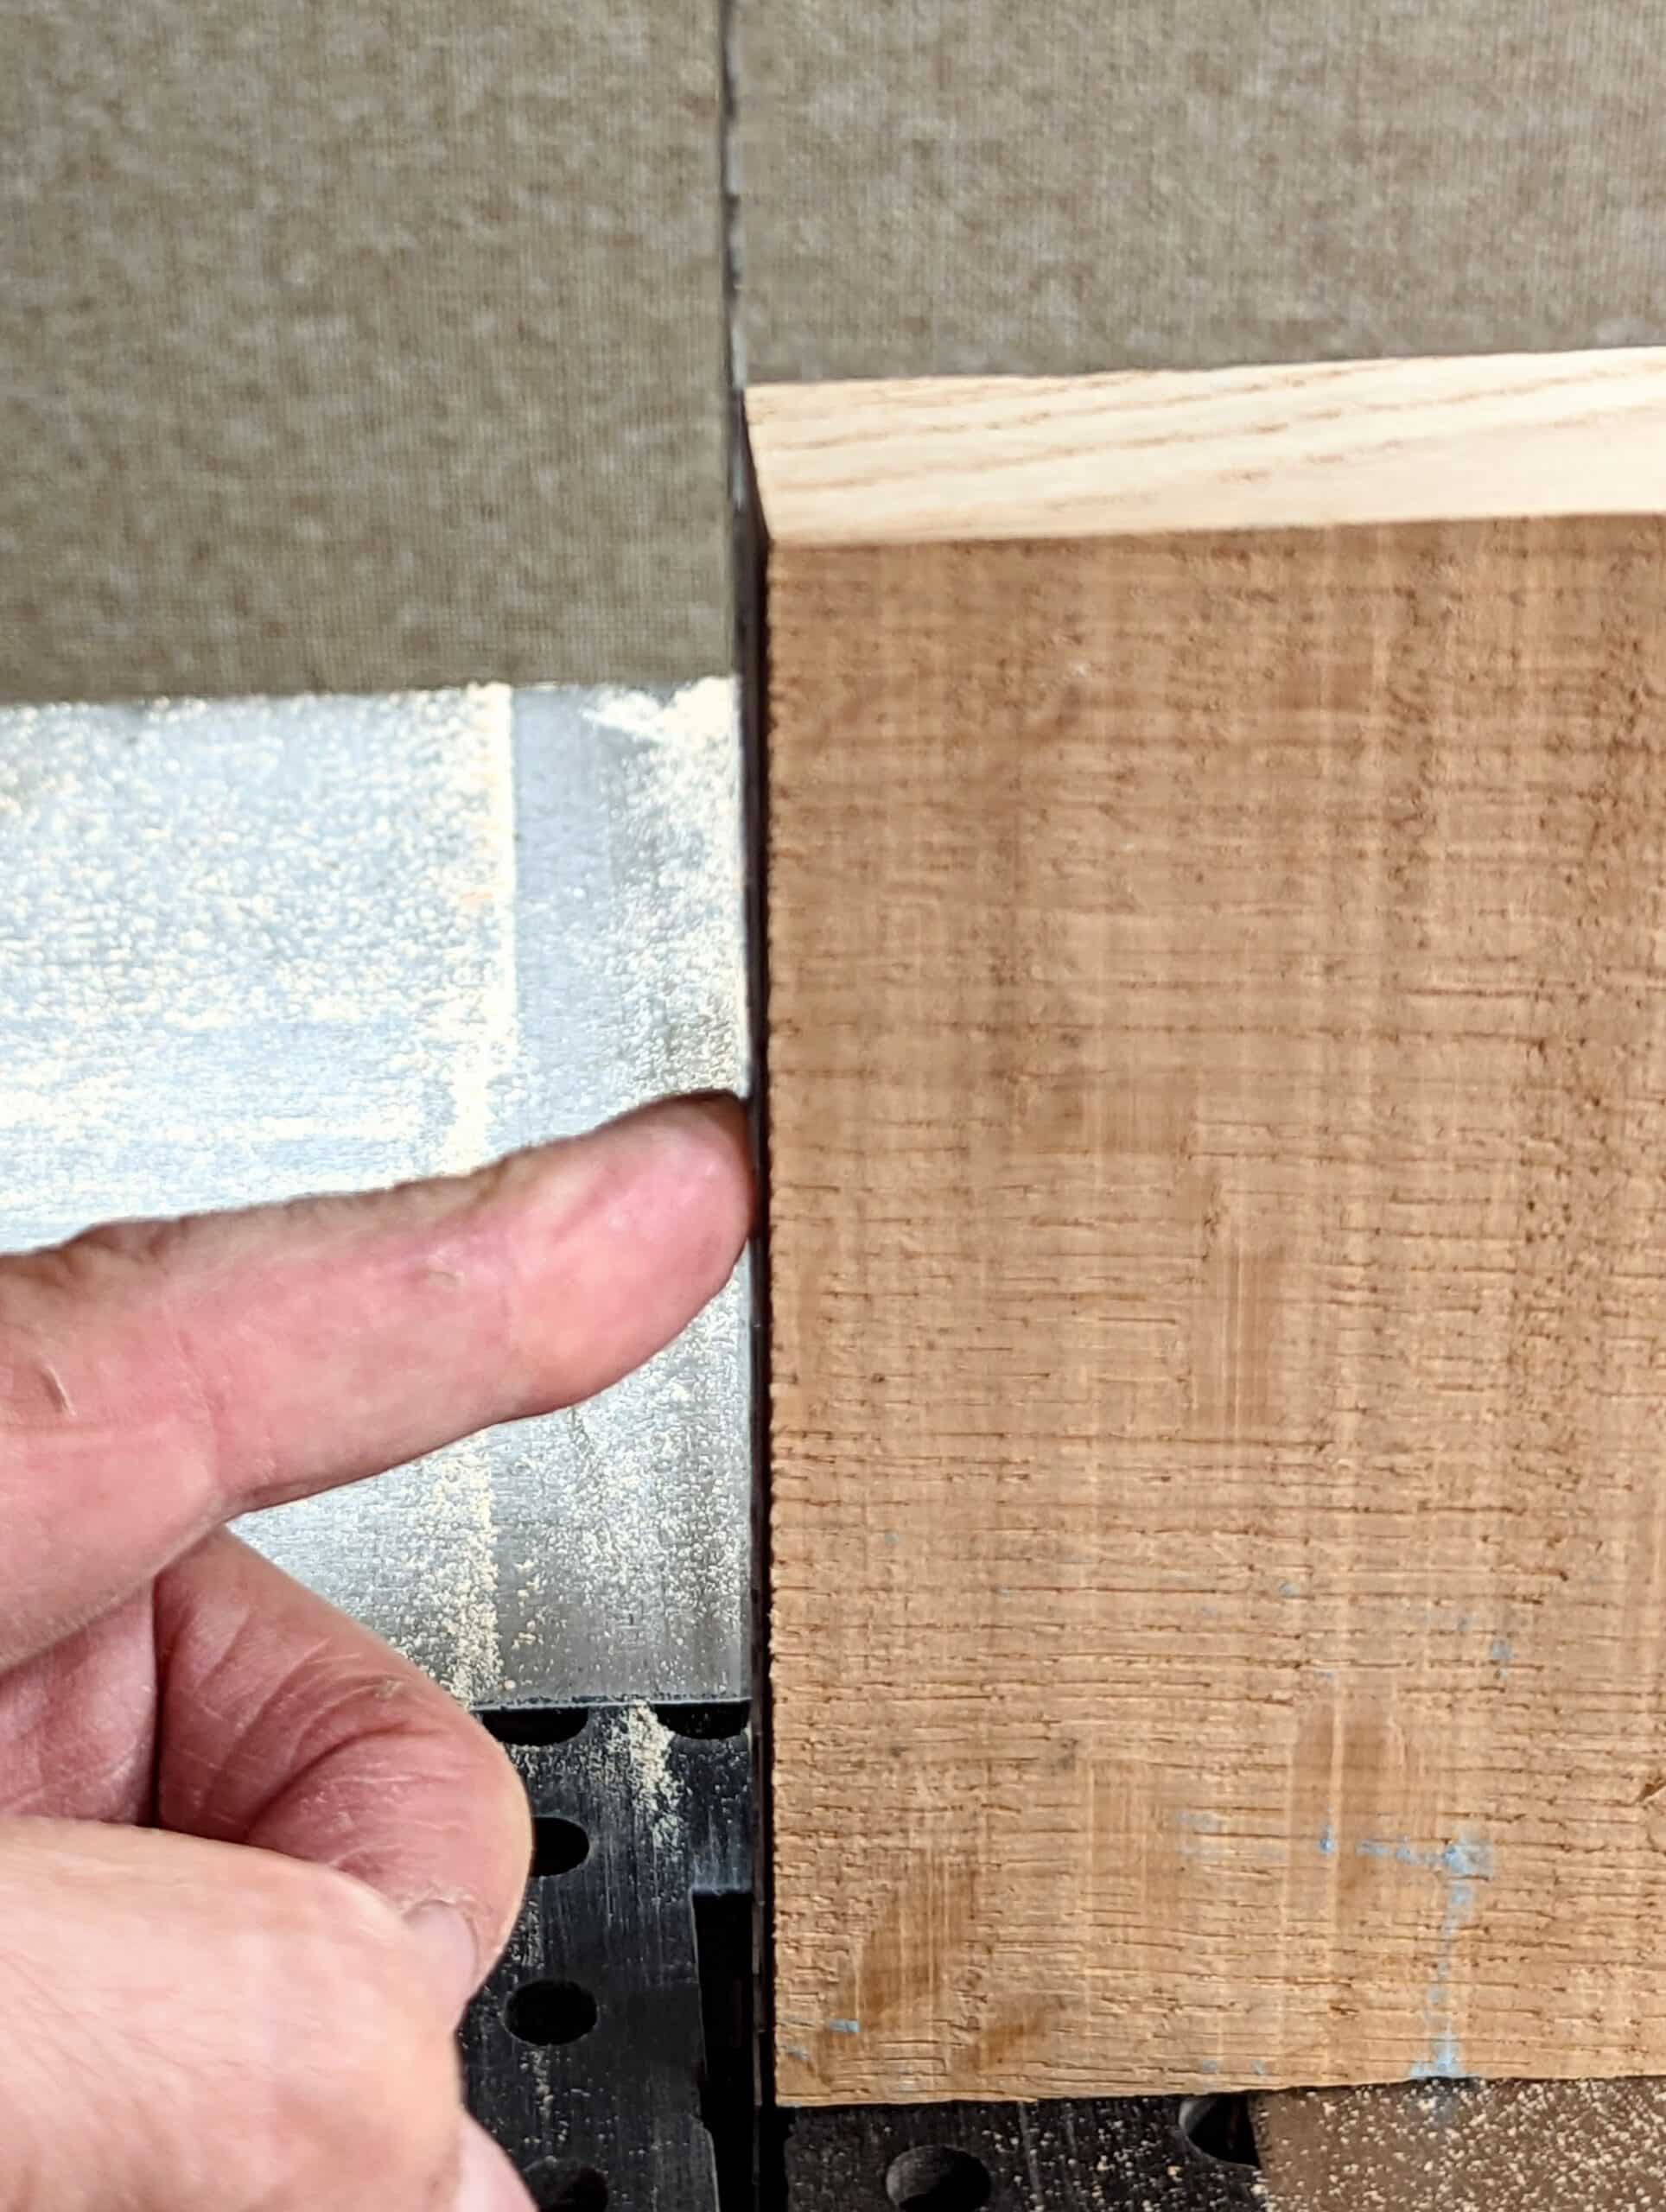

I recommend a heightened distance between the top bearings and the table of about 6-8″. Now stand a square or a block of wood directly against the blade and push on the blade midway between the top and bottom bearing with firm pressure as shown. With the blade tight there will be a little flex. Release the blade and let it spring back. The gap should be no more than say an eighth of an inch from the square or the block of wood.
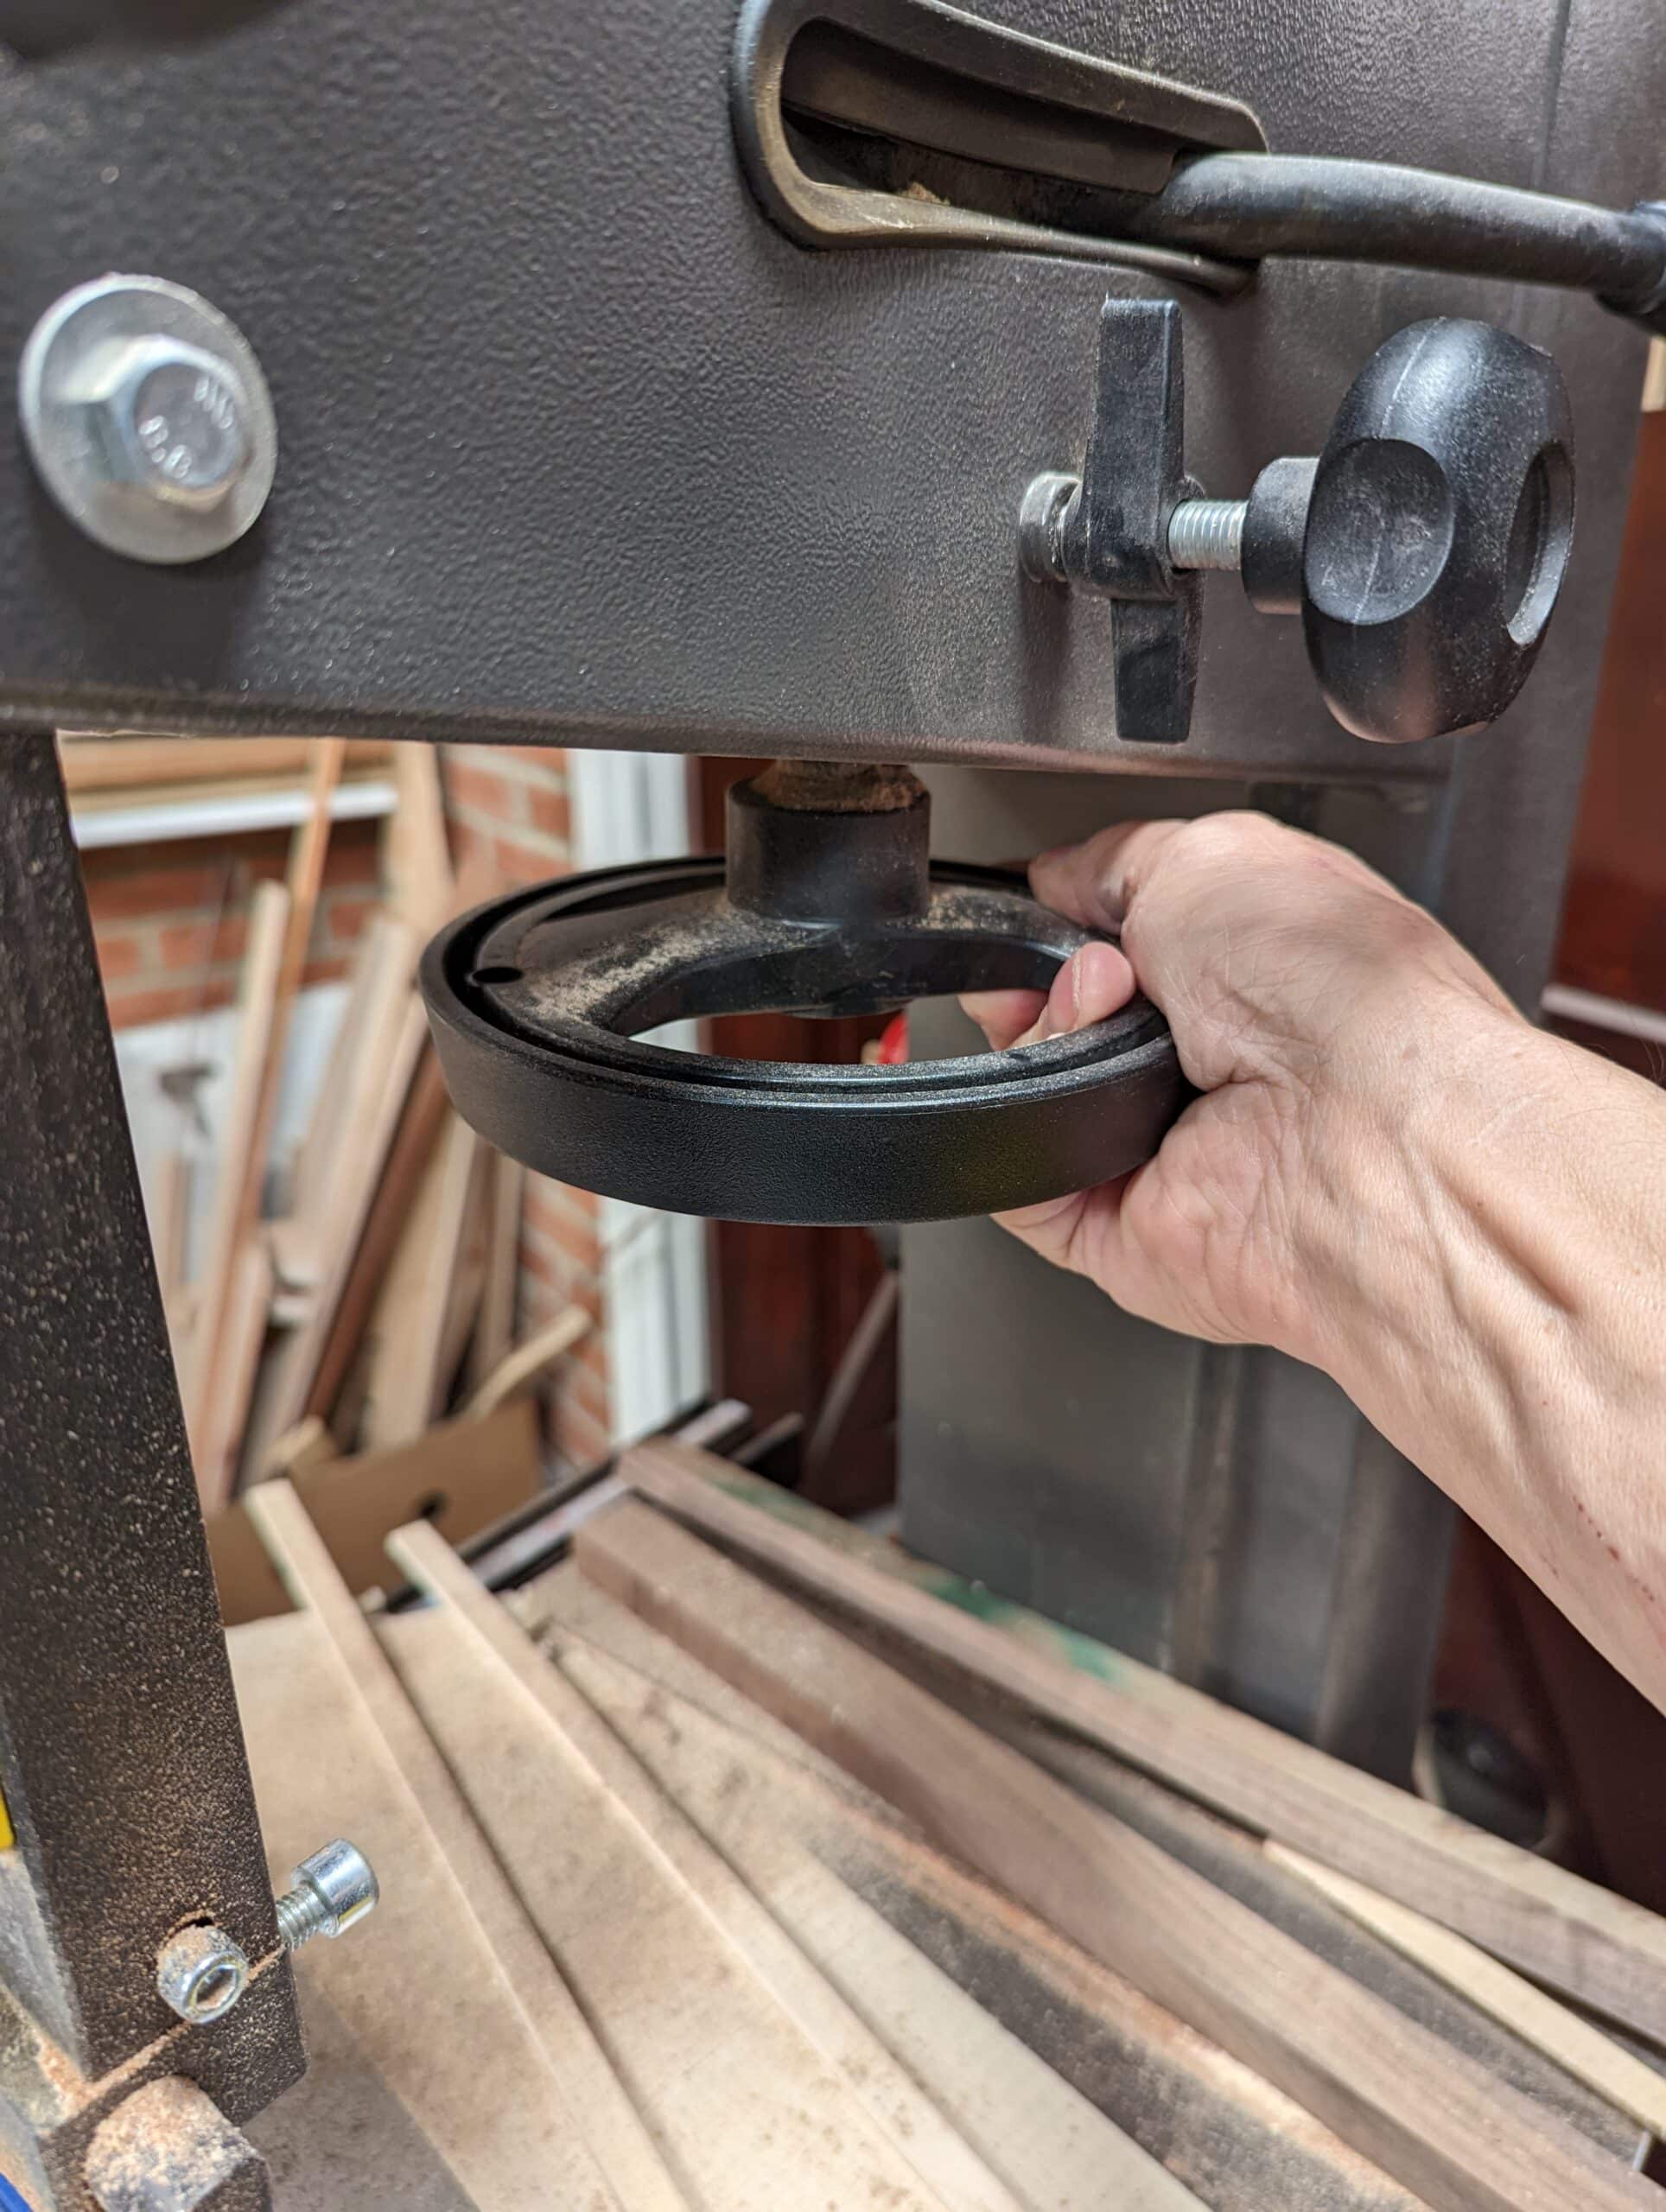
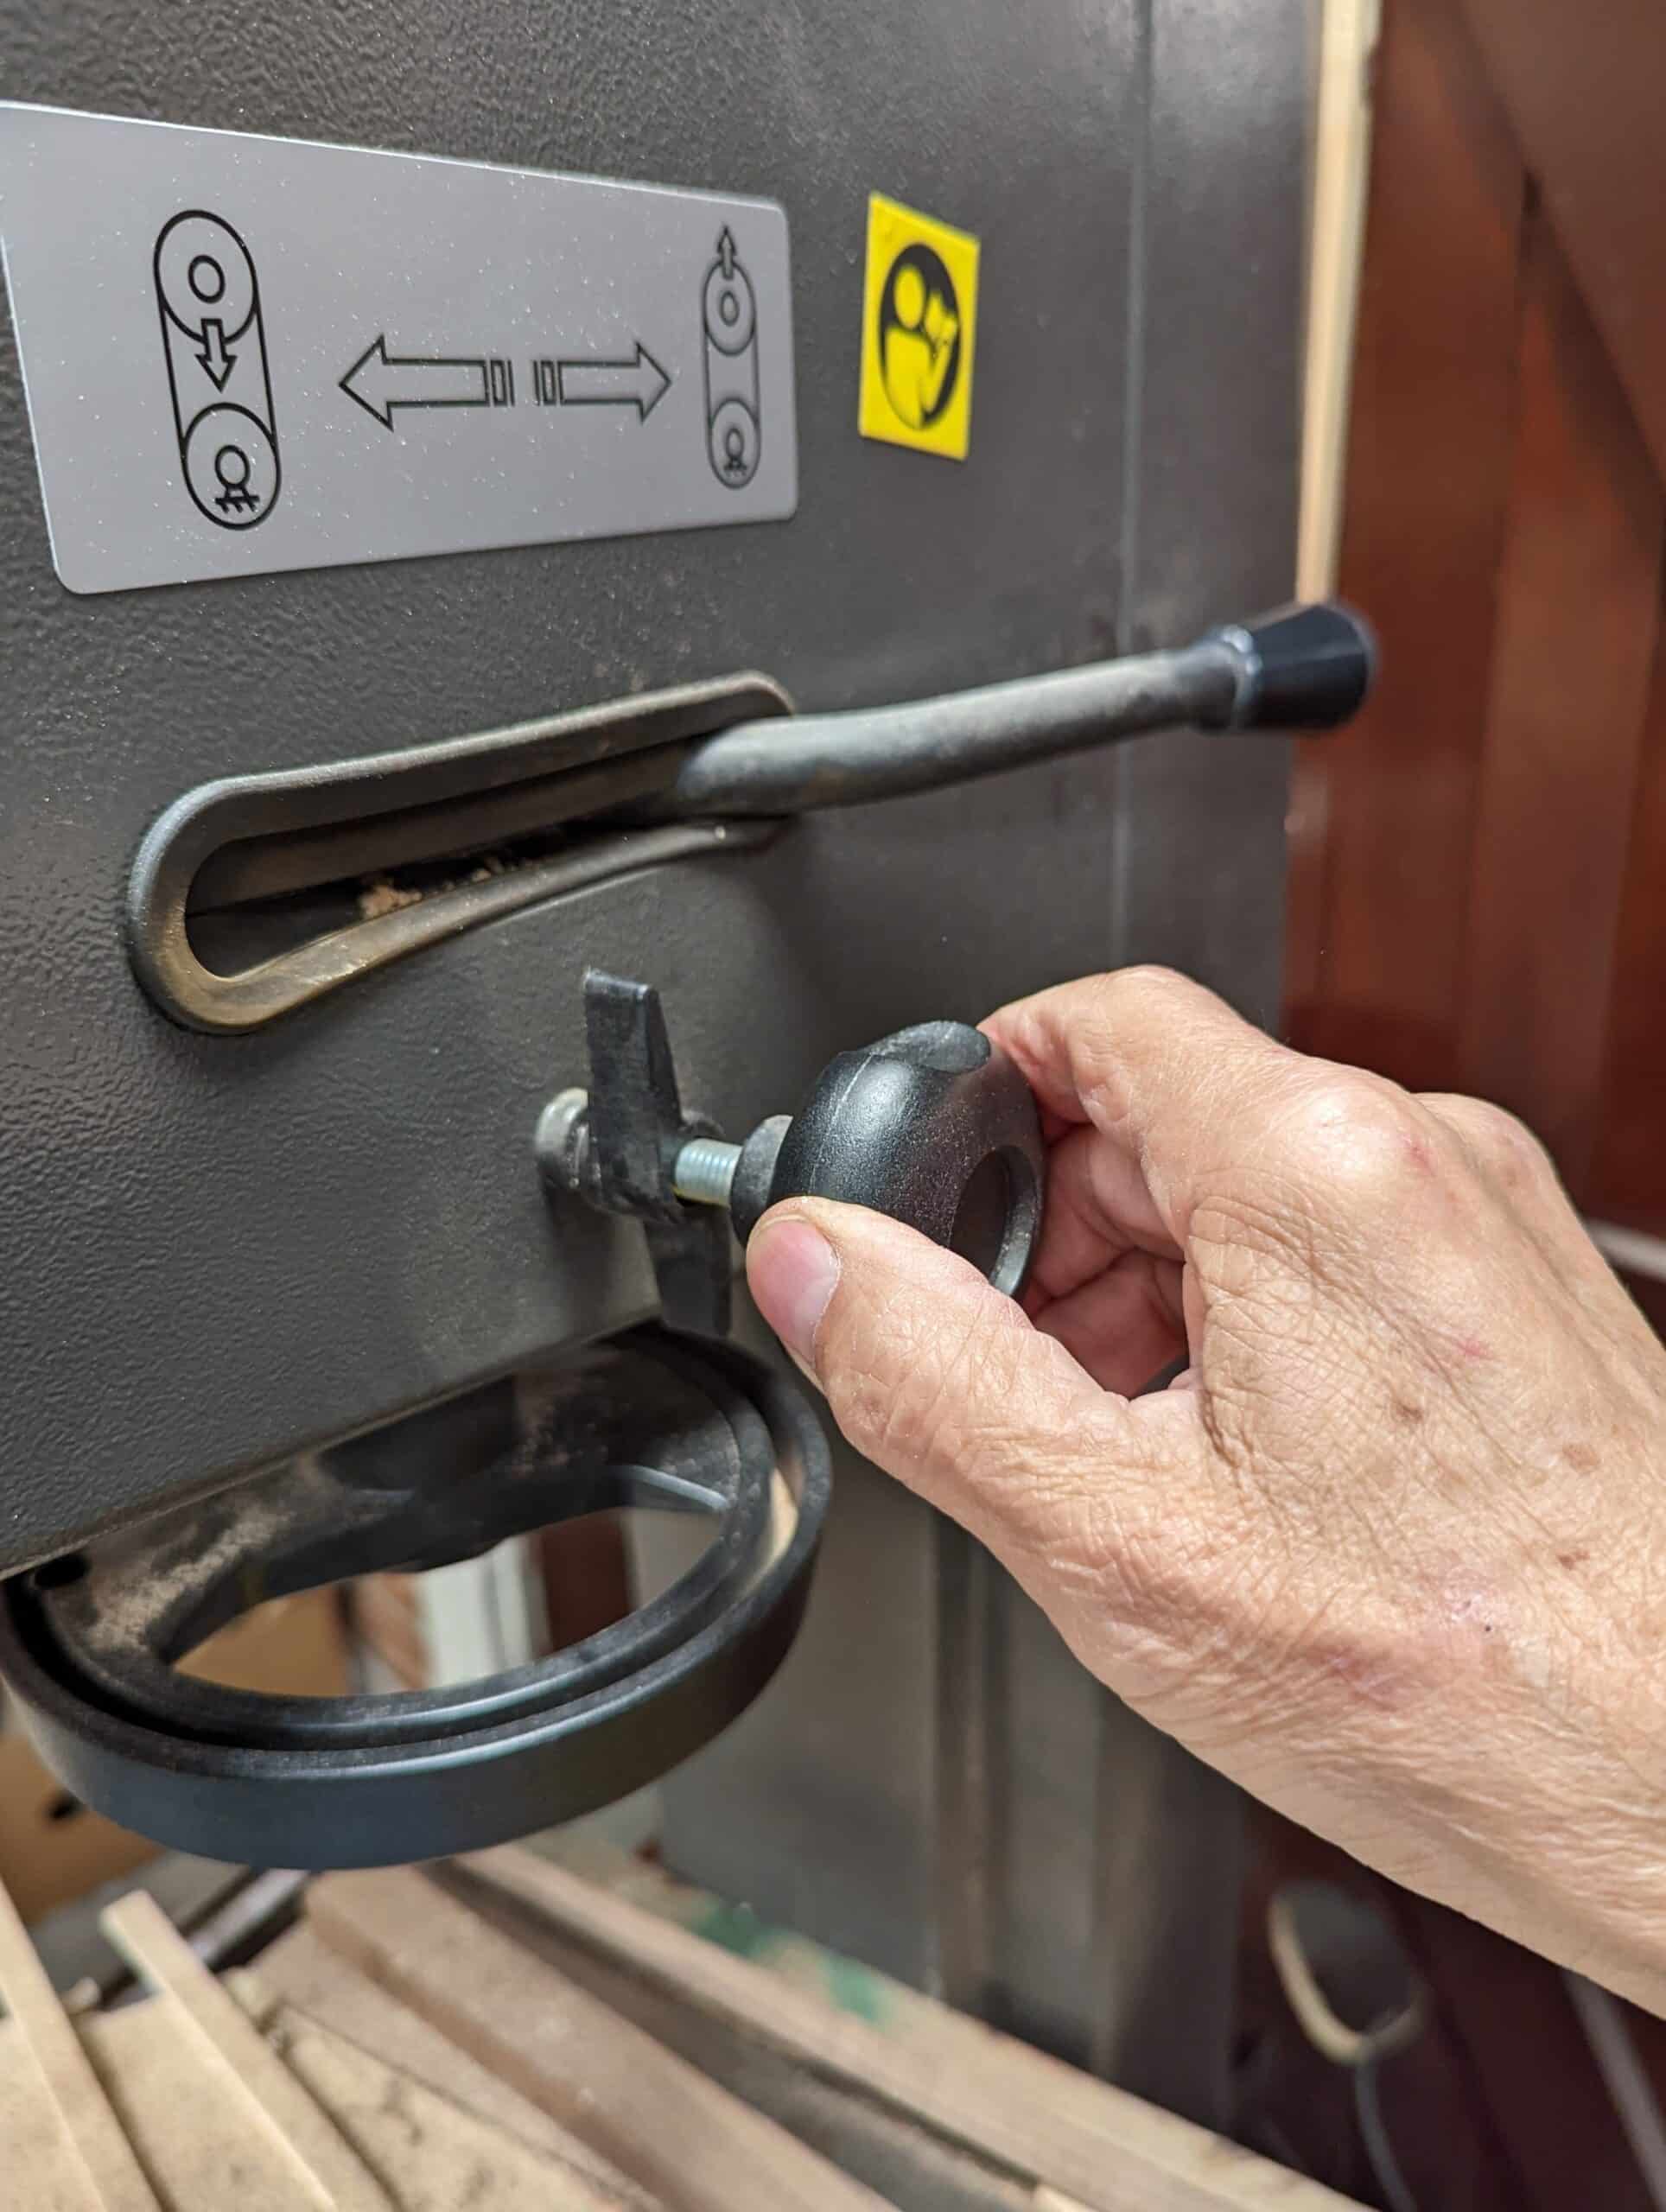
If the blade does need further tightening, adjust the tension wheel by turning it. You can feel for the tension on the blade as you turn the adjustment wheel. Check again with the square or the block of wood for spring-back from the blade.

Shut the bandsaw doors and blade covers, switch the machine on and let it run for half a minute just to ‘seat‘ the blade and centre it on its tracking path.
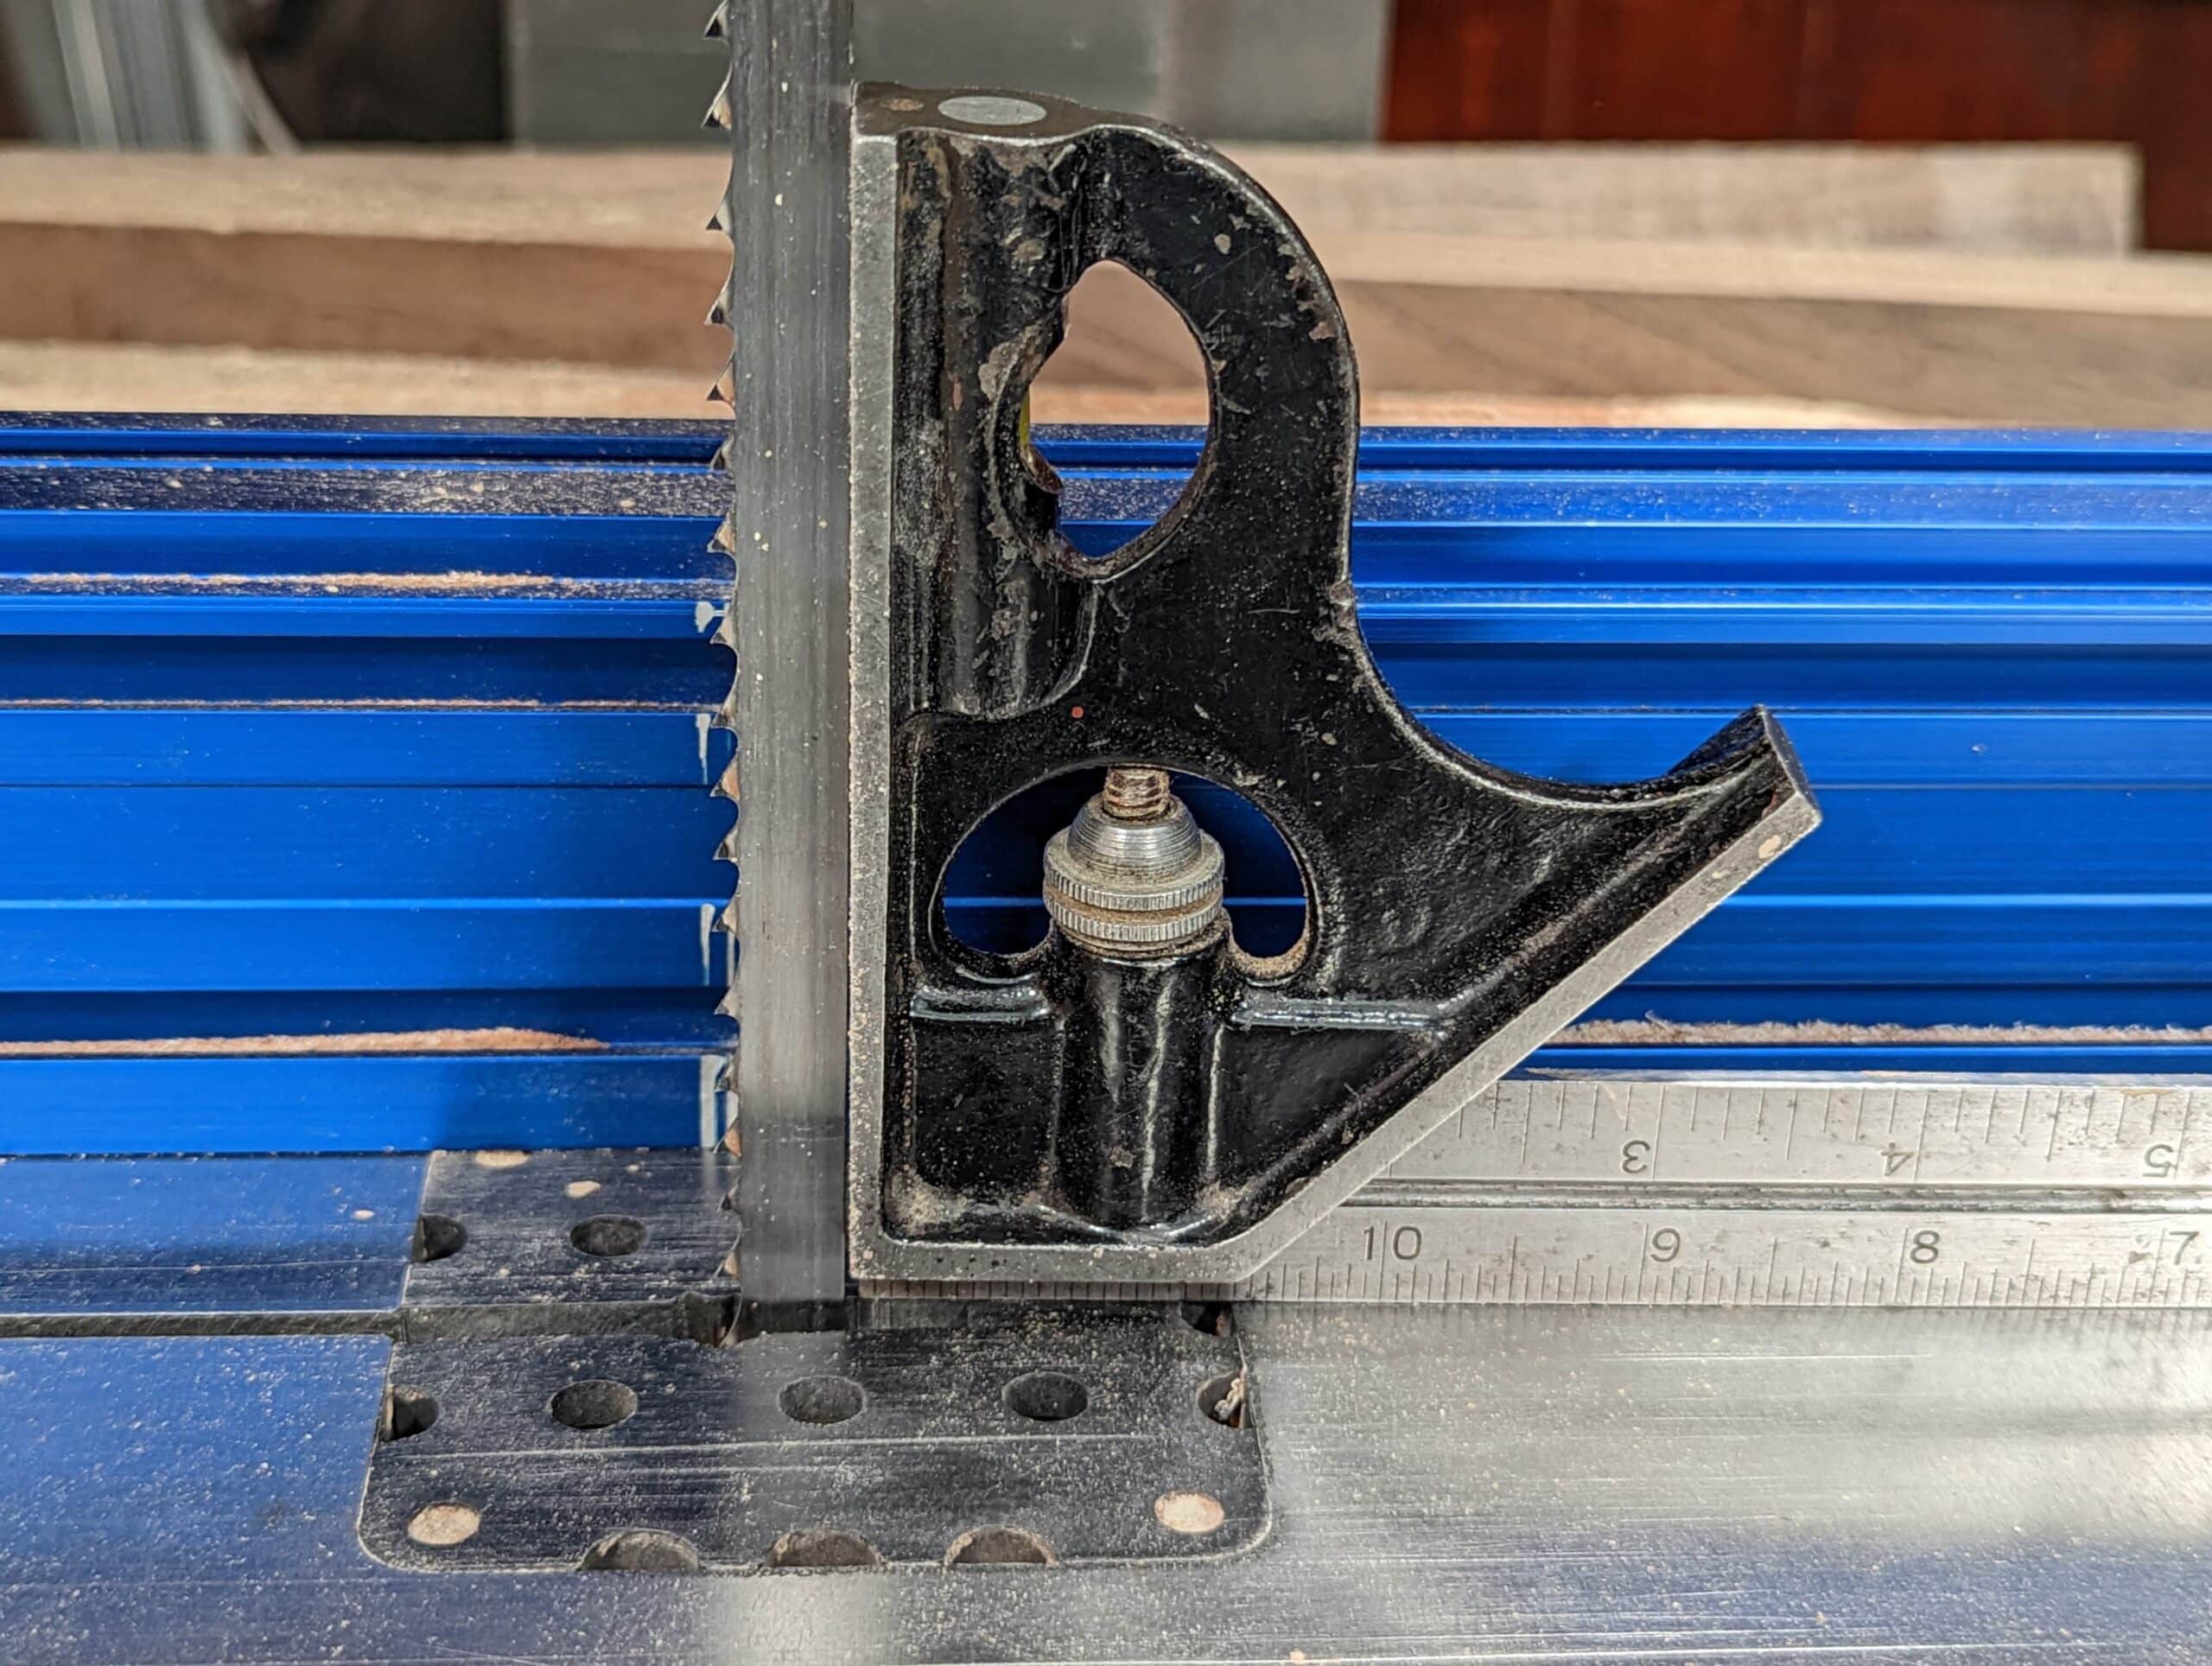
Now check the side-to-side squareness and adjust the table for squareness.
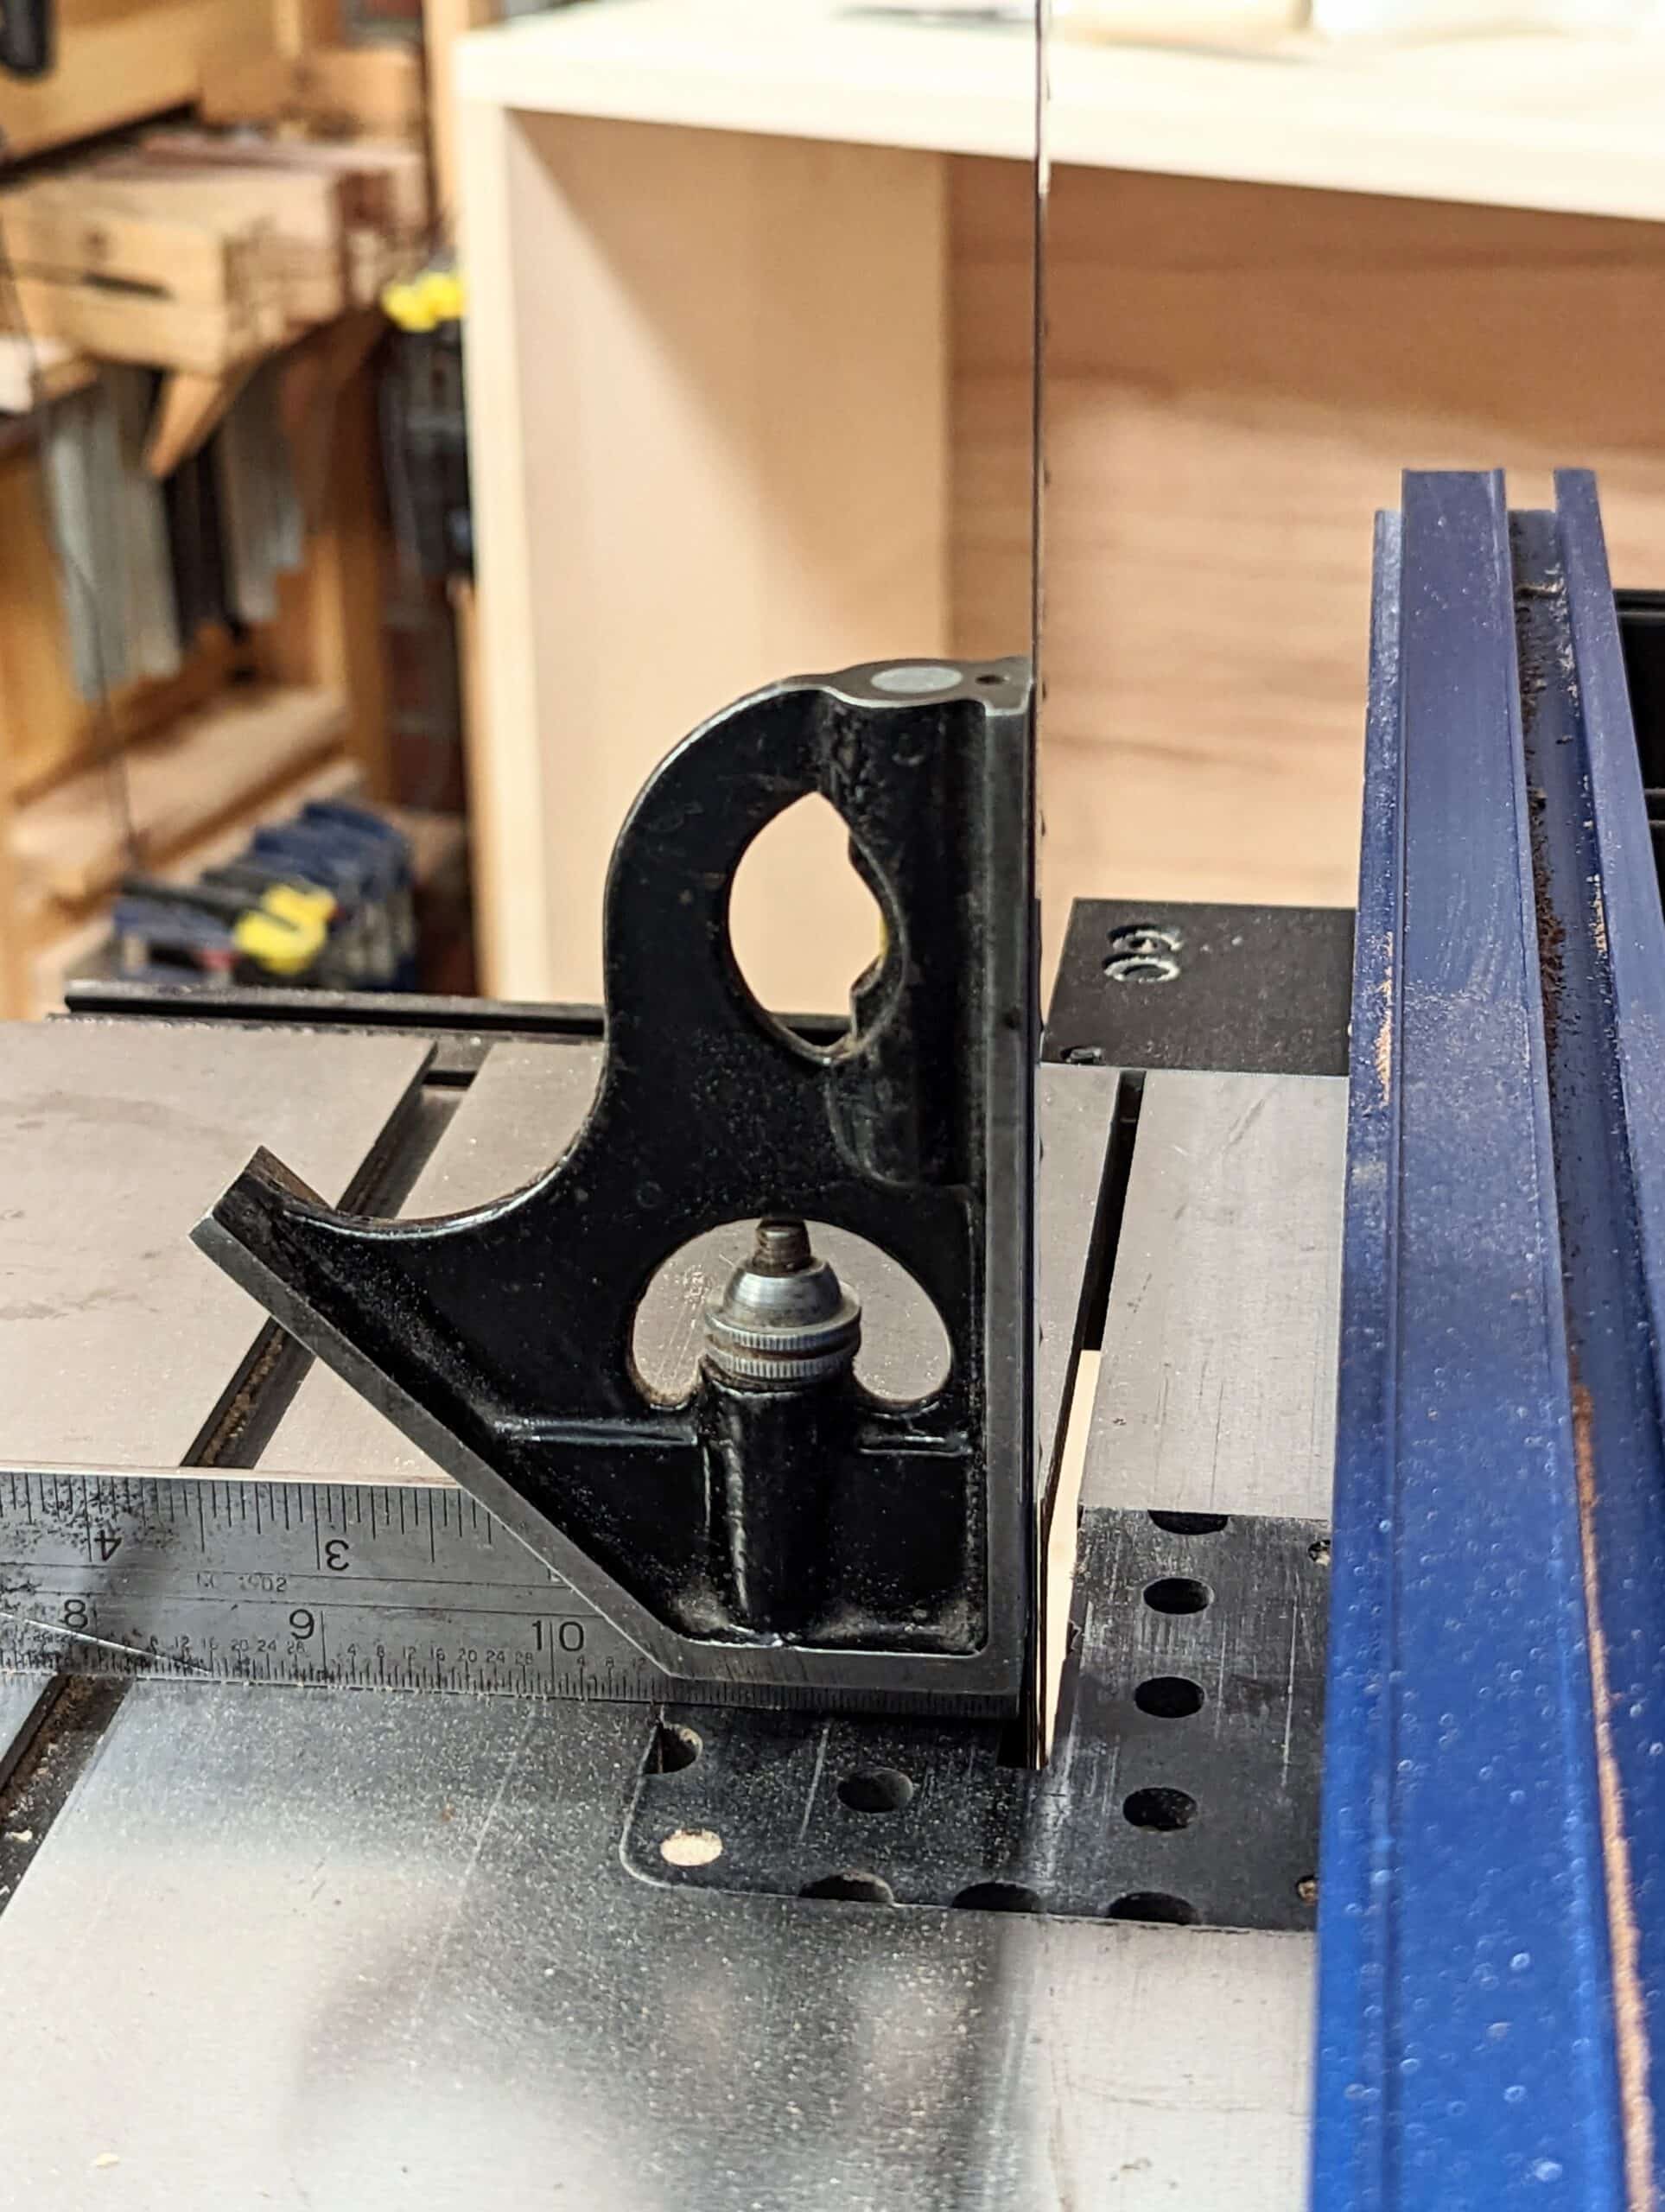
The front-to-back squareness, though stopped by the rear thrust bearings top and bottom, really relies on the alignment of the blade to the top and bottom wheels. By tweaking the adjuster at the back of the machine you can tilt the top wheel to send the blade forwards or backwards on the wheel and by this we optimise the performance of our bandsaw.
Turn the top bandsaw wheel by hand and the blade will move on the first and subsequent revolutions. The blade will also probably be hitting the two rear thrust bearings if the top of the wheel is tilted too much one way. It’s best to release the thrust bearings and let them float until you have aligned the track of the blade on the wheels and they register square by your adjusting the tilt of the top wheel. Don’t panic. It’s not rocket science and it becomes completely intuitive. By watching the alignment of the blade you will identify which direction to turn the adjuster. If the blade is already centred or biased towards the back then adjust the tilt to change the tilt of the wheel which will then move the blade forward until the blade is free of the thrust bearings and the square shows the blade is square to the table front to back.
Now, with the blade tracking and plumb square to the table in both directions, bring the rear thrust bearings up lightly against the back of the blade and cinch them tight. They should just kiss the back of the blade top and bottom.

Would you be interested in writing about testing drift? Many places talk about striking a line, cutting it freehand, and then observing whether the edge of board is parallel to the table edge or fence, but I’ve never found this to be very good for me. What I’ve been doing instead is to cut a piece with my miter and test whether it comes out square or if the work is made to slide along the miter. But, as this is just something I made up, all I can say is that it works for me, but that doesn’t mean it is right. I’d be grateful if you could write about this in a blog post some time.
I don’t know if it matters, but I leave my fence square and tune the drift out. I mention that, but it’s really a topic different to testing whether there is drift in the first place.
Ed, I hear often enough about “drift” but I have never ever had it on any bandsaw in over fifty years doing what I do. Of course, the exception is when I use an overly dull blade through my procrastinating to change it out.
Hi Paul. Thanks for the reply. I wonder if we are talking about the same thing? I’m talking about when you feed the work along the fence and the blade makes a cut that isn’t parallel to the fence, so the work is pulled away or pushed into the fence. Or, if I use a miter, the cut doesn’t come out square. On my saw, this happens if the upper wheel is not tilted in/out properly. Or, you could say it relates to where exactly the blade tracks on the upper wheel, since that tilt changes that tracking. So, are we talking about the same thing? If so, I wonder if your test for the blade being plumb to the table on its back edge is what zeros out the drift. That’s the only one of your tests I’d not heard of and don’t do. If it matters, my wheels have cambered tires.
Well, that’s what I believe my alignment has always taken care of without me knowing it pr ever having the problem. My set-up never came from reading anything about bandsaws or indeed from those I worked with but just my interpretation of how the physics of a bandsaw works in the doing of using one. I’d be interested to see if this might work on your problem as my fence is and always has been set up dead square and parallel as close as I can get it. A good instance too is my bandsaw sled which I always use on my bandsaw for dead-square crosscuts in both plains as in perpendicular and across. The sled uses the ‘T’ slot which I made from wood to fit and attached to a board of 1/2″ plywood. Even though it naturally needs a little tolerance in the slot it always cuts so square that I only have to take off a couple of superthin strokes with the #4 to create a prestine surface to end grain. Again, everything has tp be set parallel to the front-to-back line of the table for this to work otherwise I would always have to adjust the strip in the ‘T-slot’. For any angled cuts such as 45º or any other angle I simply use an appropriate wedge to the angle I want or even just mark with a pencil line onto the plywood sledge. These also give me the exactness I want.
I bought a forty-year-old delta 92 inch blade this summer for $125 on Craigslist. I cleaned it, lubed it it, adjusted tension, and hand cranked the wheels, and got it going. The fence was square to the blade, but the blade kept wandering off square. So I played with it even more. No success.
Then I bought a new TimberWolf blade, and I now have the best best bandsaw I could ever hope for. It’s wonderful. Clean, straight, accurate, and repeated cuts. The blade cost $45, and that’s at the top of the range. But it was worth every penny. I am a convert. The blade matters.
my bandsaw is made in Germany in the 90s (Elektra Beckum, now Metabo) and I picked it up secondhand for a very good price. as you mention, replacing the guide blocks for roller bearings, which are the same as yours, made a big difference: the main one being the sound they make when the blade is rubbing
as for blade drift: dull blades aside, I find that happens when I’m pushing too hard on the workpiece, or using a blade with too fine TPI for the piece thickness in question. the gullets of the teeth will fill with sawdust in both cases and the blade will protest by wandering
furthermore, I’d suggest making sure the lower wheel compartment is kept clean – I have good extraction on my bandsaw but the dust accumulates down there over time and has a tendency to stick to the tyre on the wheel, despite the cleaning brush which is supposed to keep it clean. too much dust and I’ve found the blade can wander
if I want extra accuracy on the cut I’ll often use a scrap of 12mm ply which I butt against the fence and cut 50mm or so. I clamp that in place and then cut my workpiece: it gives the business part of the saw perfect side-to-side support exactly where it’s needed
In my mind and experience, if the blade wanders, its because, improper feed rate, dull, wrong type blade for the task, height of top bearing too high . Thanks
I talked to some Canadian bandsawyers and they said drift can be due to one side of your blade dulling due to squeezing the blade in the kerf. I think cheapo blades are prone to it. I bought a more expensive and wider blade and that reduced drift.
I am bookmarking this page!
I struggle with drift mightily.
Thanks Paul. I think setting up and tuning a bandsaw would make a wonderful video for WWMC.
there is one already
I followed it to the letter and my saw was drifting like a drunken sailor. I think user error or burning the blade by catching it in a kerf or something else is to blame.
Mine also drifts like…. I couldn’t think of a metaphor as charming as yours, but it drifts. I bought the Lumberjack bandsaw Mr Sellers recommends somewhere, but he does recommend changing the blade to one by TuffSaws, and that I haven’t done. And somebody above says changing the blade solved the problem, so maybe I will try that next.
I didn’t really recommend it, per se, it was more of a mention for anyone with various limitations. I try not to recommend or use names for several and various reasons.
I have several Tuffsaws blades and they are so much better than the one my Recordpower BS350 came with, the M42 blades are really great.
At first I misread the heading as Ruining Your Bandsaw. I’ve been doing a good job of that for years. Just the other day I managed to mangle a new blade with a particularly inexpert bit of cutting, during which a piece of oak got jammed and bent the teeth. I had to reset them and file them back to health. I do find the bandsaw a temperamental creature. But when it’s out of action, I realise how much I rely on it. I’m mainly a turner, and if you can cut your own blanks, you’ve got a potentially endless supply of cheap wood. I don’t know how anyone makes any money out of turning commercial blanks at the price they are at the moment.
Thanks for this! I would be interested in hearing your views on ceramic guides vs roller guides. I am considering changing to roller guides
Re Drift,
I find it very interesting that Paul’s method may actually cancel out drift.
When I set up my bandsaw I used a process very similar to the one Paul recommends. I cannot say I did it perfectly but certainly close. When I installed a good aftermarket rip fence (parallel to the miter slot) I still had a bit of drift on long cuts. Upon reading what I could find on the subject I learned that nearly all band saw tables allow for adjustment of drift buy having elliptical holes for the 3 bolts that secure the table. I made a small adjustment and eliminated drift, but it was trial and error and not really convenient.
Now it is possible that my saw was slightly out of adjustment from the factory. I truly do not know. I am fascinated by the fact that Paul as never had a bandsaw with drift, so there may be something in his setup method that really does eliminate it if done correctly. I’m not sure how I would figure that out at this point because I have moved the table and so far ay least, am not getting drift. I would love to know what I may have done wrong.
I bought a ten inch band saw and rarely ever use it due to cutting capacity. The saw is a great little saw but I regret buying it. My advice is if you need one you probably need at least a sixteen inch.
No, you don’t! I hate for anyone to buy a 16″ when a 14″ will work well enough for 90% of work in a small shop especially. There are so many things people need to consider. “Buy at least a sixteen inch.” 10″ is small but think about people who might never afford a 16″, might not be able to get one living in a particular country. Money! So many things suggested by rich countries and rich people don’t fit 95% of countries and people’s circumstances. And richness is always relative. There are several countries suggesting people can do that and this and give no consideration to all of the ingredients that make cultures different for different people. There is a certain richness that allows someone to buy one machine and decide on another to replace it and think everyone can do the same.
Misspoke meant 14 inch, senior brain fart.
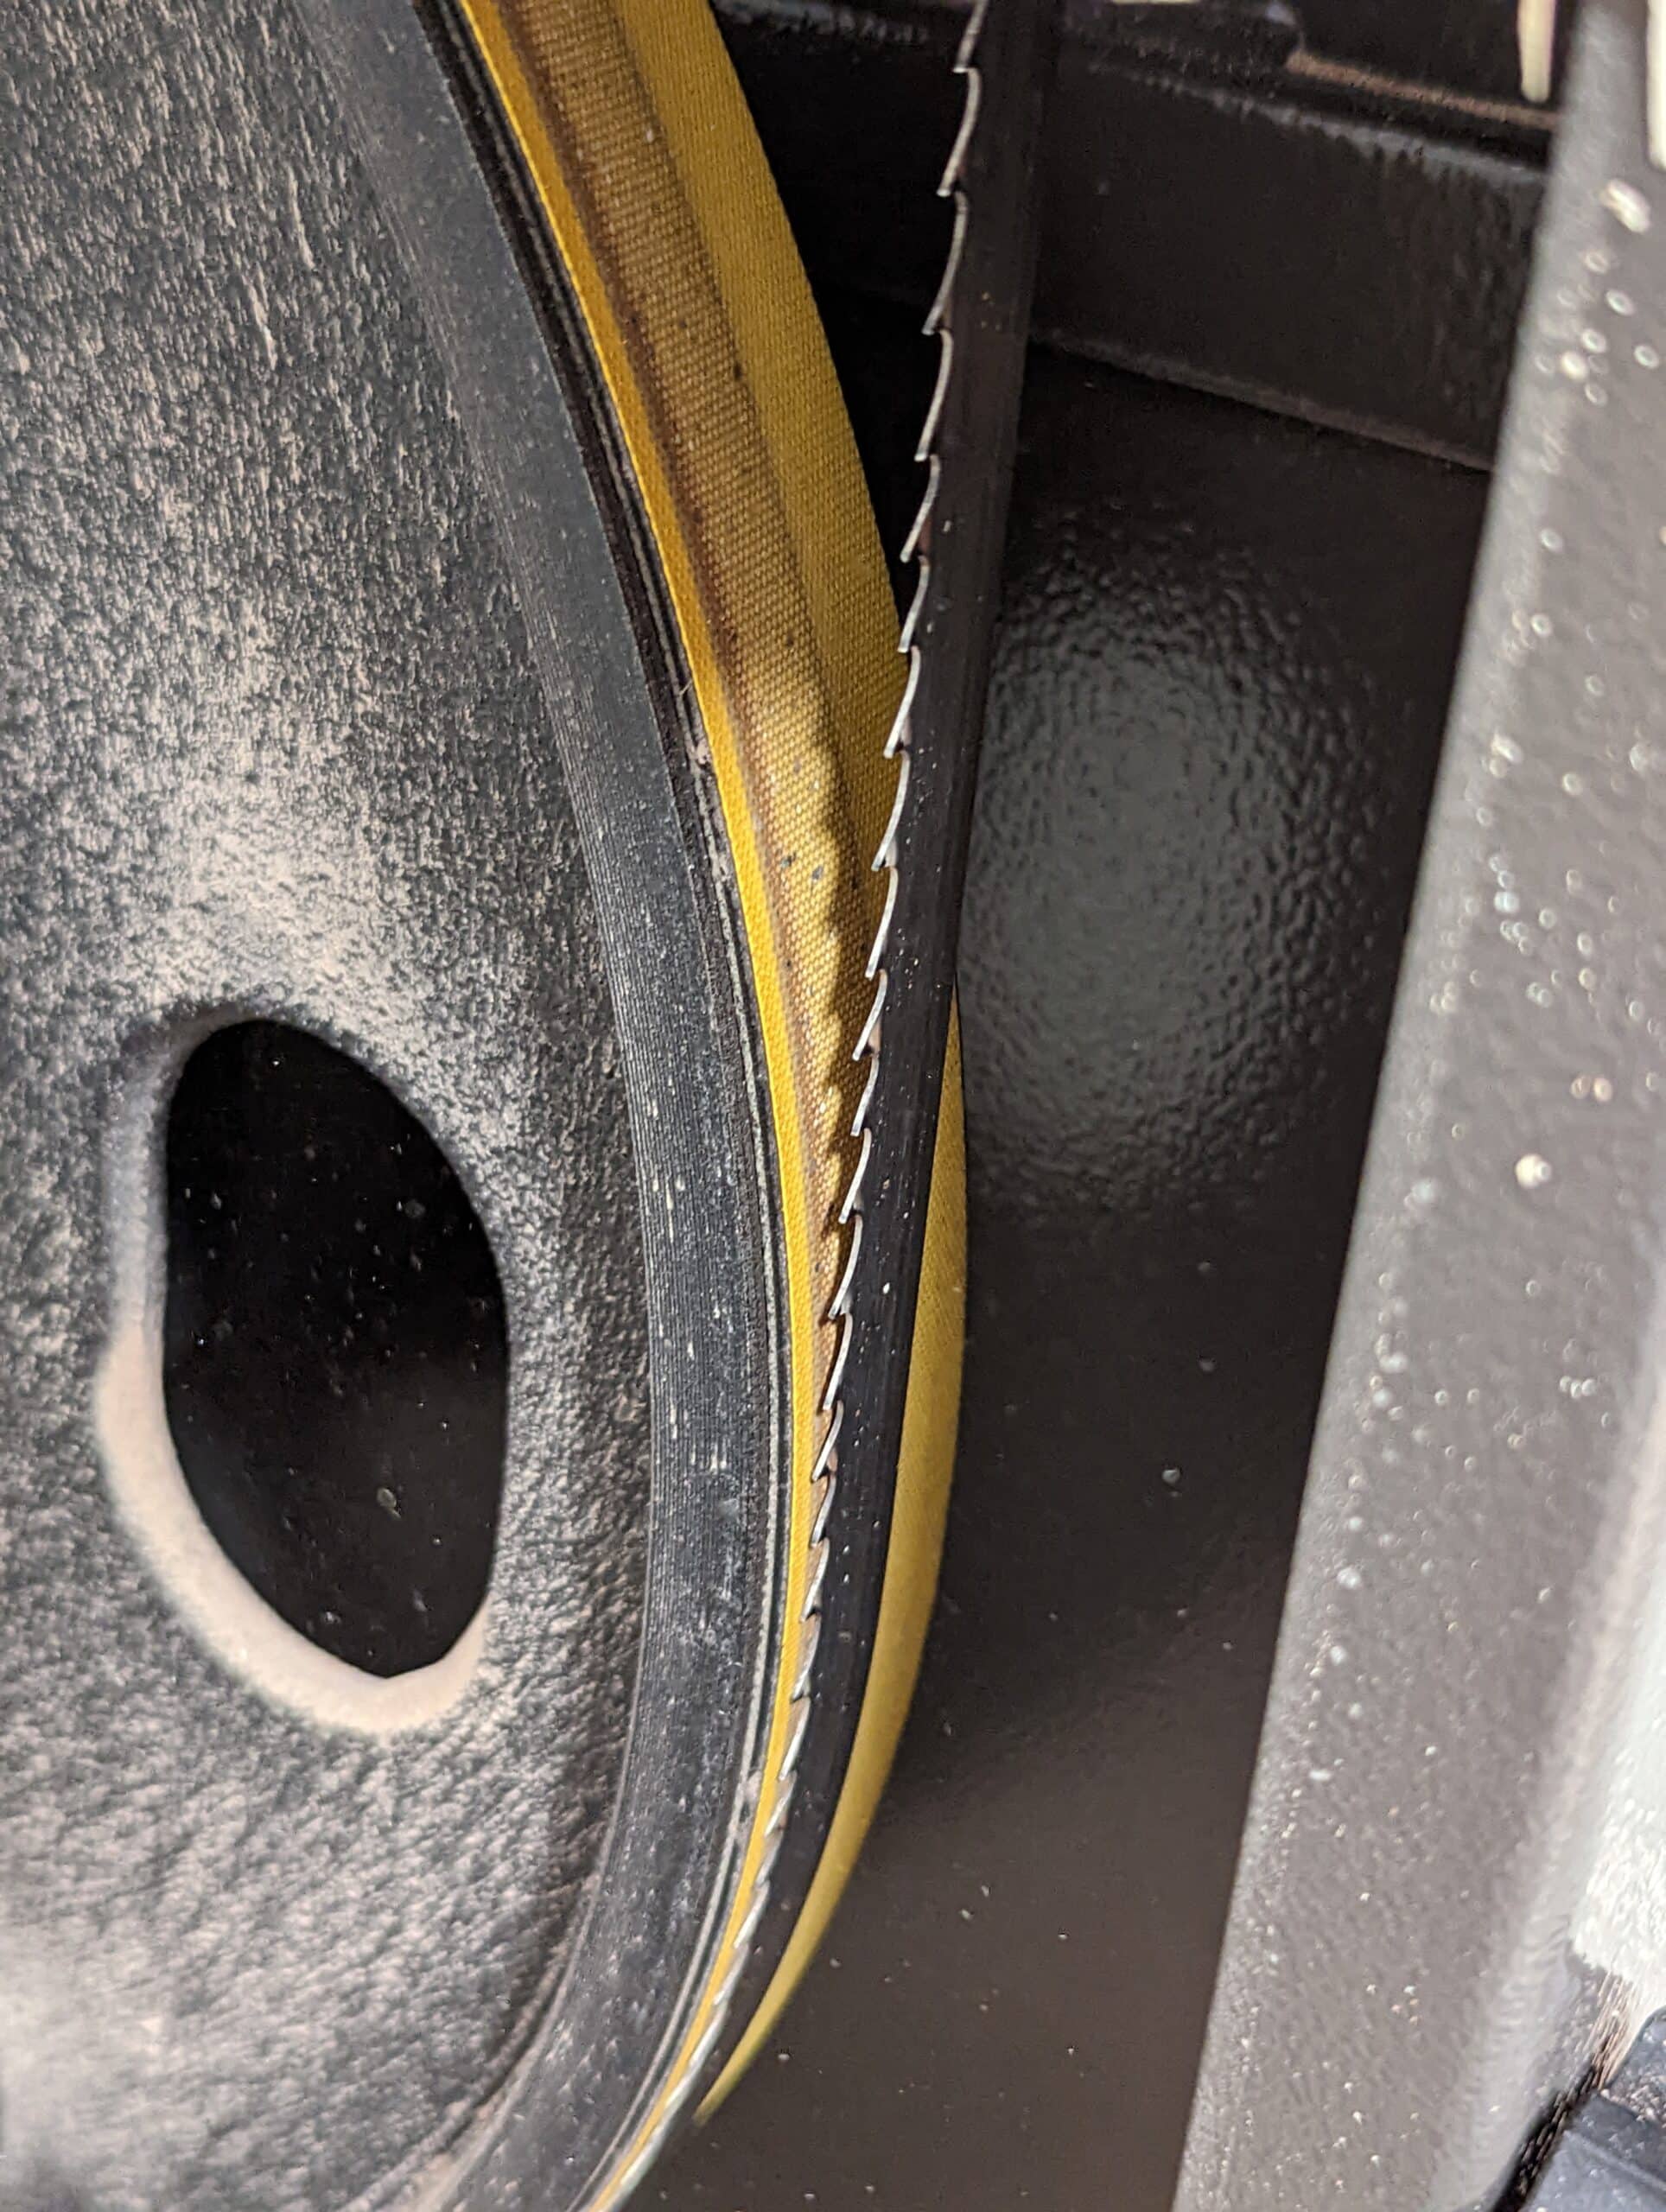
I have a French built bandsaw. The makers instruction is the gullet should be more or less in line with the front of the top wheel. Set such that the teeth do not run on the tyre.
This machine, with a sharp blade set up per the makers instruction cuts beautifully. I also use it in the main for splitting boards, so as to get “book case” matching.
It has a blade tension indicator built in. This gives tension for a given blade width.
The blade guides are roller bearings.
I buy all my blades from a preferred maker, in Swedish Steel so I can sharpen them using a blade holder. This maker ALWAYS joins the blade for correct tooth pitch, making for a better cut.
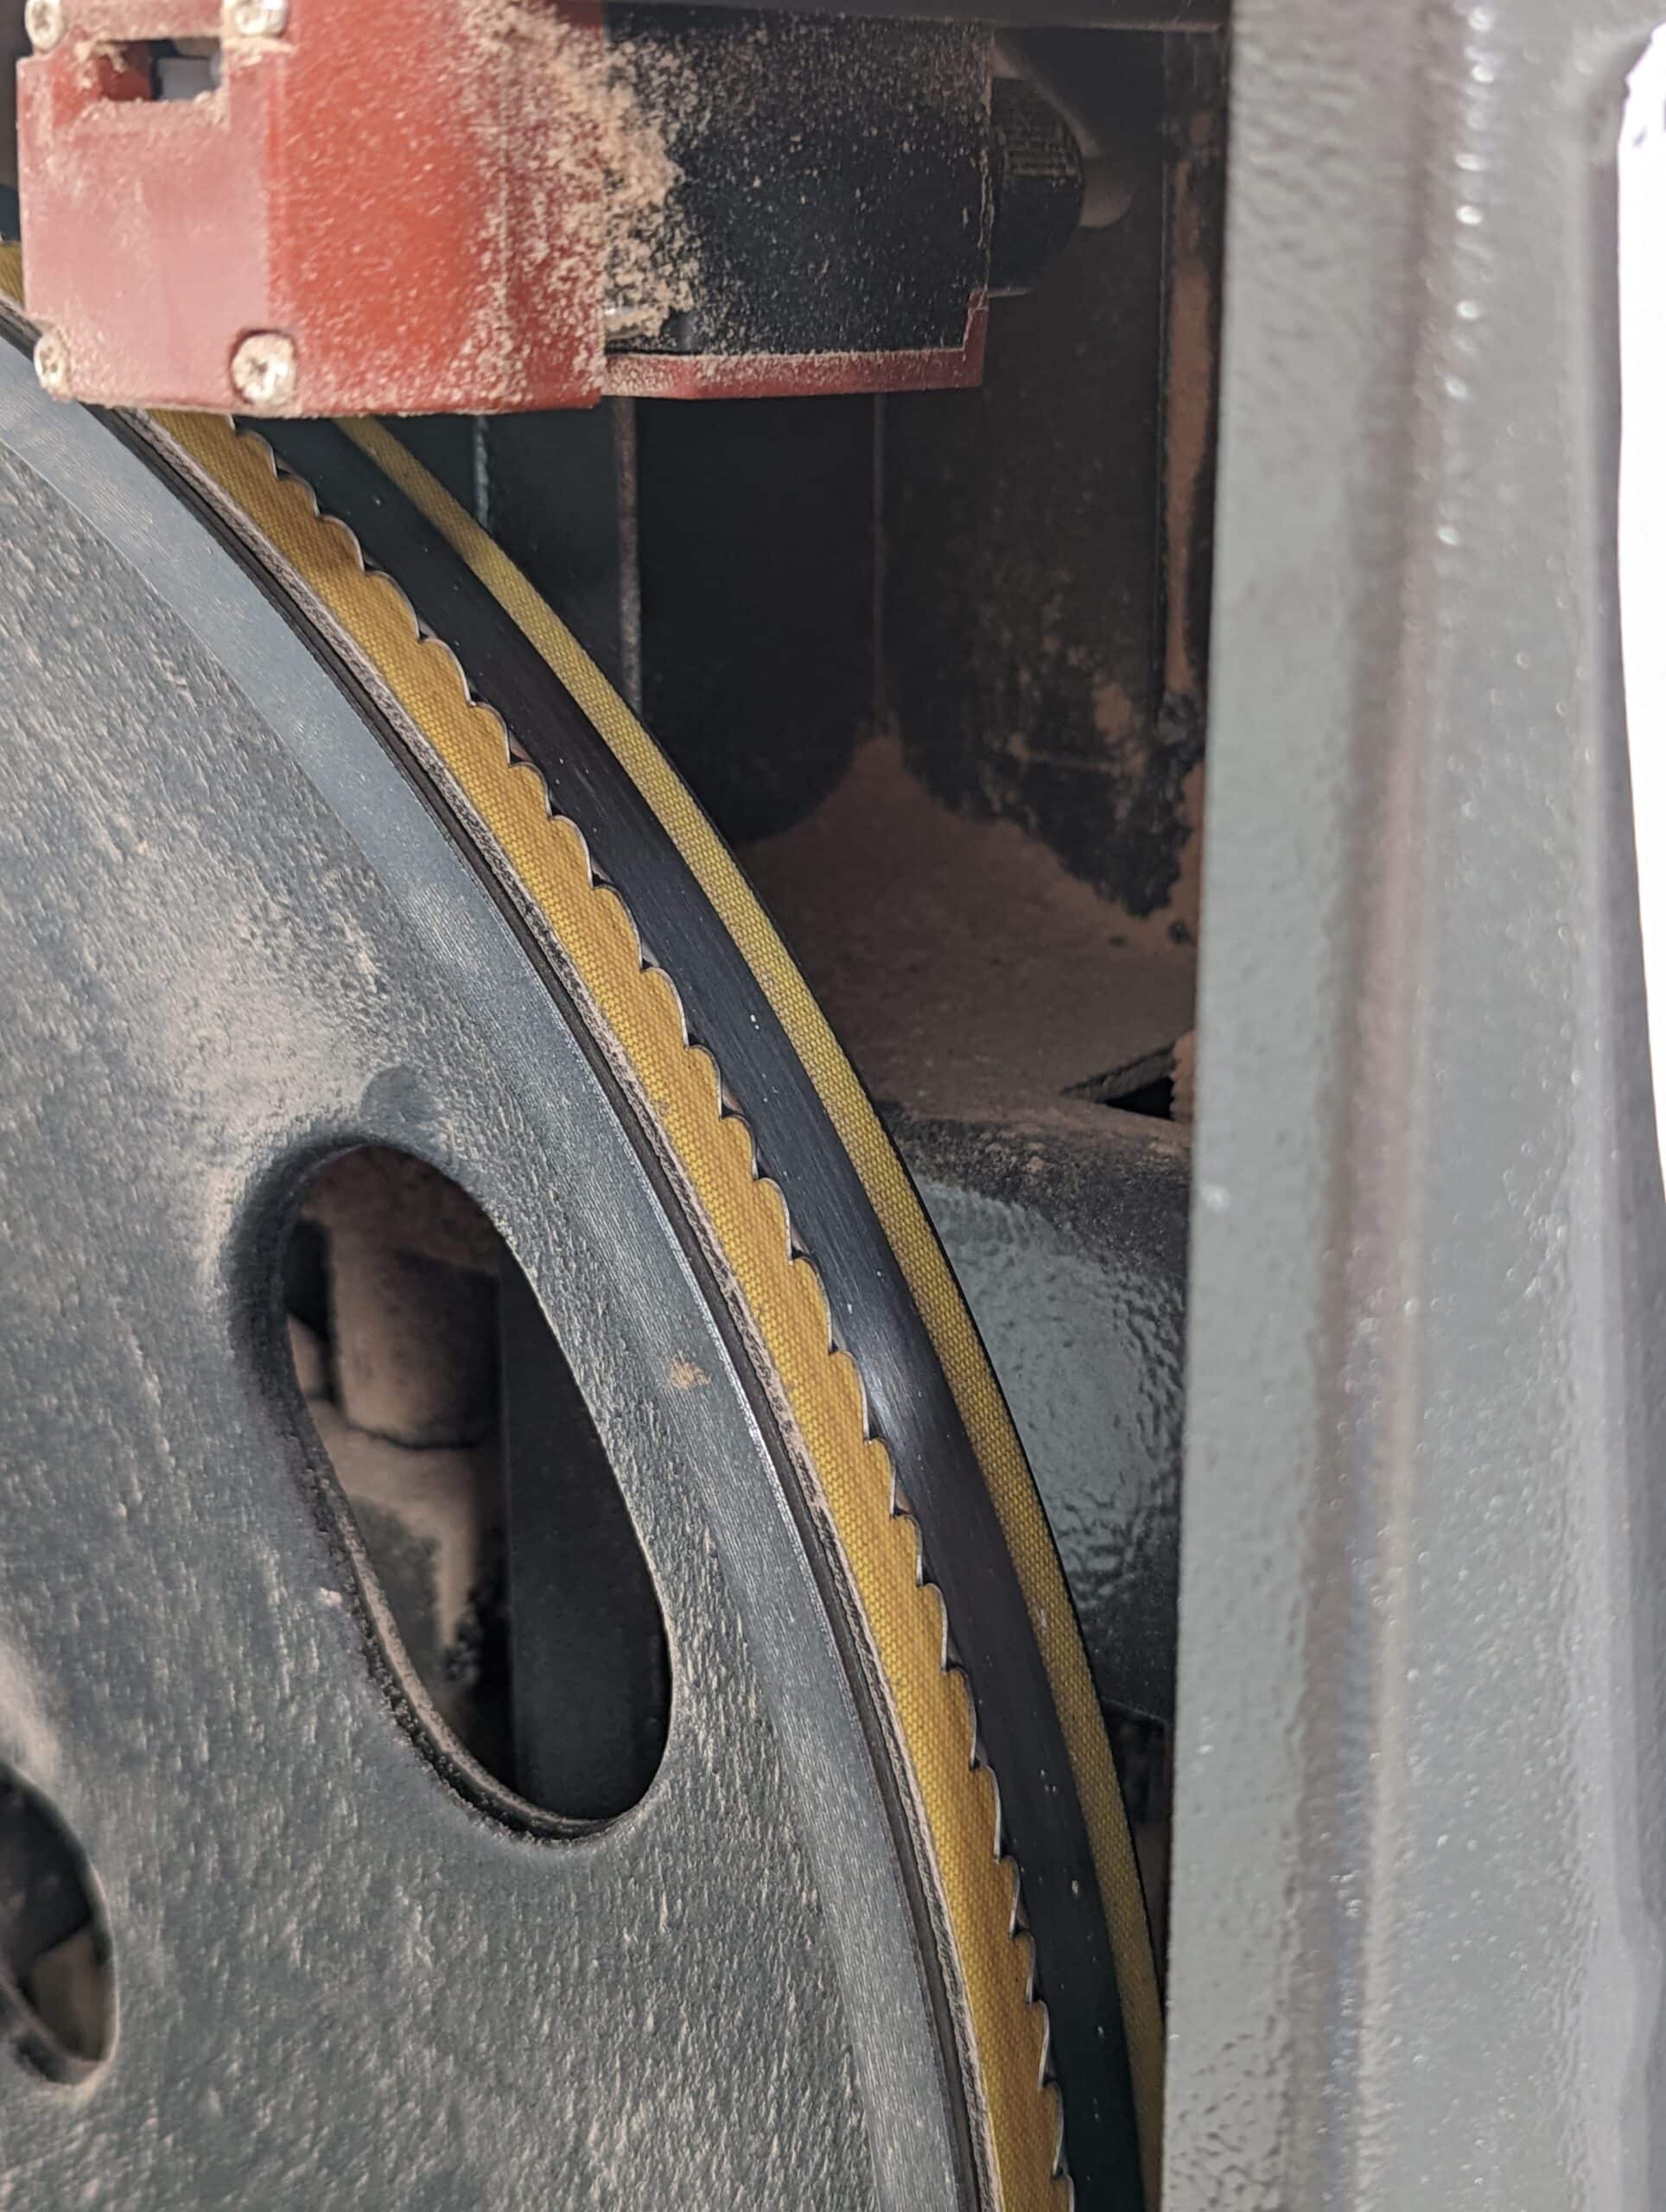
Okay, Duncan, let’s look at the facts here: If you did that on most machines made, sold and distributed throughout the world today, you’d be snapping all the teeth off the blade on first rotation on the cast iron wheel rims. If you look closely at my pictures of the bandsaw wheels you will see that the rubberised tyres are on a level with the cast iron upstanding rim of the wheel, so you will understand why I say this, and (95% of bandsaw wheels today are made this way). Most manufacturers use cast iron for the added momentum heavy-rimmed bandsaw wheels deliver throughout use. What one French maker does does not mean all bandsaws should be set up the same way so this would indeed be bad advice for anyone buying a more commonly distributed and available machine to follow, Duncan. In fact, as I have never heard of or seen a French-made bandsaw sold anywhere in the US (lived there half my working life too) or other parts of the world including Britain, I might go further and say don’t set your bandsaw machines as you would this French-made machine.
As to the blade tensioners you mention. I gave a clear account for the blade tensioners being almost less than useless for good reason in the blog post. I believe what I said was true as in most cases the blades will be made slightly differently and even a small amount will affect the tension on the blades installed and the reading on the tensioner will be more misleading than a help.
Now as to sharpening the steel: well, that too is of little value as the hardened steels used have impulse-hardened teeth which will keep their edge five times longer than sharpenable steel and therefore give five times more use than a resharpenable blade. Now you might think well it is better to be able to resharpen a bandsaw blade in the same we share handsaws but that is not really true because on bandsaws the steel travelling in a circular motion for so long and at such speed, causes the steel to degrade at a faster and continuous rate. So that means the quality itself gets less and less. Now as to costs and savings, my premium blades cost just £13 and last me on average about two months of daily use for say two hours a day. I work six days a week so that’s 96 hours of a lifetime for my blades — that’s 6.5 pence for an hour of use so if I halve that time of working per day still only costs me 13 pence a day. I think that that is £42 a year (similar in Euros and dollars too) so really, surprising though it is, it would be poor time management and false economy for most people to resharpen bandsaw blades.
I went to this much trouble in my response to your comment because what you are advised to do on your machine seems to well suit you but it will not suit 98% of other bandsaw users and that is who I write for, teach and cater to. I am pleased that whatever advice your machine maker gave you works for you. If you were to adopt the outline I gave in my blog post that would work just as well and maybe even better too,
Hi Paul. I have a 14” bandsaw, with settings allowing for two speeds. I haven’t managed to find anything in the user manual to tell me which setting I should use under different circumstances. It came (second hand) on the slower setting. I’m using it with a half inch blade for a mix of hard and soft woods – oak, sycamore and pine, all for basic rip cuts; I haven’t attempted anything complicated with it yet. Any advice on what speed setting I should use would be much appreciated? Thanks. Alan
The slower the speed the slower the feed rate for us woodworkers but a slow feed rate is an option when the machine is running fast so the best speed is the faster because if you manage your feed rate, that’s you pushing, you get more cuts per foot run of material. Slower speeds are the only way for cutting metals so it could be that your machine is for both metal and wood. You cannot push material faster on a metal cutting slower speed as you will more likely snap off all the teeth in one go or burn them and the steel because of increased friction. I am guessing you are not looking for metal cutting but woodworking. A faster speed in woodworking does not mean that you have to match the speed with pushing faster.
Many thanks Paul, that’s exactly what I needed to hear. You are right I’m only using it for wood. It’s been amazingly difficult to find the answer to that question. Like many others who follow you, I find you a mine of invaluable information that simply isn’t there or clear elsewhere. Thanks and best wishes.
i think the main thing here is people who were trained ie apprenticed were taught how to set up and use machines properly, versus so many who have learn’t by watching youtube experts. drift is simply an incorrectly set up machine. same as snipe is caused by an incorrectly set up planer. my quick way of tensioning an bandsaw blade is to tune it like a guitar string. pluck it as i tighten till it makes a note. then do my final checks on flex.
What note?
B-sharp.
Yes, that’s a joke…
Interesting note here about sound from the saw. For years my 18” powermatic bandsaw has made some kind of vibration noise. I searched off and on for years trying to find the culprit. The sound was like the blade rubbing somewhere off and on but not in tune to the revolution of the wheel. The blade never got dull, so I know the teeth weren’t rubbing. The tensioner arm is very stiff when tensioning and I didn’t see any wobble in the blade so I felt good about that. Just for giggles, one day, I tensioned it a little further while running and the noise went away. Not sure if the blade is too tight now, but it still cuts good and haven’t broken a blade yet. I do worry about the bearings and the tensioner is much stiffer, but so far so good. The saw runs very quiet now and I am much happier about that.
I had a cheap 14 ” taiwanese saw that i got yesrs ago. the only change i made initially was to put cooling blocks on for the side guides. It was always drifting and did not resaw well. For years i could not get it to work right.
I waytched an Alex Snodgrass video where he discussed ‘Drift’ saying like Paul does it should not happen .
I retuned my saw making sure blade was squared up in all directions. Made sure the guides were aligned, aligned the blade on the wheel , centered, just as Paul and Alex Snodgrass suggested. I also got a woodmiser blade resaw blade 3 TPI with deep gullet. adjusted the blade tension. Ended up with tensioning it a few times before it all worked. I ended up putting more tension on the blade than i had ever done before. It has worked with that tension for a couple of years with no blade breakage or bearing issues. Recommend tensioning as the last adjustment.
Everything works like a dream. It cuts straight with no drift and resaws great. I think the resaw blade being the proper number of teeth and gullet clearance also helped. I like Paul use a 1/2 blade for everything I do. Oh yeah if you occasionally hit one side of the teeth on the blade that will cause the blade to favor one side. think about the set on a handsaw being out of balance and having to stone the side that it pulls to. Slow and steady to avoid sawdust buildup in the resaw cut to eliminate the dreaded barrel cut.
Paul,
Along with Duncan I have always run my blades with level with the edge of the rubber eg the teeth do not sit on the rubber. I will admit that I only have the smallest of the Record bandsaws, but there is no raised lip on the aluminium wheels on this machine. I must have had the thing for nearly twenty years and the rubber is as good as new. It runs true, no drift and you can trust it to cut very thin. I have never run the saw as much as you do but have cut plenty of turning blanks. This method of running the bandsaw blade works fine for me too. I find that taking the corners off the back of the blade helps a lot if you have to back up in a tight cut.
Your blade tensioning technique is magical and simple. I went through your process with my 14″ saw and what an improvement – now not worried about over tensioning. Thank you!