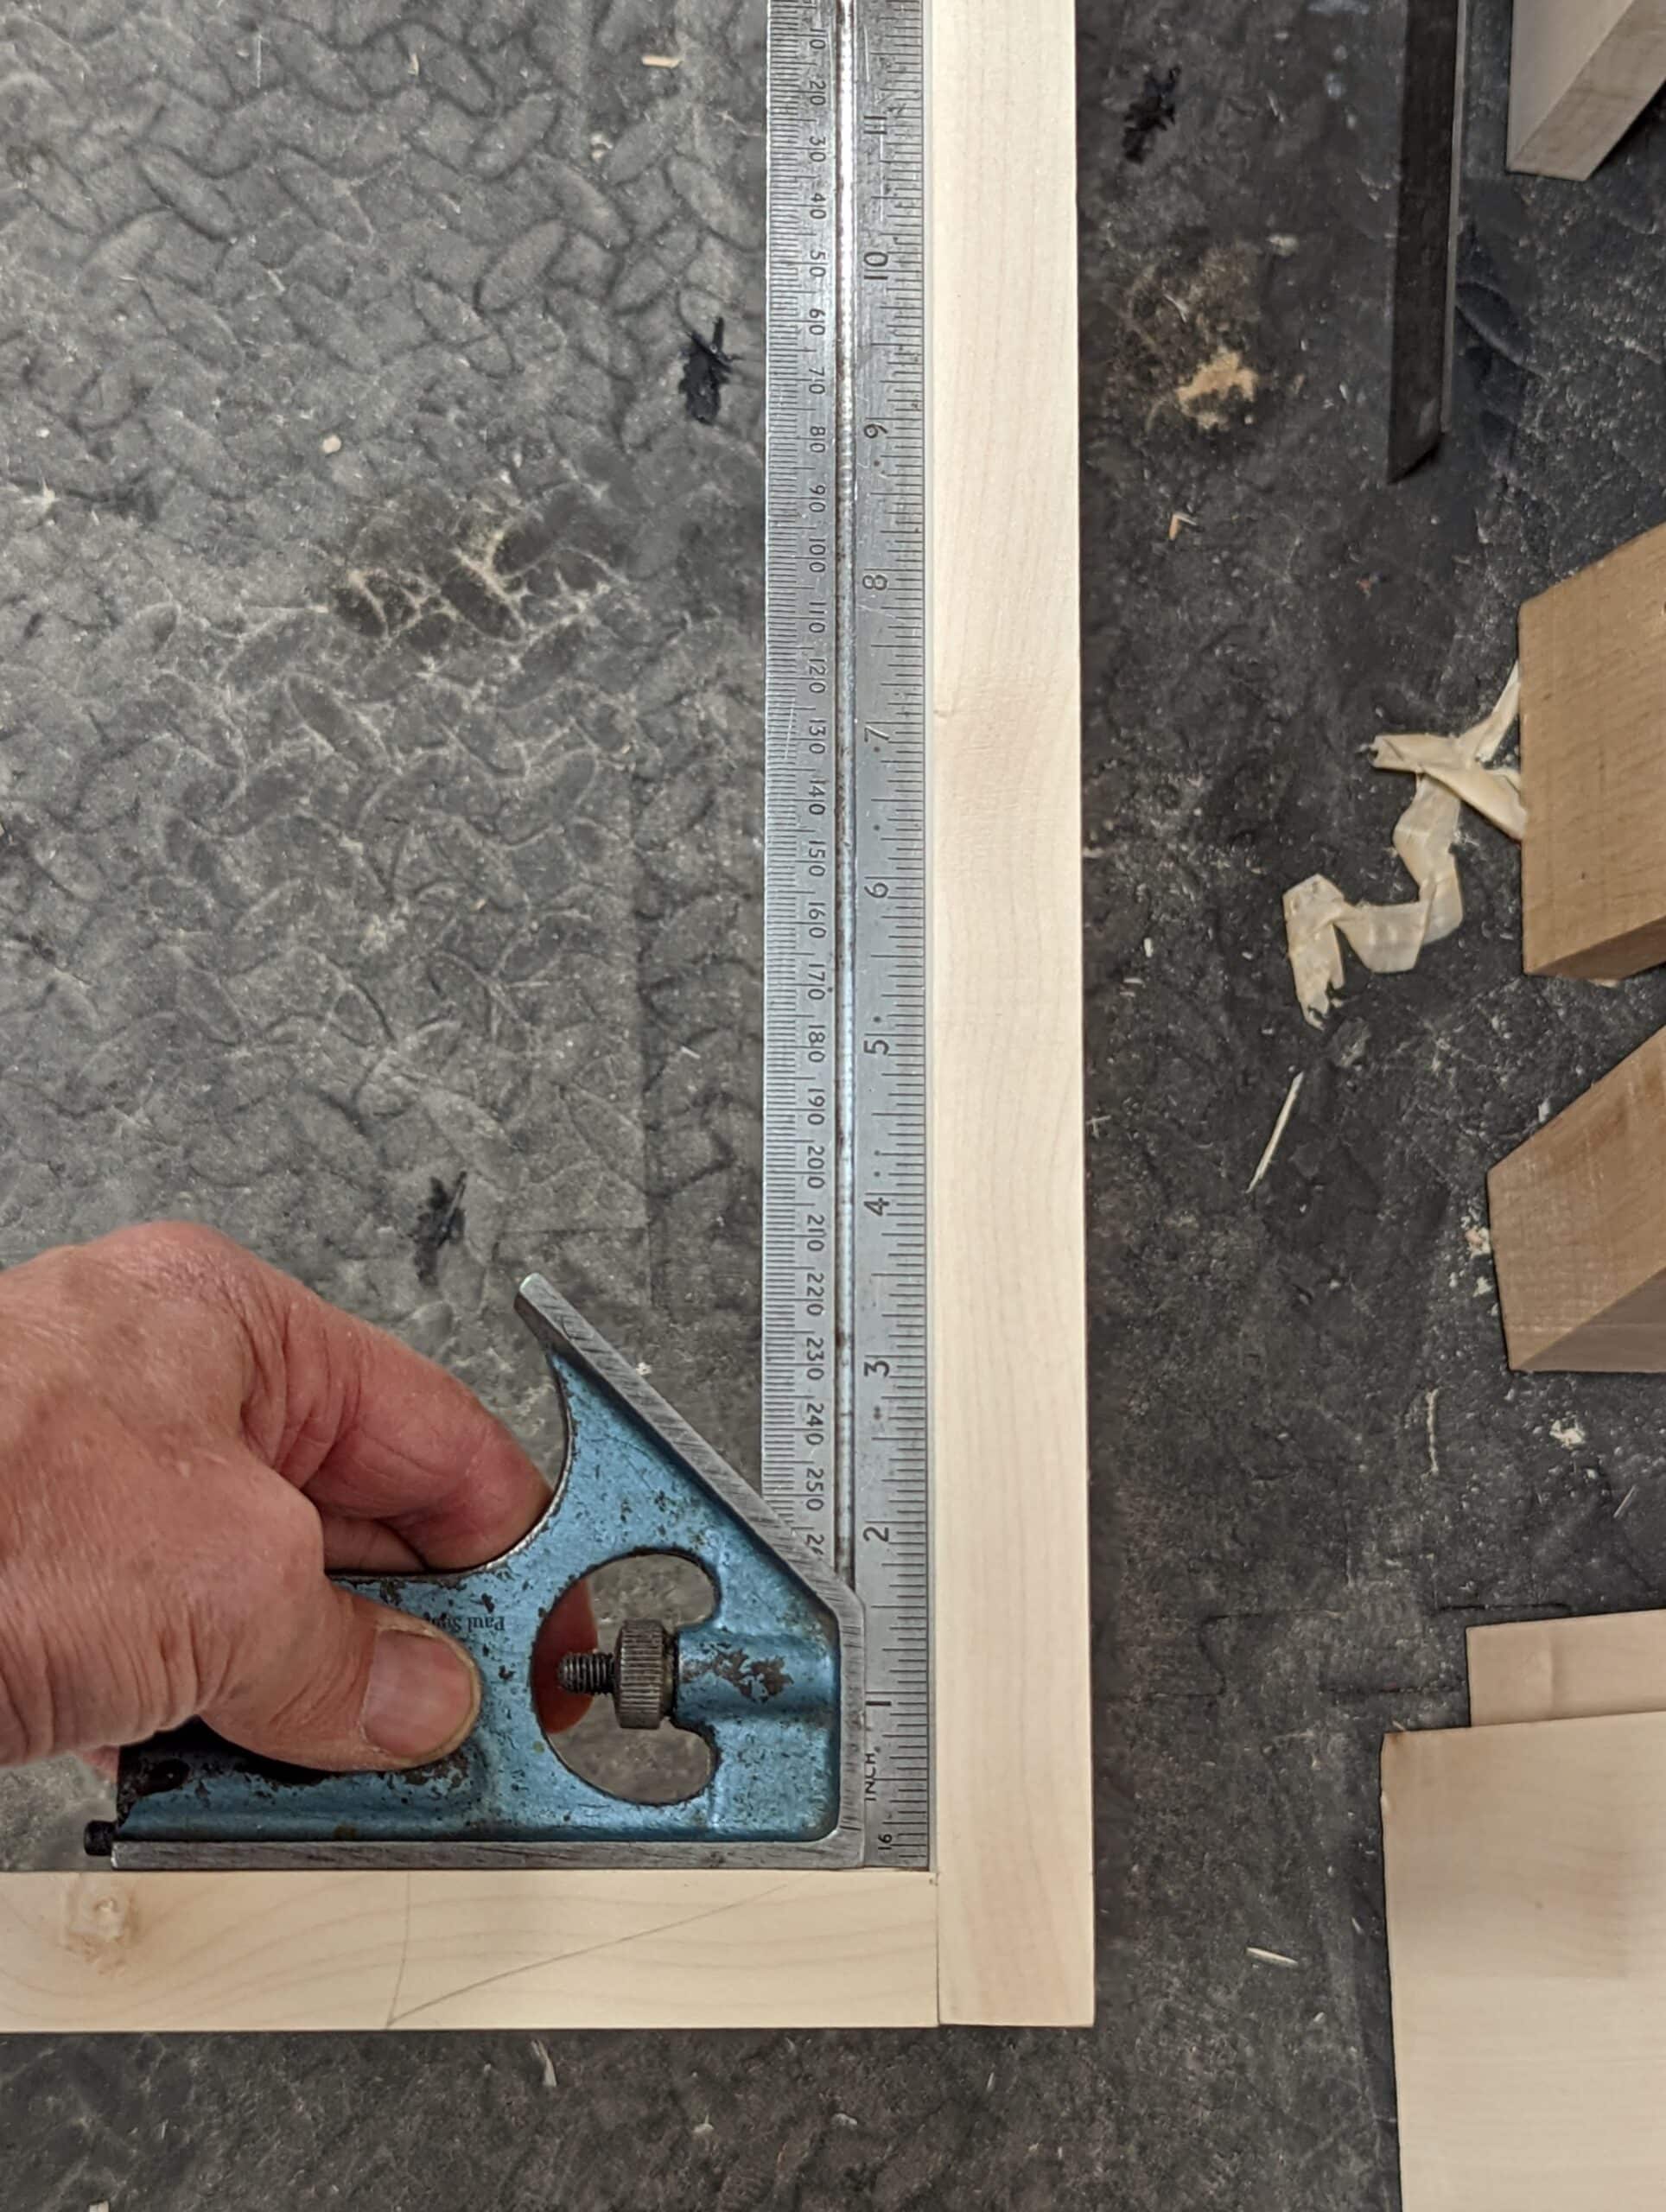
When not to use a Square
It shouldn’t surprise me how often I see someone check an internal corner for square using a basic 12″ square or worse still a speed square, but it’s not something to rely on most of the time. Even carpenters do it and whereas today they think it’s a good and positive test, in the past, furniture makers and joiners generally relied on it only as a quick and rough check in lieu of a more accurate one yet to come. Imagine testing the corner of four foot by six-foot frame with a speed square or even a larger framing square. It could possibly be a quick check to see how close it might be but overall it is not a good way of testing for square at all. If this surprises you then the following will help you better understand.
Mostly it’s to do with distortions that occur in the wood due to moisture levels in the wood, distortion caused through clamping joints, flex in wood and then too a range of other reasons. When we make frames and boxes our aim is always to start with straight lengths, a virtual impossibility in long lengths, but even in shorter lengths like the sides of boxes the most minor discrepancy in fractions of a millimetre will throw the square exaggeratingly off.

There are ways of checking for square without using squares and this is much needed when checking projects such as door frames, doors, window sashes and frames, boxes and so on. In fact, there is barely any project that can simply be checked with just a square alone. I would never check any project with a square whether the square be large or small. Rarely will it give a good reading and rarely could you ever rely on it. As it is the rarity and not the norm, I understand the question mark . . . it’s automatically questionable. The reason is that wood generally changes from straightness to slightly curving and though it may not be clearly visible, it keeps changing throughout its life, whether in the raw as lumber or in a finely finished piece. Our task is to minimise that liability and then too work ‘with‘ the wood to either mildly constrain it or totally allow it. A door, the lid of a box, a window sash in its frame all hang freely at two or three points by hinges. They are free to expand and contract according to the surrounding relative humidity. In fixed frames and boxes, we always strive for squareness but if the stiles or frame heads and sills are even slightly bowed we cannot rely on a square to test out for squareness; the registration face for registering the square against is compromised. Using a square in these circumstances will not work for us at all. Make a window frame a metre long and three-quarters of a metre high and it is most likely that the 12″ square in the inside corner will not tell us much of anything and certainly not the accuracy of 90º.
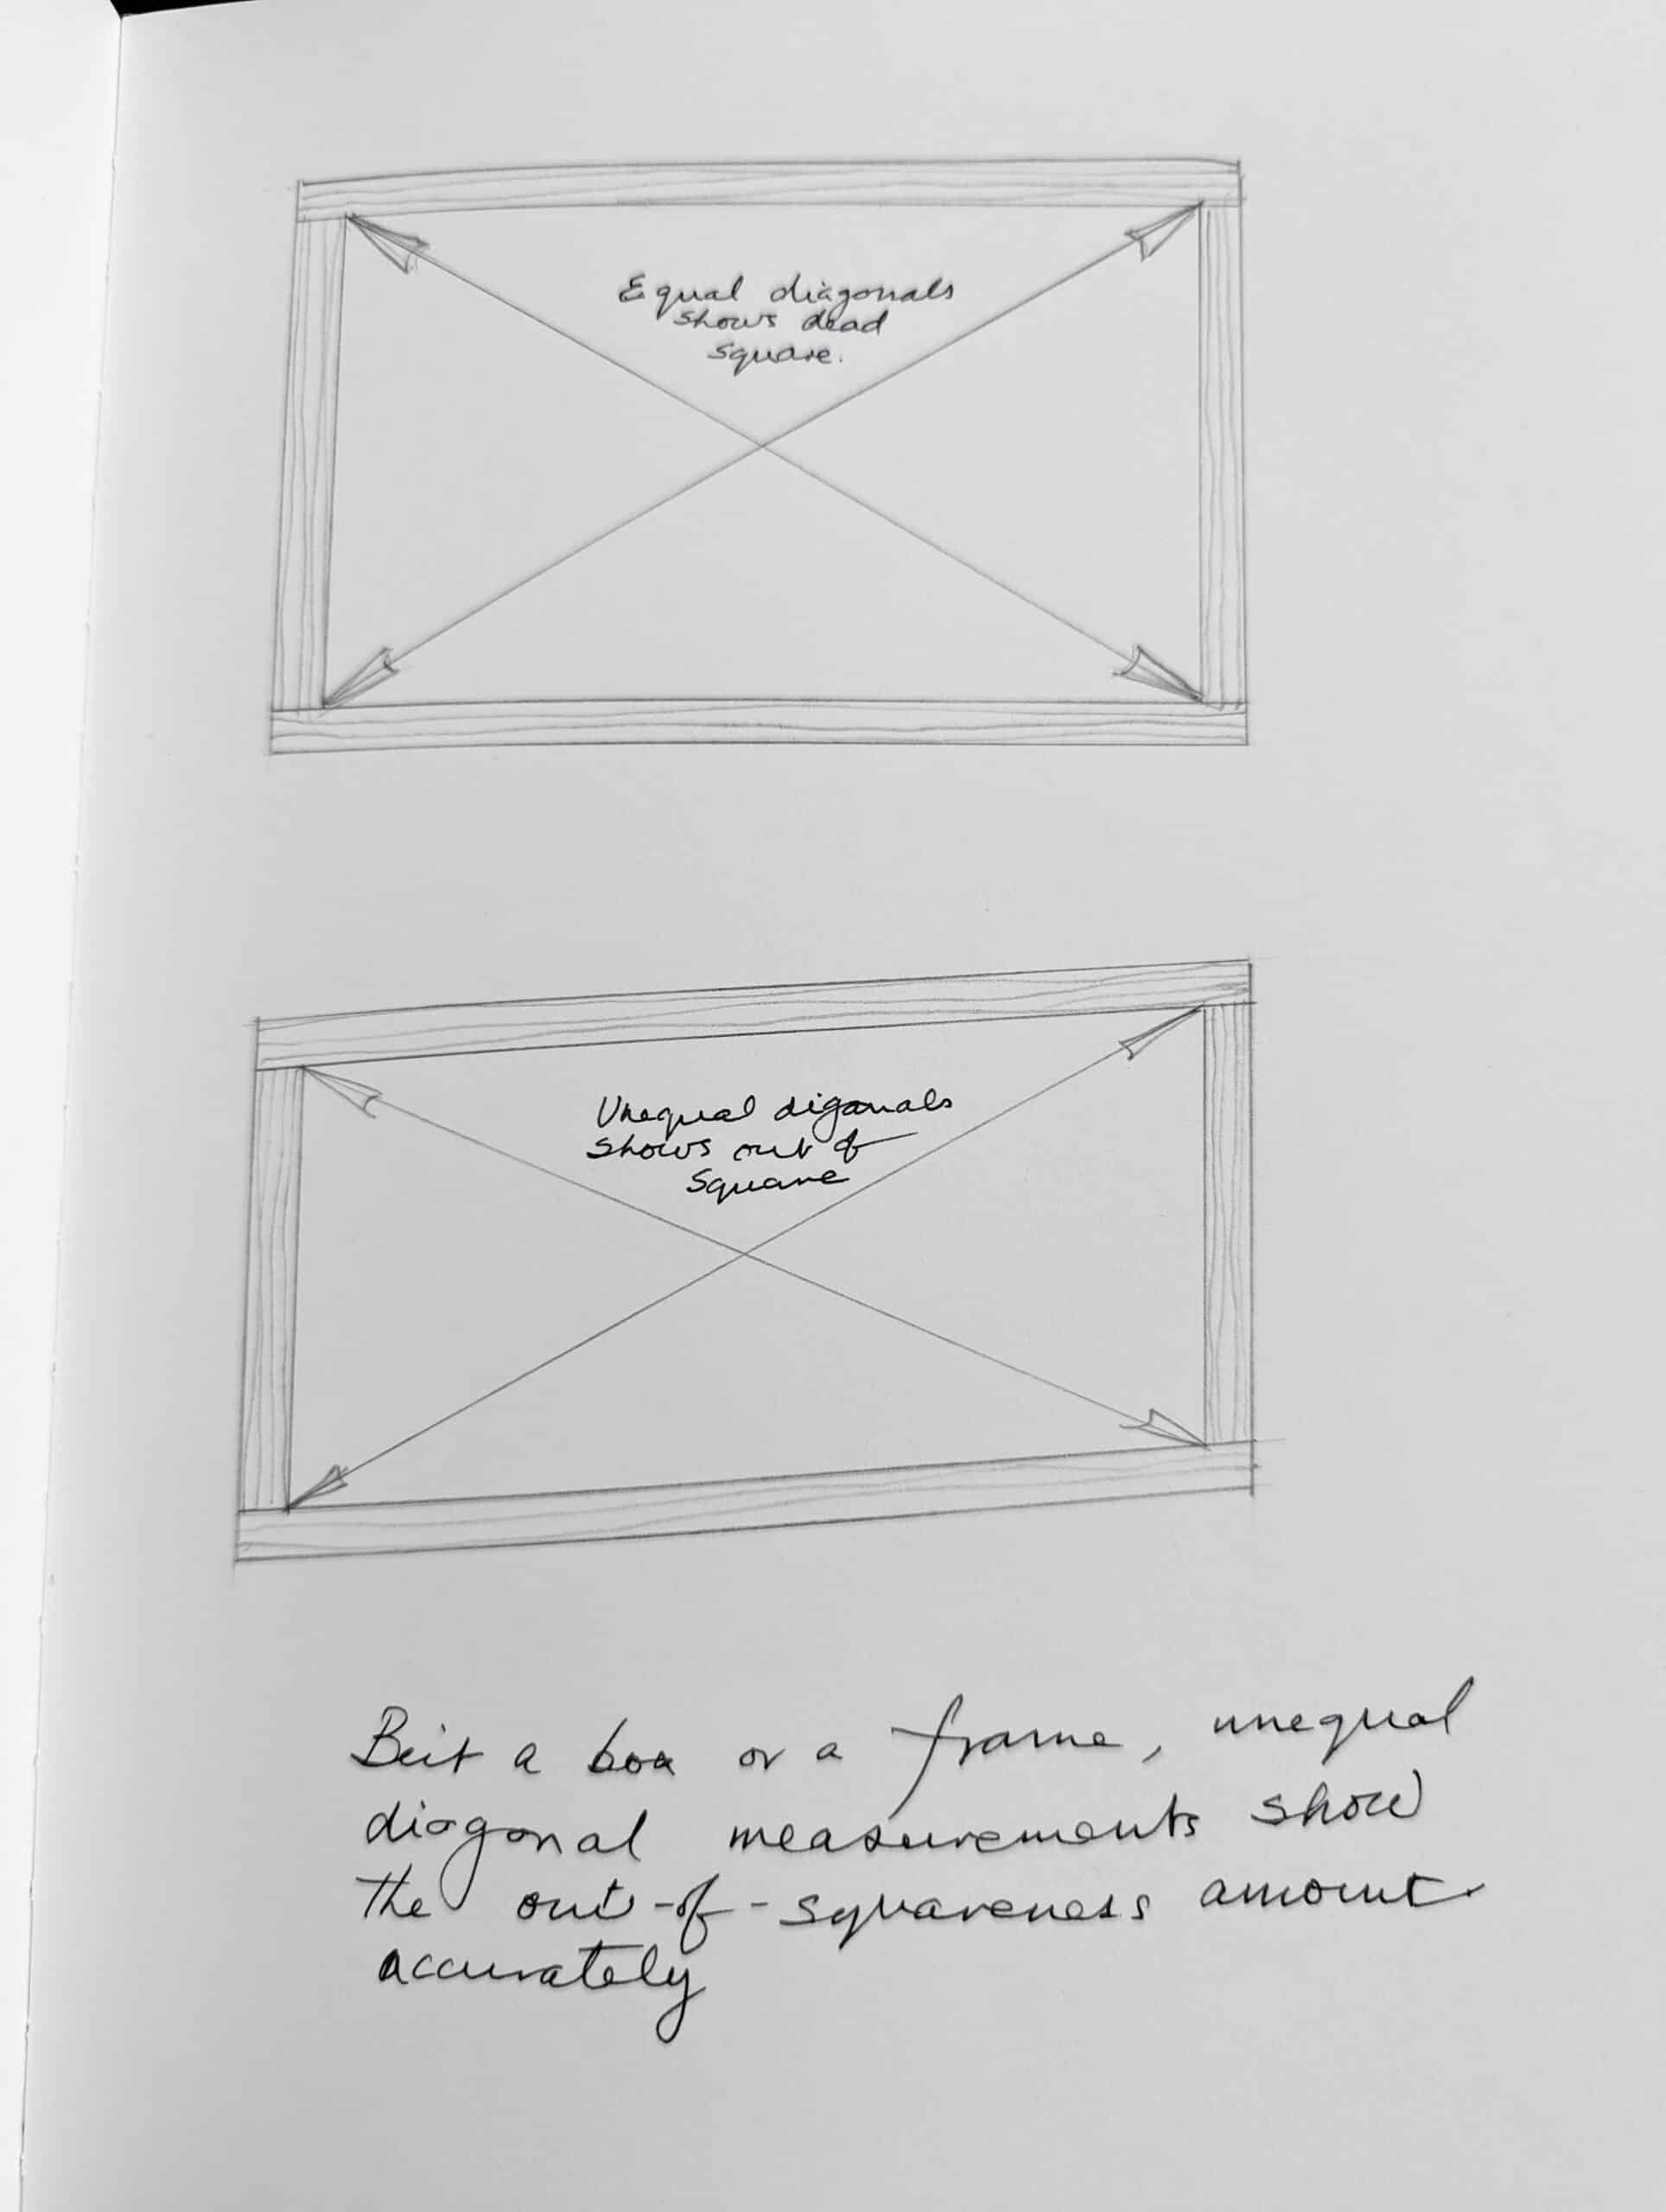
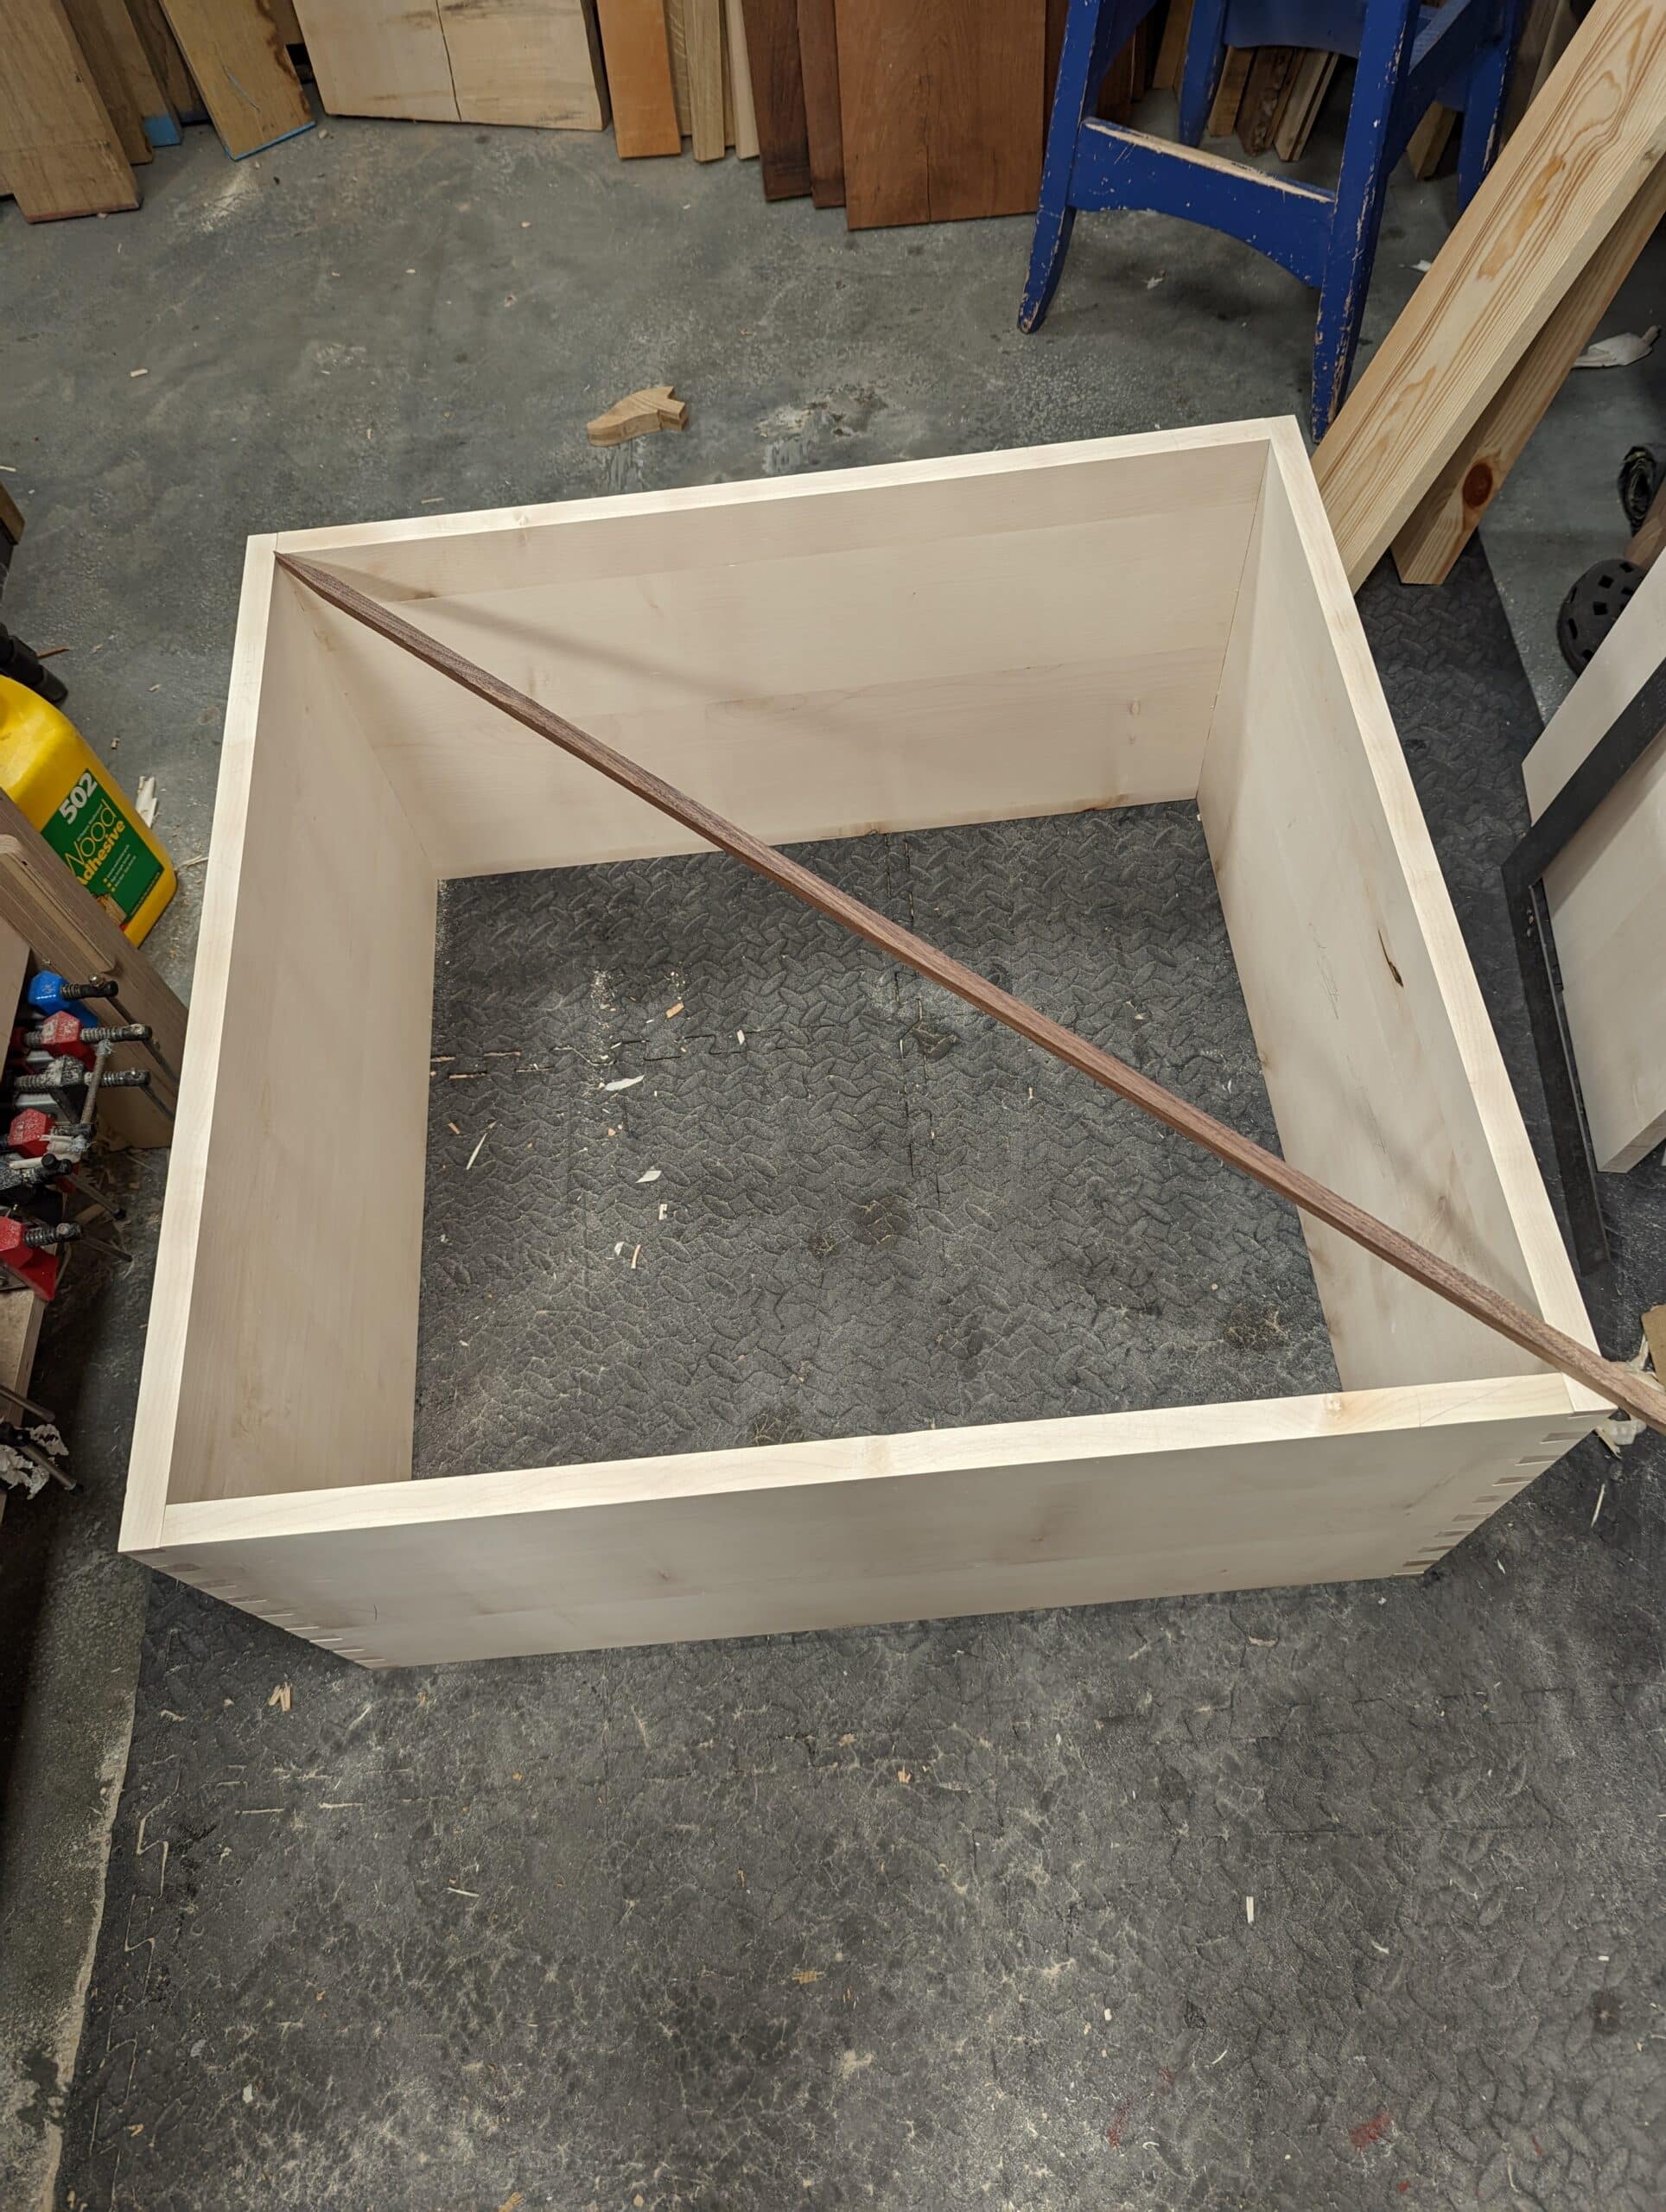
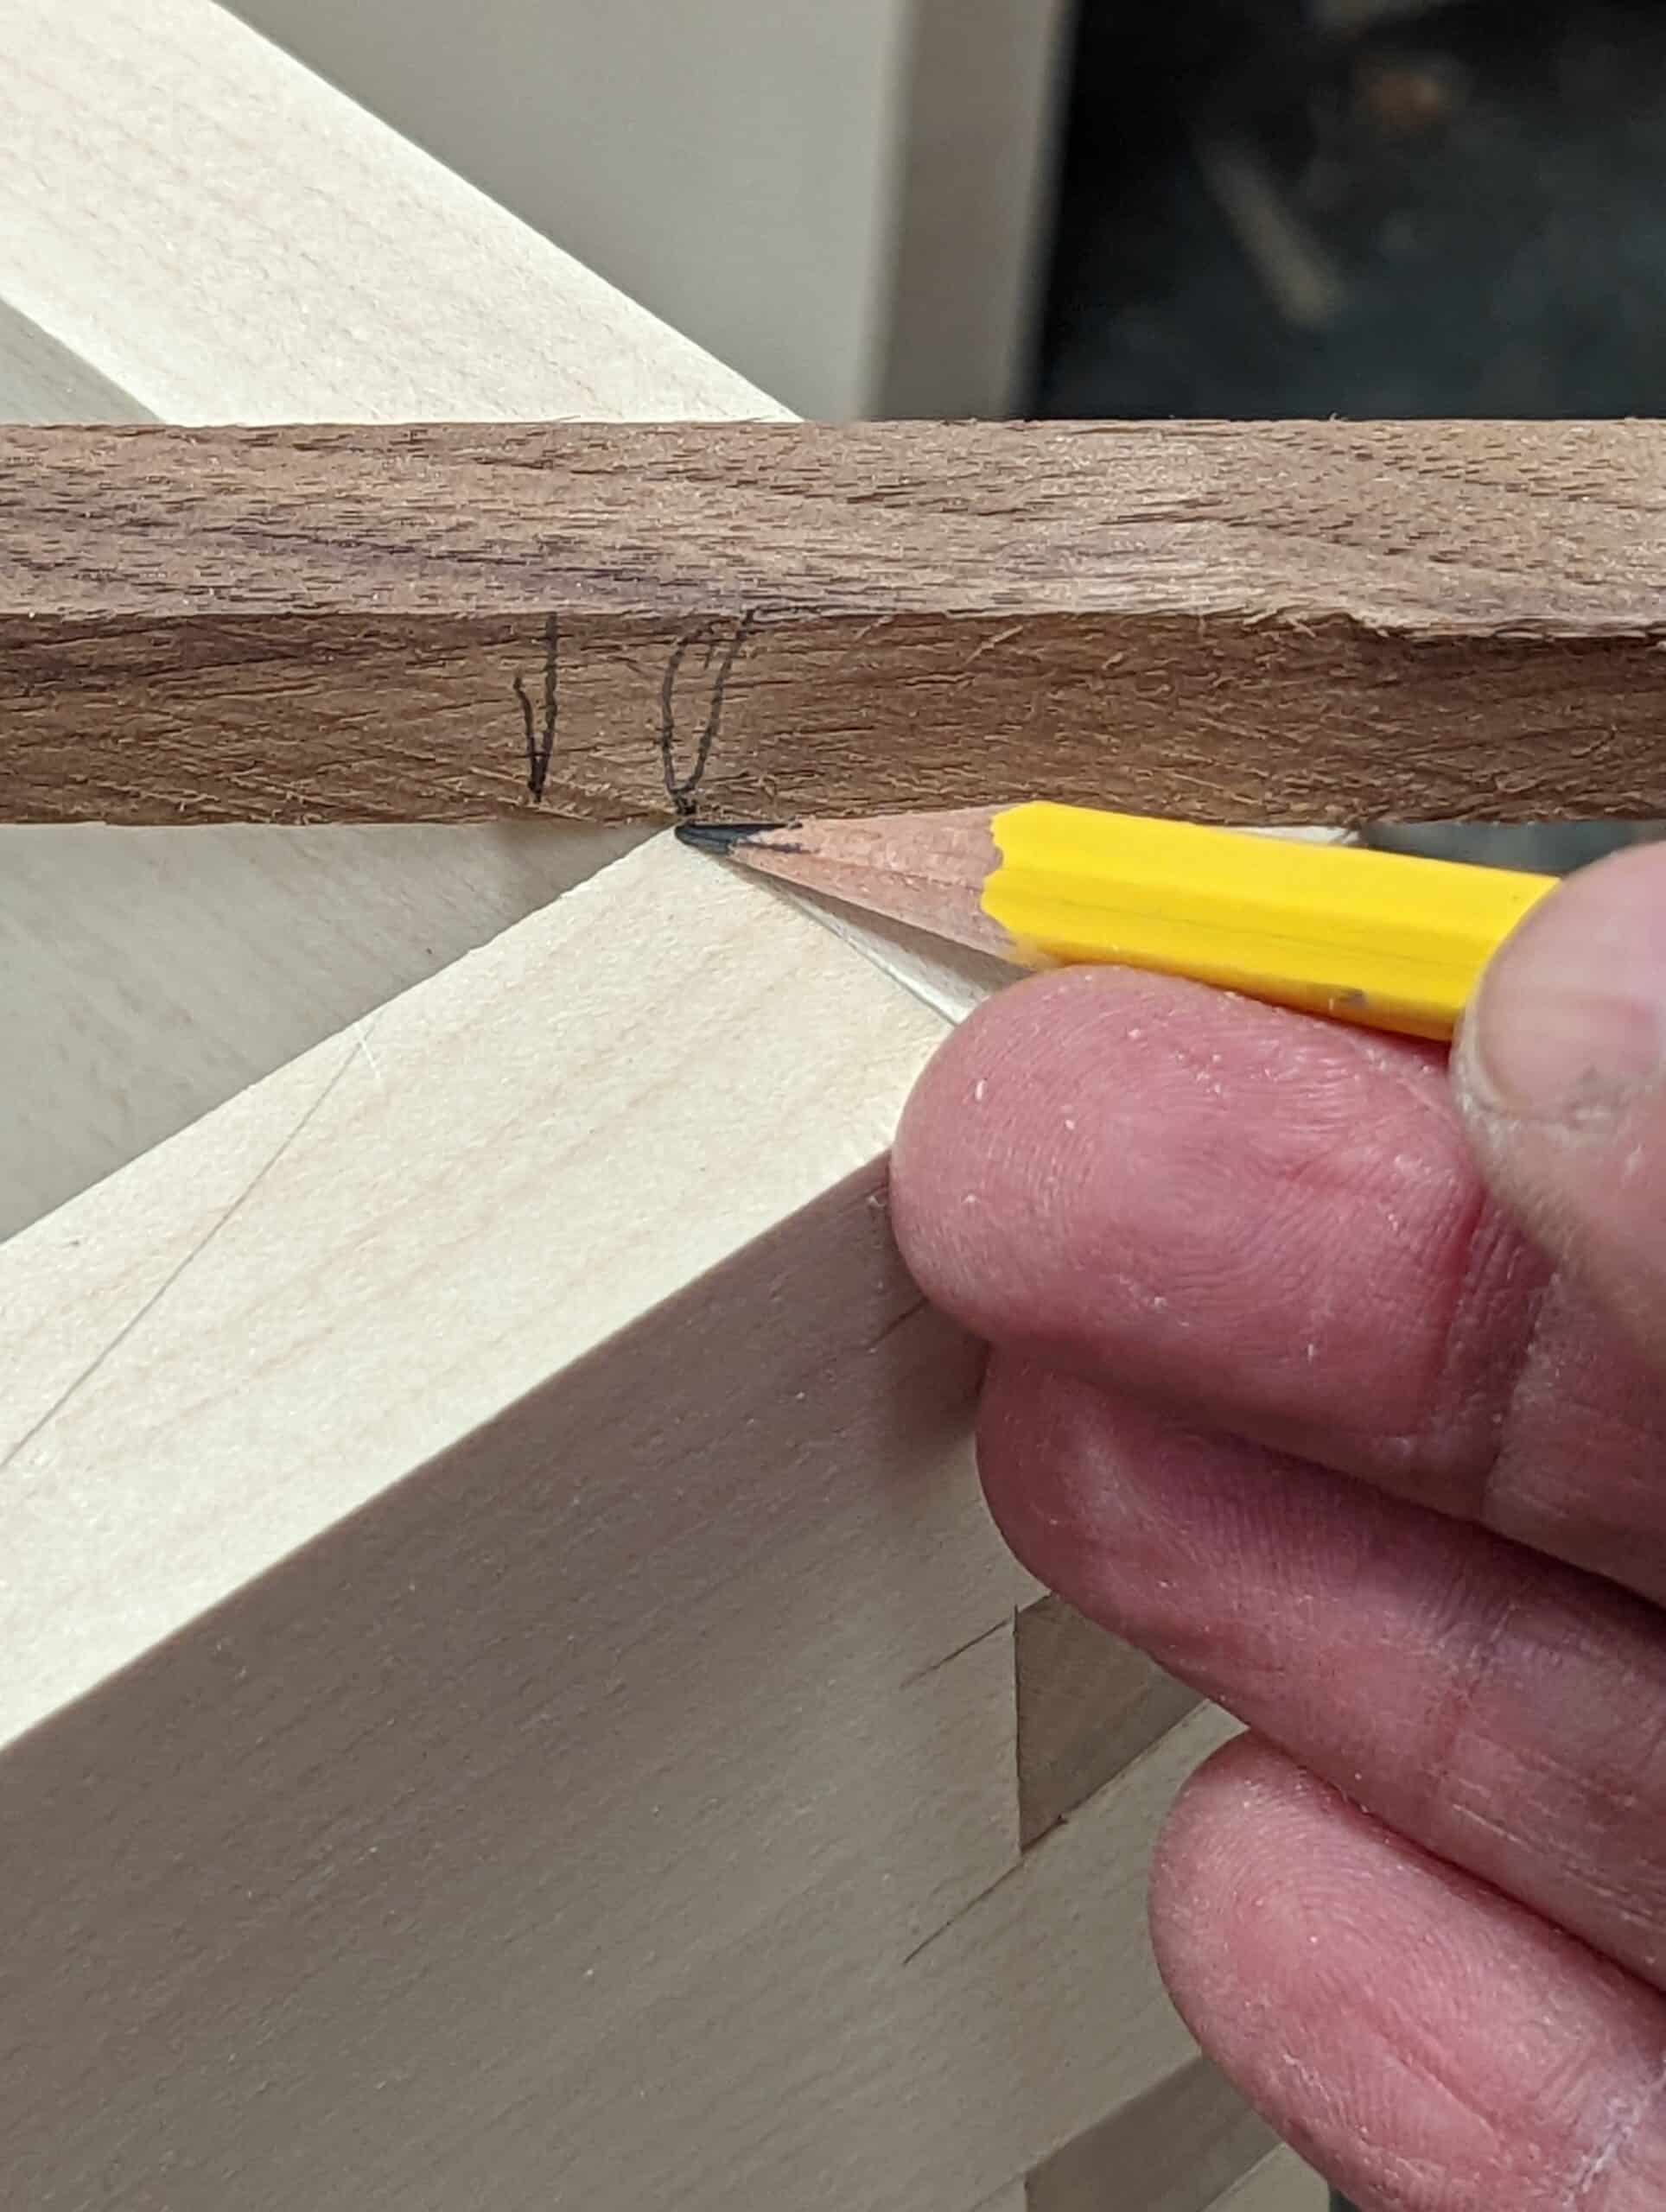
So what’s the answer? The only way to really check for square is to measure the two internal diagonals from inside corner to inside corner. If the two distances are equal then the frame is square. If there is a discrepancy then the difference between the two measurements must be halved and this split number will be how much out of square the frame or box is. I generally measure for a quick reference but I also use what we call a squaring rod where I can mark the two diagonals and then s[lit the difference using pencil markings. By marking the two diagonals onto the rod I can then split the difference to show where the frame can be pushed to to get it dead square.

For frames of different types, pushing the project to evenness and bracing one of the corners will usually keep the frame square, allow installation and fixing, and the frame will remain square. On boxes, we can maintain squareness by fixing the bottom to the sides or using grooves to house the bottom and keep it square that way. This is mostly for larger boxes as cabinets. Small boxes remain square after the glue goes off as long as you clamp them and they are square beforehand.

Fortunately, wood loses a percentage of its elasticity over the years and stabilises. Our aim is to get the frames and boxes as square as possible. The shoulder lines are the absolute first step to this. Working accurately at this micro level, the shoulders of our tenons and dovetails, things around there, usually translate into good levels of extended squareness throughout a project. Exactness in distance between shoulders is another critical point too. Any variation there will cause out-of-squareness and parallelity too. When this happens, we either need to correct or whack it out to even out the discrepancy. In big frames, a millimetre or two makes little difference, on a small box it can be more critical.
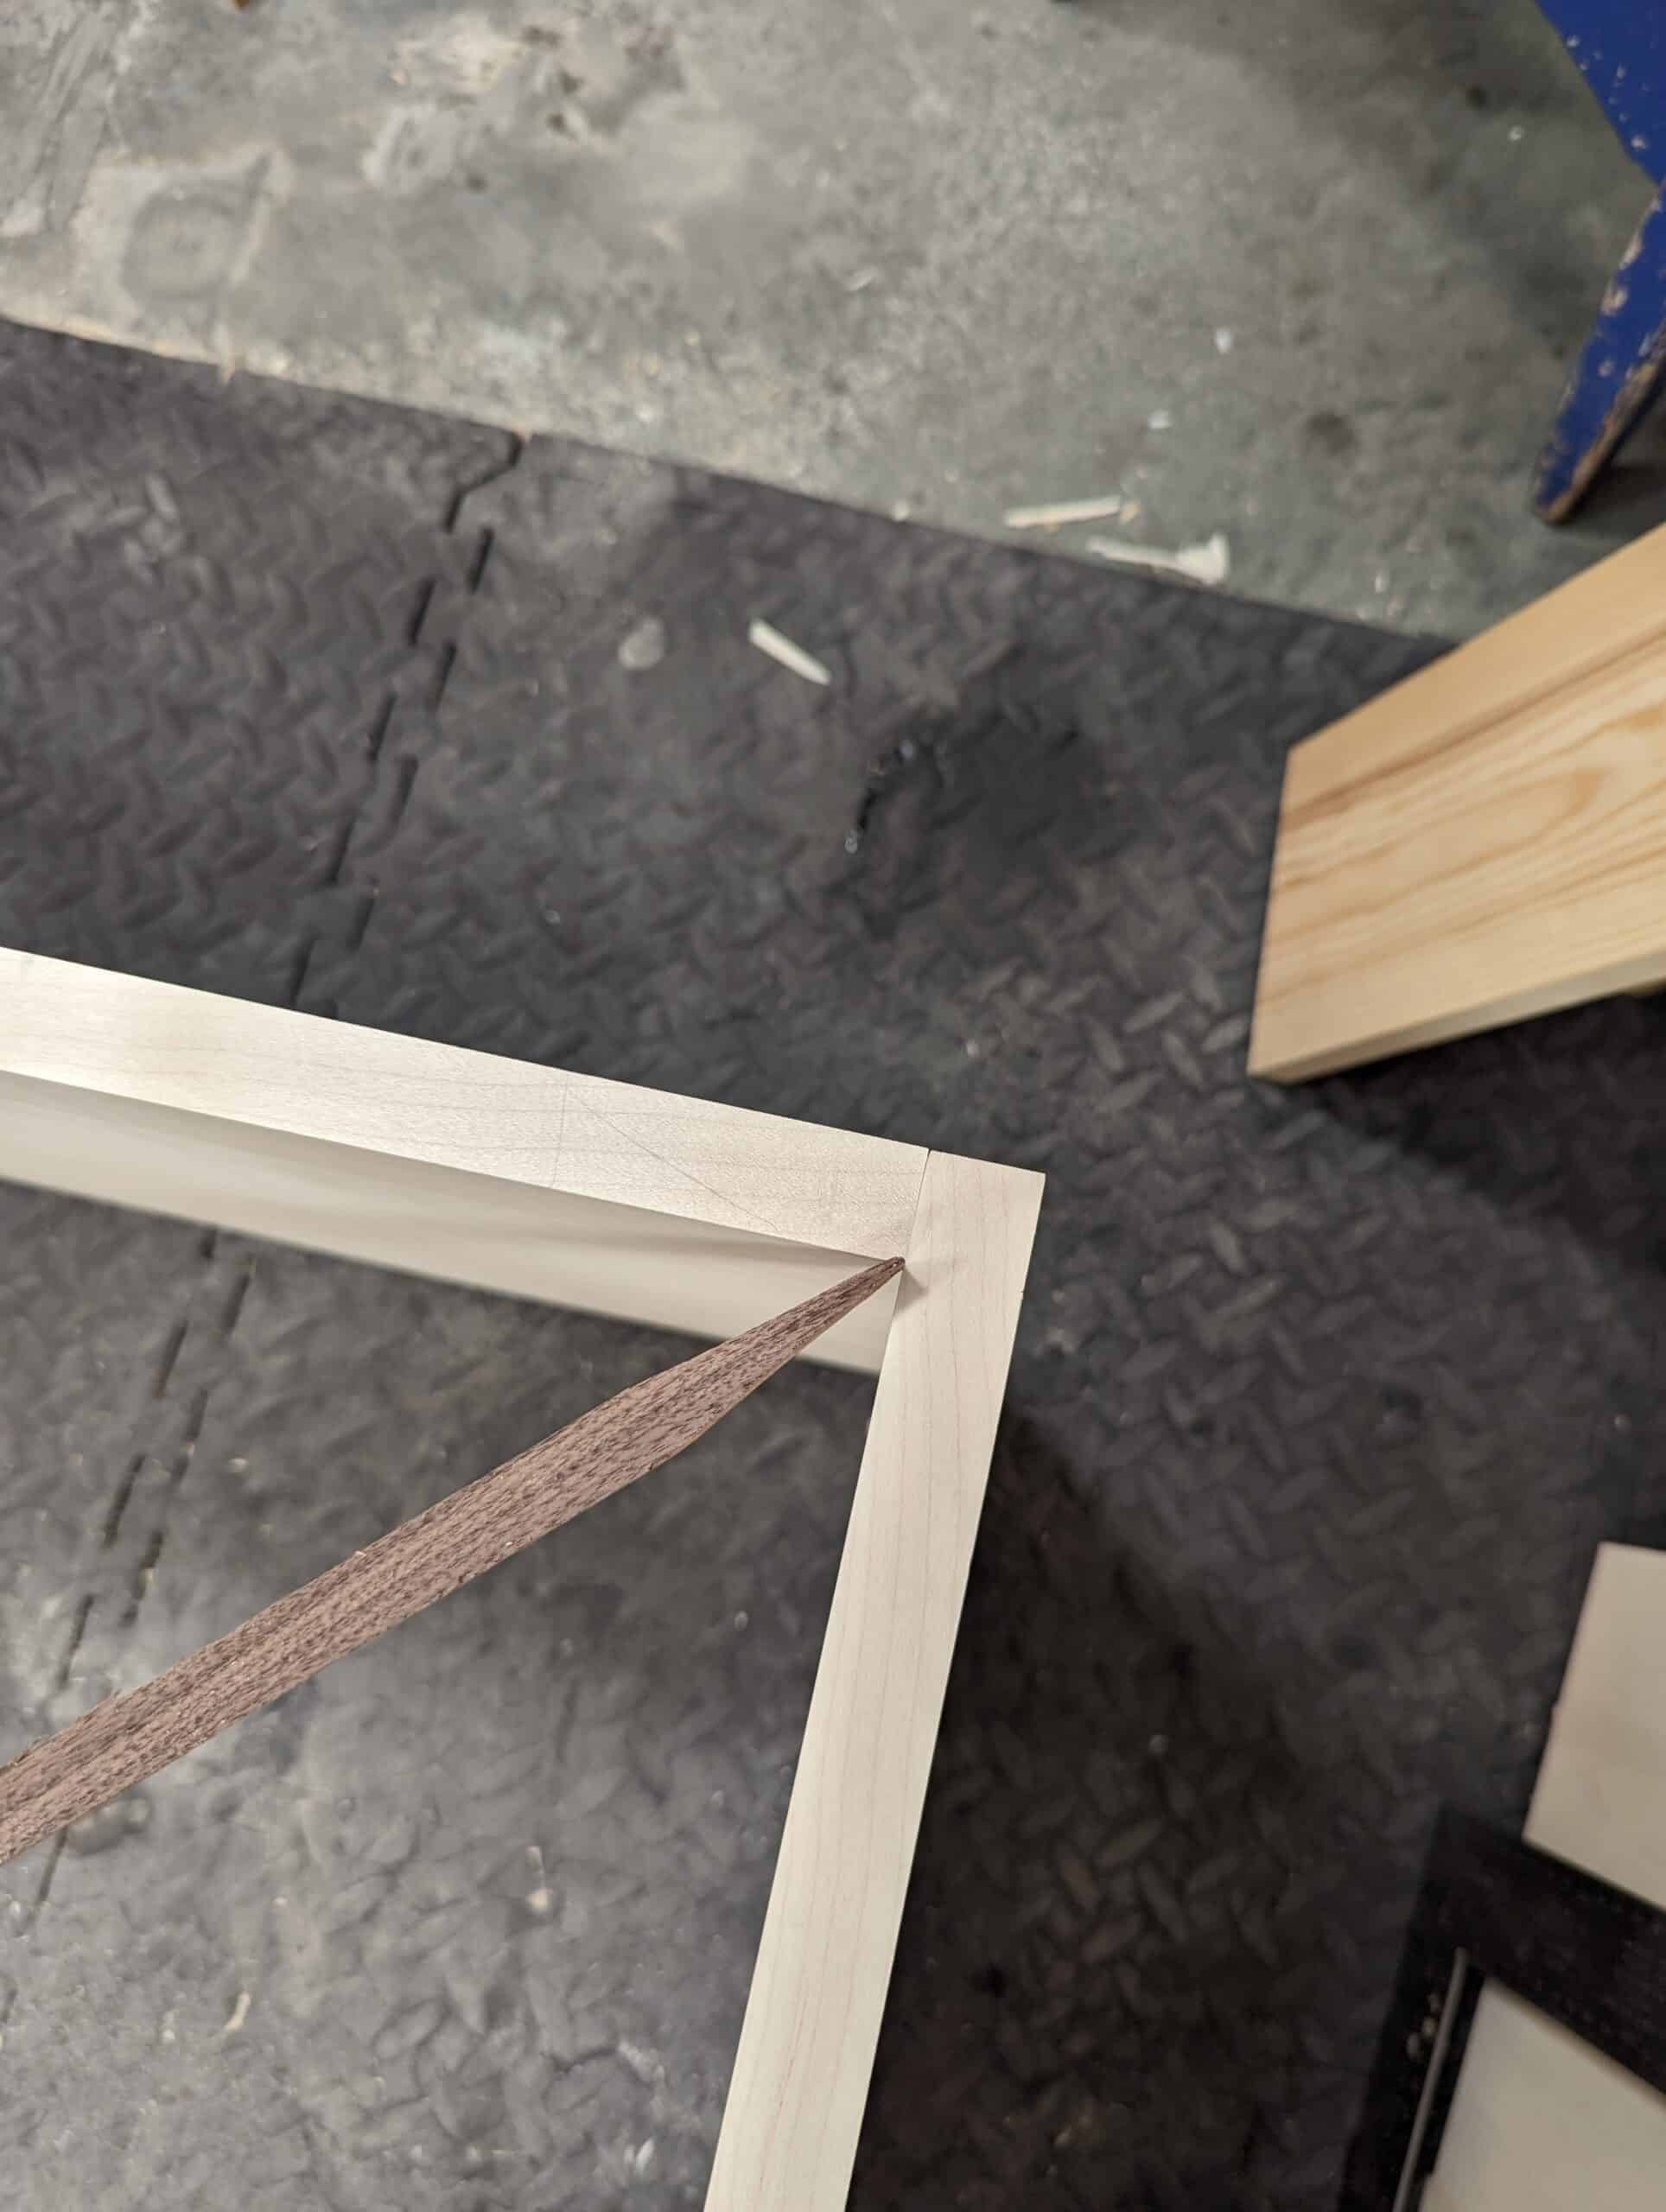
Sometimes it is not possible to go internal corner to internal corner because of some obstruction. In such cases, you can mark off a distance to each side from one end. Now measure diagonally from the inside corners to the marks. If they are equal in diagonal distance then the frame is square. If not, any discrepancy halved will give you the amount that it is out of square.
Though you can simply use a tape to measure internal corner distances, it is easier to use something more rigid like a length of wood with a point to fit neatly into the corners . . .

. . . but sometimes a small headless nail to the side of a stick at one end will work just as well.
As a final thought, remember that placing clamps out of parallel when glueing up can and will pull the box or frame out square. All clamps should always be parallel to the sides or frame and checked for square as discussed. If the project shows out of square still when checked than you can run the clamps out of parallel to correct the discrepancy too. Very hand.
Interesting tricks:
– marking the difference to be able to visibly halve it instead of using trial and error;
– using a nail in the corner;
– using markings where the corner can not be reached.
All this isn’t shown by the vendors of adjustable pinch rods.
This blog of course assume we want to make something rectangular and not another type of tetragon. “Exactness in distance between shoulders is another critical point too. Any variation there will cause out-of-squareness and parallelism too. “
remember your formula for finding a true 90° angle as well: 3+4=5 whether inches or feet, would assume it applies to metrics as well…
The Pythagorean theorem.
a*a+b*b=c*c
Your method is accurate for metric units.
It does indeed apply to Metrics. The 3,4,5 method came to my mind first but upon reflection I think Paul’s idea would be much quicker and probably just about as accurate.
If you ever watched the old time carpenters that were good at their craft. They carried a folding ruler, to cross measures. It was more ridged than a tape measure. I like to use pinch sticks.
It’s too easy to say they did this or that. Actually, in my world, even with rigid folding rules, most of them grabbed a stick and as tape measures were uncommon at that time they always had several lengths of sticks including ones that were longer than a folding rule.
My dad carried an ‘extension rule’ (folding wooden ruler), for years. My older brother and I both just retired from construction, and we BOTH carried them. (Still do in my shop)
Thank you for this, Paul. I will try to rely more on this technique rather than my square. (Guilty as charged!)
Would you mind speaking to the reasons why measuring “outside corner to outside corner” would be unreliable or not as accurate? Is it simply due to the chance that there could be variations in the thickness of the stock?
If you put one end in an internal corner then you limit it’s movement and only need to look at the other end. Avoids slippage.
Thanks Paul. I though using a square to measure and the diagonals measurement were of equal value. I was obviously wrong. I will make the pointy rod as I have plenty of suitable scraps for just such a thing.
Thanks for the pointy-stick tip; now I know why.
Hope you answer the question about measuring between exterior corners vis-a-vis internal corners, though I think I can guess why.
Went back to your 2011 blog on accuracy and reliability of Starrett Combination squares. Several months ago I took the dollar dive and bought both the 6″ and 12″ combos. Gulp. But wow, what a difference!
There can be a variance in thicknesses when using hand planes so we work from the inner tighter tolerances and let the intolerances magnify to the outer regions to float.
When doing a box, one use knife walls to mark what will be the internal dimensions of the sides (marking the second side identical to the first one). After assembly, one use a plane to clean the outside of the dovetails. So even when starting with boards of uniform thickness, the outside dimensions are not as accurate as the inside ones.
Great article. As a steel fabricators, I always use this technique when making frames of any size. So much more accurate and especially so, I’m sure, with the inconsistencies with wood.
This is so, so helpful as I have always struggled with the tape measure method because I worry about not fitting the square end of the tape measure into the corner at the right angle. The stick method seems so much easier (for ignoramuses like me) Thank you, sir !
If you have a spare tape measure, you can always remove the metal end piece, and simply screw/bolt in a triangle of wood in its place. That way you’ve got a retractable inside dimension measuring tape. Not as easy as the stick method, but I’ve used it when making a large wardrobe as I didn’t have a stick that length. You need a decent tape that holds taught when extracted of course.
Yet another proof that basic trigonometry IS useful in “everyday” practical situations (thinking back of so many times I said and hear “why learning this? We’ll never need it!” while at school).
Knowledge plus a stick/string beats fancy gadgets (with mental laziness) any day.
Thanks Paul!
Thank you for highlighting this Paul, at least people that read your blogs will know the correct way. It never fails to annoy me how many times I see YouTubers reach for a small square and try and check if their larger box type construction is square.
When squaring and bracing a door lining you can use the no measure no square method just using some lengths of wood and some pencil marks. This needs to be a video to demonstrate Paul. As a woodworking influencer people will listen and learn from you.
We have an emerging generation for whom much handed-down knowledge from master craftsmen to apprentice through the centuries, unwritten knowledge mostly, is taken for granted by each generation. It’s important to make sure this new-genre hand toolist gets the information that goes beyond pouring acrylic into slabs of cracked wood to make another dull and boring river table.
Ah yes, the inane practice of wasting wood and acrylic at the same time. Add to that some butt ugly steel trestles and you have the perfect storm.
You forgot spalting and river end(s). Preferably “joinery” done with a black and green machine made for cutting oblong dowel holes, for overpriced oblong dowels…
Way back when I was doing framing on home construction, we built walls on the “deck”. Once the studs and plates were fastened together, we used a very long tape measure to measure the diagonals. If adjustment was necessary, a sledge hammer could move it into square. Fasten plywood to it, and it stayed square when you tipped it up – you just needed to make sure it was plumb all the way down the wall.
Another great trick, that also explains why discrepancies in smaller pieces are more critical, is the angular rule of thumb, and the angles don’t even need to be 90s to work.
For every degree out of nominal, the distance will vary by .017″ for every inch.
As long as you know 2 of those variables, you can calculate the 3rd. And if you’re aware of your tolerances, you can determine how far off you can be and still make a fitting piece.
Sorry, I don’t know the metric equivalent of the top of my head…
I find that clamps can cause all sorts of mischief even when carefully set to be parallel, misleading me when I use a square to check for right angled sides. Paul touches on this in the last paragraph. Clamping could be a subject for a whole article on its own.
I don’t like tape measures, other than for rough measuring beyond 2 metres. Today I measured for a walkway in an attic, which turned out to be roughly 20 metres long. My 5 meter tape measure was handy for that, but when I had to measure from the existing walkway to the wall, I had great difficulty extending the tape measure beyond 1.5 meter. My folding ruler was quickly retrieved and the tape measure hung on the tool pocket, and I got the measurement I needed with ease.
In my shop I have steel rulers of different lengths; the longest is 1 meter. Beyond that, I use a stick of wood.
It amuses me when I see youtubers using a tape measure when doing a project, and in their channel you can find videos about the five cut method or which ever accuracy fad is circulating at the moment. It reminds me of a Walter Levin lecture where he demonstrates what the uncertainty of a measurement means. Nothing is more accurate than the least accurate step.
Pointed stick is a clever idea will use