Router Plane Kits Are Available!
We have finally caught up on demand from an initial group who said they wanted a router plane kit, and we have a small stock available. If you want a kit rather than building from scratch you can purchase them by following this button:
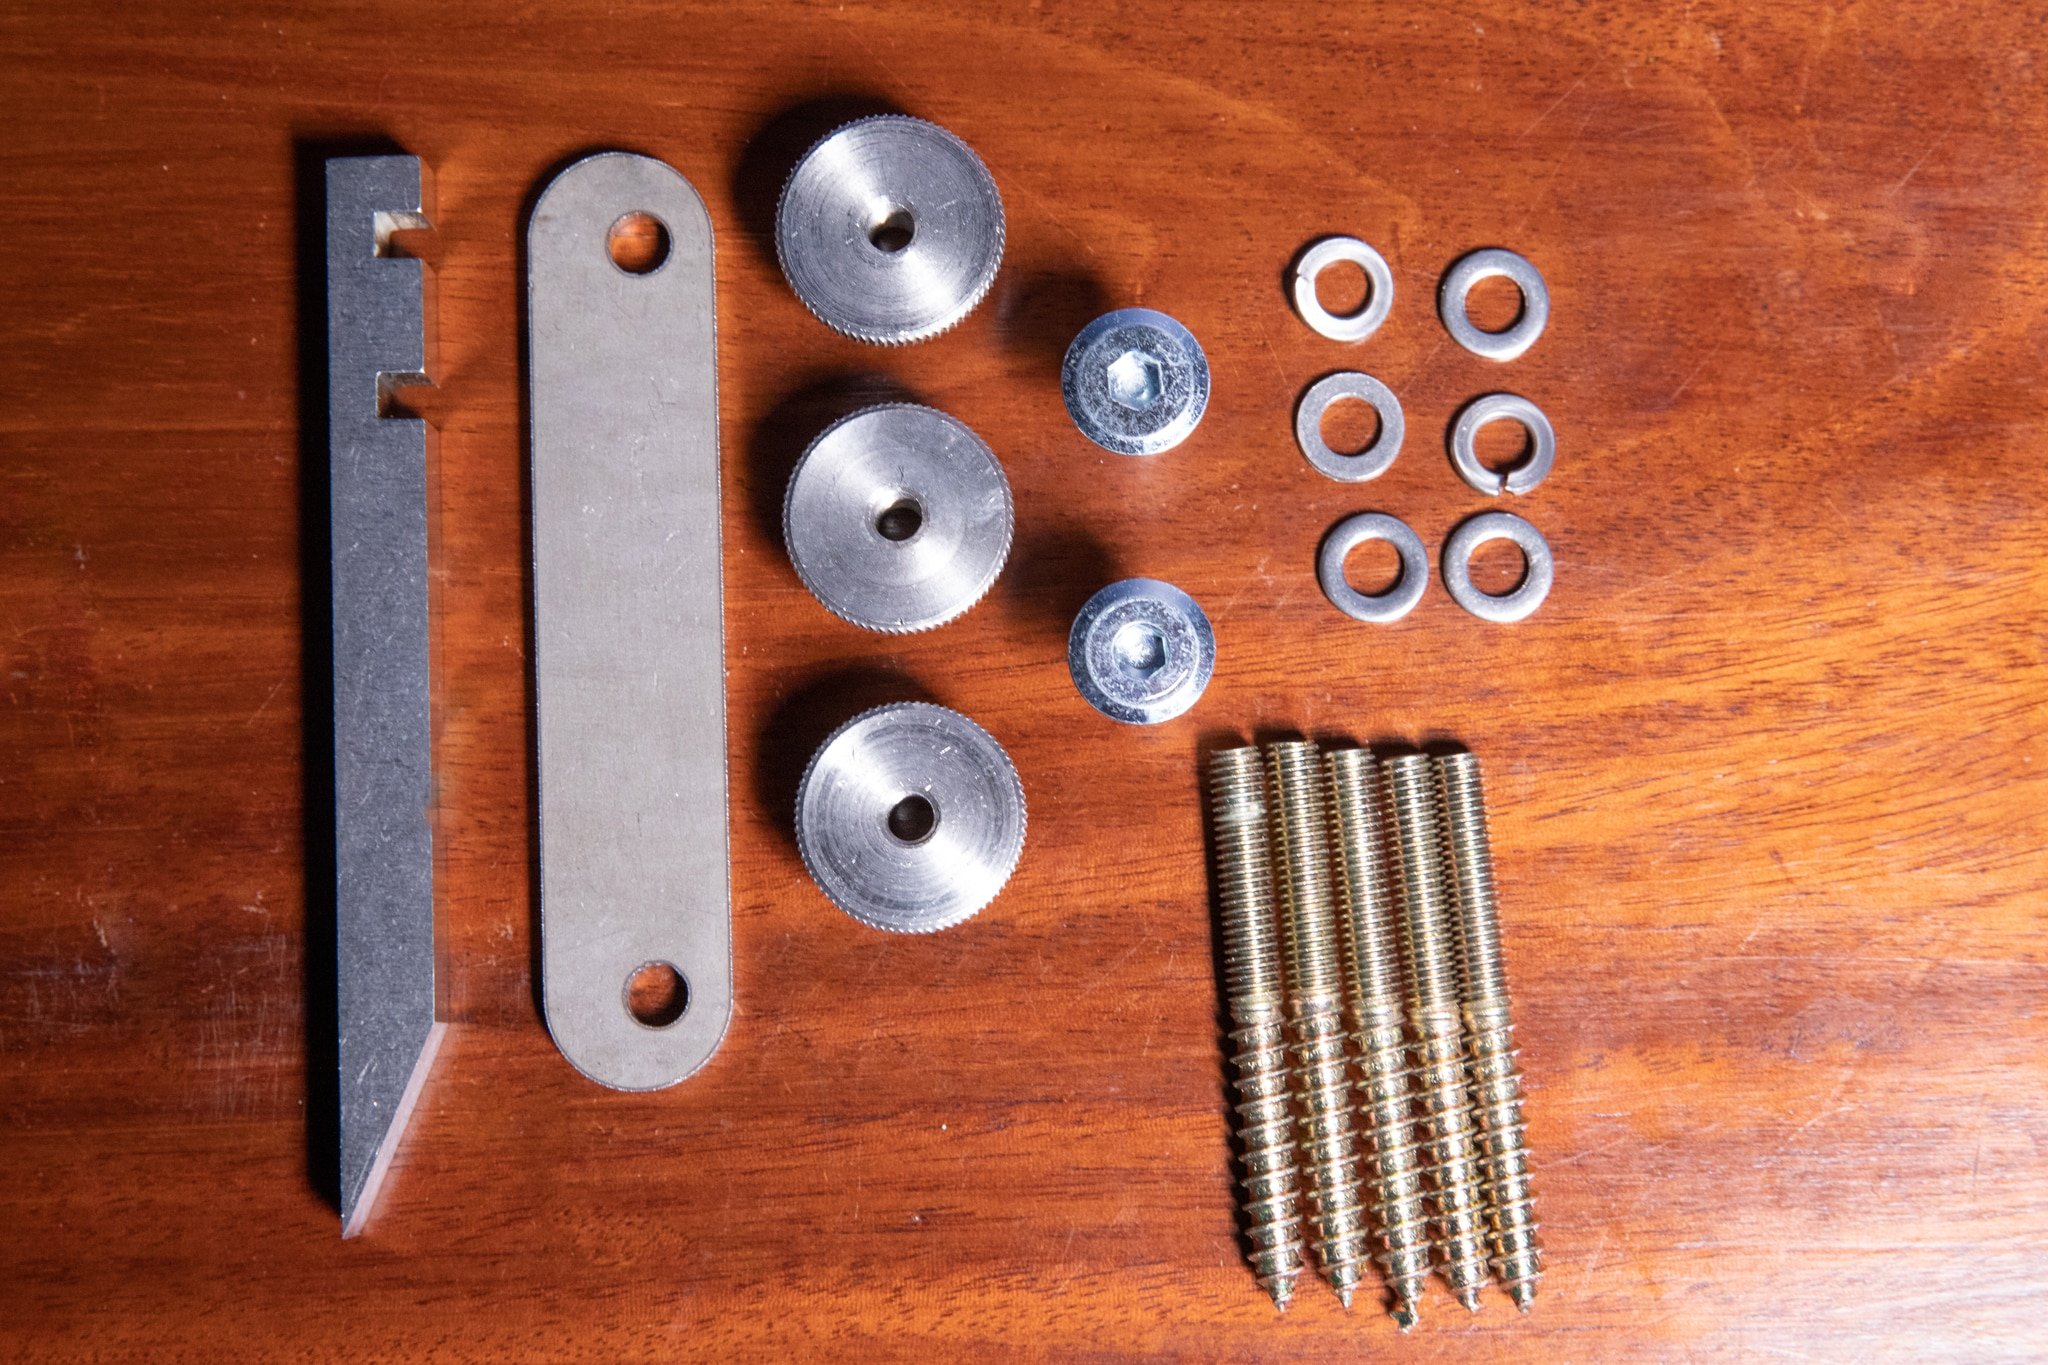
Remember though, we have given you all the details you need to make this entirely off the shelf parts plus some custom parts you can make from wood and metal.
That said, we do really appreciate those of you supporting our family business by making a purchase. It helps us do what we do!
Okay, it was a bit tongue-in-cheek my declaring my hand router plane to be ‘The best hand router plane in the world bar none!’ when we launched it for people to make but now that it’s seen a full year in daily use by a full-time user (me) I can seriously say that for me (and many a dozen others to date) it has undoubtedly become so. To clear up ambiguous boasting, my reasoning was that making a tool of such quality with your own hands that was equal to or surpassed the best of the best had to put any woodworker ahead of the curve. `This hand router did it for me and now nearly three thousand woodworkers around the world have bought our kit (and many more have likely made it from scratch following our videos).
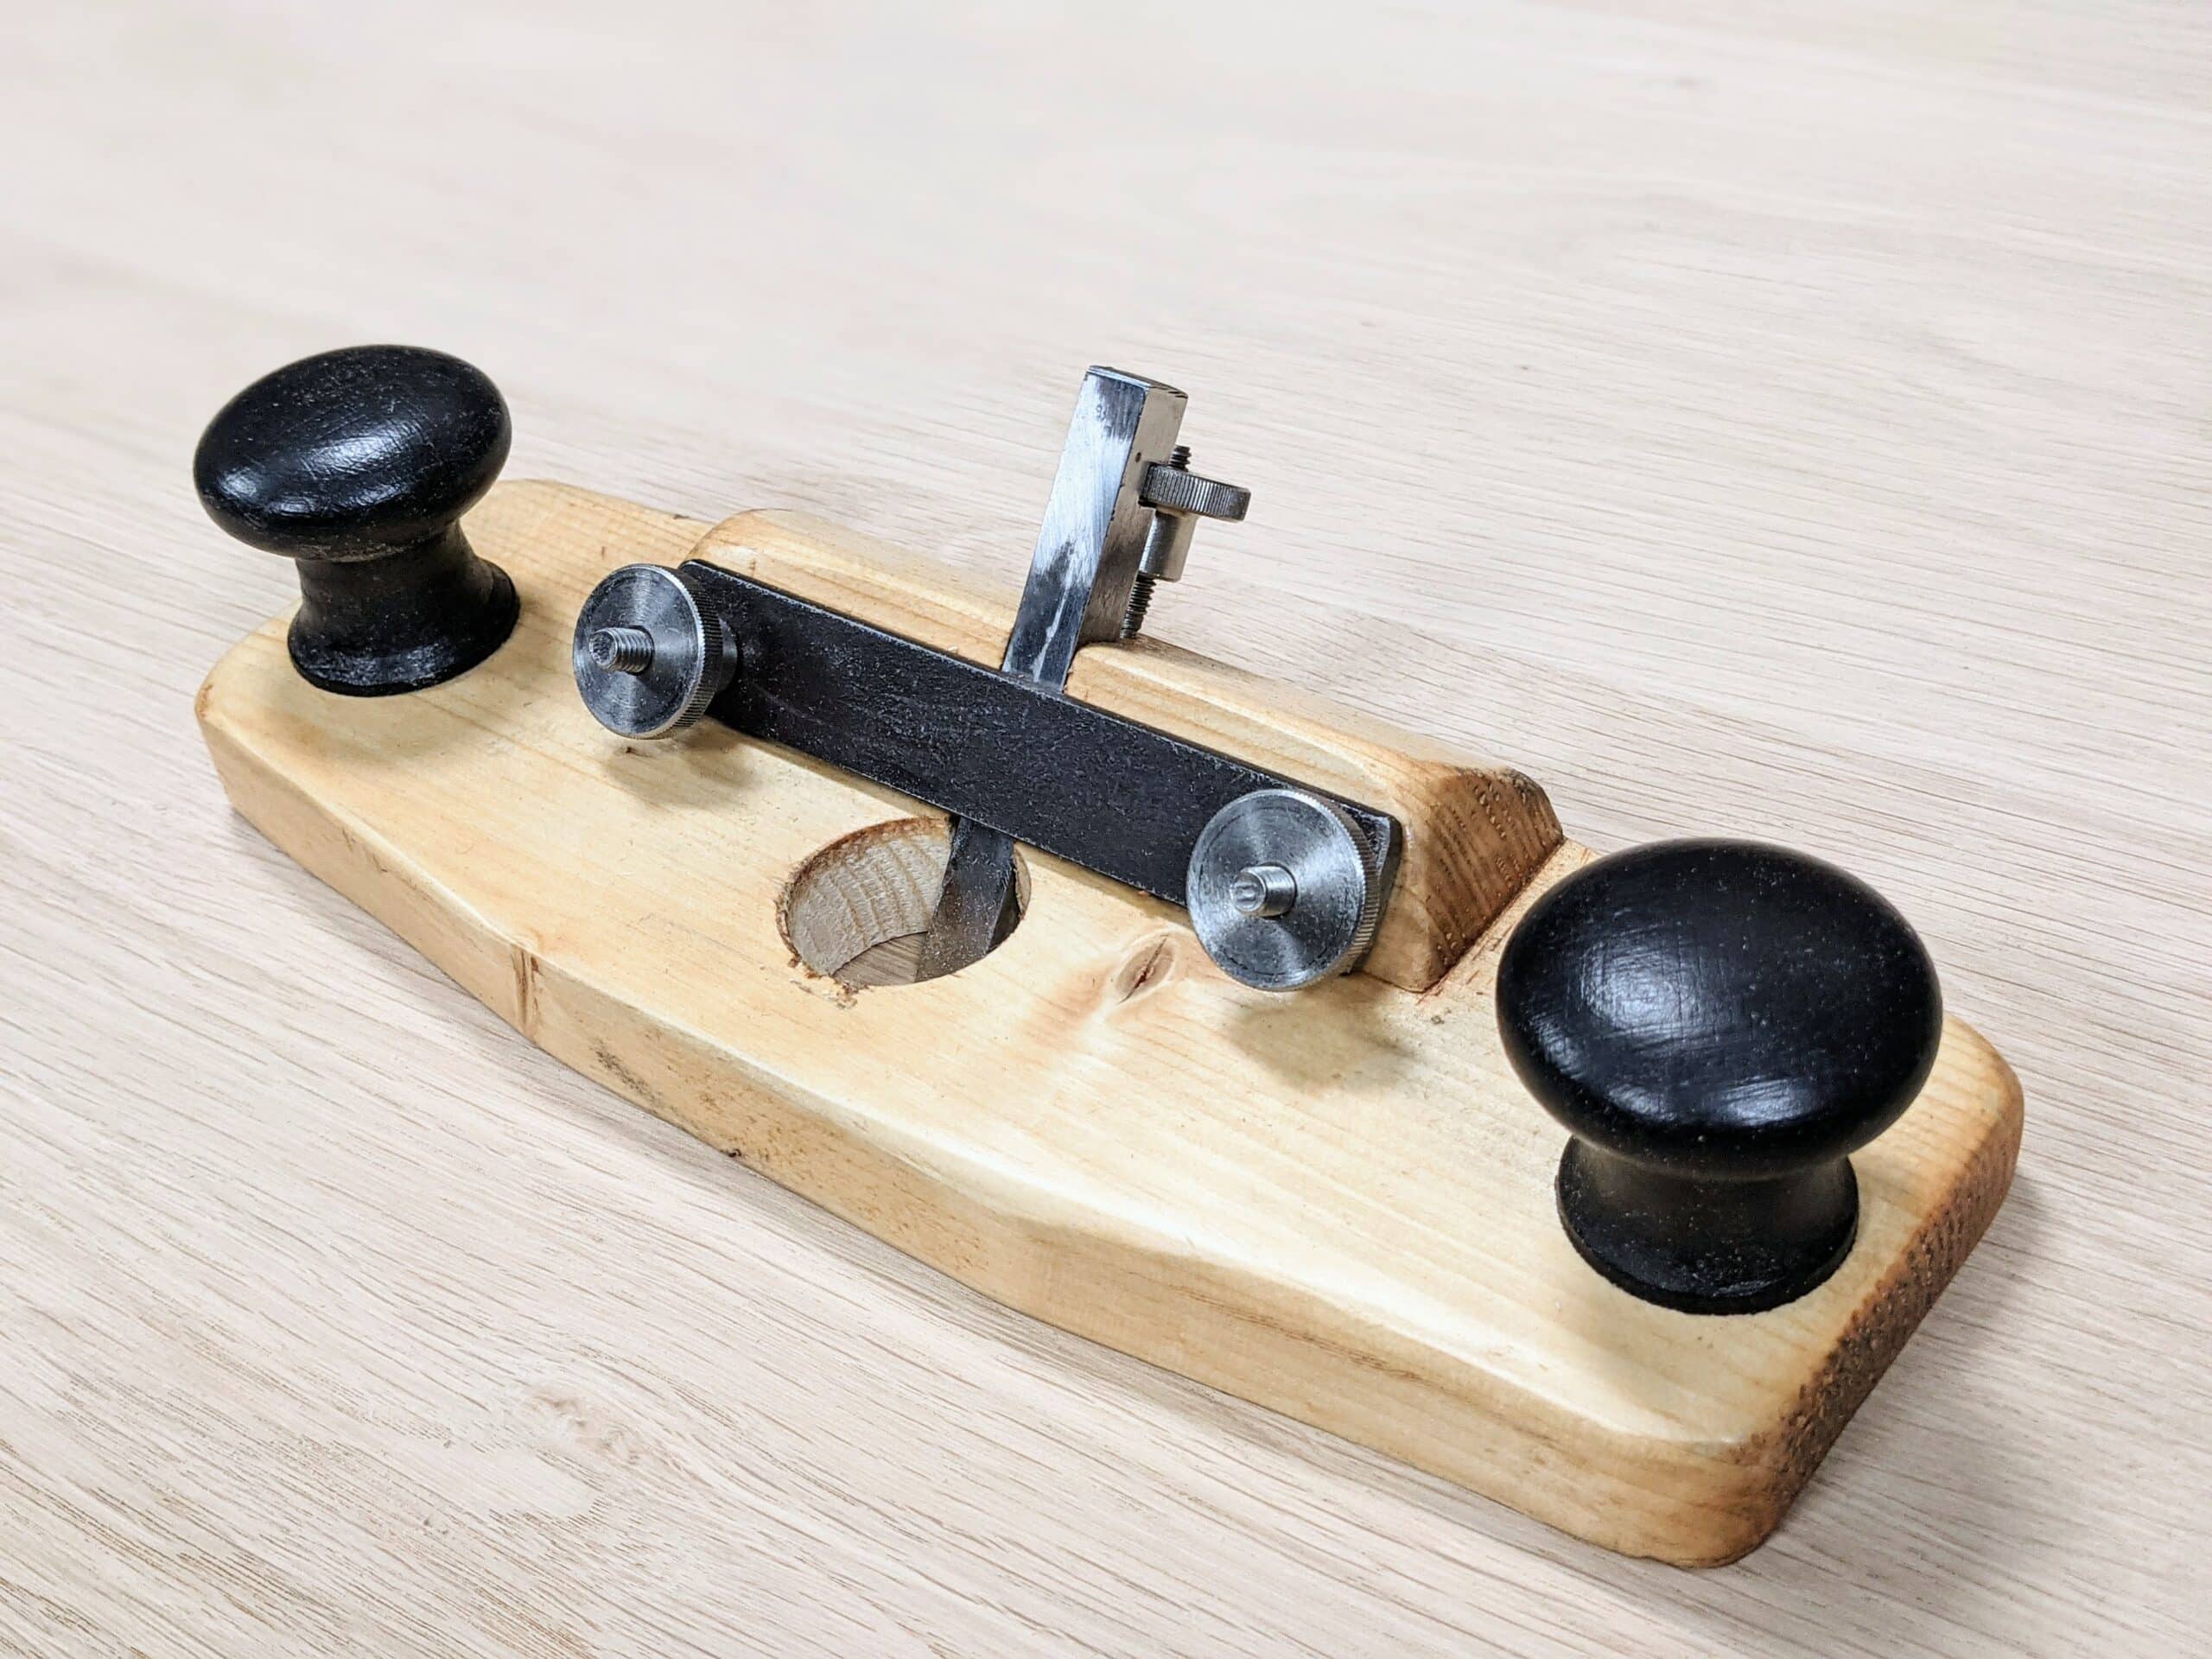
I remembered that over year ago I was finalising the details of my prototype from a spruce stud. Prototypes for me are as much about making the way-to as making the item. After a dozen days of formulating my ideas and then too designing them in my head, the making was as if I had already made a dozen of them. Every step was defined and refined ahead of any tool touching the wood or the steel, the tools and pencil to paper. An hour after starting I severed the walls of an inch-wide housing dado with a gent’s saw and removed the wood in between to a flawless level 3/8″ deep across a six-inch-wide board of walnut. I was alone and I smiled. “Done it!” I said to myself. And then I made 15 more to make sure and the ones I made worked superbly.

On my ultimate daily-user version I used solid beech. I hope that you too will make your own even if you already own a commercially made version. We have some more in stock ready for shipping this week and in the coming week or two before the next batch arrives from our specialist Sheffield-based blade maker. They have done an astounding job for us to give us exactly the specifications we wanted. The instructions for making can be followed online via video and also on my blog with a step-by-step guide on making the plane from a kit. You can also retrieve downloadable PDFs with all the details you need.
I can say without a doubt this is so worth doing. Those kits are beautifully packaged and the video guides (as always) are easy to follow and a great aide when completing the build. Another Paul Sellers staple in my garage!
What I like about this router is how easy it is to sharpen the cutter. Nicely engineered!
I had a kit and it was great . I just finished making the router plane . I used oak .
Great project with great results .
I have to say I think the plane does a better job than the Stanley .
Love it .
Will you have other size blades available?
I made one of these from the original set of videos, and I like it very much. The one problem I have with it is the smoothness of the blade retract/advance system. I have filed and sanded the slots in the blade, and it still takes a great deal of strength in the fingers (which are quite arthritic) to turn the knob for raising and lowering the blade, even with the blade holder slightly loosened. Any additional thoughts on making the mechanism work more smoothly?
Could it be that your threaded bolt hangers are not perpendicular to the face of the channel even slightly? If so, you can tap them with a hammer and bend them ever so slightly. Alternatively, take off the knurled adjustment nuts and abrade the flat side on some 150-grit abrasive.
I have had to tap on the screw to make it parallel to the iron. (left-right and forward-backward).
I have lightly filed any arris of the iron and also of the blade holder which had a burr as it was apparently stamped. Less than 3 minutes work?
It works great.
Once the cutter adjusting screw was exactly perpendicular and parallel to the blade, the movement was very smooth.
I had some difficulty in finding beech handles that were the correct diameter and height. Eventually found 2 handles at Homebase in Stockport that were the correct diameter but needed a 6mm thick make up piece to give the right height.
A great project to make and an excellent tool to use.
many thanks Paul.
Beeswax works wonders in making mechanisms smooth and preserving the finish of steel
Add some silicon grease where the blade slides that should help
Paul,
My kit is almost done. I never thought getting a simple 1 3/4 inch cabinet knob would be that difficult. That’s where I’m stuck. I live in a rural section of upstate New York and the box stores within 25 miles do not have a wooden knob that would work. We used to have some good furniture stores but they are gone. The internet had not help much. The knob pics are deceiving. My most recent idea was get a couple replacement knobs for a wood plane. My first quote was $10.00 each plus 9.00 shipping. Would you please send me your link sources for the 1 3/4 – 1 1/2 inch wooden knob. US only, the overseas postage will just drive the price up. A set of used knobs would work too if you have any links to recycle/repurpose parts. Etsy and ebay were very pricey for used things. If I had a lath I’d learn how to turn one out.
Looking forward to using the router plane.
Thank you,
David
I have made the knobs (with recycled garden furniture wood) using the method Paul has shown for the “plane front knob” (to be found in the Paul Sellers videos).
This was my first attempt at making knobs; the first one was not usable but #2 and #3 were not too bad and are functional.
I forgot to say the method doesn’t need a lathe.
Plus one Sylvain.
I also made knobs a’la the “Plane front knob” video. Not too hard and worth it to try for future knob needs.
Made my router and knobs out of a French Walnut root piece.
Only weakness was the blade (which I sourced and made like the rest of the metalware) would move slightly and shatter when cutting a bit heavy. I figured that the wood was a bit soft, so I deepened the recess under the blade and glued in a two millimeter thick piece of brass for the blade to ride on.
This worked as a charm and now it’s as good as they get.
Perhaps something to try if anyone else has the same problem, the area under the blade may be a bit short if you use wood that is liable to compress under pressure….
I had a hard time finding anything that has the right dimmensions here in Poland. All I could find in every store nearby and online was 35mm high tops! In the end I used offcuts from when I was making some hammer handles. It’s a different shape, but I have no issues with how it works or how ergonomic it is. Maybe you don’t have to try to emulate Paul’s design to the minutest detail. Take what you can find and make it work
I second what Pawel says. I made octagonal handles, out of a christmas tree I dried from around 5 christmases ago! I squared it on all sides, then drew a circle in each end and joined up various points on it to make eight points, which I joined with straight lines. Planing down to those lines leaves an octagon, which I find quite ergonomic. Might not suit everyone, of course.
I’ve made three of these from scratch now and, although I do own a Stanley router, I always find myself reaching for a Paul Sellers one instead. They are very, very good. The fine adjustment for depth is superb. It’s also a great project to make and so much more satisfying when you use it knowing that you’ve made the tool yourself!
Where does one purchase door knobs in small quantities?
I asked my daughter to get me this kit as a Father’s Day present. Put it together in my spare time this summer. I have liked it so well I built a second body/carcass with a long side on it to use with tenons or other places that need a long reach. I just have to move the cutter to this body and cinch it down – works great. Two planes in one. THANKs Paul for all you do – fantastic.
I was one of the first to sign up for the kit. it took quite a while to receive it, but it was well worth the wait.
I made a couple of changes and additions. First I drilled the center relief hole at the same 50 deg angle as the iron holder. I then cut a plug to fill the rear area enough to fully support the Iron. I then bedded the Iron with Brownell’s gun bedding system. Zero fibrations. I also use old porcelain door knobs as handles. Also built a 1/4″ and 1/8th irons from O1 steel.
I’ve used it on three complex furniture builds, no complaints..
build mine out of some local hardwood, Red Gum I believe, and it works beautifully, thanks Paul.
I’d like to add my thanks for both the design and putting the kit together (just ordered one). It is so useful as often finding small numbers of those parts is either expensive or you have to buy a large quantity. Although I did notice someone on eBay in the UK is selling a piece of o1 tool steel at exactly the right dimensions (including length) with the word plane in the listing recently, perhaps they have seen a new demand!
The most commendable part here though, I feel, is the amount of effort and care that has clearly been but in over time to provide all the guidance, videos, drawings and of course the kit. Really excellent, hopeine comes out ok.
Before the kit was available, I had a hard time finding small quantities of certain parts as well, so I ended up building one router plane for myself and three more as gifts.
Hi Paul,
I’m looking forward to receiving my kit and making this great project. I live in New Mexico. Is it possible to get a tracking number for my shipment?
Best regards,
John
Hi Paul:
Great kit, made mine in cherry! Like it better than my record router.
Hi Paul,
Order submitted.
Looking forward to assembling it on my bench made from your videos!
Just got some lovely new Veritas blades and cap irons for my inherited no4 planes. They are sharpened and waiting to be used on this project.
Best wishes to you and your family, and many thanks from a constant reader in Newfoundland.
Peter
Hello,
I’ve bought one which arrived now and I want to buy another one but your system says that it is not possible to send to my adress in Israel…?
If you contact the contact us you will always get an answer.
I just put a router kit together using Bocote wood. Bocote is hard and dense. I found that I needed to drill larger sized holes for the hanger bolts – 17/64 in. I also found it helpful to use a countersink to remove some of the wood around the hole openings to prevent surface lift up.
A tap/die for M6 x 1.0 threads was useful too. The hanger bolt threads would become slightly damaged when using the cordless drill to screw them in and a die cleaned them up for smoother functioning. One of the connector bolts had misaligned threads that required a quick tapping. Also I turned the two knobs because I couldn’t find knobs like the ones Paul used (perhaps those are UK only). I like the blade as it is easier to handle and sharpen than the Stanley 71 type blades. I’m debating getting another kit. Thanks for sharing your knowledge.
Hello. Can you tell me if the blade in the is hardened?
Yes it is, to rockwell 61