PS Plough Plane Honing Guide
Sharpening narrow cutting irons often tilt to surprisingly odd angles no matter how experienced you are at sharpening. It takes more than just countering the tilt to get the ends even close to never mind dead-on square. What’s really needed is a guide for the abrasive to give rigidity to the task. I designed this guide because of the frustration of diving from one ditch into the other. Freehand sharpening is often good for a single sharpening but repeated sharpening often follows the biases of our stronger or weightier dominant side and we end up with the inevitable skewed end. On deeper grooves that might work fine, but on inlays or shallow recessing the bottom of a groove mostly needs to be parallel to the top face of the wood otherwise our inlay or inset piece ends up tilted.
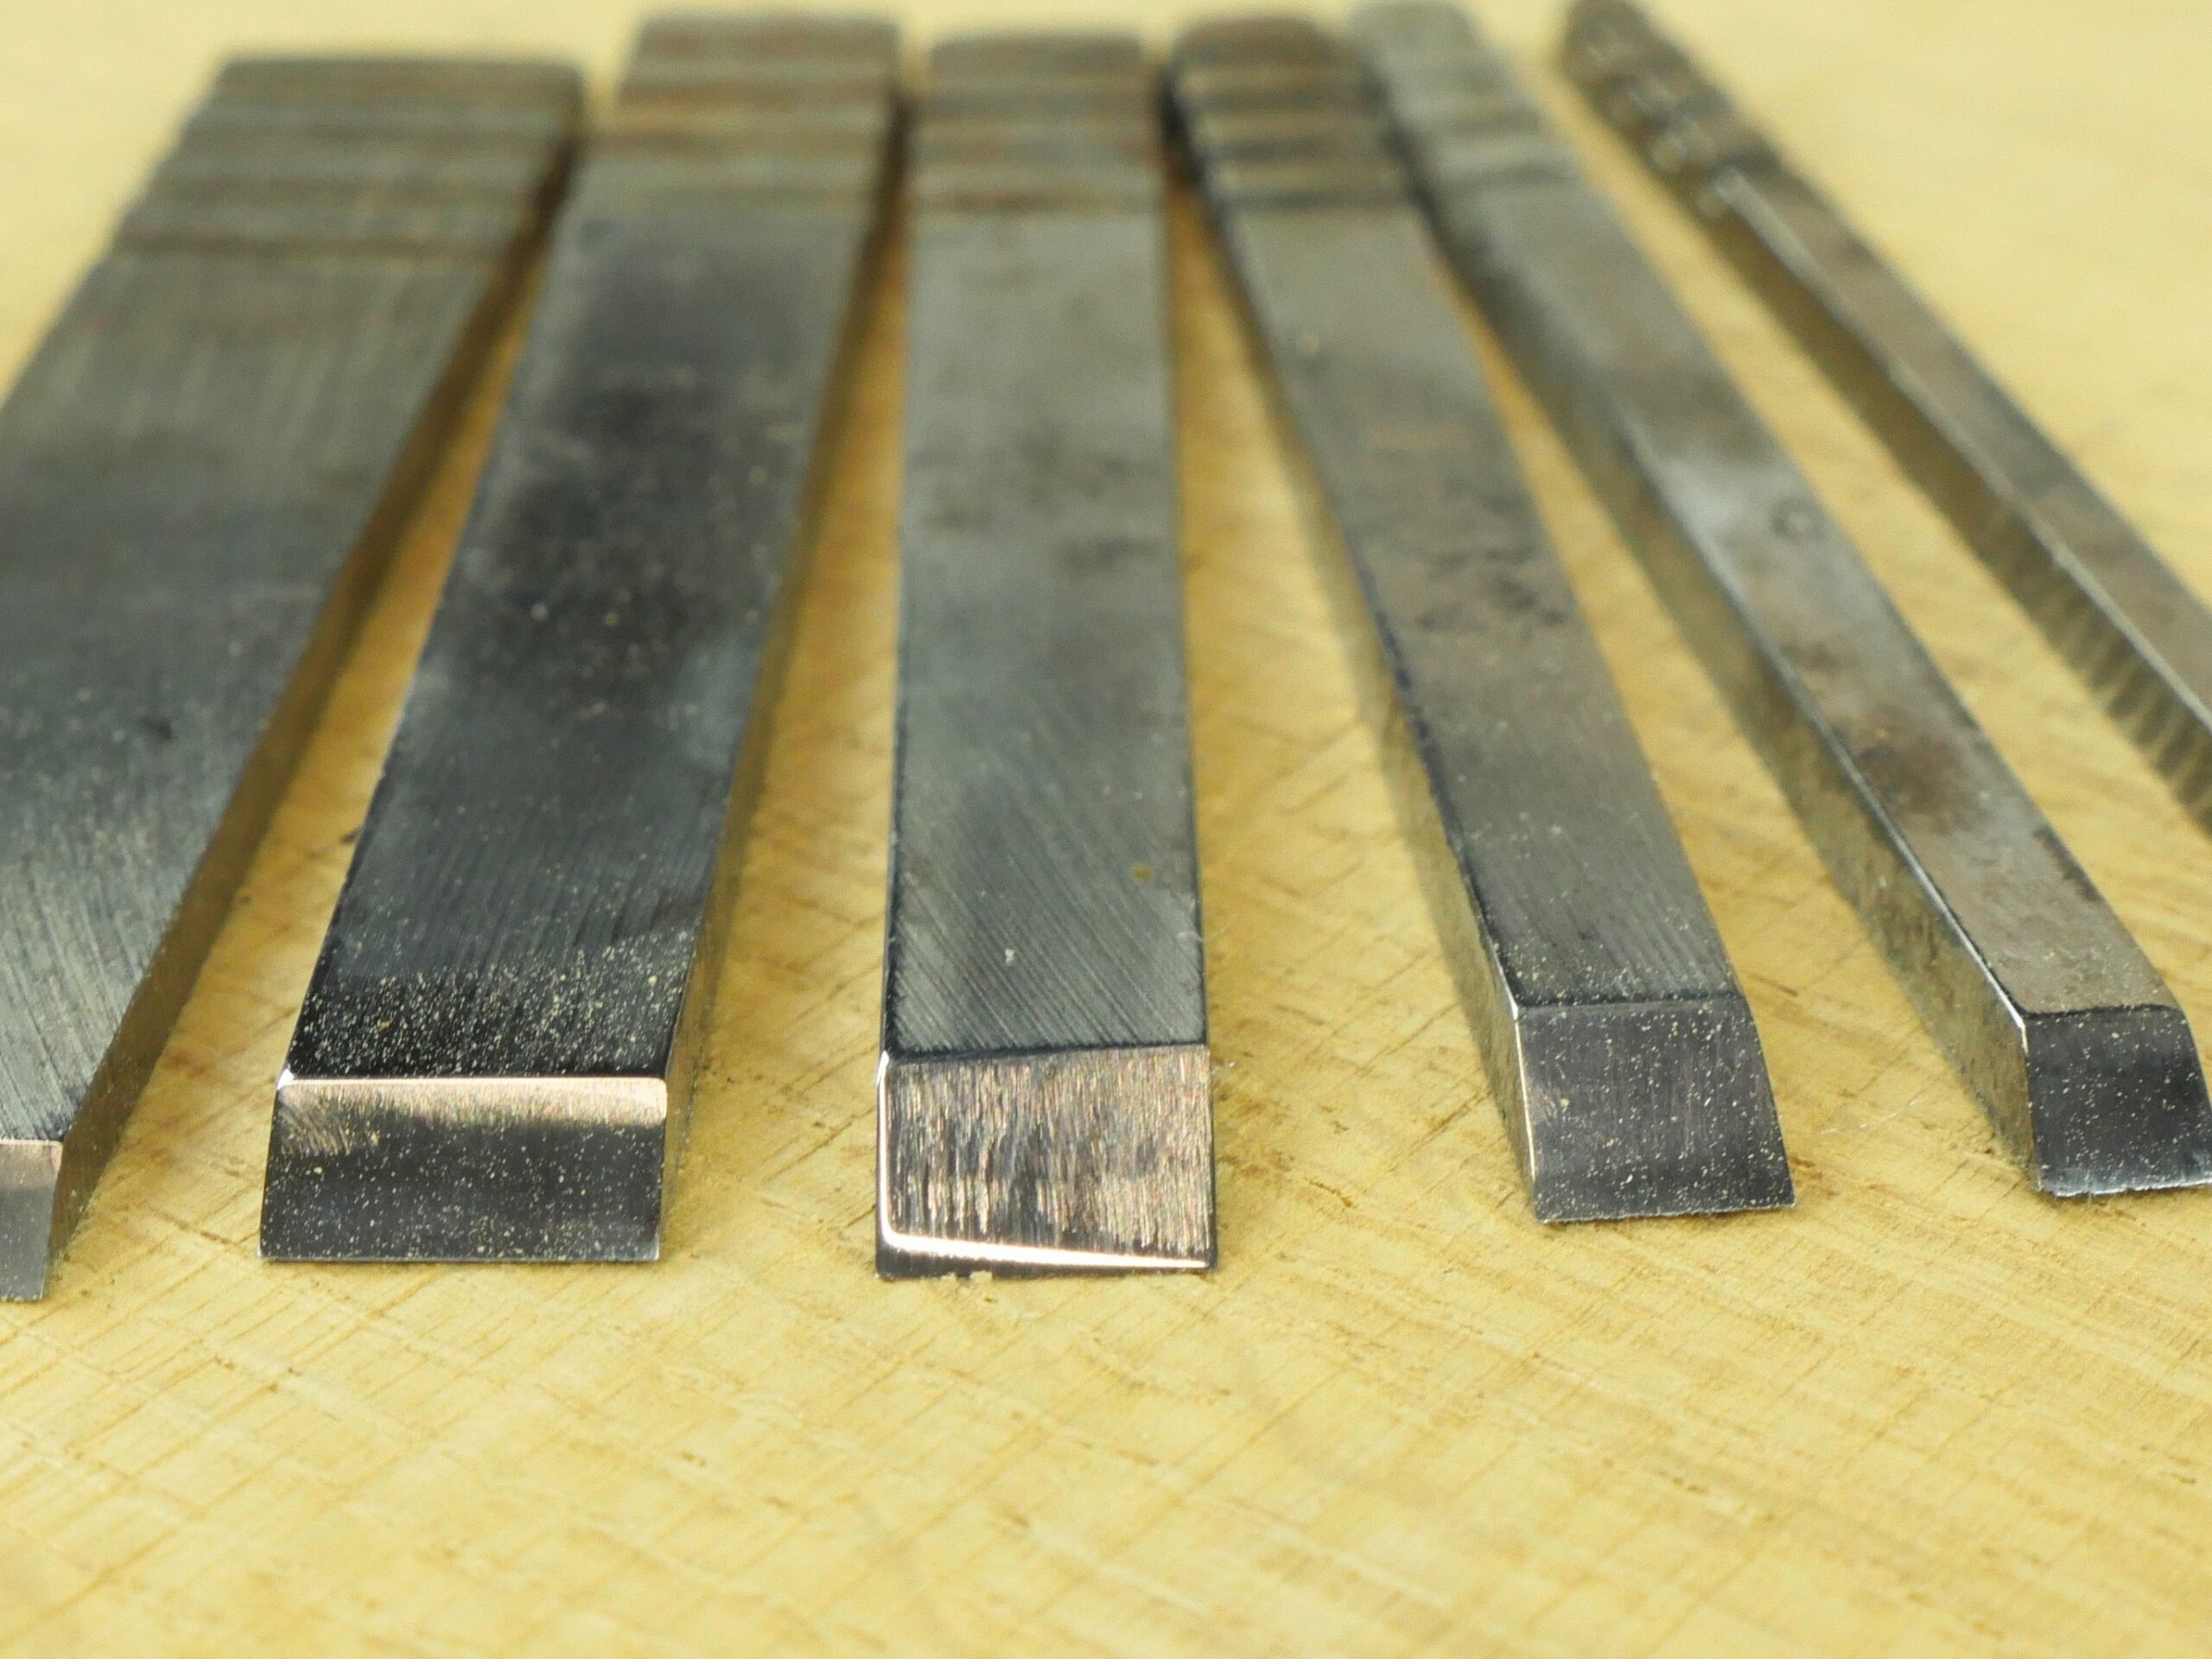
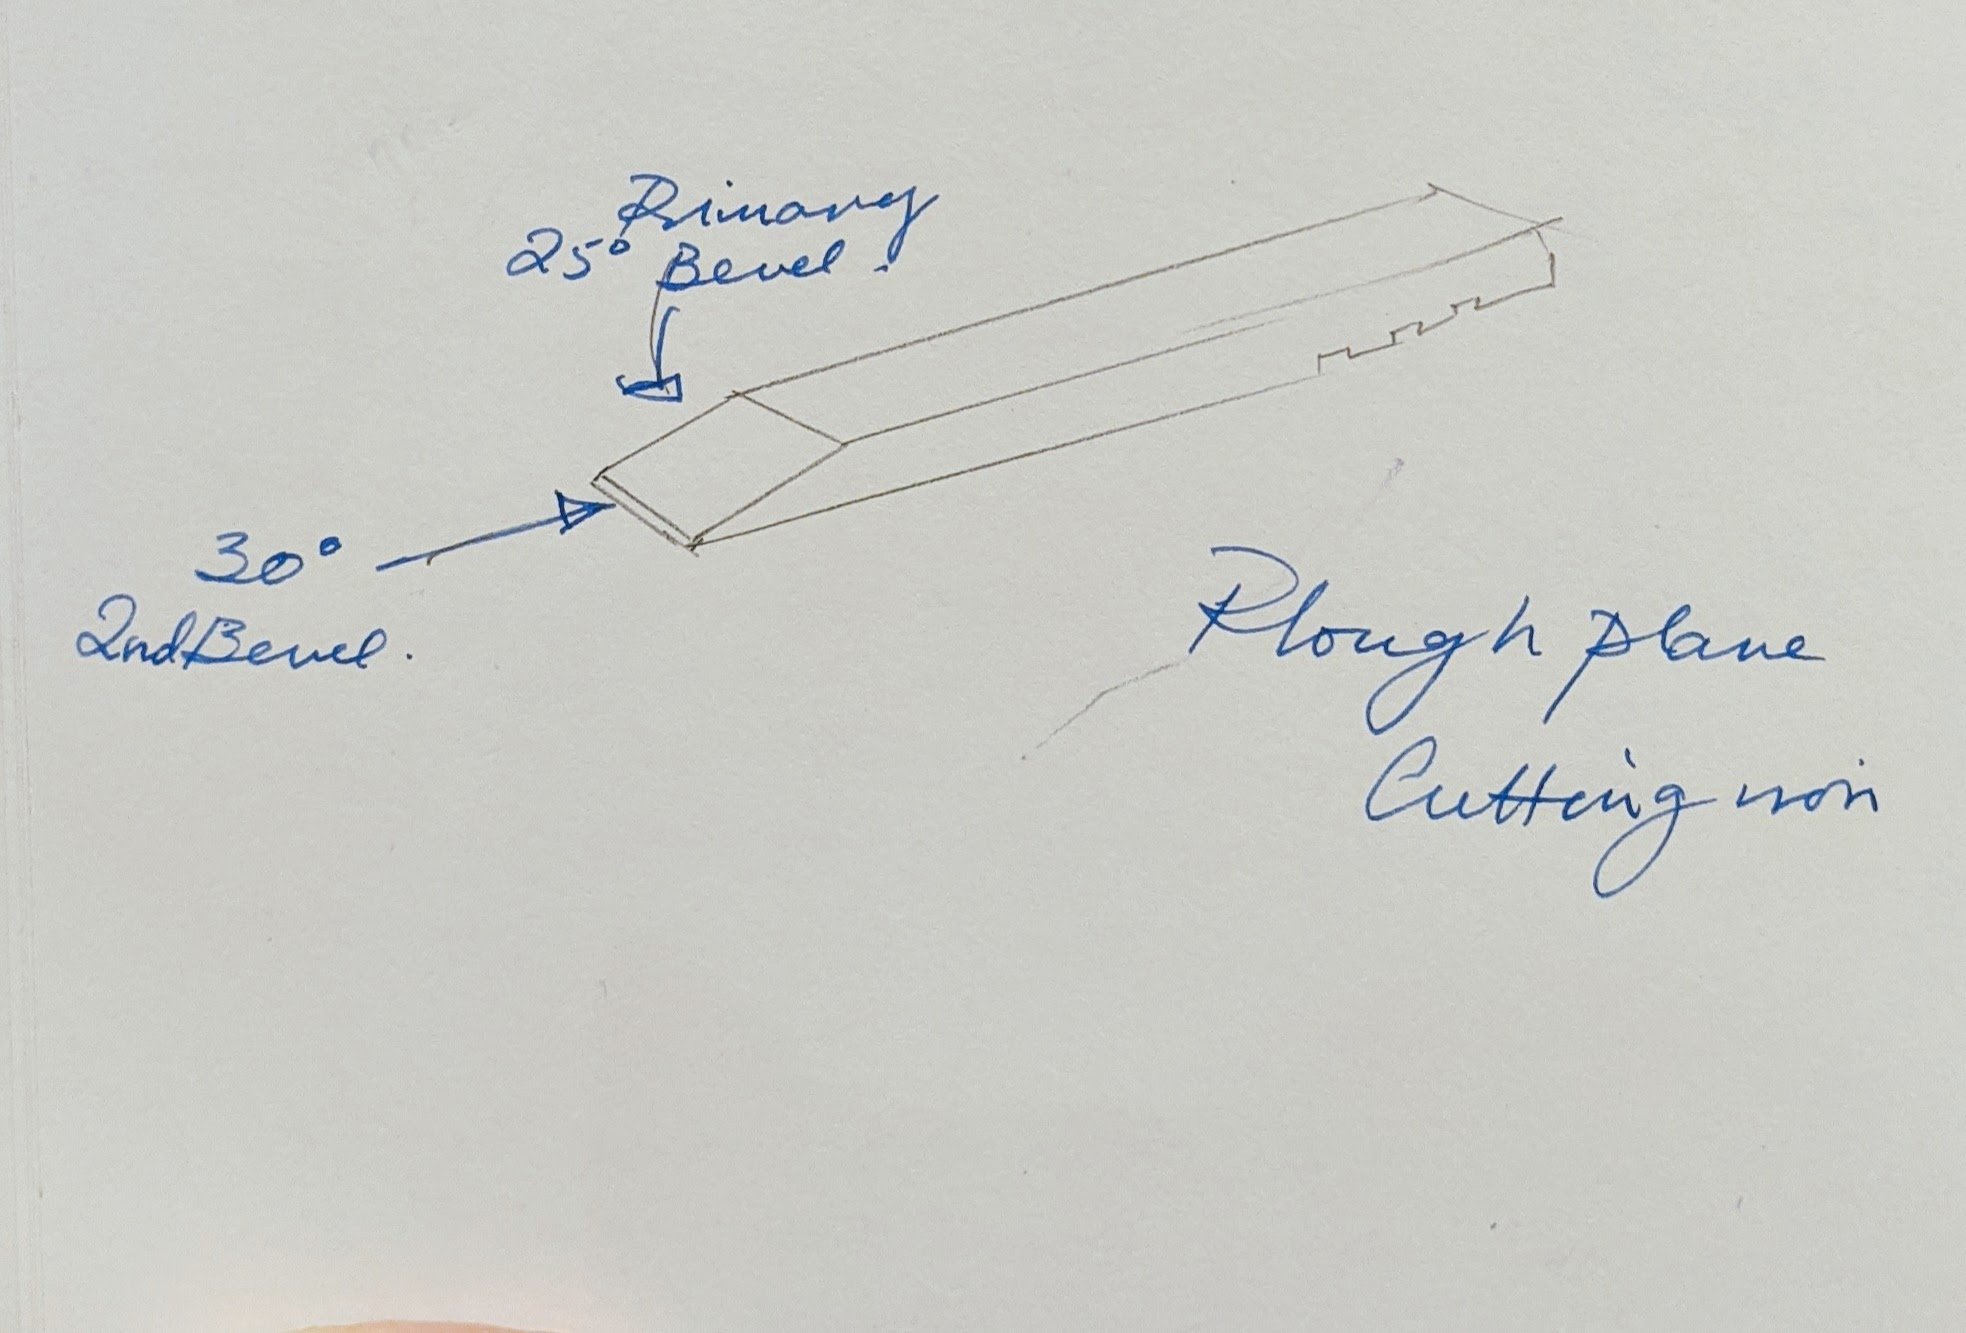
I should point out that on these cutters I tend to go with either a single bevel of 30º only or the two-bevel type and not my usual macro-camber as on all other planes. On narrow irons, it is more difficult to keep the cutting iron level across and the bevels tend to get rounded.
To make my guide, use any scrap of wood squared up and trued to somewhere around 6″ long by 1″ by 3/4″; these sizes can be bigger, depending on the cutter sizes.
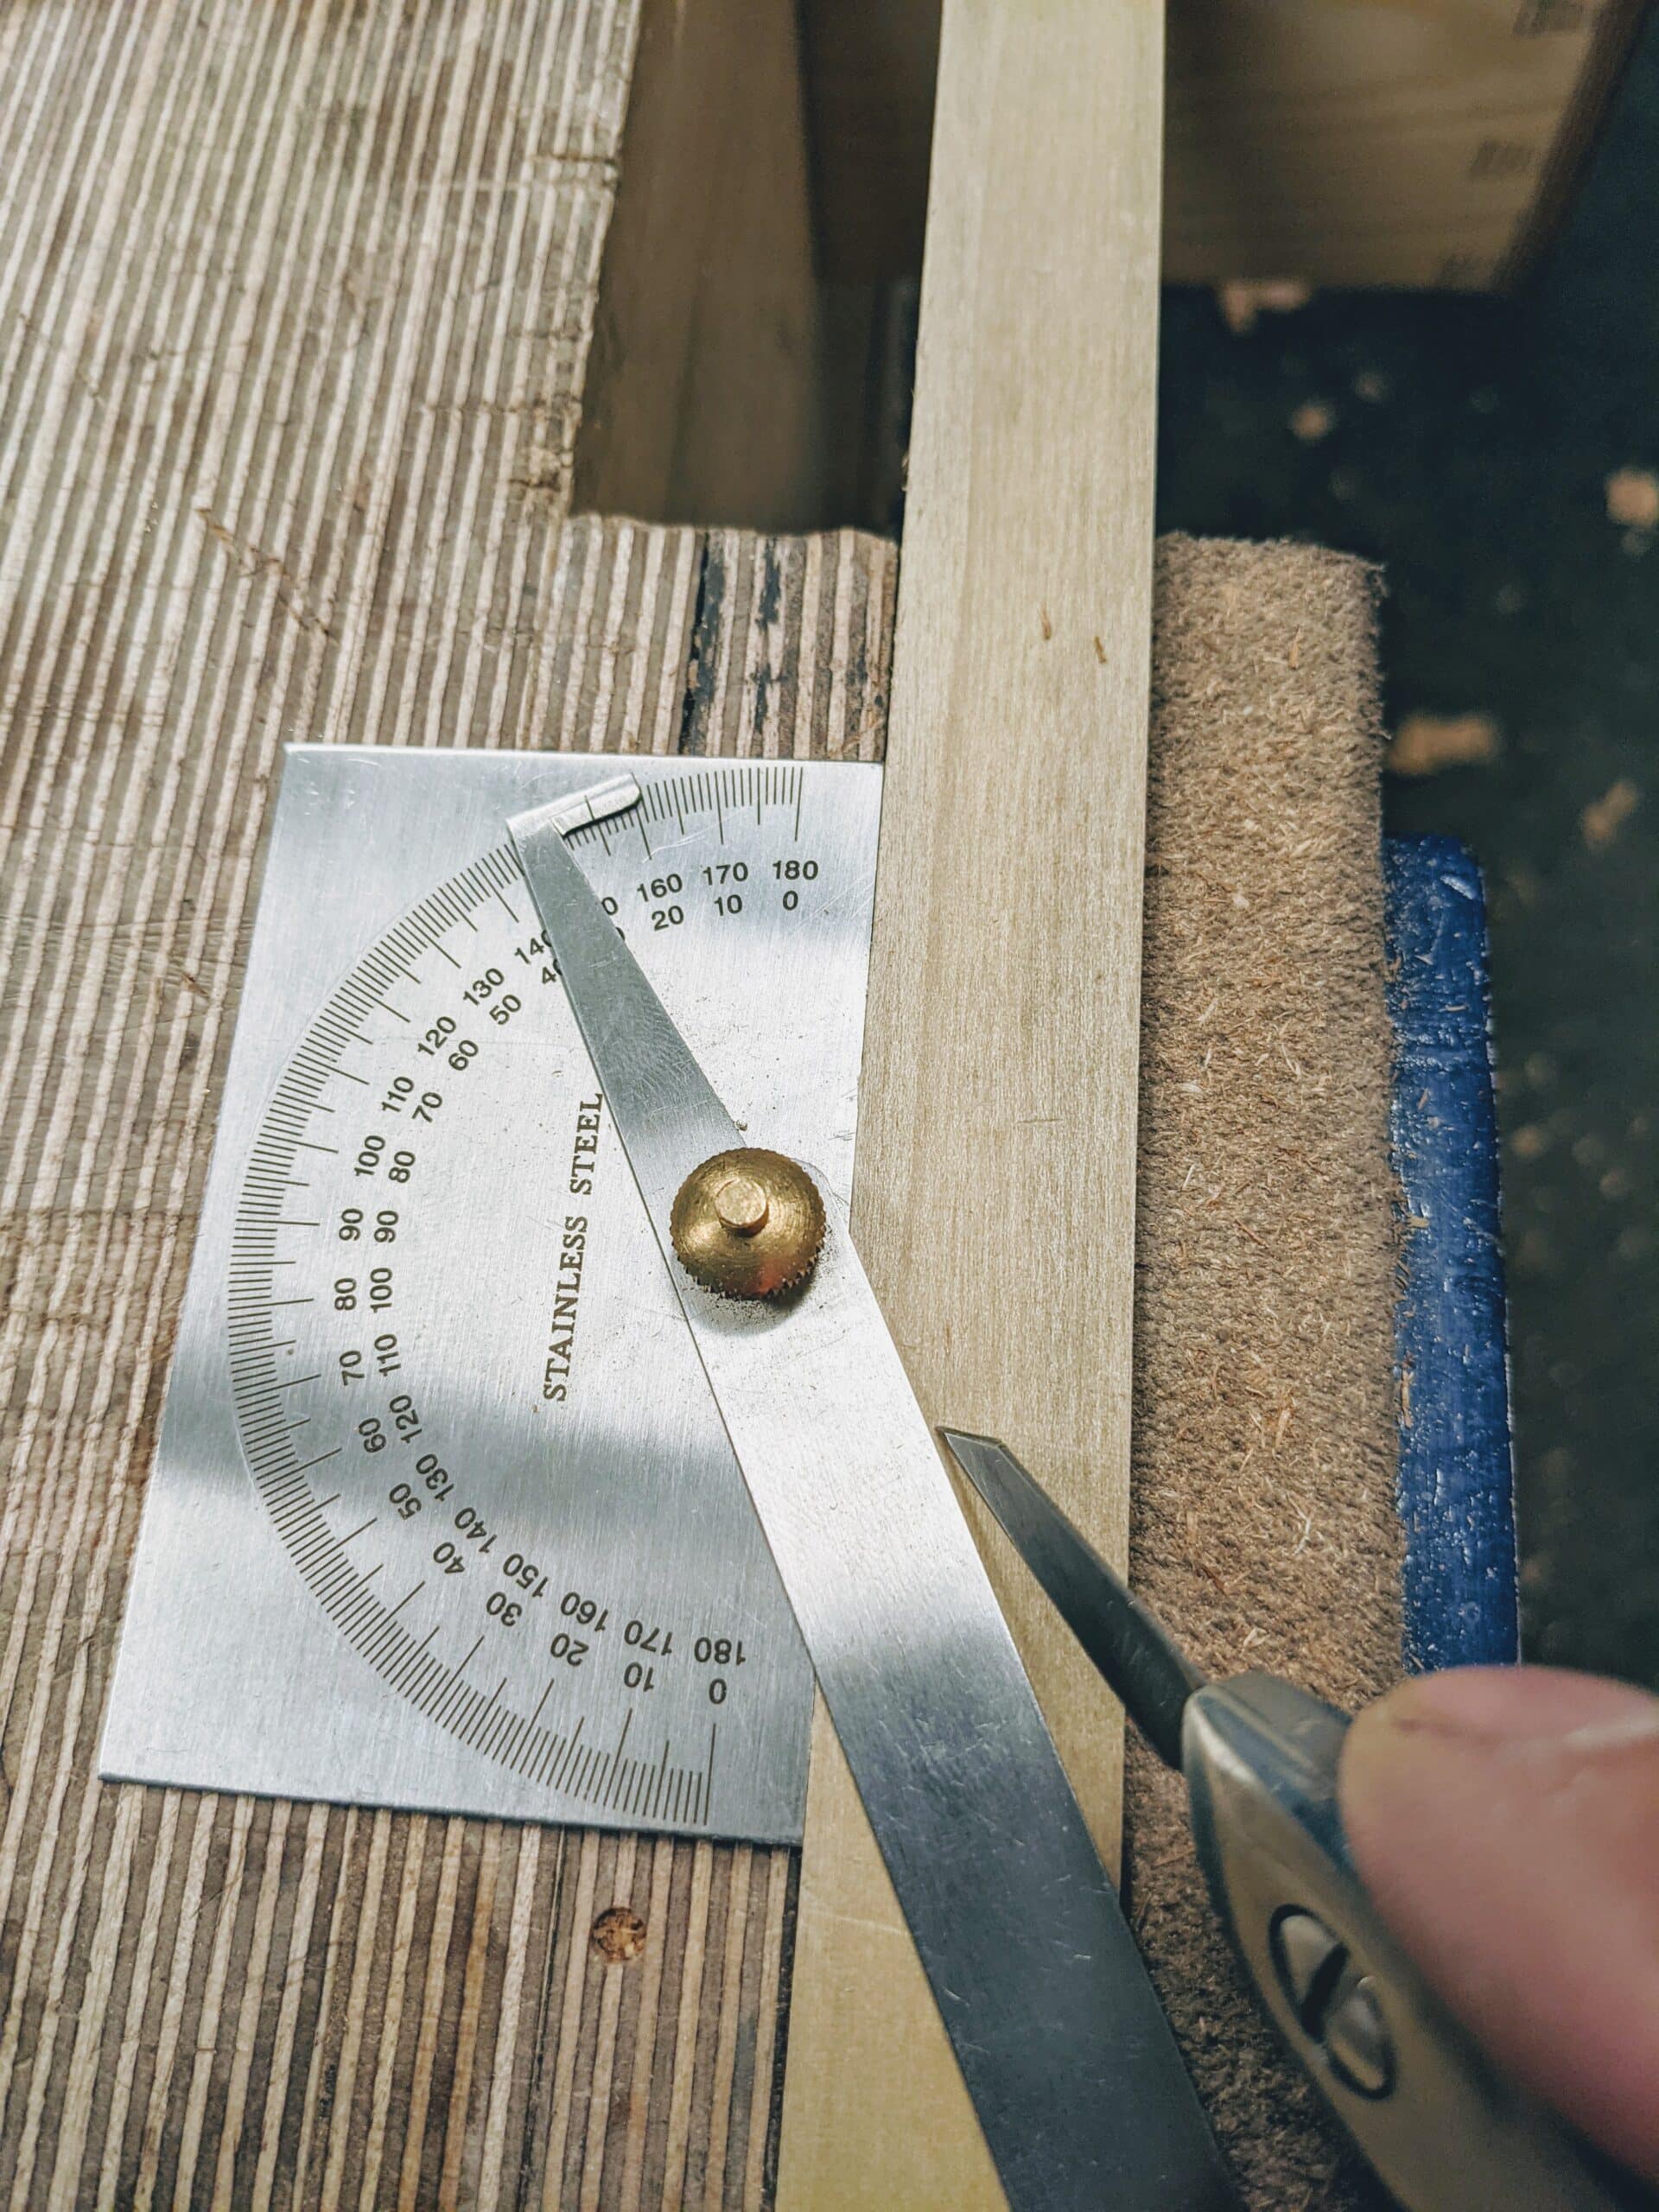
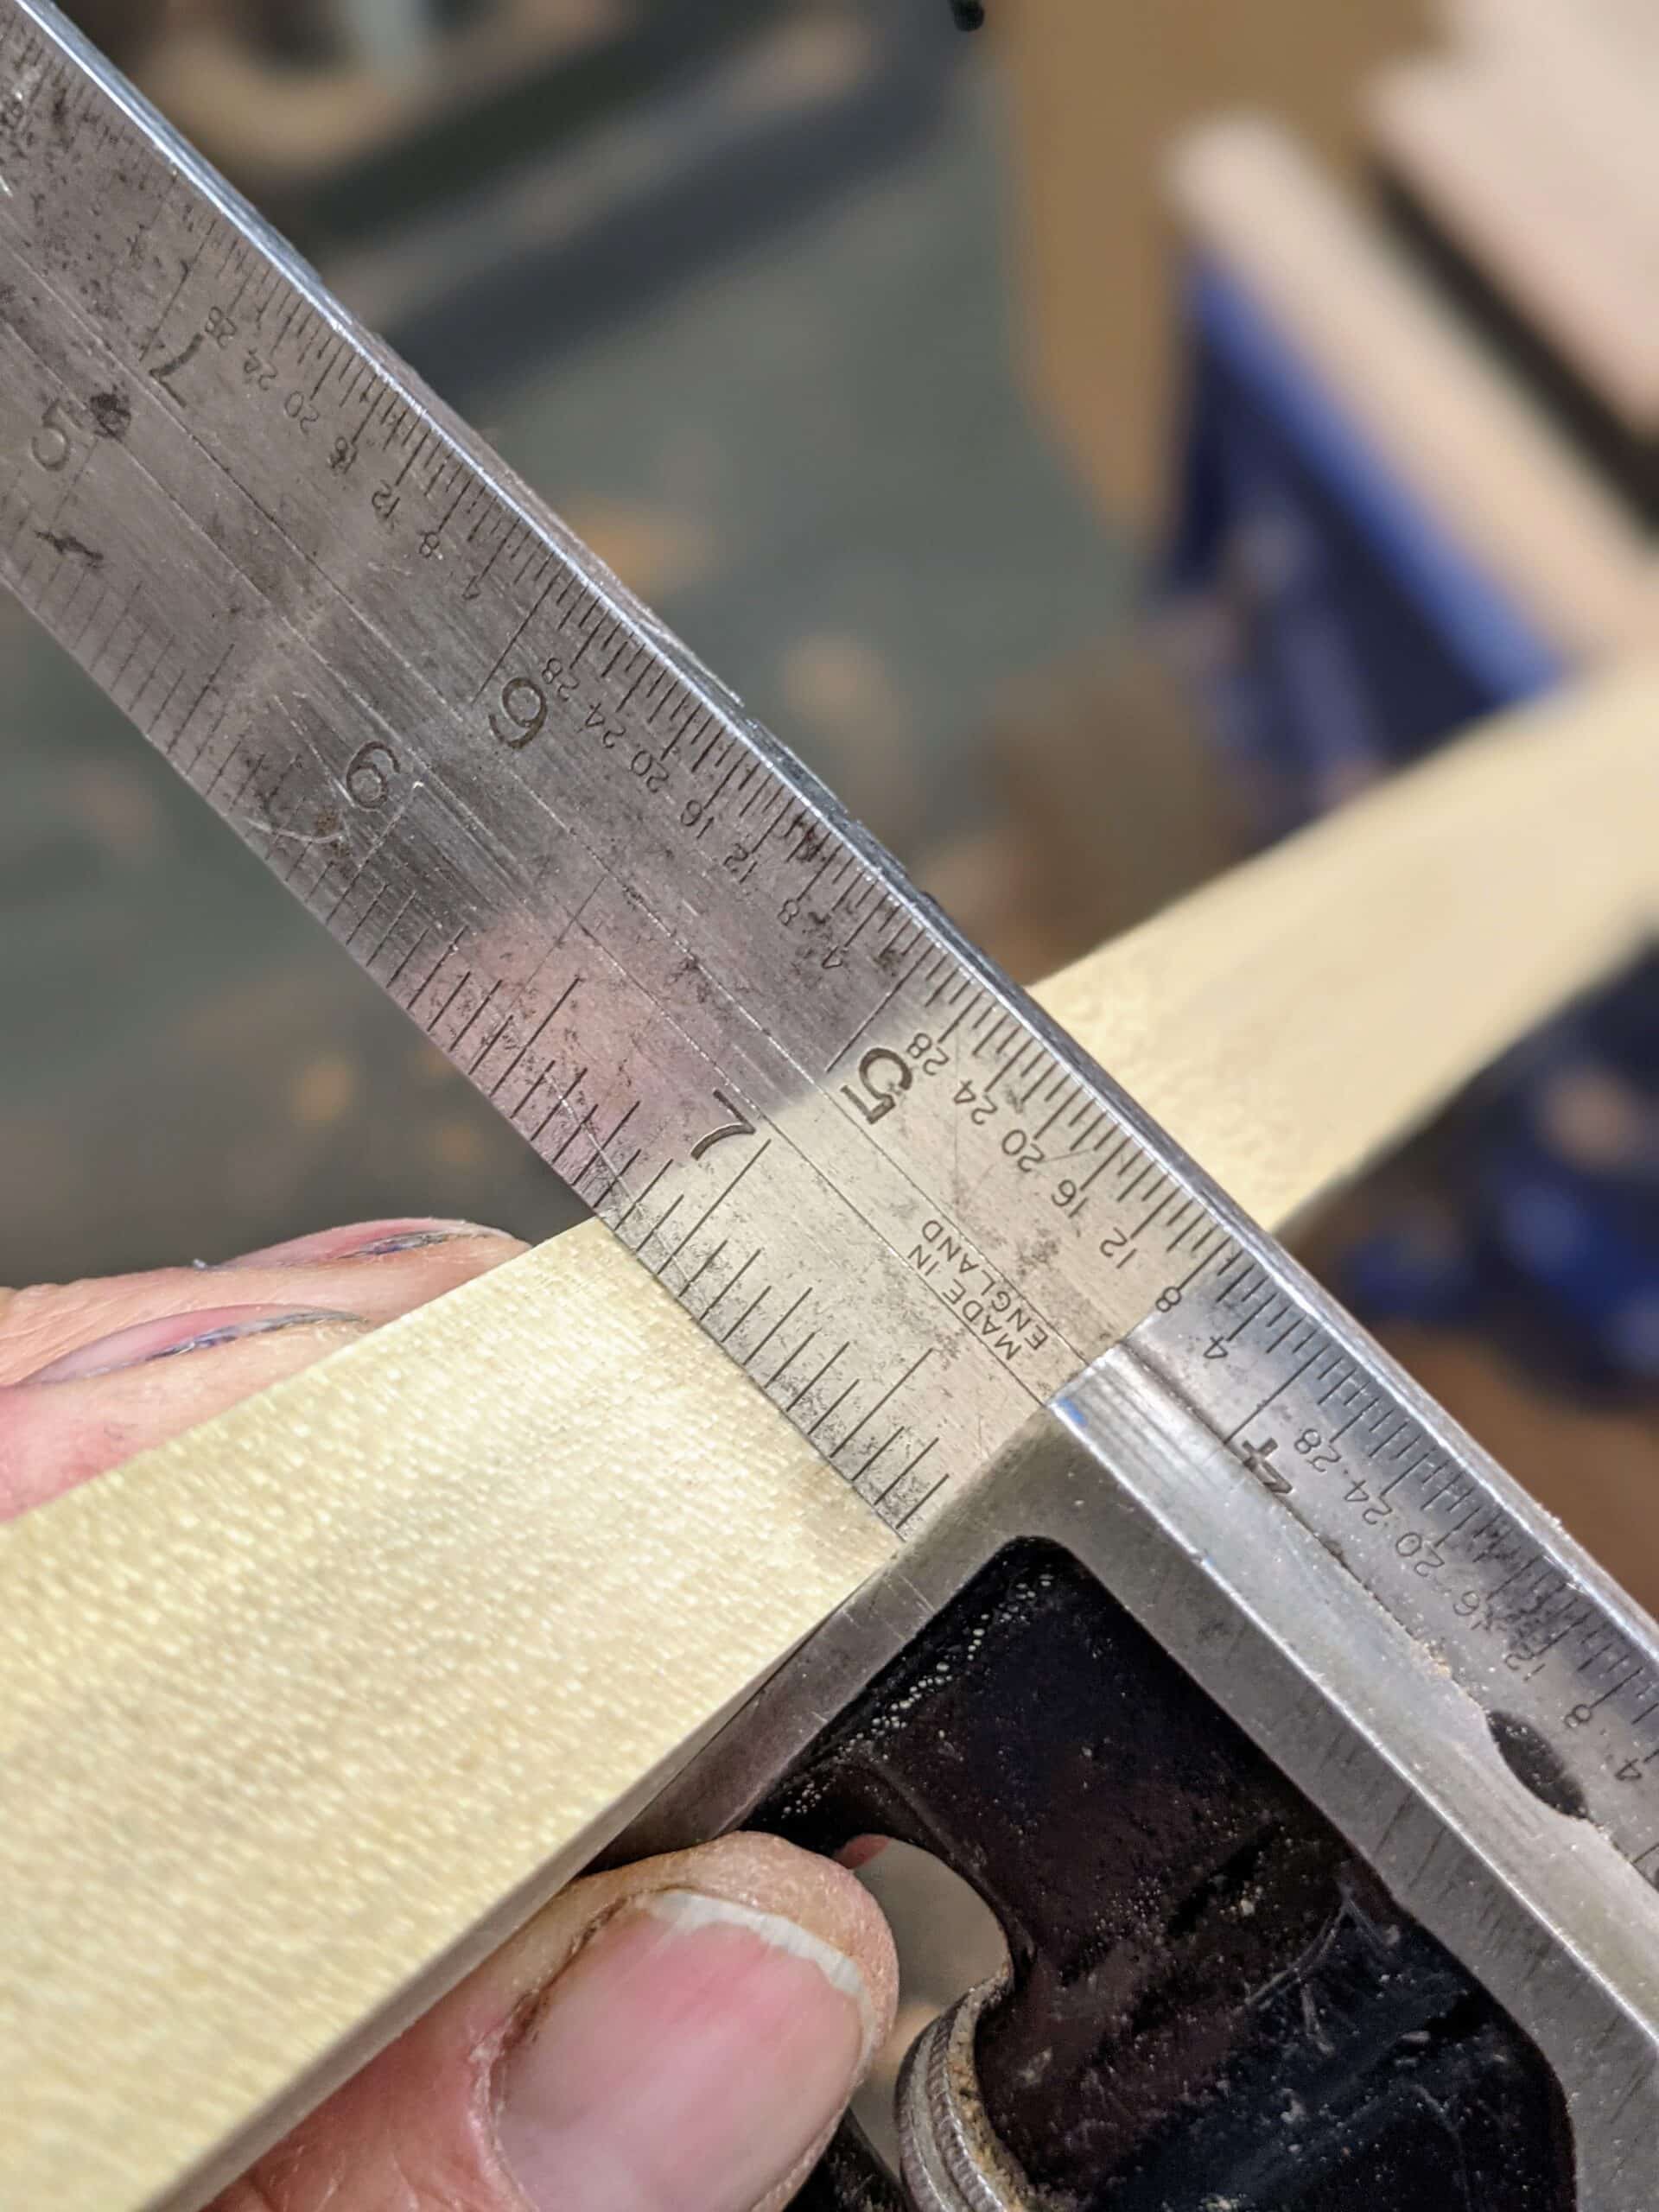
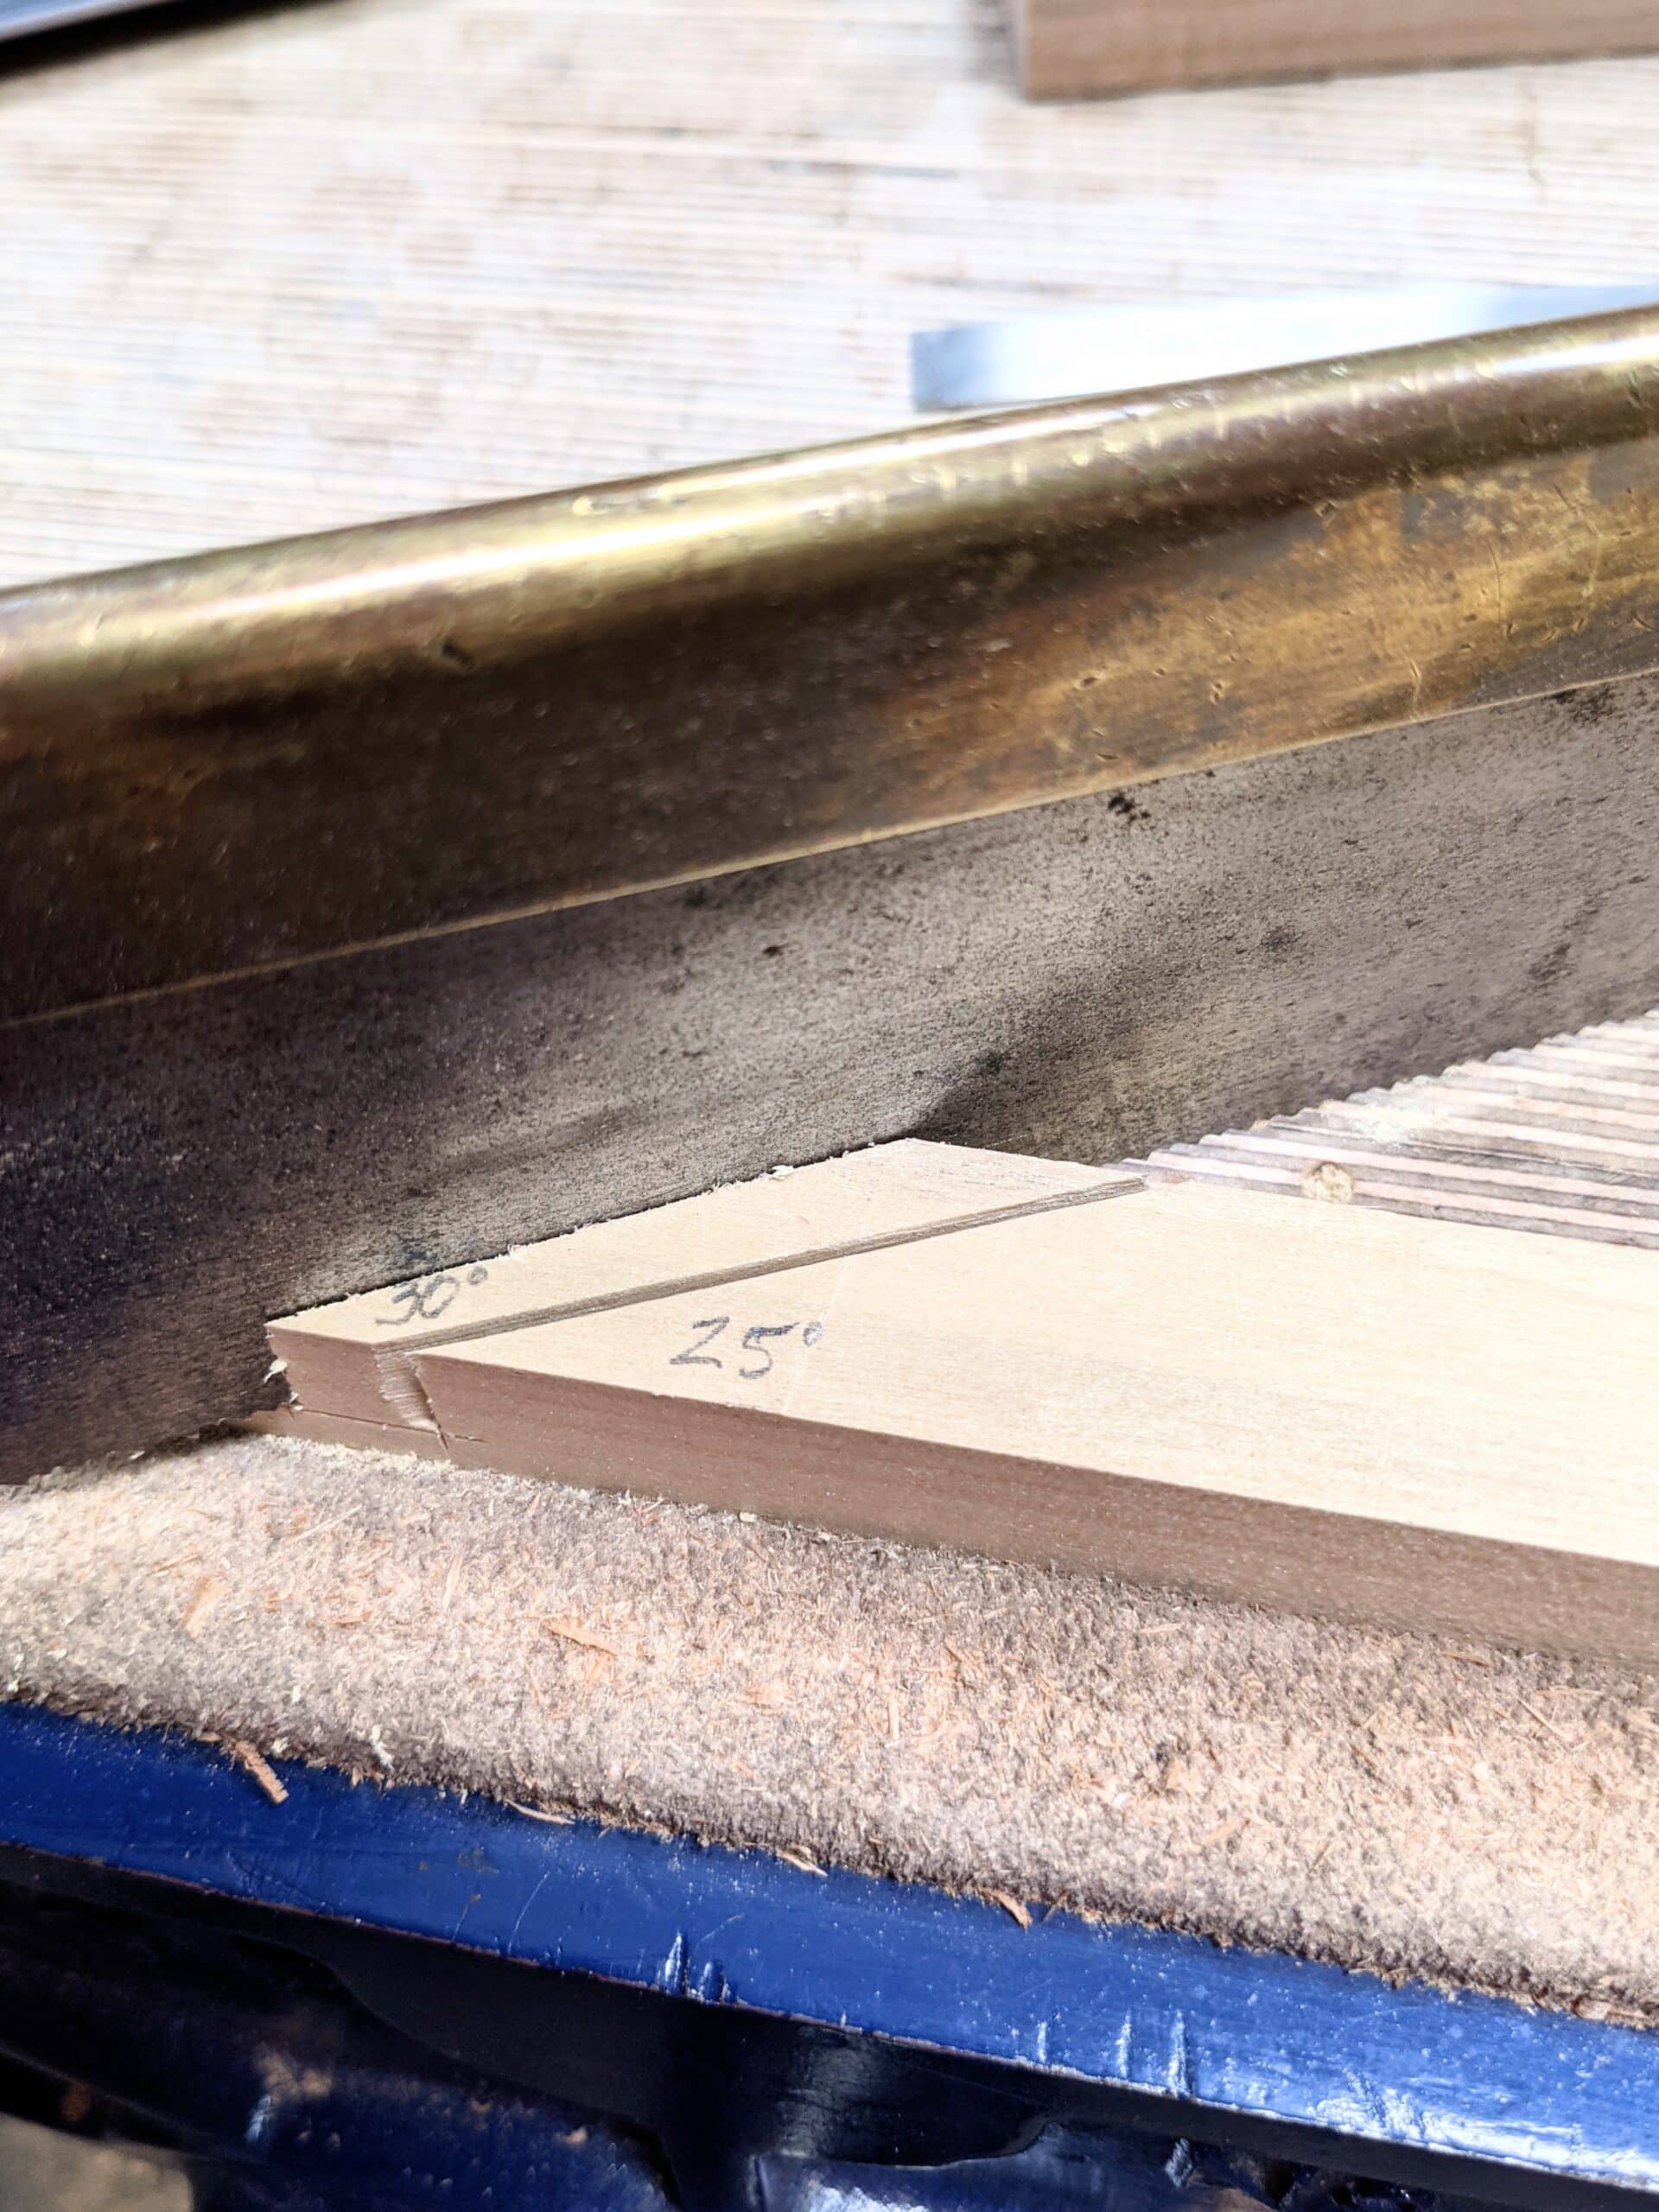
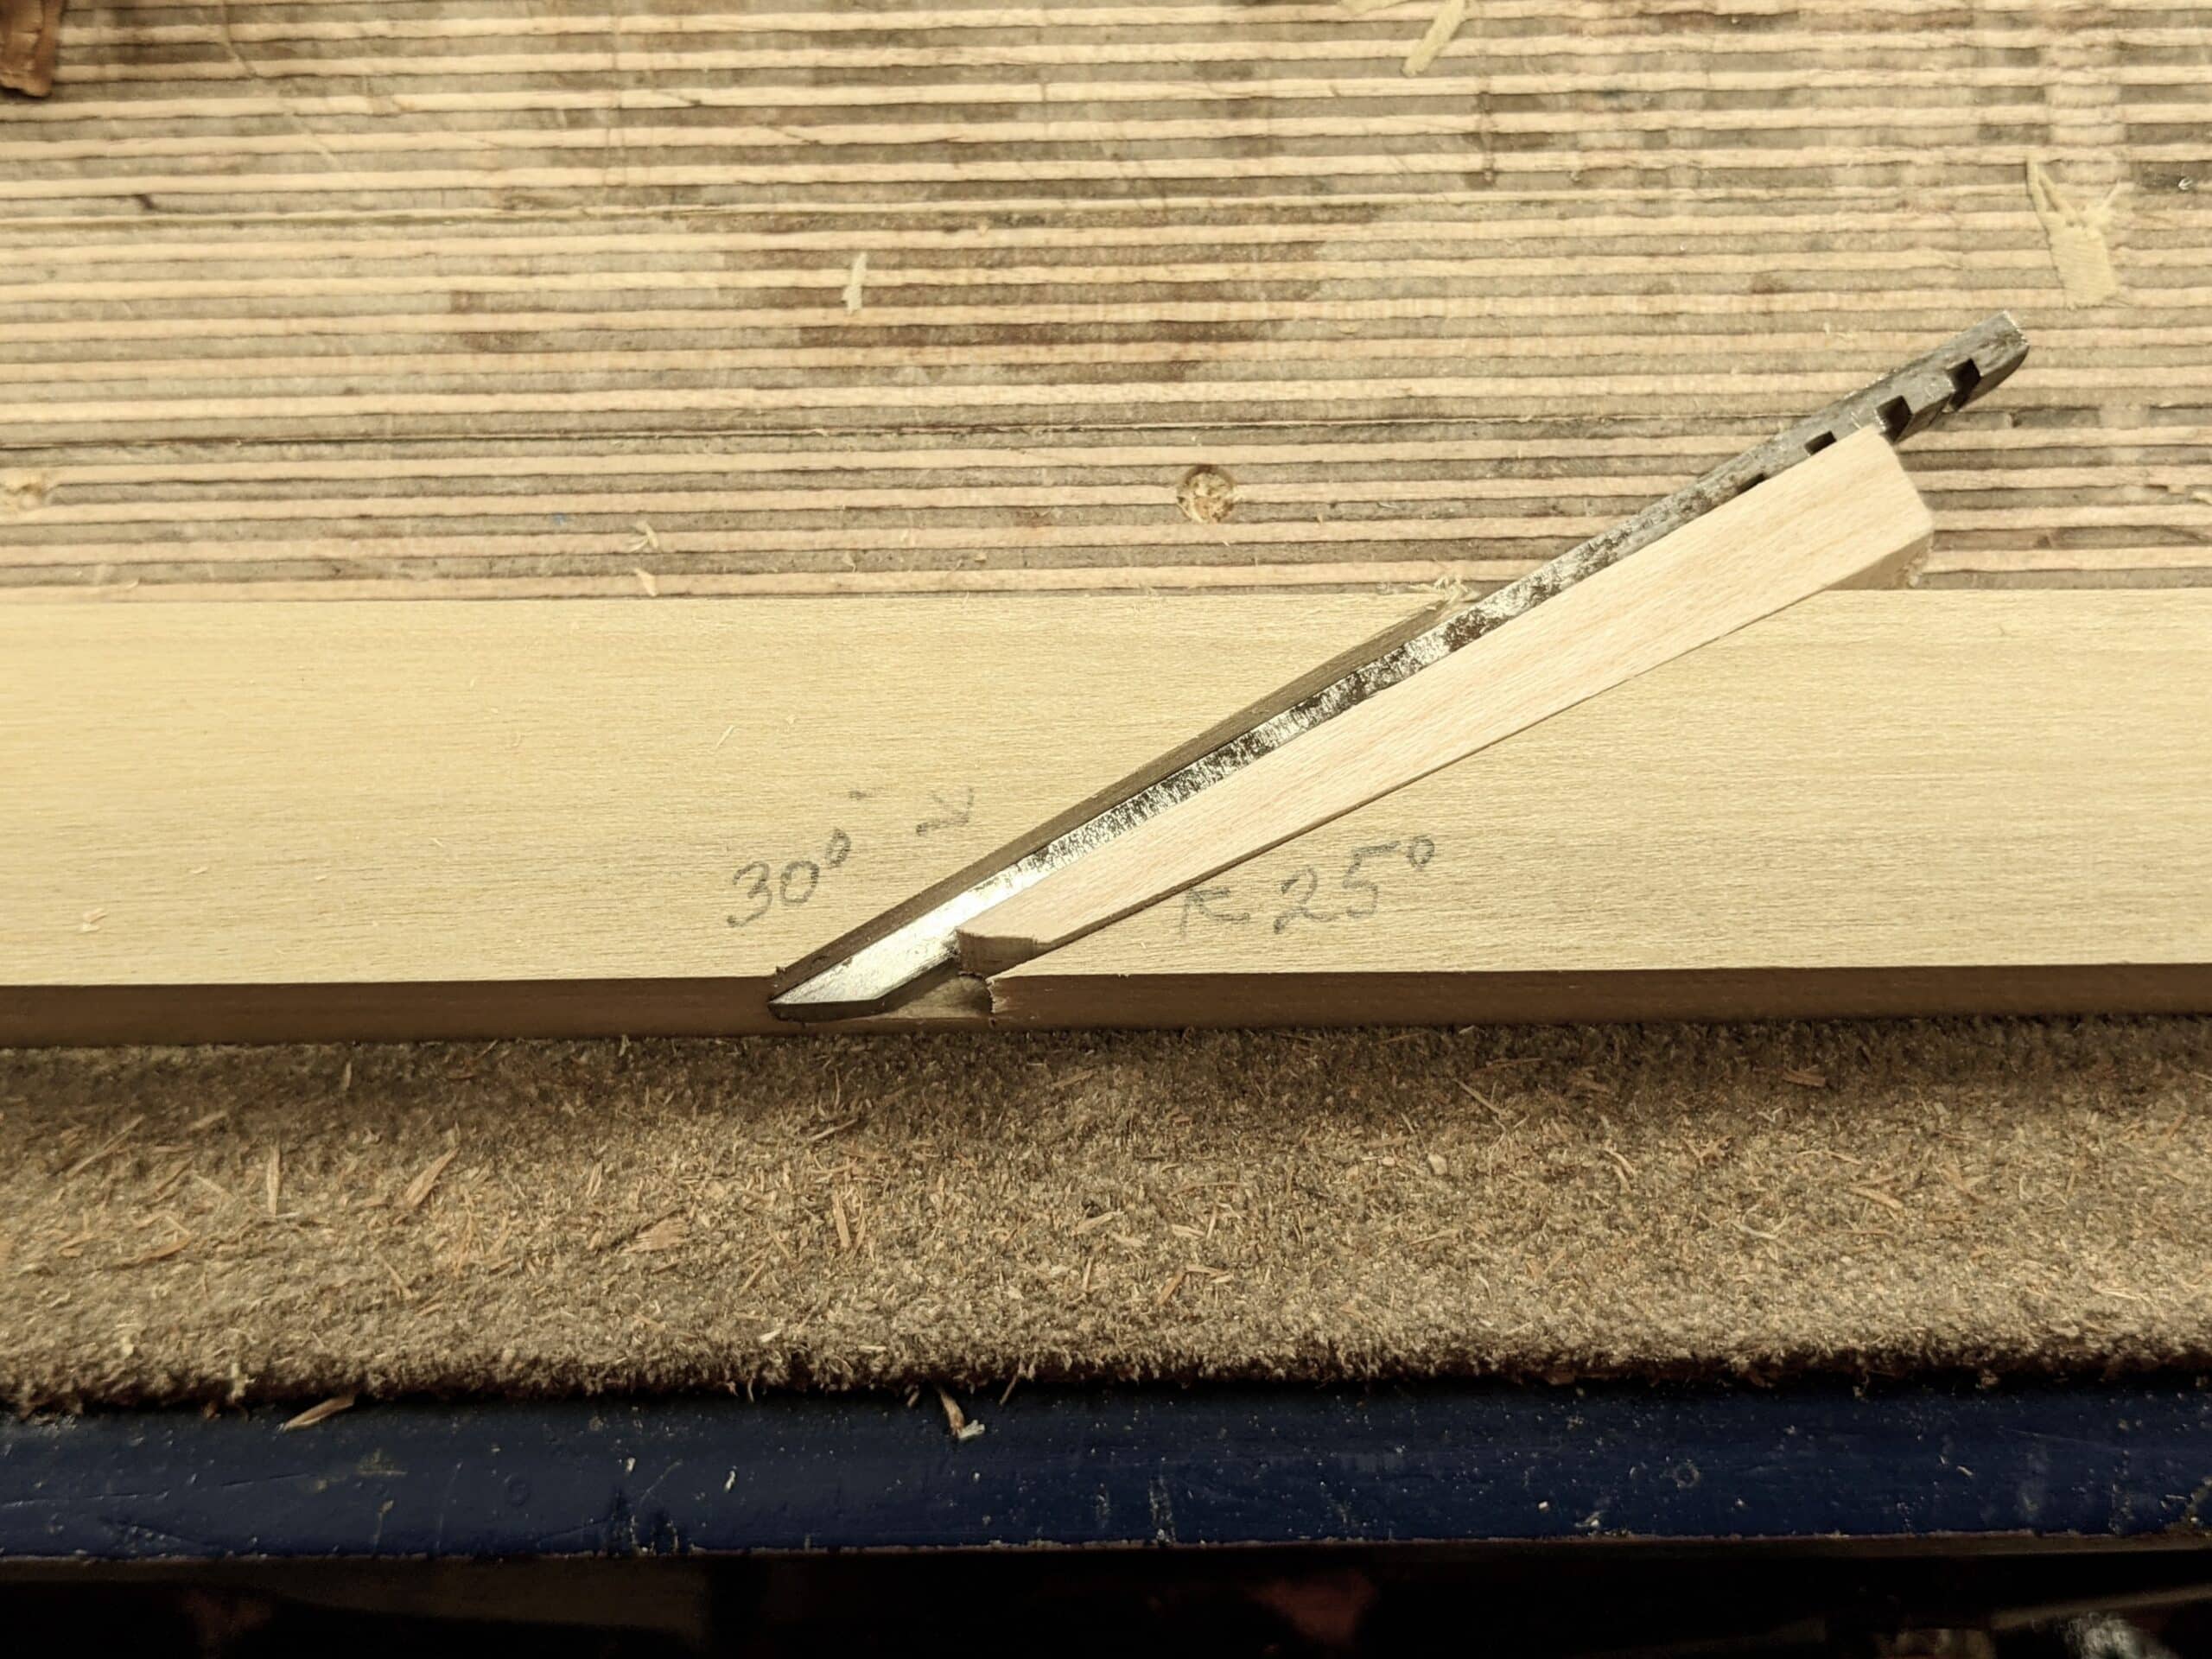
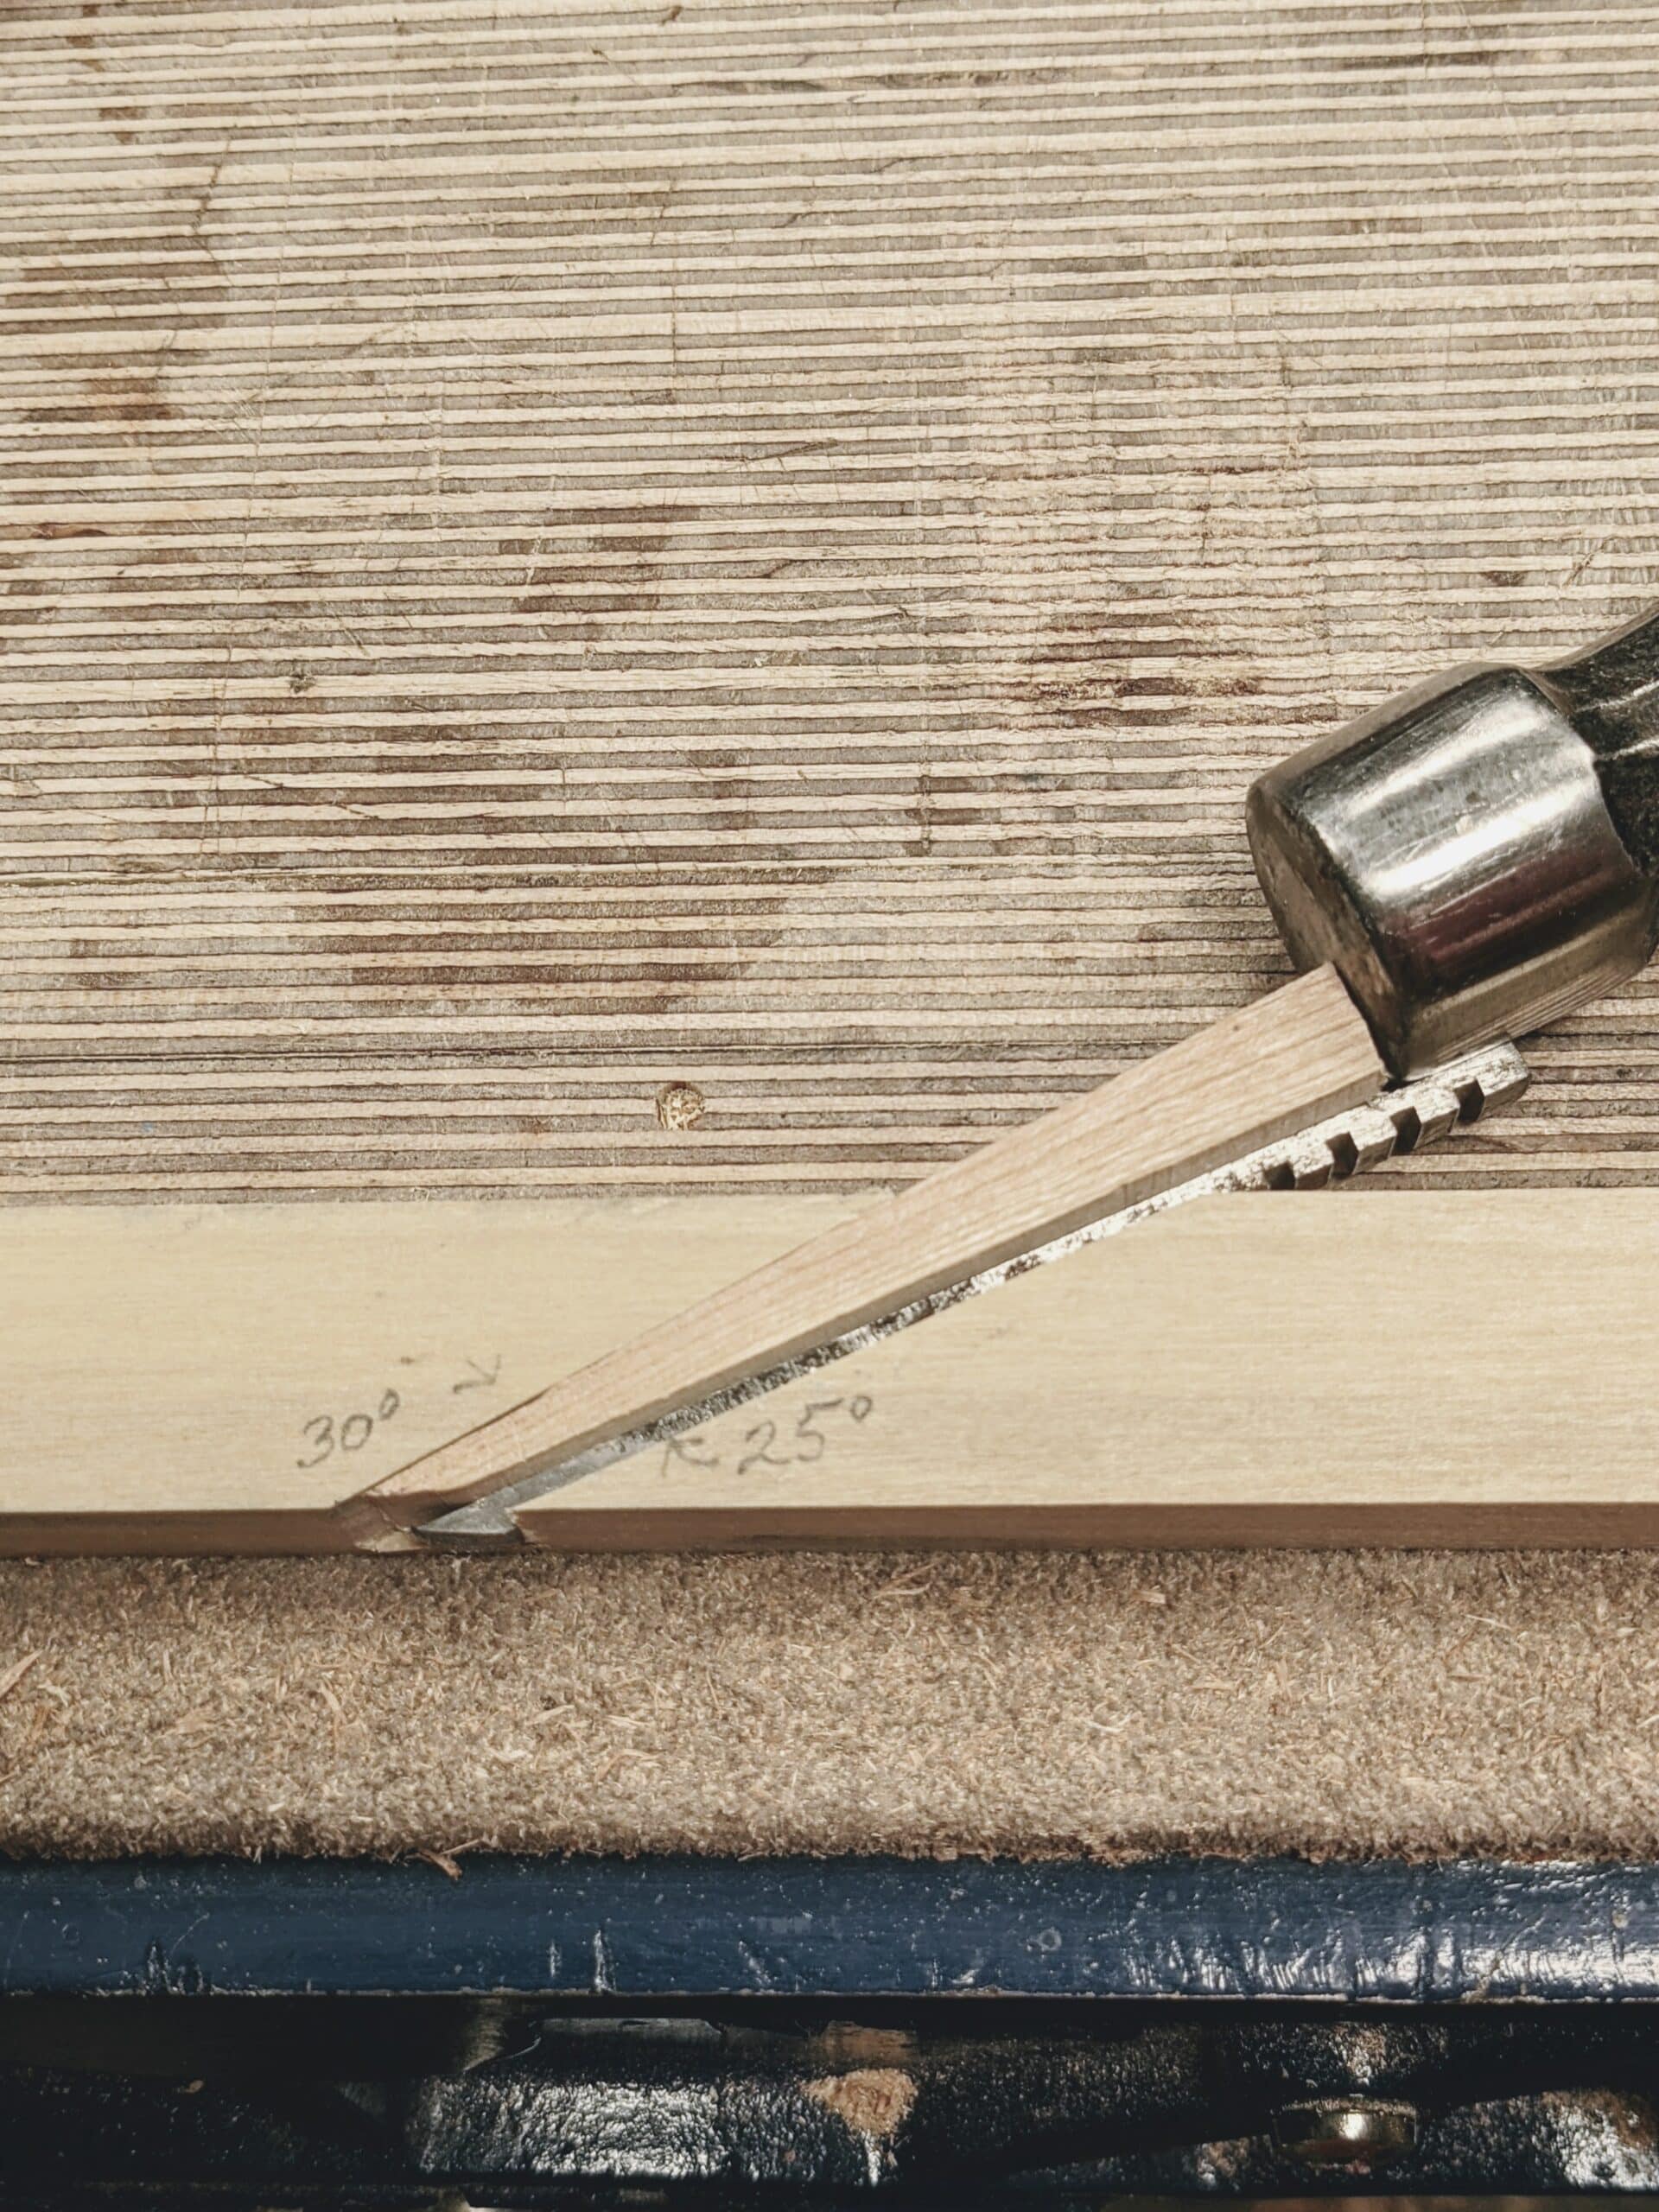
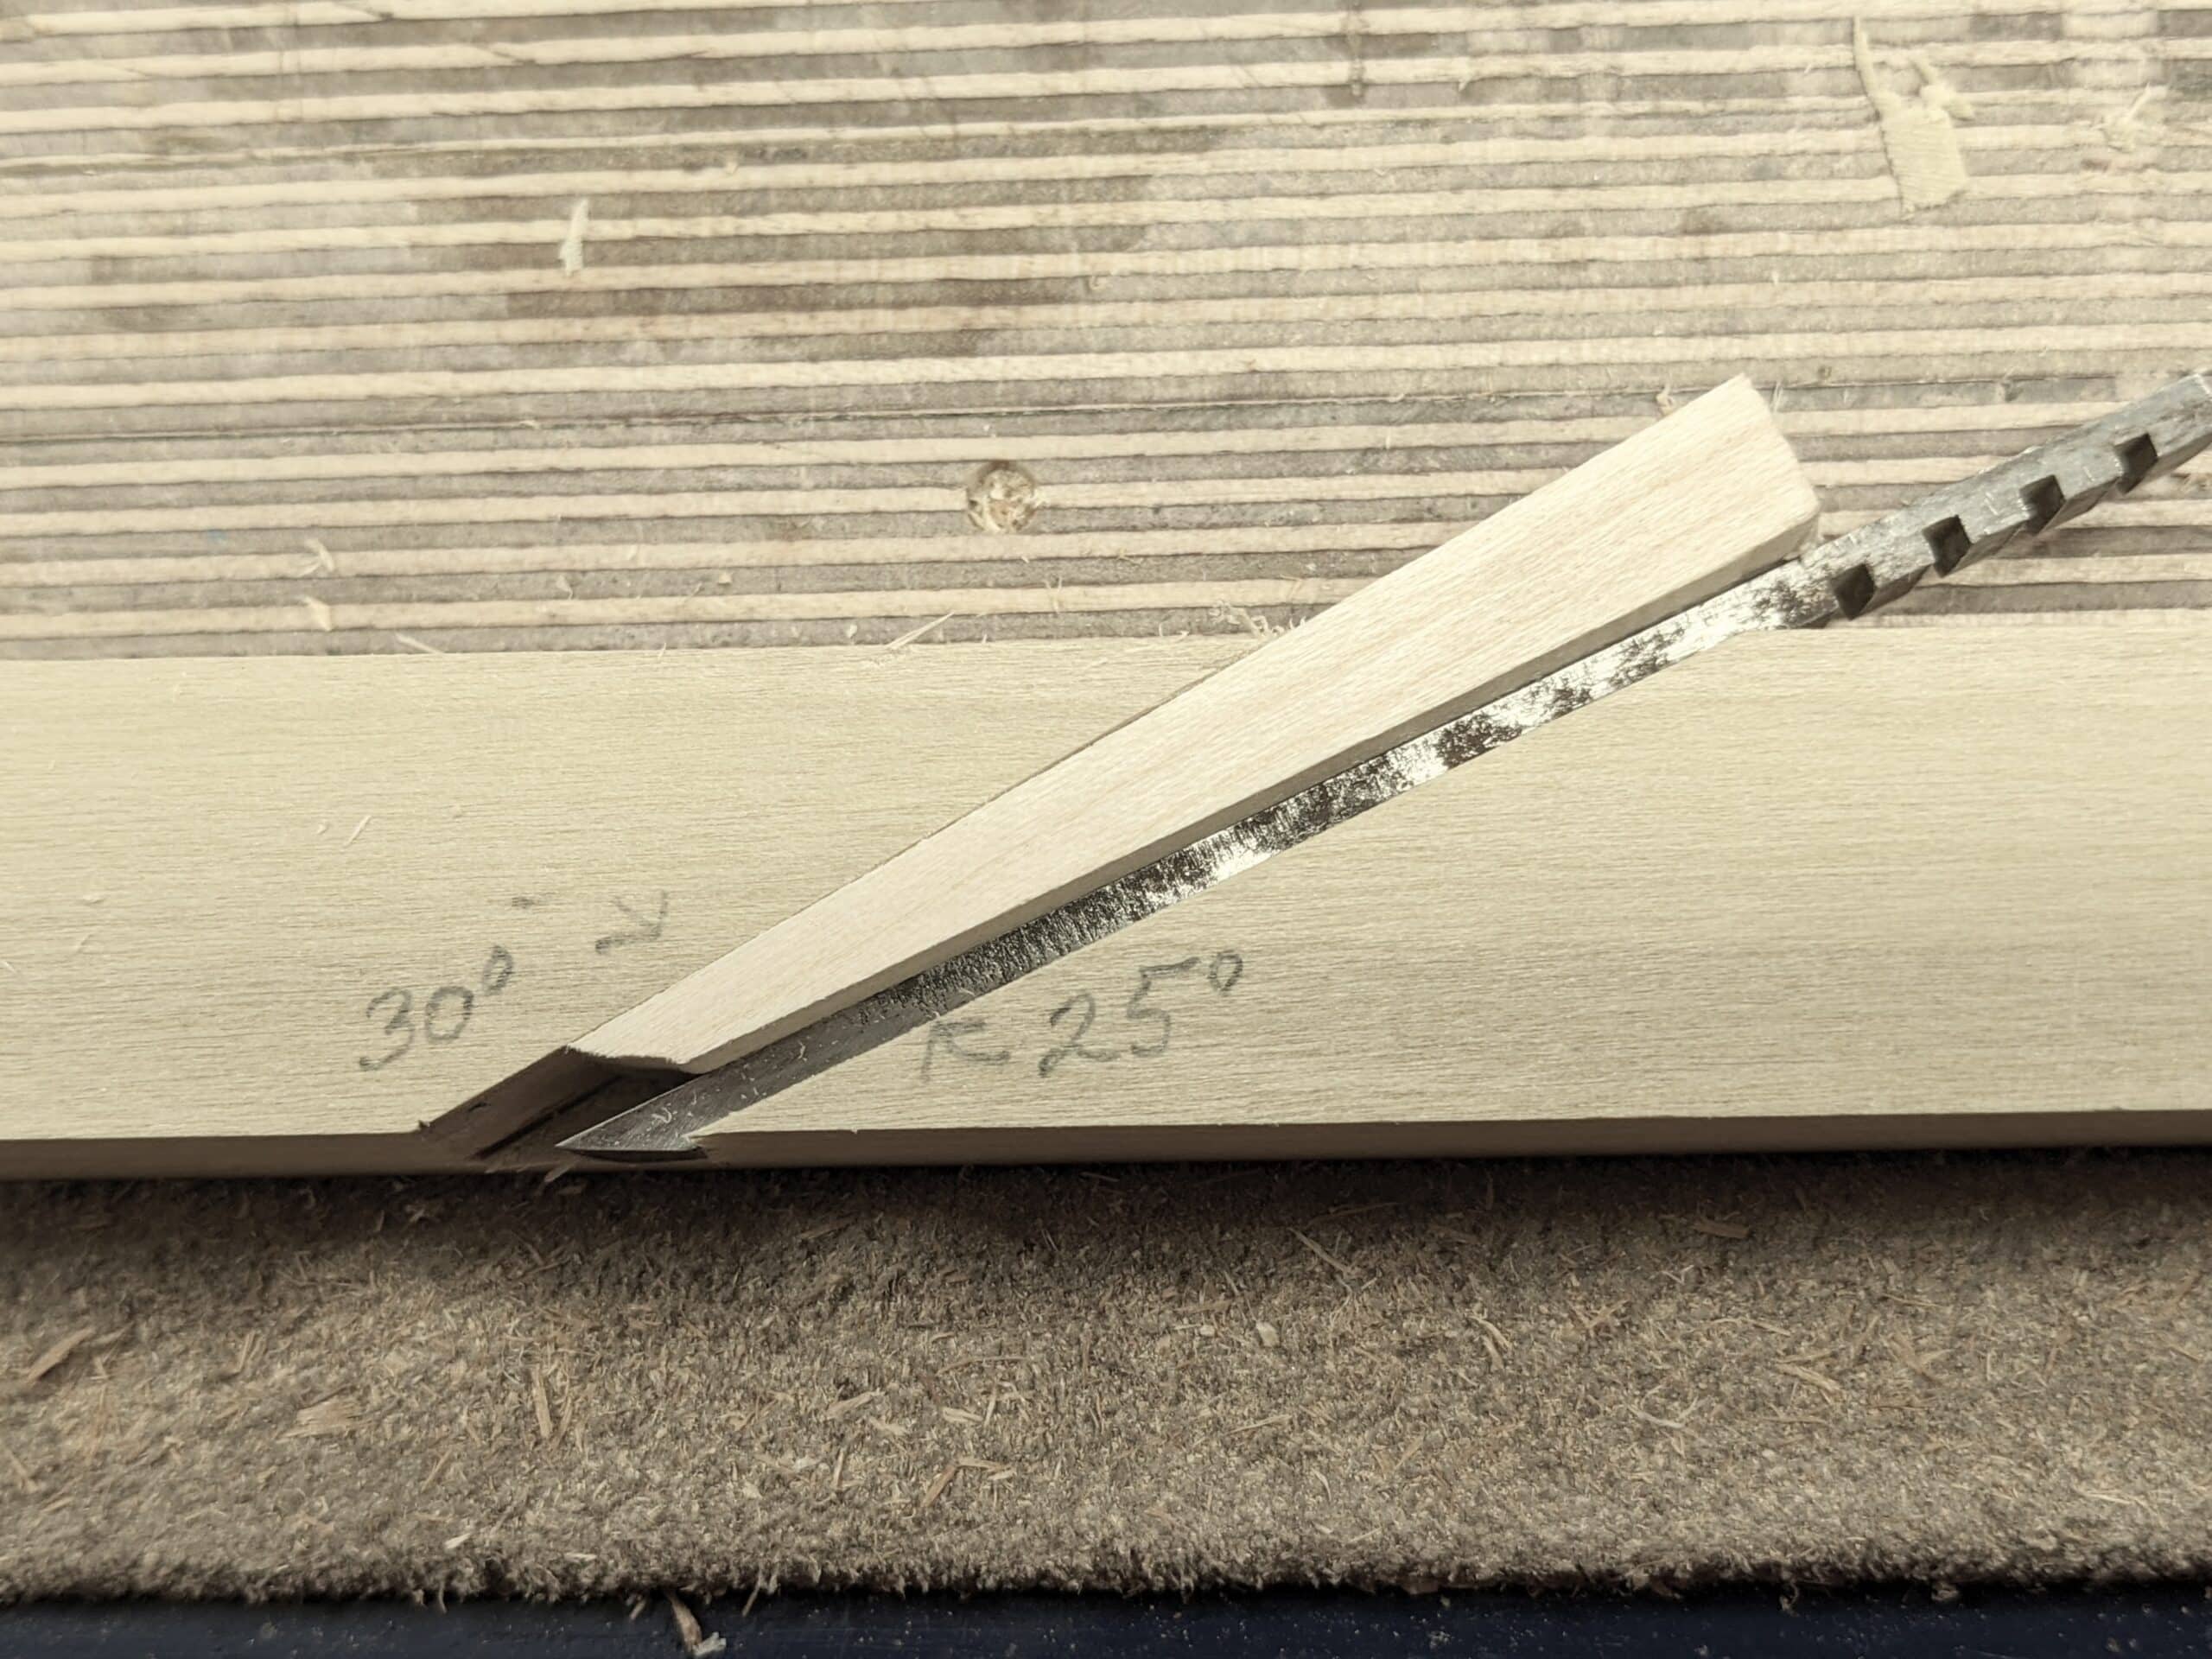
Set a protractor or sliding bevel to 25º and strike the knifewall with a sharp knife.

Set the protractor or sliding bevel to 30º, measure a 1/4″ at the narrow end of the channel . . .
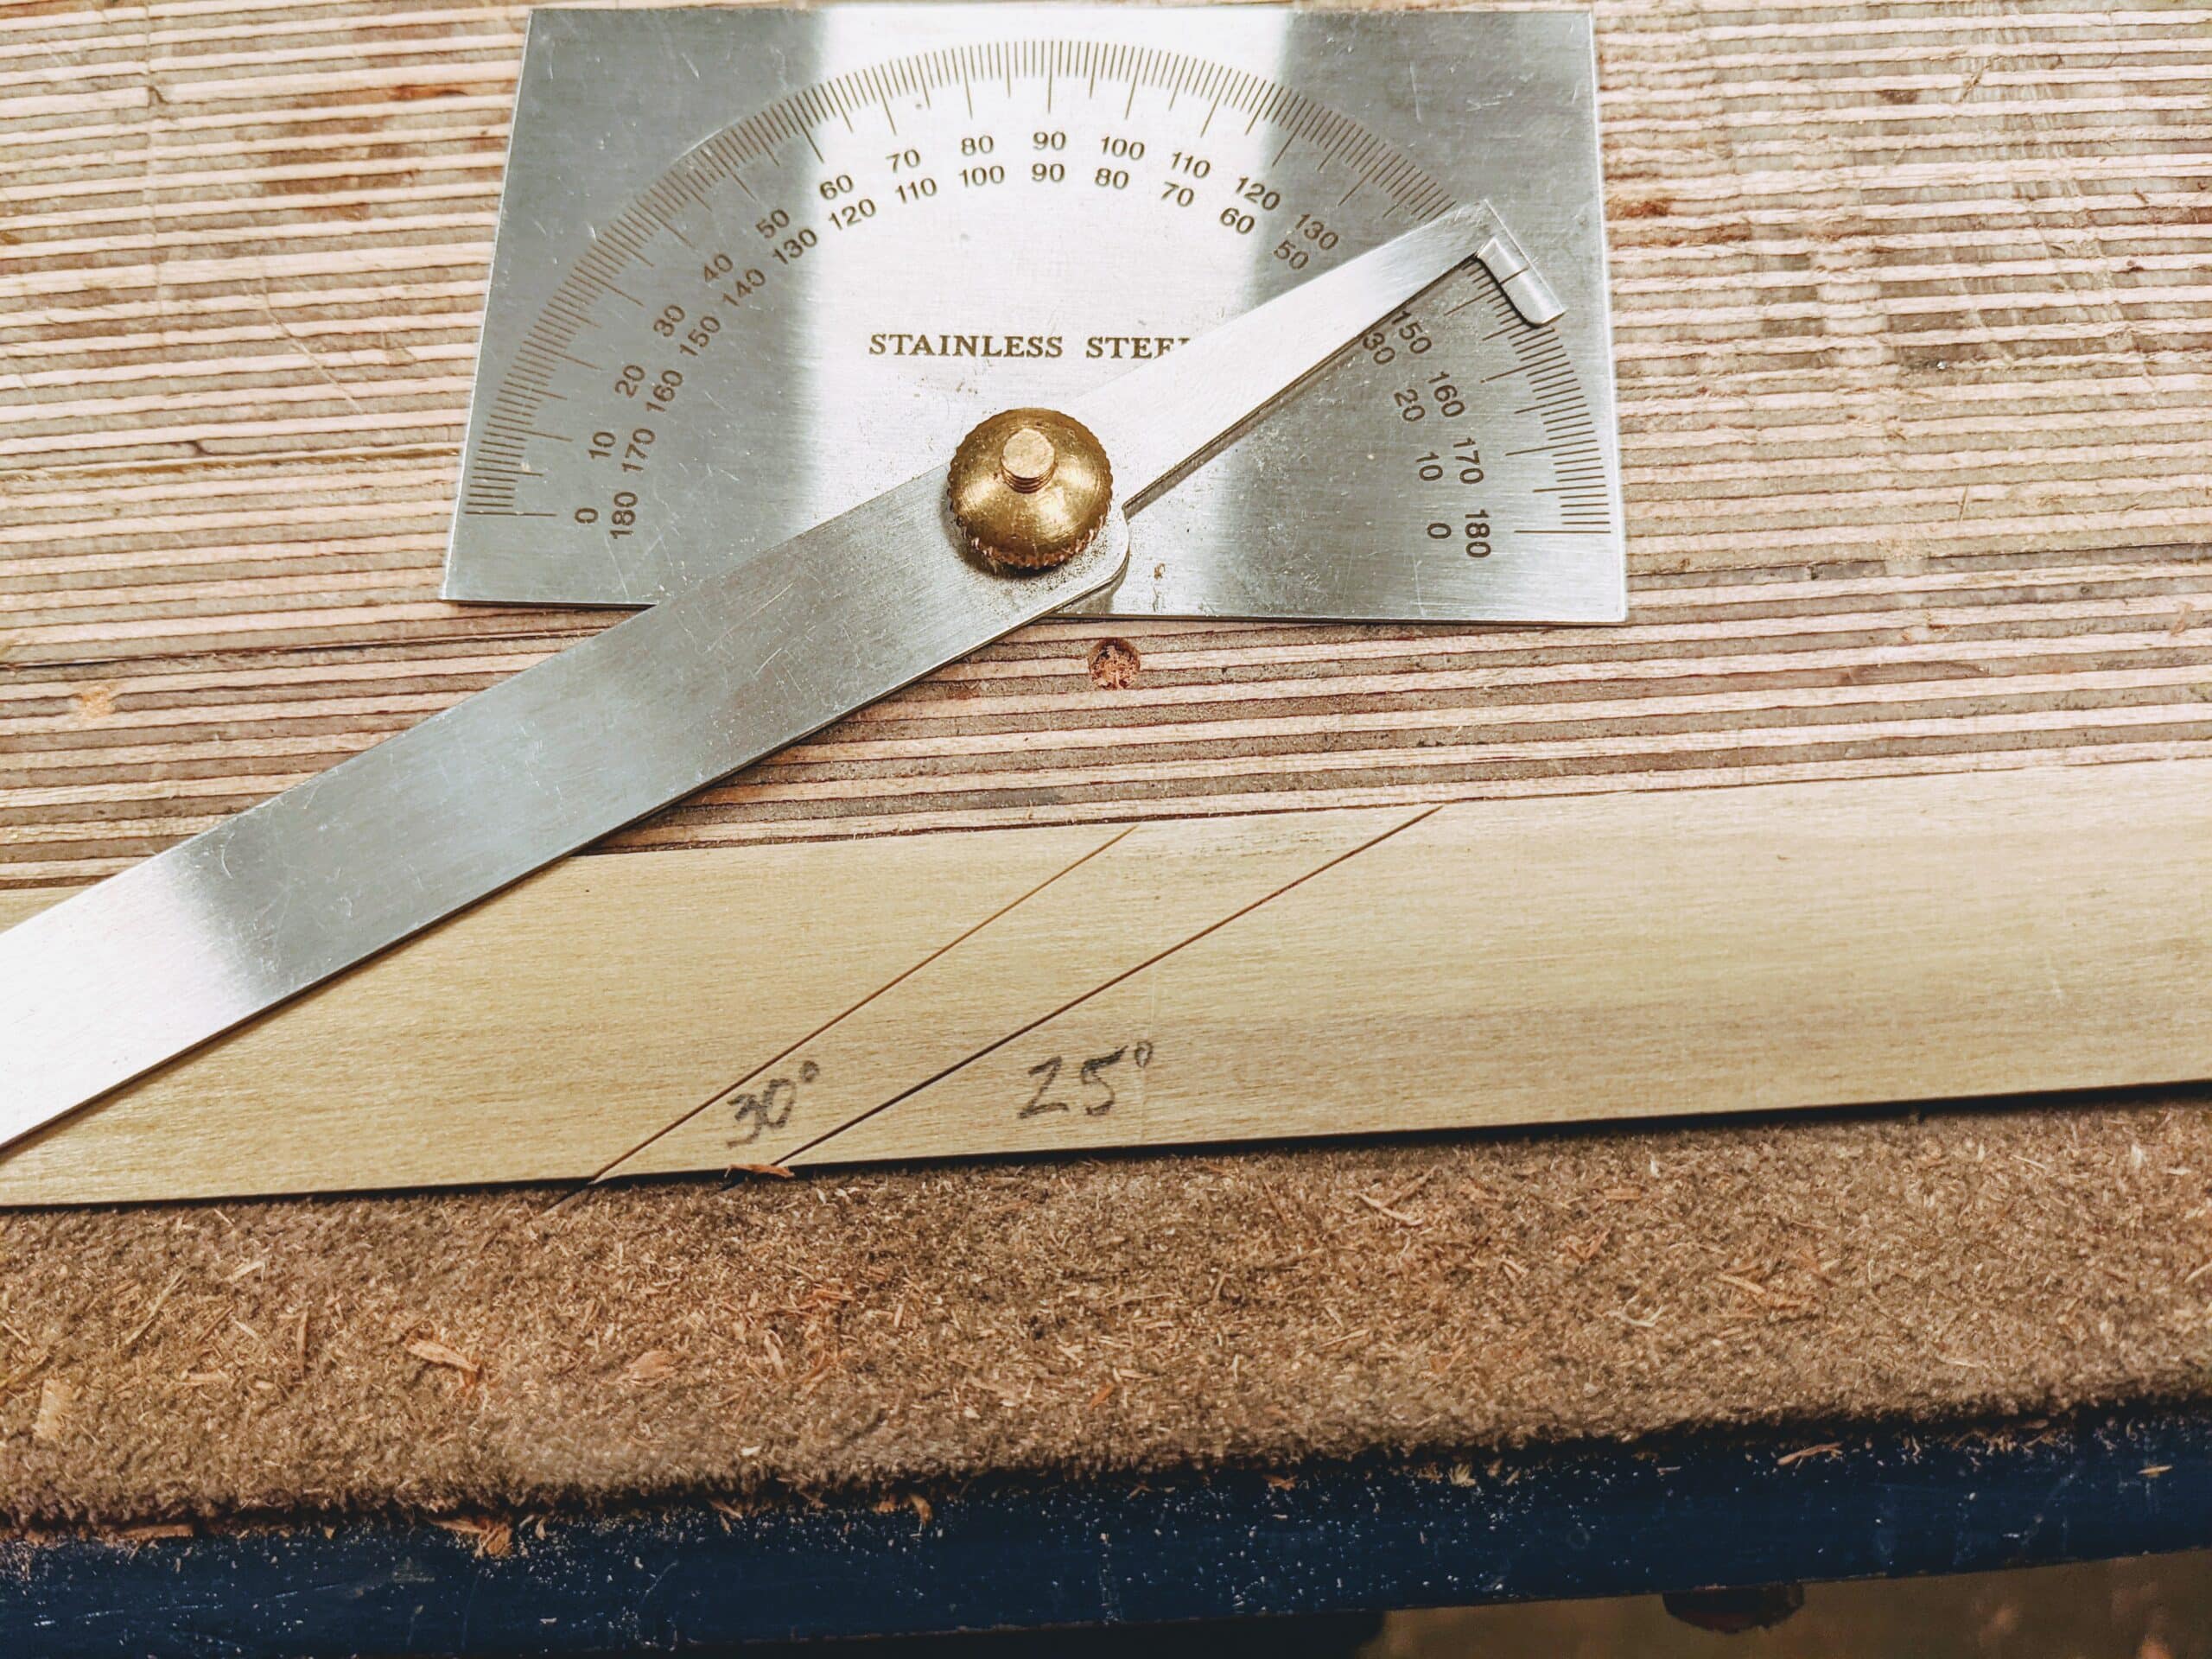
. . . .and strike the second knifewall.

Square vertical walls down onto the adjacent face using the angled lines to align the knife to.
Set a marking gauge to a depth of say 1/2″. This will take care of most of your plough plane cutters. If you want deeper use thicker wood stock if you want to but there is no real need to as the cutter can extend beyond the sides of the guide.
It’s important that the cuts you make along the lines are square to the face as these faces will govern the squareness of the sharpened edge.

With the sides sawn, chisel from both sides to try to remove the waste as intact as possible. You will use this piece to establish the retainer wedge shortly.
You can simply chisel the bottom of the recess parallel to the outside face as the bottom is not critical. It’s the walls that are more important. I own a narrow router plane, blade cut from a worn-out file.

Lay the angled waste along a straight edge of another scrap and establish a cut line. making the line and the wedge longer will enable you to plane one of the faces if you are slightly off or out of square in your sawing. Pare down the knifewalls if you need to correct any discrepancies too.

Slide the cutter in place and then the wedge. Tap it tight to establish a cut line and mark the cut lines as shown and cut to length.
To Use the Guide
I have diamond hones of different levels of fineness, coarse, medium and superfine, but abrasive paper glued to paddles works just as well. The advantage of diamonds is that you can push and pull to abrade. With abrasive paper, you can really go only in one direction in the abrading. It’s also good to remember that they make diamond nail files, they make large and small, and these work well for the coarser abrading.
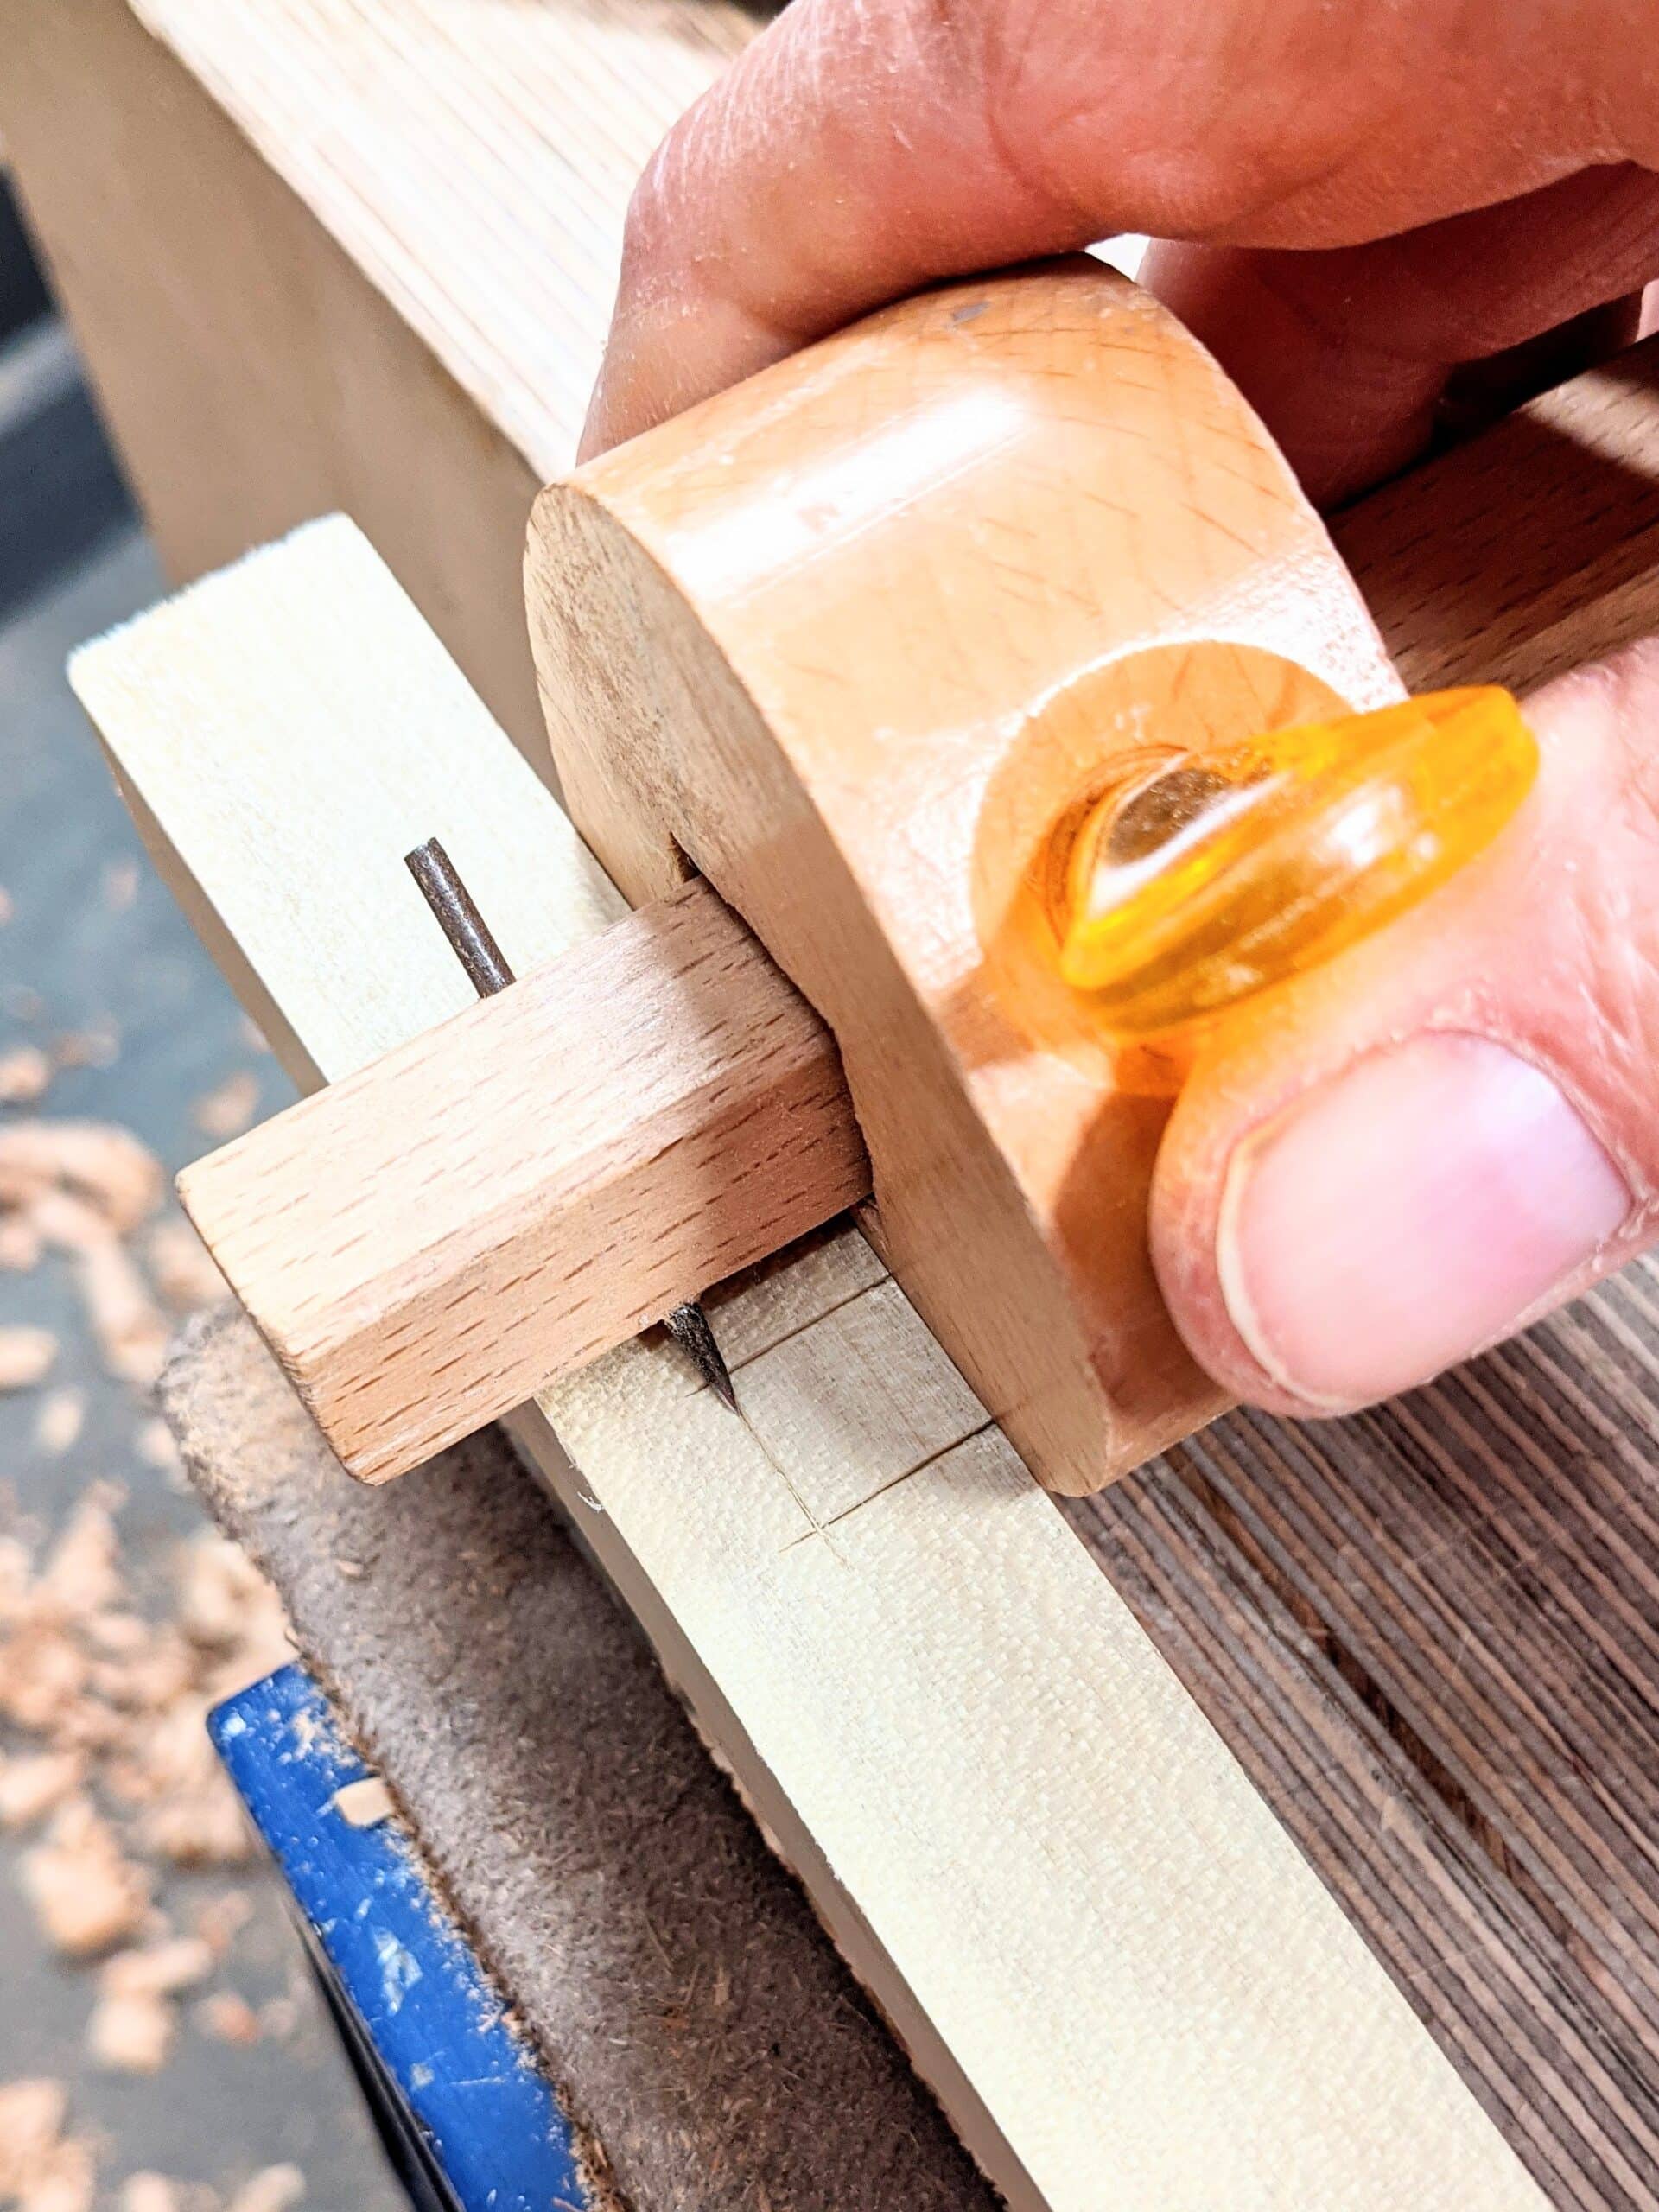
Use a hammer to tighten the wedge against the cutting iron from the top side as shown.
For the coarse abrading place the cutter against the 25º wall and wedge from the other side. The lowest point on the bevel should be about flush with the face of the guide.

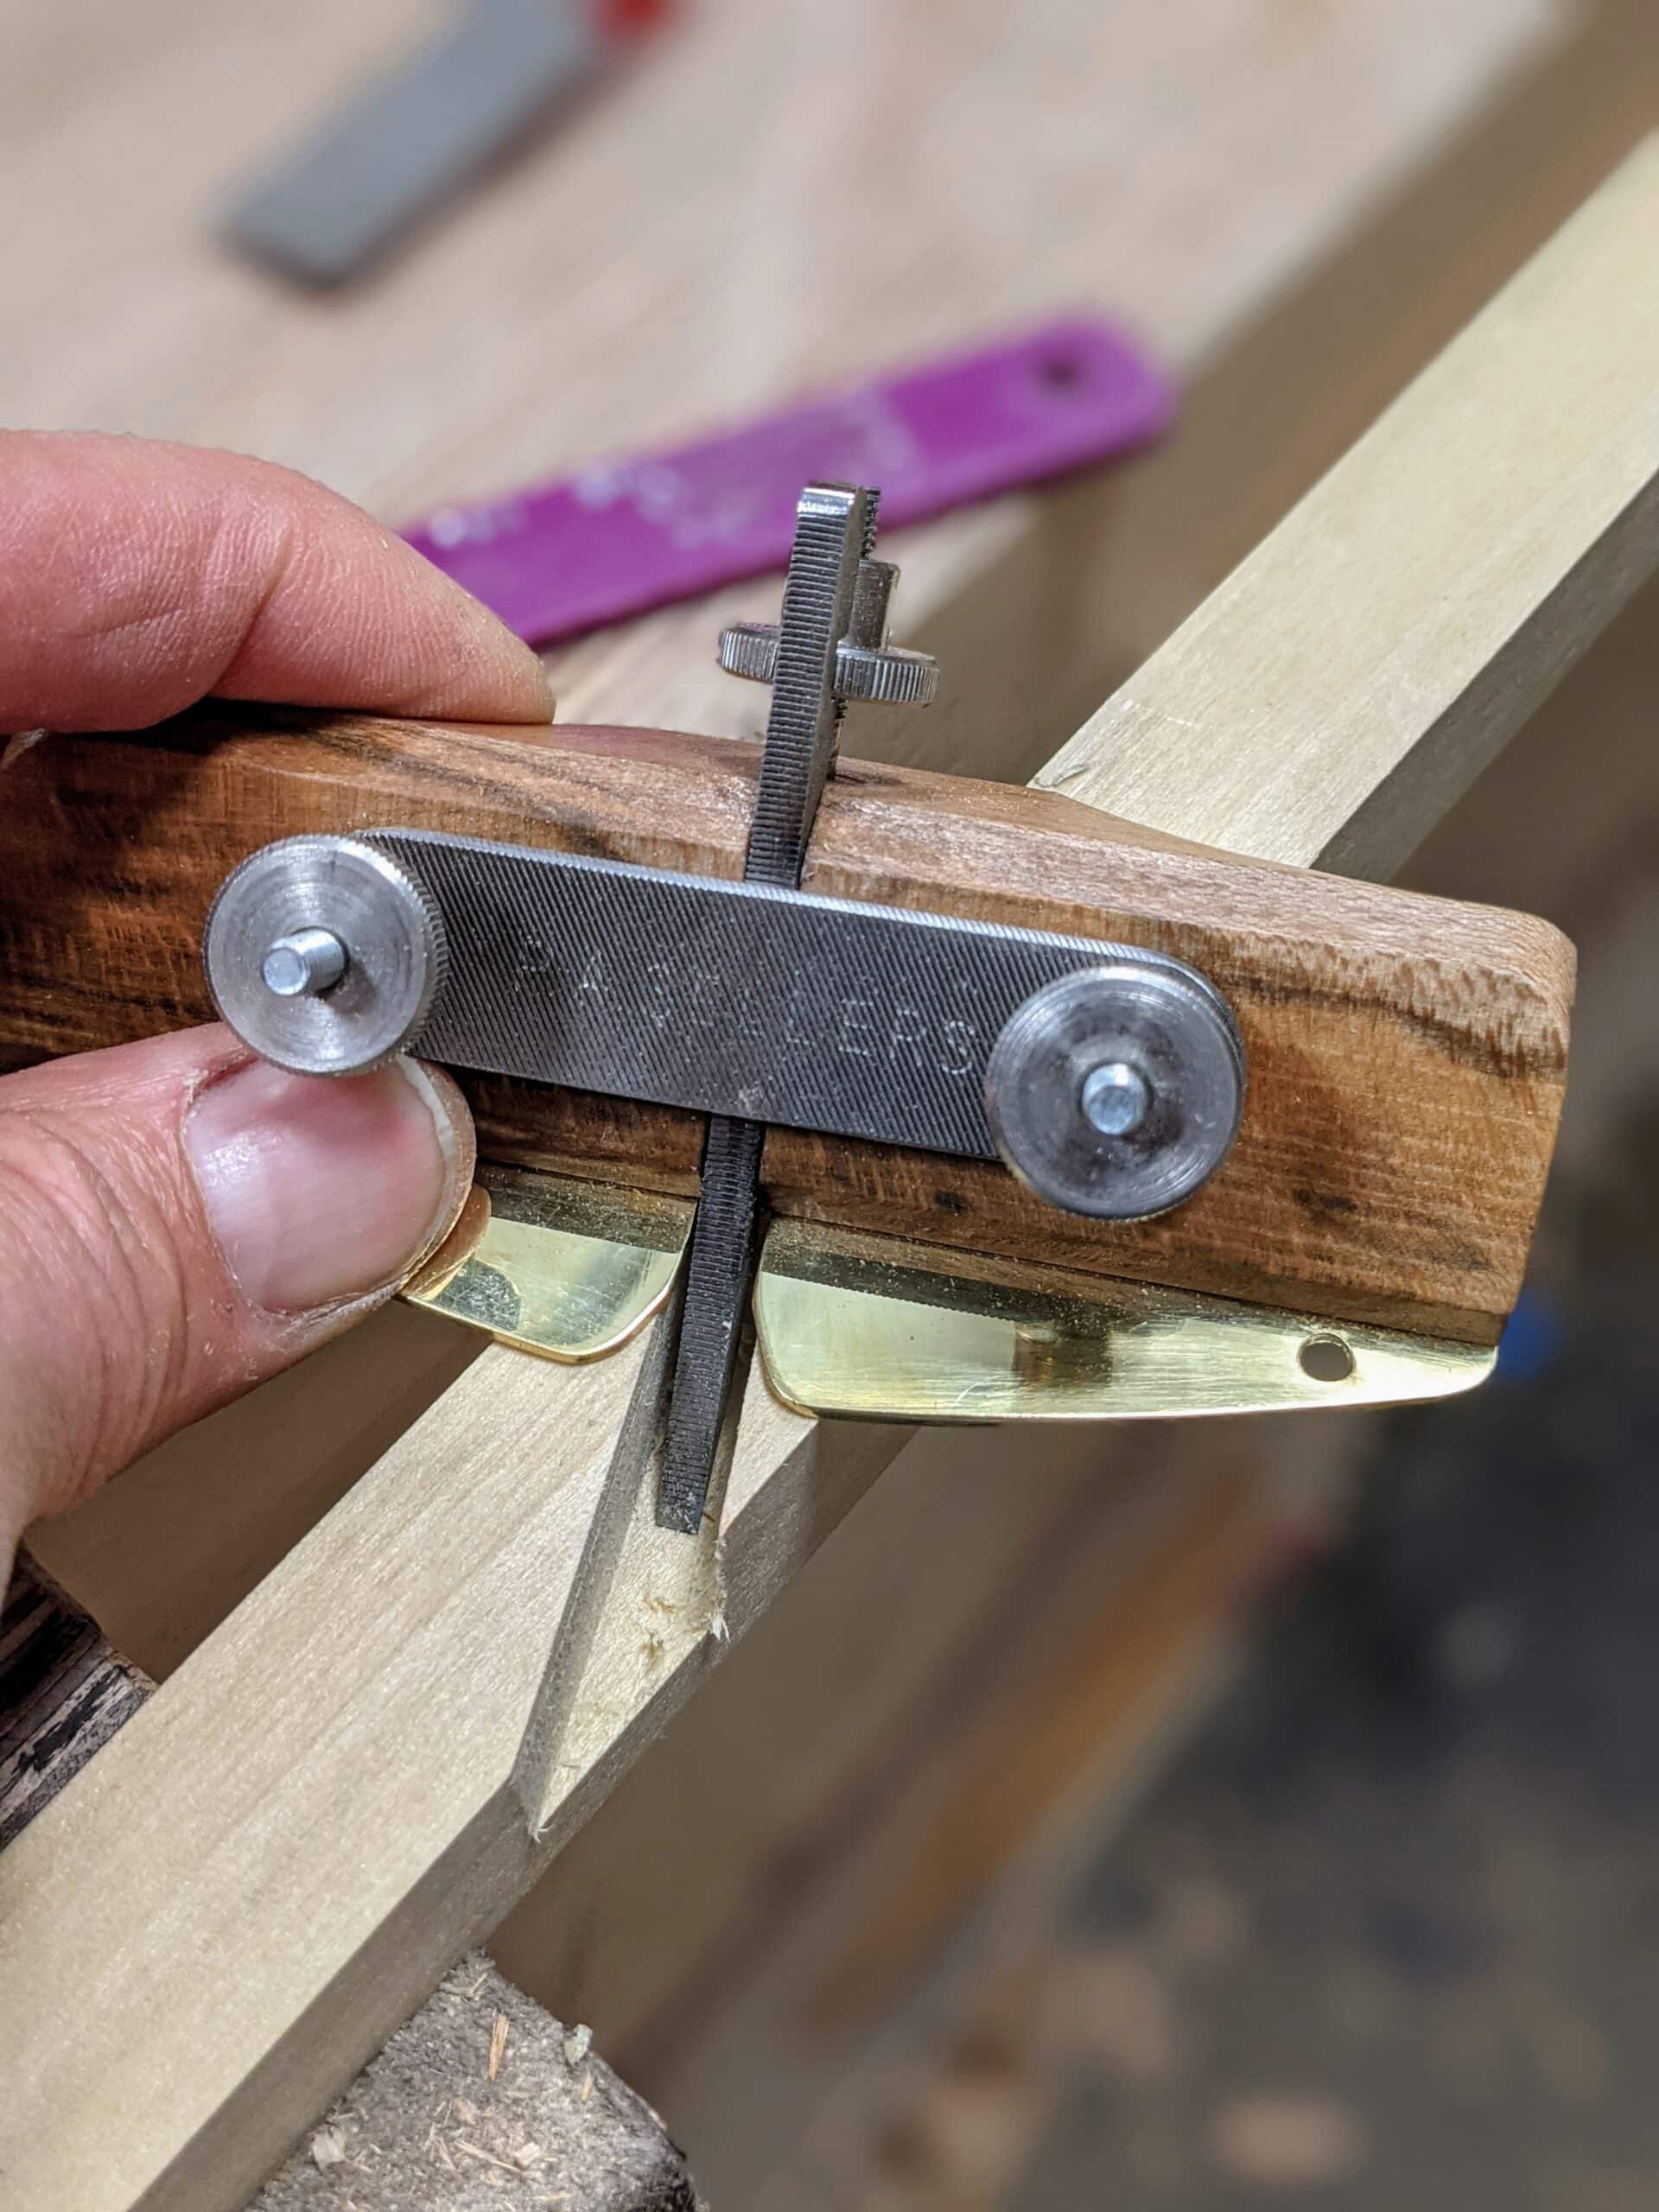
Once the bevel is established . . .
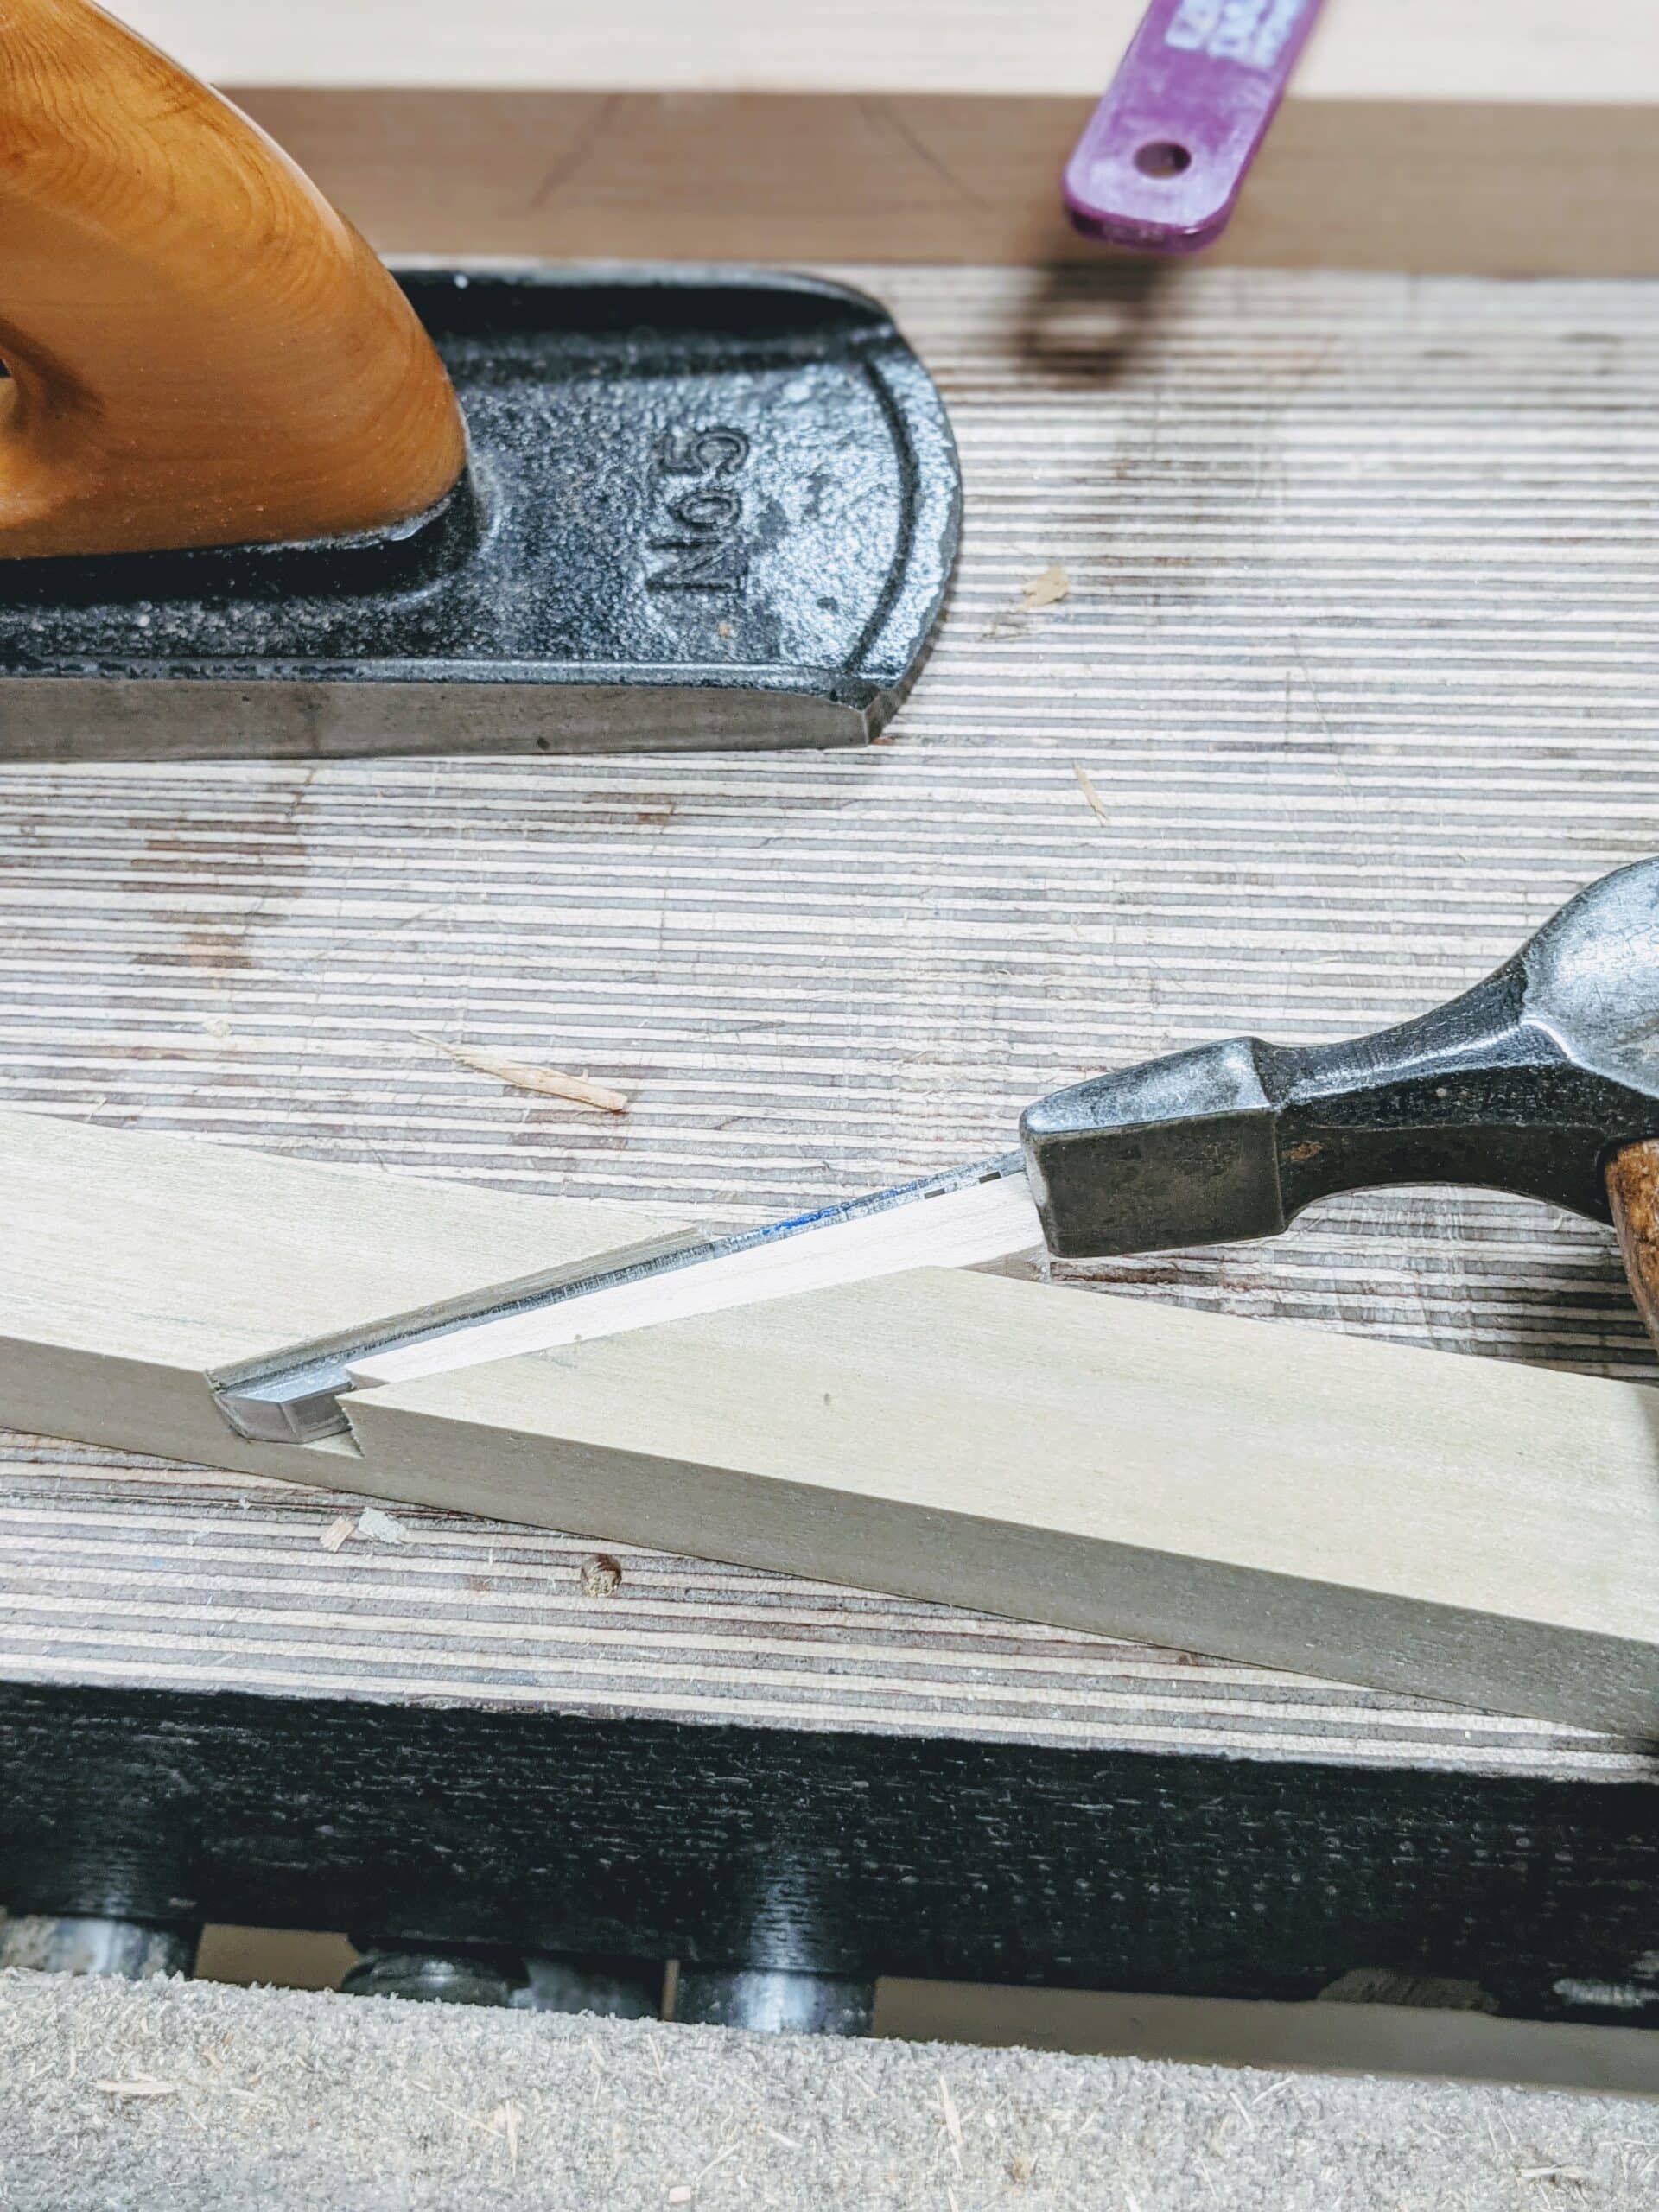
. . . remove the wedge and wedge the cutter against the 30º degree wall using the same wedge.
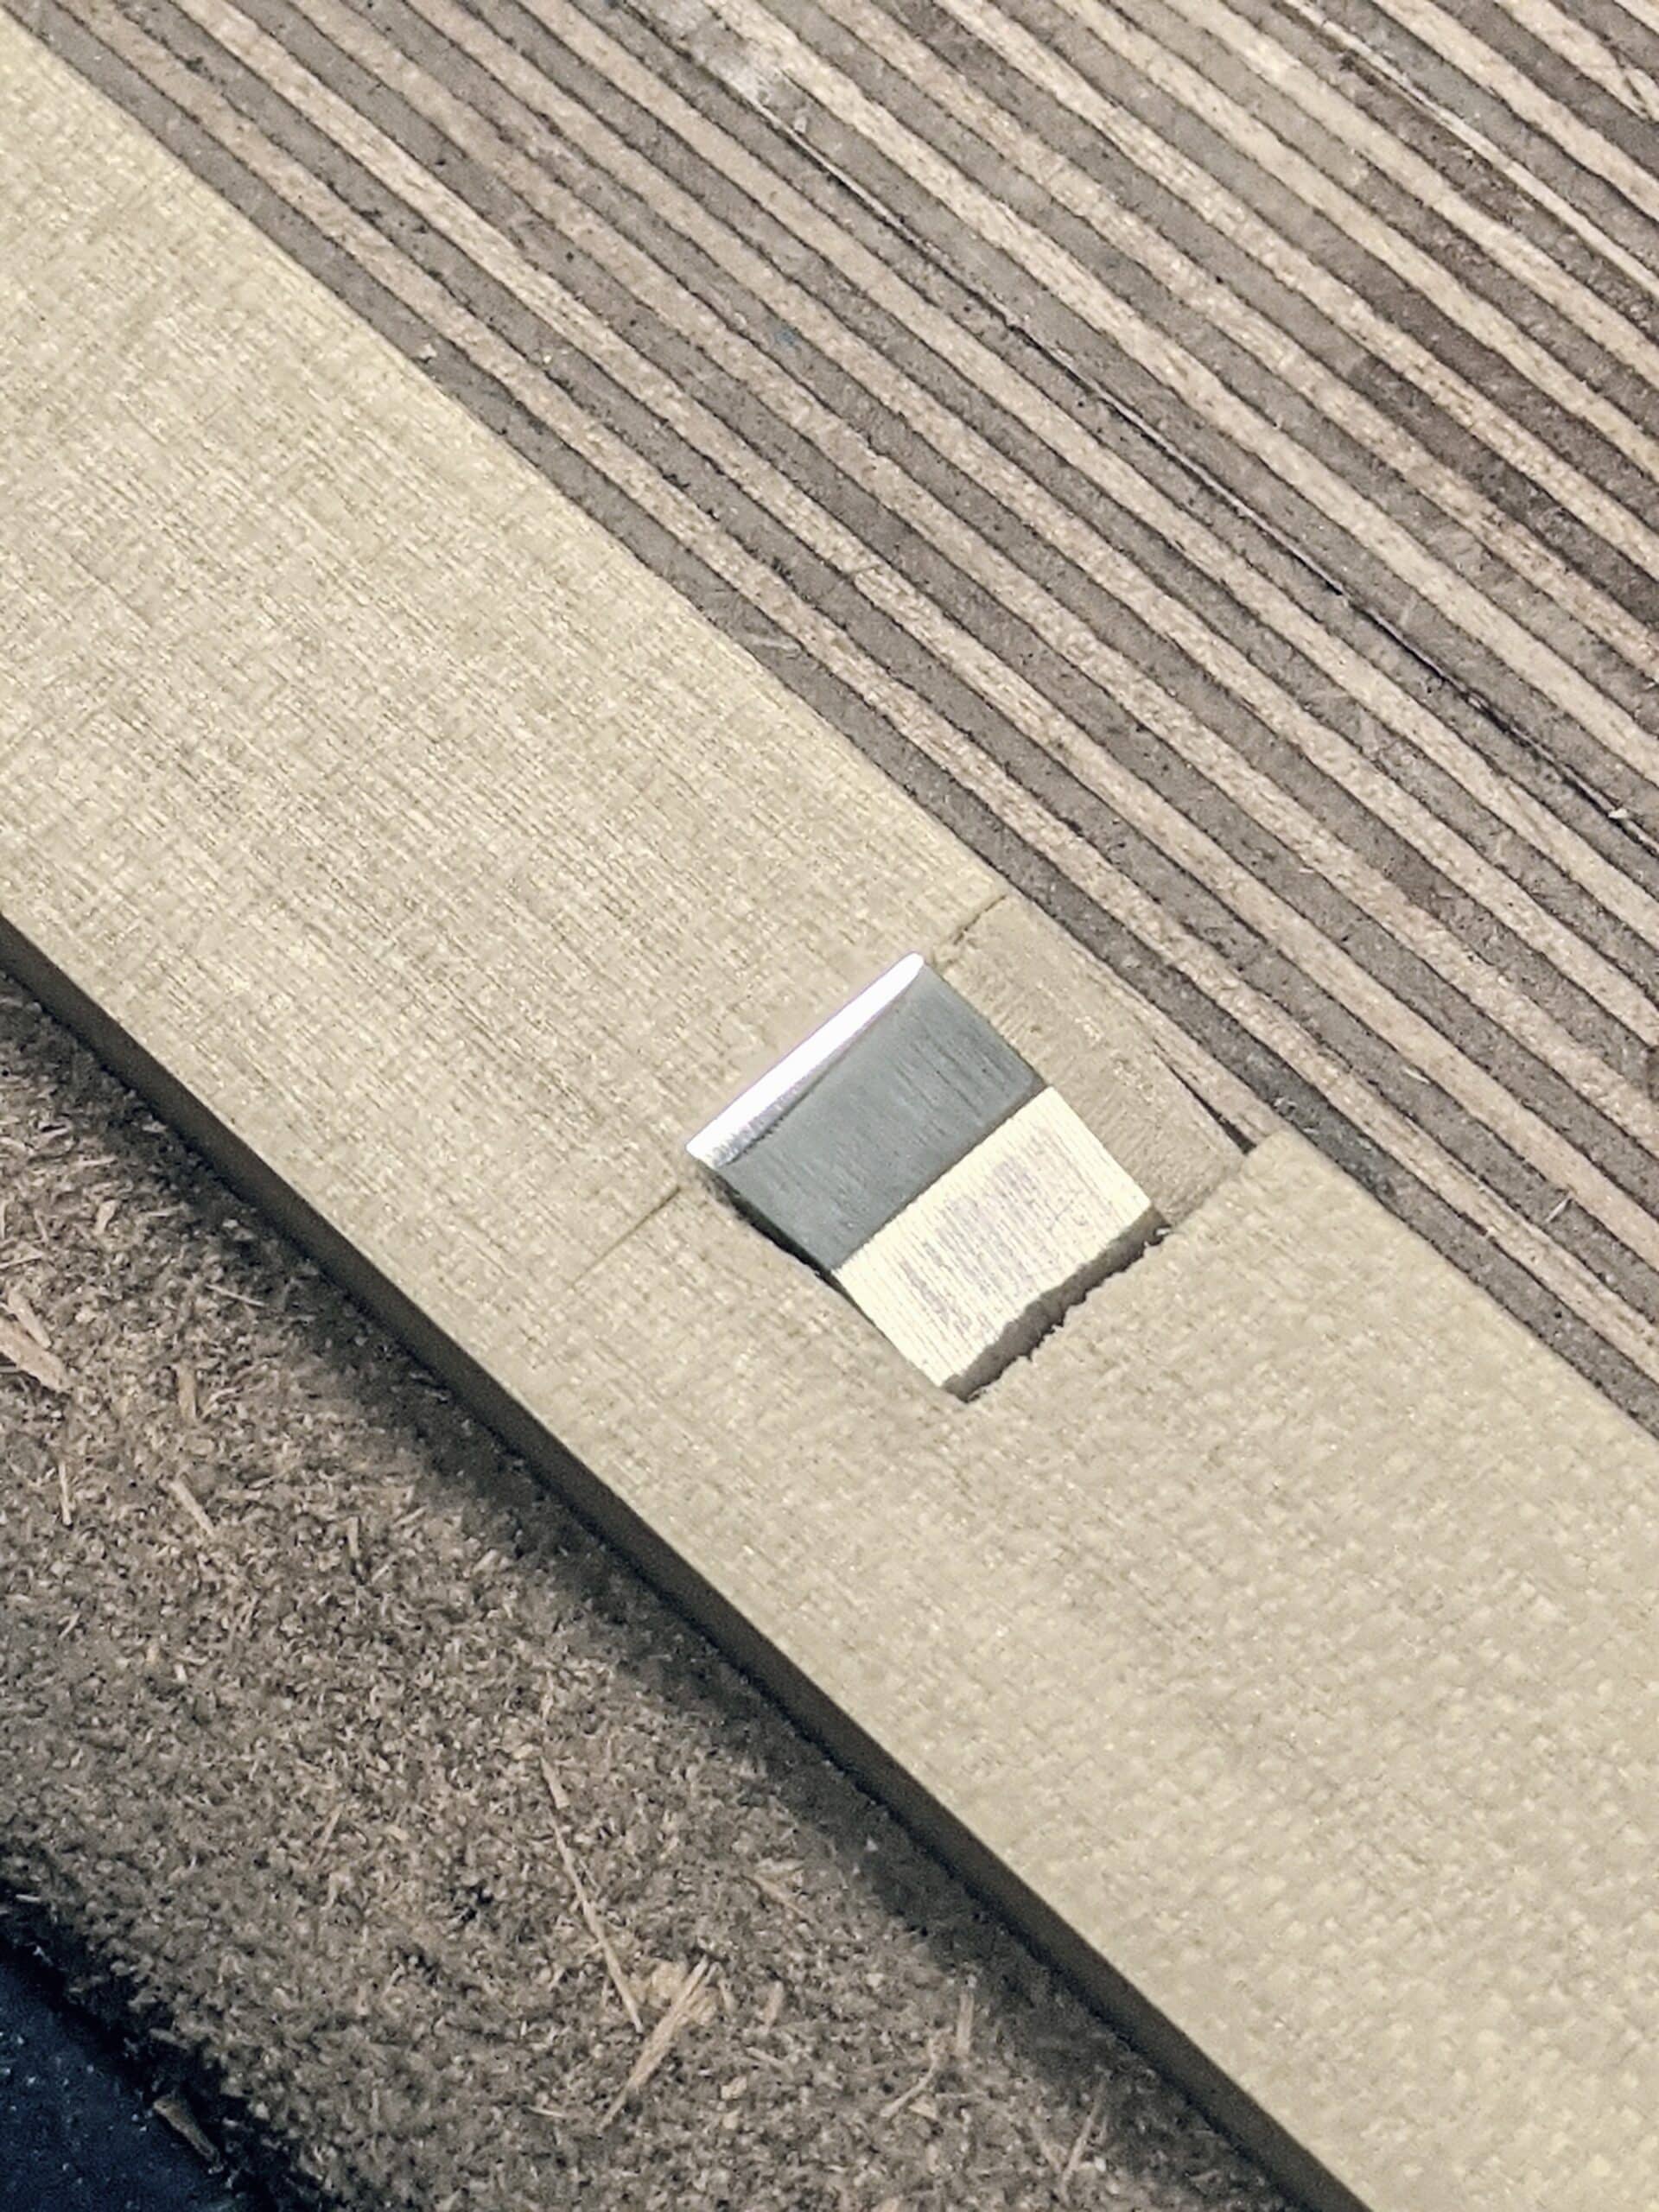
This time the wedging of the cutter should be very near flush with the face of the guide as the bevel should be as small as you want. The bevel will get wider with subsequent honings and then you will reestablish the primary bevel. You need only a narrow band of honed edge for the cutter to work great with this initialising for the cutter.
I spy a mini-router plane that looks very similar to the one Paul sells a kit for. Hope that might turn into a kit too.
Indeed!
I asked them about that a while back. We’ll see what happens.
Clever, simple, and can be made with scraps. Thanks Paul.
perfect for my Stanley #45 cutters. THANKS!
It’s looks to me that you can skip first 25°, do it on grinder and go only for the 30° onto that jig. However this seems to be another great tip from Paul’s arsenal of woodworking ideas!
And if you don’t have a grinder or electricity? Funny how we always assume everyone has access to such when we do. I said in the article you can simply go just to the 30º and skip the 25º. Anyway, we are talking one minute on the coarse level too. I’m not at all sure what the point of your comment is altogether. The system I gave is totally safe and guarantees dead accurate sharpening in a truly controlled way. You don’t get that with a grinder. I find it strange to introduce a machine when the whole work is under a minute total.
Hi Paul, my apologies if this comes up in wrong place. I’m requesting your advice. Do you think a Record No. 50 setup would be a good main tool for ploughing grooves. I can purchase one for a reasonable price. Thanks, Stephen
Yes. It is a good plough plane. The other cutters work and don’t work. Don’t expect too much from them as any rising grain will tear no matter what you do. Ploughing is the same as any of the other Record or Stanley plough/plow planes.
I own a Record No. 50C and cut with it both rebates and grooves and find it good. I have used it mainly in softwood and both along and across grain, set the small knives (sorry don’t know the name at the moment) shallow, and should work. Also good to attach a wooden fence (hardwood) so it does not jam and from time to time lubricate both fence and skids with the oil can (thanks Paul). Finally, use it as shown in Paul’s videos, i.e. start from the front end and work backward.
A question to Mr. Sellers, is there a way to do a stopped rebate or groove with this plane?
Finally thanks for the sharpening guide tip, I will try it.
Only one way and that is to chop, chisel and pare cut enough at the beginning and the end to take the fore part of the plane body and then plane out the mid section.
Picture this: a classroom with infinite(!) rows of students, definitely rows of old timey flip top wood desks …and there at the chalkboard/workbench is the teacher.
Suddenly, Scott stands up, slams his desktop and shout at the teacher 😳
I say this as a fellow classmate sitting three rows back, to the left of you (I was just taking notes of the honing guide lesson) …what are you trying to do? Start a schoolyard fight, go to the principal’s office, or are you truly expecting the teacher to beg for your forgiveness?!
Either, a less CAPITAL statement would probably be more effective.
Though I agree it would be foolish to ‘treat the man as a God’, that’s not quite what I see. I see appreciation, and sure some times over appreciation, but that’s alright, isn’t it?!
I’m not proposing we hold hands and sing kumbaya, but am neither going for the aforementioned schoolyard fight. Having said that, feel welcome to reach out to me directly if you need to talk – seems like you’ve had a traumatic experience with negative feedback
Best regards mate,
P.
Paul, I’m so happy that the absurd comment from the other Scott is gone. I hated the thought of others around here thinking I would say such a thing about you, who so freely and selflessly shares your experience and wisdom with the world. For a moment I felt complelled to reply and clarify THAT “Scott” wasn’t me, but I resisted feeding the troll. You have changed my life with your teachings, thank you for all you do.
*compelled
dang fat fingers
Absolutely awesome. Great lateral thinking again.
Aces to your photographer on this one, Paul. You wisdom is illustrated perfectly.
yet again you amaz me. what a great idea. I have struggled with keeping them square. now I know how.
Brilliant! Thank you
Paul, you answered my question without my asking! All those cutters can be sharpened. Thank you, sir.
Lynn
Wow, I have had so much trouble sharpening my narrow cutting iron that I was starting to think it was just me doing something terribly wrong. Not only does this validate that I’m not crazy but it also gives me a path forward to fixing them!
This will also aid with keeping narrow chisels square. Another great tip!
Sometimes the simplest insights are the most powerful. One jig, two “settings”of the wedge ensure the precise result desired with infinite repeatability. Another triumph of your insight, imagination, and capability!
Thanks for this. I purchased an old Stanley 50 and all of the cutters are out of kilter. I spent a considerable amount of time just getting the 1/4” square and sharp for some drawers. I haven’t touched all the other cutters because it was so much work to fix and hard to hold by hand, my fingers were cramping up.
I also used an old file to make an 1/8″ parting tool for my lathe. I hate throwing anything away.
I’ll try and make a thin cutter router next.
I just made one and it’s great! I have been free hand sharpening my cutters and I just discovered that the bevel on them has shifted to 40 degrees. Using the guide they are all nice and square and cut a lot better as well. Thank you so much.
Simple and efficient sharpening! Thank you Paul.
Paul
I have a Stanley plow plane but no blades. Any idea where to locate a set
I recently bought a set of 13 on eBay for £24. People usually split the sets and sell them individually for £4 each and you rarely need more than 4. You can also make your own from flat O1 steel or an old file.
Thanks I just bought 5 old plow planes but the blades are a mess. Your a life saver.
Kind regards Cindy.
Thank you Paul. As you always kindly do for your followers, a simple and easy solution to a common problem. I Like the narrow bladed Sellers router plane you used too. A new kit perhaps?
Cheers.
Michael
So simple, so smart! Thank you Paul.
Perfect for that maple off cut. Thank You Paul,
John P.
Absolute genius, totally practical.
Brilliant idea.
I might be wrong, but it looks like the blade in the mini router is made from an old file?
It is. I use old files that are worn beyond use to make tool blades like knives, floats, grooving saws and router blades too. I even made a chequering tool for gun stock and pistol grip chequering and duck call texturing.
I have some old punches forged from old files. The remains of the teeth act as knurling. From a time when little was thrown away.
Hi Paul, Thank you so much for this article. Any update on the progress of your next book?
How long does this guide last considering that you’re grinding it away along with the blade right?
It’s of no real consequence as wood is a resistant material and especially resistant to diamond hones. Used sensitively I would suggest 50 sharpenings before remedial action. Moreover, a quick swipe with a plane to restore the surface levels and any squareness takes little more than three or four swipes. Also, it will depend on the wood too. Beech and maple will last longer than the poplar I used. Remember too that this jig takes under four minutes to make. I suggest it might last for a lifetime in amateur realms. I’m not really sure why the question?
When creating a ‘sanding pad’ with sandpaper glued to something, I found that stone bench top samples (marble, etc) are quite flat and unyielding, and literally free at most kitchen stores.
Following Paul’s advice on how to glue your leather to a piece of ply for stropping, I found that double sided tape carefully and evenly glued to the polished side with no gaps, and stretching the paper well while glueing will reduce the chances of it snatching/tearing considerably
yes and glass splashback samples also work well.
Sadly our Bunnings (Australia’s bigbox giant) now ask $4-5, 🙁
Using files to make blades etc. sounds interesting since I have a few nearly warn out files. But isn’t file steal rather hard? Does it need to be softened (I think that is called annealing) so it can be shaped and then hardened again? I have made a few carving knives from o1 steal, but do not really know much about all this.
Yes. Heat the steel and let it cool and you can cut it with a hacksaw and file it with another file. Even though it is tool steel it cut just like mild steel. Once repurposed simply reharden it and you have a good whatever.
Paul, have you ever published something regarding making floats ?
I’ve got a reasonable idea, but you’re more likely to have some really good tips and insights to be make more of a success, than a 1st off crack at it. 🙂
A thought about sharpening those small blades. I might try Paul’s jig, but I have had some success with sharpening them by hand, though not perfect success. First, I clamp them in locking pliers. This gives plenty of grip for holding small blades easily. Second, I mainly sharpen by pulling the blade, not pushing. I found that whenever I pushed a small blade, I rocked it or skewed it. Finally, I check the progress every few strokes. I found that you can take a lot of metal off of a small blade (whether a narrow chisel or plough plane blade) very very fast. So if something is going wrong, you want to catch it very very fast before you have a seriously messed up edge. Anyway, that is my two cents worth of wisdom, and we all know how much two cents is worth now a days!
Pa Sellers it says on the router! Do you ever use dividers aka compasses? I don’t recall seeing you use a set to measure etc.? Everyone over in the US seems to use them.
Ah! Yes! But everyone in the US uses feet and inches too and it is taught in schools. Is this who we should follow? Just joking.
We might look at the words here. Not technically one and the same. A compass (or pair of compasses here) is a drafting instrument that has one pen or pencil point and one pinpoint that is positioned at the centre of the circle to be described, while a divider (again, a pair of dividers UK), on the other hand, has two sharp points, one for the centre and the other for scribing or marking.
I can’t argue with that! I was just curious if you thought they were goofy or had some secret use.
For the record, I’m pro-metric, anti-Imperial. In the US: a Communist. The logic just is so appealing…base 10, yes! But I can’t do metric, so there you go. And most of my ancestors are French Canadian.
BTW I was modifying a wooden plane an old ECE smoothing plane with your 8″ radius scrub blade which is my favorite plane now and I used a chisel to open up the mouth to let bigger chips pass up through, (they were too thick and getting stuck in the mouth) and guess what? I goofed and split a big 2-inch chunk off the sole of the plane when the chisel came chopping down to the sole part. A little wood glue saved the day and I planed the sole flat-ish. Lesson learned. Think about grain orientation when chiseling next time.
Hi Paul. I just use the straight bevel on all my tool blades, is a micro bevel essential. Didn’t know you used micro bevels on some of your tools. Is a micro bevel traditional on certain tools.
many regards.
A micro bevel would be considered a refinement of what existed throughout history simply as a second bevel that strengthens the cutting edge to give better resistance. There is no real need for a second bevel if you both sharpen and hone at say 30º. I don’t use micro bevels per see but I might add a steeper pitch for an even stronger edge so as not to ‘thicken’ the whole bevel. Where do I do that? If I am chopping a mortise in more resistant, dense-grained woods.
Thanks for your reply Paul, was reading one of your earlier blogs where you suggest putting a micro bevel on the tips on some of your rip cut hand saw teeth. Is this a technique you do every time you sharpen or only on designated saws . I’ve never tried this procedure.
Many regards.