Last Public Project of 2022 . . .
. . . ready for the next series on bed making 2023!
I’ve been enjoying this project so very much. It was a project I could really sink myself into and for a larger project, it still didn’t take that long. Larger sections of oak were reduced to thin strips and smaller sections. That’s generally the case for any project and many got laminated to thicker ones and then bent to shape for the comfort of sitting up in bed to read, have breakfast in bed or even tune in to your laptop; changed cultures and changed uses have reshaped our lives. Remember how beds and headboards used to sit bolt-upright, were unpadded and shapeless, kind of like vintage bikes, car seats, chair backs and many other things? I am anticipating that this bed will need no stacked-up pillows to pad out for lumber support. These are the things design and planning take more and more care of.

The struggles in hand work mostly come in planing heavier sections of wood, in this case, oak to remove twist, cup and bow. The hardest is of course the bow on six- and seven-foot lengths. The cup and camber to opposite faces are easy enough but still require some slog work — good for upper-body exercise and pulmonary workout though, don’t forget that. My wood is mostly 8″ wide. To minimise wood loss I mostly ripped the badly cupped pieces into to two along the length. By doing that I lost a bare sixteenth of an inch instead of six times that amount. Well worth considering, this practice was once commonplace if hand work was the work in hand. Doing this allowed me another element to save time and energy. I could take a straightedge along the edge to give me a cut line to plane to. I did this to both pieces and after truing up and squaring the lengths they came together perfectly. It still took me an hour to do one side rail but I got my workout and my wood without going to the gym (which I personally would never do). I have to say too that I felt the deeper satisfaction only productive work can give a maker. You look back on your efforts when everything is planed out and you have that inner smile knowing that whoever looks on this bed will never know the half of what it took to get there. The joint lines disappeared with the hidden mortise and tenons but a sudden solidity created the steady strength a good bed needs to take on trampolining kids and two adults weighed down by the drains of life to recover for another day.
Oak is not a hard wood to work with until you come to having to remove a lot of wood or heavy knotty areas by hand. The bandsaw is really a winner for those of who are cash strapped, time strapped, space strapped and whatever. This is the board that was a nice enough piece mentioned above. I think most often the rewards unseen make the whole worth the effort. Ten planks of oak stacked and stood on end slowly get transformed from rough-sawn to finely finished, sized and shaped with components interconnected by whatever method you choose. Sometimes someone asks why I don’t use tusk tenons and wedges rather than fastenings. My reply is this. Most tenoned work held with wedges somehow looks overly big, bordering on ugly to look at. Fastenings of all types are some of the greatest inventions I know of. That said, I will never use dominoes, biscuits, dowels, pocket hole screws, or power routers for dovetails and nor will I use jigs to guide them. For me, this would destroy what I have gained as my lifestyle through six decades of working wood.
Next, I just have to cut and fit the side rails to length and finish off a couple more coats to my headboard. Then I am ready for an hour or two to develop the undergirding to carry the mattress. A nice c;losing piece too my 2022 and a good piece to start the series for 2023.

“The joint lines disappeared with the hidden mortise and tenons”
When would we have to use tenons between two boards of a panel?
To avoid left-right (on the last picture) slipping while gluing to ensure perfect grain match?
I most likely would not aim for a perfect grain match.
Good morning Paul,
Merry Christmas and thank you for all you do for us woodworkers! God bless
Hi Paul,
Do you mean you ripped the cupped boards then rejoined them along their length in a different orientation to counter the cup?
“To minimise wood loss I mostly ripped the badly cupped pieces into to two along the length. By doing that I lost a bare sixteenth of an inch instead of six times that amount. Well worth considering, this practice was once”
Merry Christmas,
Jon
No, Jon.I ripped them in two to take out 95% of the cup, planed a true and flat face and then squared that adjacent edge I ripped. Then I ripped a parallel face to the opposite sides and surface planed to the final thickness. I did this to the second half and then glued them back together all in the same orientation as they grew in the tree. So, technically it is a consideration that you could expect a reoccurring issue of the same type but that can only happen if I take the wood back up to the high moisture levels the wood had during and through the actual drying process which will never happen unless I dump the wood in a river. It’s the natural occurrence that happens in the drying process. With the wood acclimated this way it is now stable. Only in extreme conditions will it change for the worst.
Thanks Paul. Did it take you a while to get past any mental hurdle of cutting a wider piece to then glue it up? I completely understand why you ripped and then reglued in order to minimize thickness loss. For some reason, I don’t like glue lines if I can avoid them. I think I just haven’t been doing this long enough.
No, no mental blocks. Just did it as I have many a dozen times each year.
Joe-
I can tell you the first time I did this, it was a mental hurdle. Still is sometimes, but as my saw work and jointing skill has improved it has gotten easier. Especially when it is the difference between a final thickness of 11/16 or 5/8 and 1/2 in or less.
I wonder about the comment in the text “The joint lines disappeared with the hidden mortise and tenons “.
I am not clear about what that refers to. Could someone explain where these joint lines are?
I suppose all will be revealed when the series is published, but I’m intrigued enough to ask.
I recently helped a friend rebuild part of a massive pine bed which needed reducing in width due to a house move. This project triggered an interest in building something like that from scratch, so I am looking forward to the series.
Thank you for keeping us busy Paul.
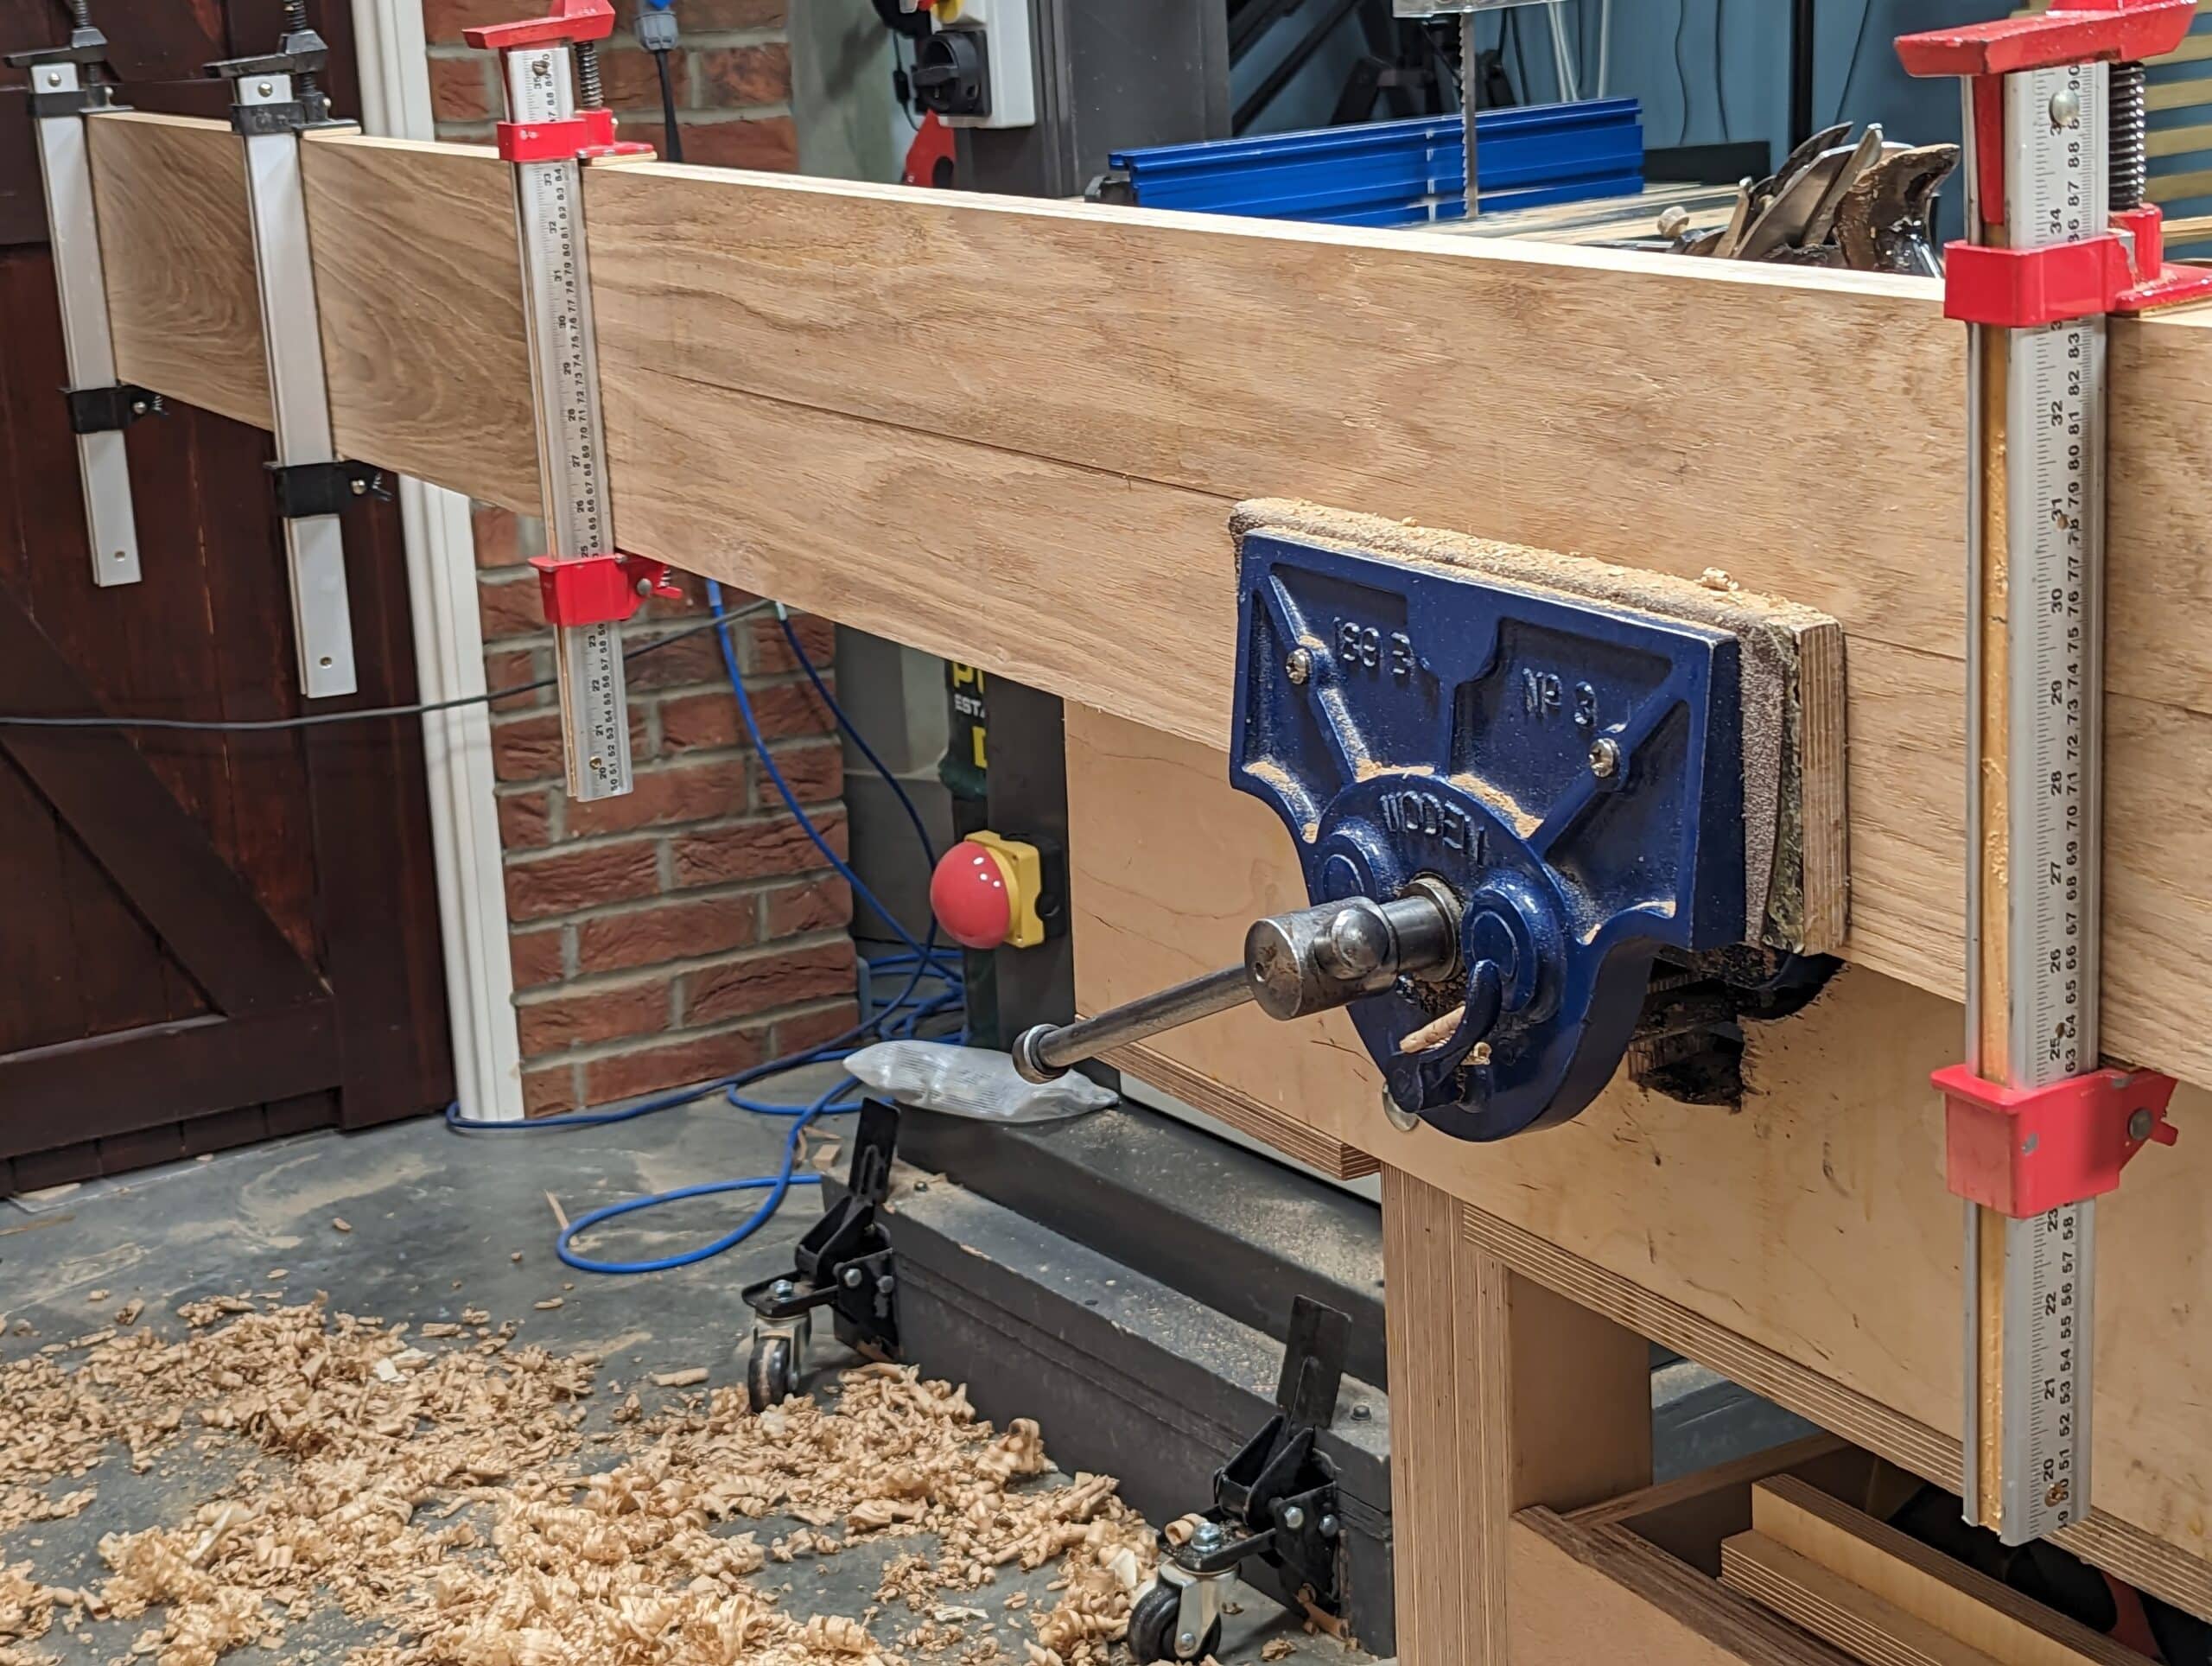
A joint line can be where the shoulders of joints show the connecting lines when they come together as in the mortise and tenon joint, dovetails and so on but it can be along the length of laminated boards to build up a width from two or more boards of wood. The rails for my bed were not all wide enough or I needed to rip them along the length, true the two halves and then glue them back together. In this case, the long section clamped up and hanging in the vise is two pieces ripped and then trued and glued back. Once I planed the pieces level the glue line along the length disappeared.
I don’t think I’m alone in not understanding where the “hidden mortise and tenons” are…
You seem to be mentioning them as if they are somehow involved in the long joint lines??
Sorry if I’m being dumb but you you please explain where these mortise and tenons are?
Thanks,
Matt
Ah! I see what you mean. I was considering how most mortise and tenon joints are not always visible even though we know are assume it’s presence. When we take wood apart the joint line can be hidden from sight if indeed the grain aligns well.
I see. Thank you for clarifying this Paul.
I am still in doubt:
did you (yes or not) use loose tenons between the two halves of the long rails?
And if “yes”, why?
No. Q sounds a bit like an interrogation. Not sure why/
my apologies.
I didn’t want to sound rude. English is not my mother language.
Ah! Then I apologise to you, Sylvain.
No, no.
Have a nice Christmas with people you love.
I can’t wait to see how you made this bed and explain your thought process.
What a fascinating craft.
Personally I’m not understanding what you mean by ripping boards to get rid of the cupping.
Questions abound! Why didn’t you use quarter sawn or maybe rift sawn.
I’ve never encountered 8” boards that had such issues, I’ve used boards 14” wide for panel doors and they never warped.
I’m sure I’ll understand once I’ve seen the process.
Tom-
To have your luck. I have had to work with poorly dried rift that has cupped, and mostly find 8in ot over to have some kind of warp, twist, cup or bend.
Regarding tenon shoulders cutting.
Or any joinery for that matter.
I acquired a bunch of vintage saws but im not sure how to sharpen them for which use.
I have 12” saws in 15, 13 and 12 tpi.
15tpi is filed with a progressive rake, which could probably be fine for tenon shoulder and tenon cutting?
I’m not sure about the 13 and 12 tpi.
I can file them progressive too for cutting cheeks? Or could i sharpen one of them for shoulder cutting? Maybe not with a progressive rake, but a more relaxed rake for a dedicated crosscutter? Im not sure how to use the 13-12 tpi saws and if they make a good candidate for crosscutting or if I should use them as rip.
Id like to have a small collection with different rip filings for different applications.
I am also only taking about rip filing back saws, no fleam, only different rip rakes.
Thx for any replies!
have you looked at this collection on saw sharpening https://paulsellers.com/knowledge-base/saws-sharpening-refurbishment/
Jasper,
Pretty much anything over 12 tpi can be a straight basic rip file. If I am going for a dedicated crosscut back saw (really only my miter saw), I commit to the full crosscut filing. It will work better and take less effort than rake adjustment tricks.
Merry Christmas and all the best for the new year to you, your family and the team.
i generally ignore all the youtube wannabee experts. it amazes me how people who have never actually earn’t their living doing something can be such experts. definition of an expert. x is the unknown factor and a spurt is a drip under pressure.
oops just to clarify. my earlier comment was re the bench vice gurus.
sick bed design! I’m drooling over this project!
Paul:Your mentioning the Heart Health aspects of hand toll woodworking reminded me of the questioning my Cardiologist regarding how soon I could get back to finishing a Hope Chest I had under construction before I had another heart failure requiring CPR. I now have a heart pacemaker.
His reply was One month and he would increase my rate as I needed to enable me to work harder. He’s a fan of Handtool Woodworking.
Thank you for your inspiration
Clamping the boards in a vice like the picture struck me as brilliant. I never thought of it. I am now in search of a project where I can try it.
Beautiful!