Gifts
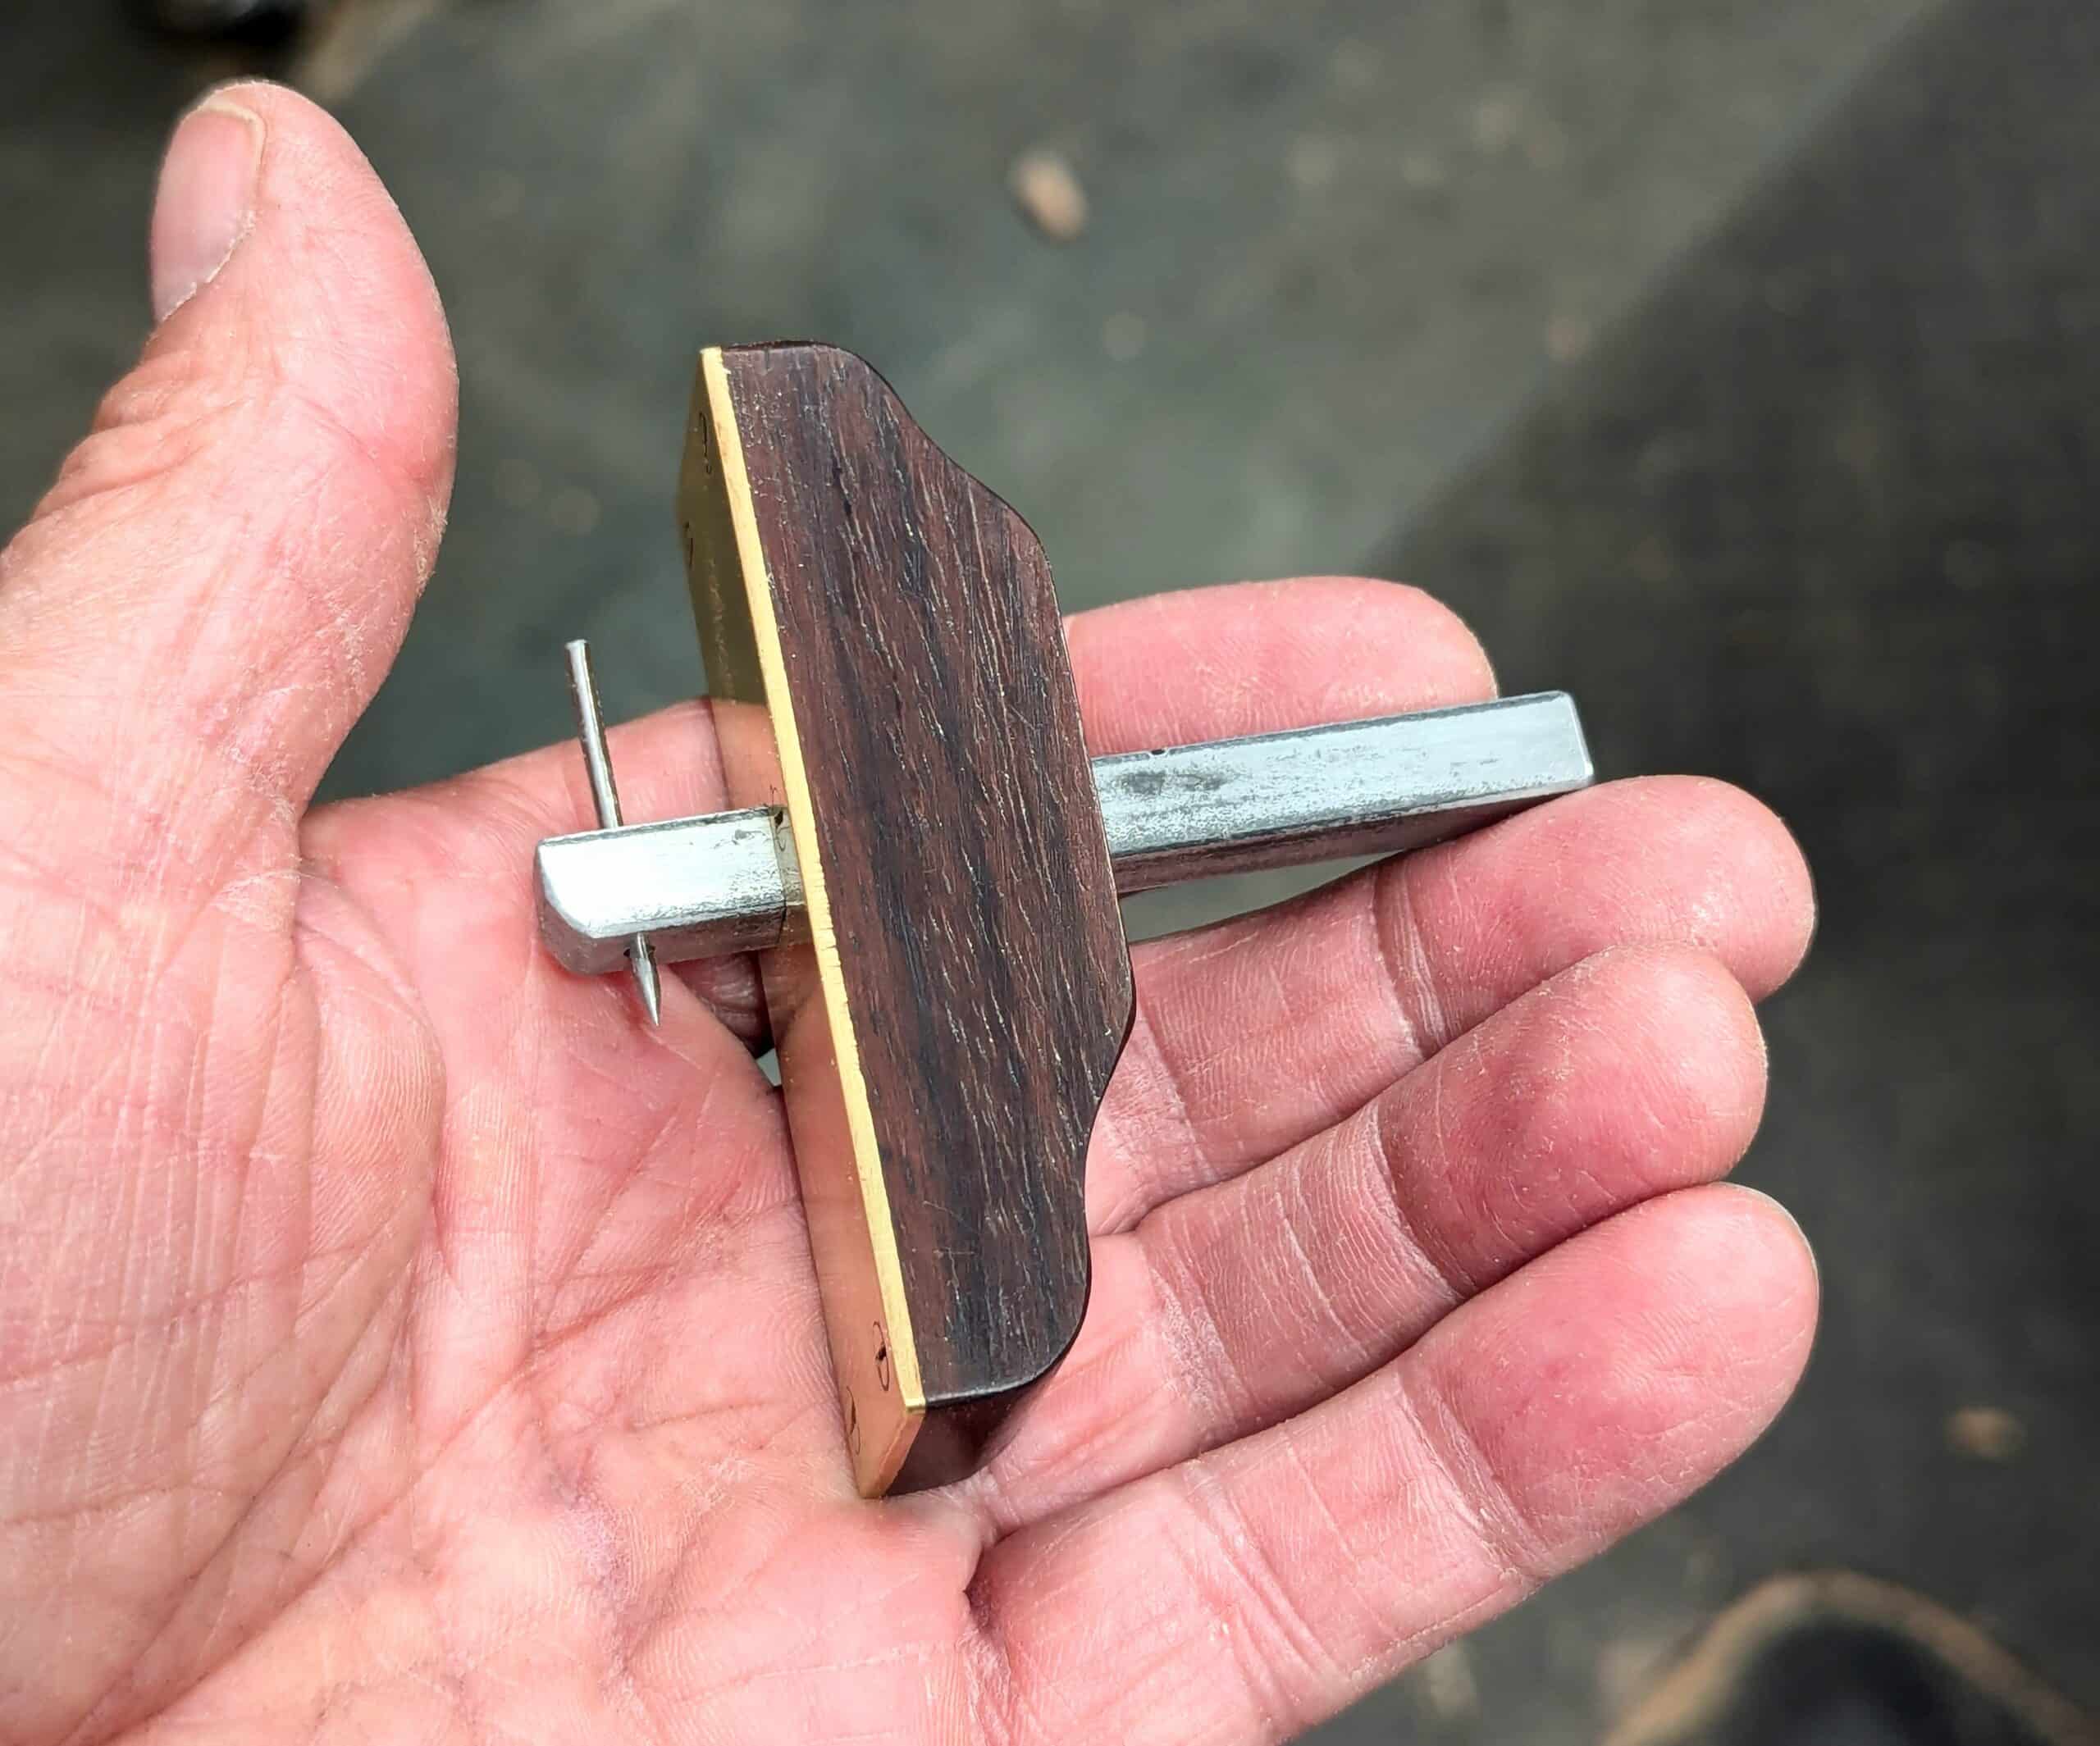
Gifts as simple as this are rare finds these days and even more rarely given. When Hannah made this for me, it was unexpected. She has one just like it that she found and enjoyed and I had admired it when I saw it for the first time. Hannah made this one for me and gave it to me a few weeks ago. I have many marking gauges and the variety ranges from Victorian ebony ones with micro-adjustability via threaded brass rods to wedge-stem versions and then those I have devised myself as better ergonomic designs. When she gave me the one she had made I put it on the bench to see which one or ones I would reach for after a week or two. I ended up with just two. One was my own, the one that follows the Stanley design that has the pin passing through from one corner to the opposite corner and so ensures the point of the pin can always be seen and that you are able to reach right into the tightest internal corners. The other is Hannah’s. On the one hand, I just like its compact size, but what I love is handmade pieces. You know, those pure works of art made from recycled materials or just using something that’s been totally scrapped by one person and made into something new and unique by another.
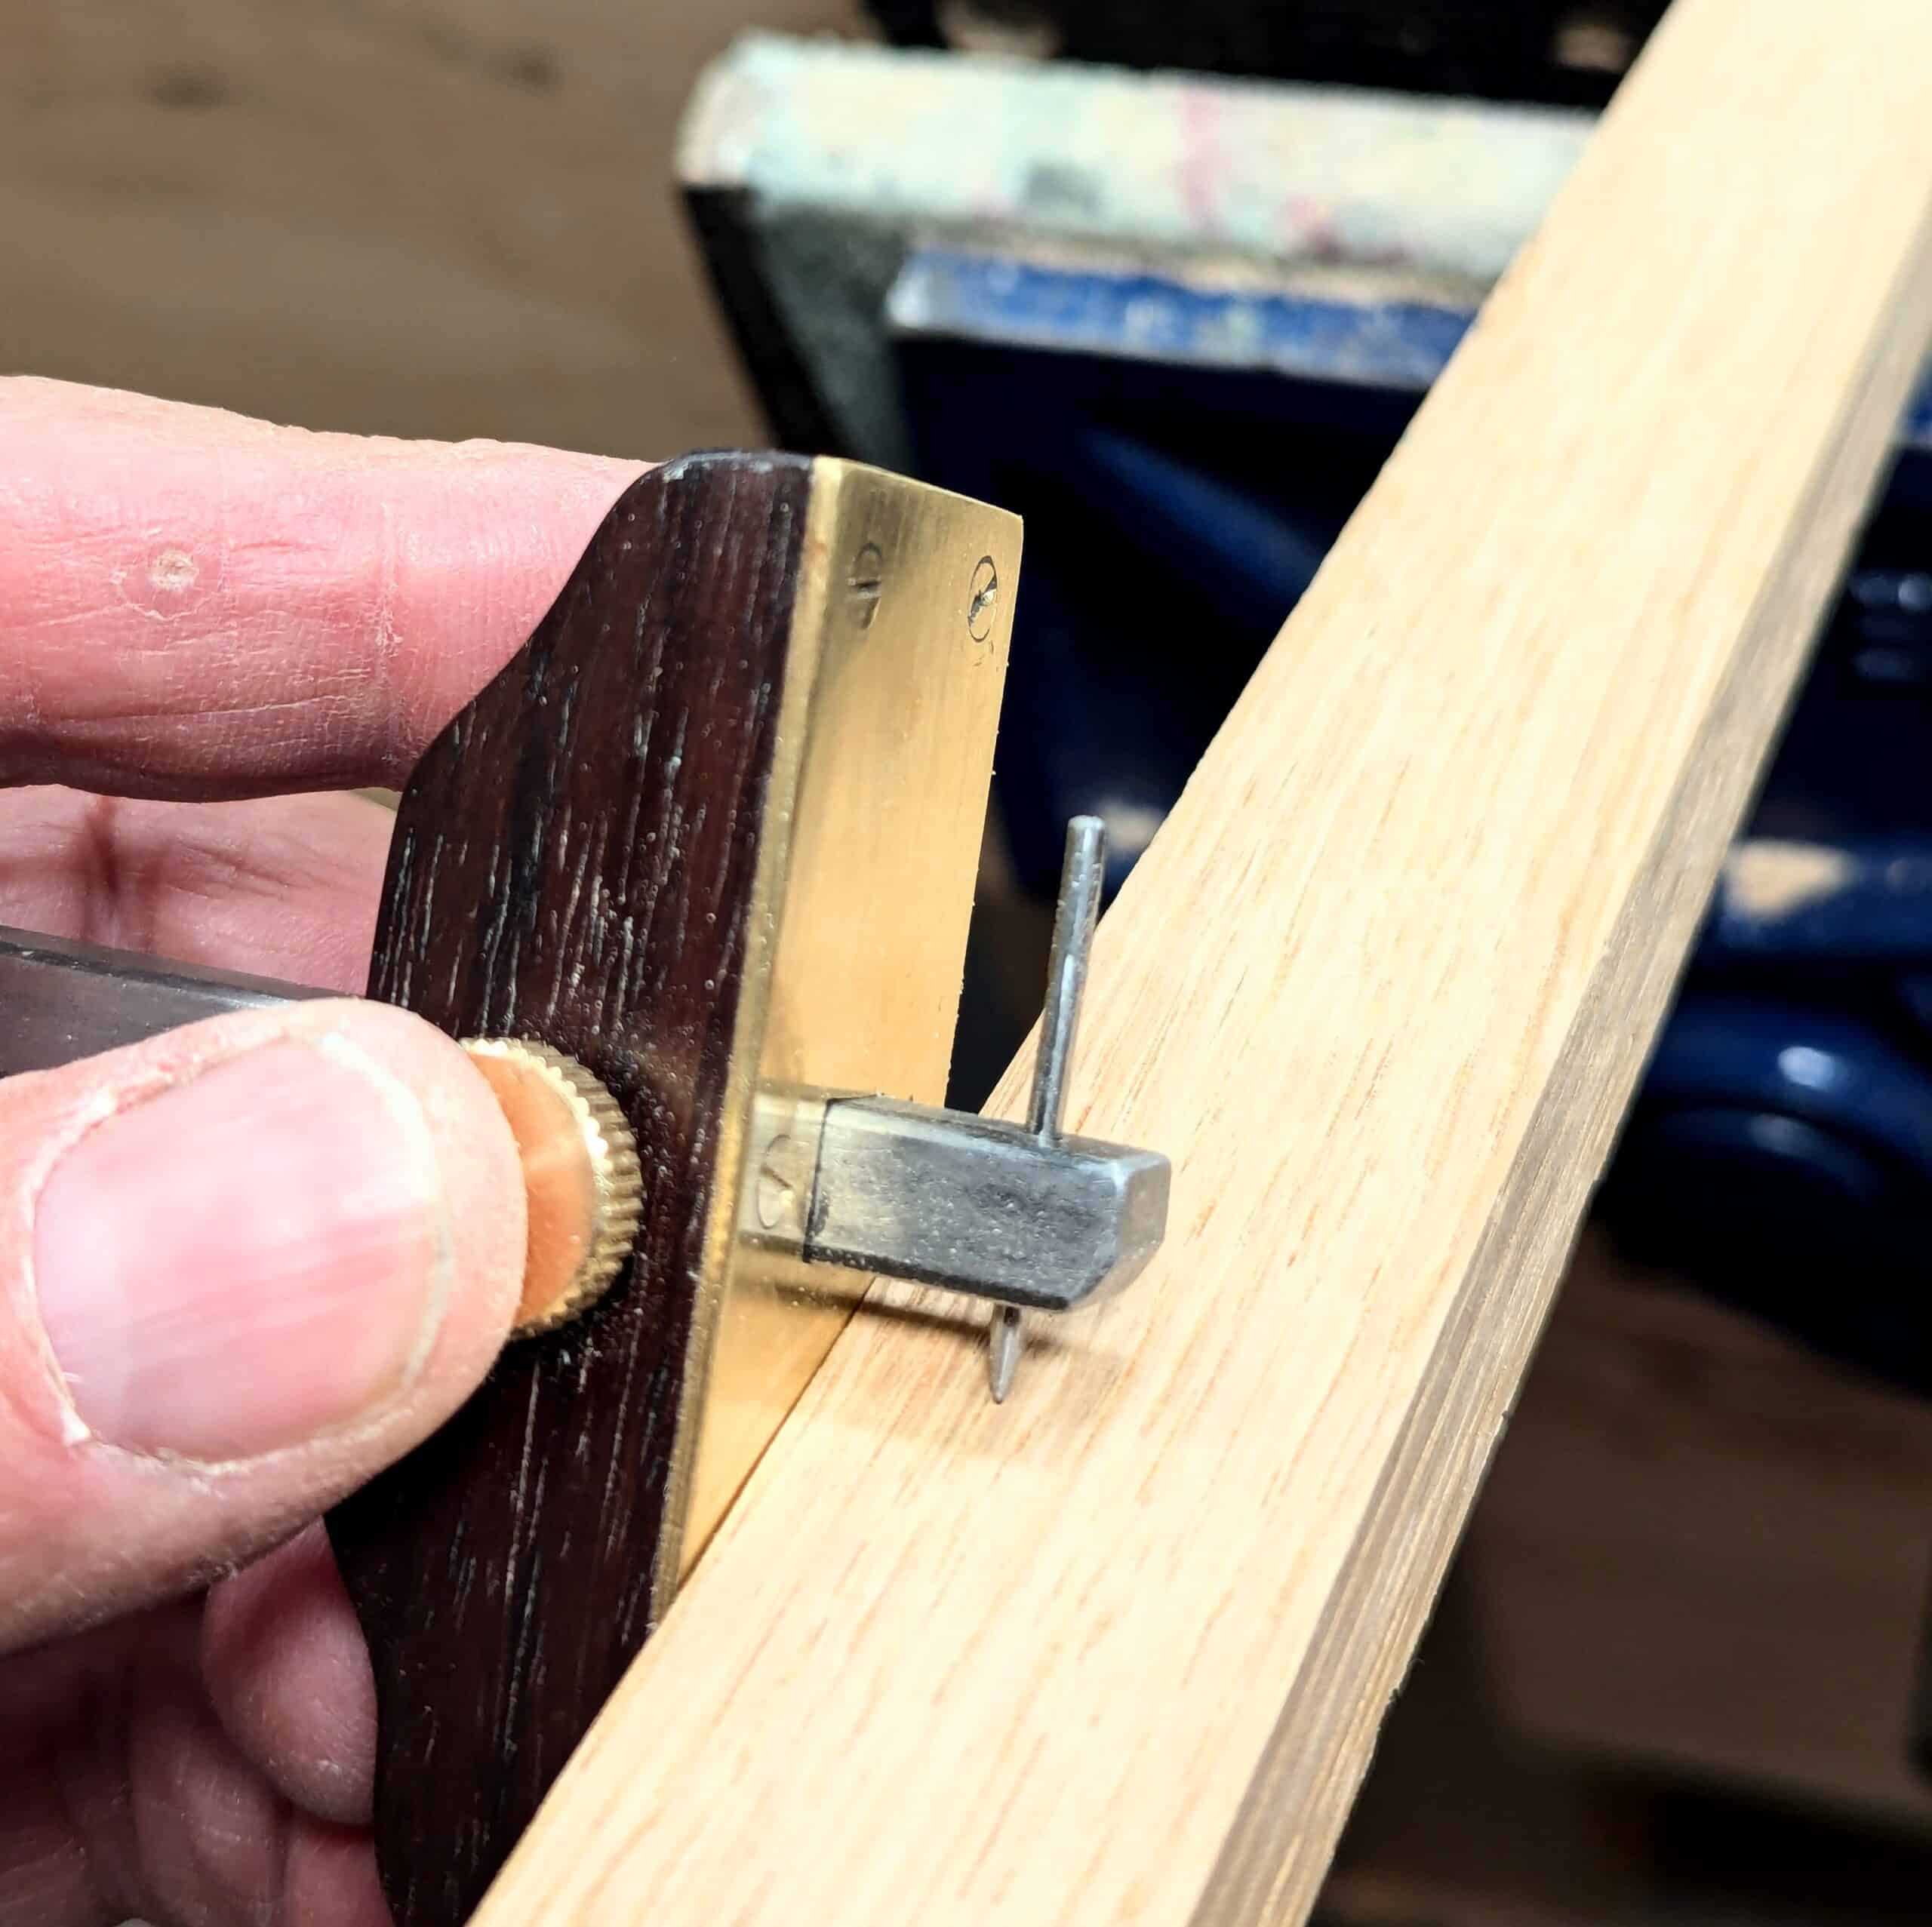
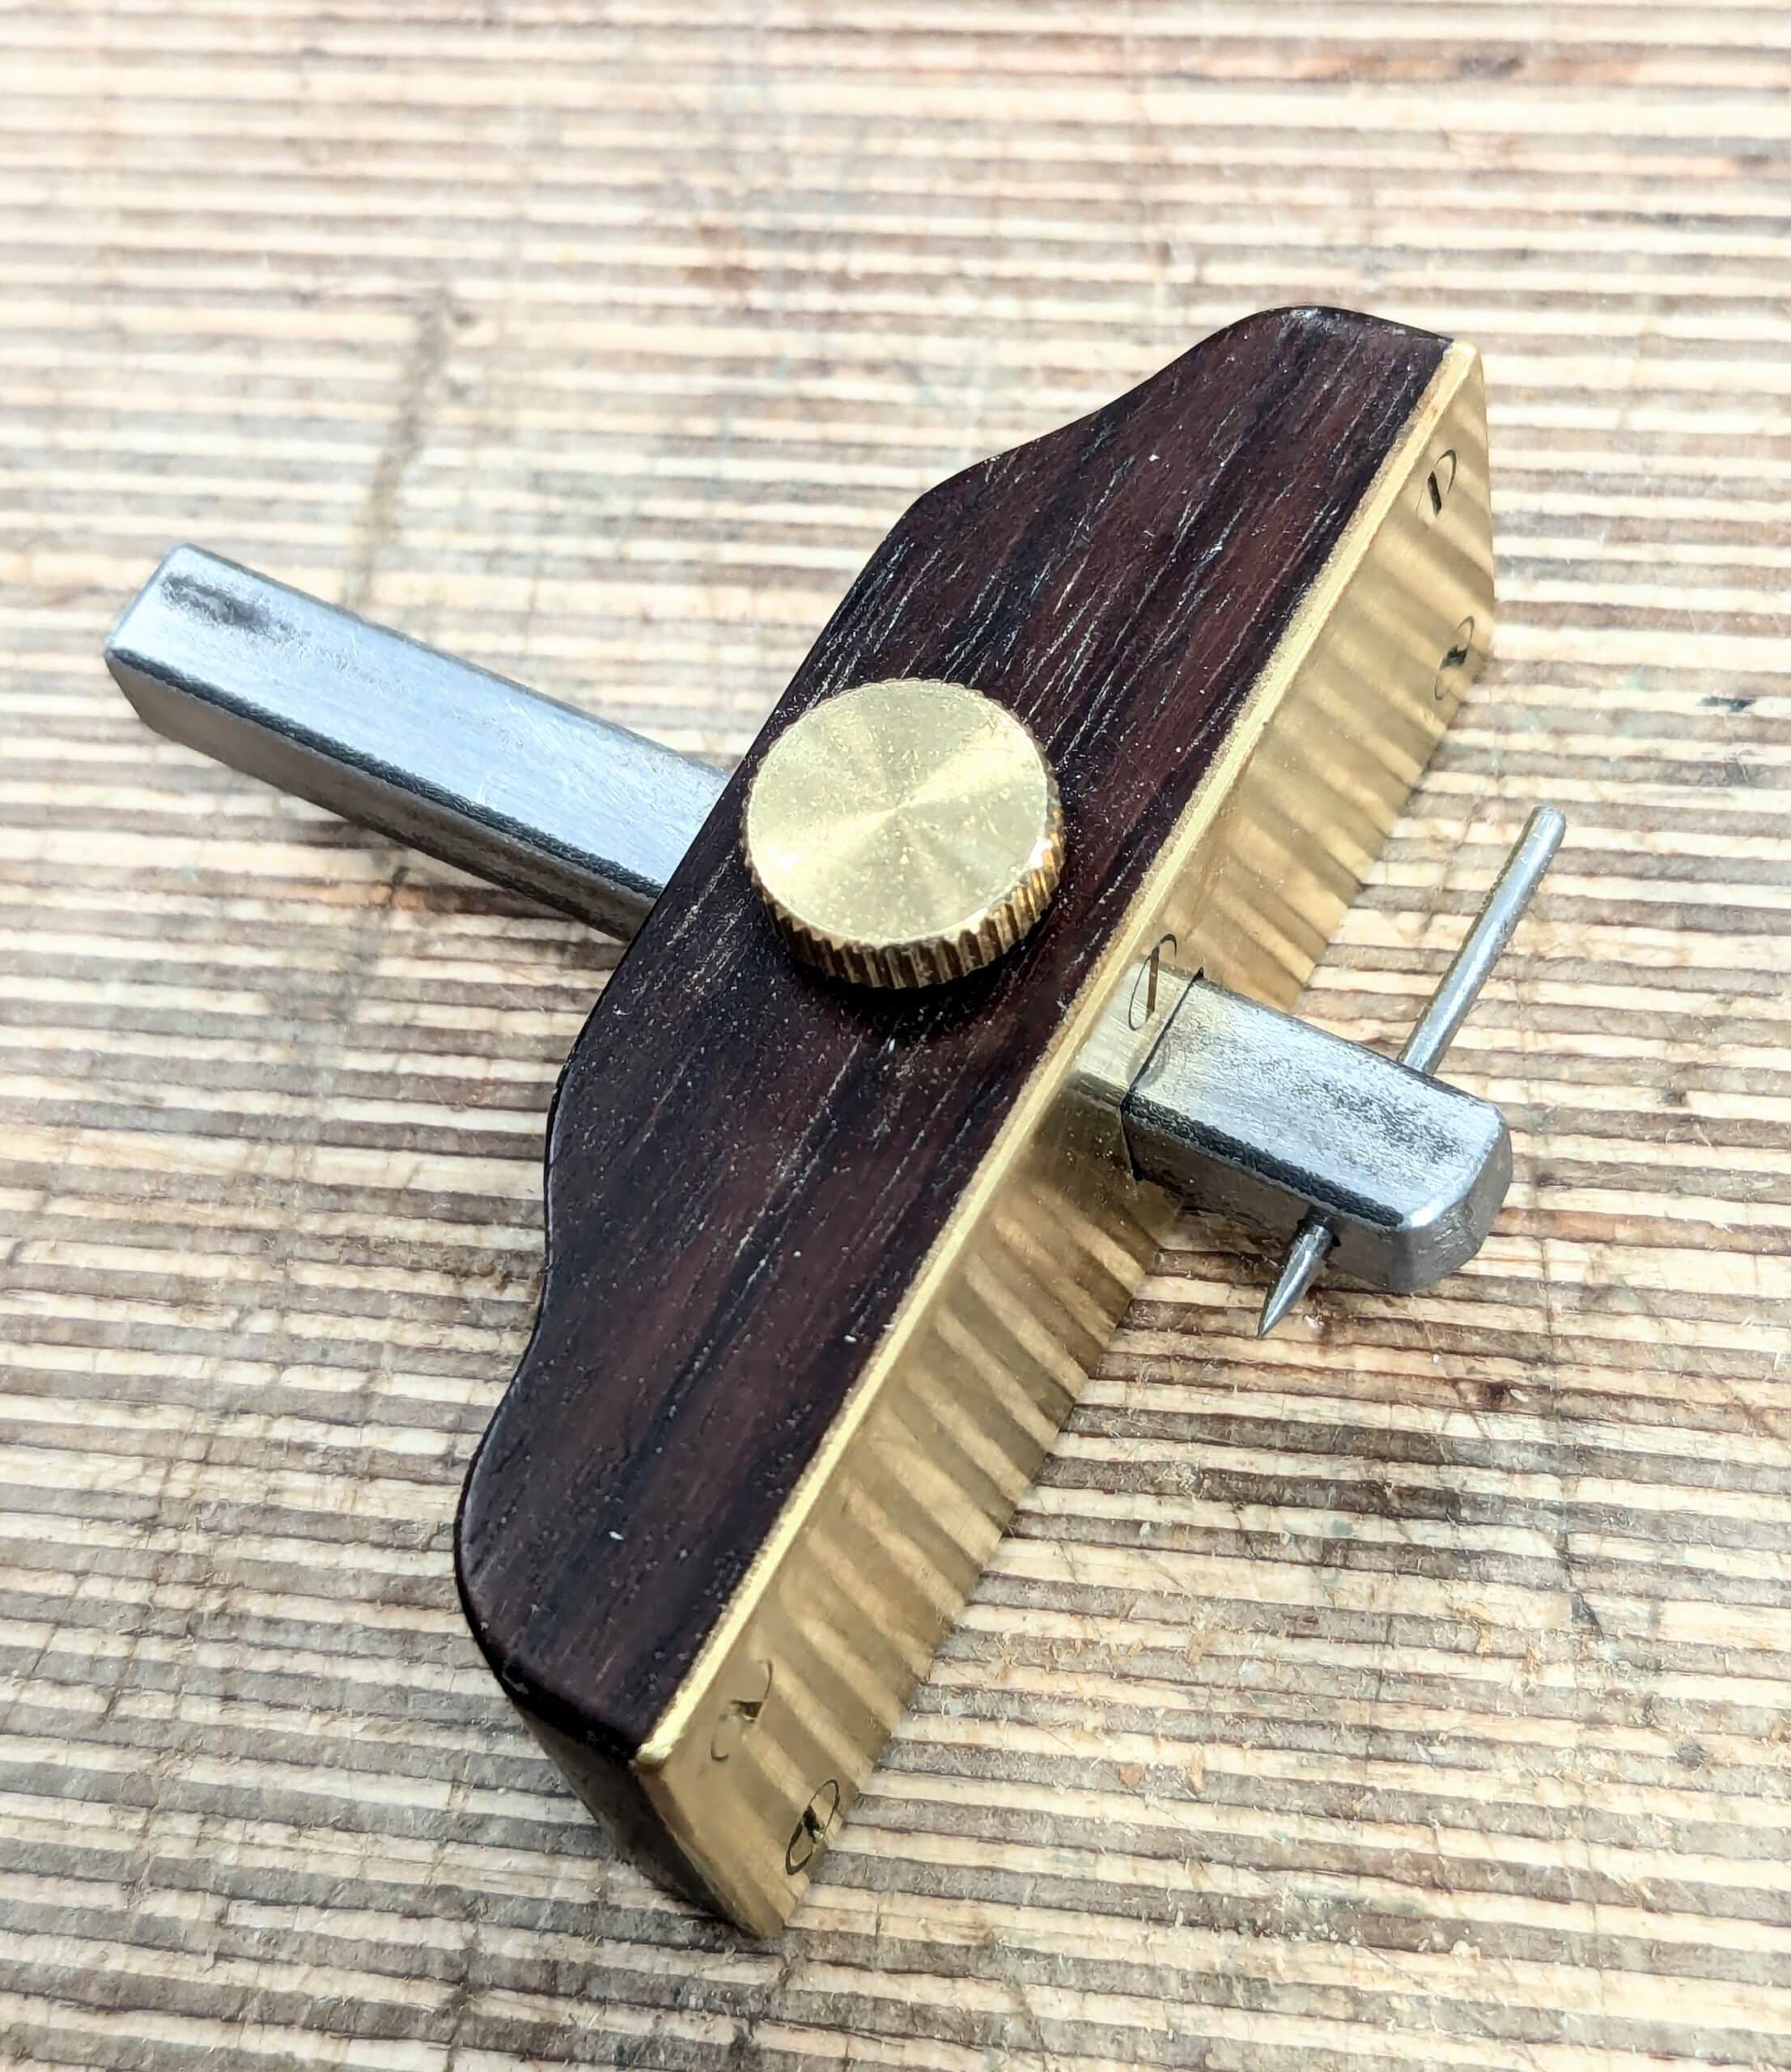
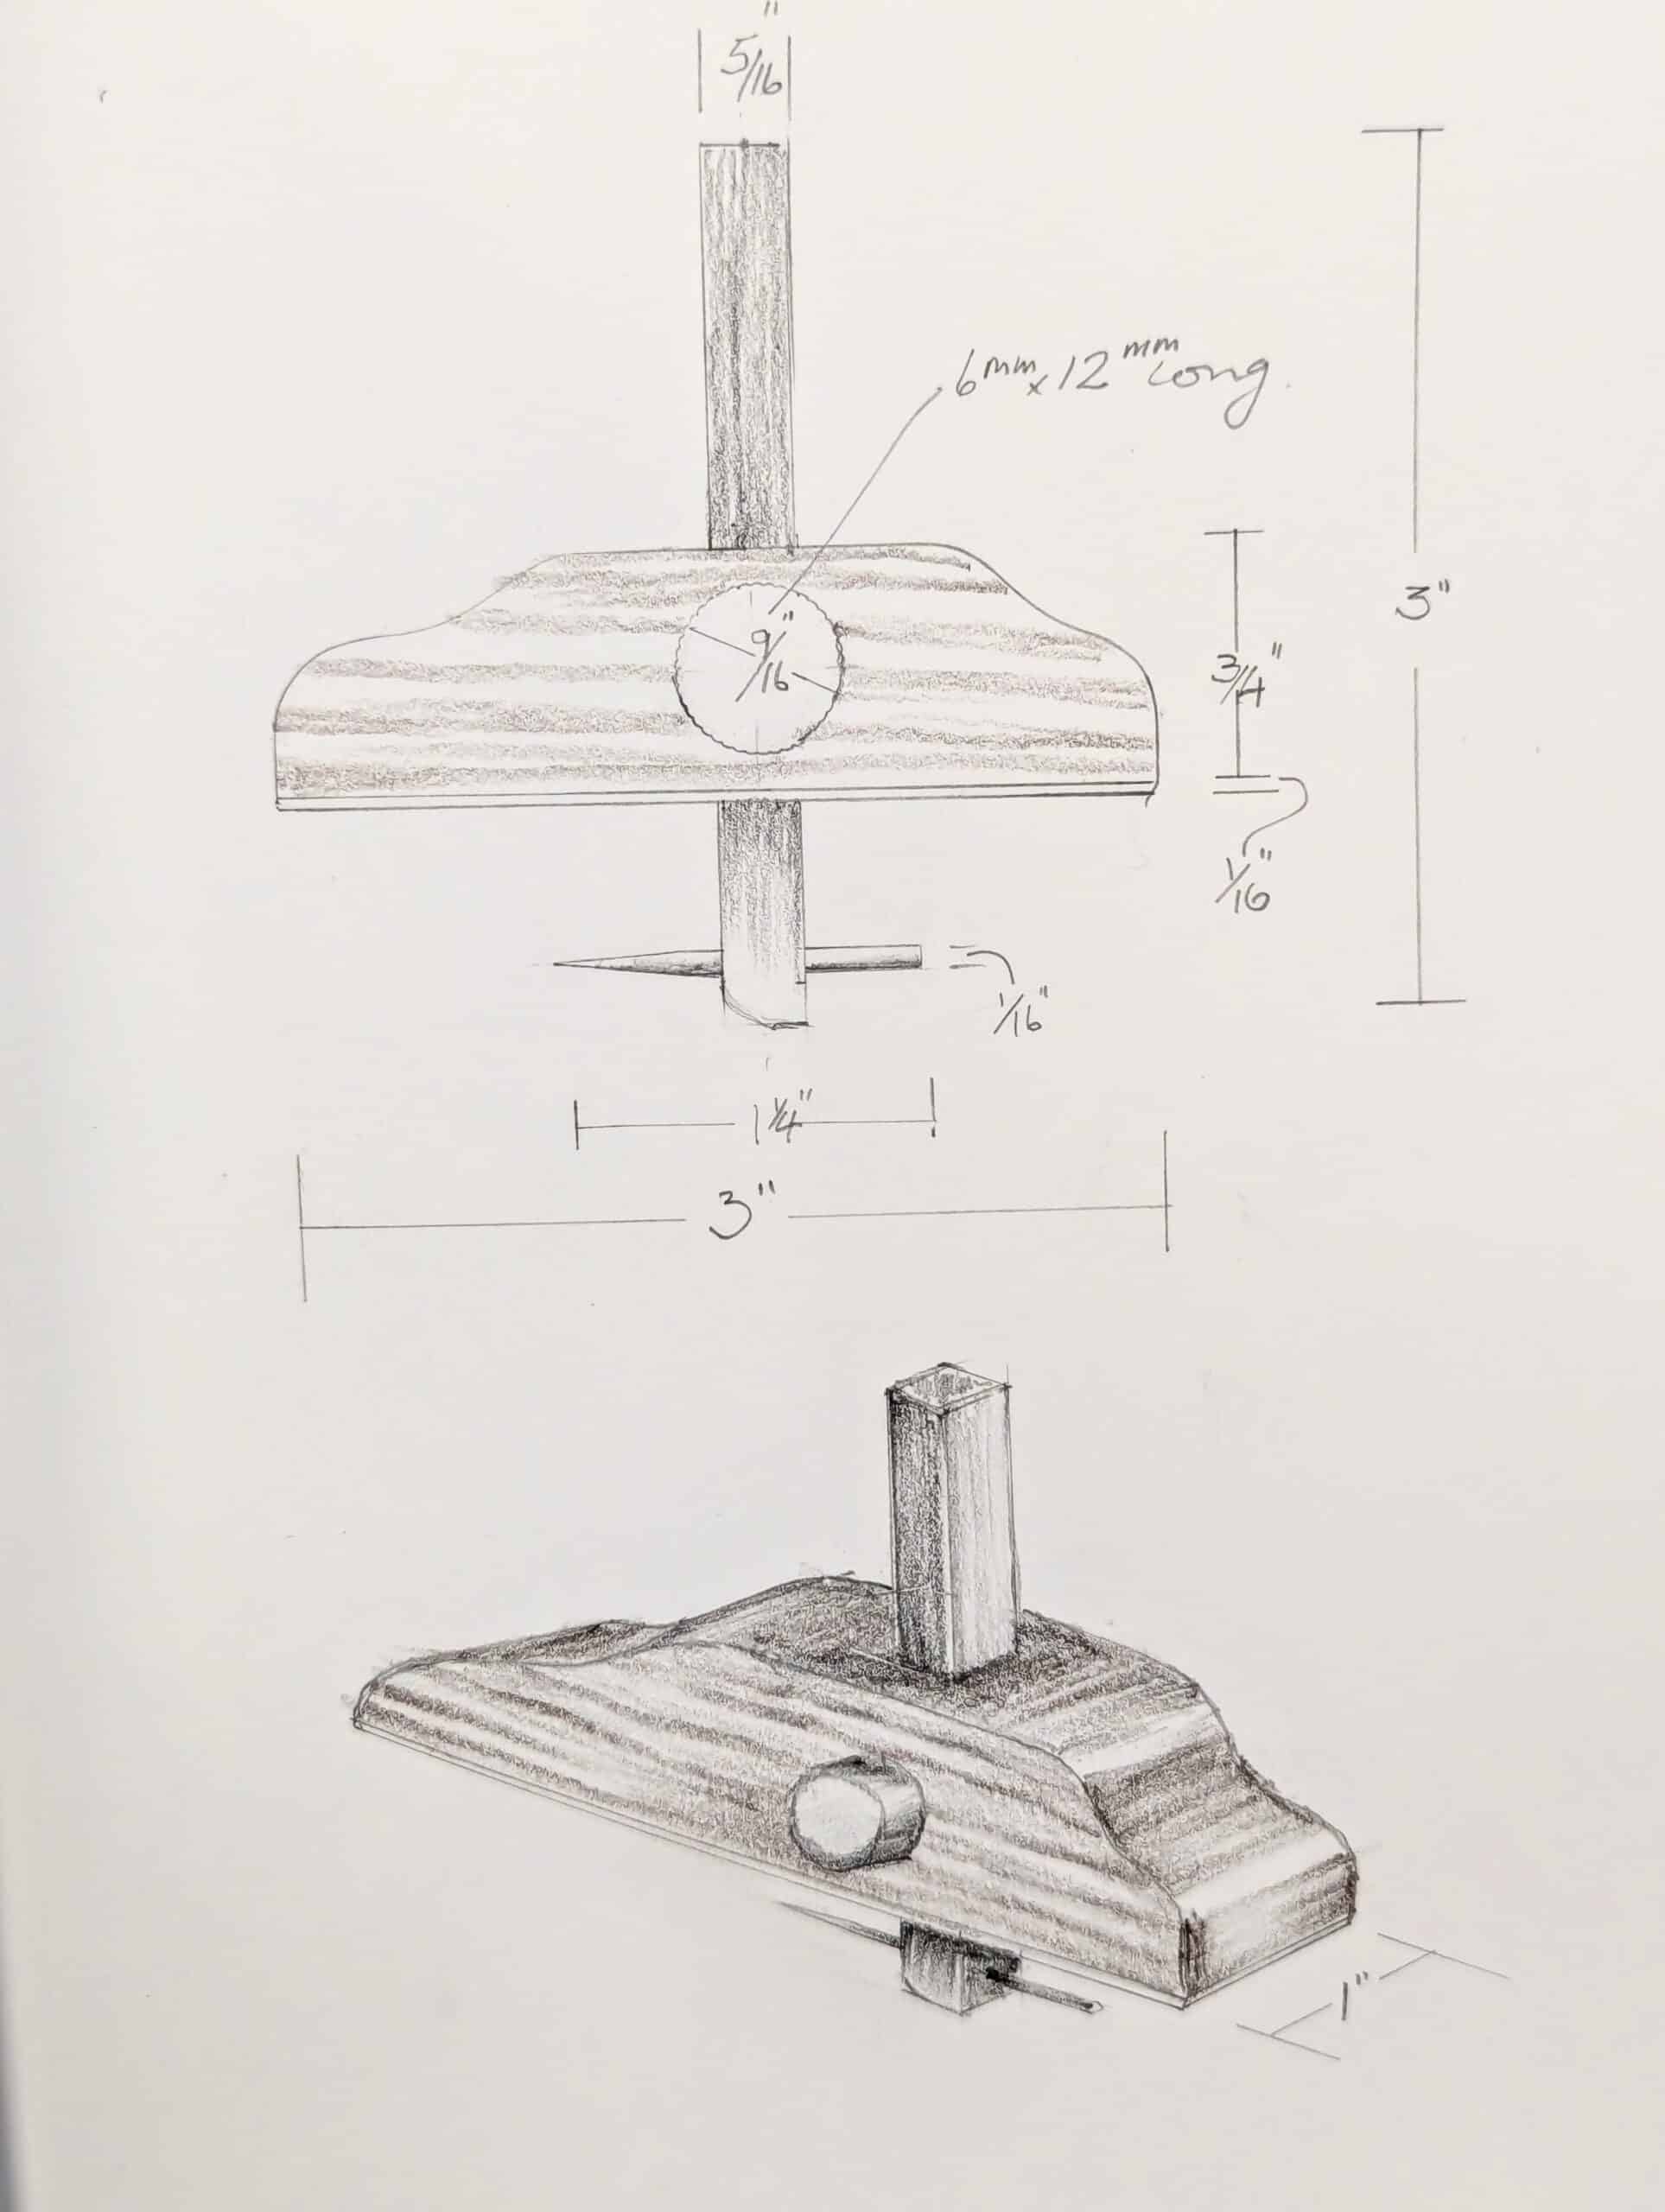
For this tool, Hannah used part of a brass door plate for a wear surface, a short section of 1/16″ diameter piano wire for the 1 1/4″ long pin, a scrap of rosewood from a salvaged cabinet and a door knob spindle for the stem. The six brass screws were new and so too the 6mm by 12mm long brass thumbscrew. The workmanship is very lovely.
I often wonder about homemade tools like this, and how many are hidden or lost or simply left and no longer used in toolboxes around the world. Going back in the history of crafts, most tools would at one time have been craftsman-made and without income productivity in mind at all. In our evolving culture, we only buy the tools we use but in the pre-industrial era before the Industrial Revolution predicating commercial manufacturing and mass-making, the ancients took wood and metal to create maker-made tools to match the work they did according to need. A woodworker worked with metal smiths like blacksmiths to hammer out twist auger bits and penny braces, cutting blades for planes and chisels. When you see one in a container on a floor somewhere your eye locks onto the patina that only comes from being well-used for a century and more. Unquestioningly, you know its age and its functionality, but then it’s by feel, look and the lack of a commercial name that you date it and understand its real value to its former owner and maker.
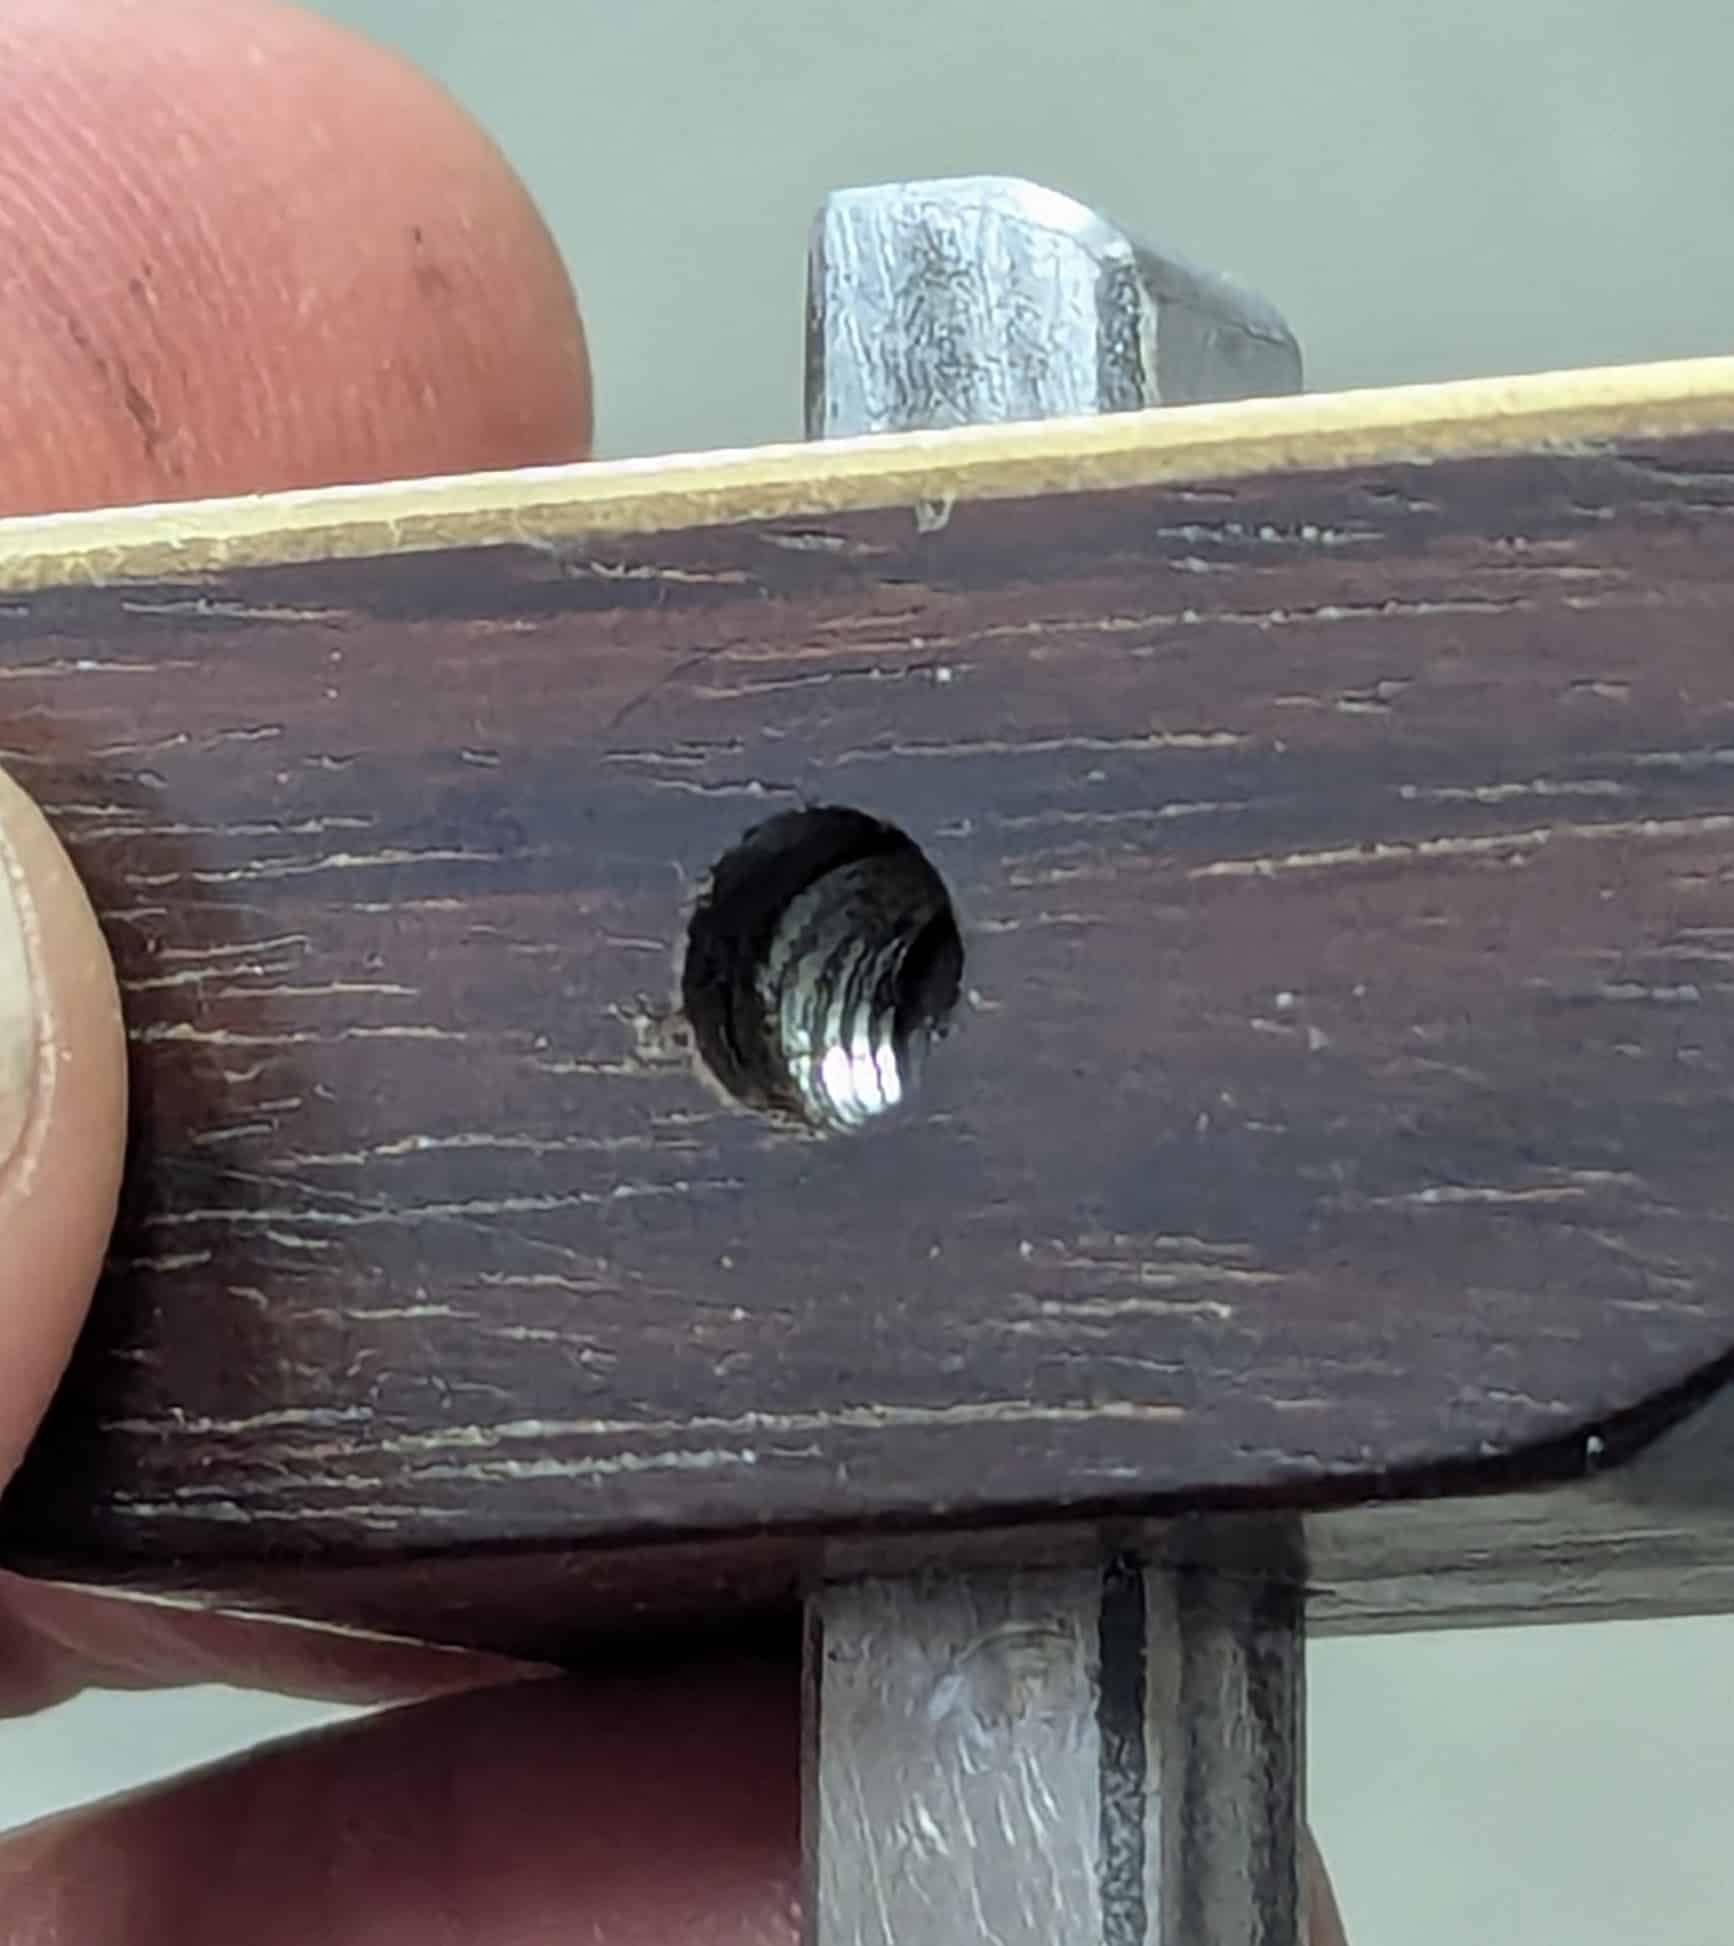
Behind the brass plate, Hannah recessed a nut corresponding to the size of the 6 mm thread of the thumbscrew. Quite tricky to get it to align but align it does.
And here is a rough drawing to work to if you decide to make one.
Kindness is always appreciate.
That was an act of kindness.
Well done, Hannah!
Great tool. Not just well made, but well designed as well.
wow, what a beautiful and really useful tool! All the more valuable because of its story. Well done Hannah
So heartening that such small ‘quantities’ of materials can be made into something so useful and beautiful, if only this sort of ‘recycling’ was a commoner trait amongst us extravagant humans… delightful story, and you’re a lucky chap Paul!
Not only is this tool been beautifully designed and made using what materials are at hand to perform its function; it has been made and given to you with love and admiration by it’s maker. Turely a tool for you to treasure for life.
Im thinking it’s about time to retire from my tech job after 40 years. I’ve been playing around with the idea of starting a small tool works focused on hand made hand tools, made with, you guessed it, hand tools. Sadly, I doubt if I’ll make any money, but I can’t think of a more peaceful, relaxing way to ride off into the sunset. Maybe a few folks will find some of them of value.
You might surprise yourself. My boys made layout knives and mallets. square awla and maple workbenches to sell and even 15 to 20 years ago they could make a few hundred dollars in a few days and they were still in their mid teens. You just have to believe in yourself and also, why not use machines. It does not always have to be handwork and nor does it all have to be handwork either.
“It does not always have to be handwork and nor does it all have to be handwork either.” Thanks Paul for saying this. Sometimes when I use a machine beyond the bandsaw, I feel like I’m cheating.
I don’t think thsat it is cheating to use a machine. What’s wrong for me is when people say it’s ther end result that matters because they discount the journey using hand tools as having an intrinsic value in and of itself. Exercise, developing skill, mental and physical acuity, critical thinking and much much more. when people dismiss this for mere ease and say the two methods of machining and handwork are one and thes ame there is something that needs saying.
I’ve been a woodworker for most of my 81 years. I started out using only hand tools. As I began to earn a living, I also used machines. My rule of thumb: Use hand tools for small tasks (even on large projects).
The pleasure of using a hand plane, spoke shave, or scraper is far more gratifying than listening to a machine scream at you, but in my case, the exigencies of making a living with production woodwork using machines just made good sense.
Now at my age, I no longer need to make a living so I mostly use hand tools. In fact I don’t even own a jointer, I use No. 7 and No. 8 Stanley hand planes and most often use a 32″ wooden plane made from a repurposed Stanley No. 29.
My shop is small (10′ x 16′) so my only machines are a band saw, a table saw, and a planer. I live alone, so I use my dining room to house a small lathe which I use to turn Windsor chair legs and I have a smallish workbench in there as well.
There’s nothing wrong with using machines, but it’s much faster (and far more pleasurable) to use hand tools for small tasks. I just don’t make a religion out of it.
Never sure why comments seem more accusatory from professionak woodworkers but thay do come across that way. No one from my side has ever, ever said machines are bad and only hand tools are good. There is however a lot wrong with using machines when you forfeit learning even the most basic of hand skills and believe that it will always be better to use machines or that you will never be able to master hand tools to a skilful level, which in my long experience is very much the case and so is what has been the common thread through modern day machine-only professional woodworkers who mostly have zero ability with hand tools. My work has been an uphill slog because of so-called professionals using only machines. It is still a battle today but after 30 ytears advocating the use and mastery of hand tools I see the tide a turning but definately not through those woodworking full time in carpentry and woodworking and such. Nuh uh!
“I don’t think that it is cheating to use a machine” Amen to that. My dad had a cherry tree on his property that died in the drought year ago. There is not a lot of cherry in TX but there is some. Anyway I cut it down, bucked it, hauled it away, took the logs to a friend that has a commercial operation making timber trusses to slice up, then dried it on the porch for years. Finally started making what I could out of it. My machines – jointer, planer, band saw, table saw saved me about 2 years of full time work getting the wood to a point where I can actually use it. Now I do a mix of hand tools and machines depending on how much time I can spend on a piece.
While I am generally happy with how most of my hand tool woodworking projects turn out when completed, I do feel slightly disappointed that the journey is over. So, I start the journey again, making another piece!
Totally agree. I still have my layout knife, mallet, and spokeshave I purchased from Joseph way back at Elm Mott. thanks again Paul and Joseph.
that’s really nice, how does she hold the piano wire firmly inside the metal bar?
Drill a dead sized hole, insert the pin and then strike the bar with a hammer. touch up with a file and the jobs done. There are other ways to. Drill a slighlty undersized hole, heat the the stem and drive the pin while hot. The stem will shrink onto the pin permanently.
What a delightfully simple and functional little tool. I’ll definitely have a go at making one. Thank you Hannah for the inspiration and to you Paul for sharing it with us.
Nice tool and very kind of Hanna to make it for you. Thanks for sharing. For the nut, I’m a bit puzzled on how the hole is made for the screw as it looks like the drill hole on the outer surface is smaller than the nut itself. Do you drill an undersized hole, cut off the side and finish octagon for nut, then laminate back on the side like you would for a Krenov style plane?
My guess would be that the brass plate hides the hole for the nut. At least that is how I would do it.
I reread the blog “Behind the brass plate, Hannah recessed a nut corresponding to the size of the 6 mm thread of the thumbscrew. Quite tricky to get it to align but align it does.” Essentially Hannah is making a mortise and then the brass plate covers it. Makes sense.
“Quite tricky to get it to align”
Probably not: Drill a hole the size of the thumb screw bolt, inset a bolt of the correct size, screw the nut on, and scribe around it with a sharp marking knife.. Then chisel out the hexagon and epoxy or super glue the nut in.
Look again to see why this won’t work, the nut is put in sideways. even the smallest drawerlock chisel won’t be able to cut as you describe, you would be cutting inside a 5/16″ rectangular hole.
Absolutely you you could make this using 2 laminations of 1/2 inch wood.
Better not to though. Unnecessary.
It’s a great reminder that those factory made tools don’t have any magic pixie dust sprinkled on them and wood and brass scraps are just as good as before they got tossed as “scraps”. Too many people, including myself, fall into the trap of “What I can buy must be better than what I would make.” Take a chance on yourself!
What a lovely thing, and such a kind gesture. You rock, Hannah! The captive nut solution is great; I’d have been hours silver soldering a drilled and tapped brass tongue to the back of the wear surface and cleaning up the mess afterwards. Your idea is better.
I absolutely love making ad-hoc tools from whatever is lying around, even if it’s something I’ll use only once and put it in a box because you-never-know.
Paul, would it be an idea to create a photo drop-box so that your followers can show us their nifty little timesavers and inventions? Might see some interesting stuff.
Thanks for showing us this and my kindest regards to Hannah.
A number of years ago I made a very similar all steel version to mark metal. It was an alternative to using a Jenny Caliper which I never really got on with.
as it was easier to drill a round rather than a square hole, I used a round beam. The advantage being you could alter the angle of the pin, but a disadvantage is that you need to cinch the screw tight to stop it twisting.
I did have a look in my brass bits drawer in preparation to make a similar one, I might use a brass beam, as I have a suitable piece, although slightly thinner at 1/4″
I very much like th esmall desing of this marking gauge. I think I am going to make one for myself. I am wondering, however, why all the rods (not sure this is the right term) of marking gauges are square. Would there be any disadvantage in making them round?
Yes, the bar would swivel under the application of pressure and therefore be less effective.
I am having a darn hard time! I put in new irons in my ECE planes and had to widen the mouth just 1/8 inch to accept the wider irons. I put in Maxamet steel irons from a small toolworks in Pennsylvania. Long story short, the doggone irons skip or chatter even though I did the Paul Sellers sharpening and stropping. I am using them on a chunk of white oak to make the World’s Best Marking Gauge (formerly Poorman’s just with a makeover). They skip and maybe scud I don’t know but they aren’t biting into the wood like they should.
Frustrating!
Lovely work Hannah. I recently replaced my garage door, and got a new lock in the process. I was staring at the nice bar thinking that I could do something with it, but couldn’t think what. Luckily I kept both the bar and steel plate (brass would have been nicer, but nevermind). I’ll be trying this. Thanks
Getting into this hobby, I had to start finding and restoring old hand tools out of financial necessity. It’s just too expensive to buy nice enough new ones, and eBay (etc) prices have generally gotten so high.
Now my wife and I escape the kids every Saturday morning to peruse estate sales. At this point, that time together is worth far more than the tools. And now I enjoy taking neglected and forgotten tools and bringing them back to working shape about as much as woodworking. I’ll never get into collectability and all that, because I want the tool to get into the hands of someone using it. Being on a shelf as a decoration is just a half step better than forgotten in a tool box to me.
I’m rambling, but finding user-made or modified tools is one of my favorite things. And a lot have turned into tools I reach for. I have a little homemade brass headed hammer I adore. I ended up with a box of homemade greenwood and framing tools that I break out once or twice a year. I love seeing where an owner stamped or scratched their initials into a tool. It reminds you of the importance to a previous owner’s livelihood.
And even my own: my chisel mallet is pretty flawed. But I like the imperfections. They either make it more comfortable for my hand or provide a little surprising utility. I’ve made tools to reach up into a hollow body electric guitar to grab or hold things. Sometimes I’ve made jigs just because I couldn’t find my pre-fab ones quickly.
That gauge is such a beautiful organic design. I love all the little details. The gently rounded edges, and the reuse of scrap material is so great. That feeling of being able to use a piece of brass or small block of nice wood you couldn’t bear to toss and getting something real out of it is awesome. Using piano wire is brilliant. I’ve done a few crude things using the wrapped guitar strings as gentle file-like abrasive. The final product ended up nicer and more uniquely elegant than anything I’ve seen for sale.
Hi Paul,
Thank you for sharing this design. There is one aspect that perplexes me. You mentioned that the nut for the thumb screw is recessed behind the brass wear plate. I assumed that there would be a void behind the wear plate were the recess is cut, but there appears to be a brass screw through the wear plate at the exact place were the void would occur. Am I missing something about the recess for the nut?
Including the brass plate, we would still have 7mm of brass and rosewood to screw into and these screws would be 1/4 #2s so would still leave 2 mm or so spare. However, if more was needed, the screw could be screwed in place, renoved and 2mm cut from the tip.
Ah, I didn’t take into account the offset for the recess. Given the thickness of the nut for the thumb screw and it’s placement adject to the stem/bar, there should be sufficient wood for the brass screws to have some “grip”. Thank you for the added dimensions of the screws.
Thank you for sharing Paul, and thank you to Hannah for making such a beautiful and useful tool. My favourite things to do in my workshop is to make hand tools, so this will be my project this week. There is something so satisfying to use tools that you have made , and I use my hand tools to make more hand tools to pass on to friends. A hand made gift is the greatest gift of all. Thank you Paul have a wonderful day. Kind regards Garry
Superb little tool. fits in my pocket, I had to make one. My tiny contribution is an M3 grub screw tapped into the end of the square shaft to hold the pin. It can now be adjusted for length or removed for sharpening.