Sharpening––Less to it Than Others Can Make You Think!
I went ahead and ground a chisel I own that I never grind on any kind of mechanical or electric grinder, never, ever hollow grind, and never grind to then sharpen with two bevels. I stopped doing that back in 1965 when I did it under instruction by a college teacher who failed as a joiner so went on to teach what shouldn’t really be taught, but then I noticed that the men I worked with didn’t grind theirs too often, if ever, either. Phew!
To new woodworkers this morning, I have argued this corner quite often, but never to be argumentative, purely to give good and honest direction. To hollow grind or not to hollow grind––that is the question––whether ’tis nobler. . .
Many will say we have many choices, but for those in the saddle of having to actually earn their living, a go-slow method would never be accepted, let alone tolerated by a watching boss intent on total efficiency there at the bench. In my case, my watching boss was a man called George who cared about my wellbeing and always mentored me to that end. This man went from pare cutting a tenon shoulder, to a sharpening stone, and then back to the shoulder trimming without missing a single step. His seamless deployment of labour and energy became the only example I needed. Since that time, I never came across a faster delivery to a surgically sharp edge anywhere, ever. By this simple and methodical action lasting under a quick minute, I saw the value of time and how the efficient use of it was essential to peaceful working and maximised output.

It might surprise you to know that many machine methods will be slower than hand methods. In a time-strapped world where we amateur woodworkers have but a few short hours a week to make, it is really important to use this time wisely. Economy of motion keeps us in the making zone, and that flow of efficiency brings total clarity and functionality without making us part of the machine or putting us on the conveyor belt of manufacturing. When we sense the need for slightly more pressure at the cutting edge we stop, turn, sharpen up and return in a swift, unfaltering movement as though the very act of sharpening the chisel is just as much a part of severing the fibres on the tenon’s shoulder. When we see that, is when we start to gain the insight of mastery.
In our early days of trying to find an answer on how to sharpen an edge, research in the age of mass-information usually takes us down many paths and because of this, the search usually becomes perplexing and thereby exhausting. Eventually, after much trial and error, expensive output, an experiment here and a trial there, we might just find an answer that seems to fit with what we need. Especially will this be so when it comes to simply sharpening the edge of a chisel and a plane. The sharpening of these two tool types is 95% of all you need to learn about sharpening, and these two edges, though the tools are different, are sharpened precisely the same way and without exception. Now, if that doesn’t bring simplicity home, I don’t know what does!
Ultimately, we all develop our own opinions and they usually become our preferences. But, the path to an efficiently produced edge can and does get very muddy. That being the case, how do we find the right path to a keen edge with so many abrasive options to choose from? Thankfully, though often bathed in myths and mystery, sharpening a pristine and surgically sharp cutting edge is not rocket science, but abrasive and abrading is always essential to the quality work we strive to achieve.
So, here is the simple but not simplistic reality we should understand as early on in our woodworking as possible. When newspapers sell news, they must have information to peddle. What they sell is not always true, but the strapline has the bait, and before you know it you are being informed as though they are the font of all knowledge. As soon as selling and making money from it becomes the objective, we should question the truthfulness of it. Sales staff selling tools pretty much copy and paste their information from elsewhere, mostly the manufacturers of what they are selling, but also from just about anything that sounds good to them. Add the strap line, ‘The scary-sharp system’ to selling kits of float glass, abrasive film, honing fluids and so on is baited. Getting to a way that has built in longevity is what we really need. Offering two dozen ways to sharpen an edge isn’t too helpful.
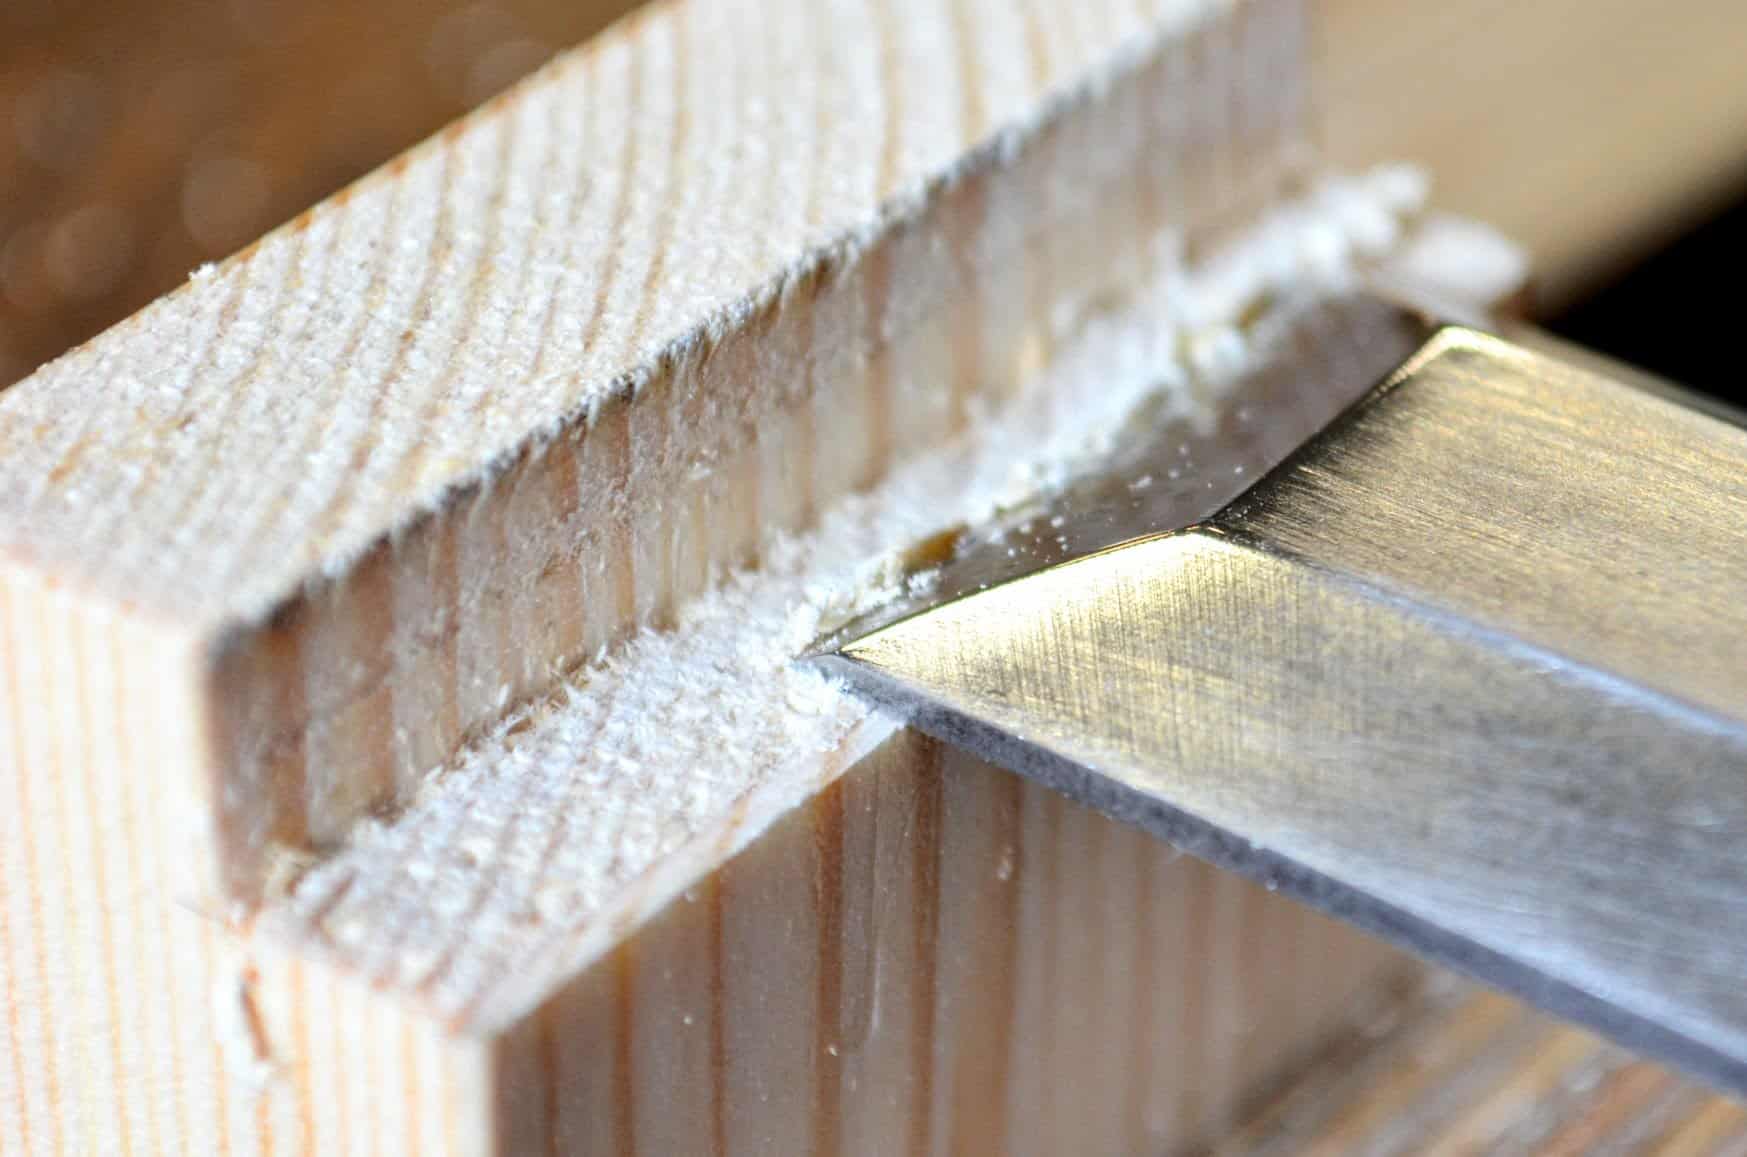
To create a sharp edge, and that is relative, we must abrade two adjacent faces by honing them on some kind of abrasive. Abrasive comes in many forms, but for centuries artisans and peoples around the world relied very much on one type of solid abrasive––rock! Now, rock is just about the most widely distributed resource undergirding our whole world. We can use it as is, or we can create particles of grit from it and attach it to paper to create abrasive paper of one kind or another––hence the term sandpaper. That’s today. In times past, most sharpening came only from solid lumps of rock split or cut into smaller rectangular sections, we then called whetstones. The word whet comes from the Old English hwettan to whet, to sharpen. Though this term is relatively old-fashioned these days, as a boy, the men sent me to get “the whetstone” to “sharpen up.” The list and options for abrading or whetting an edge given today may well give us many choices, but in the age of multiple choices we can suffer from what is known as the pluralist illusion. This multiplicity may seem to give us so many options we can easily be confused, and it’s this can so easily incapacitate our decision-making. We simply cannot choose by physically experiencing all of them, and that leaves us in a ‘don’t know’ place. That being so, we generally rely on what others tell us. Filtering through what is mostly opinion is where we ultimately end up making our decisions. In the 1990s, the advocacy for something called Japanese water stones took hold across the USA. I got the same results very cleanly without any slurry, water-soaked stones and water baths on mats with a black Arkansas stone and two drops of oil in under a minute. Then came the so-called scary-sharp system. New straplines for magazines and sales outlets. Again, my results came from a single stone, and I was back in the saddle.
Through the centuries, on every continent, craftsmen and women have developed their own systems to produce amazingly sharp edges. These edges resulted in cuts that have the ability to sever any and all natural and synthetic materials to enable creative and efficient work. I intend to show the system I use, simply because the abrasive from any source will ultimately cut our steel to develop an edge. It is up to us to decide how much and how little mess we want in our work area. It’s also up to use to determine how much interruption we want to our workflow. My recommendation is to disregard any and all cute sayings and keep realness to the forefront. Headlines and Straplines are intended lures used to draw you into the world of wizard sales outlets of one kind or another. My craft needs no such thing because handwork of any kind has enough fascination of its own. There is no such thing as scary-sharp edges, and edges have always been used throughout the history of centuries. Artisans 250 years ago matched and surpassed anything we have on our hand tools today. How do I know? I look at the results of those tools and the artisan’s accomplishments in that era. No handwork comes close today.
Sharpening is the single most important skill to develop and own but should be the very least intrusive to your working. Many of those new to woodworking with hand tools, and I include seasoned machinist woodworkers not using hand tools, neglect this important task often for days. The sooner you start sharpening, the sooner it becomes intuitive to you, and then the work just gets easier and easier. The good thing is, it’s easy to do. You just need to understand what the goal is.
To get a sharp edge takes no more than a minute’s transition from dull to sharp and on back to the task at hand. That’s what my system has evolved into for me. The abrasive is partly inconsequential until you must replace it, or clean up after it or put it away elsewhere from your working area. This then consumes the most important thing for most of us––time. Four plane irons and half a dozen chisels in different widths, either group, is about four minutes work to go from dull to sharp for me. It’s clean and orderly. But as I just said, the preparation, method requirements, etc can extend the amount of time needed to get to the edge and then the clearing away. My system is the fastest of all long term and the clean-up is almost non-existent. It will take longer to read this blog post than sharpen half a dozen chisels and a couple of plane irons.
My reasons for not using mechanical grinding go beyond the risk of burning the steel and so losing metal as an unnecessary waste––not using one also removes the need for buying a grinding machine. Those with water baths to keep the steel cool, slow grinders passing the stone through a water bath or trickling cold water onto the wheel, have their own problems to deal with, so I will say owning a grinding wheel is great for general aspects of metal working but a definite non-essential for our edge-tool sharpening.
How you invest in your newfound craft often depends on the influence you’ve received from elsewhere or turn to for the information you need. Our world has radically changed in the last two decades, and most of us now turn to Google and YouTube as the primary sources of information. Googling how to sharpen this or that might deliver some good advice, but advice that’s delivered badly or inadequately––and whereas the saying goes, ‘Practice makes perfect.’ it can equally go, ‘practice makes permanent.’ and that can be permanently bad. I tend to avoid woodworking online, even though I use it to promote my own teaching to a global audience I could never reach any other way.
Starting out in something new, we have to question any initial investment. Follow some advice, and you need thousands of pounds in hand tools because the advice generally is to buy the best. The scenario worsens if someone says machines are the only way forward. To get a sharp edge and feel the sharpness in the wood can cost you around £30 and that is what this blog post is about. I’m going to point any woodworkers new to hand tools to our Common Woodworking site here straight off. The information and the tools you really need, together with projects and a mass of other information, where and how to get started, which tools to buy and so on is right there at your fingertips and all of it is free. What you read there will be what I do and use in my day to day woodworking. Remember, we don’t sell any of this information and the tool advice does not produce income from selling tools or taking sponsorship or free goods from makers and suppliers. We are completely independent. This keeps our work clean and wholesome. Also, if you are a machinist only woodworker, this site is for you too. Rarely have I met a machine-only woodworker who understands hand tool methods with any real depth, and that’s understandable. What I am talking about isn’t the general knowledge of what a plane or chisel does, but the minute ways we adjust the tool settings and more importantly the flex of our arms and hands in the manipulations we do throughout their use. Oh, and I do include 95% of professional woodworkers and furniture makers in the machine-only realms. I don’t say this to be antagonistic, unkind, elitist or self-promoting. As it is with many things; when we think we have arrived, we tend to close off to other things, influences, thinking there is nothing more to be learned.
It’s nothing these days to spend hundreds of pounds on equipment based on the advice of some ‘expert‘ just to sharpen a chisel or a plane, but even if you buy a chisel that arrives sharp, within an hour of use it will need resharpening to restore the edge enough to cut wood. For us, the use of disposable tools isn’t really an option. Even though saws might only cost £7 to cut your wood, these are disposable tools designed not so much to cut wood but to keep you coming back to buy another and another and another. In the beginning, you, starting out, this might just work, as will the sharp and well-set plane and the sharp chisels, but all the edge tools and saws must be resharpened regularly and this should never be neglected if you are to get good results in your making. And don’t be sold the line that says, “Works straight out of the box!” or the buyer comments that say so. That’s fine for an electric kettle or a camera. It’s possibly right and even likely to be true with some companies, but the person sending out a plane will not be there after an hour of using it to resharpen and set it for you. One slip of a lever or a twist of the “turny-thingy” does not reset the alignment of the blade or the depth of cut to restore the previous settings, and there is no reset button or default setting to return to. We have to gain the kind of knowledge needed to tweak with a pinch or a twist as early as possible. I spent years writing my book, Essential Woodworking Hand Tools, to cut to the core of tool sharpening, use and ownership. It was less about owning the tools and everything about owning the knowledge on how to maintain them, so, how to sharpen them and use them efficiently and effectively is key to all future.
Okay, we need to know these things to build and undergird a new future on the simplicity of simple sharpening. My follow-on from this will be the nuts-and-bolts stuff I do in my everyday working. If I teach you nothing else, we must get the simple art of sharpening our tools down first.
Using good quality hardwood or softwood in a nice workshop is great if you’re a joiner or cabinet maker, but I’m a carpenter and often hit buried screws and nails. I use a Tormek 2000 to sharpen chisels (over 20 years old now) with a Trend double sided diamond stone. I carry onto the jobsite the G sharp kit to keep the edges keen. I’ve got about 50 to 60 chisels but the best are Marples. I also hate round handles on chisels, they roll around and twist in your hand when being struck.
KEVIN, THIS BLOG ISN’T INTENDED FOR YOU. You are welcome if you are helpful, but I am afraid you seem to typify one or two of the emerging breed of offended carpenters. I’m not really too interested in those who are not interested in helping their fellow man. ‘Carpenters hitting nails and screws.’ Sounds like you do this all the time. The last time we on the benches hit a nail or a screw might have been ten years ago because even though we often use secondhand wood, we took the time to look for the offending steel before we did anything with the tools. But, hey, it happens. I just took another very unhelpful Tormek user’s comment down because he obviously is privileged enough to own some sophisticated equipment not all of us can afford and certainly not all of us need at all. Your second comment is just as unhelpful and therefore useless, Kevin. So, now we need a Tormek system where grinding wheels alone can cost upwards of £250 (and it seems like you might just need three of them) on top of the cheapest machine at £444 and you say to go buy a slow grind grinder as well. All we want to do is make a spice rack or a coffee table over four weekends.
Forgot to say that hitting buried screws and nails chip the edge of the chisel, so you need to regrind the bevel on a slow running grindstone with water, never a bench grinder!
I can attest to all of this. I copied your “three diamond plates and a strop” setup, and it serves me very well. I am using a Veritas honing jig for more thorough sharpening, but mostly I “stop and strop” freehand as soon as the edge looses its sharpness. I am trying to move away from the honing jig, but I find it much more comfortable to use it than freehand, as I tend to get pain in my thumb joints after some time.
I inherited my dad’s wet grinder, which I find useful for when I need to do a lot of grinding – which is very rare, or to sharpen tools that do not fit the diamond plate setup all that well.
After nearly two decades of watching “youtube content creators with a woodworking theme”, I’ve become rather immune to catchy names such as “scary sharp”.
To me, “scary sharp” is a blunt tool that can still inflict nasty damage on soft tissue. Not one that can split atoms, because usually – sharpness means control.
Fully agree, stop ‘n strop is so conveniently effective that there is no reason whatsoever to delay sharpening when needed. Also, I don’t like talking about sharpening unless asked about it in a one on one situation. Someone is surely going to be offended by my opinion – almost as much as me having the audacity of not laying a plane on its side.
Chisels get scary when they’re blunt so I don’t really get why that particular adjective should be a selling point on any sharpening system. But that’s me.
“it’ll take longer to read this blog than to sharpen a couple of plane irons and a half a dozen chisels” oh so true!!! time would be much better spent sharpening
Another unfortunate and unhelpful contribution here, Thomas. Jus’ sayin’! Couldn’t you have said something, well, more helpful instead?
Paul, I have made your 3 plate board for my diamond plates. My question is why did you put your stropping leather on a separate board? I did it too, because you did, but I find it inconvenient and takes more time to change from plates to strop.
Two things come to mind, Todd. The first one is applying pressure through the heel of the hand and pulling the iron or chisel over the surface is exponentially heavier in buffing the bevel than abrading on the plates. The securement of the strop in the vise full width and full length gives us the security to apply as much as we can. The strop will be rock solid. Secondly, we use water on the plates to float off particulate of abraded steel. It’s not a lot, but water on the strop is the last thing we want, as if or when the leather gets soggy it also becomes stretchy. Not what we want at all. Thirdly, which is not really a thirdly, it sounds like a first-world issue having to flit from sharpening to strop-honing. I have been doing this multiple times a day for six decades and never once felt the issue you describe. I have included a strop on the board a couple of times but always abandoned it because the leather, not being rigid, can stick up above the plates, and it definitely gets in the way.
Paul, I have a question about the leather strop – I made my own, but I am wondering if I used too thick leather – it is about 2-3mm thick. I have the suede side up (meat side up), and I have the feeling that when I strop too hard, my edges are not as sharp as if I am more gentle. Could it be that I am in effect honing my edges with a roundover because the leather is a tad too soft? It is secured to a thick piece of plywood using contact cement.
Of course, this can be me overthinking this. My edges are still very sharp and I have no problems – but I seem to be unable to reach the level of sharpness I find on my father’s carving chisels. I get a cut just looking at those.. But the thought is nagging me: are my tools as sharp as they can be from a practical standpoint? I could spend two hours making an edge that will split atoms, but two good whacks into oak and that edge is reduced to the level of a 30 second sharpening anyways.
What say you, Paul? 🙂
Thank you for the reply. Great justification and now I know. I will feel differently about it now.
Thank you for the reply. Great justification and now I know. I will feel differently about it now.
Todd, I’ll add a fourth point; I can’t think of a more awkward way of using a strop as a fourth place on the board with the diamond plates. Pulling an iron/chisel toward you, is ergonomically…..weird (IMO). I know some of the YouTube guru’s have it there, but what a pain. If you watch them using it, they strop at such a slow speed, it will take them an hour to get the results that a quick 30, hard pressure strokes give you.
Good point. It is great to get these perspectives.
Sharpening, the “third rail” of woodworking!
I struggled for a long time and spent/ wasted a lot of time and money on different sharpening systems. With your methods I now sharpen up in less than a minute most of the time.
So I don’t listen to any other methods or systems information anymore.
The thing that slows me down sometimes is a metal that is harder than my Stanley Irons.
Then I have to take more time to get the edge I need. I don’t think that a harder steel saves you anything in fact I suspect you can’t put as fine of an edge on harder steels. While it may last longer you lose time making it sharp again. Often I just touch up a tool just using the finer grits and polishing it on my leather strop.
I bought myself a Tormek water wheel when I first started woodworking, and to be fair to it, with its jigs and slow, wet wheel it got me through that painful starting time well. But as you say, there is a lot of faffing about required with it, and it does take up space.
For years now it’s been relegated to a dusty corner of my workshop, and the only part of it that gets regular use are the leather stropping wheels.
The fact is that a set of diamond plates on a board does the job more quickly and easily. The price of these has really plummeted in recent years too, which removes the main barrier to entry to a diamond-based hand sharpening regime.
I was initially very hesitant to sharpen freehand using Paul’s method. I went down the rabbit hole of using guides, water stones, and whatever else is touted as the best method.
I now use Paul’s method, and it’s absolutely the best way to sharpen.
I have a double sided ez-lap stone 250/600 grit, a DMT 1200gr, and a strop with honing compound. It would be more convenient if I had separate 250 and 600 grit stones, but I got a great deal on that stone.
If you’re new to hand tools and are trying to learn to sharpen, I would highly recommend watching Paul’s videos. You will save a lot of time and money in the end. If you notice, most people that are using guides and water stones probably sharpen way less often than Paul does.
I would always procrastinate sharpening until I started using Paul’s method. You have to sharpen all the time with hand tools. I usually use sharpening time to think about my next sequence of events.
Jim monette
I have learned how to sharpen my tools and the credit goes to paul sellers. It is easy and fast enough for me.
I did notice the cursive style of writing in the diagrams used. I just read an article about cursive writing and it’s abandonment by many schools. One thing mentioned is that reading cursive is like a different language to todays students. I was elated to hear that because I have long felt bad that I only know one language. I realise now that I do know another language ‘ cursive ‘. If I did not know that language than I would not have been able to read Paul’s handwriting in his diagrams, hooray!
Hello, Mr. Sellers;
Thank you for sharing your view.
On my own, I’ve came to the same view, except for the strop.
I use one, every time I want a sharp edge, but I use pine & white polishing compound.
I say white because it’s white when applied but turns almost black as it polishes the steel.
I went to pine (usually a piece of construction lumber) because leather was dulling my edges.
Yes, I know that means I was doing it wrong.
But putting much pressure on leather, which compresses easily, was much of my issue.
So I looked for something that would not easily compress & a piece was nearby.
I tried it, it works great & I’ve been using it ever since.
The piece I’m using now is 8″x2-1/2″x1/2″.
I’ve been using it about a year, I’ll prolly go to 10″x3-1/2″x3/4″ next time because I’ve some that size.
So I just use whatever’s handy.
I like to warm the wood to get the compound to stick so I put it in the microwave for 20-30 seconds & that warms it enough.
I may use more than 3 diamond plates if I need to create a good edge but once that’s done I seldom need to repeat it.
I read that back in the 1900s they usually used 2 grits, maybe 200 & 600 for the “Fine”.
I’ve used coarse grits from my youth up because it was all we had.
I found the ‘cheap’ carborundum two-sided stones work fine but they don’t last.
When I was young I learned that a coarse stone will sharpen but it may need more times on the stone than a finer stone.
Now I use the strop & get a fine edge from the polishing compound.
Wishing you the best.
Some safety issues here. Microwaving buffing compound, if indeed you are saying you warm the wood with any residue of buffing compound, can give off very harmful fumes that can cause harmful breathing issues. I have seen wood explode in microwave heating, and by that, I mean into smithereens. I have used more plates and found no real value and that the board supporting them becomes unwieldy. MDF actually takes a charge of buffing compound well enough. You could simply roughen smooth wood with coarse sandpaper, 60-grit, and it will take a charge that way too.
I haven’t microwaved any compound, just a bare piece of pine.
And it was 20-30 seconds, not long enough to get it hot, only warming it.
That makes the wood take the compound very well.
I’m 69 so I’ve learned a thing or two including to be careful.
That’s why the microwave was on only 20-30 seconds.
I do appreciate your taking time to caution me, many wouldn’t have bothered.
That means something to me and I “THANK YOU!”, sir!
All I can say is that this method of sharpening transformed my views on woodworking, a view resulting from my (and others) experience at UK schools in the early 1970’s where I now realise cutting tools were poorly prepared and blunt. I’m now convinced that alone persuaded us that woodworking could never be for us. With some moderate expenditure and experience I’ve found I can do it.
Can’t wait Paul. I followed you hand plane refurbishment process and turned a $30 Stanley No 5, probably 30 years old into a plane as good as a Lie Neilson $400 unit.
I already subscribe to your blogs and emails.
I started with Lie Nielsen hand planes (lacked confidence initially to restore an old plane which was a silly fear; LN used to put on an annual tool show in my area and they had woodworkers there who would answer questions and I was so appreciative of that I bought their products). Over the years, I’ve tried vintage ones and have replaced my LN 4-1/2 and LN 5 with vintage ones. The No 3 LN I use for final smoothing will likely get replaced with a vintage No 3 once I do a bit of fettling with it. Took me a while to figure out why I didn’t like the vintage No 3; turns out the lateral adjuster is hitting the handle and that will be easy to fix with a rasp.
Tried replacing my LN chisels with vintage Marples but found I still preferred the LN chisels. I have a set of Ashley Isles chisels and will try them.
The one thing I realized is that diamond stones work excellently for O1 steel but work poorly on A2 steel which Lie Nielsen uses on their blades. Initially I thought it was me but over time I realized it was the A2. When my diamond stones stopped working well, I ended up going to Japanese water stones and they do cut A2 steel remarkable fast (10-20 strokes vs 125 strokes on diamond stones) but oh my they are messy and they need to be flattened which is annoying. Basically, all the things Paul has talked about. If I had to do it all over again (which I could as I can easily get 90% of what I paid for the LN tool if I sell them), I would only get 01 steel tools and use diamond stones. In other words, Paul’s advice is the best. I’m not too upset that I am in this less than ideal situation. On a number of occasions when I’ve tried something else (fancy, expensive mallets and marking knives only to find myself eventually going to what Paul recommended because they do work better), I have found that Paul’s advice is really solid good advice. This is all easily fixable and I already did so on the hand planes. Sorry, more than I had planned on writing. Paul’s advice is very sound advice.
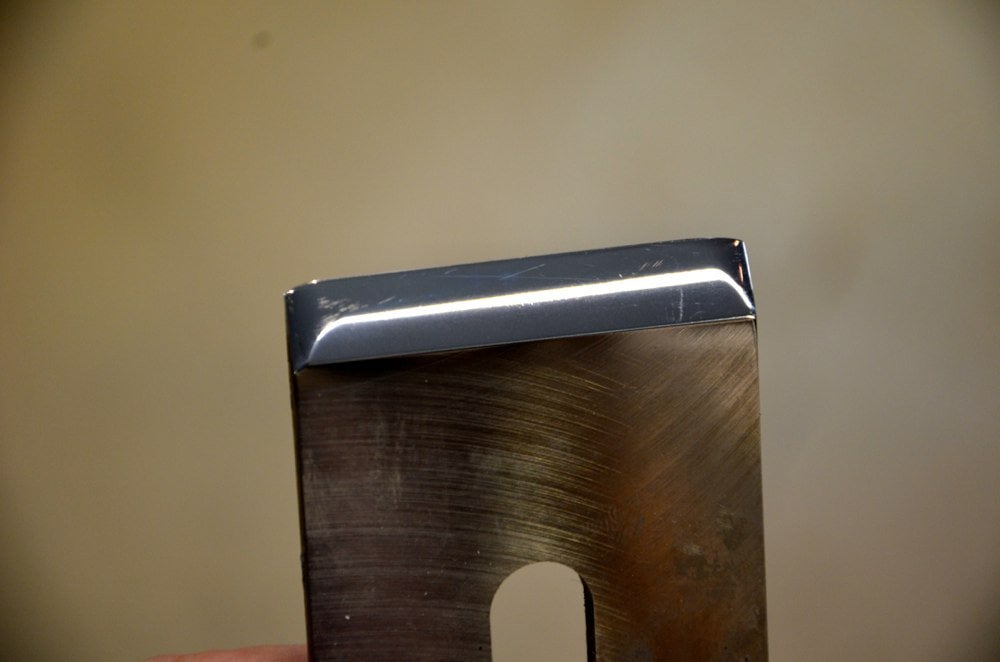
I am curious as to why the scallop is beneficial on a scrub plane? I can see that it effectively makes the blade thinner. Does it help to lift the fibers? I guess I will need to try it on mine. I guess the danger is taking too much off.
Scrub planes are used to remove a lot of wood more quickly. The scalloped edge allows for thicker shavings with less effort.
Thank you Paul for great sharpening techniques. Sharpness was always elusive for me over the years, until i tried your method. After countless theories, and different stones I purchased diamond plates boarded them, with a separate strop. It’s no longer hit or miss. I have worked with wood off and on most of my life i wouldn’t trade it for the world. I am grateful to have found your site, I always enjoy your blog and have learned new techniques from your sites. THANK YOU for your passion!
THANK YOU for your common sense, down to earth approach!
Carl
Yup, I’ve gone through all the stages of sharpening anxiety. Along with the associated sharpening systems.
My problem was being para socially taught thru YouTube was there was no solid feedback of is it sharp enough flat enough ? Am I doing this right ? Why are edges crooked ?
Due to if you mess this up at all it makes working with the tools and the results all “off” and meh.
You end up in a loop of if I can find a better sharpening system I can do better easier work.
Most shop tasks have a work saving method for the all the slog jobs you hate to do, that just cost a bit more need to resaw a 6 foot board ? band saw … Sanding 30 sq feet of panels , orbital sander etc
But when applied to sharpening it takes almost more work and time and expertise to set up the proper machines and stones/belts etc to get close to just hand sharpening a few pieces but more efficient for mass sharpening dozen or a few hundreds pieces a day.
Which is why the old man still drives around ringing his bell to sharpen your tools.
I have a dead flat 9″ x 12″ slab of granite which I use with various grits (usually 6000 or 8000) of silicon carbide sandpaper to touch up my chisels and planes. I did make a concession to machines for stropping though. I use a Work Sharp horizontal “grinder” with a leather wheel on it. It literally takes more time to turn it on and off than the 3 or 4 seconds it takes to strop the edge.
The diamond plates + strop method (Paul’s method) works very well on conventional western blades. I have used it for years and still do. But the method alone is not particularly efficient for thicker blades and some steels (A2, PMV11, etc.). The article doesn’t mention this, but I believe Paul addresses it elsewhere, at least indirectly, as in: “there is no need to use those thick blades.” Be that as it may (probably true), I do have one or two of those blades in use.
Maintaining the overall bevel angle of such blades slows the method down quite a bit. As someone mentioned earlier, Japanese waterstones can be more efficient, but the mess … For these blades, I find that grinding the primary bevel on a grinder every now and then, combined with a honing guide, can improve efficiency greatly.
When it comes to chisels, I seem to like Japanese timber and paring chisels. For some reason, I like their “top-heaviness,” and their steels stay very sharp forever. I have used Naniwa diamond plates for a year now. I find them to work exceptionally well. For Japanese steels and everything else. They are almost like waterstones but without the mess or the need for flattening. Unfortunately, they are very expensive too.