Sandusky plow – black and white facts
It’s not hard to see why wooden planes were abandoned when you think that the wood used to make one would be cut from the tree, slabbed into stock thicknesses, kept for several years under cover to naturally air-dry as slowly as possible and then be converted into working stock that required much hand work. It wasn’t so much instant abandonment as, well, a reluctant giving up in the sense of surrender. It was a slow, laying down of the tools by one generation and an apparent dismissal by the next. The message was poignant in that the surrendering came as a fait accompli:
Fait accompli – an action which is completed before those affected by it are in a position to query or reverse it.
The changed face of working wood
Industrial giants like Stanley, who’s goal was purely to make money and oust all others from the market, were the big guns of the day. Machine manufacturers too industrialised all processes of woodworking and so Real Woodworking jobs were gradually phased out and eventually became lost to the individual artisan who became part of the mechanised world of commercial production. At woodworking shows over 95% of attendees are amateur woodworkers. In general, the only options for them, because most of them never had the opportunity to learn and master hand skills with hand tools, adopted industrial methods, not realising that in just a few hours they could be complementing machine methods with developed skill unneeded for machines. Unwittingly they find themselves on today’s conveyor belt of unwoodworking.
Giving up an inheritance
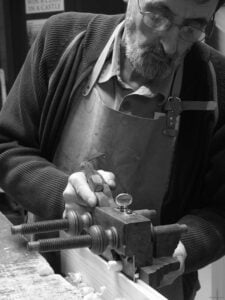
I think it’s true to say that passing on knowledge of tools can only really happen in the tactile. You have to feel the difference. I cannot convey to you the absolute ease with which this plane ploughs its groove.
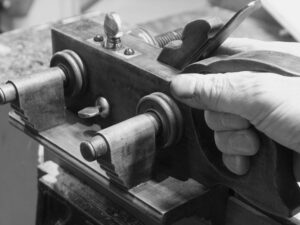
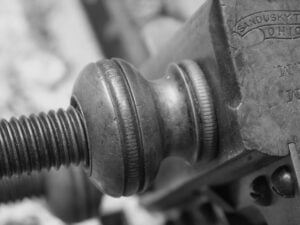
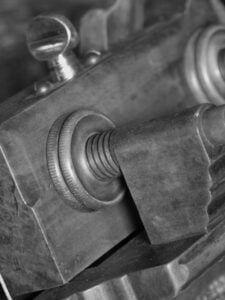
Here are images that bring black and white reality to a sad loss. Do you realise that this step in the history of woodworking is quite irreversible. We will never see planes like this produced for user craftsmen again. I bought this extremely useable plane for £80 or $120 with shipping. I will keep and use it for the remainder of my life, which I have no control over, but I hope will be long.
If you get chance, try it out.
Thousands of you who read this post this week and over the weeks and months to come will never use a wooden plane at all let alone a wooden plough plane like this one.
Antique tools still good value
For the record, it would be impossible to produce this plane today for less than £1000 or $1000. It is impossible to for me to convey how wooden planes feel; the value they have in thousands if not millions of buildings would be equally impossible for me to convey. I cannot convey that these planes feel like no other in the sense of solidity and positivity. They really, really work and they feel very lovely in the cut, no matter the wood.
Mere nostalgia – living in an unreal world?
The ones that say this the most, and they do say it, is the professional woodworker. Usually they have never worked to this degree with hand tools. When they come in the workshop they look at hand planes and make statements about how archaic they are. When they see a wooden handled handsaw made by Disston they say, “We use throwaways today. Can’t be bothered sharpening them. It’s cheaper than a file and better too.” I think they may have a sense of loss but not want to admit that what was was indeed better, more organic, more, well, within the craftsman’s reach and control.
It isn’t trivial nostalgia that makes me post of these wonderful tools, but to record here the reality that for those pursuing Real Woodworking these tools really do work. That our forebears did the best that they could to produce working tools from the raw materials they had available and that does not mean we have bettered what they had. The centre of thrust (COT) through the low wooden handle really the power in each stroke. You will not regret buying one of these planes if you find one in good condition as I did.
Paul, that is a beautiful plane. But my tool fund doesn’t have room for more than one plow plane. While I’d love to add a wooden plow plane to my user collection, I have many concerns. In the wiles of Colorado they are not common, so I am forced to use Ebay or other online sources. For something of this “complexity” I hesitate to buy one sight unseen. Moreover, the availability of blades concerns me. The ones I’ve seen online sometimes come with a single blade and often without any. So acquiring, say, a 1/4″ blade that is compatible with the wood plow plane is a concern too.
I think that the shows do a good job, it’s more that we don’t realise the percentages of pro v amateur attending shows to be so disproportionately low and so we think that what is being sold is what the amateur is looking for when in reality they forget that the journey os what they enjoy and not just the end result. I don’t think that any of us enjoy wearing a dust mask and ear protectors for most of our workday so why not develop some skills that minimise the use of things like power sanders and routers. Of the 120.000 joints I have made 90% were cut by hand methods. In 48 years of making dovetails almost every day and often several times a day I have never once used a router and dovetail jig to cut a dovetail joint. I doubt there are many woodworkers today that can say that. Old fashioned? Nostalgic fantasy land? Not at all. It’s simply a lifestyle I chose decades ago called real woodworking. Anyone can do it and anyone can have it.
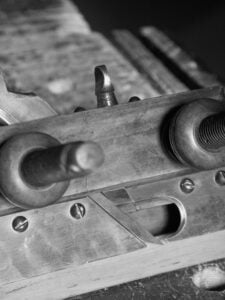
OK. I frequently see plough plane irons come up on eBay and they are out there by the thousands in people’s sheds and at flea markets so it’s more question of finding them. You don’t have to use Sandusky irons for Sandusky planes. You can use any iron and of course you can make one to suit your specific need too. Most ploughs have a ‘V’ bevelled leading edge to the front of the rear skate. This is a design feature that corresponds to a ‘V’ groove cut into the back of the cutting irons. This keeps the cutting iron centred properly and immovably on the skate so that it always aligns correctly in alignment to the plough itself and saves any shifting in use along the cut.
So, in general, you can buy any cutting iron and it should fit the ploughs made by other makers. Now the irons are tapered, being thicker at the cutting end than the top. This is another clever design feature that counters the pressure of the plough in the cut. Pushing forward then will never weaken the grip but further tighten it.
Don;t give up. If you can;t find one. Get an old one and rework it or buy some good old O1 steel and make one. The ‘V’ groove is simple enough to file in before you harden it.
One last thing; you may have to remake a wedge of you use the iron of another. Keep the original just in case you come across irons matched to your plane. Of course you don’t have to have a Sandusky, there are others.
I just bought a Sandusky plow the other day for 150 and a set of Sandusky blades for 100. I love using this plow and though some may think that is a lot of money for this tool, I still spent less than the Veritas model with all the blades. And in my opinion the wood plow is much better than the metal versions out there.
Love your articles Paul, keep up the good work.
Sounds like a steal to me now that I have one that’s fully useable. I love these planes and they should be used as much as possible.
best regards Bill,
Paul
I’ve been looking at several on the bay and there’s one that’s a insane amount of money (sandusky plough with wheel). I haven’t come across any so far with full blade sets yet.
Am I right in thinking that you can do more than a single width with one blade?
I’m hoping someone can enlighten me as to the correct way to remove the wedge and iron from one of these planes. Is there a “magic” location to tap the body? Is there some magic incantation? Perhaps no magic is involved at all…only knowledge.
Also, are the front and rear skates suppose to be dead even on their base, or is the trailing skate supposed to be a millimeter or so lower?
Finally, what tolerance should I be aiming for when adjusting the fence parallel to the body? With two screws, one fore one aft, I’m not sure how crucial (or easy) it is to get it dead parallel.
I just picked up a beautiful Auburn No. 90 on eBay for $90 USD. It came with only one 1/4″ iron, which needed squaring and sharpening; but that was easy enough to take care of. Even on my first attempt I did not make too much of a muddle of things. And it’s about 1/3rd the price of a new Veritas. Wish I had known about these 30 years ago, when I was milling new window sashes with only a contractor’s table saw. It’s pretty dang groovy.
Thanks in advance for all suggestions.
If the wedges have not been dislodged for a long time and kept somewhere that has damp then often the wedge has swelled in the width of the wedge so that the wedge is tighter between the walls and not necessarily along its wedging line alone. In this case, if that is so, it is best to take it into somewhere with more passive heat rather than heavier tapping. This will allow the moisture to be released and the main body to turn loose of the wedge as much as the wedge to shrink a little too. Good to remember that both will or could be swollen and even the smallest fraction will indeed hold on to it much harder than you might think.
The skate halves front and rear should be level although you would think relief would be practical, but the skate is really the sole part (or equivalent of) the plane as in say a number 4 smoother and of course governs the thickness of the shaving only.
The fence is a guide more than a rigid resister. Allow a half millimetre more open at the rear and set the ‘true’ distance on the first stem. I have often found metal plough planes lock out of parallel on the first locking setscrew, which is a pain if it does, and especially those with twin stems. This makes the plane wedge and tighten in the cut and the deeper you go the greater the resistance because if friction and such.
Oh, by the way, the wedge in the plane, after a few days in a warm and dry place, West Texas will work well, or Arizona, just joking, take a steel hammer and a well placed blow on the heel of the plane should loosen it. I use a Warrington hammer and use the cross peen to tap carefully after the one or two good blows on the heel. You can also give a good tap on the fore part-top of the plane and this will usually work too.
Thanks, Paul.
I jus bought a Greenfield plow plane, and found the forward skate is lower than the rear. Is it ok to file the rear to align it with the front skate?
Not sure why you would do that. It is supposed to be stepped to facilitate the thickness of the shaving. Not an exact science as it depends on the thickness of the shaving, but it works fine.
Just bought an Auburn plow plane. The skate is not square to the body. This throws off the alignment of the skate with the blade grove. Is it worth planing the wood behind the skate to make the skate square to the body?
I have purchased two wooden plough planes in the last several months, one made in Greenfield, and the other in upstate New York. The depth adjustment on the New York plane was seriously corroded. I had to break the soldering on the brass thumb screw and then extract the assembly and heat it with a blow torch to release the screw from the rectangular piece that slides in the housing. It all works smoothly now, and I reattached the thumb screw with epoxy — not exactly kosher, but it works very well. Unfortunately, the fence on that one was compromised and broke, but I think I can use thickened epoxy to put it back together. The Greenfield plane is in better condition (the depth adjuster worked perfectly), but the threads on one of the wooden screw are gone at the very end which gives you the 1/4 or 1/2 inch clearance. I figure I will just put shims in to make it work. I found a nice set of irons, from 1/8 up to almost an inch, as well as some molding irons, on ebay for a good price. If I can get the New York fence epoxied, I’ll set the two planes up with 1/4 and 3/8 inch irons, but I may have to try some of the moulding irons as well. I have spent a total of about $130 (US) on the complete ensemble, and I am looking forward to using them. Now I have to find a wooden moulding plane for decorative work on a loom stand I am doing. I saw a number of these last week at a couple of used tools stores — but didn’t know then that I wanted one. Such is life! I find I am using the power tools (table saw) less and less these days — and only for cutting down lumber to the width I want for rails and stiles, or for bottoms of drawers. Thanks for all of your wonderful videos, Paul.