Alluminium clamps – Retrofit makes a perfect clamp
For more information on sash clamps, see our beginner site Common Woodworking.
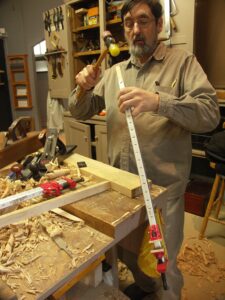
This post is for Matthew who asked me about the red sash clamps I use in my workshop. He saw them on the videos and in my book. This was my reply:
Matthew,
You can buy the 24″-48″ sash clamps in this style for between £7-£11, which I think makes them good buy. I will post some tips on my blog tomorrow with pics about them so others benefit from your question too. These clamps feel somewhat cheap when you first pick them up but the actually work well. I retrofit mine by inserting a strip of wood inside the clamp full length. I cut the wood for a snug fit but not too tight as the more the wood enters the greater the bite. This one change exponentially changes the feel of the clamp and makes it rigid so that it actually removes any tendency to torque, which was a definite problem with them before. These clamps, regardless of colour, are all made by the same Asian maker. In the UK they are sold under several makers including Silverline and Faithful and are also available from Axminster who claims them as theirs, but all of these companies buy from the same maker and put their name on them. I also superglue 1/4″ plywood pads on the heads to cushion and that works great.
Best regards
Paul
Here is how to retrofit the clamps. Now these clamps are very common and you may think as I did that they are cheap feeling but this work really changes them and makes them to where you will wonder how you lived without them. Now I know that they are not heavy enough for some work, but these are just about the only ones I have used for 15 years. I have I-bar clamps for heavy framework.
Cut the wood to fit. The fit should be snug bit not too much as the wood will increase in resistance as the wood deepens into the extruded aluminum.
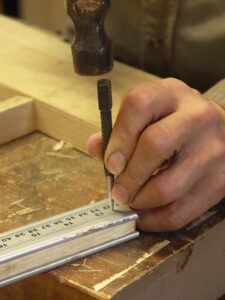
Cut the wood to the end of the aluminum and dimple the aluminum with a nail set to secure.
Step:
Wax the working head between the two shoes and the bar to prevent binding.
Step:
Cut pads of ¼” plywood the same size as the shoes.
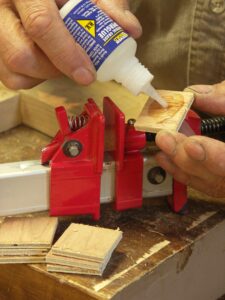
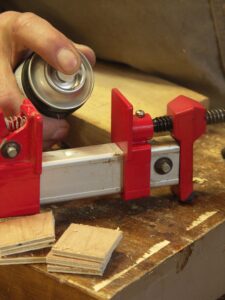
Apply superglue to the pad and spray shoe with accelerator. Press two together and hold until set.
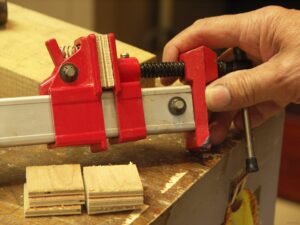
Repeat to second shoe and clamp together and tighten quickly so pads and shoes bed down tightly. Sometime in the future the pad may separate, but this method works well and the pad is quickly resituated.
These clamps work well. They are light in weight yet you can apply enough pressure for anything you need to clamp. We have used them in the New Legacy School for a long time without any real failure.
You are most welcome, Matthew.
Paul,
I’ve found a place that sells the same clamps here in the US for $11 for a 36″. Based on your mods, I think I’ll pick up a few.
Was the wood insert hard or softwood?
Hello Patrick,
I have used both with no marked difference,. I avoided loose knots but otherwise used any scrap strips that I could cut to size. The trick is to get enough friction to bite but not so much you get half in and it bites so much it won’t move.
I know this is rather old, but I’ve just come across it and someone else may, so I thought I’d put it here for the record.
I made *precisely this mistake* – I planed my softwood to a thickness where it got half in then wouldn’t budge. In that case (it worked for me) judicious smashing of the wooden end against the ground solved that problem. Seeing as I’d left the wood slightly long, I could then cut off the mushed up end and now I have a very sturdy clamp.
If anyone’s in any way clumsy I’d suggest leaving the wood a bit long anyway, so if you accidentally bash that end against things (floors, walls) it’ll be a bit kinder on the surfaces you’re abusing.
J-P
Not sure if I said this before but I did look at the Harbor Freight ones and they looked pretty decent to me. I plan on buying a few myself to test them out before I buy. We will need a hundred or more clamps for the New Legacy New York School. In a couple of months so that alone can be quite an item altogether.
I carried out your mods on the Harbor Freight clamps. I can testify that it works as you advertised it did. Keep it secret from HF, else the price will quadruple.
I stumbled across the exact same one’s in Paul’s shop on amazon. Not as cheap as the harbor freight ones though.
http://www.amazon.com/Shop-Tek-36-Inch-Aluminum-Bar-Clamp/dp/B0053A5RPA/ref=sr_1_24?s=hi&ie=UTF8&qid=1328320586&sr=1-24
I tried sawing lots of “saw kerfs”, then chiseling them out but, it seemed like too much work to me.
I
bought 4 – 2′, 7 – 3′, 2 – 4′ and, 2 – 6′ clamps from Harbor Freight.
Lowes had some 4′ and 6′ pieces of pine in almost the correct dimensions
so, I’m just planing them down to size. Planing is a little more fun
for me and, seems to be a little faster too.
I’m using a Stanley #5 to do the planing.
I tried sawing lots of “saw kerfs”, then chiseling them out but, it seemed like too much work to me.
I
bought four – 2′, seven – 3′, two – 4′ and, two – 6′ clamps from Harbor Freight.
Lowes had some 4′ and 6′ pieces of pine in almost the correct dimensions. About 3/8″ needs to come off of the top and, about 1/16 to an 1/8 off of the side. So, I’m just planing them down to size. Planing is a little more fun
for me and, seems to be a little faster too. I’m using a Stanley #5 to do the planing.
I never rant, I explain and no, if it stops someone from making woodworking happen, I would buy all Chinese as long as the quality matched my requirements.
I live in a world where clamps are cheap and low quality,good clamps are only in your(my) dreams. So , every time I can , I avoid using them.(It is right , you can never have enough of them) I saw (~10 seconds -Japan)a wood -laminating technique for a bow : long thin pieces where glued and wrapped together with kind- a thin rope; each 2nd or 3rd turn was fixing a convenient sized wedge.At the end , the assembly had around 15 wedges or so.The man held it with the left hand by the top and hammered -in the wedges with a single stroke of a wooden hammer.
Another way to avoid clamps is using a convenient TOURNIQUETor (spanish capstan/crank/jack ? -sorry ) -, rope again. http://dictionary.reference.com/browse/tourniquet?s=t%5D , (oh, those Roubo’s !). Gluing is unavoidable , using modern clamps – is only eficient.. Maybe Mr.Sellers will -in the future , show -us some of the old ‘poor man’ clamping techniques.
Thank you.
For a new woodworker in the US, what size clamps should I get? If I can afford it should I get Harbor Freight, Universal or Jorgensen? The latter two are the same price for me at 36″ and the HF are obviously cheap for me. I can afford any but don’t want to spend money I don’t have to… but would like something that lasts. As far as size goes, keep in mind I’m making the workbench soon and I saw you use at most I think 12 clamps, but no idea on sizes.
Both Universal and Jorgensen are lifetime. I like the aluminum because of their lightness. I don’t like steel clamps much. Pipe clapms are good too. I like them. On the otherhand, I use the HB type and have found them more than adequate once retrofitted. I have used mine for many years at the schools I have had and they work there so in a home shop used once or twice a week they should last fine.
So much research goes into starting out. Tools and brands and secondhand and then there’s restoring and sharpening and such. I think the end result will be worth it. I’m going to go HF and retrofit. One comment I forgot to make is I was leaning there anyway because there’s a local one and because I’m not a professional… my day job is in IT and so any tools I get won’t see as much use. I work in my garage probably 4-5 days a week, but also do house, electronics and mechanic stuff. What size clamps would you suggest, length-wise? The first order of business is the workbench so I plan on getting 12 as that’s the most I saw you use, but I’m not sure on length. I’m considering HF bar / sash clamps I’ve seen you use mostly. Pipe clamps seem too heavy with the steel pipe and all; the interchangable piping sounds great but I want to spend my time learning wood and the working of it not playing with pipes. Thanks and let me know what a good starter set would be in terms of length… 12 36″ or some 24″ 36″ and 48″ or something?
Generally I find much work falls within the 24″ range. Maybe 6-8 of those. 6 of 36″ and 4 of 48″. Long will work for shorts in a pinch.
Fantastic. Thanks for all your support. Without your blog and online master classes stuff I would be lost enough to give up on hand tools and real craftsmanship. As it is I’m far more excited in working wood than working machines. I would bet there’s an older gentlemen in anybody’s area that could transfer some similar knowledge, but the industrial age has destroyed the master and apprentice relationship. Internet to the rescue! Thanks again.
I would have thought that but somehow my leaving the UK and living in the US cocooned me from changing to machine only. I had to develop my own progress and then when I came back to the UK I found that my generation and younger, in general, had lost the art and pursued the machine. Mostly any way. But we are snatching back our inheritance and that’s most important.
In my opinion machines come down to supplementary or primary. What’s the ratio of working wood versus working the machine? You’re already going to have to add some to the machine side due to the upstart, safety equipment, cleanup and sometimes involved maintenance of the machine. I like the idea of not needing to look like a storm trooper in my garage. If you can keep it simple and supplementary, you’re fine. I think it’s more about nostalgia at that point. When it comes to primarily working a machine, you aren’t. My opinion. If you feel like you’re doing more woodworking, go for it. If it feels like you’re mostly working the machine itself, find another way. I mean, lathe turning definitely looks more like working wood with a machine’s assistance than working a machine. The band saw, maybe less so. Planer/jointer, miter and other power saws, not so much. I do use them for house stuff of course. Table saw I guess could go either way. You’re going to need to plane it either way when it comes out of the machine. Table saw just seems like a way to cut to length faster prior to prep. Power router and dado stack on a table saw and seems to me you’ve ventured heavily into machineworking instead. You could think about it eleventy differet ways, but I think the loss is more about the master-apprentice craftsman relationship. If we had that, the craft would not be in peril. It’s not really anybody’s fault… I’m 32 and people my age may seem to not care about the art form, but they haven’t really had a choice in the environment in which they’ve grown up. If you weren’t all over the Internet I probably wouldn’t have discovered it either. And now I’m learning. The best part is not just the art form, it’s the health difference with dust and power tools and directly related to that, being able to involve children at a vastly earlier age. Who knows, in a few years I may be teaching my girls’ Girl Scouts troope about working wood. 🙂
I bought the Harbor Freight alum bar ones in early part of this year but couldn’t find a stick of pine with just the right width to insert into the body of the clamp. Resawing would have been pretty difficult given the dimensions and I didn’t have access to a bandsaw. Nevertheless, they got the job done even without the reinforcement and I was able to laminate my two bench top slabs. I later got for some good, solid Dubuque ones from Lee Valley. They have proven very well-made and solid (about $25 for 24″ clamp).
Anyone have any tips on getting the pine sticks down to size to retrofit the clamps (besides using a bandsaw)? I still have the HF ones that I still could use if retrofitted.
Thank you.
Wait a minute…just plane them down…of course! …sorry for the lapse..
Hi Paul. Thanks for this post, it’s helping me as I try to find my first set of clamps on a paper thin budget. But I’m left with a question – how much does squareness of the clamp head make a difference? I read in some forums that some cheaper clamps appear to have less that square faces on the clamp head, in relation to the body. That this causes “problems”, and so one should strive for the more expensive ones.
In your experience is it that simply the ones you recommended are square enough? Or is it -as I suspect- another case of hype and that any inaccuracies are likely so small as not to make any difference. I’d think the cauls will likely change that property anyway. My presumption would be that as long as they aren’t so bad as to make clamping difficult in the first place, if I check my work for square when clamping… it *should* be fine?
I was also looking at these steel clamps which works out at £10 each for a pack of 6: http://www.rutlands.co.uk/sp+woodworking-whats-hot-best-sellers-best-sellers-in-woodworking-sash-clamps-dakota+m_dk135
…but again found similar comments as above. As a beginner it’s really hard to tell if this is just hype or if I’m wasting my money. But on a tight budget the difference between £10 a clamp and £20+ can simply mean I end up getting no clamps at all!
I dislike the type of sash clamp shown even though they mirror the ones used in joinery. The thin steel bars mark wood very easily whereas the alluminium ones don’t. I admit that the alluminium imports are not as robust as they could be but with care they do work well and they will last. They take care of all my needs and you can get them from Screwfix ofr less than your target price. Squareness of clamp head makes little difference but these clamps are always fine in my work.
What sort of wax to use?
Any soft paste or furniture wax works.
Hi Paul
I have just purchased some of these clamps and am beginning to retrofit them like yours.
I was wondering if it matters what wood you use to fill the clamp in with, I know you don’t like MDF, but I have some about that is practically the right length.
Would it be ok to use or should I use a proper wood?
P.S thanks for all the great advice on this and everything else you’ve posted
Regards
Tom
I would just try it in one and see how it feels. Can’t lose anything.
Ok thanks for that. I’ve got 12 of them to do so will try a range of fillings.
One annoying feature is the plastic caps come off the Tommy bars. Locktite didn’t work for me. I found that a 1/4″ UNF nut is a perfect tight fit. I pushed them on using a 6″ engineers vice and a final belt from a 3ib hammer. Now good an secure.
Dear Mr Sellers,
In your Woodworking Masterclass series (most enjoyable) there is a set of other clamps half hidden behind and to the right of you, as you are facing the camera. They are all aluminium with wingnuts on their tops.
You rarely use these clamps (perhaps only in the Bookshelf project), and I’m curious why. Having ordered a quantity, paying well above the ‘redheads’, I hope you haven’t found them too inferior.
Kind regards
Sven-Olof Jansson
the cheapest i have found are made by
Blackspear i get them from a shop in Frome for £8 and some change for the 900 mil ones they are from a shop called proper job and a few of them scatterd around the west country
New wood worker here. Just retrofitted 4 harbor freight clamps this weekend and they work great. Used the rip and panel saws to dimension my lumber and the no 4 plane for micro adjustments. Cool part is I restored and tuned all of these tools with info Paul has provided in his books, YouTube channel and blog. Have found Working Wood 1 & 2 very helpful, finishing up the bedside table and then it is on to the workbench!
Thanks Paul!
Just bought some 2 ft and 3 ft aluminum bar clamps at Harbor freight for 10 and 12 dollars. I took a piece of 1×4 pine and used a marking gauge set to 1.25 inch width. Ripped just outside the line using panel saw, turning the board frequently like Paul did in his winding stick video to help stay near the line. trimmed up with #5 plane so it was just a bit too thick and hung up on the indents inside the channel. I took a few shavings off the 3/4 inch thickness so it didn’t splay open the bar clamp’s U-shape profile. Cut it to length and tapped it right in. Took me 12 minutes for the first one. half that for second one. No dust cloud and no noise. Thanks Paul for opening this world to me!
Does anyone know where in the UK (hopefully at a best price) I can get the aluminium clamps Paul uses and recommends (I’m typing this in earlt February 2018).
Finally, huge thanks to Paul for his videos and enthusiasm! ( http://www.paulsellers.com )
I had to choose two GCE courses out if four when I was 14, 52 years’ago: Art and Woodwork lost out to History and Geography, a sensible, but sad, choice at the time, even though my *excellent!* school, Cray Valley Technical High School for Boys in Sidcup, Kent cleverly used a six-day rolling timetable to squeeze as much in a five-day school week as possible!
Happy times! And well done, then, Headmaster JC (‘Joe’) Kingsland and Deputy head, ‘Reg’ Mayo.
So, 52years’ on, back to woodwork and art!
I use alluminium clamps produced for Screwfix now. They seem on average to be the best value for money with good returns policy although ~I have never had to return one.