Winding sticks for guaranteed flatness – and more beyond
I don’t know of many that rely on winding sticks for detecting twist in boards and billets these days but I use mine often as in days past most woodworkers did. Like the square and the shooting board, these simple pieces were essential to producing accurate work; a slight twist on one rail or stile translates into a twisted door, wasted wood and lost time. So essential was the use of winding sticks and the “rack o’ th’ eye” every shop had large and small pairs to gauge the accuracy of their planning by. Ideally a pair should not only span the width of a board or billet, they should exceed its width by one or more times when possible, hence the need for more than one pair. A pair equal inn width to the stock reflects the exact condition of the stock.
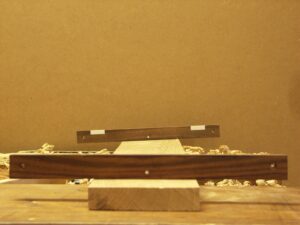
A pair of winding sticks twice the width of stock exaggerated the twist by twice as much; making it easier to detect the twist in minutely twisted material. On small sections of wood, a 1” by 2” cross rail for instance, my sticks are 12” long and so magnify problems 6 times. Hence, hand planing the surface of my material for my doors with a well sharpened, dead flat plane like a Veritas, Lie Nielsen or a Clifton enables me to work within one thousandth of an inch. A perfectly untwisted door is always the result. These winding sticks were a gift from a friend in Canada some years ago. Every time I pull them out I think of him sending them to me out of the blue. They are simple enough. Traditionally they taper from a wider bottomed base to a narrower top, so that they have more bottom weight to help them ‘sit’ properly. I have seen them made from two types of wood such as ebony and maple, so that the contrast is clear for sighting. I have seen them painted differently and I have seen them made from the same wood but with an inset corner of contrasting ebony and a light wood such as holly or maple. I once used a felt tip marker on pine when away from my shop and in need at a local lumber yard.
In the case of mine above, the maker used abalone instrument dots as centres in each one because it’s very important the winding sticks are centred on the boards when being checked, otherwise the uneven weight and lightness of the winding sticks can leave gaps and give a false reading. He used white pieces of hard plastic inset into the rosewood pieces. I thin that these are the best winding sticks I have ever used.
Thank you for sharing. I am making my first winding stick’s ever. From a piece of kiaat wood i cut two length’s of 60cm long.
And now i was wondering were and how to put white pieces on it.
And after reading i am going to taper them.
Greetings, Raymond
Thank you for sharing this.
I’m making a pare of winding stick’s for my own use.
From a piece of Kiaat wood is saw of 60cm.
After reading your blog i am going to try to taper them and insert a white piece of something.
Greetings, Raymond
When you are starting out….rank beginner..and you are making your workbench you need winding sticks for a flat top.
But…one is just starting out. What do you recommend for winding sticks that are good enough to start with? Seems very much like a chicken/egg thing.
In your earlier workbench video it seemed as if you were using two pieces of pine.
How does one begin?
You do not need anything more than two 1 x 2s. The just need to be true and parallel that’s all. That said, making your own with contrasting woods means they are always ready to go and that’s the reason we make them.