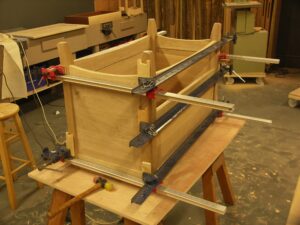
Hope chest glue up
Some times I simply want to declare that my day went great today even though so many things tug at my time. I am not sure who the first person was that said “I had a great day.”, but somehow it seems, well, flat. Going into my workshop doesn’t so much excite me but, more, much more, it means sanity to me. If I spend three hours working on logistics for the books I am currently working on that’s fine as long as I know I can get out into the workshops and spend a few hours simply working and making. The blog, forums and answering the emails and question takes a great deal of 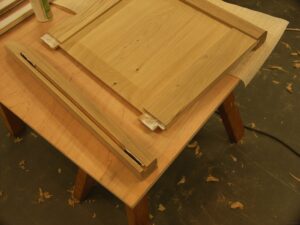
Today was one of those days when planing, scraping and sanding pinnacled. The parts smoothed out and fitted are now the composition I aimed for, good or bad, and the decisions at this stage cannot be altered.
There was a time when I was ashamed by the tradition of my craft. I wanted the modern and the future not the past or even the present. I regret that now. Tradition undergirds the work of most designers, painters, artists and artisans. Yielding to the demands of tradition was to step into peace. I never looked back.
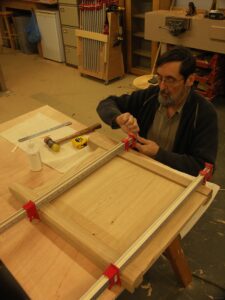

The other thing that’s important as a result of order is that it builds in safety during the assembly. A joint froze on me one eighth of an inch from the closed shoulder line. The chest was fully glued up and everything else was in order but for the one joint. Experience told me that any frozen joint will go with two things; an extra clamp and an unflinching hammer well aimed. I took a clamp from a closed joint, united it with the existing clamp and, under the extra pressure, struck the leg. The joint snapped to and the shoulder seated perfectly and I retightened the one clamp and replaced the other.
You should remember that one. You’ll need it some day.
Home now!
Hi Paul- I’m searching through the Hope Chest series looking for a description or photo of how you supported the drawer, e.g., how runners or a dust panel was installed. This chest is different from the other carcass work you’ve shown us because of the panels. Can you point me in the right direction? If you have a sketch, would you be willing to update the Hope Chest series? I think I understand everything except the drawer runners. 🙂
(Sorry if this shows up twice…I made a mistake the first time)
I would also like to know how the drawer is supported. As well as the bottom of the chest.
Is the bottom supported by cleats screwed or glued to the sides?
Thanks in advance.
That’s correct Ryan.
Thanks for the answer Paul. Much appreciated. My joinery is nearing completion on my chest. I made mine out of wormy maple at a customers request. Such a beautiful wood to work. The colours present in the wood are incredible.
Thank you for being a driving force in my woodwork training.
Do you not need to finish the panels before gluing up? Are you worried that when the panel shrinks you’ll see some bare wood around the edges because that wood was in the ploughed groove when it was finished?