How to Build a Workbench – Preparing the Aprons and Legs (part3)
NOTE:Just so you know, this is an older workbench series. Paul has a newer Workbench series. If you are interested in the updated version of Paul’s workbench please click the button down below. This page links to a cutting list, tools list, FAQS and much more.
The workbench
I suppose we could call this making a garden bench

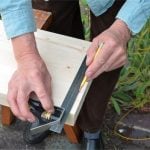
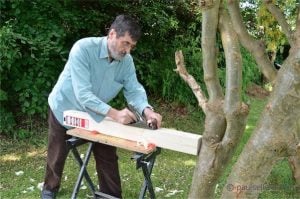
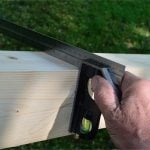
There is more planing to do and I did that first thing. Soon we will get on with the joinery, but cleaning up the surfaces and squaring the edges and ends are steps we do first, as the square and gauges we use for layout register against these surfaces and accuracy is critical to good joinery and good tight, well-fitting joints.
Planing the bench aprons
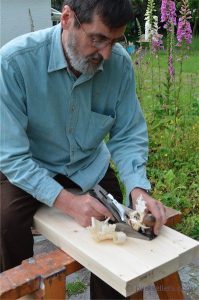
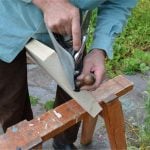
With the outside face planed smooth I squared the ends and cut the board to length. A panel saw will work best for this or even a hard-point crosscut saw if that’s what you have.
The legs
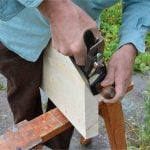
I plane one of the flat faces first and check it for straightness. This need not be a drawn out process. 
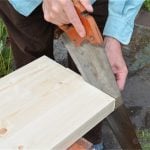
With the legs squared and planed, I determine my overall length to cut them to length. In my case, where my bench height is 38” overall, I deduct the finished thickness of my top, 2 ¾”, and also 1 ¼” for my bearer to establish my overall length. My leg length is 34”.

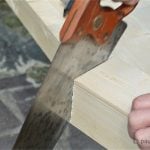
My panel saw quickly cuts away the waste. 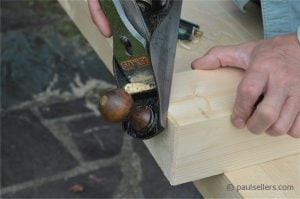
Now we have our stock planed and perfected we are ready to create the joinery and soon assembly begins. I had a pretty fruitful day really. I planed and trued all of my stock and made all of my mortise and tenons for the leg frame assemblies. That was great fun. In fact I am grateful for the fact that even though I have made and sold at least a hundred such benches and used the same style made from the same or similar materials for the different schools I have started through the years, I have never lost interest in making and teaching others to make them. 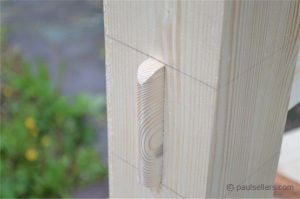
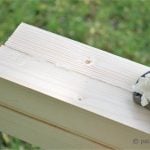
Through-tenon with roundovers
Now here is what you can look forward to next. This should be fun, but now is time to hone and fine tune your #4 or 4 1/2 Stanley smoothing plane (the best planes ever designed bar none) because we will be refining the work all around as we go. I will be sanding the bench with a Dewalt random orbit sander after all is finished but before assembly, for the main part.
I have 2 question concerning this workbench phase:
1) after removing a twist (poor stock for the legs) can you check the parallel edge for suareness against the other faces which are not the first straight edge.
2) Is there a way to help cutting the edges straight, I tried several times even using a knife line and a chisel to create a wall. I always got disorted edge and when trying to square it using a hand plane I couldn’t get the legs to be the same length.
Thanks.
1) If you were accurate with subsequent face planing, yes you can.
2) I wasn’t sure what the question was but it seemed to relate to cutting the legs to length. Remember this is still a weighty bench and if the length of the legs was even 1/8″ different, there is not a floor in the world that is that perfect. You can make a perfect bench but the floor can easily be 14″ out of level or twist in 4-5 feet. It’s unlikely that you are anything but 1/16″ out so don’t let that be of any concern.
With practice, and that’s what this project is, you will gain the skills to cut all four legs in any wood dead to length by hand.
I have 2 question concerning this workbench phase:
1) after removing a twist (poor stock for the legs) can you check the parallel edge for suareness against the other faces which are not the first straight edge.
2) Is there a way to help cutting the edges straight, I tried several times even using a knife line and a chisel to create a wall. I always got disorted edge and when trying to square it using a hand plane I couldn’t get the legs to be the same length.
Thanks.
Question: Can you use 2 – 1×12 laminated together for the apron?
You can but it can be difficult to get good lamination across the whole of the two boards without the right equipment. The two faces would need to be trued up well so nothing hinders the lamination and the boards would need to be equal in moisture content so that shrinkage or expansion in the two boards is equal. It is not a method I would use or recommend because of the hygroscopic nature of solid wood, but in an impossible situation, better that than not progressing at all.
I have made this bench from solid plywood by laminating 3/4″ baltic birch into bench tops and aprons and well board and it made a really solid and heavy bench. For the aprons I formed the housing dadoes by simply cutting the plywood either side of the leg. It worked perfectly. As I recall it took 4 sheets of 8 x 4 foot plywood. V fast construction primarily from 1′ strips of plywood. I used screws to secure the laminations and once the glue dried and cured I backed out the screws in case they were in the way for bench dog holes and the like.
Blimey! Squaring up the ends of the legs is challenging. I have tried the band saw and then the hand saw using the knife wall and chiselling out to get a defined starting edge. Interestingly and without doubt I get better results with the hand saw and knife wall. However I do seem to get some minor variation possibly by as much as a millimetre and I need to plane the end grain to get the end perfectly at 90 degrees. This is where my problems arise trying to plane the end grain on the legs is a pain especially when I don’t have any decent way of holding the leg to work on it. I assume I should have the sharpest possible edge on my Stanley number 4 plane and try to cut at a 45 degree angle. I would really like to crack this and would appreciate any guidance from any one reading this. I’m sure I won’t be the first or the last person with issues about getting a perfect cross-section through a timber. I guess on smaller stock this is where a shooting board comes in!
No one should dismiss the learning curve of handling a plane. Many people demoing will leave you feeling like an idiot because you can’t do what they do with pristine and fancy planes supremely sharpened. technique ias important but practice makes perfect and practice also makes permanent, good or bad. It’s very easy at woodworking shows to show how you can plane a pristine surface on a 1 1/2″ wide piece of maple 18″ long. Even highly figured maple is one of the easiest woods to plane. It’s unfortunate that this happens, but people make a living from selling stuff and that’s part of life. Planing end grain on square stock takes practice. On the workbench, 1mm is nothing. Just get as close as you can and remember that the bench making is a training vehicle for making. By the time you’ve practiced a few more times you will become proficient to the point that you don;t even think about whether you can or not, you will just do it.
Yes, on small stock shooting boards work well. I am so glad that you and so many others are doing this. It takes courage and determination.
This is good advice Brian, thanks for diving in there.
Ok still in my suit and tie from work as I couldn’t wait to get changed to have a fresh look at my issues. So I sharpened the plane blade on the Worksharp 3000 (I’ll get around to Pauls sharpening method soon) Have put a mirror finish on the plane blade and cracked open the 3 in 1 oil to put a little lubrication on to the #4 plane base. Set the blade to super fine and hey presto I managed to take off the 1 mm deviation from my leg. Only two more legs to square up before I get on to the jointing. Two nice tennon saws arrived from eBay today and my Record 53A clamp from 1930 is been posted out on Friday so I’m going to be in workbench Heaven. Brian your right Paul makes it all look so easy, but it’s that ability that we strive for.
As an aside I had a bit of fun with weather balloons a few years back. See http://news.bbc.co.uk/1/hi/sci/tech/8588156.stm
and for a bit more info here
http://www.robertharrison.org/icarus/wordpress/about/
Thanks again both for your help and encouragement. I’m getting there.
best of luck with your build Robert
Hey Brian, Looks like were are on the same journey at the moment with regards to the workbench. Thanks for the email this morning and I’m glad you liked the CNN interview. It was certainly a bit of fun with the media getting involved… As you say the world is indeed getting a whole lot smaller. We will have to swap pics on the workbench when complete. I’m hoping to get done by the end of weekend coming up. (Excluding fitting the vice). Subject to family life not getting in the way too much. 3 Kids 12,8,5 and 1 wife 🙂
thank you for the encouragement and confirmation of direction. I have the legs together now and so on to the next step. (Off to Houston on business next week so unfortunately will put me behind where I’d lke to be… .. darn conveyor belt syndome….)
Me hard at work in the sunshine today! http://www.youtube.com/watch?v=ez6kxfcb9-Q&feature=youtu.be
This learning curve you speak of is a steep on indeed. I’m getting close to the home stretch with my bench, planing the aprons and such. Very soon I’ll be cutting the housing dados and it’s got me a bit on the jittery side just hoping that I don’t mess up, but I am constantly referring back to your blogs and videos. Every step along the way holds something that I don’t remember and the learning is something that should stick with me the rest of my life.
I’m not worried that my bench won’t be the prettiest bench. I want it to outlive me, my kids and their kids. Somewhere underneath will be a mention of the teachings of Paul Sellers so my great grandchildren can wonder who the heck was Paul Sellers.
It’s been a truly wild ride Paul and it ain’t over yet.
Thanks
That’s great. I have been building anew one for my garage workshop and got the well board in yesterday so I am on with the vise today and then I will be done. I made it completely from secondhand pine from the Oxford Recycling Centre in Abingdon and it all worked out great. The whole bench excluding the vise has cost me under £25! Will post on it soon.