Plane chatter—Myths busted by facts
Induced plane chatter is a difficult task that even accomplished woodworkers cannot achieve no matter how hard they try yet novice woodworkers seem to somehow do it without even trying. Doesn’t that tell you something about this mysterious myth? If what I say is the case, that even experts have difficulty inducing plane chatter, why has it gained such attention for three decades. Here is the way I see it.
Alright, I tried with all my might to get a regular thin iron in a Stanley smoothing plane to produce true surface chatter on oak and finally succeeded after a dozen or more attempts. This took great effort because I wanted to show you visually that what most people bring to me as chatter is not and never was chatter. Plane makers knew this at the time but said nothing because they could capitalize on the misinformation put out in magazines that kept people in ignorance. Others confirmed that what they saw in the novices plane work was chatter, but that was not really the case at all. Fact was they just knew no difference. They were not intentionally deceitful but, well, unknowing.
Now we know that plane chatter is indeed an observable reality the consequence of which can be removed with very minor light sanding and here is what plane chatter looks like when magnified. 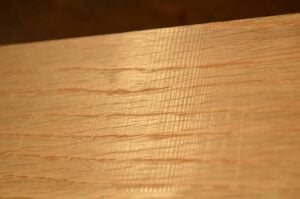
The massive 3/16″ setting still produced a pristine surface with no chatter or scudding yet the ‘experts’ (not usually real woodworkers) tell us that this is the result of thin irons, thin cap irons and lightweight planes. It’s an untruth we have put up with for too long now.
Below is a pristine oak surface produced with an iron extended 3/16″ from the cap iron.

In my induction attempts and experiments today I extended the cutting iron a massive 3/16” from the leading edge of the cap iron; the plane, with its original thin iron, continued to produce a pristine surface and my students were there to witness it. I used a regular Stanley # 4 ½ smoothing plane with all standard parts to plane into adverse grain and this is what it produced, the bevel-up planes worsened the dilemma. I then planed with the grain instead of against it and the results were perfect. I find that the #4 and #4½ is equal to all smoothing plane tasks without change.

Thanks Jacob.
I usually find it’s due to a loose cap iron,or a loose chip-breaker, or taking too deep a cut. But it happens, even with a thicker blade. (Not only to the novice) especially on difficult grains. So lets say it’s still chatter and it happens to the best and the worst of us. The worst of us more often than the best of us. To say so ‘in public’ usually exposes us to ‘ridicule’ from the misinformed.
Hi Mr. Sellers,
2 Thank Yous.
First thank you for allowing people (or choosing a platform that supports this function) to post a comment without having to sign up for anything.
Thank you for your very insightful article and sharing your experience with the public in a meticulous way! This really, really helps people troubleshoot whatever problem they have which has brought them to your post.
I have a benchtop Delta 22-555 13″ planer. It worked great for a year, planed smoothly, up until last week.
After priming some pine that I had planed down to 1/2″ thick from 3/4″, I noticed a pattern left behind by…something. Immediately I suspected the vibrating sander as it was getting hung up in some spots, but, decided it was not the culprit after changing sand paper and taking my time sanding. I suspect that there is someone out there who would tell me that planing a painted board is a mistake because it can dull the blades quickly and/or cause nicks in the blade to develop. I hope I’m not the only one out there who has done something less than preferable out of pure frustration.
After planing the pine down a little more, I saw the marks again and knew it was occurring during the planing process. But WHAT is causing it, is now the task before me to figure out.
To eliminate the possibility of the workpiece not being supported properly I changed to a shorter board, and a different species (poplar). The marks were still there although they were not as noticable. Because of the numerous imperfections in the wood (knots), I gather that pine can be difficult to plane.
Last night it dawned on me that my planer is has a 120 volt 15 amp motor and I was running my shop vac along with it. I”m going to try again, running just the planer so it can draw the proper current (things ‘wired’ in parallel draw the same voltage but different levels of current). My suspicion in this is that setup caused the motor to run slower which could introduce vibrations into the workpiece. Then again…..dull knives might do the same thing? I’m also going to wax the bed/tables and clean out the gears.
It must be difficult to read someone’s description of a problem and offer advice. Based on the details I’ve provided you, what would you suspect is causing this wavy pattern to appear?
My experience is the frog is too far forward or too far back. If it’s too forward there is minute area for flex, if it’s to far back the iron is fulcrumed (not a word) higher up and also allows a minute flex under contention and so iterent flex allowed.
I suspected as much about a frog moved too far forward, but I hadn’t thought about a frog too far back causing the same problem. Thanks for the tip.
I’m willing to accept “fulcrum” as a verb.
Thanks for that!
That’s why it’s so important to counter any presentation that establishes itself as the truth when in fact it stands in truth’s stead. No one I ever worked under as a boy and since then who worked with hand tools as a norm ever complained of chatter. It’s been mst unfortunate that we have seen skill lost because of issues like this and also standards of skill have slipped to abhorrent states because of misinformation through magazines originally and now forums and blogs. I cannot imagine a company like Stanley Rule and Level or Record making such a mistake when the were flying n the face of thicker irons as that status quo back then.
In that case I propose two experiments to you.
With the Bailey plane, set the capiron much much closer to the edge. Even closer then a 1/64″. It might be a bit fiddly the first time around, but when you use the refection of the light in the face of the blade you can see very nicely how narrow the gap is. Then plane that piece of oak against the grain again.
Then with the bevel up plane, hone a small but steeper secondairy bevel on the blade, so that the bedding angle plus bevel angle is about 55 to 60 degrees. Proceed to plane that piece of oak against the grain again.
Both strategies are ways to avoid tearout.
I had thick and thin shavings with the same results regardless of distance. Fact is that 1/32″ to 1/16″ seems ideal to me and that’s after 48 years in daily hand planing my work.
I cannot give BU planes much credibility beyond end or crossgrain plaining because the risk of surface damage is so much higher than with bevel down planes. In all surface grain there will be grain direction and if you are planing in the right direction all will go well. If the wrong direction, the damage will be twice as bad with a BU plane though. All of my BU planes are bedded at 12-degrees. I do not generally use block planes for anything except taking chamfers off of hard corners but even then I mostly use a my #4 or # 4 1/2 smoother.
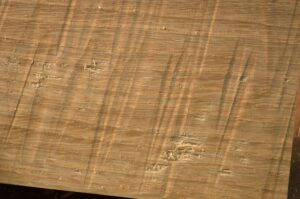
Now I can better see the picture I see you have tearout in that last picture, which is to be expected with a capiron at 3/16″ and planing against the grain.
My question changes now. How did you get the chatter in the first picture and how did you get that scudded surface in the second picture?
The tear-out was from using a thick-iron heavyweight plane and not from my intentional scudding which worked great with a heavyweight thick-ironed plane.
I think that you miss my point. The scudding is my replicated what new woodworkers encounter when they use even a well set and well adjusted plane in the early stages of their development and had nothing to do with my proving you can use an iron 3/16″ from the cap iron and still get good results without any chatter. This flies on the face of articels in most US magazines that state this is a result of standard Stanley or Record planes with thin irons. Extolling the virtues of thick irons as the answer to planes that chatter when they actually don;t chatter and they never did. My point is that the thin irons worked for 140 decades and suddenly someone says, “End plane chatter, use a thicker iron” when there was no chatter in the first place.
In my experience it is true that thinner blades and cap irons close to the blade edge do not make a difference. I usually put my cap irons an 1/8″ from the blade anyways to reduce clogging. I have made wooden hand planes with old thin metal plane blades without cap irons and they work fantastic. I personally prefer thicker blades because they are easier to sharpen free hand, but thats about the only reason, aside from the weight they give to wooden planes.
In my experience it is true that thinner blades and cap irons close to the blade edge do not make a difference. I usually put my cap irons an 1/8″ from the blade anyways to reduce clogging. I have made wooden hand planes with old thin metal plane blades without cap irons and they work fantastic. I personally prefer thicker blades because they are easier to sharpen free hand, but thats about the only reason, aside from the weight they give to wooden planes.
The photo of the piece of oak does not show how the plane performed, either good, or bad, and your wording indicates that the photo shows all we need to see. Maybe a better pix or wording?…
It’s all clear. I just went back. You have two images showing chatter and skudding and one that shows a clear surface in the same wood. The wording says the surface is pristine so the wording says it all too. Can’t see what I would change really. Sorry if I am missing something Seth.
When planing soft wood, no chatter; when planing oak, chatters quite a lot. But… it is not the plane, or the oak, but my workbench/vise that chatters. It is just not sturdy enough. With soft wood, the forces are quite small, but planing oak with a #4 or #4 1/2 is a different matter. The same happens during sawing a piece of wood, the whole bench vibrates.
So I am now investing in a decent vise, level the bench and secure it to the wall to stiffen it.
In my humble opinion the iron pressed in many places and therefore the thickness should not affect. Only 0.5-1 mm is not pressed under chipbreaker. Suppose a piece of iron sharpened at the same angle regardless of their thickness. So it turns out that the cutting edge thickness of a piece thick or thin iron will be the same. So what’s the difference then? It is all marketing. May be someone will be easier to sharpen thick iron, but it’s only one reason to choose thick iron what I see. This is my point.
Just subscribed. Great article
Isn’t the yoke away here, plane with the grain?
Sorry, take away.