What is a well for? More myth busting.
More myth and mystery busting.
This question has come up because of the design of the bench. Please remember that this bench is indeed and practical terms equal in fame to or even more recognised than any other European Workbench and was made in greater quantities than any other. It is when all is said and done The Joiner’s Workbench, the one I and hundreds of thousands of other apprentices trained at and then followed through with the preservation of when they built their own workbench as master craftsmen in their own right. I have them in all of the schools I have started and owned and people have copied them the world over. Once you work at this bench you will want to own no other.
More controversy

Fact is both can be correct, but in practical terms it IS BEST to stand it upright in its functioning position. It makes more sense and the men I worked under never ever laid their planes on their sides as for some strange and unknown reason become tradition and accepted. These men were second and third generation carpenters, joiners, shopfitters and furniture makers (cabinetmakers UK did not mean box making kitchen manufacturers).
I never established the bad habit of laying my plane down on its side for several reasons. When I was in school, my woodworking teacher was also a joiner, or at least before he became a teacher. He was the one that suggested I do not go into woodworking because it would not lead to a very good life. After 50 years since then I have enjoyed a wonderful, wonderful woodworking life and it’s been a provision for me and my family throughout those treasured years. Anyway, he told us not to lay the planes down on their sides because we had a well in the benches and placing the plane on a strip in the bench well was the place to place the plane. 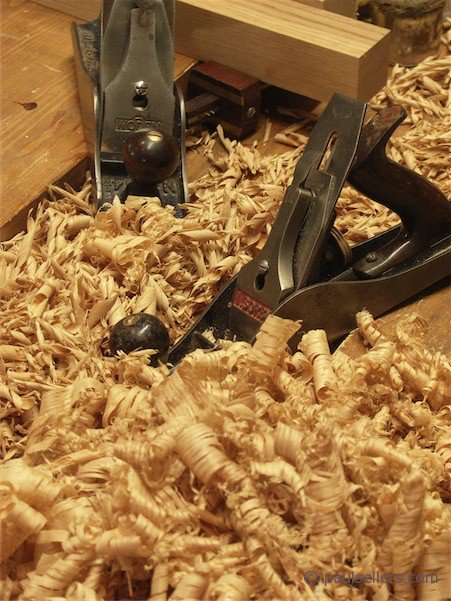
From a purely practical view, plane placing in an upright position means that my plane is ready to hand and ready to go. I place it in the well, catty-corner and at an angle that lines up with my hand on the corner of the well and also on my benchtop as can be seen. That way, whether flat on the benchtop or catty-corner, my iron is fully protected from careless placement of tools as I return them from use to the benchtop or well. When the plane is laying on its side the cutting iron is exposed and in danger of being clipped by another metal tool. 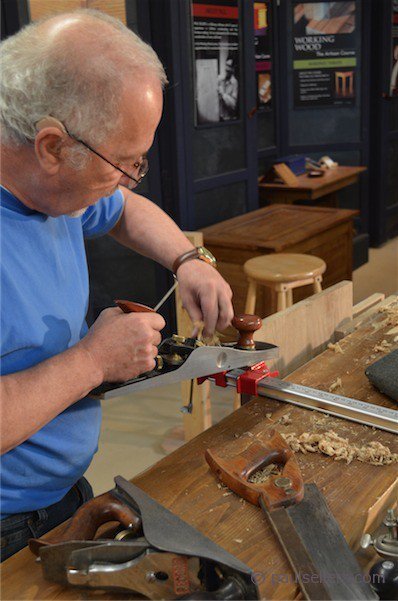
Here at left, I think the plane is exposed to the swivel of a tenon saw into the cutting edge, whereas in the image at the top, the cutting iron is in no danger whatsoever. Now if you have a fancy hardwood bench I can see that you will spend more time preserving its surface than actually working wood , but that’s up to you.
So you can see from my working and practical perspective as a woodworker who has earned his living from woodworking every day of his life, standing the plane upright works perfectly well and makes great sense. Now here is another issue with placement of planes. Placing the plane on its side very readily alters the set on the plane, especially is this so if you drop it slightly or bump it by the sheer awkwardness of this procedure. My students accept my explanation and adopt my standard. Of course many will follow the tradition of laying them on their side, but at least this is another myth busted, whether I make a difference or not.
Now as to wells in benches
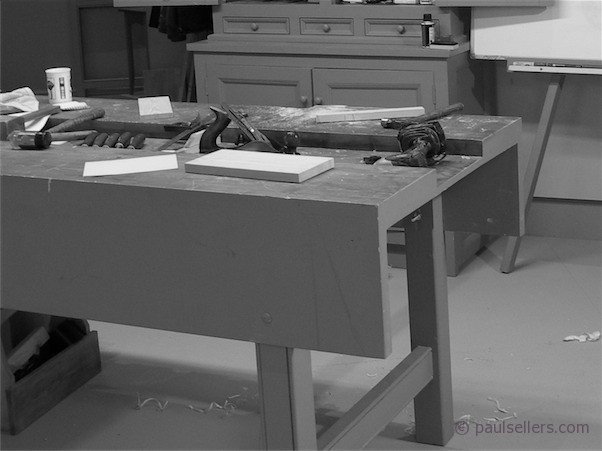
OK, the well is very practical. I worked with joiners, shop fitters and furniture makers and they all of them used the same bench pattern with the well in the middle. Their benches were a standard 8’ long but some were 10’. My foreman did all of the layout for all the men and he used a 10’ bench. The bench I worked on was 10’ because I was an apprentice working with a craftsman and we had two vises, one at each corner, one for the master and the other for the boy.
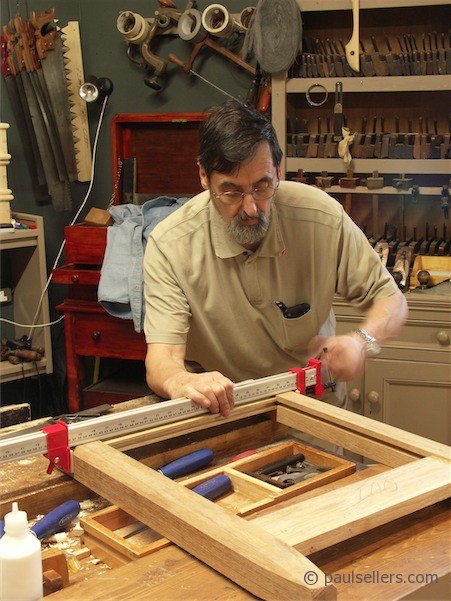
The well allowed for the majority of tools to remain on the bench but out of the way of work in progress. Joinery, no matter the woodworking craft, generally runs along from left to right of the craftsman, so there is little need for solid wood across so expansive an area. Mortises and tenons, housing joints and so on can be readily worked from left to right or right to left easily and fully accessible with the tools close to hand in the well and free from the risk of rolling or falling from the benchtop.
A much less obvious reality is that the wide, solid-top laminated benches will expand and contract throughout the lifetime of the bench. A 30-40” benchtop can expand ½” or indeed shrink ½” in a given season. As woodworking workshops are rarely climate controlled this is more a reality than not. I read one woodworking guru suggest that taking the materials into the shop and allowing acclimation prevented such exchanges, but that’s not true at all. It is a good idea to allow acclimation, but you must still anticipate that any benchtop will expand and contract. So, making benchtops with the centre well is again a winner with a practical perspective. The 12” benchtops will expand only minimally compared to a full-width top of 3’. The other aspect is that bolting or screwing the bench top to the frame actually makes an allowing in that both allow a 1/8” inch flex in the screws alone that will prevent the top from splitting. Again, in 48 years of daily working with wood for a living, I have never had a benchtop split EXCEPT in the one and only bench that I made that had a solid, two-foot deep laminated top. So you see, the three-part bench top allows the three sections to move independently, breathing in and out as the seasons change, and thus there is no splitting or undue stress.
I have learned more in two weeks reading your blog than in the last two years looking at woodworking magazines. Thanks for your efforts.
I have also found it much easier to flatten my 16 inch wide benchtop than a 24 inch wide benchtop.
I have a small makeshift bench with a plywood top. With a small surface, my problem is tool placement. The picture of your bench with mortising going on is the clincher for me on the benefits of having a well. That would have ameliorated my issues even in my small workbench.
FWIW, I have never bought the always-keep-your-plane-on-the-side argument. It seemed ridiculous that the blade would be dulled/damaged by workbench when in reality it is being asked to much more in planing.
I own a book on workbenches and have read considerable number of articles and blogs on building them. I must say that your blog series has been the most useful in terms of building a real workbench that I don’t have to worry about working on it. I haven’t started yet on building one yet but looking forward to! Thanks for your effort!
I think it depends on whether you are primarly a site “carpenter” or a bench “joiner” I find that site carpenters (like me) tend to lay there planes on the side because more often than not there is no bench . So when you are shooting doors on a price, the floor is were you plane goes or if you are lucky on a little shelf under your saw horse and there are often all sorts of nasty things on the floor or it is concrete etc etc. So laying your plane on its side definatly protects it. But as you say not required if you are working at the bench.
You’re right. Been there too. Thanks for the input.
Hi Paul,
perhaps I will have my first commisioned job in woodworking, and if it will so, it will be only THANKS TO YOU, because perhaps in future I’ll take some of my cash receipts from my love for my handicraft: what can be better?
I must make a sort of wooden island (american style but smaller), and the top must be about 2400X800X70 mm, very big for a solid laminated piece! My fear is that I will not be able to squeeze all the thick timber togheter (I’ve not enough clamps, so I must build a sort of big wedged system I think): I’ve tried with only two 3″x3″ timbers, eliminate the twist between the two gluing surfaces, and it seem to work with few clamps, but with something like 12 pieces like these, I don’t know if it can be possible.
Also, will the top crack, twist or create some problems? I’m planning to use a lot of oak or beech turnbottoms.
If in future I’ll earn my living from wood, I don’t know how to thanks with you.
Valerio.
Valerio,
You may find that Paul’s ‘Masterclass’ website (Free content as well as (in my opinion) unbelievable value for money paid content) is a better place to ask specific and ‘off topic’ questions.
I have found Paul and his team very good at replying to questions over there.
Blogs “comments” typically follow the common thread of the post only.
Good luck with your work,
Steve
Hello Paul,
On placing planes upright, resting on their soles: by chance I came across a photograph of Henry Studley (of the famous Studley Tool Chest). Next to him, on his left you can see his plane upright. It is in an article by Don Williams on the blog of Lost Art Press.
This is the direct link to the imagefile:
https://lostartpress.files.wordpress.com/2016/12/studley-mtr-profile.jpg
and the accompanying article is here:
https://blog.lostartpress.com/2016/12/07/remarkable-article-sheds-new-light-on-h-o-studley/
I never doubted your ‘myth busting’ explanation, Paul, but I think it is nice to see another craftsman, doing exactly the same thing, one hundred years ago.
Thanks for this blog post, Paul. I found it so well worth it. ?