Working at the Hub of Woodworking
The epicentre of real woodworking
I’ve worked with many hand tool woodworkers through the years either in my own workshops, the workshops of others, my bosses in my early days and so on. I’ve worked with a couple of dozen and more other artisans too. Men and women who worked with their hands in blacksmithing and pottery, spinning, sewing, weaving, basket making, stained glass making and others too. Even though the crafts were very distinct and different, each one of them had two key elements common to the work lives of the artisans; one, the tools they worked with were never much more than an arm’s length away, two, their work revolved around a central hub. For the blacksmith, the forge and the anvil stood a mere yard apart or so from one another with the stump beneath the anvil being the chief sweet spot for working on and from and holding a couple of hammers, some tongues and a hardie cutter. The blacksmith stood triangularly to both anvil and forge in equidistance and the work was heated or hammered interactively throughout the day , but the anvil was the key anchor for the constructive and creative work. With the potter it’s no different. There’s more to being a potter than wheel-throwing. Hand building opens the craft up to a massively diverse range of functional and creative work and here again the workbench or the wheel anchor the worker to a fixed local around which the work rotates day in and day out. Other crafts, not all of them, are pretty much the same.
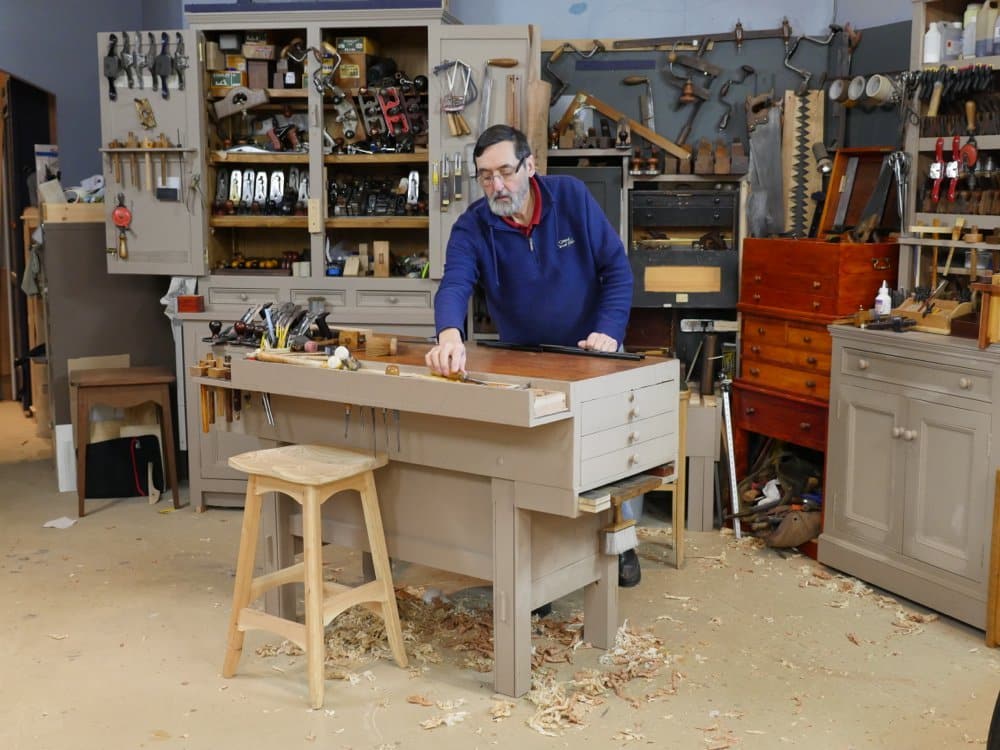
The first bench I worked from was too tall for me. At 15 years old I still would grow two more inches. Today, exactly 50 years on, I’ve stood about 2” taller at between 5’10 1/2” and 5’11 and used the same 37 1/2 – 38” high bench height I worked at when I was 15 (Variation in personal height usually revolve around footwear). That’s probably more than anyone you ever knew because I work a minimum of six days a week, a minimum of 8 hours a day and a minimum of 50 weeks in any given year. My back’s good and so are my neck and legs, knees, ankles, eyesight, hearing and all the bits in between. So I suppose you must find your zone height. I’ve banged on about bench heights enough in the years past. This article is more about living within the zone of your creativity and that means definitive comfort within reach of your work and your tools and your equipment as much as possible.
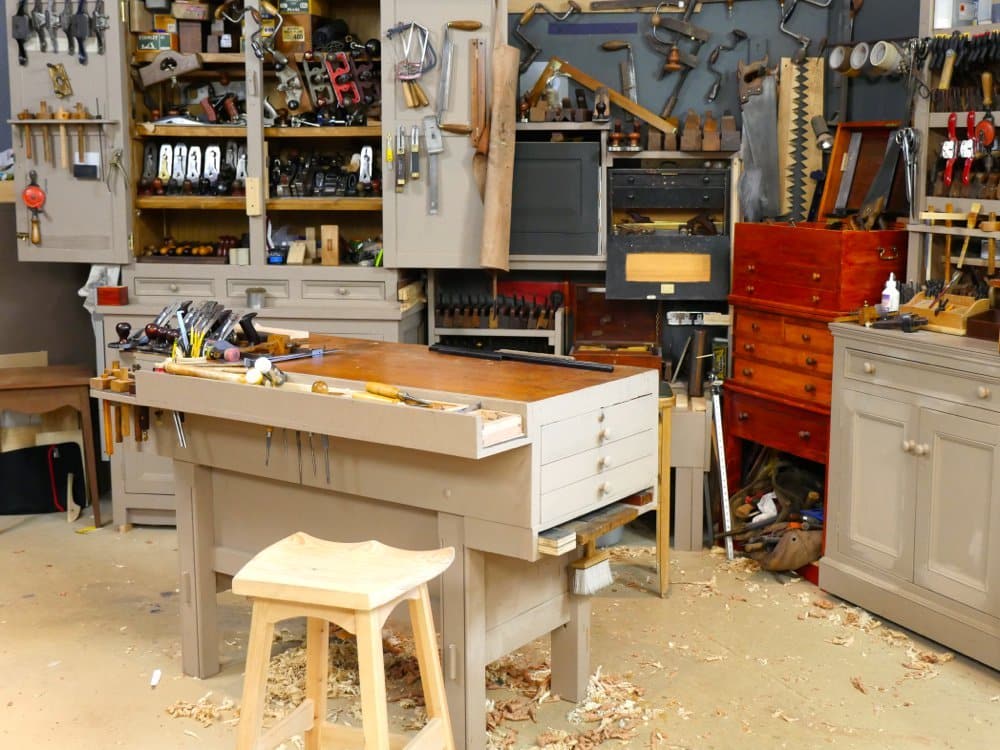
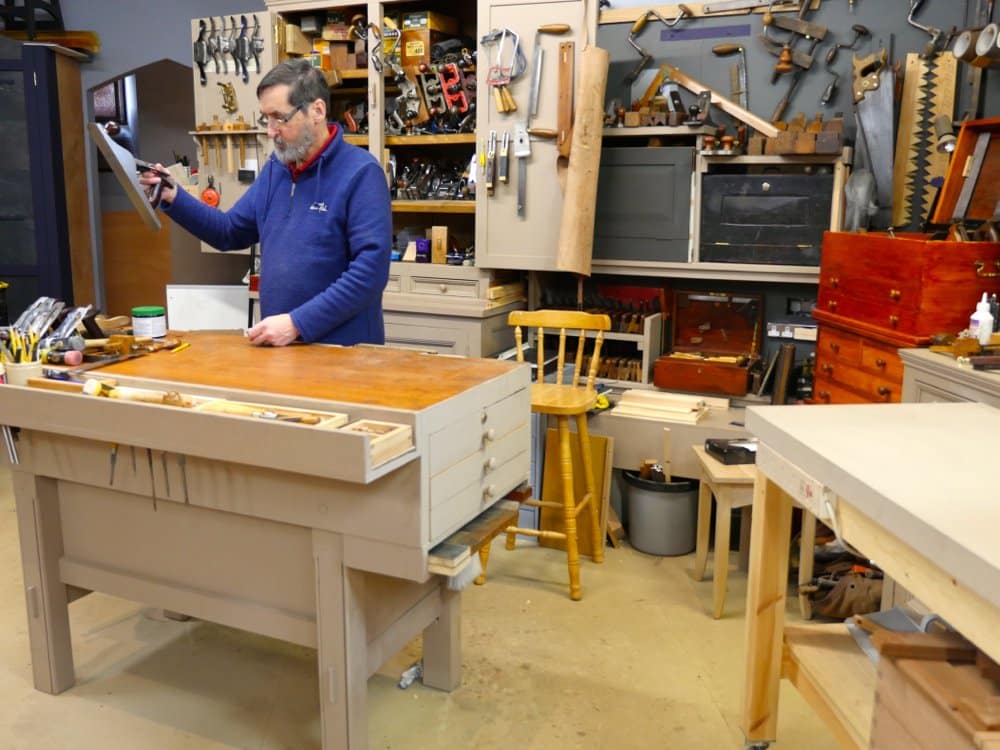
Most of my tools are on or in my workbench to my right because I’m right-hand dominant. Additional tools are in my tool cupboard immediately behind me but offset to my right of my right arm. Other tools are in two tool chests to my left but when I step-spin on my left leg to my left the tools face me and my left hand pulls open the drawers so that my right hand reaches in to retrieve the tool I want. To the right of these tools is a tall cabinet with shelves holding my moulding planes. I sue these frequently enough to want them near.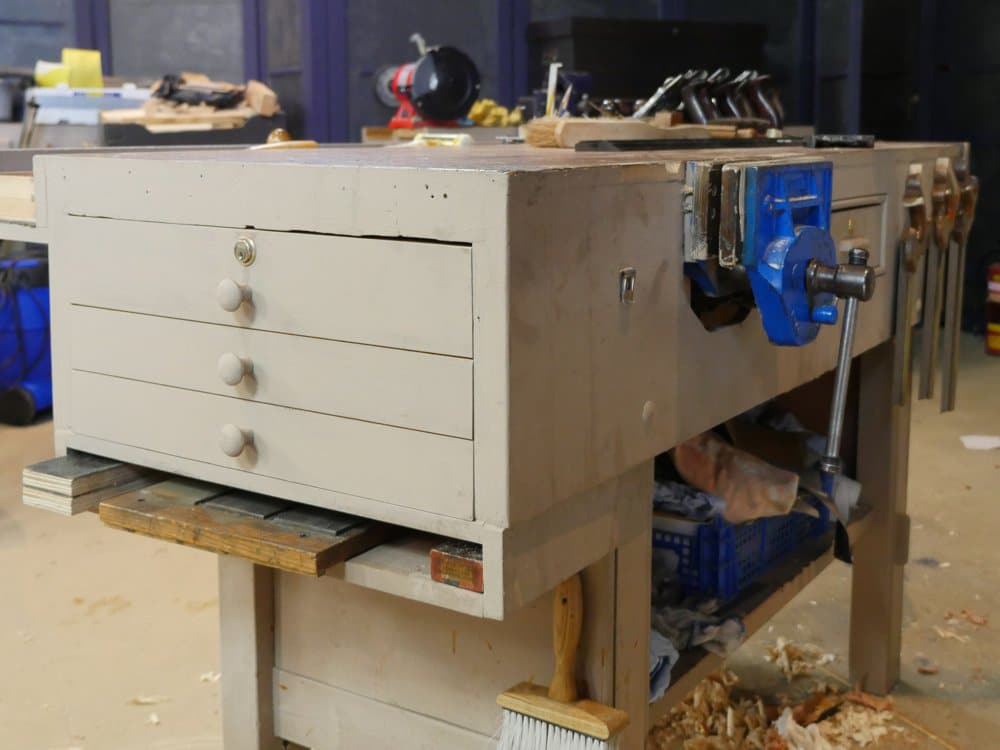

Oh, yes! Just behind me are two joiner’s tool boxes and behind and to my right is my tool cupboard where I keep bulky tools like planes and braces, additional saws and awkward stuff too. Below the cabinet is a supplies cabinet for the nuts and bolts of a woodworkers life. There’s another beneath the moulding planes shelf unit too.
Machinists on the other hand set their work zone up like a mini factory system and generally cannot work from a fixed point because they mostly flit from machine to machine throughout most of their day.
Tomorrow, or soon anyway, I will post a second blog, but please feel free to start asking me questions as soon as you like.

Hi Paul, I really like these sorts of posts. As a relatively new woodworker I am still at that stage of buying up essential tools, creating useful storage spaces and setting up my shop as ergonomically as possible. I ditched my power tools almost immediately after discovering your blog and woodworking masterclasses.
You can sort of get an idea for the size of space that you work in, (condensed for fiming perhaps). I wonder if you could plot out the dimensions of your main working area. Especially the space around your bench for example. My bench is tucked into a corner of my shop but perhaps it would be more functional to draw it further into the room?
Kind regards, Adam.
What hand saws do you use and what power tools, both hand power and stationary power tools? Please let me know.
I only have a bandsaw in my workshop at the castle. I have other machines but use them only to prep class materials each month and never for my furniture making. For instance I have never used a dovetail guide and router for making dovetails. Most of my materials come from the bandsaw.
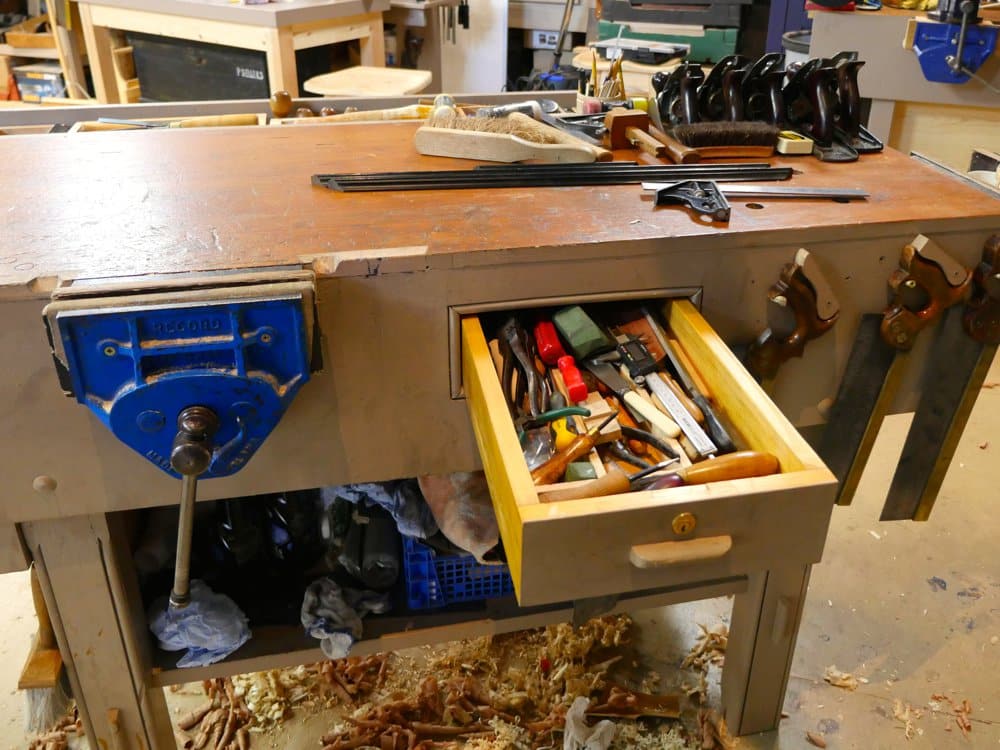
Hi Paul, could you give a bit of guidance for people like me who have built a workbench like yours but want to add a drawer in the apron like you have? I’m mostly thinking about A) cutting the required hole in the apron and B) how you might add the drawer runners. Many thanks, Jon.
I’ll take a look at this and see what I can do.
Hi Paul, due to the weather here in Wyoming and more so to my disability, I have my workshop in a spare bedroom of my house (which at 12×14′ works really well for me). Since I’m a bachelor, this causes no problems; my dog and cat aren’t offended in the least. Anyway, I’d really like to see a set of plans for the cupboard behind your bench where you store your planes, braces, etc. If you have no plans for featuring it as a project series, just your drawings and measurements would be a tremendous help. I really enjoyed today’s entry.
Regards, Gary
Funnily enough one of the guys in class was asking me about workspaces yesterday and we decided that about 14′ long and 7 feet deep was a minimum workspace for comfort. Add into that for cupboards and you move the 7′ to nearer to 9′. I am trying to get to tool cupboards but with my schedule it’s quite difficult. It’s one of those things I need to get done I suppose.
Pul, I have learned a lot from your posts, especially regarding tool sharpening. Would you happen to have a schematic of your shop bench. Those drawers have to be incredibly useful, instead of having to move away from the bench to a more remote tool cabinet.
I am afraid I don’t but I have thought about it and will likely have one one of these days.
Hello Paul, I started to get serious about woodworking about 9 years ago and am becoming more pleased with my progress as a pseudo woodworking “artisan” on a small scale compared to the “real” pros. Much of my progress in hand skills has come from intense study of your DVDs and Youtube videos. Thank you so much for what you have done for me while not even knowing it. You help so many invisible woodworkers and you have said often this is much of what you want to accomplish. Anyway, I digress. I want to say I have a passion for wood as an item of beauty beyond my ability to describe. I want to display it’s beauty in my work as much as possible to the point of almost despising paint. I finished a nice carpenters tool chest recently that I just love but I had great anxiety when I painted over the dovetails but I also wanted to honor tradition. I notice in this blog that you have a lot of stuff painted in your shop, I was surprised by how much paint I saw. I guess I just assumed with your love of wood you too might avoid paint. Have I touched on something you have pondered before? Probably won’t get a chance to meet you but thanks again from afar. An “Invisible Woodworker”
I like both painted wood and the natural look. I find things keep cleaner with finish on and really don’t find all woods nice to look at. I do like painting wood and solid colours for some reason so I have no hesitation to do what others might never do. I think it’s unlikely I would paint over hardwoods such as oak or cherry or walnut so I suppose I tend to paint over some softwoods and not others and never most hardwoods except perhaps say poplar or birch.
Paul, with the addition of the drawers etc., is that the same workbench for which you show the plans and instructions for building in your book?
It’s a different bench, but everything I have done to this bench can be applied to the one in the book.
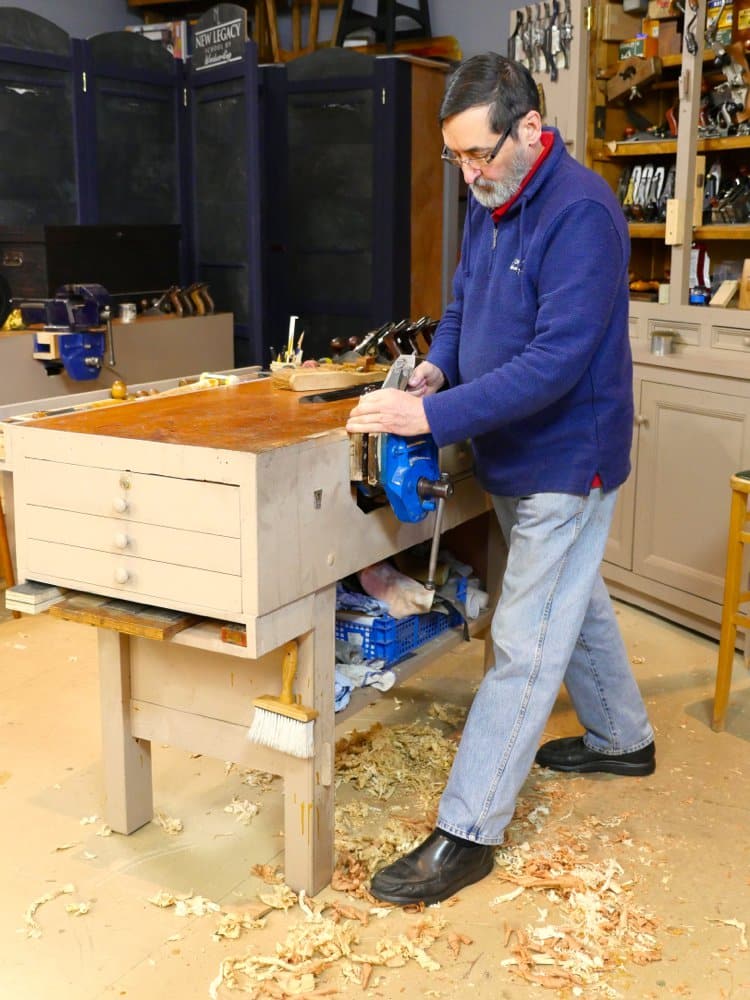
Paul, I am always noticing the absence of bench dogs on your work benches and I do appreciate all of the clever uses of bar clamps (instead) that you have continued to demonstrate in the videos. I was however wondering about your apprentice period. Were your mentors working with dogs and or did you develop your own preferences to use clamps instead to suit your own style of working sans bench dogs?
Joe, I never saw a bench with bench dogs in when I was a boy, but we didn’t have prissy benches either. Two nails in a 1/2″ x 2″ 12″ long stick got nailed to the bench for a stop and if needed a second one with two opposed wedges slid in between, that was only if you had a batch to do. I have yet to find a situation where I would need bench dogs. I do not like holes in my bench top, I do know that. They are just one of those minor irritations. I think for the main part woodworkers undervalue the full use of the bench vise. In the past 20 years I can’t recall a a time when I thought to myself, “I wish I had a bench dog.”
Paul, what is the clip to the left of your face vise?
Jason, I believe I can answer this question for you: If you’ll notice, Paul removes the metal clips from his tape measures. I’ve read this is so he (or a student) won’t have the tape clipped on his belt and scratch or ding a piece of furniture under construction. Then he repurposes the clips at strategic places on his bench where he’ll have a shop rag or “duster” to hand. Hope this helps.
Hello Paul,
Wonderful post and timely too as I’m reorganizing my own shop this weekend. I’ll second the requests for more information about adding drawers to the bench and the cabinets. I have one other question, what do you do with components of the project you are currently working on but aren’t on the bench at the moment ? Say the opposite pieces of a chest while you dovetail one corner or frame and panel assemblies while you build the case they will go into? I’m thinking of building a “staging” table for lack of a better term that can sit behind me and to my right even with the right hand side of my bench to hold the other components of my current project and wondered how you keep things handy but organized and out of the way.
Hi Paul
Have been wondering what’s behind the bench for a year now. Thanks for letting us into your personal work space. This has also finally shown me how you store your saws. Being one year now that I have followed your classes this is one thing I have been curious about. I have a few saws in a box that I found at a antique market that a craftsman used to store his saws in. Cant keep the saw box close to the bench though. Would love to see a little Paul’s Perks video showing how to store saws. I know there has to be many different ways to store them. Some right and some wrong. I like the idea of them close at hand. Hope to see a video in the future with some history lessons too. As you always do! Thanks for being a great teacher and opening my eyes to a new world.
Paul, what vice do you recommend or better yet since I don’t have a lot of money — what vice can I get by with. I was thinking of making a vice with a 3/4″ pipe clamp and piece of pipe. That way I would have quick release (of sorts). Should be able to rig up some sort of way to ‘trip’ the release on the pipe vise. I’ve noticed from the WWMC videos and YouTube videos how much you are in and out of the vice. It might get me by till I can find the “perfect” vice.
Hi Paul, I second the request for a build process on the large cabinet behind your bench, the one with the hand routers hanging on it and planes inside. I love that cabinet, especially the deep-inset mouldings on the shallow drawers in the middle.
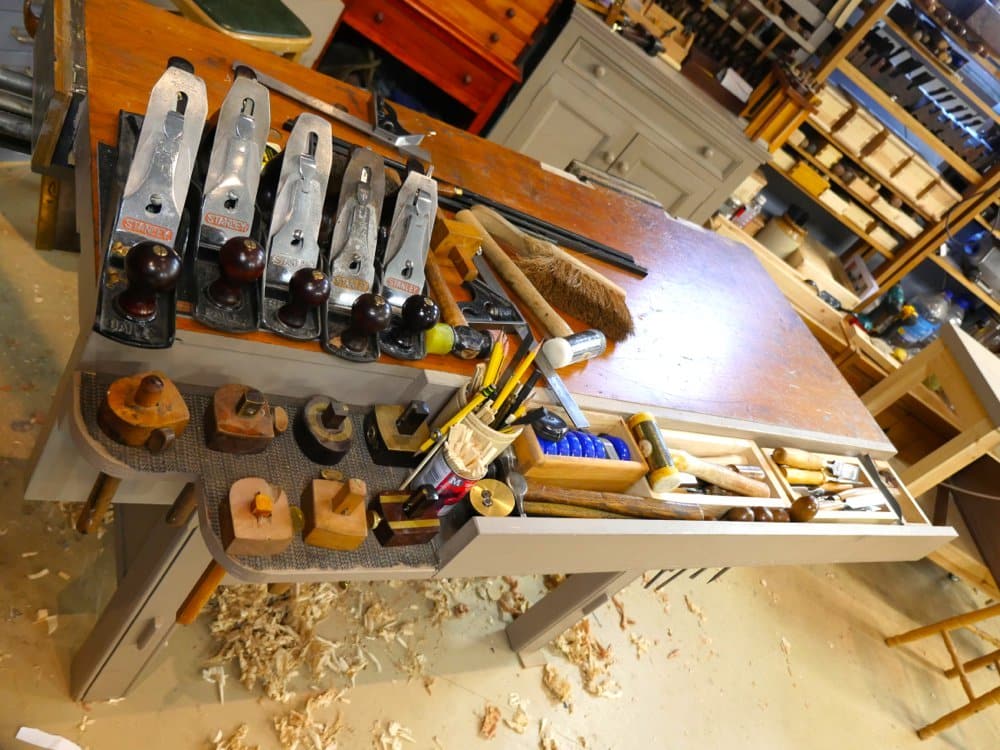
I noticed you have about 6 or so tape measures in your well. I couldn’t help but wonder why? I guess I can see a use for an extra one. Are these for classes, or is there really a benefit for having more?
These tapes cost £1 each, they are dead on accurate, have great rewind mechanisms and the blue ones say these are Paul’s in a classful of students who have other colours. As I wander to the benches and measure something the tape gets left there and I walk away. When I shout, “Where’s my tape measure.” Everyone knows to look for a blue tape. If you read the blog too, there is another account there.
Dear Paul, I see so many gauges at your workshop. At least 8 at your workbench and then some at your tool cupboard. Many of them even look the same on first sight. Do you use most of them or only have so many models available to explain them / their differencens in your courses? I’m just curious because I have a marking gauge and will by a used mortise gauge soon. But since you have so many models at your workbench I’m a little bit confused how many I really need.
After five decades of gravitating to the magnetism of secondhand discoveries it’s inevitable that you find tools for a few pennies from time to time. This gathering of gauges happened in the last ten years and I have many more besides these in the USA. In reality I would suggest you will need more than one gauge of either type on most larger and more complex projects. That way you can leave gauges set to dedicated parts. You don’t need them all at once and so two of each would be practical if you have already got started and decided this craft is for you. I like having four of each for my own use.
When we hold a rocking hair or indeed a chairmaking course for say ten to sixteen people, each student will need at least two mortise gauges usually. Other pieces need marking gauges. Rather than just leave them at the benches and confuse new woodworkers, I keep and use them at my bench.
As a beginner and poor man, my bench is still saw horses and plywood with clamps. I will get there someday. Nice work sir.
very good read. I was actually searching your blog looking for bench dogs. I am so glad for this post because now I don’t want them. If you don’t need them then I don’t either. Thanks again.
Paul I enjoyed the tour of your bench and immediate area, good stuff. As I have mentioned I built your rendition of the 5′ bench last year and it has served me well, even the height. I have customized mine a little bit to hold clamps on one end and added a small tool holder for my saws and tri squares etc.
However I have all ways like your bench set up that you use in your films and want to incorprate some of these to my bench. Thanks for sharing !
Steve
This bench pictured above is more like what I have space for and have been planning to build soon. The legs and height are obviously the same as the one in your book, but the top surface width (or depth) and the tool well are different. What are the dimensions on this one pictured above, and is the “well” just a shelf glued on to the side? Thank you to you and your team for all that you do! Amazing job and very inspirational for woodworkers of all stages!