For more information on spokeshaves, see our beginner site Common Woodworking.
….continuing on from the last blog I wrote.
These spokeshaves are not complicated or difficult to set provided everything is in fairly good shape. Complications come when the tangs are rusted into their sockets which is not at all unusual, or the forepart of the spokeshave is so worn away that there is massive gaping hole above the cutting edge. There are different reasons one not working well and being difficult to set and use. Sometimes the tangs are too loose and won’t hold their position in the holes. This often happens when they have been rusted into the holes and separating the tangs from the spokeshave pulls away rotted or damaged wood. For now we must assume all is well, the wood is good and the tangs are capable of tightening and turning loose.
The four-sided tangs are indeed a friction fit relying on a compression fit as well as the slope of the four sides inside the four-sided hole. Amazingly this works and works well. You would think the compressed walls wood give out eventually and of course sometimes they do, but I have bought enough and used enough to say it’s worth the rick in buying at least one of these as a user. They are wonderful tools and well worth having in your user selection of tools. If on the other hand you want to own something with a more guaranteed outcome for a user and you like the idea of making your own then plum for the Veritas kit. I have run courses in making these and they are indeed all you want from a blade-soled spokeshave. They work the same way as the conventional ones and they are quickly and easily adjusted without any fuss of needing added tools like screwdrivers and allen wrenches to adjust the mechanisms for depth of cut. I have owned three or four of these myself for about a decade or more now and find them about as good as it gets.
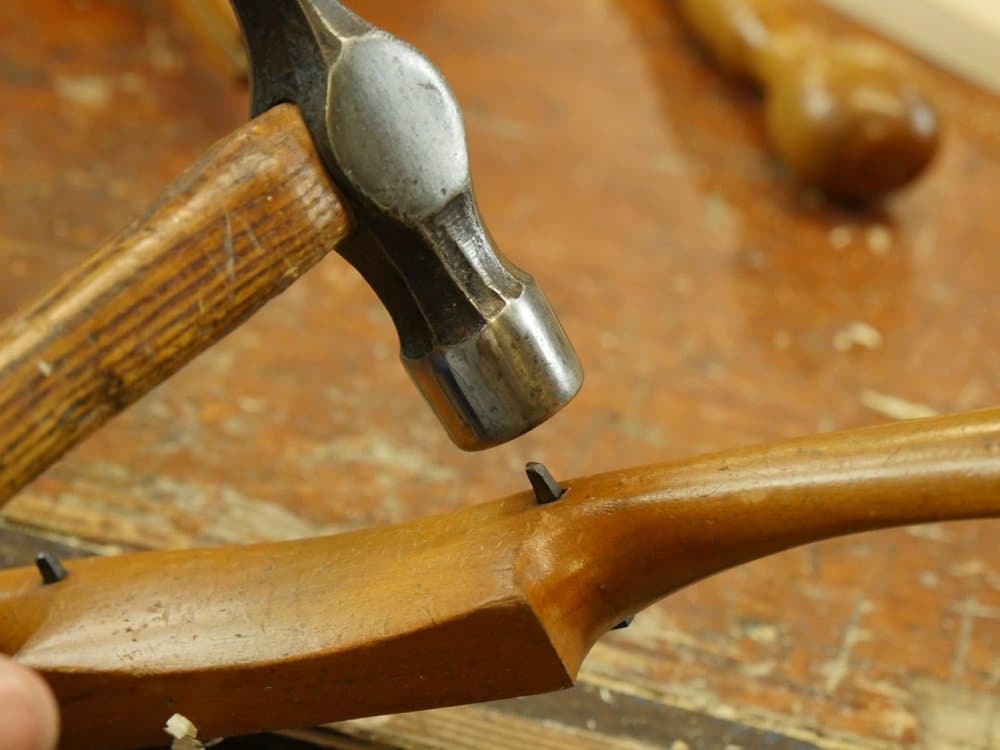
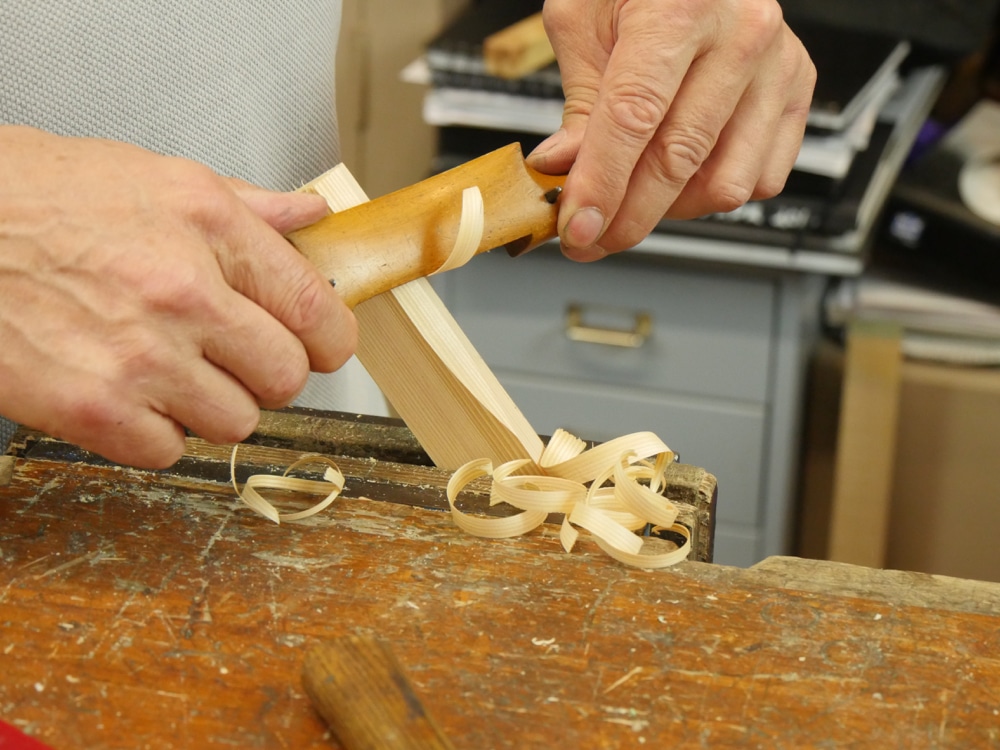
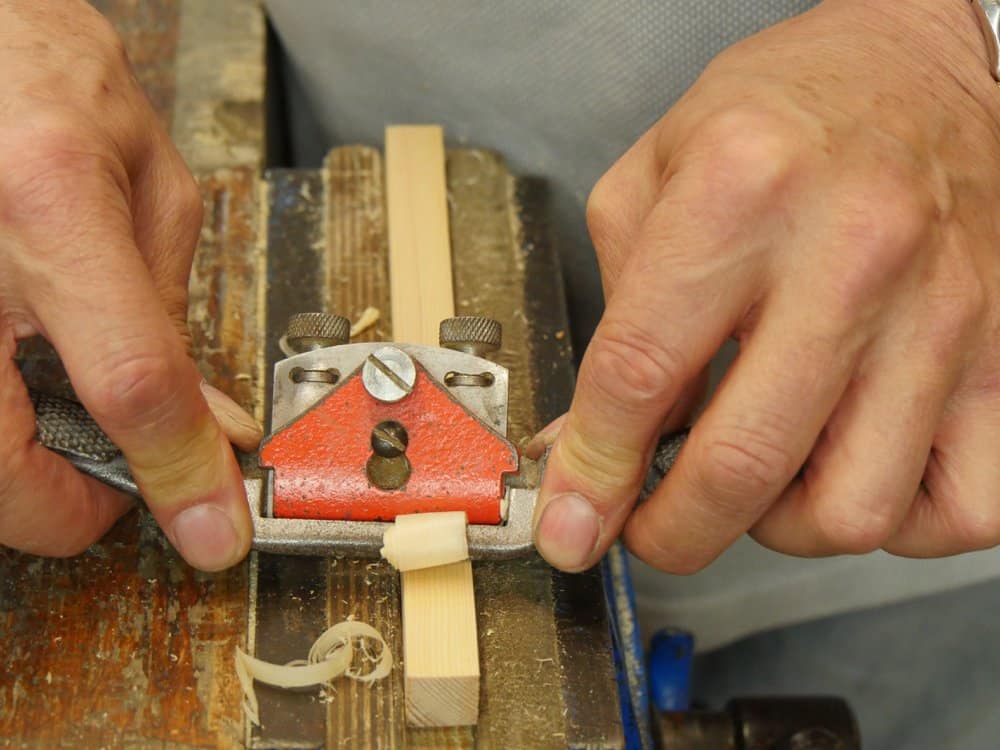
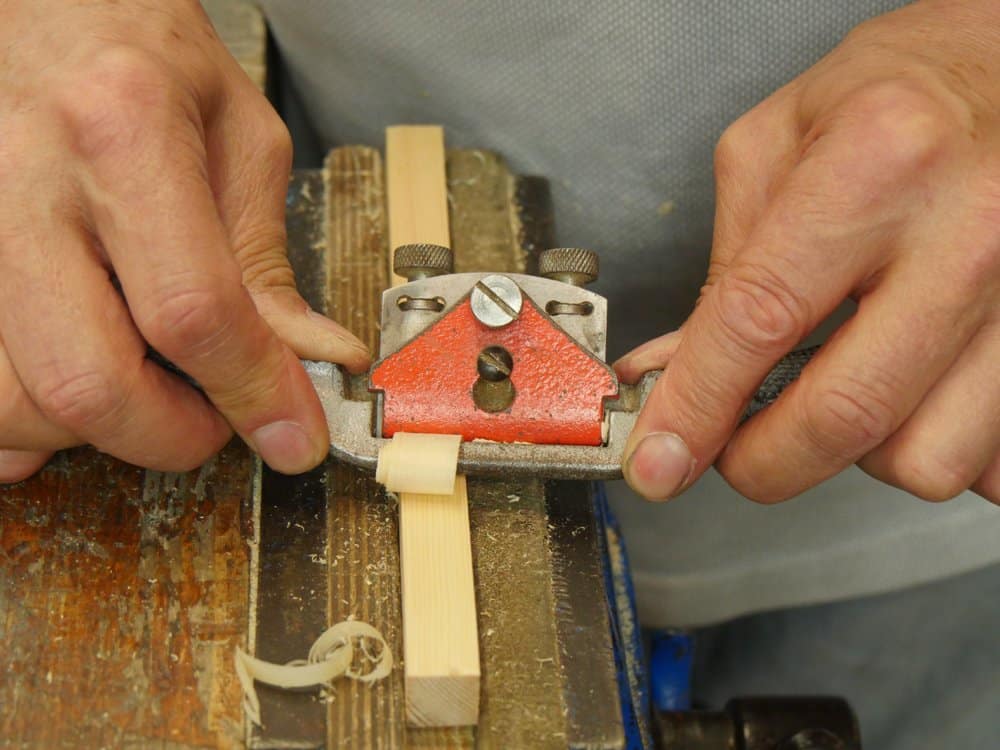
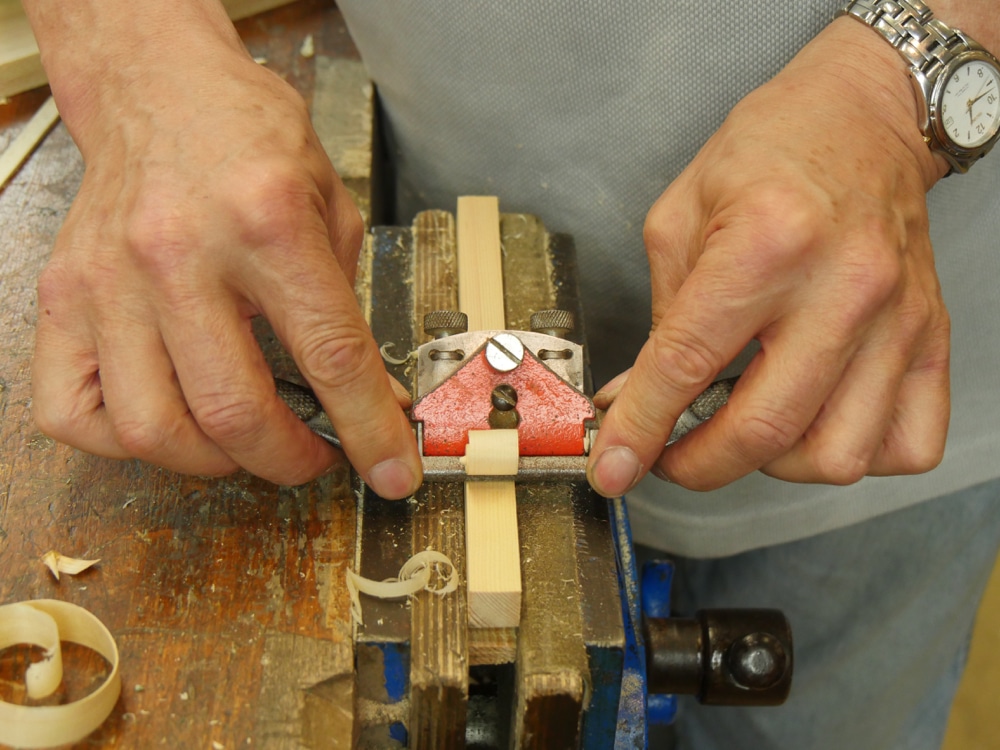
Once your spokeshave is sharpened as per the last blog, tap in the blade until the tangs are fully seated and working equally on each tang side
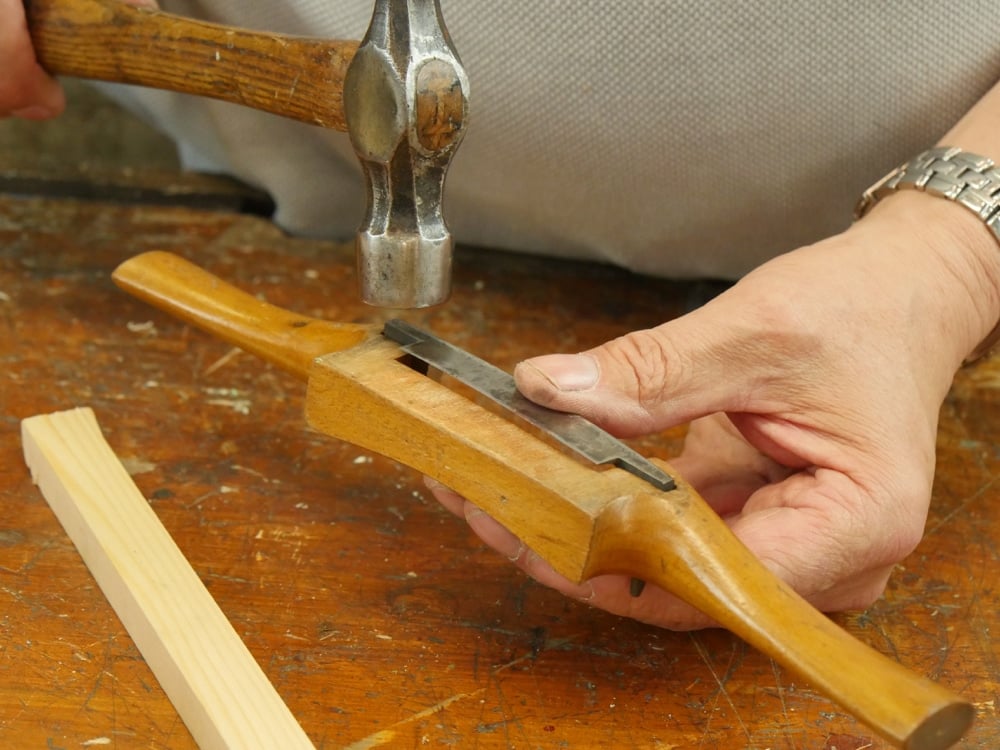
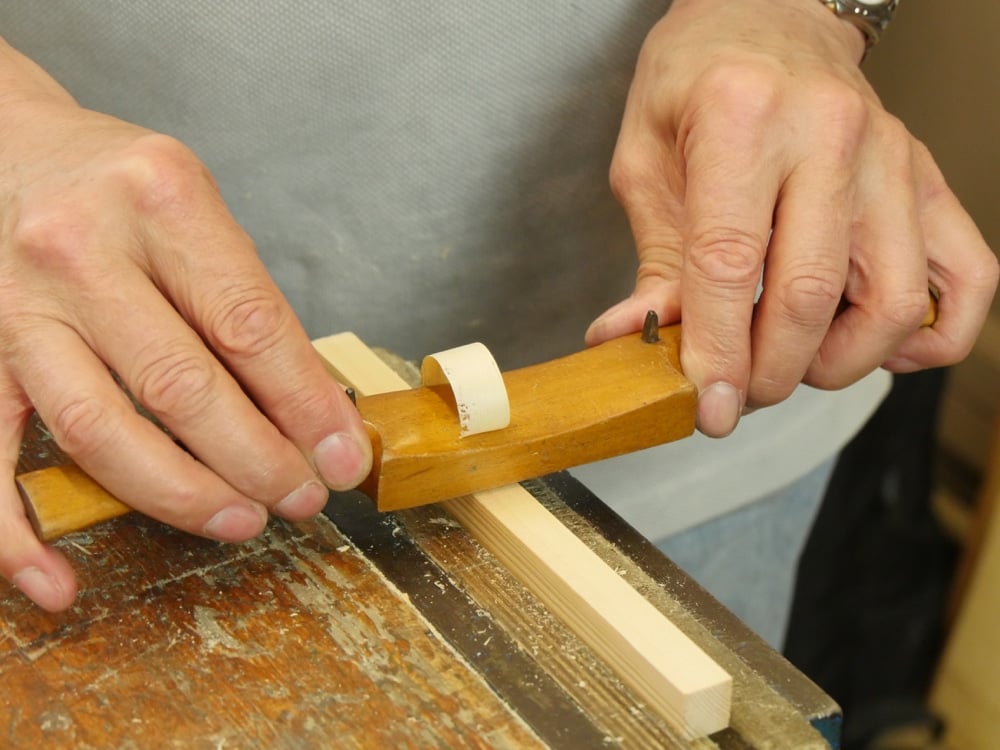
Using a thin strip of wood held in the vise, offer the spokeshave to the wood first offering one side of the spokeshave blade to the wood and then the other. There should not but could be a saving emerge depending on the condition of the spokeshave and other things too. Makers matched their blades to individual spokeshave at the point of installing the blade and making the spokeshave, a lifetime marriage of one part to the other with not intentions of the two interchanging elsewhere ever. Of course we can always make an adjustment of a blade snaps and we find another provided we heat the tangs to bend them and reshape them or make a new spokeshave and install an existing blade fitted for that purpose. Lets assume all is good and no or just a small shaving emerges somewhere. Its at this point you have a decision to make. Depending on the nature of the work you can set the cutting edge parallel as you would any plane, which is what a spokeshave is really, or you can offset one side so that it takes a thicker more aggressive shaving from one side of the throat and a thin or zero shaving from the other side. This gives us an infinitely variable ability to move from left to right to take thick shaving for roughing out and then a refining shaving for finishing.For chair makers this was a standard procedure being as they were mostly making spindles and legs, rungs and so on. It was quick and effective to work economically by hand this way. In fact, we often do this with spokeshaves that have adjusters too because it is so effective.
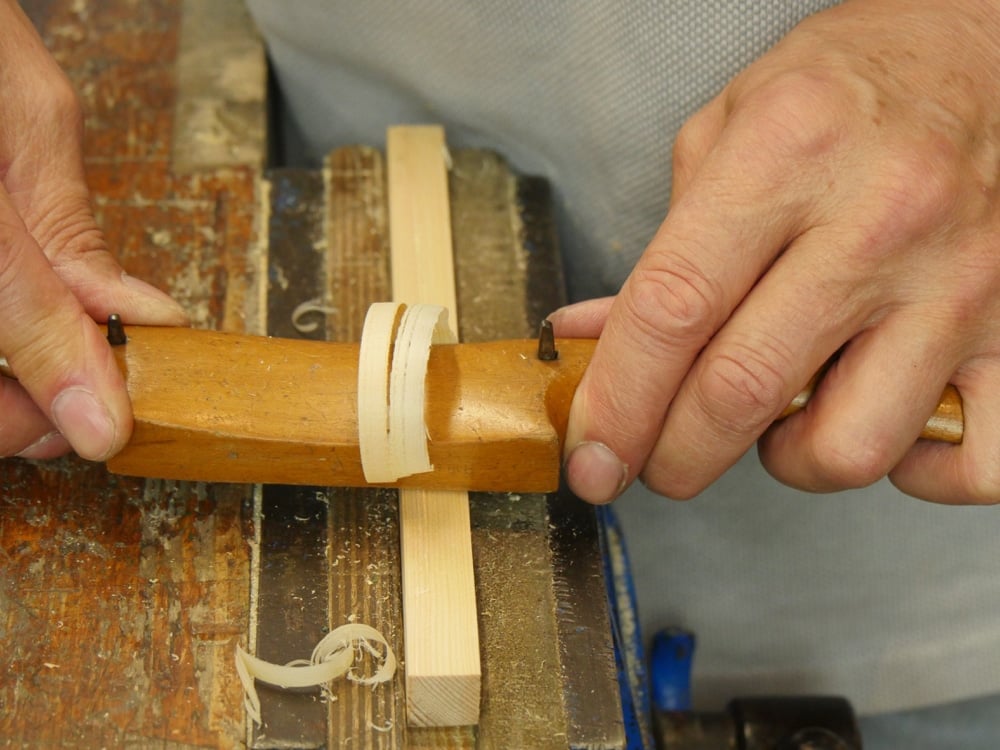
With a zero cut setting or thin shavings coming from the throat it’s now merely a question of tapping the tangs with a steel hammer and testing on the thin strip of wood to test the thickness you want. Tap the tangs with the spokeshave held in front of you lightly. A light tap will give you a thin shaving adjustment. Tap twice for doubling the thickness and so on. If you tap too much and the shaving’s too thick tap the underside of the blade to correct it. The offset idea of the uneven setting os mostly for rounding work, which is why the old chair makers used them that way, but at the bench we use to that way for rounding over work to create roundovers we call bull noses. This happens on say window sills and stair treads and especially where the the stair tread is round at the bottom of the staircase, places like that. We use it for kitchen ware like spoons, spatulas and cutting boards too. For cabinet and furniture work, joinery work and so on, we often want the spokeshave set parallel as we would any plane. This gives us the control we need. Always remember that the work of rustic woodworking commonly known today as green woodworking was just a segment of woodworking carried out in woodland regions by a group of chair part makers known in England as chair bodgers. This was in an era now long past and though a substantial part of the woodworking industry of the period in terms of overall furniture making this played only the smallest part and not the whole, not the predominant user at all. The bodger of course was highly skilled using the lathe and so should be if most of your work is replication of the same or similar components by the thousands from dawn until dusk. These men were hard workers working in a competitive era and the use of the lathe gave them the speed they needed. Ultimately of course mechanical replication won to and gave the companies the control they wanted together with the speed too. The electric machines ultimately rendered them redundant. Turned parts from dry wood and cutter heads that made their parts in seconds with a pristine finish meant hand work was gone. The spokeshave filled in the gap for some work that could not be worked on the lathe however. Crinoline stretchers and bow backs, long thin spindles and so on defied the lathe and had to be cut and shaped with the spokeshave and finished ff with chair devils. Thespokeshave was indeed a fully refined tool used by every segment of the woodworking world of course and these trades included barrel makers and pattern makers, cabinet makers, joiners and carpenters of every type including shipwrights, and two dozen more trades.
So we see that the traditional spokeshave still has a home inour user tools and of course we often adjust the 151’s with their adjusters the same way because of practicalities. I learned this when I was 15 and the men I worked with introduced me to their wooden spokeshaves.
12 Comments
All these years, which have included the last very few I have been following your blog, I have wondered about the fascination amateur woodworkers have had with wood turning. Every machine tool section of box stores, every woodworking specialty store, every catalog — have all got sections filled with expensive, esoteric (to me) machine tools dedicated to turning. (Though some of the hollowing tools look like effective back scratchers.)
And turning what? Chair parts? Legs, spindles, salt grinders, an entire aisle at Woodcraft for turning pens? (I do admit asking a coworker to turn a Bethlehem Olivewood pen — complete with certificate of authenticity — for a very devout young immigrant at my wife’s church. I think he was grateful for me to pick up the cost of materials.)
But, largely, I never got the point of woodturning as a hobby! I’m waiting for the right piece of wood for a carving mallet (or two pieces, if I’m a lucky searcher and willing to joint the tool). I simply have assumed I would use a draw knife and spokeshave.
Your explanation, Paul, suddenly made it clear to me. Wood turning has its place, just as 35 years ago I used a Craftsman electric router to dado, rabbet, and lap joint wooden radiator covers instead of buying hideously expensive sheet metal radiator covers. (My house has passed 100-years-old sometime in the last couple of years.) But, that electric router threw off some very scary sparks when I last took it off the shelf.
Using a poor man’s shavehorse { https://www.youtube.com/watch?v=Tu_UddemHgk } with tools, space and accessories I already have, I don’t have to drop over $1,000US and have anxiety about the color (colour) of the special woodturning smock. Simple, eh?
Any recommendations regarding tattoos?
I turned for about fifteen years as part of my income producing furniture making work and sold everything I ever made, but though I turned I never considered myself a woodturner. I think the main interest starts out because it’s a simple aspect of woodturning that produces a product in minutes and even complex pieces come off the drive spurs and chucks in an hour or so. The outlay is inexpensive too. A small lathe produces a lot of product. Once yo see that three or four turning tools gets the work done and you are on your way.
I do think that it’s a great escape though too. Go out to the shop and make something like a stool can be very therapeutic and this should not be undervalued. I think it often leads to other woodworking too.
Pens have a fascination even though for most it’s simply a matter of turning a square glued to a brass tube to form a long wooden tube. From there it’s a question of assembling the components and here is usually where the affair ends. Once you’ve turned 50 pens then it’s time to sell them and here you enter the competition alongside others doing the same thing. I like turning if it enhances my work and so I look to turning as a minor aspect of my main furniture making and woodworking and not as the whole. Knobs, handles, tool handles and so on are quick and easy to produce on the lathe and although I enjoyed turning bowls for a season, platters too, it never grabbed me as it has others.
Paul,
I picked up a wooden bodied shave for next to nothing. The tangs were badly rusted to the point the rust was flaking off. Of course by the time I removed the rust down to bare metal the tang was too loose in the mortice. I drilled and tapped and put in set screws to hold the tangs tight. Still working years later.
PaulS
Nice one!
Beautiful post. I was wondering if you know much about and what you think of the people who put together furniture with green wood without glue or dowels and such. I have heard of people making rockers using this technique.
I don’t altogether follow trends for stick furniture but there is not much to it. We often use the same techniques using dried materials with the same results. If it is done properly it can be solid but my experience in the USA and here has been less than positive. The issue usually depends on those crafting. In general the projects rely on some parts being dry and others being green and capable of shrinking after holes are bored. The four legs are taken from round or riven stock split green or still green in the round. Holes are bored to receive rounded ends of rails that can be turned or shaved to fit tightly into the hole. These are driven hard home and hold well. The legs also known as posts gradually shrink tightly onto the rails and so lock in place. The important thing here is that the rails are dried down as much as possible. This can be accelerated by drying on trays of heated sand. The most important part for being dry is the end of the rail that fits into the holes, which should not be finally fitted until as dried down as possible.
Very informative as always, I enjoy reading your posts on tools which have fallen out of the public consciousness I think more than any others.
A friend of mine moved into a new house recently and found a wooden spokeshave in his garage, having no use for it he kindly gave it to me. It is in good condition but very worn ahead of the blade; my question is whether this can be repaired effectively or if it would be better to take the blade and make another body.
Thanks,
Matt
Often when they are worn this way they are still functioning and it may well have been used for rounding work rather than flat-across work like shaping arches to square edges and so on. I have worn down spokeshaves myself this way and it’s perfectly natural to do this, especially if worker rougher woods or working corners to rounds. You can cut away the corner using a tenon saw, clean up with a chisel, rebate or shoulder plane and glue in another section and rework the wood to shape as needed and that works well.
Thanks, that give me a good idea of what it is.
Thank you, I will make the repair as you suggest.
Matt
Thank you for these 2 articles. I got a couple of wooden spokeshaves in a box of wooden planes recently, so your timing is perfect! I tried them out and the were a pleasure to use with their light weight and simple design. This will help a lot.
Is there a way to refurbish a tool when the tangs are too loose in the holes in the handle? I am trying to rescue a travisher.
Comments are closed.
Privacy Notice
You must enter certain information to submit the form on this page. We take the handling of personal information seriously and appreciate your trust in us. Our Privacy Policy sets out important information about us and how we use and protect your personal data and it also explains your legal rights in respect of it. Please click here to read it before you provide any information on this form.
Want a roundup of Paul’s latest posts each week? We’ve got you covered.

All these years, which have included the last very few I have been following your blog, I have wondered about the fascination amateur woodworkers have had with wood turning. Every machine tool section of box stores, every woodworking specialty store, every catalog — have all got sections filled with expensive, esoteric (to me) machine tools dedicated to turning. (Though some of the hollowing tools look like effective back scratchers.)
And turning what? Chair parts? Legs, spindles, salt grinders, an entire aisle at Woodcraft for turning pens? (I do admit asking a coworker to turn a Bethlehem Olivewood pen — complete with certificate of authenticity — for a very devout young immigrant at my wife’s church. I think he was grateful for me to pick up the cost of materials.)
But, largely, I never got the point of woodturning as a hobby! I’m waiting for the right piece of wood for a carving mallet (or two pieces, if I’m a lucky searcher and willing to joint the tool). I simply have assumed I would use a draw knife and spokeshave.
Your explanation, Paul, suddenly made it clear to me. Wood turning has its place, just as 35 years ago I used a Craftsman electric router to dado, rabbet, and lap joint wooden radiator covers instead of buying hideously expensive sheet metal radiator covers. (My house has passed 100-years-old sometime in the last couple of years.) But, that electric router threw off some very scary sparks when I last took it off the shelf.
Using a poor man’s shavehorse { https://www.youtube.com/watch?v=Tu_UddemHgk } with tools, space and accessories I already have, I don’t have to drop over $1,000US and have anxiety about the color (colour) of the special woodturning smock. Simple, eh?
Any recommendations regarding tattoos?
I turned for about fifteen years as part of my income producing furniture making work and sold everything I ever made, but though I turned I never considered myself a woodturner. I think the main interest starts out because it’s a simple aspect of woodturning that produces a product in minutes and even complex pieces come off the drive spurs and chucks in an hour or so. The outlay is inexpensive too. A small lathe produces a lot of product. Once yo see that three or four turning tools gets the work done and you are on your way.
I do think that it’s a great escape though too. Go out to the shop and make something like a stool can be very therapeutic and this should not be undervalued. I think it often leads to other woodworking too.
Pens have a fascination even though for most it’s simply a matter of turning a square glued to a brass tube to form a long wooden tube. From there it’s a question of assembling the components and here is usually where the affair ends. Once you’ve turned 50 pens then it’s time to sell them and here you enter the competition alongside others doing the same thing. I like turning if it enhances my work and so I look to turning as a minor aspect of my main furniture making and woodworking and not as the whole. Knobs, handles, tool handles and so on are quick and easy to produce on the lathe and although I enjoyed turning bowls for a season, platters too, it never grabbed me as it has others.
Paul,
I picked up a wooden bodied shave for next to nothing. The tangs were badly rusted to the point the rust was flaking off. Of course by the time I removed the rust down to bare metal the tang was too loose in the mortice. I drilled and tapped and put in set screws to hold the tangs tight. Still working years later.
PaulS
Nice one!
Beautiful post. I was wondering if you know much about and what you think of the people who put together furniture with green wood without glue or dowels and such. I have heard of people making rockers using this technique.
I don’t altogether follow trends for stick furniture but there is not much to it. We often use the same techniques using dried materials with the same results. If it is done properly it can be solid but my experience in the USA and here has been less than positive. The issue usually depends on those crafting. In general the projects rely on some parts being dry and others being green and capable of shrinking after holes are bored. The four legs are taken from round or riven stock split green or still green in the round. Holes are bored to receive rounded ends of rails that can be turned or shaved to fit tightly into the hole. These are driven hard home and hold well. The legs also known as posts gradually shrink tightly onto the rails and so lock in place. The important thing here is that the rails are dried down as much as possible. This can be accelerated by drying on trays of heated sand. The most important part for being dry is the end of the rail that fits into the holes, which should not be finally fitted until as dried down as possible.
Very informative as always, I enjoy reading your posts on tools which have fallen out of the public consciousness I think more than any others.
A friend of mine moved into a new house recently and found a wooden spokeshave in his garage, having no use for it he kindly gave it to me. It is in good condition but very worn ahead of the blade; my question is whether this can be repaired effectively or if it would be better to take the blade and make another body.
Thanks,
Matt
Often when they are worn this way they are still functioning and it may well have been used for rounding work rather than flat-across work like shaping arches to square edges and so on. I have worn down spokeshaves myself this way and it’s perfectly natural to do this, especially if worker rougher woods or working corners to rounds. You can cut away the corner using a tenon saw, clean up with a chisel, rebate or shoulder plane and glue in another section and rework the wood to shape as needed and that works well.
Thanks, that give me a good idea of what it is.
Thank you, I will make the repair as you suggest.
Matt
Thank you for these 2 articles. I got a couple of wooden spokeshaves in a box of wooden planes recently, so your timing is perfect! I tried them out and the were a pleasure to use with their light weight and simple design. This will help a lot.
Is there a way to refurbish a tool when the tangs are too loose in the holes in the handle? I am trying to rescue a travisher.