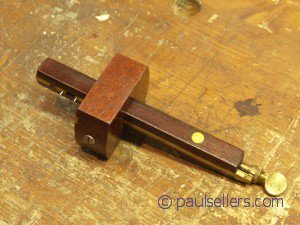
Old combination gauges – Worth repairing?
Paul,
I purchased a few combination gauges using eBay. The pins are severely worn…almost gone. I have asked around and no one knows the proper method for replacing the pins. Most folks I have checked with suggest I just throw the tools out and get new ones. I am interested in your insight.
Thank you, sir.
Answer:
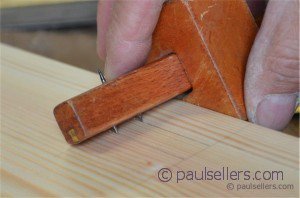
Don’t listen to them. They don’t know anything, obviously. Of course gauges are cheaper now than they have ever been, but the quality is often not as good. Usually you can buy a hand-made top quality gauge from a century past made from old growth rosewood for very little and, yes, often the pins are down to the nubs. The hard part can be to get rid of the old pin because there is nothing to hold onto. In that case you can file or abrade them flush, re-drill a new hole and then install new pins. One pin is fixed , so you must unscrew the retaining screw, withdraw the T bar and drill a new hole. I use 1/16″ piano wire for my pins. You can buy this online or from a modeller’s shop. It is not expensive. Drill a new hole next to the old one. the hole should be fractionally undersized but as close as you can get it to the piano wire diameter without matching it. Cut the pin to the length you want. If you want a conical point, chuck the rod in the electric drill and rotate it onto some abrasive until it is the shape you want. Put the T bar onto something solid and drive it through the T bar to the protruding length you want. This may bulge the sides of the T bar. If it does, just file it straight. Do the same to the sliding T bar and you have a new gauge. It is about 15 minutes work.
As always Paul you have a practical solution to a problem. One thing I have to note though, is for you to make a quick read what you have written to find the typo’s, it makes reading bit easier 😉
A good source for music wire is a hobby shop that sells radio controlled aircraft. R/C aircraft use music wire for lots of things from control linkages to landing gear. I just picked up enough for a lifetime of gauge fixes (9 feet) for $3.50.
I have thought of making myself another gauge (that would make a great video Paul) and I was thinking of using a brad. Would that work?
It depends. If it’s a brad from a nail gun, probably, as many of these are hardened steel, but not a hand driven one, these are too soft and they bend like a noodle.
I normally use the pins from picture hooks, these are usually hardened and are about the same diameter as the original pins.
Please don’t throw the gauges away for want of a new pin
Sorry it should have said picture hook.
I just hate this predicted text function
I did a quick edit for you, Geoff.
My father and his fellow toolmakers of a generation now passing always used steel phonograph needles for marking gauges for sheet metal layout. I inherited his stash but a quick look on the internet shows me that you can readily find them today. They are hard, come with a conical point and are already cut to a convenient length. Mine are .057″ diameter, I suspect that’s pretty standard. They may not fit in an your existing hole but a #54 drill is perfect for a press fit in wood.
NZ Pete, find something better to do with your time.
I suppose you’re right Ben I did start making Paul’s wall clock but sometimes small short projects are fun for me. Another time maybe.
Phonograph needles! Brilliant.
With the resurgence of hobby vinyl collectors and audiophiles there may be a better chance of finding some on the Internet.
As already stated, phonograph needles work great and are readily available and cheap. I think I paid about $5 for 100 on Amazon.
Im really confused on these phonograph needles to work for pins in my marking gauges. Maybe Im thinking of something else. I was thinking like the needles that come as a cartridge type that rides across the top of a Vinyl Album. Is that what your talking about. If so How do you get those to work. Im curious.
The ones I had growing up were very small and fragile I was always breaking mine. .
Most of the pins in my Marking gauges are 3/32″ or 1/16″. I have often wondered what would be a good substitute since most of the older marking gauges Ive bought were even missing are worn down. So the Piano wire is a perfect suggestion. Thanks Again.Paul for Sharing that info..
I will share a cool way to sharpen them without having to remove them from the tool and It works really good and its easy If you would like to hear.
Ok then I’ll tell you anyway.lol
I use the diamond cones that I use on my Chisels on my Mortise and chisel bit sets. I bought mine from Lee Valley and its a set of two one course and one fine. The angle is 60 degrees. I just put them in my drill press and lock the arbor down close to the table just so that I can rotate the pin around the rotating tip of the diamond cone. Just a few times on the course and then the fine cone and walah. A perfect 60 degree sharp point.
And If I really want to get funky, I take some Hard Maple dowels I made on the Lathe. Take the marking gauge and push it in the center of one end, then load it with some diamond paste, 15 micron, Chuck the other end in the drill press and While holding the pin in the hole with the diamond Paste I turn the drill press on and polish it up. Then do the same thing with 4 micron, Neither is necessary but sometimes I get really bored and just half to do something.
By doing it this way I don’t mar up my rosewood Vintage Marking Gauges..
Thanks Paul.
Chris
Thanks Paul, I have a gauge that needs news pins and now I have the answer.
Chris, think older as in Victrolas. Phonograph, not turntable. I checked, $5 for 100, plus a few dollars shipping at Amazon. They are about .050 diameter and 5/8 long with a conical end.
Oh I see now the old old phonograph needles. I see yea there only $4.99 for 100 of them wow thats a lot of marking gauges. Im gona have to get me some of those. Thanks Chris
The phonograph needles of which we speak predate the cartridge type. These are hardened steel and are roughly 1/2″ long and a bit under 1/16″ in diameter. They were for early wind-up machines playing 78’s and were only intended to be used a few times each as a worn needle would damage the fragile shellac record.
How about a broken or worn 1/16″ drill bit?
“If you want a conical point, chuck the rod in the electric drill and rotate it onto some abrasive until it is the shape you want.”
This blog post was worth it just for this tip! So simple, can’t believe I never thought of it. Thanks!
Two pieces of advice for you if I may Pete. Firstly, practice what you preach and secondly, read up on the theories of altruism. Paul being one of the finest examples of the second.
Your two line post bemoaning typos in Paul’s blogs contains three grammatical errors itself.
One being, the word ‘of’ is missing from between ‘read’ and ‘what’ as you have written it. It should have read “make a quick read of what you have written”
The second point and to be grammatically correct you should have written “to proof-read” instead of “to make a quick read of”. It makes reading a bit easier.
Thirdly, typos is a plural and therefore should not contain an apostrophe. I’m surprised that someone so keen to expound their higher education on others should make such basic errors.
Finally, by reading these blogs and watching the videos with a more altruistic input, you might get to appreciate just how busy or hectic Paul’s life is. Apart from a very long six day week, he still makes time for this blog and responds to queries and comments thereof. He writes articles for magazines and responds to queries from them. He receives shed loads of emails worldwide every week that he replies to religiously. Many of these he writes while on the move, on trains or planes or in airport lounges. All this and he still manages to squeeze in a few hours with his family on a Sunday. Yet you still think he should take time proof-read his writings.
When you’ve had an in-depth read up on altruism Pete, you might just become aware of others in the world and refrain from posting such as you have.
As a penance I think you should be made to cheer on the Aussies tomorrow.
My earlier post was directed at NZ Pete and Pete, yes I made at least one bob-boo in it. I missed out the word ‘to’ between ‘time’ and ‘proof-read! My excuse is alzheimers, what’s yours?
I’m just stupid!
I just realized that I responded to your reply Ben and didn’t notice NZ Pete in the forum. Me bad!
Great post with some very good tips. Praise goes out to Paul for sure, I don’t know how he does it but very grateful for his time and sharing of his knowledge and experience.
Steve
With so many altruistic inputs, I have to confess that I had seen a real poor man’s marking gauge made with an allen wrench. The allen wrench is grinded to a point at the bend and directly driven into a piece of wood. Well, the poor man should not be too poor as the allen wrench costs a leg.
Hey guys, let’s try to be polite here, please! We need to protect this lovely place for civil discourse amongst adults, OK? Paul and his team work selflessly to help people all over the world. Let’s all please participate in that same spirit of friendly cooperation and sharing.
Well said, I couldn’t agree more.
Steve
I have a lovely applewood gauge that I do not use because the brass faceplate has worked itself proud of the wooden surface, and I fear it will scratch the reference surface of my wood. I want to seat it deeper so it is flush in the gauge, but I do not know how to pop it out without damaging the gouge, nor the best way to seat the plate in deeper if I get it out. It doesn’t have screws in the plate, or else they were filed flush, removing the heads.
Often they were nailed with brass pins and file flush so you can’t see them afterwards. Often, too, they were glued on, or in if recessed, with animal hide glue. If they are glued they should just pop out. If still firm you can abrade them level again or pop them out and reglue with animal hide glue again.
I’ve used nails successfully after work hardening them a little on a makeshift anvil. I think it was your pinch dog video that gave me the idea.
I have a mortise gauge where one pin is shorter than the other. Would you file these down to level (maybe 2 or 3 mm) and then re-sharpen the point, or would you fit a new pin of the right length?
You don’t really need long pins so 2-3mm still works for a few years more. I have several old one like this and like them just fine.
I find it very difficult to proof read text on a computer screen. Mistakes jump out on a printed version.
John
Is there any advantage to flattening one side of the pin.
I don’t know what the question refers to, John. And I am not sure who is asking you to proof read anything.
Pete all you have to do is write one reply can you begin to guess how many Paul has plus hours of video …….it’s easy to criticise
Your brain should recognize words no matter what the order of the letters so long as the first and last letter are corerect
I have a mortise gauge that no longer tightens enough to set it. Any ideas?
It could be that it originally had a circular plate of steel or brass at the end of the screw that interfaced with the side of the beam to ensure a good look yet distributing pressure over a wider area. You can make one out of thick plastic or metal.
Can anyone suggest a source for the yellow plastic thumbscrews on marking gauges? I inherited a gauge that I really like, but the thumbscrew was cracked inside and has broken off in the hole. I’m sure there will be no problem to get it out of there, but I’ve searched the web for replacements and haven’t found a source. Has anyone?
If you go to ebay you will find them there but often they are more expensive than buying a gauge and using one from there.
Thanks for the quick reply, Paul (and for everything else you are doing!). I’m on the west-coast of Canada, and the only ones I found on e-bay want ~$5 Canadian for the screw, and ~$35 Canadian to ship it to me! At those prices for a tiny piece of plastic, I think you are right – I might have to retire the gauge. Seems such a shame though, got it from my late Dad. Think I’ll try some creative rework on the tool first. All the best to you and yours in this new year.