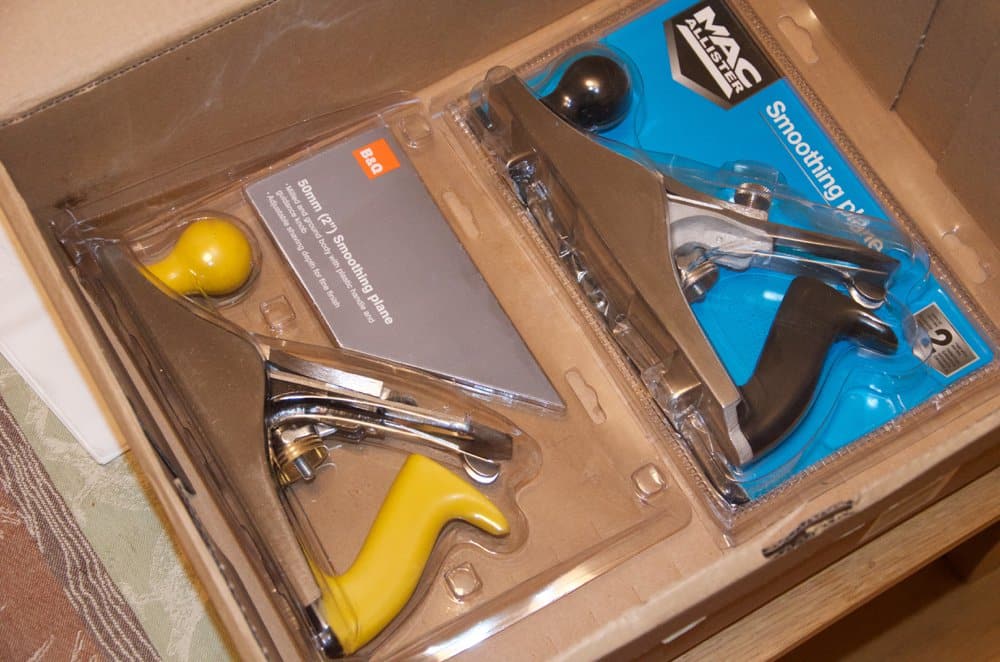
Of course most of the time we might pass them up, but look what would have happened had I passed up the Aldi chisels six years ago. Seemed to me I should give a couple of inexpensive planes a fair try to see how they did and so I bought two from B&Q. The ask was actually to post a video or two on upgrading lower end/grade mass-made planes to see if qualities were issues that compromised functionality compared to say the old Stanley and Record planes and then generally to see just how well the planes functioned. I bought these two by different manufacturers but made specifically for selling through the same outlet to look over and fettle and see what we could do. These two came from B&Q, a DIY home repair and maintenance chain here in the UK and something of the equivalent of the Home Depot in the USA. Not quite the same and somewhat different because we don’t build stick-frame homes with sheetrock walls for outer walls to homes and commercial buildings as is the general method of the USA and others following those patterns as standard.
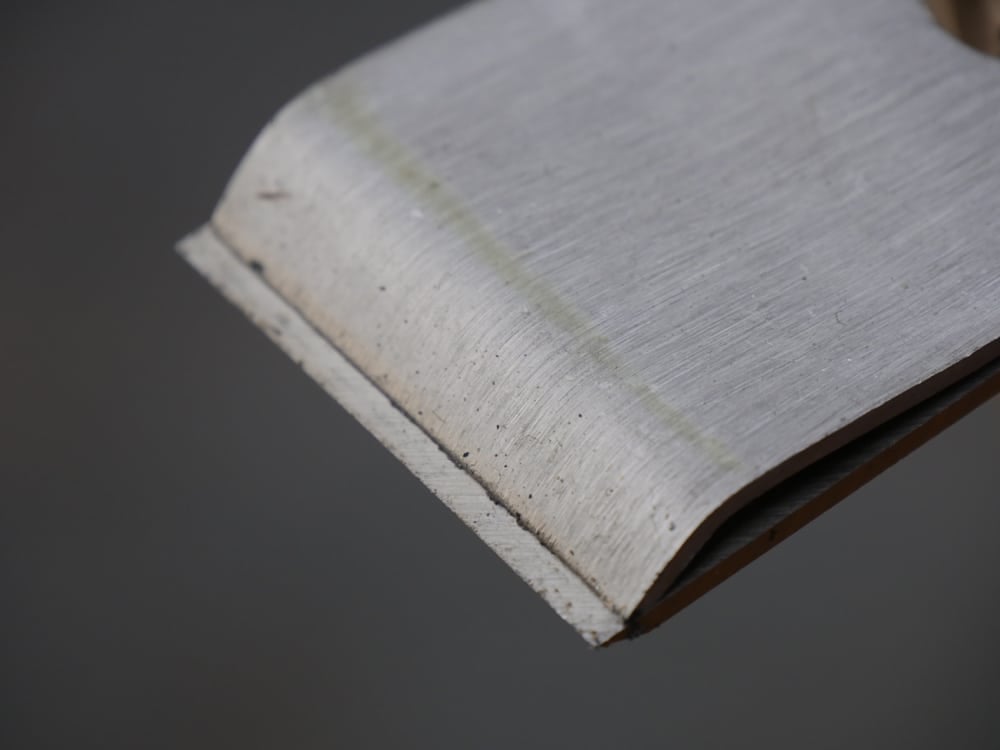
Just to start out I opened the box to see what I had bought. The two planes arrived bubble-packed side by side and cost £10 (yellow handled one) and £20 respectively. If anyone had taken the yellow handled one straight from the box and tried to use it as it arrived it would have gouged the wood and ruined whatever was there. The blade was locked into the body with the centre setscrew cinched way tight, so I suspect set with a screwdriver as no leverage on the lever cam could have got it that tight as it could not be unlocked using the retractive mechanism of the lever cam. So, mixed message here. One, the lever cam is for a quick set and then the setscrew is for locking in place. This very wrong! The second wrong signal is that the blade should protrude through the throat 3mm (1/8″) to cut. Very wrong again! The blade would best be withdrawn into the mouth for aspects of safety as well as to prevent damage to the work in hand, but it couldn’t in this case because the cap iron was set 3mm too far from the cutting edge so that adjuster was maxed out and couldn’t withdraw the cutting iron beyond the threads and the angle of the yoke that sets the depth.
To me, these things seem minor elements of training for the assembly staff in Asia. Three twiddles here, a minor tweak there and little eyeballing and the plane could have actually worked out of the bubble pack. I must admit though, this standard was set by Stanley UK back in the 1960s because that’s how their planes arrived from Sheffield.
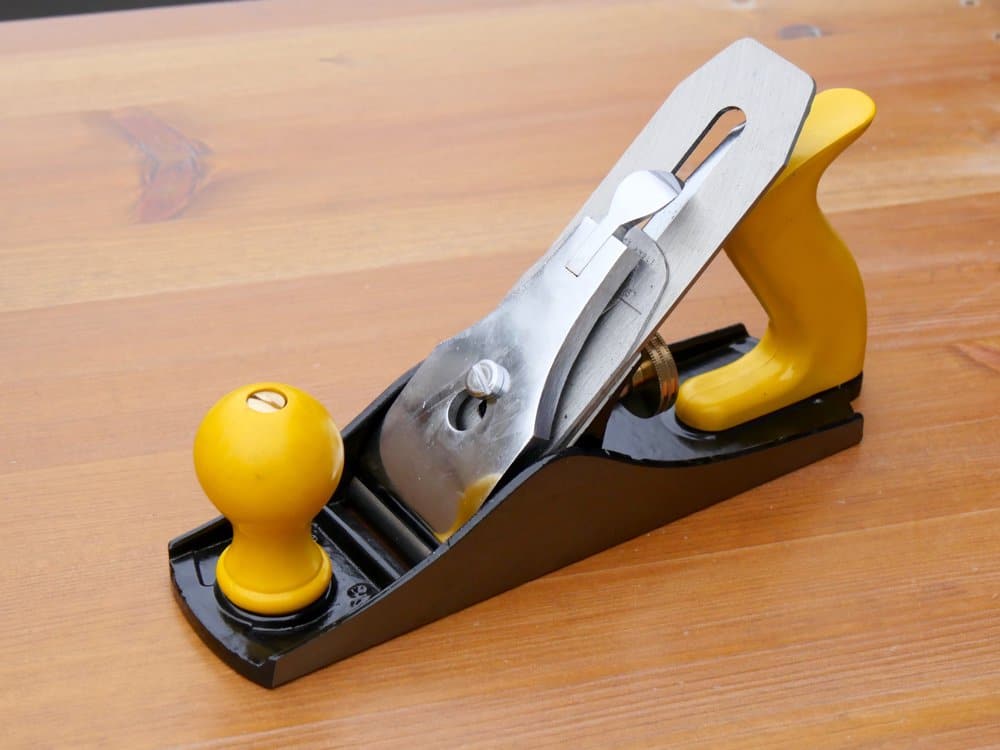
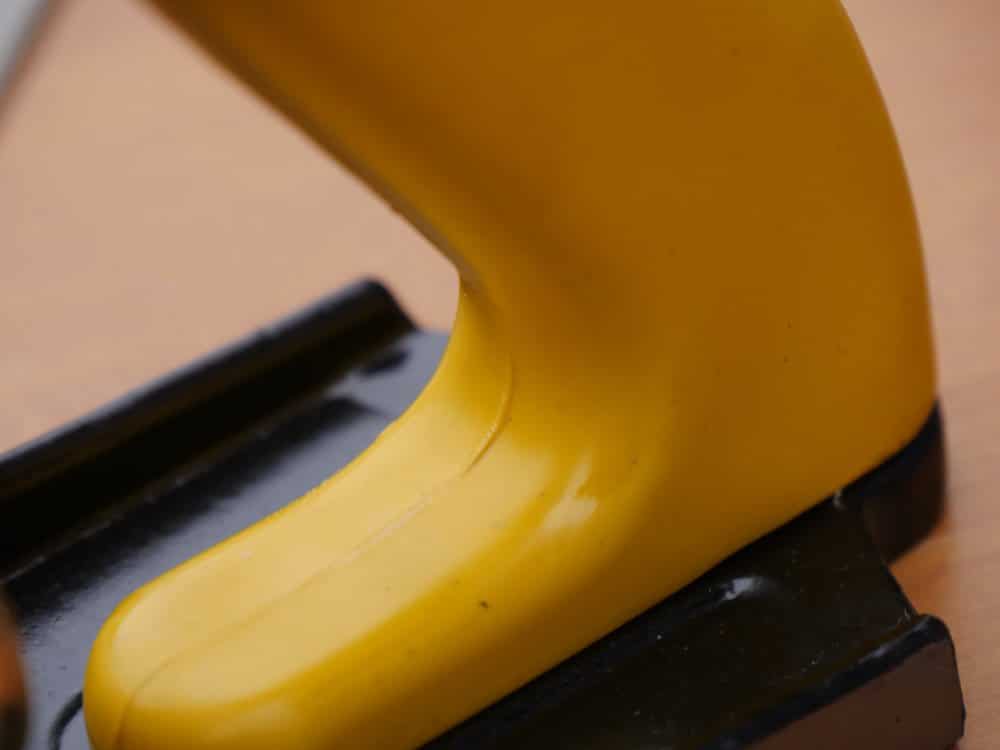
I didn’t too much care for the heavy dip-coat of oil that by the time you catch it has gone everywhere but there was no sign of rust. The yellow nylonny handles felt comfortable to me and funnily enough I can’t always say that for wooden ones. In this case the mould seam left an exaggerated line that will need removal before use or a blister will come as result.
We will film the first plane this week and let you know how we go on. M gut feeling is the plane will work. How well I will let you know. I will say this. It definitely feels better than the Harbor Freight #4 I did the same thing to a few years back. U think that they have changed theirs from the rosewood handles to plastic now. They give you a block plane including in the $14 but that doesn’t even make a door stop never mind work.
More on this plane shortly.
32 Comments
I have a no4 from wickes.it’s a shambles,but a little fettling and now i use it when ever I have to plane hollow doors,hardboard edges and all,very nasty to work.
But I found a better way,on the last of 6doors I had to fit,just knock the bottom and top frame pieces of wood out then just planes the hardboard,then glue the wood back in.I’m a slow learner.
I will say I picked up a cheap modern Stanley block plane when I first started to learn woodworking last year, and it sat around pretty useless for a while. But recently I found out it works wonders at removing paint. I had a few cabinet doors in my apartment that have been painted over by the landlord so many times, they wouldn’t stay shut. So I planed down the white paint on the inner edge, and painted back on a single coat, and now they close quite well. Glad it finally got some use!
I don’t doubt though that it could work well on wood after a proper fettling, at least for some amount of time; but I’m quite partial to the older tools I have, and would far rather use them… I just love the stories they tell me as I hold them.
I bought the number 4 plane set from Harbor Freight for ONE purpose. I needed a scrub plane and after about 3 hours semi-flattening the sole and working over the edges as well as grinding the entire bevel( if you could call it that) off and attempting to flatten the iron, I ground a new 25 degree radius according to Paul’s directions, sharpened it on paper/glass and it worked just fine for that rough work. Not bad for the $14—- I am in love with my Stanley/Bailey’s though. Just feel right in my hand. I need a number 7 Stanley/Bailey jointer to overhaul if anyone has an extra!!!
I might have questioned why you flattened the sole if using it for a scrub plane, Jay?
Well, because now it’s flat of course! 😉 sure we all need the exercise.
At least the planes you found are genuine Bailey pattern, I’ve seen budget offerings with a 151 spokeshave type blade adjustment — prob. quite course adjustment (I can’t imagine they thought of using a fine thread pitch)
SteveWales that would be the stanley 2″ adjustable plane. The 2 adjuster nuts give you a surprisingly fine adjustment. just really tedious to do. Overall though I still prefer a basic #4.
I converted the so-called “#33” bench plane from Harbor Freight to a scrub plane. It’s a bit small, but works great!
I bought an import plane before i got into woodworking because i had a cherry headboard from a bed i replaced and wanted to make into a shelf. It took the glue of with the out of the box settings, it had to (i knew less than nothing about planes). I still have it today, the iron is soft, holds an edge very poorly, the sole is as flat as the bubblewrap it didnt come in and its very heavy, but i found use for the blade as it fits my stanley handyman (my only other 4) I gave it a york pitch and now i change the blades whenever i run into short grain. It kinda works, but im spending increasing amounts of time on ebay to find a real plane so my handyman can get the higher angle.
Looking forward to see what you find out Paul.
I have the yellow one! A quick flatten of the iron and chip breaker and a sharpen, and honestly, it cuts super fine shavings that are translucent. Holds the sharpness fine. I’m currently building your workbench with it, and, whilst I don’t have any reference point, never having used anything else, its doing a great job of flattening and smoothing pine. I leave cap pretty tight, and use a small hammer to tap the adjuster, to get the iron aligned perfectly.
There are a couple serious but fixable issues in this one.
Maybe what I like best about your blog is that you are “fair and balanced”. You give a “fair”, i.e. honest appraisal of various tools and methods. You are not influenced by manufacturers, although many on line woodworking gurus are. You are also “balanced” in that you select high end as well as low end tools to evaluate. Thank you.
Been looking forward to these tests, I think you “should” be able to get some great results from even the cheapest plane, I’ve got a fairly naff wooden block plane with a single Iron that manages to work quite well when its sharpened repeatedly. A plane is “almost” all about the iron, it’s a fancy adjustable jig that holds a cutter and not much else.
The problem comes in a year or two when you’ve replaced the handles, maybe the lever has cracked and been replaced and you realise that you’ve done all this for a sole that’s starting to warp really badly, okay maybe I’m exaggerating, call it 10 years.
Meanwhile I picked up a £15 pre-war millers falls (do people in the U.K. not know how good these planes are!) and I know with certainty that it’s going to be making shavings 10, 20, 50 maybe 100 years from now.
I can indeed back up how great Millers Falls are, at least Pre-war, with Planes. They have some great tools; along with Goodell-Pratt (who have lovely drills, squares, dividers, and a great spokeshave, but alas– no planes) before they merged with Millers Falls in 1932~ or so.
Are they not American planes? If so that probably answers your question about them in the uk.
Millers Falls planes crop up now and again but mostly because they came in with oversees visitors bringing them in or someone from the 60’s buying them and liking them. I know some who have owned these for decades and used them without any issues.
I used to have one Narex no4 and it’s absolutely awful. Miserable iron, bumped sole, curved throat and tote, that makes your hand bloody in a few seconds.
Well, it took about 8 hours to first stroke, but i was pretty close to suicide with this well-made plane. Never again.
C:\Users\Johnny\Pictures\Nikon Transfer 2\189\DSC_0106.JPG
Hi Paul. Those planes remind me somehow of the first plane I ever had in the early 60’s made by Stanley for Sears. I was 14 years old and working on boats. Though I did get it to work after a fashion, It took me almost 10 years before I learned enough about tuning a plane to make it work really well. No internet then, so I had to wait until I worked with an old guy who really knew the tools. I still use that plane and it still works quite well with a newer iron, though my Baileys and Bedrocks were much easier to tune. I can’t seem to get rid of it. Too many good memories of working with it as a youth, and it’s the lightest of the planes I regularly use.
If you do a follow up, can you show how you deal with adjusting the frogs with each tool? It would no doubt really help folks who are on a tight budget. Mine only has a single screw holding it on. Quite strange.
Two points, neither of any importance. First, the planes look but ugly. Second, I can’t state with certaintly, but I believe the cap iron is screwed tight for freighting only, just something I read some where. Cheers Peter
My main question about these and other cheap tools is; are they the “lifetime” tools that the Stanley’s Disstons and Sorby’s of old are? I bought a #4 and #5 Craftsman from the ’60s because they matched a block plane I got when my dad passed. My thought was that they couldn’t be completely worthless and with the right setup and treatment they would be good for learning with. I followed Paul’s instructions on fettling them. (still not sure the exact meaning of that word, but I did it anyway lol) They seem to be temperamental from time to time but that’s probably me, fettling with them too much. Since they are now around fifty years old, I guess you could say that’s close to a lifetime. Not as many lifetime’s as the type 16 Stanley #4 I just purchased but we’ll see.
The question is a little more difficult to answer as most hand planes are perhaps used for a lifetime of half days a week whereas my number 4 and 4 1/2 have both been used every day for 50 years including Saturdays, so six days a week. I have gone through 7 plane irons in that time so that’s about 10″ of steel and of course I never grind them on mechanical grinders so thats a tone of planing. I doubt that there are more than a handful of people with that much planing under their belt today. `when I was young there would have been many, many thousands. So a “lifetime” plane. Not really sure how to answer that beyond my own life but my own lifetime of using mine is a testament to Stanley, but Stanely of old and not any endorsement of Stanley UK today.
Roy,
To a Northern English and particularly a Yorkshireman, To Fettle means — To modify, alter, change or touch up something.
it can also be used to describe the act of throwing-up after drinking too much alcohol!!
Do not confuse Fettling with Furtling though, as Furtling was a (mostly) victorian pass-time and somewhat lewd!
I have 2 new cheap planes. One was a Use Luck No.3 from Jula. I can not recommend it for anyone. First of all the sole was far out, and somehow moved after I flattened it. The plastic handles are solid, but had a 1-2mm step at the mold line, fixed easy enough with a file and sandpaper though. The frog could not be seated because of how the frog adjustment mechanism was made. Removing this mechanism altogether did remedy that though. Now the frog was rocking, fixed that too. The lever on the lever cap had a completely square profile, and was thus impossible to use. This was remedied with a file easily enough.The depth adjustment mechanism uses two stamped pieces of soft steel, so soft that they would just bend out of the adjustment screw in stead of actually adjusting the blade. The lateral adjuster seems to be made of the same soft stuff, barely usable. Same story with the cap iron, it’s rather floppy and raged, not really useful. After hours of trying to make it work as a smoother I had to resign, and turn it in to a scrub. After all of that work it made a great scrub though.
The Other one, a No.4 from Biltema was much better. The cap iron was a little floppy and raged from the chrome plating, and the sole did require some work to get sufficiently flat. The mouth was also a little on the big side. Other than that though it works great.
Paul – I’ve got a similar plane from Homebase that I picked up a few weeks ago to find out just how bad it might be. In this model the handle is screwed to the body through the sole of the plane and with the example I picked off the shelf the screw protrudes from the sole!
I don’t know what it’ll be like once fettled and tuned, but this one will need almost complete reassembly (if it is fixable at all) to prevent it from gouging the wood.
Probably I would always recommend not buying any planer with handle fixing through the sole. Sorry not to be able to advise sooner.
A few years ago, before I knew better, I bought a new Stanley No 6 from Axminster. Cost nearly £100, so should have been much better than the above planes. I spent ages ages fettling it, particularly to flatten the sole which was way out, but I then discovered something which seemed irretrievable. The frog was so far out of square that it was impossible to get the blade to sit flat on it, even with it twisted as far as the adjustment screws would allow. Fortunately, Axminster took it back but I had wasted hours. Can I recommend anyone else buying a plane to look for these irretrievable flaws before they start the laborious task of flattening.
Paul, do you know any way this could be fixed?
When I started woodworking 4 years ago I purchased some planes from the local DIY shop. The brand was MacAllister (anybody living in France will recognise that). Even then I understood there was nothing I could do to fix the plane : the bed the frog rests on was at an angle to the sole. This in effect meant the the sole of the plane was 3mm thicker on one side of the plane. Even with the adjuster maxed out it was not possible to expose the same amount of blade on each side.
This is obviously a quality control issue and will not have affected all planes by that manufacturer. But I wasted an entire day trying to get that beast working.
Luckily for me the shop gave me a refund.
As interesting as it is to read these experiences, isn’t it much better to buy second hand planes/chisels and renovate them. There are so many available from local auctions and junk shops. I prefer to work with old tools many from my Father and hold the handels he held. Stamping your name on a plastic handel is just not the same.
I hear what you are saying and agree to some degree, Geoff. Thanks for your input here. I think the point is that some people lead ultra busy lives, have limited finances, one or both, and want to get woodworking asap. It’s not meant to be an either/or as such and nor is it too limited so this could be a way to just open an otherwise closed door. Also, no matter what you do to this plane, pretty much anyway, you can just take it back to the store if it fails in any way. That said, as I said somewhere, I think I can have this plane working in 15 to 20 minutes. Yes, plastic handles might be a bit naff but then again you are in the zone name stamp or no. This is what I am looking for. You have student on a grant in Wisbech who never had a chance to progress a bent for woodworking and then she/he sees a YT video or searches google and yours truly pops up and says this will work and they are on their way. I am not endorsing cheapo planes or imports per se, just getting some clay on the wheel.
What I like about what Paul is doing here is covering avenues for people who may not have any other choice, or due to logistics, lack of infrastructure, knowledge etc and would like the ‘easiest’ path which may be a big box store for their tools. Personally the small variety of cheap hand tools I have come across in regards to planes have been a waste of time in terms of the sheer effort required to try and get them up to speed. In saying that I did inadvertently purchase an India manufactured knockoff Record no. 4 with a pile of other second hand tools and the iron when fettled has been very good, in my scrub plane. I haven’t actually tried out the rest of the plane as such. Ideally I would hope that the general feedback and reviews will filter back to the manufacturers in one way or another and result in a better result in the compromise between price point and quality. Interested to see how this goes.
Paul, firstly thanks for your contributions! The workbench series inspired me to get started working wood. While I am not “the student on a grant”, I did see a YT video of you making a bench in your garden. I wanted to get started and couldn’t find a vintage plane. I went to Lowes and purchased a Kobalt plane. Got home and read reviews from the “snobs” about it and felt defeated. So much so that I actually went to the wood working store and purchased an expensive new Stanley sweetheart no. 4. Was going to purchase a woodriver no 4, but ended up with the stanley.
I then found your restoring old planes video. That was when I realized that the new Stanley was nothing like the plane you where using. I disassembled the Kobalt plane and found every single part you showed. I decided to try to use this imported bailey “clone”. It had the adjustable frog, a brass adjustment knob, and wood handles. I figured no matter what, I would learn some things about planes and was prepared for it to never work no matter what I did.
I went to Homedepot and purchased the most flat granite tile I could find, a bunch of sandpaper (120 through 2000), a 1×4 piece of (expensive) oak and then from hobby lobby a piece of leather, and from walmart some turtlewax metal polish for a strop.
I put the plane back together, then started the restoration video and followed along with restoring my “New” plane. I started, re-started, and paused many times until I understood what you where trying to get me to do.
The sole was relatively flat right out of the box, almost like yours. I managed to improved on that with several sheets of 60 grit, followed up with several sheets of 120 and then some 220 until the sharpie marker lines were almost gone (re-applying the sharpie marks many times).
I spent a bit of time on the nubs where the frog and the sole meet, mostly sanding until all the paint was removed and I had nice square metal flats for the frog to rest on. While you didn’t spend much time on that, it seemed to me that a flat metal surface was better than than the thickly painted over ones 🙂
I also did a little more work on the cap iron than you showed mainly working on it until I had a nice flat edge on the blade side and a nice bevel on the “spring” side. I got things as square and true as I could. I gave the sole and the blade your filing treatment until they felt smooth in my hands and not so hard edged and rough machined. I cleaned up the mouth til it was nice and square. I then worked the blade (sharpened) as your showed, including starting the rounding the blade edges.
After I assembled and adjusted as close as I could to your video. Or as much person who had never held a plane could. After taking cuts on both sides until I had leveled the blade, I was able to get shavings that according to my dial caliper were .006″.
I re-sharpened the blade before starting on the bench and after reassembling it cut like crap. I guess I got lucky with my first setup, so when it was tearing the wood after the second sharpening, I was able to keep trying until I got it adjusted properly again. I am now learning how to use my tools and know I just have to be patient if I don’t get it right first time.
Trusting your experience and not listening to the other opinions on the net about this junk of plane has resulted in me getting a useful tool. My journey only started about a month ago (the reading, gather supplies, etc) and this work took place last week.
Over the weekend I purchased some 2X4’s for the bench. I have jointed the edges and have completed my first lamination. I have also smoothed the bottom of that lamination using this tool. I will use it until I reach the point that I know I need something better. For now I am trusting you that I can use a bailey style no 4 (which was cast into the sole of this plane behind the front knob).
I have also purchased the aldi chisels, only the harbor freight versions. They are razor sharp now thanks to your sharpening chisels video. I also purchased 10 of the aluminum harbor freight clamps ($10 each on sale), I have since also purchased a starrett 12in combination square and a DMT superfine diamond plate (I will also get the course and fine). These I purchased new from Amazon (with my prime subscription).
Not counting the square and sharpening plate, I have purchased everything else including the lumber and glue for the bench for less than what I spent on that new stanley. Know anyone who may be interested in purchasing a barely used stanley sweetheart no 4, LOL!
Maybe one day I can find a vintage plane at a decent price (i have looked on craigslist, the antique store and on ebay), but for now, I am very happy with my expenditures and believe I can use these tools to learn more about hand woodworking. After all, sharpening and tuning my tools is a skill that has to be acquired just like sawing straight has to be acquired.
Thanks again for sharing your real world expertise and giving me the confidence to start on this path and not simply pouring money into trying to correct for my lack of experience.
PS. I also read part 3 and will be doing your mod to the cap lever during the next sharpening before I start on the 2nd lamination. This information was quite timely for me as adjusting the cap iron screw while trying to get the plane working again following that first re-sharpening was quite fiddly.
Sorry for such a wordy comment, please feel free to remove if you want too…
Yup! That’s a long comment, but I enjoyed it. Thanks for taking the time to log your comments on the Kobalt. I often looked at them when I lived there but never had need of one. I am sure Lowes went into it when they decided to go with their own line under the Kobalt name.
Comments are closed.
Privacy Notice
You must enter certain information to submit the form on this page. We take the handling of personal information seriously and appreciate your trust in us. Our Privacy Policy sets out important information about us and how we use and protect your personal data and it also explains your legal rights in respect of it. Please click here to read it before you provide any information on this form.
Want a roundup of Paul’s latest posts each week? We’ve got you covered.
I have a no4 from wickes.it’s a shambles,but a little fettling and now i use it when ever I have to plane hollow doors,hardboard edges and all,very nasty to work.
But I found a better way,on the last of 6doors I had to fit,just knock the bottom and top frame pieces of wood out then just planes the hardboard,then glue the wood back in.I’m a slow learner.
I will say I picked up a cheap modern Stanley block plane when I first started to learn woodworking last year, and it sat around pretty useless for a while. But recently I found out it works wonders at removing paint. I had a few cabinet doors in my apartment that have been painted over by the landlord so many times, they wouldn’t stay shut. So I planed down the white paint on the inner edge, and painted back on a single coat, and now they close quite well. Glad it finally got some use!
I don’t doubt though that it could work well on wood after a proper fettling, at least for some amount of time; but I’m quite partial to the older tools I have, and would far rather use them… I just love the stories they tell me as I hold them.
I bought the number 4 plane set from Harbor Freight for ONE purpose. I needed a scrub plane and after about 3 hours semi-flattening the sole and working over the edges as well as grinding the entire bevel( if you could call it that) off and attempting to flatten the iron, I ground a new 25 degree radius according to Paul’s directions, sharpened it on paper/glass and it worked just fine for that rough work. Not bad for the $14—- I am in love with my Stanley/Bailey’s though. Just feel right in my hand. I need a number 7 Stanley/Bailey jointer to overhaul if anyone has an extra!!!
I might have questioned why you flattened the sole if using it for a scrub plane, Jay?
Well, because now it’s flat of course! 😉 sure we all need the exercise.
At least the planes you found are genuine Bailey pattern, I’ve seen budget offerings with a 151 spokeshave type blade adjustment — prob. quite course adjustment (I can’t imagine they thought of using a fine thread pitch)
SteveWales that would be the stanley 2″ adjustable plane. The 2 adjuster nuts give you a surprisingly fine adjustment. just really tedious to do. Overall though I still prefer a basic #4.
I converted the so-called “#33” bench plane from Harbor Freight to a scrub plane. It’s a bit small, but works great!
I bought an import plane before i got into woodworking because i had a cherry headboard from a bed i replaced and wanted to make into a shelf. It took the glue of with the out of the box settings, it had to (i knew less than nothing about planes). I still have it today, the iron is soft, holds an edge very poorly, the sole is as flat as the bubblewrap it didnt come in and its very heavy, but i found use for the blade as it fits my stanley handyman (my only other 4) I gave it a york pitch and now i change the blades whenever i run into short grain. It kinda works, but im spending increasing amounts of time on ebay to find a real plane so my handyman can get the higher angle.
Looking forward to see what you find out Paul.
I have the yellow one! A quick flatten of the iron and chip breaker and a sharpen, and honestly, it cuts super fine shavings that are translucent. Holds the sharpness fine. I’m currently building your workbench with it, and, whilst I don’t have any reference point, never having used anything else, its doing a great job of flattening and smoothing pine. I leave cap pretty tight, and use a small hammer to tap the adjuster, to get the iron aligned perfectly.
There are a couple serious but fixable issues in this one.
Maybe what I like best about your blog is that you are “fair and balanced”. You give a “fair”, i.e. honest appraisal of various tools and methods. You are not influenced by manufacturers, although many on line woodworking gurus are. You are also “balanced” in that you select high end as well as low end tools to evaluate. Thank you.
Been looking forward to these tests, I think you “should” be able to get some great results from even the cheapest plane, I’ve got a fairly naff wooden block plane with a single Iron that manages to work quite well when its sharpened repeatedly. A plane is “almost” all about the iron, it’s a fancy adjustable jig that holds a cutter and not much else.
The problem comes in a year or two when you’ve replaced the handles, maybe the lever has cracked and been replaced and you realise that you’ve done all this for a sole that’s starting to warp really badly, okay maybe I’m exaggerating, call it 10 years.
Meanwhile I picked up a £15 pre-war millers falls (do people in the U.K. not know how good these planes are!) and I know with certainty that it’s going to be making shavings 10, 20, 50 maybe 100 years from now.
I can indeed back up how great Millers Falls are, at least Pre-war, with Planes. They have some great tools; along with Goodell-Pratt (who have lovely drills, squares, dividers, and a great spokeshave, but alas– no planes) before they merged with Millers Falls in 1932~ or so.
Are they not American planes? If so that probably answers your question about them in the uk.
Millers Falls planes crop up now and again but mostly because they came in with oversees visitors bringing them in or someone from the 60’s buying them and liking them. I know some who have owned these for decades and used them without any issues.
I used to have one Narex no4 and it’s absolutely awful. Miserable iron, bumped sole, curved throat and tote, that makes your hand bloody in a few seconds.
Well, it took about 8 hours to first stroke, but i was pretty close to suicide with this well-made plane. Never again.
C:\Users\Johnny\Pictures\Nikon Transfer 2\189\DSC_0106.JPG
Hi Paul. Those planes remind me somehow of the first plane I ever had in the early 60’s made by Stanley for Sears. I was 14 years old and working on boats. Though I did get it to work after a fashion, It took me almost 10 years before I learned enough about tuning a plane to make it work really well. No internet then, so I had to wait until I worked with an old guy who really knew the tools. I still use that plane and it still works quite well with a newer iron, though my Baileys and Bedrocks were much easier to tune. I can’t seem to get rid of it. Too many good memories of working with it as a youth, and it’s the lightest of the planes I regularly use.
If you do a follow up, can you show how you deal with adjusting the frogs with each tool? It would no doubt really help folks who are on a tight budget. Mine only has a single screw holding it on. Quite strange.
Two points, neither of any importance. First, the planes look but ugly. Second, I can’t state with certaintly, but I believe the cap iron is screwed tight for freighting only, just something I read some where. Cheers Peter
My main question about these and other cheap tools is; are they the “lifetime” tools that the Stanley’s Disstons and Sorby’s of old are? I bought a #4 and #5 Craftsman from the ’60s because they matched a block plane I got when my dad passed. My thought was that they couldn’t be completely worthless and with the right setup and treatment they would be good for learning with. I followed Paul’s instructions on fettling them. (still not sure the exact meaning of that word, but I did it anyway lol) They seem to be temperamental from time to time but that’s probably me, fettling with them too much. Since they are now around fifty years old, I guess you could say that’s close to a lifetime. Not as many lifetime’s as the type 16 Stanley #4 I just purchased but we’ll see.
The question is a little more difficult to answer as most hand planes are perhaps used for a lifetime of half days a week whereas my number 4 and 4 1/2 have both been used every day for 50 years including Saturdays, so six days a week. I have gone through 7 plane irons in that time so that’s about 10″ of steel and of course I never grind them on mechanical grinders so thats a tone of planing. I doubt that there are more than a handful of people with that much planing under their belt today. `when I was young there would have been many, many thousands. So a “lifetime” plane. Not really sure how to answer that beyond my own life but my own lifetime of using mine is a testament to Stanley, but Stanely of old and not any endorsement of Stanley UK today.
Roy,
To a Northern English and particularly a Yorkshireman, To Fettle means — To modify, alter, change or touch up something.
it can also be used to describe the act of throwing-up after drinking too much alcohol!!
Do not confuse Fettling with Furtling though, as Furtling was a (mostly) victorian pass-time and somewhat lewd!
I have 2 new cheap planes. One was a Use Luck No.3 from Jula. I can not recommend it for anyone. First of all the sole was far out, and somehow moved after I flattened it. The plastic handles are solid, but had a 1-2mm step at the mold line, fixed easy enough with a file and sandpaper though. The frog could not be seated because of how the frog adjustment mechanism was made. Removing this mechanism altogether did remedy that though. Now the frog was rocking, fixed that too. The lever on the lever cap had a completely square profile, and was thus impossible to use. This was remedied with a file easily enough.The depth adjustment mechanism uses two stamped pieces of soft steel, so soft that they would just bend out of the adjustment screw in stead of actually adjusting the blade. The lateral adjuster seems to be made of the same soft stuff, barely usable. Same story with the cap iron, it’s rather floppy and raged, not really useful. After hours of trying to make it work as a smoother I had to resign, and turn it in to a scrub. After all of that work it made a great scrub though.
The Other one, a No.4 from Biltema was much better. The cap iron was a little floppy and raged from the chrome plating, and the sole did require some work to get sufficiently flat. The mouth was also a little on the big side. Other than that though it works great.
Paul – I’ve got a similar plane from Homebase that I picked up a few weeks ago to find out just how bad it might be. In this model the handle is screwed to the body through the sole of the plane and with the example I picked off the shelf the screw protrudes from the sole!
I don’t know what it’ll be like once fettled and tuned, but this one will need almost complete reassembly (if it is fixable at all) to prevent it from gouging the wood.
Probably I would always recommend not buying any planer with handle fixing through the sole. Sorry not to be able to advise sooner.
A few years ago, before I knew better, I bought a new Stanley No 6 from Axminster. Cost nearly £100, so should have been much better than the above planes. I spent ages ages fettling it, particularly to flatten the sole which was way out, but I then discovered something which seemed irretrievable. The frog was so far out of square that it was impossible to get the blade to sit flat on it, even with it twisted as far as the adjustment screws would allow. Fortunately, Axminster took it back but I had wasted hours. Can I recommend anyone else buying a plane to look for these irretrievable flaws before they start the laborious task of flattening.
Paul, do you know any way this could be fixed?
When I started woodworking 4 years ago I purchased some planes from the local DIY shop. The brand was MacAllister (anybody living in France will recognise that). Even then I understood there was nothing I could do to fix the plane : the bed the frog rests on was at an angle to the sole. This in effect meant the the sole of the plane was 3mm thicker on one side of the plane. Even with the adjuster maxed out it was not possible to expose the same amount of blade on each side.
This is obviously a quality control issue and will not have affected all planes by that manufacturer. But I wasted an entire day trying to get that beast working.
Luckily for me the shop gave me a refund.
As interesting as it is to read these experiences, isn’t it much better to buy second hand planes/chisels and renovate them. There are so many available from local auctions and junk shops. I prefer to work with old tools many from my Father and hold the handels he held. Stamping your name on a plastic handel is just not the same.
I hear what you are saying and agree to some degree, Geoff. Thanks for your input here. I think the point is that some people lead ultra busy lives, have limited finances, one or both, and want to get woodworking asap. It’s not meant to be an either/or as such and nor is it too limited so this could be a way to just open an otherwise closed door. Also, no matter what you do to this plane, pretty much anyway, you can just take it back to the store if it fails in any way. That said, as I said somewhere, I think I can have this plane working in 15 to 20 minutes. Yes, plastic handles might be a bit naff but then again you are in the zone name stamp or no. This is what I am looking for. You have student on a grant in Wisbech who never had a chance to progress a bent for woodworking and then she/he sees a YT video or searches google and yours truly pops up and says this will work and they are on their way. I am not endorsing cheapo planes or imports per se, just getting some clay on the wheel.
What I like about what Paul is doing here is covering avenues for people who may not have any other choice, or due to logistics, lack of infrastructure, knowledge etc and would like the ‘easiest’ path which may be a big box store for their tools. Personally the small variety of cheap hand tools I have come across in regards to planes have been a waste of time in terms of the sheer effort required to try and get them up to speed. In saying that I did inadvertently purchase an India manufactured knockoff Record no. 4 with a pile of other second hand tools and the iron when fettled has been very good, in my scrub plane. I haven’t actually tried out the rest of the plane as such. Ideally I would hope that the general feedback and reviews will filter back to the manufacturers in one way or another and result in a better result in the compromise between price point and quality. Interested to see how this goes.
Paul, firstly thanks for your contributions! The workbench series inspired me to get started working wood. While I am not “the student on a grant”, I did see a YT video of you making a bench in your garden. I wanted to get started and couldn’t find a vintage plane. I went to Lowes and purchased a Kobalt plane. Got home and read reviews from the “snobs” about it and felt defeated. So much so that I actually went to the wood working store and purchased an expensive new Stanley sweetheart no. 4. Was going to purchase a woodriver no 4, but ended up with the stanley.
I then found your restoring old planes video. That was when I realized that the new Stanley was nothing like the plane you where using. I disassembled the Kobalt plane and found every single part you showed. I decided to try to use this imported bailey “clone”. It had the adjustable frog, a brass adjustment knob, and wood handles. I figured no matter what, I would learn some things about planes and was prepared for it to never work no matter what I did.
I went to Homedepot and purchased the most flat granite tile I could find, a bunch of sandpaper (120 through 2000), a 1×4 piece of (expensive) oak and then from hobby lobby a piece of leather, and from walmart some turtlewax metal polish for a strop.
I put the plane back together, then started the restoration video and followed along with restoring my “New” plane. I started, re-started, and paused many times until I understood what you where trying to get me to do.
The sole was relatively flat right out of the box, almost like yours. I managed to improved on that with several sheets of 60 grit, followed up with several sheets of 120 and then some 220 until the sharpie marker lines were almost gone (re-applying the sharpie marks many times).
I spent a bit of time on the nubs where the frog and the sole meet, mostly sanding until all the paint was removed and I had nice square metal flats for the frog to rest on. While you didn’t spend much time on that, it seemed to me that a flat metal surface was better than than the thickly painted over ones 🙂
I also did a little more work on the cap iron than you showed mainly working on it until I had a nice flat edge on the blade side and a nice bevel on the “spring” side. I got things as square and true as I could. I gave the sole and the blade your filing treatment until they felt smooth in my hands and not so hard edged and rough machined. I cleaned up the mouth til it was nice and square. I then worked the blade (sharpened) as your showed, including starting the rounding the blade edges.
After I assembled and adjusted as close as I could to your video. Or as much person who had never held a plane could. After taking cuts on both sides until I had leveled the blade, I was able to get shavings that according to my dial caliper were .006″.
I re-sharpened the blade before starting on the bench and after reassembling it cut like crap. I guess I got lucky with my first setup, so when it was tearing the wood after the second sharpening, I was able to keep trying until I got it adjusted properly again. I am now learning how to use my tools and know I just have to be patient if I don’t get it right first time.
Trusting your experience and not listening to the other opinions on the net about this junk of plane has resulted in me getting a useful tool. My journey only started about a month ago (the reading, gather supplies, etc) and this work took place last week.
Over the weekend I purchased some 2X4’s for the bench. I have jointed the edges and have completed my first lamination. I have also smoothed the bottom of that lamination using this tool. I will use it until I reach the point that I know I need something better. For now I am trusting you that I can use a bailey style no 4 (which was cast into the sole of this plane behind the front knob).
I have also purchased the aldi chisels, only the harbor freight versions. They are razor sharp now thanks to your sharpening chisels video. I also purchased 10 of the aluminum harbor freight clamps ($10 each on sale), I have since also purchased a starrett 12in combination square and a DMT superfine diamond plate (I will also get the course and fine). These I purchased new from Amazon (with my prime subscription).
Not counting the square and sharpening plate, I have purchased everything else including the lumber and glue for the bench for less than what I spent on that new stanley. Know anyone who may be interested in purchasing a barely used stanley sweetheart no 4, LOL!
Maybe one day I can find a vintage plane at a decent price (i have looked on craigslist, the antique store and on ebay), but for now, I am very happy with my expenditures and believe I can use these tools to learn more about hand woodworking. After all, sharpening and tuning my tools is a skill that has to be acquired just like sawing straight has to be acquired.
Thanks again for sharing your real world expertise and giving me the confidence to start on this path and not simply pouring money into trying to correct for my lack of experience.
PS. I also read part 3 and will be doing your mod to the cap lever during the next sharpening before I start on the 2nd lamination. This information was quite timely for me as adjusting the cap iron screw while trying to get the plane working again following that first re-sharpening was quite fiddly.
Sorry for such a wordy comment, please feel free to remove if you want too…
Yup! That’s a long comment, but I enjoyed it. Thanks for taking the time to log your comments on the Kobalt. I often looked at them when I lived there but never had need of one. I am sure Lowes went into it when they decided to go with their own line under the Kobalt name.