Heavy rust—Being left unused for decades
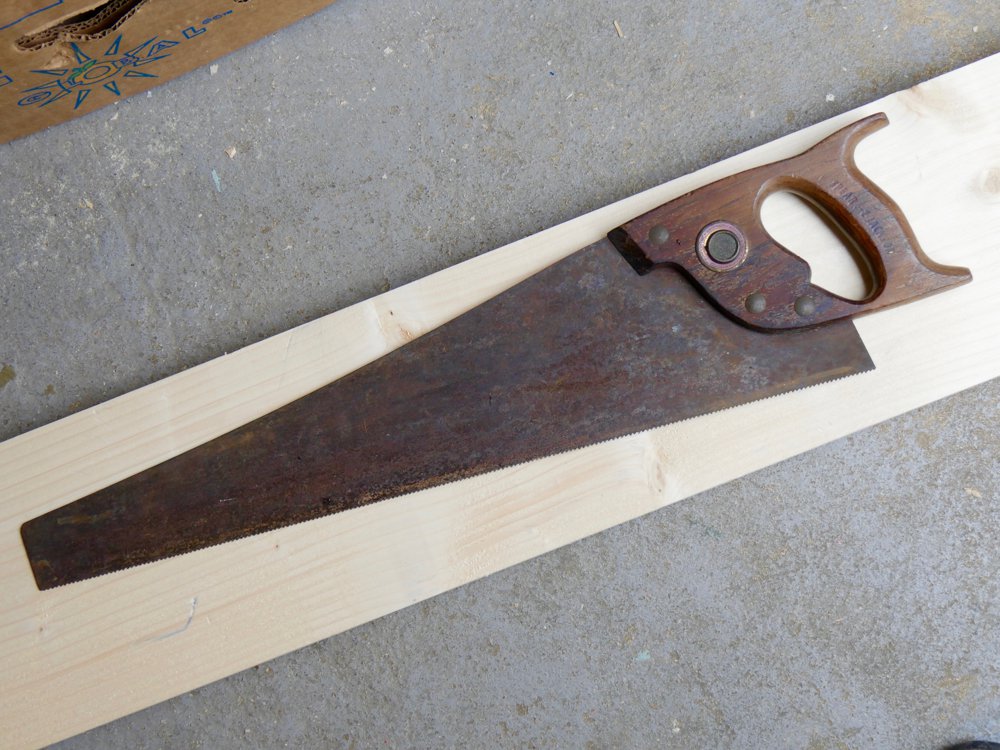

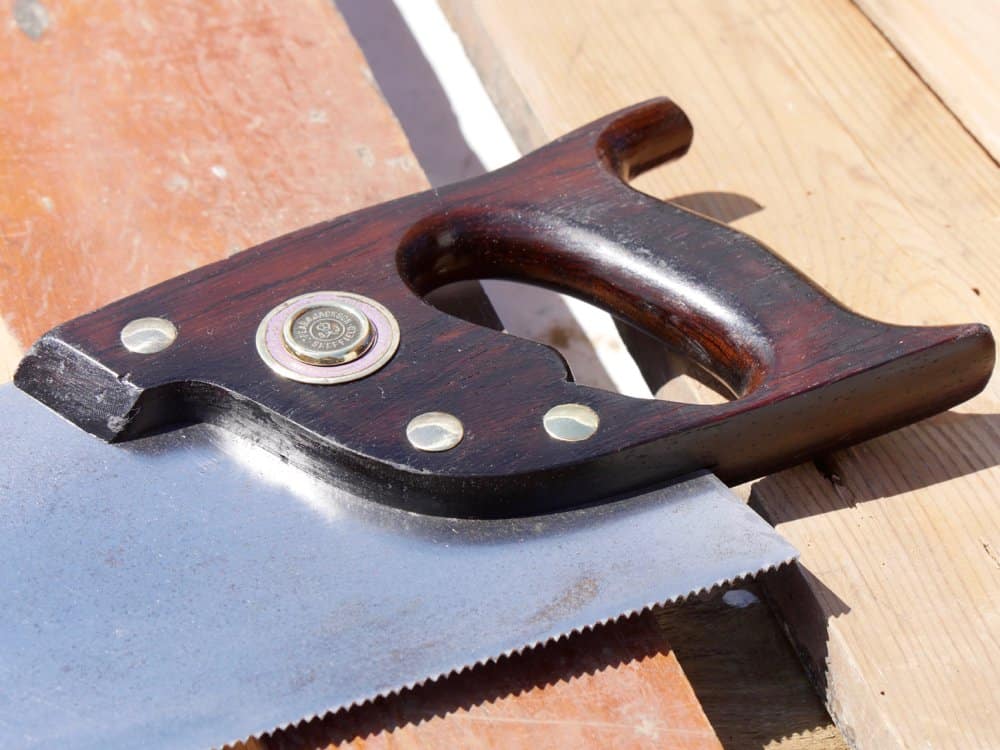
Someone very kindly asked if the saw above was of use to me. Of course in the condition I saw it it was not, but I knew exactly what it was and even with a bowed blade I knew I could fix it back up to become a good user in an hour. The rust was caked on and though it looked old I don’t think it was actually used much, seeing that the saw plate was still full size. I suspect it’s one of those saws that was used until it would cut no more and then left to the atmosphere to slowly but surely decline. That said, though there is much rust on the plate and the varnish is all but gone from the handle, the saw was one that was getting rarer and rarer to find and it is one I have always liked. This is one of the Spear & Jackson double-century celebration saws to mark 200 years of saw making back in the lat 1960’s. S&J claim to be the oldest saw makers in the world, but of course that’s not true. Saws date back millennia. For some of that series S&J used Rosewood for the handles so this one will serve as a user for me and the students, apprentices and so on.
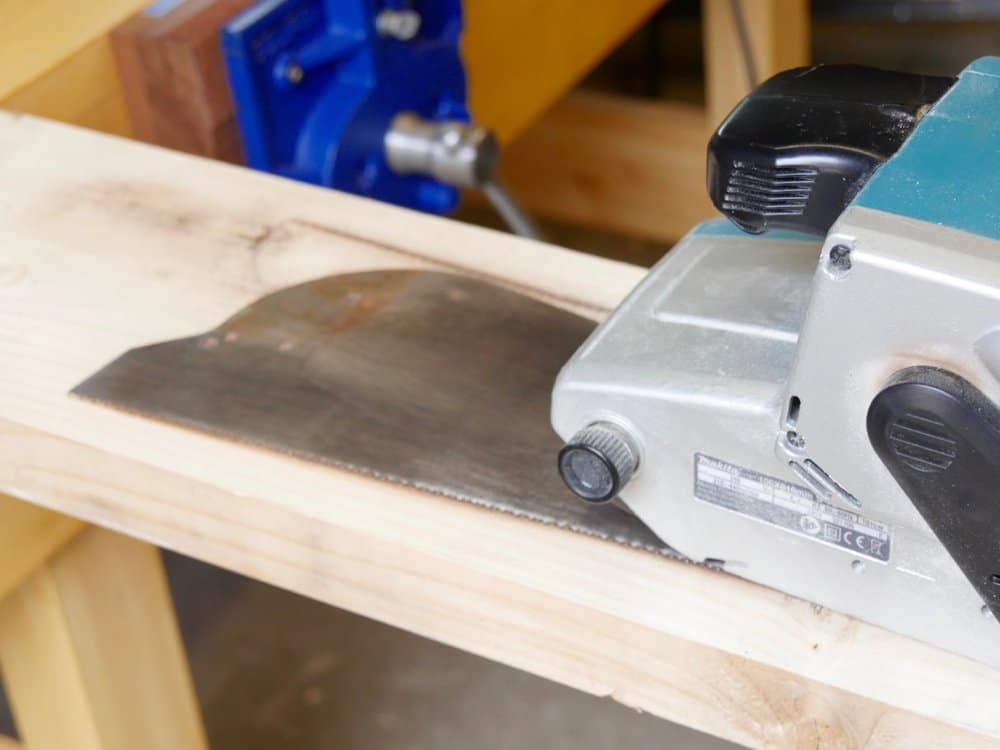
First of all when the plate rust is this thick I usually will use a belt sander to get through it first. Safety is an issue everyone, so I will say that up front. Heat builds up and so too at high speed sparks of metal can be carried into the bag. Best to do it outside and take the bag off otherwise the sparks can smoulder inside the bag nestled quietly amongst the sawdust and a few hours later the shop is burned down. So consider these things first. With the right precautions you will be fine. Keep the speed down, change out the belt if needed and the plate will look like new in a few minutes.
I removed the handle and put a couple of small screws through the holes in the saw plate into a backer board to hold it safely and flat. Take care not to roll the belt sander into the teeth but keep it flat to the plate otherwise you will taper grind the plate the wrong way and the teeth will be narrower than the plate in seconds. You can of course avoid the teeth and just not touch them at all. I used a 100 grit belt followed by a 180 grit one. This is plenty smooth when done. I would never do this on a plate that doesn’t need it. A light film of rust comes away with just abrasive paper and a block just fine.
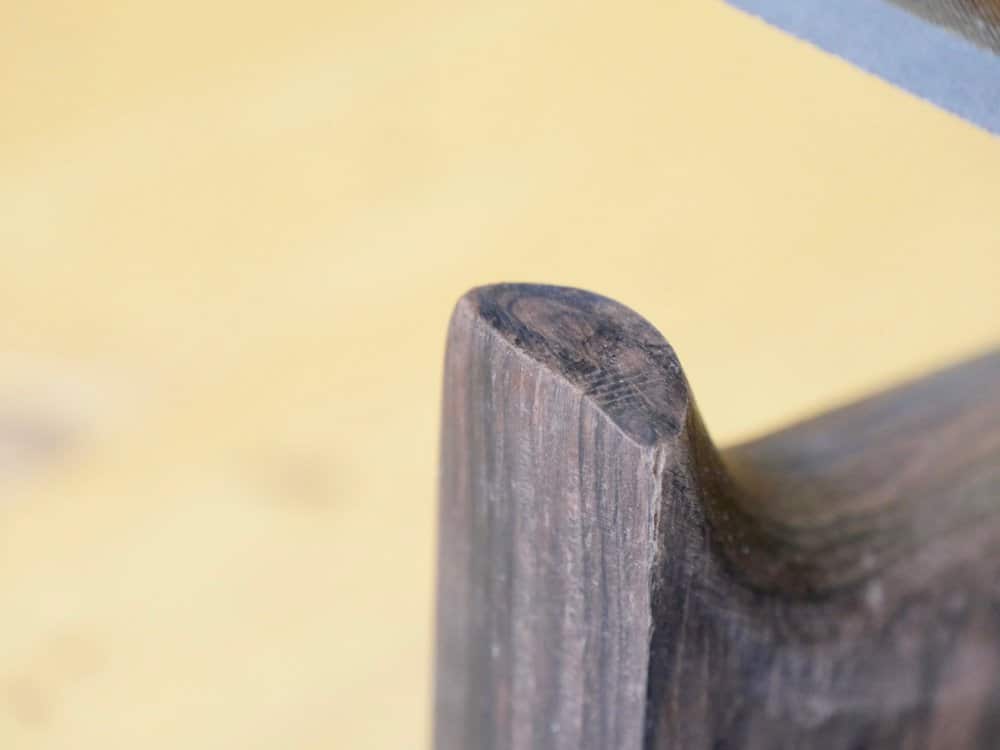
The back edge of the plate looked as though it had been hammered or used as an ax so I draw filed the edge to a clean edge again. This is simply a method of pulling or pushing the flat file perpendicular to the plate in both directions. 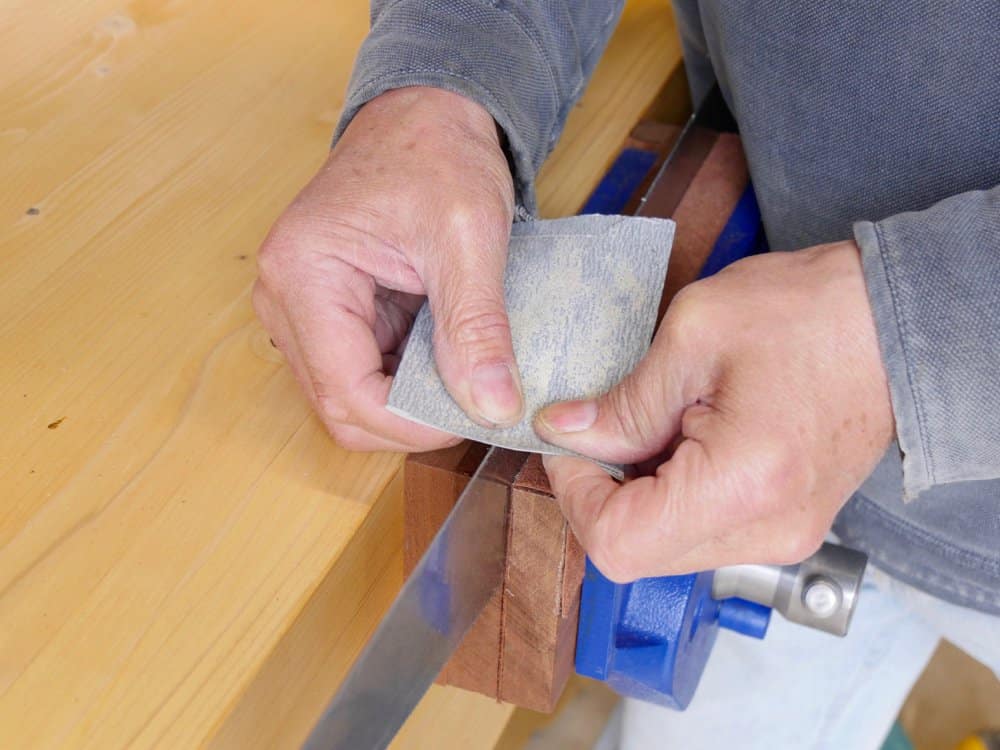
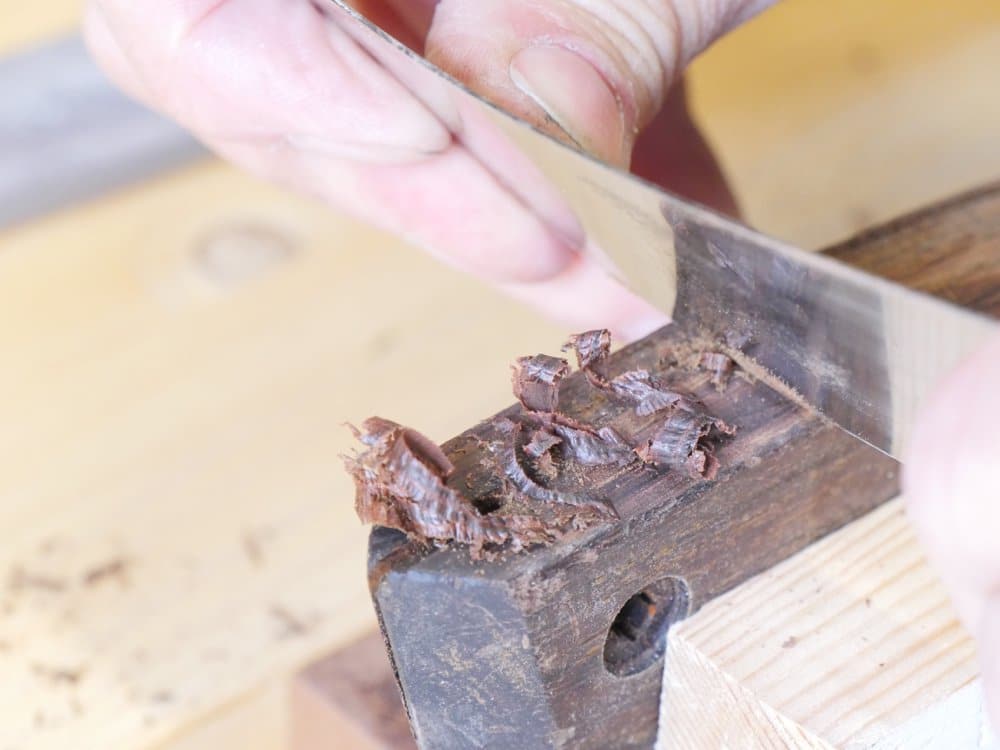
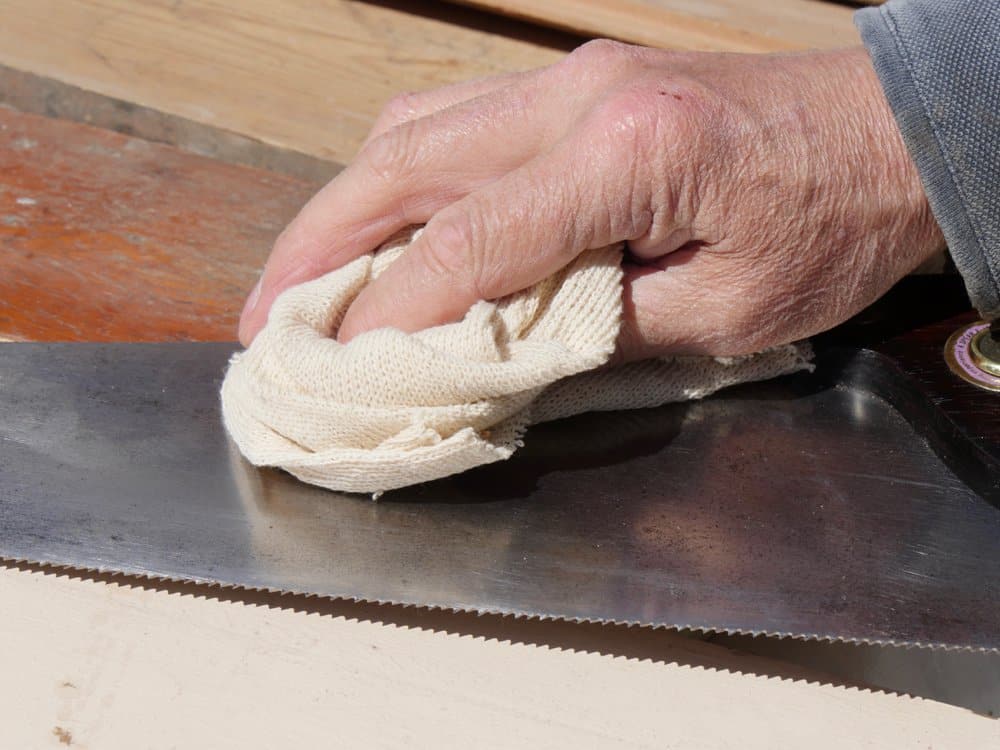
I used a card scraper to remove the surface defects and the old varnish and also to remove the hard edges left from the manufacture. 
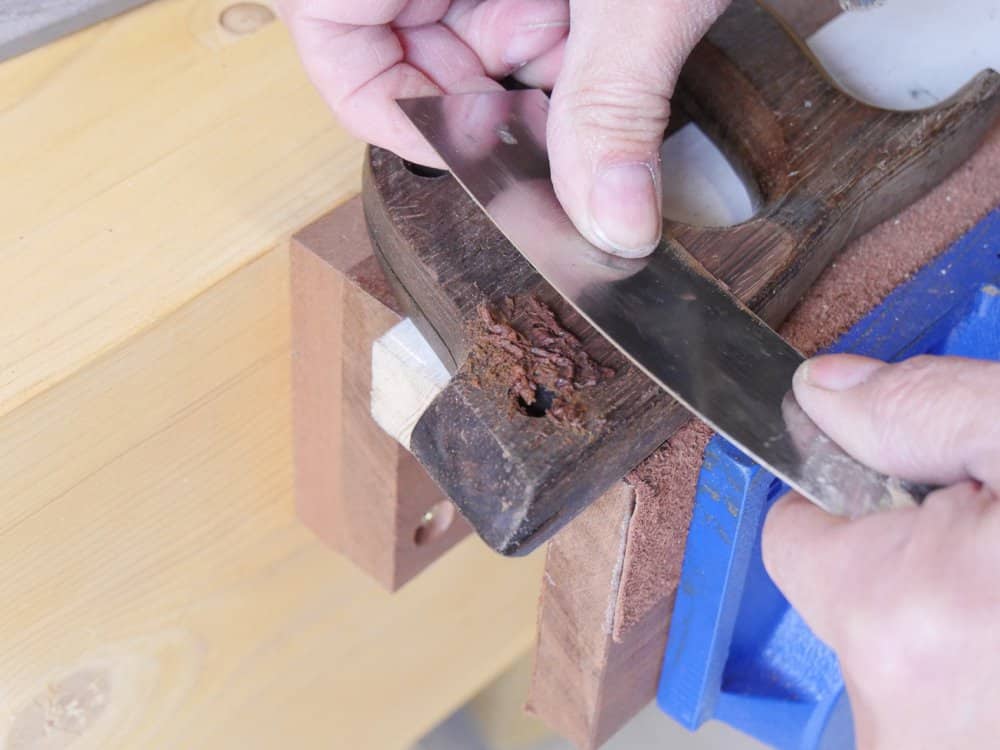


The brass studs polished up quickly the abrasive compound on the leather strop. It’s up to the individual owner whether to reapply shellac, oil or some other wood finish to the wood. Rosewood is naturally oily and just using it will polish it out. You could just apply furniture wax and that would be enough for this wood.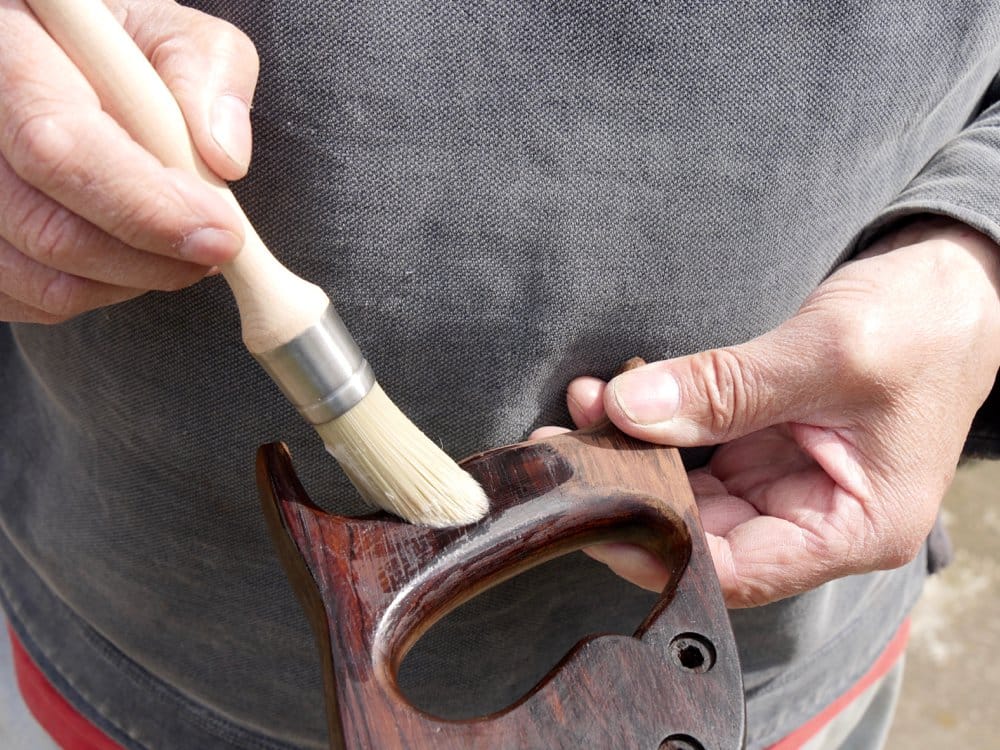


Finishing off the double century saw plate, even though severely dull, took only three strokes per gullet with a new Bahco saw file.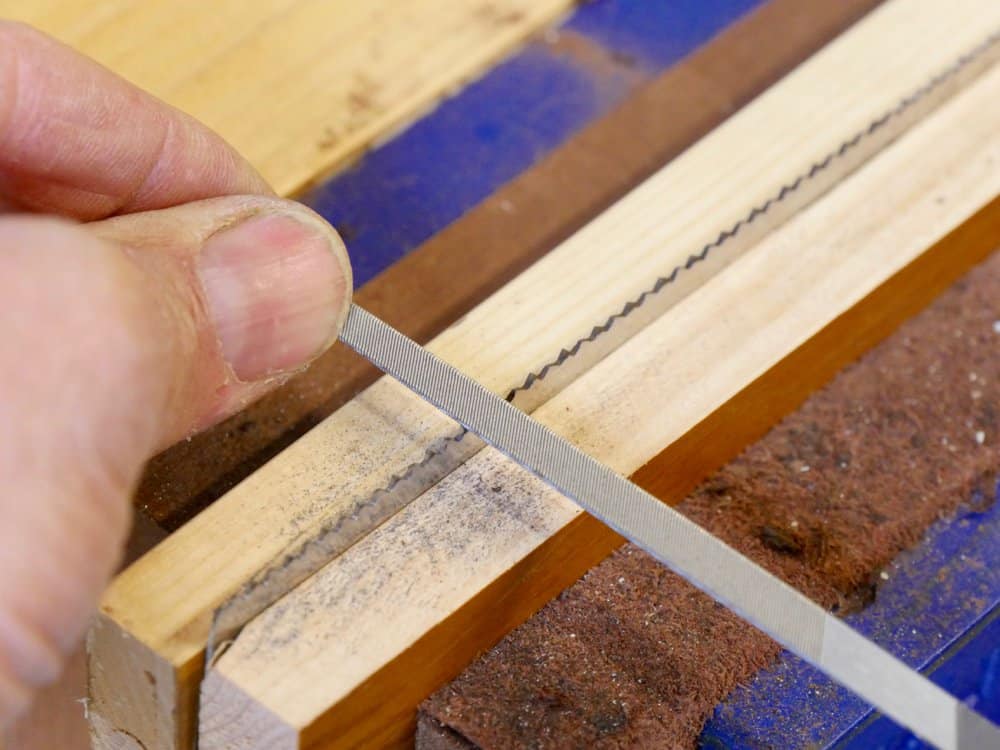
Now the saw will go back to work for another half century all being well.

I found two brass backed S&J saws from this era in a skip. No where near as much rust fortunately, both twelve inch and I sharpened one to cross cut and the other to rip to become my tenon saws. I also had a 10″ S&J dovetail saw that my Father gave me when I was 21 and I sharpened this to a rip cut to be my saw for work larger than I can handle with my Thomas Flinn fine Pax.
My Grandfathers 16″ backsaw had a handle beyond repair so I copied it in good beech. The saw plate had also been damaged but I replace it with a new one and filled it to cross cut for use as a carcasse saw. So all that was left was the lovely brass back – who says sentiment is dead!
Before the 1970s we didn’t need to write professional on the blade. Isn’t that silly!
Love it.
Of the blade is bent, what could i do to straighten it?
It would be great to see something on straightening hand saws
On steady bends just bend it the opposite way. Each saw will requite different pressures, some more and some less. You have to be quite ruthless with some saws. Look for the centre of the bend or each bend if it has more than one and try to work equally from the centre of the bend out.
The “good old days” is and always will be a misleading phrase. On one hand there was much more a sense of pride in workmanship, but on the other hand and I know you remember Paul at one time not so long ago the telephone was bolted to the kitchen wall and our mothers watched over them like hawks. The only thing that came over those lines was sound. Now we get to watch you teach us all these wonderful crafts and skills on the cell phone in our shops in color with sound…wireless no less.
Progress? Yeah, I’d say that’s progress as well. You don’t have to distribute super 8 movies of yourself teaching these skills and for that I’m very grateful.
As for those ugly office chairs? You can throw one through a wall and the only thing that might get damaged is the wall..
It’s fine to question progress. Just don’t question all progress.
I remember reading a quote in one of John Brunner’s books –
“The two great lies – This is old and therefore good. This is new and therefore better.”
I think there’s a difference between “technology” and “progress”. We have more technology – that doesn’t mean we’ve progressed.
Well said John
By the way, fabulous job with the saw. My big box saw will cut. That’s about it.
Really useful insight into yet more of your techniques for tool restoration.
I noticed that the vise in the photos looks new – presumably fitted to one of your newly built benches – I wonder if you can tell us what type it is?
Yes, it is an Eclipse 9″. In the UK you can get them from Highland Woodworking and in the UK from Amazon.
Paul, you rehab saws via sad paper. Now seen belt sander also, My question is relivent of both methods. How do you sand rust off the teeth. Cheers Peter
In the case of the one seen in this blog I went over the whole plate teeth as well because of the thickness of the rust. In the teeth gullets I went through the gullets with an old saw file and then the new Bahco one; to prevent clogging of the new one.
How did you manage to keep the makers mark in this case? Or did you not use the belt sander on that side? Thank you for the great blog.
I belt sanded both sides because the rust was too bad and I knew the mark wouldn’t be there. But, anyway, I wasn’t particularly interested in the maker’s mark, I just wanted a user.
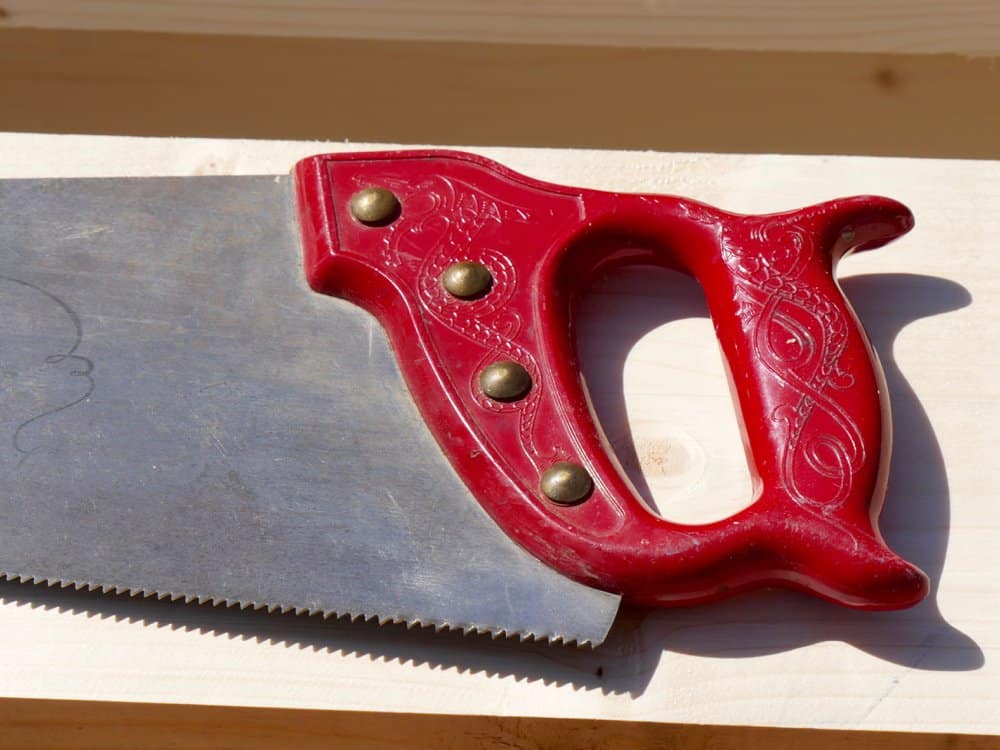
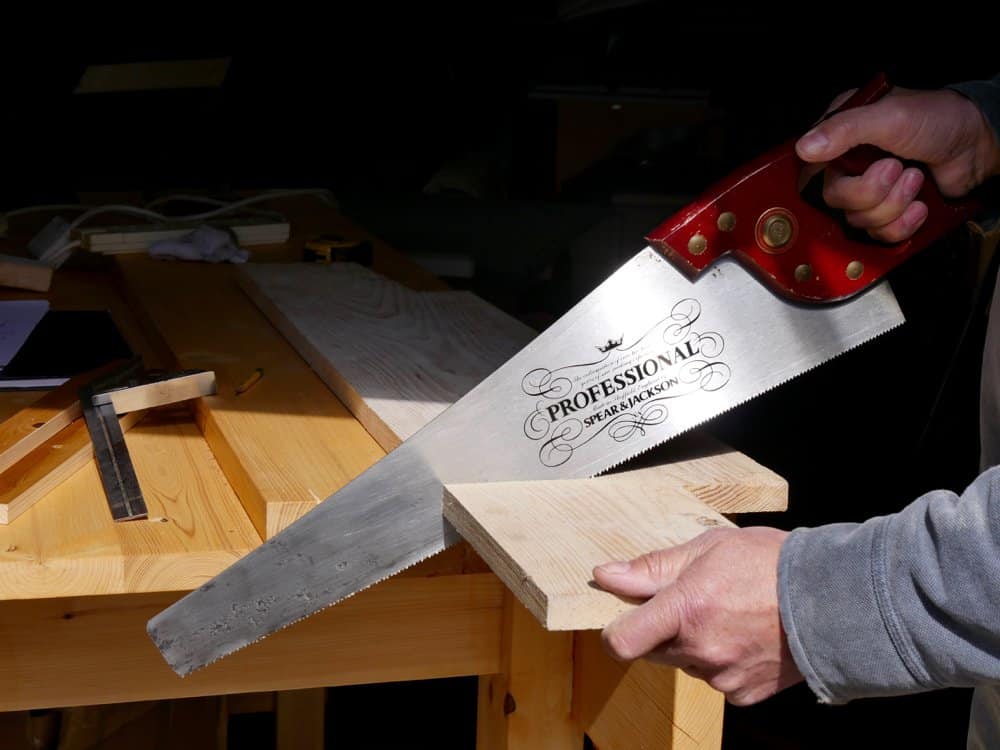
I’m with Robert–the 4th photo from the bottom shows what looks like a brand new manf decal or etching “Professional Spear & Jackson”. Where did that come from or is it a different saw?
Ah, two totally different saws. One from the 1960/70s the other from three months ago.
Like the use of the belt sander, might give it a try. Been using my oscillating palm sander with less aggressive grits.
Might give it a try on a good but pitted blade.
Thanks!
I’ve currently have a tenon saw plate soaking in a rust remover, will see how well that works.
I worry about losing the makers stamp on the plate with sanding. On the one hand, it doesn’t affect it’s use, but on the other, it loses some of the history.
It will depend on the thickness and longevity of the rust. In the case of the saws I might take drastic action and use the belt sander for there is no question of stamps being in the plate any more.
The post-WWII era in the U.S. was a strange one indeed. We emerged as a super power both militarily and economically, and enjoyed an unprecedented economic boom creating a huge middle class. At the same time urban centers began to rapidly decay as the new middle class moved out to the suburbs. The federal highway system brought an incredible network of freeways for transportation, destroying many inner city neighborhoods that had been in existence for decades in the process. Urban revitalization saw some of the grandest buildings from the 19th century torn down to make way for the shiny new glass, concrete and steel buildings that would replace them. It seems we were struck by an epidemic of “out with the old, in with the new”. This time period would have coincided with the decline of tool makers as well I suppose.
Hi Paul,
like your new workbench and the feel of the natural colour of the redwood.
I don’t see the metal fasteners through the aprons; had you attached them with another method? And the well isn’t very deep like the one in your big workbench of your you tube video; do you find it more comfortabl?
Last question: the vice is an old one restored, or a new one? I have a Czech York type with quick release, that give me problems: there’s another brand that you like and find a good one?
Thanks,
Valerio.
Yes, because this one is a single sided bench I don’t need one that can be dismantled because it will go through most standard doorways. Therefore I screwed and glued the apron to the legs. Te vise is made by the English company Eclipse.
Thank you for this, very interesting and inspiring indeed. I recently picked up an old Sandvik handsaw, one with a wooden handle I might add since you mention them, and I intend to restore it using the method you describe here and in your videos. It had probably been abandoned for a long time when I found it in the flea market, but I hope to bring back life to what I believe could be a quality tool. I would not even have thought about a project like that, hadn’t it been for your informative and inspiring lessons. Thank you for that!
I never knew it could be done with a belt sander it rings alarm bells in my head, different for you Paul your a trained professional who knows what he’s doing but what about those eBay sellers who don’t. Now people should be wondering if their saw plates bought on eBay are tapered with hollow spots through out. These are just ordinary people with no formal training not much different to beginning woodworkers, after a few months of watching videos and reading blogs become self proclaimed know it alls. It bothers me a lot that I cannot trust the source the tools come from. Youtube has paved a way to many opportunities people once did not have before but it has also a paved a way for unskilled people making irreparable damage to vintage stock then passing it off as refurbished and in excellent condition.
The safest way to clean a saw plate is to soak it in vinegar overnight and then lightly abrade it and your guaranteed not to make irreparable damage. I often wondered how is it possible for many of these tools I see on ebay to look so shiny and knew like even though they are over 100 years old. I too can make them look pretty good but I spend 2,3 or even 4 days fixing them up. How do they manage to refurbish a tool in 2 hours flat. eBay has become an awful place with over inflated prices and not even sure if what you buy hasn’t been damaged beyond repair.
I hope I’m just being paranoid and everything I said isn’t true, you would know better than me Paul I only ever bought two things on eBay since it’s first creation. My tools are not hand me down but are new or bought from reputable antique dealers.
I doubt Sellers will take that much time. More damage has been done to saw plates with a coarse sanding pad in the wrong hands I think. Anyway, we’ll see if such restorations show up.
Thanks Paul for your reply the coarsest grit I’ll use is 400 but like I said your a trained professional so your experience allows you to use these devices. I’m just cautious plus I have a dislike towards machinery in general.
I only went to 180 grit because of the heat build up with finer grits. And try to remember I did emphasize I would only do this with severe cases of thick and deep rust, not at all for most rusted saws.
It makes much sense in what you say, however I use wet’n’dry and lubricate the paper with WD40. It does create a mess and the results are ok depending on how bad it was in the first place, if using WD40 is not a good thing would you recommend anything else.
It is like many things. A one time or occasional use like with restoring a saw is not usually any kind of health issue, but long term daily use often can be. We usually drift into things like using machines because we feel it is easier but then we end up working all the more because the machines end up driving us. Bit like fast car driving when when we started we thought we were travelling at 90 when we were doing 15 but in a few weeks we merge in with people doing 6o in a 30 without realising it.
How wise these words are my friend.
Salko, you just hit one of the reason I pretty much never even bother to bid on a shiny “restored” saw. You just don’t know what was done to make that 80-90 year old plate shine like brand new. On the other hand, I just got a D-23 that looked liked a neglected user that almost sliced my hand open because it had been properly filed crosscut before being put away for the last time. It was pleasant, if shocking surprise.
Yes, the emergence of the plastic handled saw and the like started in the 60s and 70s and, in my belief, coincided with the ‘arrival’ of the DIY-er, who realised one day that he/she needed a saw to do a few little jobs around the house. This person never really aspired to being a craftsman but just needed a cheap tool to do the basic job they had in mind, and some switched-on manufacturers responded with the ‘plastic’ saw. The concept of sharpening a tool, especially something like a saw that needed other tools to accomplish it, would have been completely foreign to this person. Only someone with some degree of real woodwork training would have contemplated sharpening a saw, and so the demand for ‘throw-away’ saws and tools rose. And with cheaper methods of manufacture and probably even cheaper imports, the domestic garages around the western world found themselves home to an old shopping bag containing a saw, and a few chisels and an electric drill, etc., 95% of them unlikely to see the light of day more than once or twice a year, and sharpen them……heaven forbid, just pop round to the local superstore and grab another £7.99 replacement. Only a person with enough need, knowledge and pride in their work would consider learning how to sharpen a tool, and these are the ones who probably care enough to restore what was once a fine, and, by comparison expensive, tool and give it a new life in a modern age. We thank you Paul for educating us not only in the working of wood but in the care of the tools that don’t just do the job but make the job a pleasure.
This really needs a like button. I very much second this opinion.
Hello Paul,
First, thanks for all the inspiration, insights and advice – really appreciated.
A quick question – would you consider using the belt sander on a badly rusted plane sole? It would certainly be a faster method than the usual soaking. And I’m not that fond of the smell of distilled white vinegar in the morning!
I wouldn’t. You don’t have the width of registration you have with a saw plate and this will rarely produce a good result. The heat buildup too causes the sole to change too. I wouldn’t do it this way. I certainly wouldn’t soak a plane in vinegar either. Plane soles are really quick to de-rust and pitting makes no difference to the functionality of a sole anyway.
I’m probably going to lose the Disston etching, but a careful, very light brushing of the belt sander, with the direction of the abrasive going toward the points of the teeth might preserve the taper. A saw maker suggested wet-dry sanding belts, and a fingertip touching now and again monitors the heat.
Worst case, after a micrometer measurement (YouTube retaught me what I had forgotten from high school about Vernier calipers), I figure I can always make some extra passes at the top of the plate to ensure the taper. A slight adjustment to the tooth set might balance that out also.
Without intending to do so, I have a small collection of redeemable saws to round out the choices in what to use for different types of work.
It’s fun. Haven’t had that for a while.
Hello Paul. was looking ant your book and the blog and would like to know how straight a saw has to be and how easily can bends be corrected?
I’ve got couple of old handsaws that, whilst they do not look like bananas, are not straignt if you look along them? I like to have an idea of how much can be done to restore them, and what is actually worth doing? – all very subjective I know
Hi Paul,
Just wondered if you’ve ever tried electrolosys for rust removal. I’ve had good luck using my battery charger.
Yes but it complicates a simple process so I don’t feel I would generally use it or recommend it. Most saws can be derusred with sand paper in a few minutes. So too a plane.
I just read a short note that scraping blades can be used as first step in cleaning up a saw blade. Tried it and sure enough they take off the first layer. Can’t be too concerned about the etching, they are users anyway.
The teeth can also be cleaned some by using the belt saw so that the paper moves across the teeth in the direction away from the blade.
Using a sander that does random orbits or other circular flat motion, I just stuck a wad of steel wool between the sandpaper and the blade at the teeth. It tears up the steel wool a bit, but the teeth got cleaner and I lost no sleep.
I also have given up trying to get a shiny, shave-in-the-mirror surface in user saws. If I can run my tongue over the flat of the blade, even if it is stained, then it’s smooth enough to use on wood. Lunch tastes somehow different, though, but you can’t get everything perfect. 😉
If you want a slow and safe method of rust removal you can always try soaking it in blackstrap molasses solution.
Plenty of web sites around about this method.
Might take a week or so but usually does the job.
I’ve seen an Australian outbacker use that on rusted antique car panels, he would place it in large tub something to do with cows I can’t remember the name of it and let it sit there from a week upto 3 weeks and then just hose the rust off. I was amazed at the results all of it just washed away.
On farms they occasionally feed molasses to cows with other dry feed to make it more palatable – especially when there is a shortage of hay/feed on the ground.
On heavily alloyed steel the colour may change to black with molasses but it can quickly be restored.
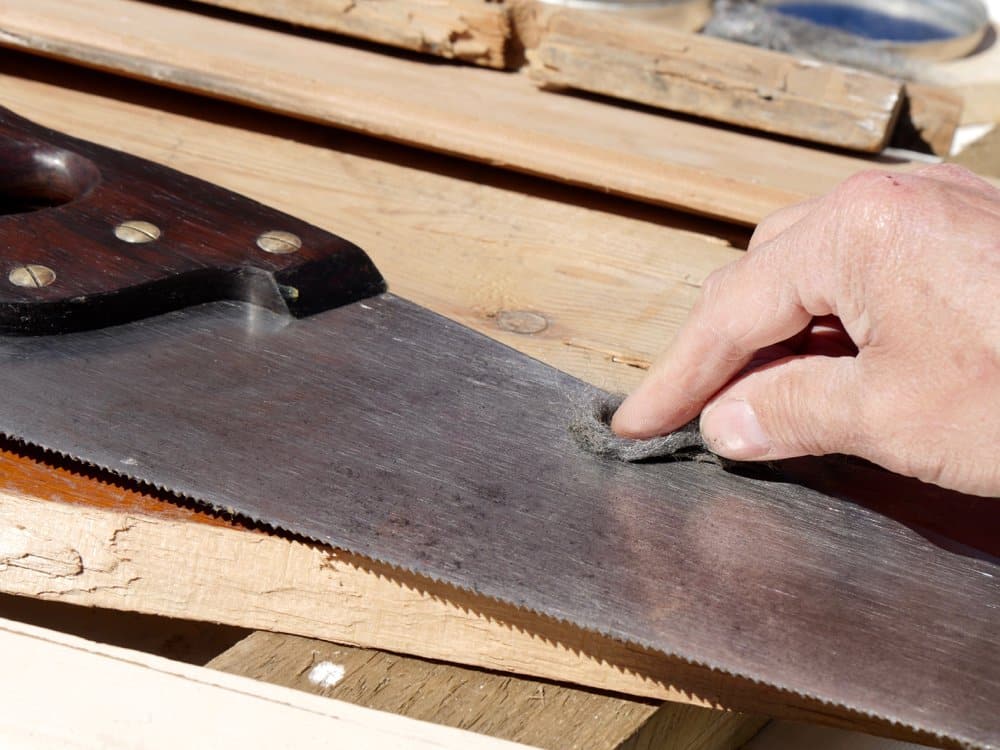
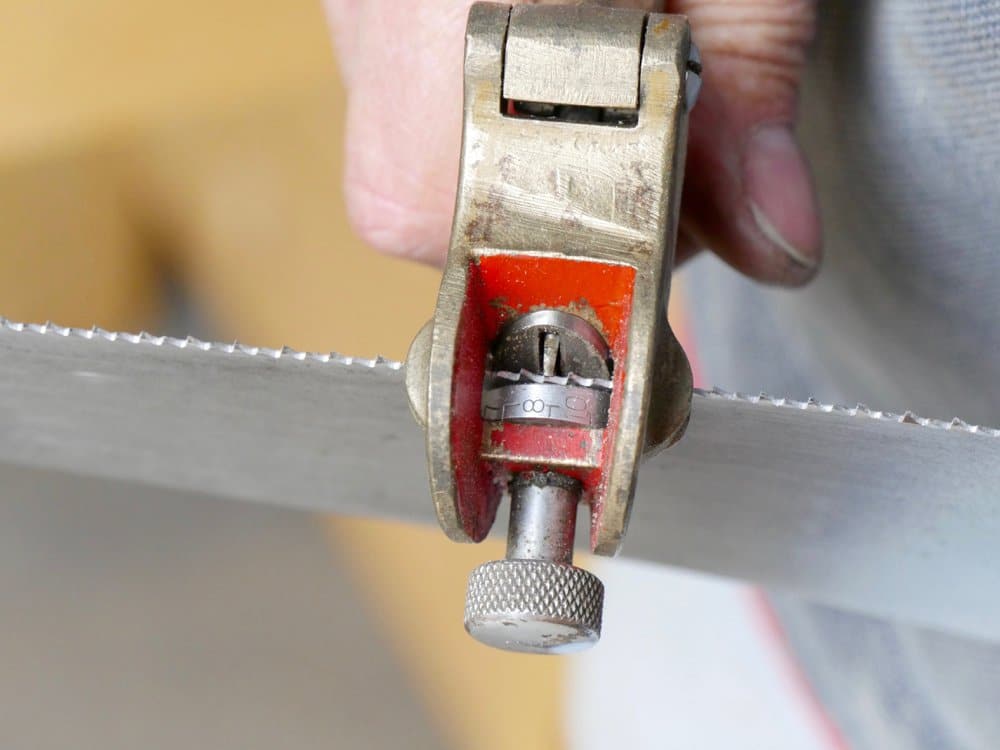
Hi Paul, I was wondering what tool you were using on the saw teeth on the second to last picture in the post?
Also do you have a post about how to sharpen a hand saw?
That is a saw set tool. It is used to set the teeth of a saw.
https://www.youtube.com/watch?v=UA5DixEaaUo