Purpose of a Stopped Housing Dado?
There are good but perhaps somewhat hidden reasons that we use stepped housing dadoes that may or may not be obvious, especially not to a new woodworker. Actually, many seasoned woodworkers are more likely not to know than know. There are three types used mostly and then variations on the theme that are scarcely used. It’s actually perhaps quite less usual to use the common or through dadoes in our present climate of hand work than in previous centuries when so much woodwork was created for factory and workshops used between the 17-20th centuries. Rarely would a through housing dado be used in the manufacture of fine furniture pieces. What replaced wood in those previous centuries for use throughout the last century and on into this one was sheet metal, plastic and composite sheet goods made from a wide range of mixed materials. That being so, we saw the gradual demise of the through housing dado because we saw a massive reduction in wooden cabinetry where it might be used the most. Beyond that we saw the steady development of a wide range of metal fastenings that were originally designed for industrial manufacturing and have now spilled over into the domestic suppliers. Is the dado extinct then? No, at least not in the realm of the hand tool enthusiast. Housing dadoes are practical and made with ease by hand methods so let’s look at them and see how and why they exist for us.
The through housing dado was more the utilitarian form of housing dado joint; used as it was to build masses of equipment and furnishings such as shelves in kitchens and sculleries, below-stairs rooms where staff catered to the rich were filled with functional equipment ranging from butter churns to clothing presses and then drawer backs, firewood boxes, carriers and so much more. The working environs where pretty was unimportant and function key to speed, simple joints like the common through housing dado was a must in the making.
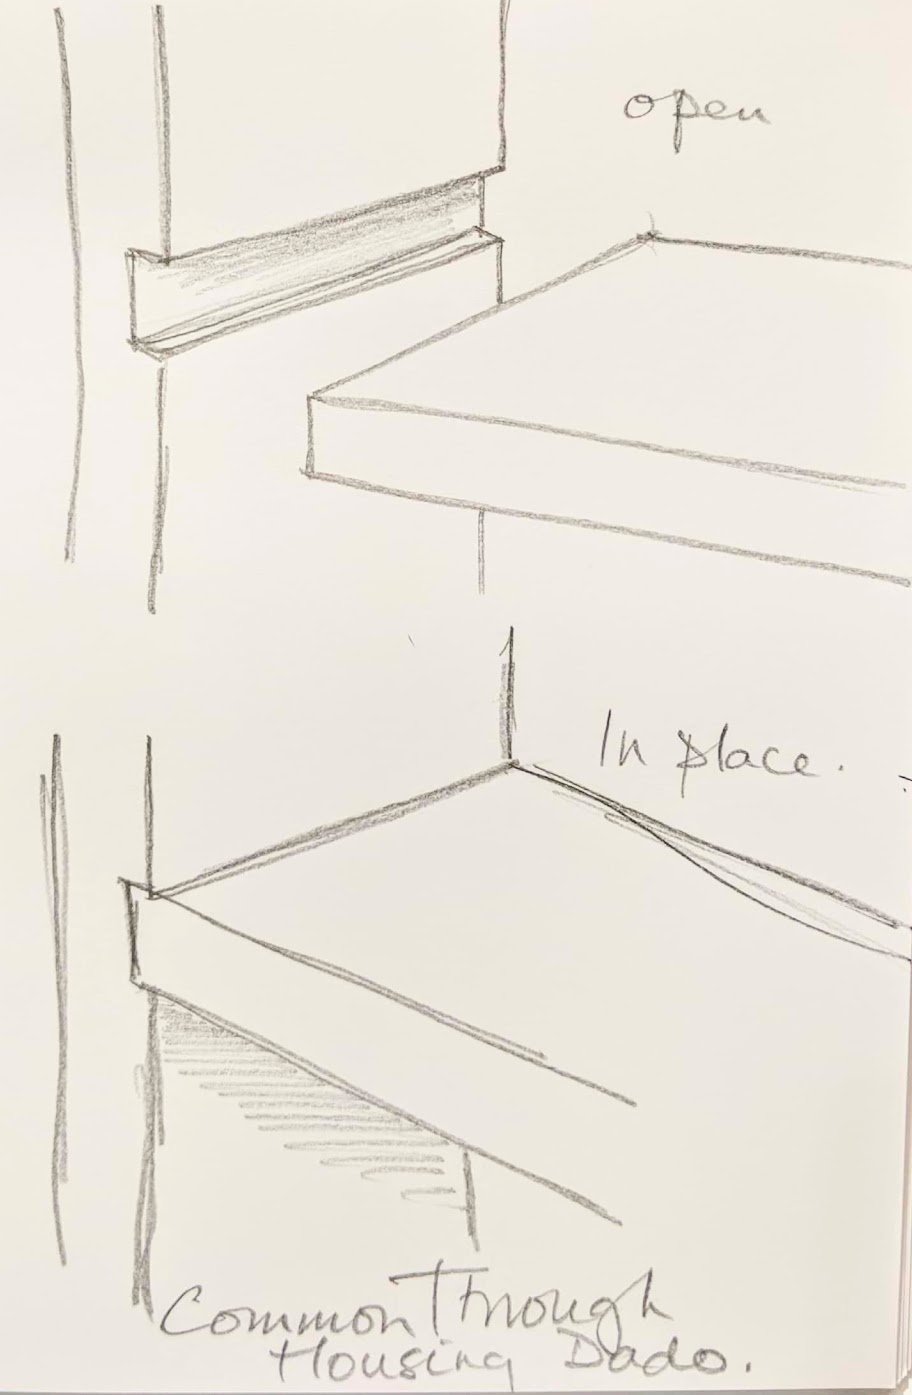
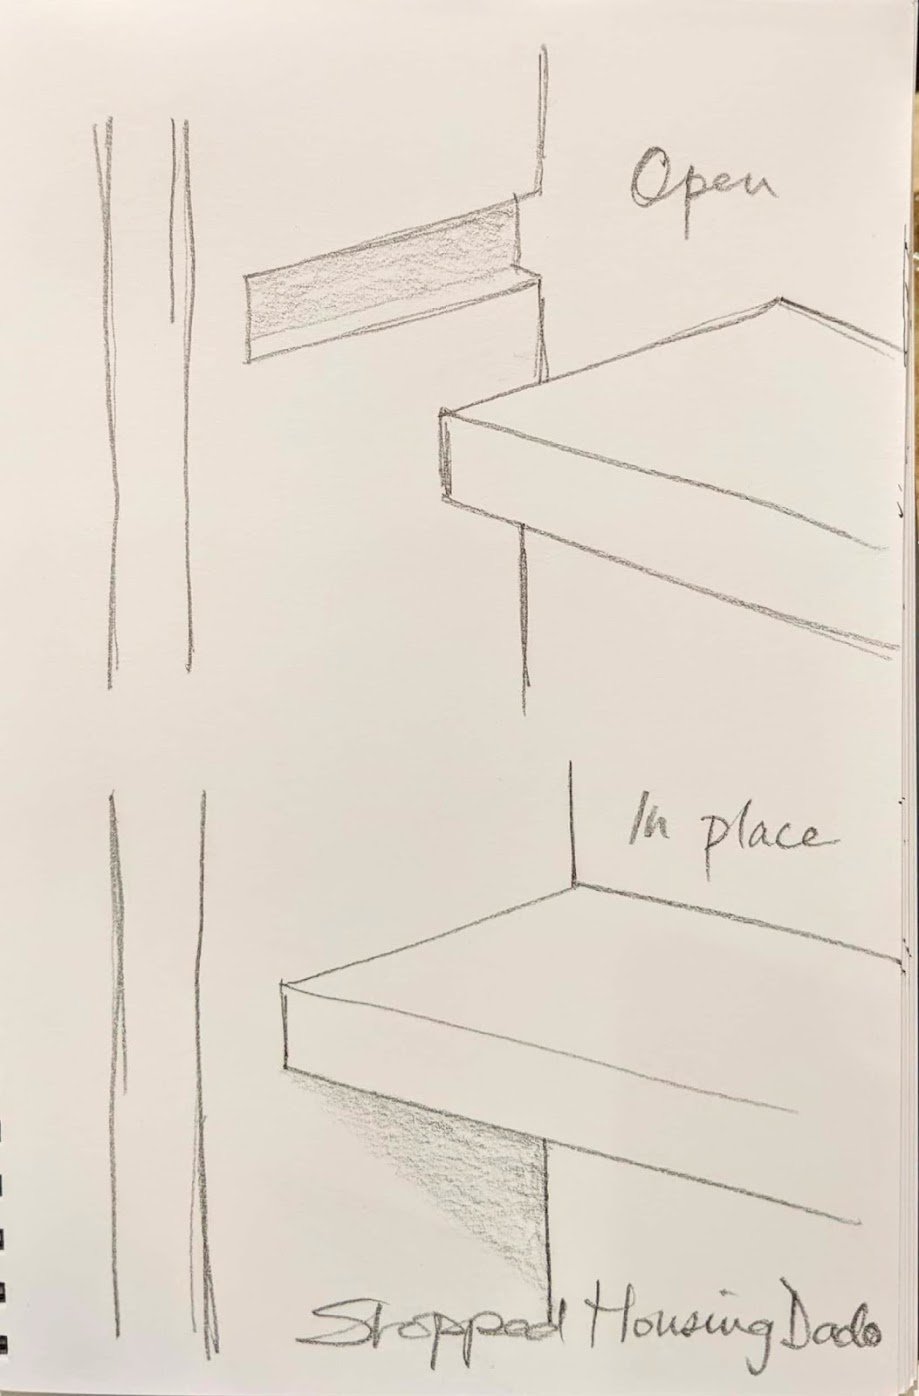
Stopped and stepped housing dadoes hid the front edge of the joint line so as not to draw the eye. The through type is not at all a good looking joint. Not even particularly mechanically strong. Without additional joinery in support, the joint offers little lateral stability. What the joint does do well, better than any other really, is it bears downward weight exceptionally well. Masses of it. I think we can all relate to the housing dado more as the bookcase joint than any other. That being so, and the fact that few materials in home and office weigh more than paper, its load-bearing capacity is well proven. Think of a five-shelf bookshelf unit three feet wide and you begin to understand the accumulated mass of weight bookcases are expected to withstand. Push the top of the bookcase laterally from one side to the other and there is almost no chance of moving the bottom because of the combined weight the books send to the two sides either side. What you will do though is you will easily break the glued joint lines at the bottoms of all the dadoes. Ultimately this weakens the whole piece. So we see that what this joint does best is it takes on dead weight. That’s mostly where and why we use it. In my work I generally combine the housing dado with some other type of joint. At the backs of drawers I use it with through tenons or sliding dovetails. For bookshelves I use through tenons in rails to undergird a middle shelf. This is what we joiners and furniture makers consider when we design a piece.
Identifying a Dado From a Groove or a Housing
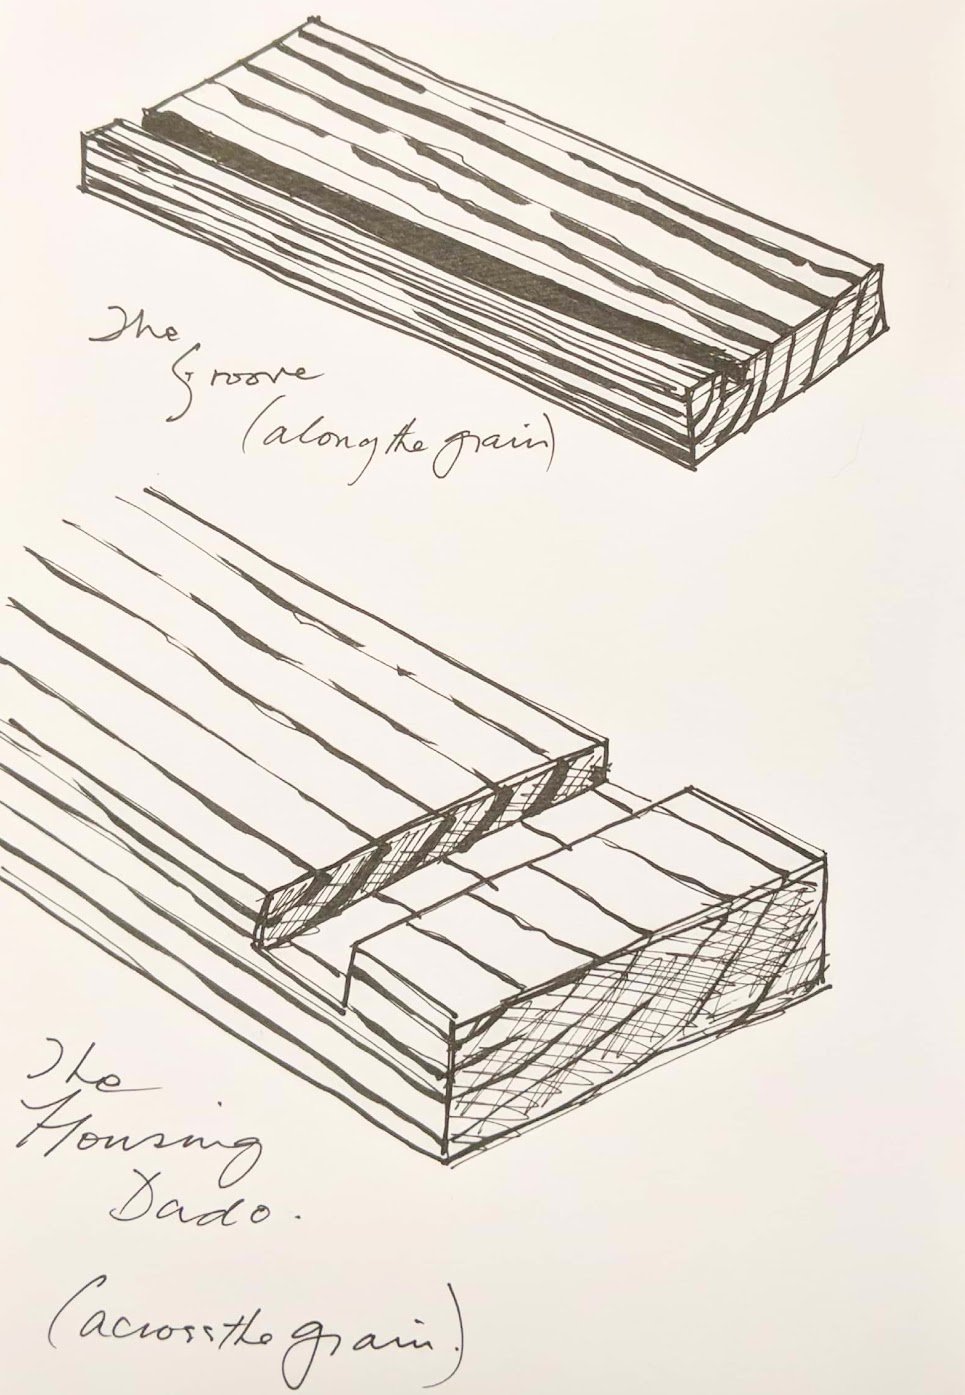
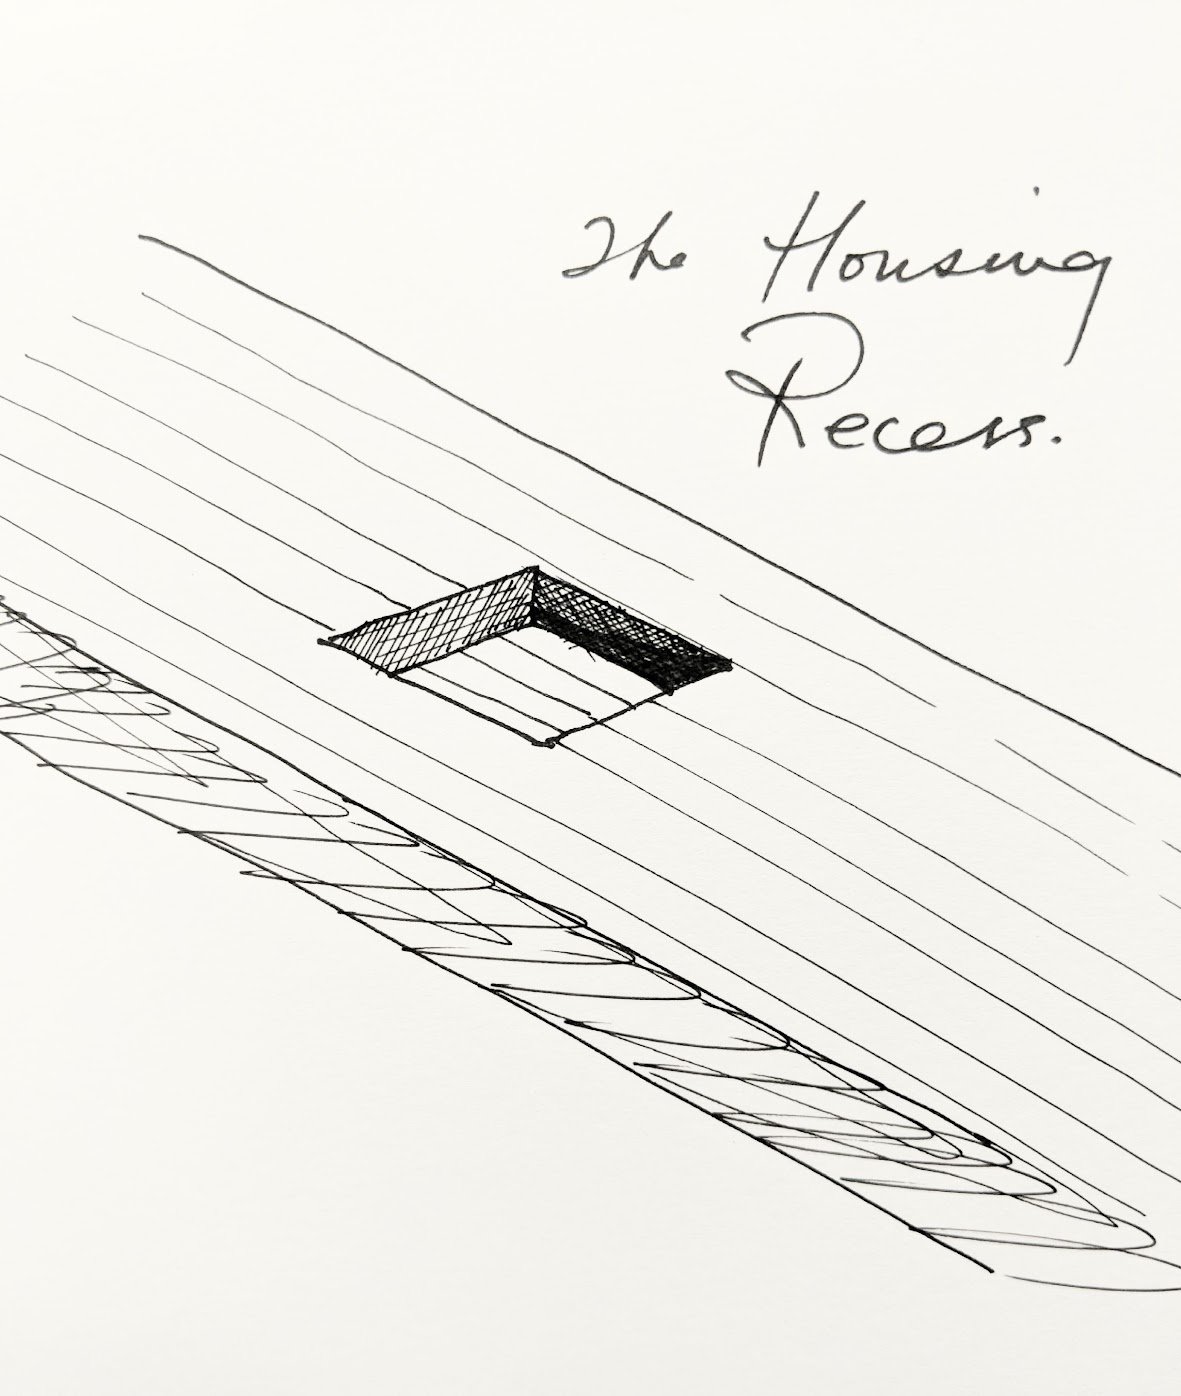
In the UK the use of the term dado is less used than in the USA. Generally, the Brit’s use the term housing or housing joint, but this term can be used so broadly that it sometimes fails to specifically identify what would benefit us. I discovered dado when I moved to the USA and it made sense. Whereas a housing joint can go with and across the grain, in the US dado is used for across the grain channels and grooves go along or with the grain. Simple and descriptive. I named the joint differently to better define it and to connect the two countries (two countries divided by a common language) as a compromise but the compromise really works without diminishing anything at all. Hybridising housing with dado tells me and others that it is an across the grain channel. A groove needs no further defining and then a housing makes great sense for with or across the grain and is used for recessing mostly, be that then to receive the end of a section of wood or a piece of hardware.
The Good Reasons For Stopped and or Stepped Housing Dadoes
One, the shelf might shrink at a different level to the adjacent receiving members, the shrinkage will not be visible because it’s behind the stepped part. Remember that these joints were developed centuries ago when the only way to really measure moisture content was by local knowledge of local atmosphere and the local craftsman knowing his stock wood. He knew how long since it was cut and how long it had been drying, give a year or two. Today we can use a moisture meter or weigh the wood over a given period to see if the wood is stabilised or increasing or decreasing according to the atmosphere we live and work in.
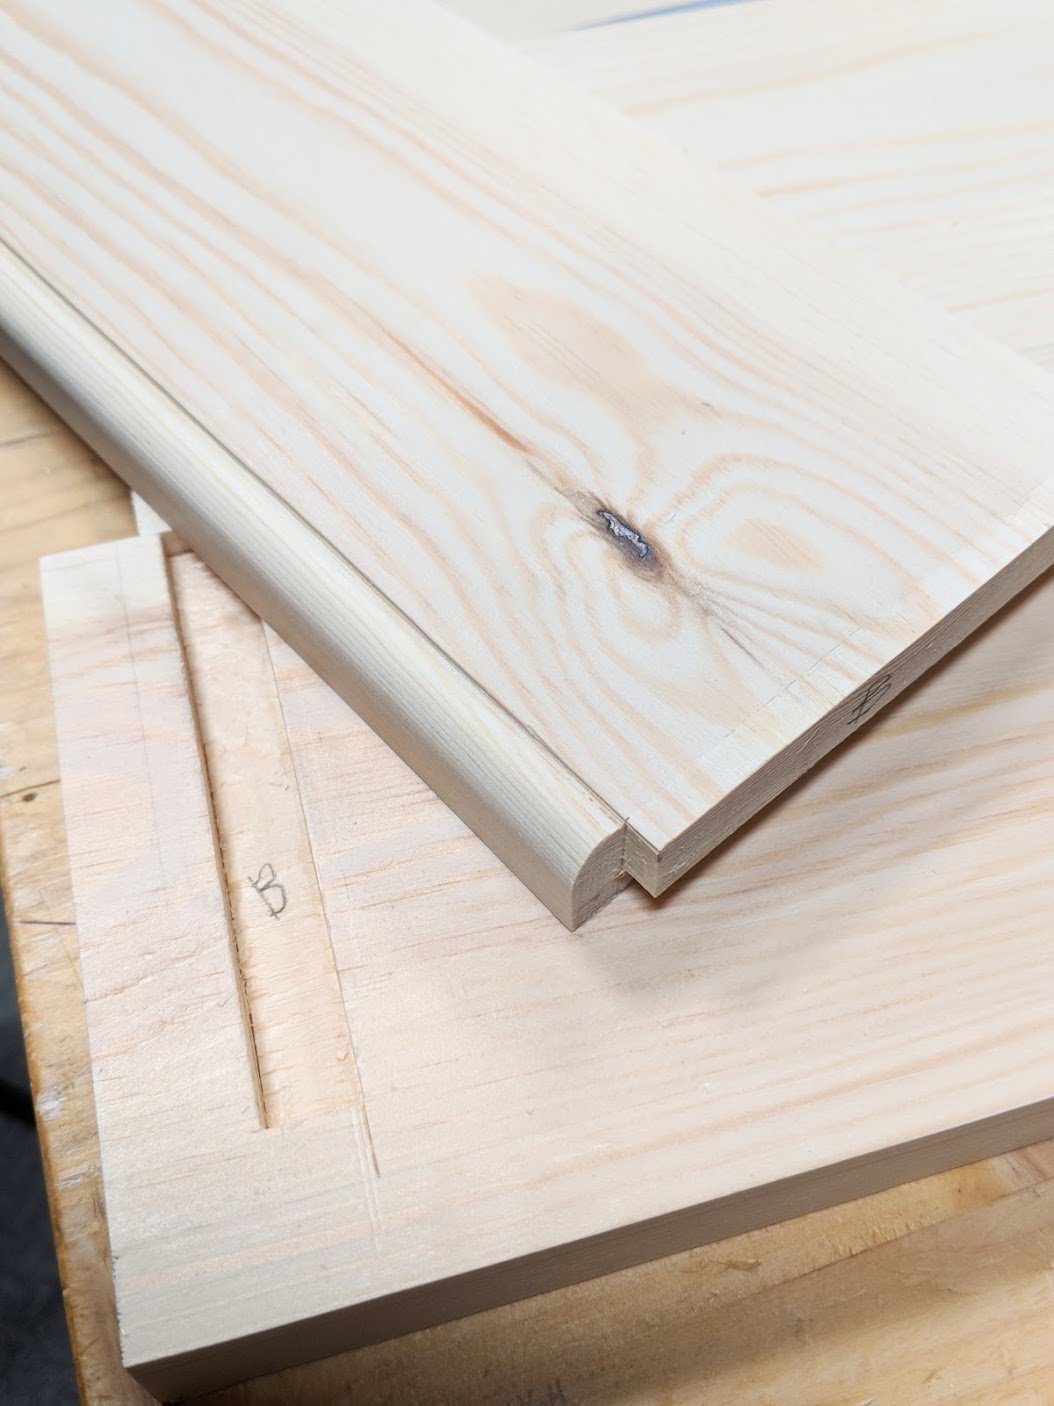
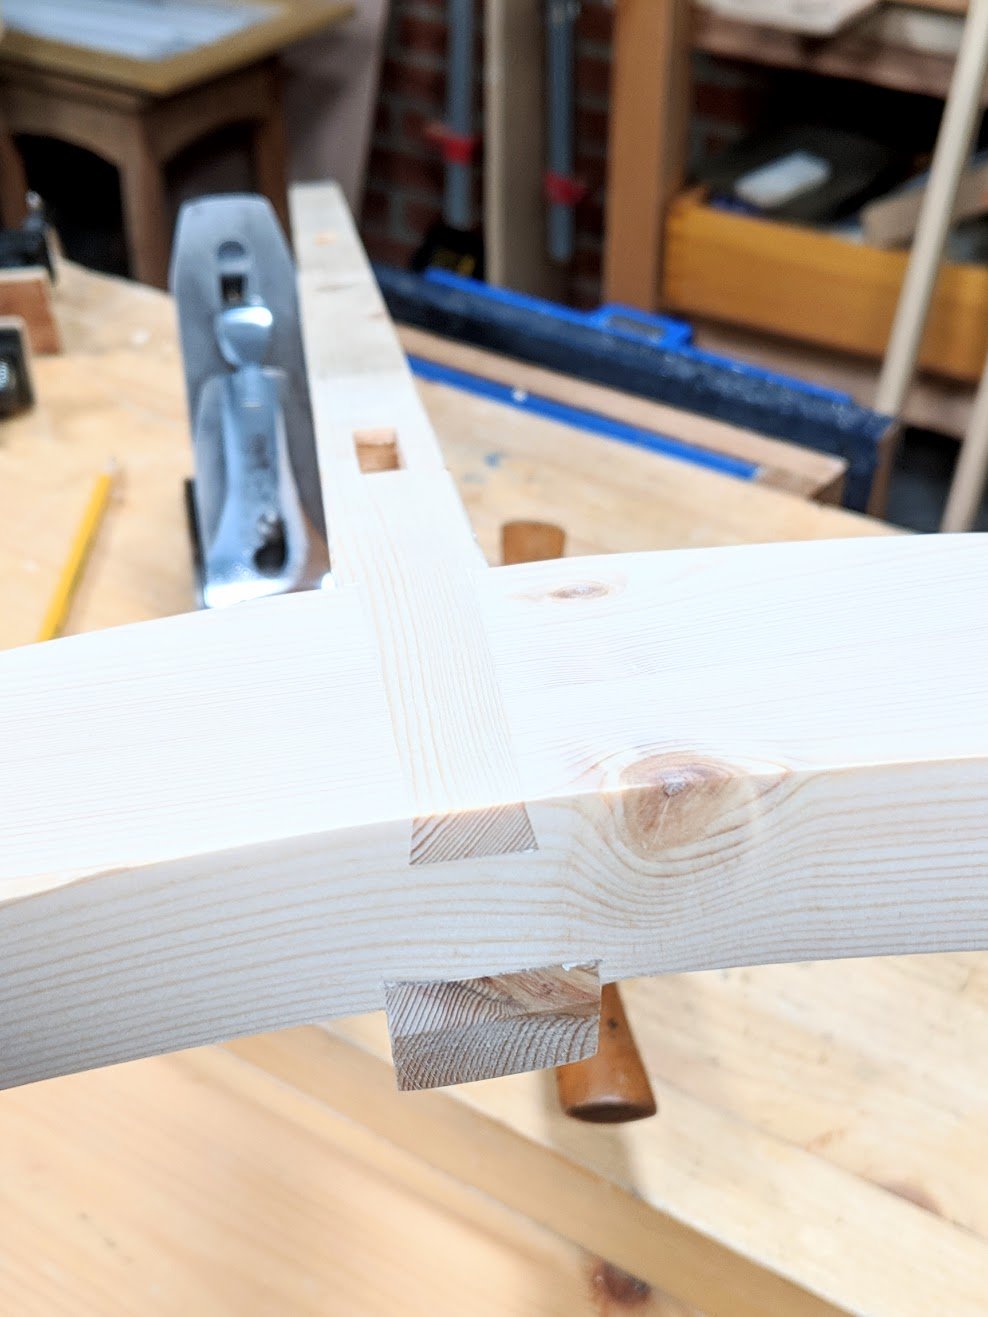
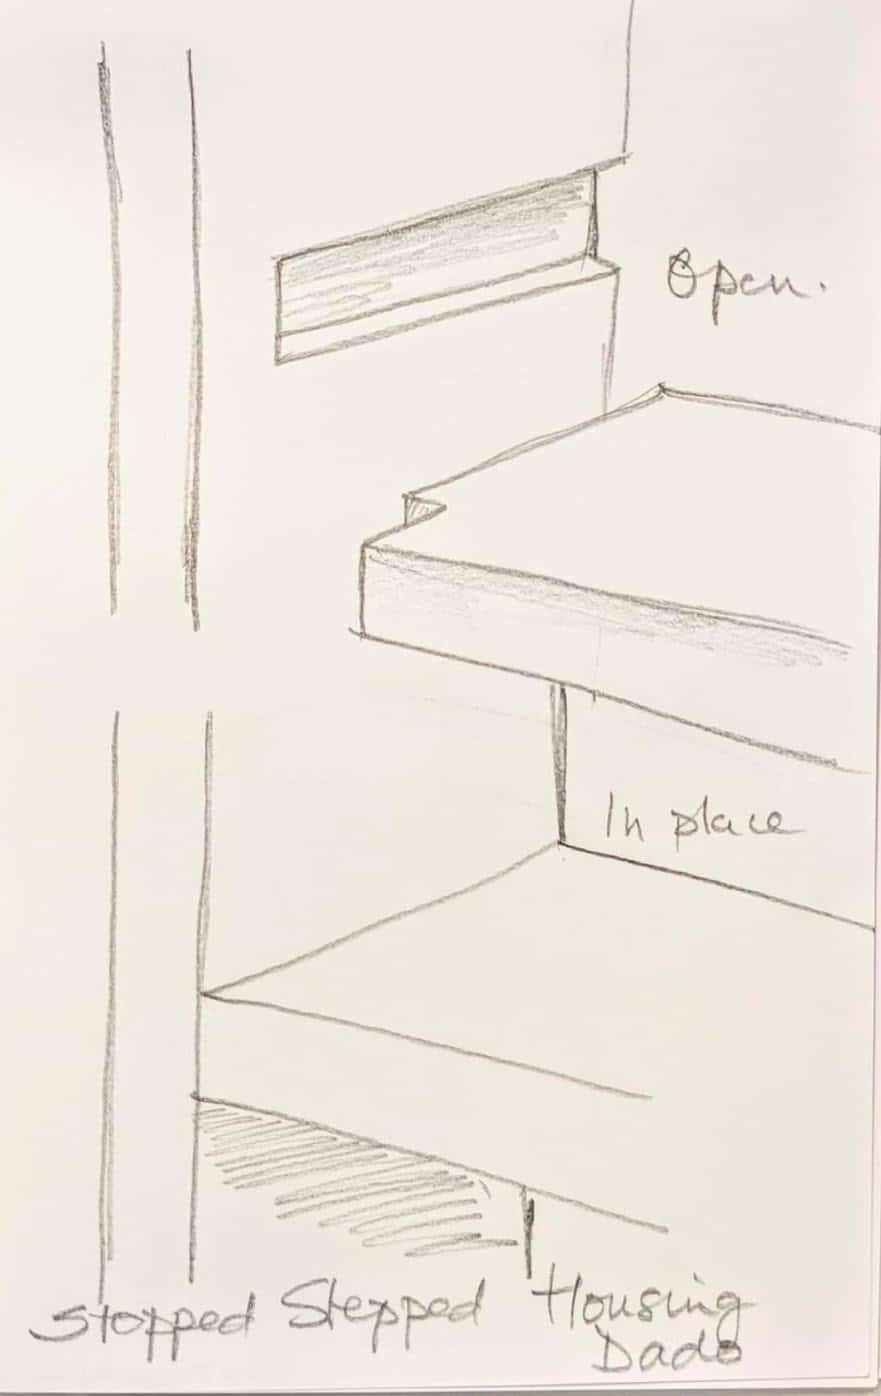
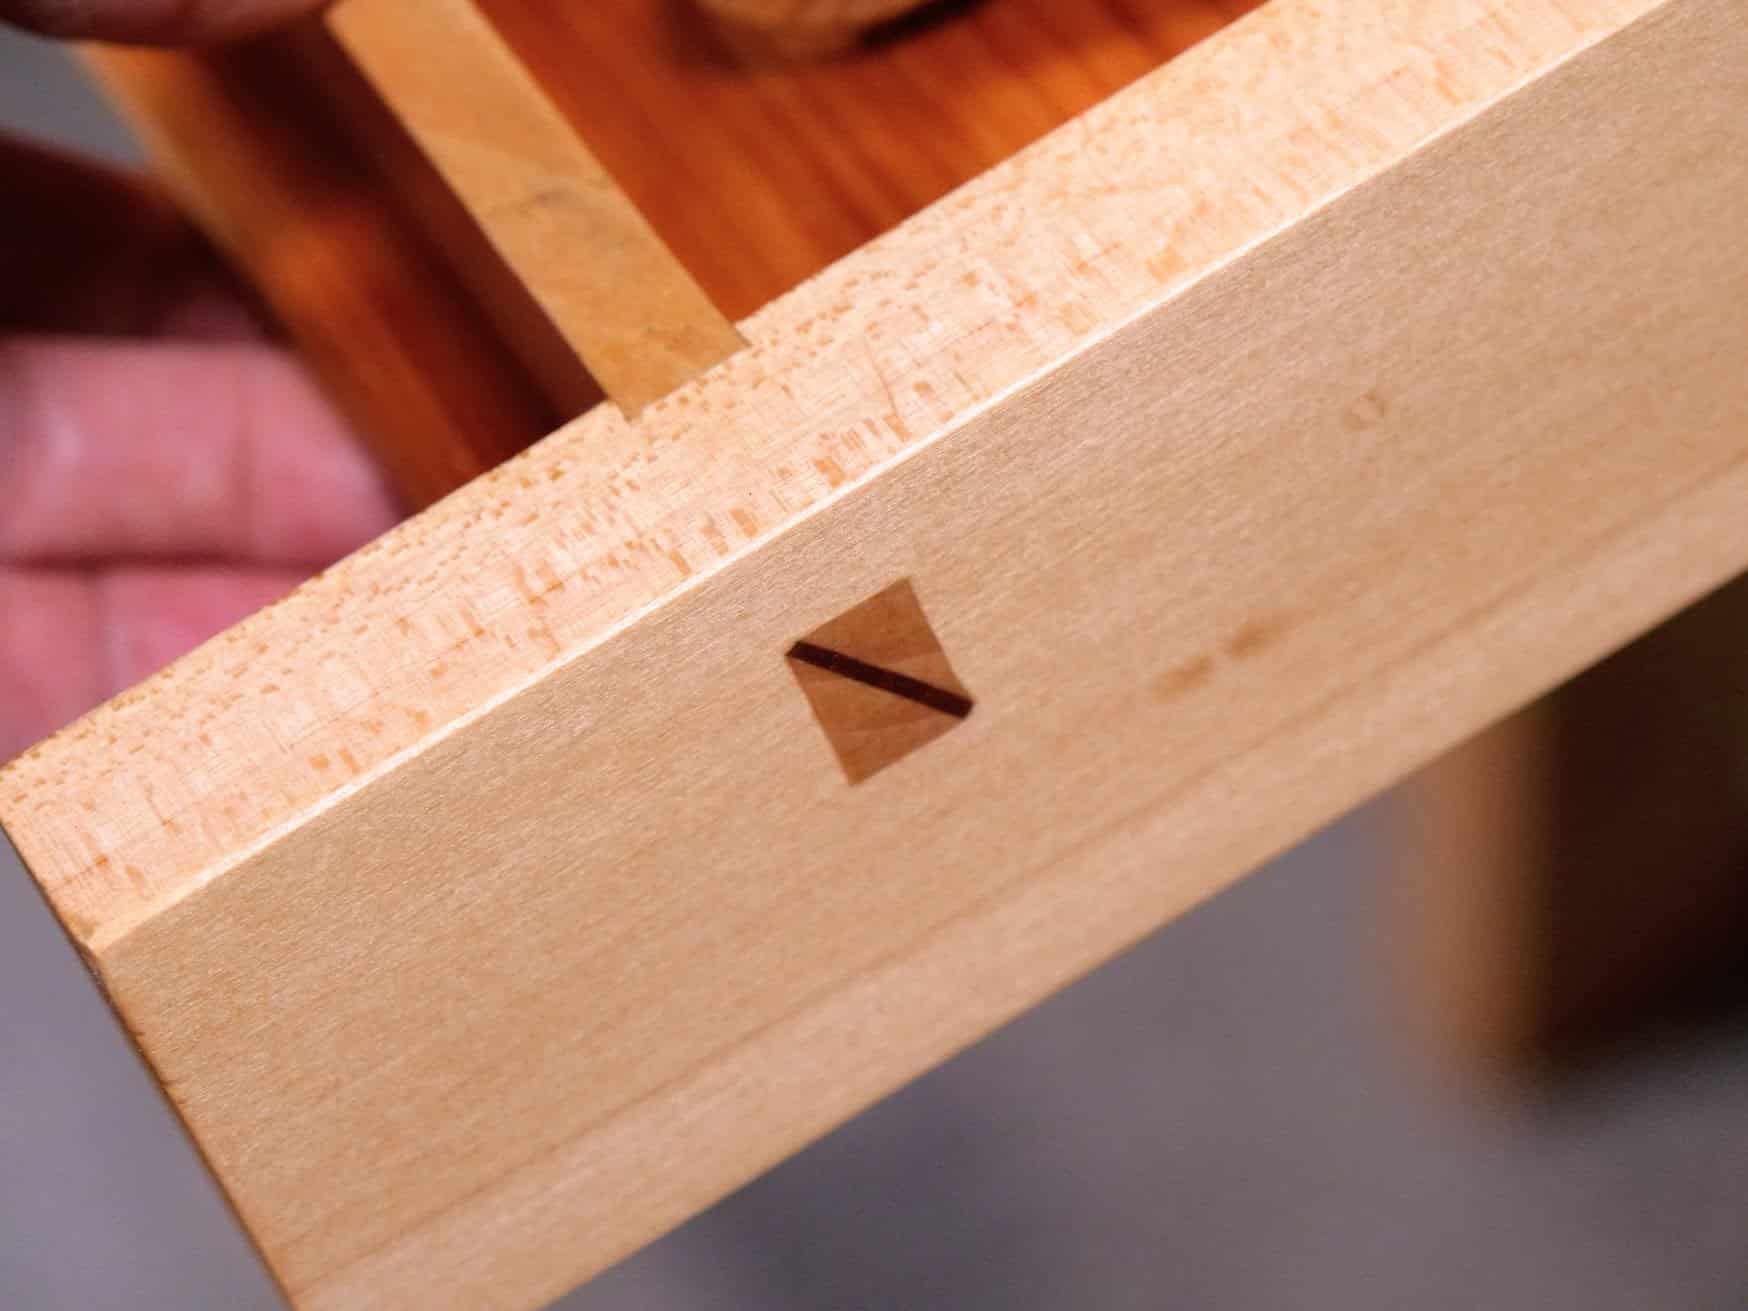
The second reason for using stepped housing dadoes is we can shape the fore edge of the shelf or shelves so that as it butts into the adjacent housing piece the moulded fore edge isn’t left unresolved at the meeting point. Yet another good reason, the third, is where a stepped housing dado is used in conjunction with a stopped housing dado and the fore edge of both shelf and adjacent housing pieces are aligned without any step back. This gives a clean and crisp line to the joint which is hidden inside the wood.
Often the stopped housing dado allows us to set any inner shelves back from the fore edge of the main carcass to facilitate hingeing a door within the the main outer carcass.

I made a drawer back without the tenon. The back was housed only in a dadoe. Every time I opened it, it became tighter and tighter to open until I pulled the whole drawer out and realized the back popped out of the dadoe. Last night I screwed the back into place from the outside of the sides.
I had to make another drawer and this time added a small tenon to each end of the drawer back. It was a lot more sturdy and solid. I also a small 1/4 inch hunch to the tenon. This made a big difference when I was tapping the tenon into the mortise and dadoe. It kept the end of the drawer in line with the dadoe as well as 90 degrees to the inside of the sides
Dado, not dadoe.
Thanks for the insight on these joints. Your explanation clears a lot up for me as to why and where you would use a certain variation of these joints.
Agreed, I was missing the logic behind the application of the various joints.
“the US dado is used for across the grain channels and grooves go along or with the grain. Simple and descriptive.”
For a french, it’s difficult to make a link between dado with across, or groove with along. I have to remember this, the term is not descriptive.
Ah, but that IS France!
I don’t get it.
Paul,
Can you go into a little further description of “Housing Dado” versus the simple “Dado” (across the grain (groove) to inlet another board) Perhaps they are one in the same? I know you did a “rising Dado” in the workbench (maybe the tool tray, can’t remember) but that is obviously different from the housing dado, right?
I think he combined the two names so people from the US and this side of the ditch would both understand what joint he’s referring to.
More like this! PLEASE. I’m in the middle of composing a casement for a large nightstand, and the joinery feels complicated. It’s humbling, bordering on discouraging. More insight on the strengths and weaknesses of various joints, and best circumstances to use them in, would be most welcome.
Thanks Paul – I really enjoyed this one. Very informative.
Underlying the shaping of joints is the need to ensure the glue will not be stressed too much . Just out of curiosity I made a frame to support the new kitchen sink and worktop . I used normal mortice and tenon joints but for glue I used Sikaflex EBT which is a polyurethane glue/sealant. Mainly used as a sealant but it is so tough and flexible and waterproof I could not resist the experiment. Similar to wood in a sense as wood will always flex under strain but this polyurethane will never crack either . The worktop will be attached to the walls as well so changes in humidity will be no problem . The ultimate test might be a small wooden stool .
In the Dado what trick is used to achieve the angled edges ? Is there a specific tool to do this cut ?
Hello Paul,
I certainly enjoyed this week’s epistle, as I do all your missives (especially your vlogs (is that the right term?)) but this one, while clarifying, for once was not new to me, since I spent 17 years in cabinet shops in the US where we were in the habit of cutting dadoes regularly. But not by hand; the boss would never stand for the extra time it took, so we would do it all on the table saw using the dado set (I’m sure you are familiar with the contraption, since you spent a period on this side of the pond). As you know (but several of your readers may not) this is a specialized set of circular saw blades, with ‘chippers’ included, the stack of which creates wide, shallow grooves. We used the term ‘dado’ for any sort of a groove not on the edge of a board, and ‘rabbit’ (or I guess you would say ‘rebate’) for any groove on the edge. This was notwithstanding the direction of the surface grain (which was invariably plywood or laminated particle board). This in spite of the major limitations of table saw dado sets, such as the extreme difficulty (before I stumbled onto a hand router) of uniform depth of the groove (of which ever sort), or the fact that the shelving material (also made from ply or p.b.) was NEVER precisely 3/4 inch, though the stock dado sets always were, necessitating our invention of various shims (laminate, paper, cardboard, steel, whatever) to space the width of to dadoes ~exactly. Dadoes were generally limited, in our shops, to structural joints, the shelves usually sitting pegs or clips so they’d be movable, though the ‘shelf standards’ (sets of–usually–aluminum channel with rectangular holes punched into them) were nailed into shallow dadoes.You are precisely correct in your explanations of the limitations of these sorts of joints, which I can testify to from my own personal experience. However, most of these pieces were built and sold as ‘temporary’ pieces (this is the USA, after all; the land of consumerism and all that entails) and the customers would buy new ones only a few years later. This always made me crazy, and was why I was so grateful to find your online videos in which you SHOW us how we should have been doing it this entire time.
All of which–finally–brings me to my question. My next project (after I finish the bench you detailed online and in your magnificent book and video) will be ‘Making a four shelf wall unit’, your chapter (or section, or whatever) #8, with the photos on p. 128. But the bottom shelf/bottom of the entire cabinet sorta worried me, that it wouldn’t be able to handle the weight of (e.g) a few family bibles, or heaven forbid, a shelf full of old style record albums. You say, above, that you “generally combine the housing dado with some other type of joint…” You go on to say “At the backs of drawers I use it with through tenons…” Well, I was thinking I’d do the same thing, but in this case the tenon would need to be wedged to resist the weight of the (supposed) rack of old time records. So I’ll ask you here, would this be over kill? I realize that modern glues are pretty remarkable, but my instinct says relying on glue alone would be more dangerous than I could stand, but what do you think? I see that you don’t include any sort of tenon in the book (only attaching the bottom shelf with a stopped dado) so I am willing and ready to throw the idea of building the cabinet bottom with a tenon as part of the dado out the window, but I’d like some reassurance if you’d have the time. Thank you SO much for all your helpful efforts. I know it can’t be easy, but it sure is helpful, especially to us yanks.
Please, yes add tenons and open out the mortise so that the wedge in the tenon splays dovetailed fashion. Nothing wrong with any of that.
Will do. Will also be sending pictures, assuming it comes out OK, including my anvil collection on the bottom shelf. (OK, just kidding. I keep them in my closet). Thanks for your reply.
Dear Paul, any plans for a book on topics like this? I’d love to see a companion to Essential Woodworking Hand Tools. Perhaps something like Essential Woodworking Joinery?
Yes. I am working on one now.
Great post Paul, thank you. On my 2nd joinery project (built in wall-to-wall, wrap-around shelves with day bed under the window) I’ve used what I now know to be through housing/dado joints which I did because I knew I’d be painting the ply (after filling/sanding). I’ve put a shelf long brace (strip of same 18mm ply) under the 860mm long shelves. But is to a more elegant way (without weakening) or a stronger way to do this in general?
Have just found your video channel these past few weeks and really getting into your videos. You are a highly gifted teacher sir and from the esteem you are held in, a master of your trade. I’m enjoying learnning from you and the community that’s grown around you.
Thanks again!